1
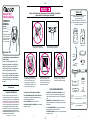
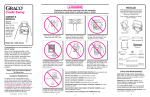
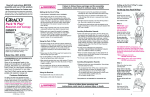
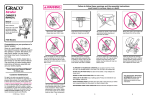
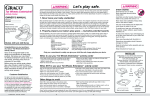
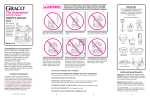
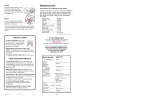
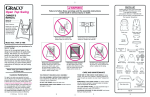
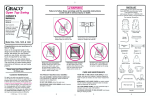
Easy-Entry Battery Swing Failure to follow these warnings and the assembly instructions could result in serious injury or death. OWNERS MANUAL PARTS LIST CHECK that you have all the parts listed below BEFORE assembling your swing. If any parts are missing, call Customer Service at 1-800-345-4109 or visit our Internet website, www.gracobaby.com. Tool required: Screwdriver Model No. __________ Serial No. __________ Dear Customer, Please fill in the model and serial numbers above from the label beneath the motor of your new swing. Never leave child unattended. Always keep your child in view. Avoid serious injury from falling or sliding out. Always use seat belt. Model No. 1602 Congratulations on your purchase of a Graco® swing! Graco is the recognized leader in the design and manufacture of quality baby swings. We believe your new Graco® swing is a wise choice, promising many hours of enjoyment for your baby. Before using your swing, please take a few minutes to read this Owners Manual. The short time you spend reading these instructions will help you use your swing properly. Please save your Owners Manual for future use. Customer Satisfaction Our goal is to make every product the best it can be! We are also committed to supporting our products after purchase. If you would like to speak with Graco about your product, please contact our Customer Service Department at 1-800-345-4109 or visit our Internet website, www.gracobaby.com. Our knowledgeable staff will be ready to answer any questions you may have concerning parts, use or maintenance. When you call, please have the model and serial numbers ready so your call may be processed quickly and efficiently. © 1999 Graco 132-7-99 IS1651 Plastic seat with crotch strap Seat cover Hanger tube (2) Motor unit Seat belt Pin screw (2) Back brace Strings can cause strangulation. DO NOT place items with a string around your childs neck, such as hood strings or pacifier cords. DO NOT suspend strings over the swing or attach strings to toys. STRANGULATION HAZARD: DO NOT place swing in any location where there are cords, such as window blind cords, drapes, phone cords, etc. DO NOT use if child weighs over 25 pounds (11.3 kg) or becomes too active to safely use the swing. CARE AND MAINTENANCE THIS PRODUCT REQUIRES ADULT ASSEMBLY. FOLLOW ASSEMBLY INSTRUCTIONS CAREFULLY. If you experience any difficulties, please contact the Customer Service Department. DO NOT USE SWING without the seat cover. DISCONTINUE USING YOUR SWING should it become damaged or broken. Tray Adjustment wire Leg brace (2) FROM TIME TO TIME CHECK YOUR SWING for loose screws, worn parts, torn material or stitching. Replace or repair the parts as needed. Use only Graco® replacement parts. Oval end REMOVABLE CLOTH SEAT COVER may be machine washed in lukewarm water on delicate cycle and drip-dried. NO BLEACH. Wire end TO CLEAN SWING FRAME, use only household soap or detergent and warm water. NO BLEACH. Toy mount cover (2) Plastic tip (4) Round end Upper leg section (4) Round end Lower leg section (4) EXCESSIVE EXPOSURE to sun or heat could cause fading or warping of parts. 2 3 4 Easy-Entry Battery Swing Failure to follow these warnings and the assembly instructions could result in serious injury or death. OWNERS MANUAL PARTS LIST CHECK that you have all the parts listed below BEFORE assembling your swing. If any parts are missing, call Customer Service at 1-800-345-4109 or visit our Internet website, www.gracobaby.com. Tool required: Screwdriver Model No. __________ Serial No. __________ Dear Customer, Please fill in the model and serial numbers above from the label beneath the motor of your new swing. Never leave child unattended. Always keep your child in view. Avoid serious injury from falling or sliding out. Always use seat belt. Model No. 1602 Congratulations on your purchase of a Graco® swing! Graco is the recognized leader in the design and manufacture of quality baby swings. We believe your new Graco® swing is a wise choice, promising many hours of enjoyment for your baby. Before using your swing, please take a few minutes to read this Owners Manual. The short time you spend reading these instructions will help you use your swing properly. Please save your Owners Manual for future use. Customer Satisfaction Our goal is to make every product the best it can be! We are also committed to supporting our products after purchase. If you would like to speak with Graco about your product, please contact our Customer Service Department at 1-800-345-4109 or visit our Internet website, www.gracobaby.com. Our knowledgeable staff will be ready to answer any questions you may have concerning parts, use or maintenance. When you call, please have the model and serial numbers ready so your call may be processed quickly and efficiently. © 1999 Graco 132-7-99 IS1651 Plastic seat with crotch strap Seat cover Hanger tube (2) Motor unit Seat belt Pin screw (2) Back brace Strings can cause strangulation. DO NOT place items with a string around your childs neck, such as hood strings or pacifier cords. DO NOT suspend strings over the swing or attach strings to toys. STRANGULATION HAZARD: DO NOT place swing in any location where there are cords, such as window blind cords, drapes, phone cords, etc. DO NOT use if child weighs over 25 pounds (11.3 kg) or becomes too active to safely use the swing. CARE AND MAINTENANCE THIS PRODUCT REQUIRES ADULT ASSEMBLY. FOLLOW ASSEMBLY INSTRUCTIONS CAREFULLY. If you experience any difficulties, please contact the Customer Service Department. DO NOT USE SWING without the seat cover. DISCONTINUE USING YOUR SWING should it become damaged or broken. Tray Adjustment wire Leg brace (2) FROM TIME TO TIME CHECK YOUR SWING for loose screws, worn parts, torn material or stitching. Replace or repair the parts as needed. Use only Graco® replacement parts. Oval end REMOVABLE CLOTH SEAT COVER may be machine washed in lukewarm water on delicate cycle and drip-dried. NO BLEACH. Wire end TO CLEAN SWING FRAME, use only household soap or detergent and warm water. NO BLEACH. Toy mount cover (2) Plastic tip (4) Round end Upper leg section (4) Round end Lower leg section (4) EXCESSIVE EXPOSURE to sun or heat could cause fading or warping of parts. 2 3 4 Attaching the Legs Step 1. Hold tube vertically Push oval end of the upper leg sections firmly onto the four plastic pegs. Hold tube vertically while pushing in. Push leg on completely. Flattened side Plastic peg Step 2. Attaching the Hanger Tubes and Seat Attaching the Back Brace Attaching the Seat Belt Step 1. Step 1. Move seat back fully forward onto seat armrests. Working behind the seat, snap the four pins in the ends of the plastic back brace into the holes in the hanger tubes. The seat back must overlap the armrests. Slide adjustment wire through openings in seat back, then insert ends into back brace holes as shown. Push the leg tips on the round ends of the lower leg sections. (The other ends have a wire.) Step 3. Seat back OVER A OVER A A A Armrest Thread one end of the seat belt through the belt retainer as shown. Step 2. Thread both ends of seat belt through the buckles as shown. CHECK that the belt is threaded correctly by pulling on the seat belt. The belt should not slip through the buckle. Be sure the back brace is securely attached by pulling on it. To release, push in on front of buckle. Wire end Put the wire end of lower leg sections into the round end of the upper leg sections. Push the sections together while twisting lower leg slightly. This will ensure a snug fit. Round end (not oval) Step 4. Slide hanger tubes into armrests of seat as shown. Place one hand on the armrest and slide the tray onto the hanger tube with other hand. Push sleeve of tray all the way into the armrest of the seat until you hear it snap. Attaching the Seat Cover Step 3. Sleeve on tray must snap completely into the armrest. Step 1. Pull firmly on tray to be sure it is securely attached. Slide the pocket of the seat cover over the top of the seat as shown. Insert two pin screws through seat armrests into the holes in the hanger tubes and tighten securely. CHECK: Lift swing as shown. If legs are assembled properly, the legs will dangle from the motor unit and not fall off. Step 2. Step 4. IF LEG FALLS: Holding leg vertically, push leg firmly up while pushing the motor unit down. Pull crotch strap and both ends of the seat belt through the slots in the seat cover. Insert the hanger tubes into the hanger brackets as shown. Metal buttons should pop out and lock upon full insertion. Step 5. Open the swing legs completely. Snap plastic leg braces onto outside of legs. The plastic pins inside the ends of the braces will fit into the dimples on the legs. Attaching the Tray Step 2. Dimple Step 3. CHECK that the hanger tubes are secure in hanger brackets by pulling firmly on them. Push the elastic loop through the hole on one side of seat. Step 4. Fold cover around bottom of seat. Then fasten the hook into the elastic loop on one side as shown. Repeat on other side. It may be necessary to spread the legs as shown. Do not use swing without the leg braces. 132-7-99 IS1651 5 Push Push sleeve all the way into armrest Push 6 7 CAUTION: Be sure the seat cover at armrest does not interfere with tray latching. 8 Attaching the Legs Step 1. Hold tube vertically Push oval end of the upper leg sections firmly onto the four plastic pegs. Hold tube vertically while pushing in. Push leg on completely. Flattened side Plastic peg Step 2. Attaching the Hanger Tubes and Seat Attaching the Back Brace Attaching the Seat Belt Step 1. Step 1. Move seat back fully forward onto seat armrests. Working behind the seat, snap the four pins in the ends of the plastic back brace into the holes in the hanger tubes. The seat back must overlap the armrests. Slide adjustment wire through openings in seat back, then insert ends into back brace holes as shown. Push the leg tips on the round ends of the lower leg sections. (The other ends have a wire.) Step 3. Seat back OVER A OVER A A A Armrest Thread one end of the seat belt through the belt retainer as shown. Step 2. Thread both ends of seat belt through the buckles as shown. CHECK that the belt is threaded correctly by pulling on the seat belt. The belt should not slip through the buckle. Be sure the back brace is securely attached by pulling on it. To release, push in on front of buckle. Wire end Put the wire end of lower leg sections into the round end of the upper leg sections. Push the sections together while twisting lower leg slightly. This will ensure a snug fit. Round end (not oval) Step 4. Slide hanger tubes into armrests of seat as shown. Place one hand on the armrest and slide the tray onto the hanger tube with other hand. Push sleeve of tray all the way into the armrest of the seat until you hear it snap. Attaching the Seat Cover Step 3. Sleeve on tray must snap completely into the armrest. Step 1. Pull firmly on tray to be sure it is securely attached. Slide the pocket of the seat cover over the top of the seat as shown. Insert two pin screws through seat armrests into the holes in the hanger tubes and tighten securely. CHECK: Lift swing as shown. If legs are assembled properly, the legs will dangle from the motor unit and not fall off. Step 2. Step 4. IF LEG FALLS: Holding leg vertically, push leg firmly up while pushing the motor unit down. Pull crotch strap and both ends of the seat belt through the slots in the seat cover. Insert the hanger tubes into the hanger brackets as shown. Metal buttons should pop out and lock upon full insertion. Step 5. Open the swing legs completely. Snap plastic leg braces onto outside of legs. The plastic pins inside the ends of the braces will fit into the dimples on the legs. Attaching the Tray Step 2. Dimple Step 3. CHECK that the hanger tubes are secure in hanger brackets by pulling firmly on them. Push the elastic loop through the hole on one side of seat. Step 4. Fold cover around bottom of seat. Then fasten the hook into the elastic loop on one side as shown. Repeat on other side. It may be necessary to spread the legs as shown. Do not use swing without the leg braces. 132-7-99 IS1651 5 Push Push sleeve all the way into armrest Push 6 7 CAUTION: Be sure the seat cover at armrest does not interfere with tray latching. 8 Toy Mounting System Your swing has a toy mounting system in the tray. This swing model does not come equipped with toys. If you would like to order toys, please see the enclosed leaflet for information. Please insert the two plastic covers as described below to fill the holes in the tray. To Install Covers To insert a cover into the tray of your swing, first push one side into a notch, then push in the other side. Installing Batteries Step 4. NEVER INSERT OR REMOVE THE BATTERIES WITH BABY IN THE SEAT. THEY COULD FALL ON BABY IF DROPPED! Step 1. With baby out of swing, open the battery compartment by gently pressing on the lid at the ridged area and lifting the lid. Step 2. Insert four D cells. CHECK that the batteries are put in correctly. (Swing will not run if batteries are put in backwards.) Do not remove or insert the batteries with baby in swing. The batteries could fall on baby if dropped. Step 5. PUSH SWING SEAT TO START. BE SURE YOU PUSH IT UP HIGH ENOUGH FOR THE MOTOR TO GET A GOOD START. Observe the swinging motion for a minute. It takes time for your swing to adjust to a new setting. For a lower speed, push the control switch toward low. For a higher speed, push the control switch toward high. A small, quiet baby will swing higher on each setting than a larger, more active baby. Indicator LightON/OFF light comes on when swing is turned on. Step 3. Using the Tray FOR SAFE BATTERY USE: Adjust the control switch to medium setting. Snap the lid closed. If tray does not latch, check back brace to be sure the word REAR is away from the seat. Step 2. To latch tray, push down firmly. Tray must be latched at all times when baby is in the swing. Pull up on tray to be sure it is latched. Reclining Back Four Positions Pull adjustment wire upward and pull seat backward to recline seat. Extra pressure is needed to go from third position to full recline. For upright position, simply lift back of seat forward. 132-7-99 IS1652 9 Any battery may leak battery acid if mixed with a different battery type, if inserted incorrectly (put in backwards) or if all batteries are not replaced or recharged at the same time. Any battery may leak battery acid or explode if disposed of in fire or an attempt is made to charge a battery not intended to be recharged. Never recharge a battery of one type in a recharger made for a battery of another type. Discard leaky batteries immediately. Leaky batteries can cause skin burns or other personal injury. When discarding batteries, be sure to dispose of them in the proper manner, according to your state and local regulations. Always remove batteries if the swing is not going to be used for a month or more. Batteries left in the unit may leak and cause damage. Recommended Type BatteriesSize D ! RechargeablesUse and recharge according to ! manufacturers instructions. ! DisposablesAlkaline. ! NEVER mix battery types. Your seat may be stopped at any time the motor is running without damaging the motor. Push swing to restart. Step 1. Unlatch the tray by squeezing the two latches under the tray at the same time, and lift up the tray. Be careful not to let the tray hit your baby when lifting or closing the tray. Keep the batteries out of childrens reach. Starting Swing CHECK that all parts are securely fastened together before using the swing. If your swing motor stops operating by itself, a protective device may have been activated. Turn off motor, wait three minutes, then restart swing. Change batteries when swing ceases to operate satisfactorily. Caring for Your Battery Powered Swing Step 1. Open tray and seat belt. Place baby in the seat. (If your child is very small, you may want to use rolled-up blankets as a prop.) Problem: Possible Reasons for Problem: Swing won't operate 1. No batteries in swing. Step 2. 2. Batteries dead. 3. Speed setting too low. 4. Batteries in backwardscheck + and -. Place crotch strap between childs legs and snap both side buckles to the center buckle. Adjust belt as needed to get a snug fit around your child. 5. Corrosion on battery terminals. Rotate batteries in place against terminals, or clean with sandpaper or steel wool if corrosion is severe. Step 3. 9. Protective device activated. (Turn off motor, wait 3 minutes, then restart swing.) 6. Baby leaning too far forward. 7. Baby grabbing swing legs. (Discontinue use.) 8. Seat not pushed high enough for a good start. Close the tray. CHECK that tray is latched by lifting up on the tray. Seat doesn't swing very high Do not depend on the tray or seat belt alone to hold your baby. Always secure your baby with both the seat belt and tray when your baby is in the swing. 1. Control setting too low. 2. Blanket hanging down, causing increased wind resistance. 3. Batteries too weak. 4. Baby leaning too far forward. 5. Baby too heavy or too active. (Discontinue use.) 6. Soft carpet (swings higher on hard floors). If you still have problems, call our toll-free number, 1-800-345-4109. 10 11 12 Toy Mounting System Your swing has a toy mounting system in the tray. This swing model does not come equipped with toys. If you would like to order toys, please see the enclosed leaflet for information. Please insert the two plastic covers as described below to fill the holes in the tray. To Install Covers To insert a cover into the tray of your swing, first push one side into a notch, then push in the other side. Installing Batteries Step 4. NEVER INSERT OR REMOVE THE BATTERIES WITH BABY IN THE SEAT. THEY COULD FALL ON BABY IF DROPPED! Step 1. With baby out of swing, open the battery compartment by gently pressing on the lid at the ridged area and lifting the lid. Step 2. Insert four D cells. CHECK that the batteries are put in correctly. (Swing will not run if batteries are put in backwards.) Do not remove or insert the batteries with baby in swing. The batteries could fall on baby if dropped. Step 5. PUSH SWING SEAT TO START. BE SURE YOU PUSH IT UP HIGH ENOUGH FOR THE MOTOR TO GET A GOOD START. Observe the swinging motion for a minute. It takes time for your swing to adjust to a new setting. For a lower speed, push the control switch toward low. For a higher speed, push the control switch toward high. A small, quiet baby will swing higher on each setting than a larger, more active baby. Indicator LightON/OFF light comes on when swing is turned on. Step 3. Using the Tray FOR SAFE BATTERY USE: Adjust the control switch to medium setting. Snap the lid closed. If tray does not latch, check back brace to be sure the word REAR is away from the seat. Step 2. To latch tray, push down firmly. Tray must be latched at all times when baby is in the swing. Pull up on tray to be sure it is latched. Reclining Back Four Positions Pull adjustment wire upward and pull seat backward to recline seat. Extra pressure is needed to go from third position to full recline. For upright position, simply lift back of seat forward. 132-7-99 IS1652 9 Any battery may leak battery acid if mixed with a different battery type, if inserted incorrectly (put in backwards) or if all batteries are not replaced or recharged at the same time. Any battery may leak battery acid or explode if disposed of in fire or an attempt is made to charge a battery not intended to be recharged. Never recharge a battery of one type in a recharger made for a battery of another type. Discard leaky batteries immediately. Leaky batteries can cause skin burns or other personal injury. When discarding batteries, be sure to dispose of them in the proper manner, according to your state and local regulations. Always remove batteries if the swing is not going to be used for a month or more. Batteries left in the unit may leak and cause damage. Recommended Type BatteriesSize D ! RechargeablesUse and recharge according to ! manufacturers instructions. ! DisposablesAlkaline. ! NEVER mix battery types. Your seat may be stopped at any time the motor is running without damaging the motor. Push swing to restart. Step 1. Unlatch the tray by squeezing the two latches under the tray at the same time, and lift up the tray. Be careful not to let the tray hit your baby when lifting or closing the tray. Keep the batteries out of childrens reach. Starting Swing CHECK that all parts are securely fastened together before using the swing. If your swing motor stops operating by itself, a protective device may have been activated. Turn off motor, wait three minutes, then restart swing. Change batteries when swing ceases to operate satisfactorily. Caring for Your Battery Powered Swing Step 1. Open tray and seat belt. Place baby in the seat. (If your child is very small, you may want to use rolled-up blankets as a prop.) Problem: Possible Reasons for Problem: Swing won't operate 1. No batteries in swing. Step 2. 2. Batteries dead. 3. Speed setting too low. 4. Batteries in backwardscheck + and -. Place crotch strap between childs legs and snap both side buckles to the center buckle. Adjust belt as needed to get a snug fit around your child. 5. Corrosion on battery terminals. Rotate batteries in place against terminals, or clean with sandpaper or steel wool if corrosion is severe. Step 3. 9. Protective device activated. (Turn off motor, wait 3 minutes, then restart swing.) 6. Baby leaning too far forward. 7. Baby grabbing swing legs. (Discontinue use.) 8. Seat not pushed high enough for a good start. Close the tray. CHECK that tray is latched by lifting up on the tray. Seat doesn't swing very high Do not depend on the tray or seat belt alone to hold your baby. Always secure your baby with both the seat belt and tray when your baby is in the swing. 1. Control setting too low. 2. Blanket hanging down, causing increased wind resistance. 3. Batteries too weak. 4. Baby leaning too far forward. 5. Baby too heavy or too active. (Discontinue use.) 6. Soft carpet (swings higher on hard floors). If you still have problems, call our toll-free number, 1-800-345-4109. 10 11 12 Replacement Parts Instructions for ordering swing parts: Complete form below. Your swing model number MUST be included on the form to ensure proper replacement parts. Your model number can be found on a sticker beneath the swing motor. Payment must accompany your order. Parts List: Price:* Motor unit..................... $25.00 Hanger tube ................ $13.00 Plastic seat................... $20.00 with strap & buckle Cloth seat cover........... $14.00 Seat belt ...................... $15.00 Hardware...................... $15.00 Plastic leg brace........... $15.00 Adjustment wire............ $17.00 Back brace................... $17.00 Upper leg section......... $17.00 Lower leg section......... $17.00 Leg tips (set of 4)......... $15.00 Tray.............................. $12.00 (each) (each) (each) (each) * Prices subject to change without notice. IF YOU NEED HELP If you have any questions or if you need any part not listed, please call toll-free: 1-800-345-4109 or visit our Internet website, www.gracobaby.com. Return the form below with payment to: GRACO CHILDRENS PRODUCTS INC. CUSTOMER SERVICE DEPARTMENT P. O. BOX 100, MAIN STREET ELVERSON, PA 19520 Model Number (Must be filled in) Motor unit Hanger tube Plastic seat with strap & buckle Cloth seat cover Seat belt with buckle Hardware Plastic leg brace Adjustment wire Back brace Upper leg section Lower leg section Leg tips (set of 4) Tray Total: Shipping & handling: 6% sales tax (PA only): Total amount due: 132-7-99 IS1652 $5.00 SHIP TO: Name Address City, State, Zip ( ) Telephone Check enclosed (payable to Graco Childrens Products Inc.) Charge to credit card: Visa MasterCard Discover Account #: Expiration date: Signature: 13