1
S
www.goI&_pliar_es+com
OWNER'S MANUAL
MANUAL DEL PROPiETARIO
Models/Modelo
GWHD5000
S_
P_ons
...........................
3
FOR YOUR RECORDS
Write _e model 8nd s_
r_J_
h_:
Model #
.........................
Ser_i #
In_duction
..................................... 8
SyruPs
Used in this Manual ............
8
Featu_es .......................................... 8
mYoU can find _
p_uct.
num_m on a _1
_ _
s_e of the
O_le_s
Date Pu_haeed
m S_p_ your _ipt
_ this pa_ in _ _t
_ need it
p_
d_ of purch_e o__r warra_ is_s,
Adap_
........................................ tl
Tempom_ Use of an
E_r_n
Cord ............................ 11
Inml_t_n
.........................................
_2
WindOw P,equ_ents
.......................................13
Oea_n_
of C_is
Unit In_|la_
_on
of Co_
................14
............................15
I_tNctJons
.................. 16
a_ Fun_on
........................................16
_l_al
Fea_ms ....................... 17
Air Di_n
.............................. 17
D=mimPipe ................................... "7
_n_va]
!_e
_ w[!]!fi_d _a_ _lpfu!! hi_ _ h_ t_ use _nd
_int_n _ur _lr co_l_r
p_dy, Jus_t
a flttliepreventive
_
_ _u_ part _n sa_ you a gm_t _l
_ ti_ and
ov_ _ I_ _ _r' air _d_io,_er.
of trou_hoot_g
tips. _f_u review ou_'_
Trou_esh_ng
_evtce at _fl.
_i_
first, i_
................................. 13
_rat[on
Ope_
THIS MANUAL
.................t 2
Size ........................................... 12
Loca_
,o READ
_
Win_
............... 17
Main_ance and Se_
............18
Air Fl_r ....................................18
Cleaning_ _r Cor_ition_ .....t8
HOw_ Re_e
Fm_ Grille .................................
18
Co.on Problemsand
Room Air Cond#_,_er
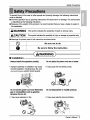
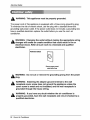
PRECAUTION
m_' _t
of
n_
to _ll
_
To prevent inju_ _ _e u_r
must _ _ll_d.
or o_er _ple
and property damage, _e _Uowing
[] In_rrect open, on due to igno_ng ins_ions
_U _use harm or damage. The seriousness
is class_ed by tl_ foUowi_
[] Becau_ of the weight _ _e p_du_, it is recommended _at _
have a hel_r _ assist in
the i_!_a_on.
[] Meanings _ sym_!!s us_
in _is
ma,nus!! 8re as shown be!_,
[] Ins liation
" Improper assem_y or ilnstalJa_on im_ cau_
In_ed
_n,
including injiu_, fire, and
poor pe_ormance,el_zic
sho_ h_ards.
It may _use
explosion or fire.
• it may _u_
fire and ele_ric sh_.
" It may _u_
e_ric
sh_k and failure.
_er's
Manual
3
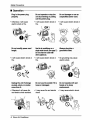
[] Operation
. Obhe_,
it will _,use
elec'_c _,o_ or fin,
• It willcau_ e_ric
fire.
sh_
or
• It will _se
_re.
• It will _use
fire.
,, It will cau_ e_ric
fire.
sh_
or
,, No groundi_ m_ cau_
electric sh_.
. Ot_se
and el_
4
ele_ic
sho_ or
itwill _u_
_re
s_
a_ident.
Room Air Conditioner
• it _y
_u_
_re and ele_c
, It may _use
elec'_csink or
e_ric
sh_k.
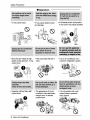
_fe_
"
_e air _n, di_ner mus_ be _erated
a enclosed area. to _ most effe_ve.
in
, It _1 cause electric sh_k or failure
machine.
•. _t_
cau_
Precautions
explosion, _re,and bum.
• Water may enter the unit _
d_m_
insulation.It may cau_ an electric sh_..
[] Ins llation
• Th,_ are sharpand may
cause injury.
*It may cause failure of _pli_
or peffo_an_
detenoratei.
• !f the o_er _e
is _aged,
_t mu_ be repair_ or
replaced imm_iately..
Leaving k damag_
could
resuff _n the air _nd_tioner
fallt_ out of the window,
creating a _fety _a_.
_,,ner_
Manual
_
P_ons
_,- ,,,,
:::
jj_j_j
::::::
:
:::
::::
r r rr r r r
:::
,,, -
::
[] O_ratu,on
. It may _use
Injiu_:
* Since the _n re,ares m high
sp_d during operation, ff may
cause injury:
• Ol_r_
_out
cause failure.,
_ers will
"It may causeele_nc _k
and damage.
* This cou_ injure,the pet or
planL
* _e
appearan_
of _e air
change _ller, er d_l,op.
surface fla_.
6
R_m
Air Cond#_ner
, It _l w_
power consumption
in vain and it may cau_ ac_idem.
'* it is an _r _nd_i,oner, not a
pr_:ision refngemibn s_t_f.
* It is not sani_,ry a_ cou_
_use i!lness or pe_:on_
lnju_ hi_,a_,
1.
2.
3.
4.
5.
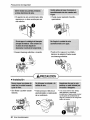
Plug in the _wer cord proper_.
Use a d_icated
circuit. Overloading the line could create a fire h_ard.
Do not u_ an extension c,ord. See page 1 i for more details.
Do not staWstop operation by pluggin_unplugging
the power cod.
IIf_e power cord is damaged and requires repla_ment,
have an Authorized
Se_icer instaB an exact replacement pa_.
i. Being ex_d
to direct airflow for _ e_ended peri_ of time could be
hazardous to your health. Do not e_ose o_upants,
pets, or plants to dir_
airflow _r extended periods of time.
2. Due to the possibility of oxygen deficiency, ventilate the room when us_
together with stoves or other heating d_i_s.
3. Do not u_ _is air _nditioner
for non-specified special purposes (e.g.
preserving precision devices, P_, pets, plants, and art objects). Such u_ge
could damage the items.
4. _e air condiUoner is a consumer _m_
appliance, not a precision climate
control system.
i. Do not touch the metal pa_s of the unit when removing the filter. Injuries can
o_ur when handling sha_ metal _ges.
2:. IDo not use water to clean inside the air condffioner. Exposure to water can
destroy _e insulation, leading to _ssible
et_ric
sh_.
3. When cleaning the unit, first make sure _at _e power and br_ker are turned
off. The fan rotates at a very high speed during operation. _ere
is a
possibil_ of injury if the unit's power is accidentally triggered on whBe
cleaning inner par_ of the unit°
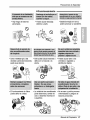
For repair iand mai_enan_,
_act
an A_odzed
Service Center. See the
warranty page for details or ca_l (8,00) 243_0.
Have your m_el number and
_dal number avai{a_e.i They should be written on page 2 of this manual
OwneKs M_nua!
7
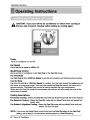
Introductio_
This symbol
alerts
you to the risk of el_Hc
This sym_l alerts you to ha_rds
air conditioner,
This symbol
indicates
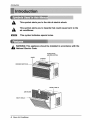
WARNING: This appliance
N_ionai Ele_ric Cede.
sh_P_
th_ could _u_
special notes.
should _
indued
in acco_ance
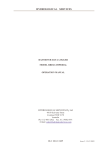
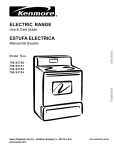
AIR DEFLEC'_R
KNOB
C_IINET
R_KER
FRONT GRILLE
8
Room Air Condi
harm to t_
with the
115,V~
Power cord may i_ude a current
inte_pter
devi_ A test _d met _tton is
pr_i_
on 'the plug case. Re dev_e
sh@JId be tested ,on a i_rl_ic
_Is
by first
pressi_ me TEST button and men _e
RESF button, if B_eTEST b,_on d_es not
tdp er if t_
RESF
bu_
/iiiiiiii_
iiiiiii_iiiiiiii[iiii
wlfl, not s_y
engage, di_-ontinue u_ of _e air
cend_i_er a_ _nta,_ a qu_if_
_rv_ce
UI_ Wall R_eptac_
t_cle
Use of e nsion
Power Supply
tared 1_,, 125V AC
U_ 15 AMP', time
delay fu_ ,o_15 A_P,
drou_: breaker,
cords
Stro_'y discoum_, _e use of an _e_
cord. _e,_o
i_ you _sh to use
e_sion
co_, use a CSA cer'dfied_L-I_ted
3-_re (glroundi_g) e_t_sion _rd, _ed 1_,
!25V.
AHwi_ng should ibe m_e _ a_co_,_
I_t el_ri_
_es
a_ _egu_tions.
_le
rate_ i 5A, 2_V
AC
Use _0 _P.
time
_lay fu_ o_ _ AMP.
cir_i_t b_a_r,.
S_
_¢_e
2_,V,
groundling
rate_ 2CA, 2_V
ELECTRICAL
IMPORTA_
3-_re
Aluminum I_use winng _y p_
specia_
prowls.
Co.It
a qualified e_dcia_.,
AC
SAF_
G_UN_NG
INS_UC_S
Air _er_r
has a three.prong g_unding pl,ug ee
_r
supp_ _rd, which m_st be pluggi_ into
p_perly gr_
_mpr®g
_ll re.prate
_r
your protectio_ ag_n_ possi_e sh_ hazard,
2_, _,
and _
_LT U,N_
The_ _s are _ip_
with a three-prong
gmu_ng pl_ on the po'_ su_ly co_d, _h
m_t be _ug_d in¢o a mat_ing properly _o_nd_
th!remp_g wat! receptacle for your p!rot_ion
a_lns! [_ss_ble _:
ha_d. If such,an o_et
_ot _e_nt, _e m_st be i_led
_ a q_allfl_
ele_ian
in a_nce
_th the Na_!
Ele_ica_
Co_ and Io_ c_s
a_d o_dinanees,
N_
208, a_
USE AN _ENSION
_3_2_ V_t units.
CORD _ 2_,
_ner'e
Manual
9
El
! Sa_
WARNING:
This appliance
must _
properly grounded.
The power cord of this appi[ance Is equipped wr_ a three-prong grounding plug.
To minimize the risk of electric shock, use the plug with a standard three-siot
grounding wail power outtet, if the power outlet does not include a grounding siot,
have a quaiffied electrician replace the outlet before you use _e room air
conditioner.
WARNING: Changing the o_|et without ma_ng the appropriate wiring
chang_ will crea_ an unsafe _ndition
that could result in fire or
ei_trtcai shock. Refer aii such wo_ to a licensed and quaiifled
el_riclan.
Ensureproperg_Jnd
e_ts _
use
WARNING:
plug.
Do not cut or remove the g_unding
prong from
the power
WARNING:
hing the adapter ground terminal to the wall
recep_cle cover scr_ does not ground me appllan_
unless the
covet screw is metal and not Insul
, and the wall re
le is
groun_
through the house wiring.
WARNING: if you h_e any doubt whe_er the air conditioner is
pro_rly grounded, have the wal! recep_cle and circuit checked by a
qualifi_
el_rician.
10
Room Air _n
t Safety
We strongly discourage
the use of an adapter due to potential safety h_ards,
For temporary conn_tions,
u_ only a UL-listed adapter, available from mo_
local hardware stores. Ensure that the large s_ot in the
r is aligned with
the large slot in the receptacle for a proper polart_ connection.
To disconnect the power cord from the adapter, u_ one hand on each to avoid
damaging the ground terminal. Avoid frequently unplugging the power cord as
this can lead to eventual ground termina! damage.
Tem_
m_h_
_le
_r
WARNING: Never use the appliance with a broken adapter.
We stmng!y discourage
the u_ of an extension cord due to potenti_
hazards. _r temporary situations, use only CSA certified and UL li
grounded extension cords, rated 15 A, 125 V.
Owner's
3-wire
Manual
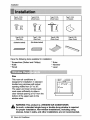
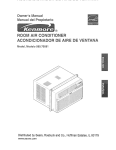
Ty_
14 _
(_o_t S_)
T_
Type B:2 _
(W_ _)
E: 1
Type D: 3
(L S_ket)
Ty_ F: 1
(SealS_p)
(_h_i_
T_ C: 2 _
(W_ _r_)
T_H:
i
,(Upper_e)
(Guide Panel)
bsck_)
Have the _llowing
* Screwdriver
* Knife
* Pencil
tools available for installation:
(Slotted and Phillips)
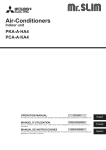
This mum air cond_oner
* Ruler
* Hammer
* Level
is
design_
_r insbilation in s_ndard
doublmhung _ndows wi_ a_ua_
opening widhhs from 21" to 35".
The up_r and lower window sash
must open s_ciently
to allow a
clear verU_l o_ning
of 12" _om the
bottom of _e upper sash to the
window stool,
,,o,._ 2i" _ 35 ° ---,.
i_
rain
WARNING: This p.mduct is a WINDOW _R CONDmONER.
As such, a standard slngle-hung or double-hung window is _quired
_r proper in_!lation.
Non_indow
in_ilations,
including using
sleeves,
holes in _!is,
and _.er
install_ions
am not re_mmend_.
Room
i Air
er
lns_latio_
Proper clearance enhances
radiation of _e condenser.
the _oling
efficien_
of the unit and preven_
heat
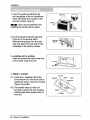
!, If a storm window presen_ interference, fasten a 2" wide wo_ stdp to the inner
window si=liacross the full width of the sill. The wood _rip should be thick
enough to raise the height of the window sill _ _at _e un_ can _ installed
without interference by, _e storm window frame.
2. S_ Figure. BoThe top of the wood _rip should be _proximately
3/4" higher
than the sto_ window frame (Storm Window Frame) or wood _rip (Outdoors)
to help condensa_on to drain pro_rly to _e outside,
3. Install a second wo_ _dp (approximately 6" long by 1V2" wide and same
thinness _ fimt stdp) in the center of the sill flush against the ba_ off the
inner sill. This will rai_ the L bracket as shown Figure. B.
4. If the distance between Storm Wind_
Frame and Wood Strip Mounted
of Inner Sil! is more _an ! ", two of wood _rips are not n_essary.
Fl,gum, A
on Top,
IFlgum, B
Owner's
Manual
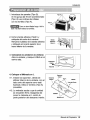
I. Insert the guide panels(Type G)
into _e guides of the air _nditioner
(Type H),Fa_en _e cumins _ the
unit with _rews (Ty_ A).i
Type A
Ty_ A
: Use a !ong screwdriver and
installing _e s_ews, will _ easier,
2. C_ the adhesiv_ba_ed
sea! strip
(Type E) _ the window width,
Remove _e backing from the seal
strip and attach me sea{ stdp to me
underside of the bottom window..
3. Locating unit in window
Open _e windowand mark _nter line
on _e centerof the inner sill
//
4. A_ch
_1.
L bracket
Install _e L brackets
behind the,
inner window sill, wi_ sho_ side
bracket as shown. Use the 2 screws
(Type A) provide.
42. The bra_et, helps to. hold un_
s_reiy
in pla_,. _e sure to p,lace
bracket _ge flush against ba_ of
iinner sill
Room Air C
ln_llation
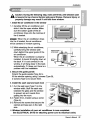
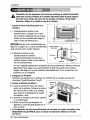
Caution: During the following
step,, hold unit firmly until wind_
sash
isi lowered to top channel behind side panel _ames. Personal injury or
pm_f
damage may result if unit falls _m
_nd_.
1. Instil
the air condiUoner in the window
1-1. Carefully !_ the air _ndiUoner and
slide it into he own window. Make
sure the bottom guide of he air
_nditioner
drops into the notches of
the L bracket:,
: When the air conditioner drops
into the L bra_et, he air _nditioner
will be centered
in wind_
o_ning.
!-2. While steadying the air _nditioner,
_refully
bring he window saslh
d_n
behind the upper guide of the
air _nditioner.
When he air _nditioner
is pro_rly
ins_il_,
it should Ult s_ighBy down at
the ba_. If it is set. _rr_[y
in the
window, _ wi!! hang !ower in the bac_,
automatically. !f it does no_, there is a
problem wih the installation.
2. _cure the guide panels
Extend the guide panels (Type G) to
fill the window opening using 2 _mws. (,Type B),
2 screws _ype C) _osecure them,
3, Instil
'the sash seal and sash lock
Cut the sash seal (Type F) to the
window _.
Stuff he sash seal
between he gla_ and the window
ito prevent air and insects from
getting into he room.
_2. Fasten the L bracket using a screw
(Type A).
3-3. Remove the. screws hat secure the
_binet
and ba_
S/_H SEAL
(TY_ F)
pan in the right
4, Window ins_llation
of room air conditioner is now _mpleted.
S_ ELECTRICAL DATE for a_ching
power cord to electrical
_e'r's
outleL
Manual
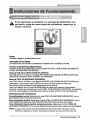
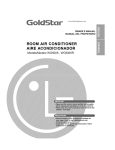
Ope_b'ng Instructions
CAUTION: If you turn off the air conditioner or _itch
i_om cooling to
the fan, wait at I_st 3 min_es before setting to _oling again,,
• Jrns air ,_nditioner
on and off.
Fan Sp_d
Use to set the,fan speed _ LOW _ IHl.
M,o_emp
Control
Use to set the air _ndHJoner
to the Fan On_ or the Cool On mode,
Fan Onty M_e
Use Fan Onlyat HI or LOW Fan S_
to provide air circulation and filtenng w_hout cr_ling.
Cool On M_
Use C_I On with HI or LOW Fan S_d
for cooling. Turn the kn_ toward the c_ler area for
the indoor air to become c_ler. Turn _e kn_ toward the Cool On area for the ind_r air to
i_me
warmer. The M_e/Temp
_ntro_ is used to main_n the room temperature.
When set in the Cool On m_e, _ compres_r will cycle on _d off to ke_ the room at the
same level of _mfort.
Cooling _riptions
For Normal Cooling - Sel_
the _1
On mode with _e Mode_emp knob set at the midpoint,
For M_lmum
For Qu_r
NO_:
Cooling - _lect the Cool On mode w_ the Mode/Temp knob set towa_ the
_oler ar_.
& Nig_ime _oling
- Sele_ the Cool Ginmode with the Mode/'remp knob set
toward the Cool ,Onarea,
If you move the Mode_emp control knob from the Cool On se_ng to the Fan Only
setting, wait at lea_ 3 minutes befo_ _it_ing
ba_ to a _o!
On setting.
Room Air Conditi_er
Operatingin,stru_ons
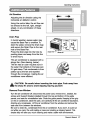
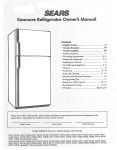
Air Dire_ion
Adjusting the air direcUon using the
horizontal air deflie_or cont_l.
Using Me control tabs, the air now _n
be dire_
to Me !eft, right, straight
ahead, or any _mbination
of these
Drain Pipe,
in humid wea_er, excess water may
_use the Base Pan to ove_ow. To
drain Me water, remove the IDmin Cap
and secure the Drain Pipe to, the rear
hole of Me Base Pan.
Pre_ Me drain pi_ into,Me hole by
pushing down and _tay from the fins
to avoid injury.
This air _nditioner
is _uipped
with a
slinger _n. (See drawing, be!ow:)
The _n has an outer ring that runs in
the water that collects in the ba_ pan
if it gets deep. That _ndensate
is then
pick_ up by the fan and expell_
through the _ndenser,
making _e air
_nditioner
moire emcient.
Be car,_l
_,en
inserUng the drain pipe, Push _ay
the sharp fin area to avoid slipping inju_ng youmelf.
_om
Removal From Wind_
_Jrn Me air cond_ioner off, di_nnect
Me p_er cord, _move the L bra_et, Me
screws and Support Bracket installed through Me top and _ttom of the guide
panels, and save _r reinstaHation later. CJose the guide panels. Keeping a fi_ grip
on the air _ndi_oner, raise the sash, and care_iliy Ult Me air _nditioner bac_rd,
draining any _ndensate.
Lift Me air cond_ioner from, the window and remove Me
sash seal from betw_n Me windows.
Be sure _ drain ALL condensate from the air _ndiUoner. if you don_, it _uld run
out while you _
the unit, making a mess and creating a slipping h_ard. This
simple step will _ve you much cleaning and make a safer _
environment.
Owners Ma_al
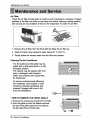
MaintenanceaM
Servi_
Air Filter
Che_ the air filter at least Mice a month to see ff cleaning is necessary. Trap_d
particl_ in the filter can build up and block the airflow, r_ucing
cooling _paci_
and _using
an a_umulation
of _ost on the evaporator, To. clean the air filter:
i. Remove
_e air filter from _e front g_lle by _Jng the air filter up.
2. Wash the filter using lukewarm _ter
below 40 ° C (t04 °IF),.
3. Gently shake _e excess water from the filter and replace.
Cleaning The Air Conditioner
The front grille and Inlet grille m_ be
wiped with a cloth dampen_
in a re!lid
dete_ent solution.
The cabinet may be wash_J wi_ mi_d
soap or detergent and lukewarm
water, then polish_ with Liquid Wax
_r Appliances.
To ensure continu_
peak efficiency,
the condenser _ils (ou_ide of unit)
shou!d be checked periodi_lly
and
dean_
ff clogged with soot or dirt
from the a_osphere.
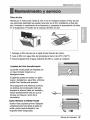
• HOW TO REMOVE THE FRONT GRILLE
1. Remove the screws se,curing the Front Gdlle.
2. Push the, gdlle up from the bottom and pull
• e top of the grille away from the _se as
• e top tabs !_ out of their slots.
Room Air Conditioner
Maint_nce
and Service
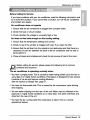
Before Calling for Service
if you have problems wi_ your air cond_ioner, read the following information and
t_ to solve the problem. If you cannot find a solution, turn off the air _nditioner
and co nt3ct your dealer.
Air _nditioner
d_s
not o_rate
1. Ensure _at _e air conditioner is plugged into a,proper o_let.
2. Check the fiJse or circuit breaker.
3, Check whether the _ltage
Air d_s
n_ _1
is unusually high or low.
cold enough ,onthe c_llng
setting
1. Ensure _at the temperature settings are ,corr..
2, Che_ to see if the air filter' is clogged with dust_ If so, ,cleanthe filter,
3. Ensure _at the air flow from the outside is not obstructed and that there is a
cleamn_ of over 20" between the back of the air _nditioner and the wall or
_nce behind it,.
4. Close all dc,om and windows and check for any"_ume
of heat in _,e room.
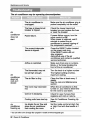
Before calling for ser¢i_, please review the following HStof _mmon
problems and sol!utions.
The air c_d#ioner
is operating
when:
You hear a pinging noi_. This is _used by water being picked up by the fan on
rainy days or in highly humid _nditions.
This feature is design_
to help remove
moisture in the air and improve cooling efficient.
See _e section on Slinger Fan, page li7.
• You hear the thermostat click._is
and stopping.
is _used
_ the compressor cycle starting
You see water dripping from _e rear of _e un_. Water may be coH_ed
in the
base pan in highly humid conditions or ion rainy days. This water overflows and
drips from the rear of the unit.
• You h_r _e fan running while the compressor is silent. This is a normal
operational feature.
_ner's
Manual
Maintenanceand
_r¢ice
The air conditioner
may _
operating
The air conditioner
abnormallywhen:
is
Make sure the .air condi_oner plug is
push_ completely into the o_let,
Che_ the house fuse/circuit
breaker box and replace the fuse
or reset the breaker.
_r
does not
_ilu re.
If _er
failure occurs, turn the
mode control to Off.
When power is restored, wait 3
minutes to resta_ the air
conditioner
devi_
is tripod,
to prevent triADping of
Press the RESET bu_on {ocated
on the power cord plug.
If the RESET button _ll not
s_y engaged,
discontinue use of the air
conditioner and contact a quailed
service technician.
Air_ow is restri_ed.
be set high enough.
Make sure there are no. curtains,
_inds, or _rni_re
bl_ing
the
front of the air conditioner.
Turn the, knob to a higher number
The highest se_ng provides,
maximum cooling.
........................
Clean the fllter at least ever,./2
does not
cool as it
See the care and Maintenan_
hot_
_^_en the air conditioner is first
turned on, you need to allow time
_r the r_m to cool down.
Che_ for open furnace floor
isters and cold air returns.
_r
Cooling coils have iced up.
See _r CondiUoner Freezing Up
!ce blo_s the air flow and
Set the m_e control at High Fan
or High Cool with thermostat at 1
or 2.
from cooling the morn.
_eezing
up
*You _n
refer to the Enemy Star program in detail at www.energystar.gov.
Room Air Conditioner
....................................................................................................................................
))))))))))))))
))))))))))))))i
ii_i_i_i_i_i_ii_
ii
iiii
i
i
il
iiii
ii
il
illi
iili
ill
ii
ii
i
lilii
Nil
i
iilli
i
Nil
iilil
ililll
llili
lllil
lllii
llli
iili
iill
ilil
ilil
llii
iilii
iilii
iilli
i
lilil
ililll
llili
lllli
illil
llll
Jill
llll
illl
ilii
iilli
iilll
iilli
iilil
iil
il
_ll
ii_ll
ii_i
iili
iiii
llli
iili
llii
llii
llll
Ill
iilll
iilli
ililil
illi
llll
liil
lili
iiil
Jill
Owner's Manual
21
Memo
22
Room Air Conditioner
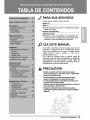
PARA SUS ARCHiVOS
Escd_ _{
m Puede
el _lo
e_n_ar
y n_m_em_ serie:
i_s N_ir_
en la eUque_
de ]a _e
[atera| de_ producto°
INom_ de| d_s_ido_:
m Adjun_e su _eci_ 8 esta p_gina _n la _a_m
el momento que 1on_si_÷ _a proof |a f_
adquisictSn o _ra _ _ad6n
_ _ gamnt|a.
_r,_
de su
LEA ESTE MANUAL
En su fntedor e_r_.
mgch_ _se_
_l_les _re
u_|i_c_
y m_tenlml_to
de sg _n_t_,_r
de _r_
Ua_ p_s
cuidados _
_ parte |e pu_e_ ahorrar
m_ho
y dinero d_rante la vtda de s_
_ndic_,_dor
_ aire..
En la tab_a de _nsejos _r_
la sol_i_
_pida
pro_
enc_tra_ m_as
te_u_s
a !_ p_o_l_as
m_s habituales. Si _isa
prime_ nue_ra T_b|a de
_n_
_
la s_uci6n _a
_ p_b_as,
_ _/r_
i_slte
flamar n_n_ aJse_tcio t_i_,
PRECAUCION
_
o d__s
dn la_perv_
a_u_,
Manual del Pmpietario
_
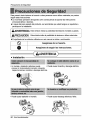
Pre_,uc_nes
de Segundad
Para prevenir tanto _esiones a_ usuario u otras _rson,as _,mo dafios maten_es, es pre_so
seguir estas instru_iones.
m_ Inertia
_raci6n
del aparato _
_ns_uencla
de Ignorar las Instru_iones
provocar& daSos o _esi=ones,
o
mA _use de_ peso p
del producto, se r_mlenda
que usted tenga a on a_.Jdante a
partici_ en _a in;s_c_no
[] El _gniflca_
de J_ s{mbolos
utilities
en este mahdi
se _n,d_ a ,_ntinua,cl6n,
[] |ns laci6n
• Un mon_
o ir_la_n
def_
pu_
pr_o_,r un fun_n_mie_
in_o,
i_luyen_
rie_os _ _iones, in,_d_s; e de_ar_s
__,
• Pue_
causat inc_io
• Puede caul_t _c_li6n
,, Pue_
caesar descar_
24
AireAc_dicio_r
o indigo,
y de_ar_,
e_Grl_
el6_r_,
y fallos.
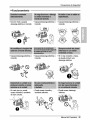
Pr_L_ione$
de
[] Funoionamiento
• _ otro modo, _usar&
, Cau_r& de_ar_
desc_rga el_
o In_nd_o. Ince_o°
e_ctrica o
,,_u_
d
i_endl.o.
• _usar_ _rga
incendio.
e_rica
, Si no hay conexi6n a _a,
se _!e
producir u_
descarga gloria.
e_6_
• En caso que no, pu_e
caesar ince_io y a_nte
de codo cir_ito.
o
,, Causar_ de_arga
in_io.
,, Pu_e cau_r incendio y
a_i_te
e_6_rico.
o
,, Pue_ _ar
e_6_rica.
a ei6ct_ o
de_a_
Manual det P_r_
25
Preca_Jon_
_ Seguridad
- El ap,arato de ai_ acondidona_ debe
_era_e en an Area _rrada pa_ ser
m_s ,_ivoo
• Poe_ c_u_r
e_losi6n,lncendio,
, Pu_e en_ i_r
en la unidad y
d_minuir A _slaci6noPu_e, ,_u_r
ag_a
un.a _a
e!_d_.
[] |ns |aci6n
= _n
filo_s
y pueden caasa.r
Aim A_n,d_ador
"Pu._ pr_o_r el f_lo de un
e_om6sUco
o d!ete_ora_n
de su re_imie_o.
debe _ra_se
o,recamb_
que el a_a_o de a_c_
_a _ la v_n_,con N _gut_
Preca_iones de S_ur_d
[] Funcionami,ento ............................................................
, Hay riesgo de _.esiones
persor_o
_mo _ _nUl_r giraa a_
v_idad c_n_o _ fun_n_,
_e ¢au_r le_or_.
• El fu_onam_nto
sin _ros
puede d_8.r _aunidad.
• G_r_
ene_{a en vano y
_rfa prewar un a_i_nte,
• Pu_e _usar de_a
el_n_
y dafio.
,, _e pue_ caus_ _es_es
da.fios en la mas_ta o la
o
p,lanta.
,, _ unidad _ii _re a_dicio_do
puededetedora_, cambiarde
_lor, o de_oll_
man@_asen
, P_
cau_
_o
a los
_ima._es o vegetales y
_rd_a _ obietos.
,, No, es _
y i_da
prov_
enfe_ades
o peH.grosde
lesiones _,rso_ales.
Manual _I' Propiet_do
27
P_io
1. Coloque e_ ench_e correctamente.
2. Use un _ni_ circuito pare este aparato. Re_rgar
el circuito podrfa provo_r
un riesgo de incendios.
3. No _ilice un alargador. Consulte la p_gina _ para m_s detal[es.
4. No arranque/detenga
el funcionamiento
enchufando/deser'_hufando
el cable
de _mente
elderly.
5. Si el alargador est_ daffado y ha de ser recambiado,
autorizado que instale un recambio exacto.
_licite
a un t_ni_
1. E_ar expuesto al fliujo dimcto de aire _r un _rfodo
largo de tiempo pu_e
_nst_uir
un riesgo para su saiud. No ex_nga
a I_ _rsonas,
mascotas o
plantas al flu,jo directo por perfodos largos de tiempo.
2. Debido a la _sibilidad
de faff_a de ox[geno, ventile la h_itaci6n
cuando se
u_ al mismo tiempo que e_ufas u otros dispositivos de calefacci6no
3. No u_ este acondicionador
de aire para piro_s_os determinados no
esp_fi_dos
(por ej.: preservar dispositLvos de precisi6n, alimentos,
cachorros, plantas y objetos de arte). Tales usos iPuede daffar los elementos,
4. E! aparato de aire acondicionado es un aparato diseffado para el _nfo_ del
consumidor. No es un sistema aclimatiza_r.
1. No toque las partes de metal de la unidad cuando quite el filtro. Puede
las_marse cuando manipule bordes fi!osos de metal.
2. No u_ agua Ipara limpiar adentro de! acondicionador. La exposici6n a! agua
puede destruir la ais!aci6n y esto a su vez provocar una des_rga
el_rica.
3. Cuando [imp ie la unidad, as_re_
que la _rriente
y e! inte_uptor est_n
desconectados.
EI ventilador gim a muy alta vel_idad
cuando est&
funcionando. Existe la _sibilidad
de lesionarse si la energfa _ conecta
acciden_lmente
cuando est6 limpiando las piezas intemas de la unidad.
Para reparaciones y mantenimiento,
po"n gase en _nta_o
con un _ro
de
sewicio autorizado. Consulte la p_gina de garantfa o Ilame al nemero (800) 2_0_0. Tenga su n_meor d emodelo y n_mero de serie a mano. Los encon_ar&
en [a p_.gina 25 de este manual.
_re
A_diciona_¥
EsW sfmbo|o Io advie_e de
el,_trica.
un
_lii_ro
E_ sfmbo|o Io adive_e de un _|ig_
de| vent|tador:
Este sirnbo|o signifi_
condiccion_
de a_idente
que pu_a
pot corriente
causar un da_o
es_iia|es.
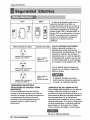
ADVERTENC|A : Este ,apar_o de_ria instalar'_ de acuerdo con las
rto_as, del C6digo Ei_rico National
R_il_ Frunta
Fi)tro
T_a
de Ai_
Manual del Pr_ietario
Seguridad
Et_ctd_
ii5V~
2 V~
EJcable _ 81imentad6# pue_ intuit un
dis_t_o
interpret
_ _en_..
La
ca_
dell enchufe cuen_ _n un bot6n de
pru_a y o_ de _in_cio.. El di_sffivo
debe
_pi_
p_i6dli_mente _esbnando
p dmere el _6n TEST y d_p_
RESET. Si
e_bo_ TEST _ se de_ec_
o st e! _t_
P_SET no _n_
active,, suspenda el
use del alre a_ndlcion_o
y ip6nga_
_ta,cte con un t,_i_
de _rvi_
~
UUIi_ el _chufe
de la par_
_eumo
de _ergla
U$O _
CORBONES DE _EN_ON
D_ldo 81 _tencia| de pel_i_ a su
s_rid_
be_ c_e_
_ur_tan_as
rec_dam_
en_re_e_nte
_ utiiiar
SNr_
Nr_
125V, e_e
_
!_,
de 3
125V _
_lice an _Wb_ de
15AMP.o un
I_rrup_ _ 15AMP
_rden_
de extens_m Sin embargo, si
usted _
user _n _
de exteasi6n,
es ebsol!u_mente _ce_
que este _a
un, cerd6n listado _jo UL de _s _pigas
_n _6_
a tie_ _lifi_do
!5A, i25V.
T_
S_
IUne_
_V,
e_e
1_,
250V
_
de 3
8EGURIDAD
a cuer_
U_iil_ un f_bie de
_AMP, o un
e_ufe
de_
_n
_s c_t_
El _bleade
_m,_ti_
realizari_
y regAment_
AC
(_
2_,
el _bI_do
de 3
Ii_rru_,_
20_P.
1_ alumiai_
_dtla o,_s_r
p_.lemas especlales.
Cons_e a un e_ctd_eta califi_do,
_LEC_ICA
El a_re acend_nado
_as _n_d_
_t_
._ipad_
con _na cilia
con,_n
a tle_ de t_es pa_ en el cable de
t_ne una ciavI_,ade
cone_i6n a ti_
de tres paras an s_ c_e
sumine_o de energla, que _r&
ench_
un toma_en_
de p_
de tree Ipar_
_nectado a tier_ adecuad_nte
_ra sw
prote_6n _ntra _n _i_e
rie_e de
en
_mini_
_ ene_ia q_e de_
e_h_rse
_ un
tom_rr_n|e
de _ed! _
_es _s
_ne_,
a
tierra e_ada_e
(vet las ilu_r_ienes a
_nt_u_i6n)
pa_ _ pro|_i6n _ta
_ _ible
deege _ e_ectr_clono S_ _e tiene ua Iomace_e_e
_n estas _ra_e_icas,
_n elect_i_
_o
deve_ instalar une de acuerdo _
el C_di_
EI_K_o Nac_on_ y lee
y _rm_
i_ales.
No u_ _n cane, de eAension,
Aim A_nd_na_r
de
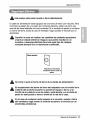
EiSte equipo de_
estat puesto ,a tier_
debidamen_.
El _ble de alimentaci6n est,_ equipado de una toma de tier_ con tr,es pins. Para
minimizar el [_igro de una Iesi6n _r corriente el_rica,
_ifice una toma con
enchufe de tierra est,_ndar con tres contacto& Si .el enchufe de pared no conaene
un borne de tierra, antes ,de u_r el ventilador haga cambiar el enchufe por un
Camblat la toma sin tealizar los camibi_ de _bl_do
apto, pJadoa
c_ar_ un estade el_ctrico ins_uro que pe,drfa _sul_t en un
incendio o d_rga
e|6_rlca°iPara rode este ripe de trabaj_,
consuite siemipre con un eiectri,cis_ cualfflcado,
_rese
No co_e ni quite e! bor_
_e ex_e _b_
de tletra de |a davija
de ali__aci6n
El acop,|amiento de| borne de tierra de| adaptador con el torni|lo de |a
cubi,e_ de| enchufe de pa_
n,e pondr_i e| _uipo a tierra, s,!e|
tomi|lo de |a cuble_ no es de metal y est_ aislado y e! enchu_ de
pa_d no es_ puesto a tierra a t=_v6s de, la _ de |a ca_°
En e| case _ cua|quier duda _sp_o
a la cor_
pu_
a tierra
do| ventilador, haga revisar e| enchufe de pa_d y el ci_u_o per un
electricista profeslena|°
Manual det Pr_rto
31
Debido a _entuales
pedigree de s_uridad
no, recomendamos
en absolute e_
use. de un adaptador, SSIo pare una cone×iSn tmnsit:,ofia se puede user e_
adaptader das_cado _me UL que est_ a dispesiciSn en la mayor{a de _,as
tiendas de productos el6_fi,coe. A_end,a que e orificio grande en .e_adap_dor
_rreeponda
alo, fificie grande en el enchu_ pare legrar la _ne×i6n
con la
polaridad _rre_.
Desconectando
el _e
de eJimentaci6n dlel adaptador uti_ice una mane pare
sondes partes pare evitar un dose de_ borne, de tier_o Evite una d,escone×i6n
frecuente de_ _ble de alimen_ciSn,
pues puede cau_r un eventua_ daSo de{
borne de tierm,
Tom[lie_ Me_
Cubietta del
_nt_r
Nunca
uti|ice el _uipo
con un adap_dor
da_,adoo
Debido a un eve_ua_ peligro no recomendam_
en a_ol_o
el u_ de un
cable aJargadoro En situaciones ex_pci,onaJes utHice s6_o alargadores
_fficad/os
_n puesta a tier_ CSA d_ificados
come UL _n tres conductores
de vailores 15 A, 1i25 Me
Aire A
dot
Tipo_ 14
T_
B:2
_tl!o
Ti_ D: 3
(El P_tesis L)
M_ia_)
i...m:..........................................................
ii
E
,i¸
Tt_ _ 1
(_t_sivo p_ed_)
_, F: _
(_da _ _rc_)
(No_si_
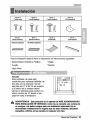
Para la insta_aci6n de_fia
* De_erniHador
_po G: 2
(Panel Gufa)
W]_ HI:
(Guia _dor)
','i'iiiiiiiiiiii_iiiiiiiiii
_
tenet a disposici6n
(EstreHa y Phillips)
* CucjiHo
los instrumentos siguientes:
* Regta
* M artillo
* L_piz Nivet
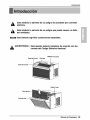
Tamale
Este ven_lader
de ca sa est_
construido para ven_nas est&ndar de
des alas con la e×tensi6n real de
21" a 35"
Mln. i2"
_e_u_
de 21" a 35". El aia sunder
y el inferior de la ventana deben
_,rirse lo s_iciente para producir un
orfficio ver_cal de 12" desde el ala
superior
hasta el antepecho.
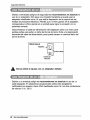
ADVE_ENCIA
: Este p_ucto _ un aparato de AIRE ACONDIClONADO
PARA INSTA_ClON EN VENTANAS. Come tal, _ _c_s_
una ven_na de
un cuelgue o de doble cuelgue _ra una instalaci6n adecuada. No se
_mlen_n
in_|acio_s
en lugams q_ no _an ven_nas, t,_ili_ndo
casquUlos, odflc|os en las _mdes ni cualquler _m tipo.
Manual de/Propie_rio
33
Espacio
libre
El sLfficiente espacio libre aumen_ la eflciencia de refrigemci6n
impide la i_adiaci6n del _lor del conden_dor.
de la u,nidad e
!. Si la sobm-ventana esto_a co I_uese
una tim de madem de 2 pulg de an_o
a Io llano del descan_ de la ventana por la parte que de Jnternamente aJ
cuarto, yen t_a su extensibn. _ tira de madem debe mr io suficientemente
g_esa para elevar el descan_
de la ventana, de tal m_era que la unidad de
aire acondicionado
pue_ ser intalada sin interferencia dell marco de la _breventana (sto_
window).
2, Ver Figura. B. _ parte superior de la tira de madem debe estar
aproxima_mente
a 3/4 de pulg mas alta que e! marco de la _bre ventana,
(storm window) ipara ayudar a que el agua de condlen_ci6n
de la unidad flLrfa
hacia afuera.
3. In_ale una segunda tim de madera (_mximadamente
6 pulg. de largo, 11/2
pulg de ancho y mismo e_e_r
que la primeratira de madem) en e! centro de!
descanso exterior, p6ngala contra la parte posterior del des_nso
interior. Esto
elevard !a m_nsu!a L como en la Figura. B.
4. Si la dis_ncia entre "Fmnja de Madem Mo_3da Sobre la Parte su_rior
De_anso
Intedo# y "Tira de Madera Pare la Mensula L y Mensula de
Figure. A
Aim A¢_r_tctona_r
Figura. B
de l
1. Introduzca los paneles _ipo, G).
en los ,gu{as del 45 aire acondicionado
(Ti_ H).Las co._inas atornMe_as
_n
_
los ternWos (_po A).
_po A
_poA,
Use un atorni_liador la_oo As_'le
m_s f&cil india I_ tomillos.
2. Co_e _abanda adhesive _ipoE ) y
col6quela del encho de _even_na.
Remueva el p_s_co de _ab_de edhes_
y col._ue_a en _apa._e su_rior de el
marco inferior .de la ventana.
3. Co|ocando
_hes_va
|a unidad en le veni_Na
Abra la ventana y marque LIiNiEA en el
centro esta°
/,/
4. Coioque
el M6nsu|a en L
4-i. {nstal,e los _rtes
L detr,_s de
alf_izar interno de _aventana., con .el
_ado corto de_ soporte come est,_
ilustmdo. Utilice 2 torniHos _ipo A)
proveidos.
4-2. La m6neula ayuda a que la unidad
se encuentre firme. AsegQre_ de
poner la m_nsuia en L contra la
parle posterior dei des_nso
interioc
Manual det Pm_eta_
35'
instataciSn
P_u_6n:
En _as,sigu_nt_
ins,t_ion_,
sostenga I,aunidad _tmemen_
hss_ q_ la _e
_i_
_ la v_a
d_n_
,s_
JQ_
su_or
_l _nal y pot' _rds
_ ma_o _ I_ pa_es cor__o
Pu_
hair
lesiones o da_os s! la unidad _ ¢ae de la ven_ns,
1, Insta|e e| Aire Acondiclonado
Ventana
1ol, Cuidado_mente
a Ja
le_nte el airs
a_ndicion.ado y colSque_o en e_hoyo
de Javer_tana.AsegOrese de que la gu{a
inferior de_airs a_ndicio_d,o c_
en
lugar correcto demm6r_ula en L0
,Cuandoe__re a_ndicionado
sea
fijado en e_.suppo_ en L, el airs aco._iidonado
ser_ ce_rado come pueden observar°
Mientms ma_iene ell airs
a_ndicionado en posic[6n,
culdado_ente
baje el bo_e de la
ventana superior ha.s_ _agu[a su_rior
del _re acondicionado.
Una vez ins_la_ d_idamente e_aparato de airs a_n,.di_ona_,, de_r_a inc_ina_e
_i_r_ente
hacia _ajo. en su parts pos_e_or.Si est_ _l puesto en _aven_a,,
_gar& m_.s abajo pot _apa_e p3ste_°or autom_camente. Si n,o Io hace, hay una
prob_ema _n _ains_aci6n.
2. A_u_
|os Psneles
E×_enda !os pansies par a reHenar !os odficios do la ventana
2_.omiHos(Tipo_),_om[Hos _ip, oC).
3. |n_ale
usande, !os
la Bands de] Ma_o
3-1. Corte la banda del marco dei mismo
_cho de la ventana. Col_ue la banda
del marco entre el vidrio y _aventana
para pr_,,enir la penetraciSn al c_ai_o
de insectos y aide..
3_-2.Atornil_e _acerrad_ra de! marco usando
Ti_
A
Tipo F
_n tornillo(Ti_,A)o
3-3. Qu_e los torniHos q_e as_uran e!
gabinete y _cerola desprec:iable en ,e_
lade. co_ecto,.
4_i_
[_ ins_|a,ci_
SEGUR_DAD
cerrienteo
36
_re,
de| airs acondtclonado
EL_CTR_CA pata coheir
dot
de ve_tana no estard _mp_ta°
Ve,a
|a e,xte_sibn el_tr_ca a| toms
Inst_ciones
_ func_,_miento
SiiVd, de_onec_
eJventiladot o |o oonmu_ del enf_damiento a la
ve_i!i,a,ci6n, antes del nuevo ajuste dei en_[amiento espere per Io
_nos 3 minutes°
_iende
y a_
el _ndi_dor
I__
_ Fan
U_ e=_ fusion _
_ar
_ _re.
la ve_idad del _i_ador
,_m Low(Bajo)y Hi (_o),
Con_|
de M_emp
(M_emp)
Use para aju_r el acondictona_r
de aim al modo FAN ONLY e,/ENTI_DOR
o COOL ON (ENFRIADO ENCENDI_)_
Modo _ FAN ONLY (VE_DOR
_._MIE_)
Use FAN ONLY en Hi (hJto) o Low (Bajo) FAN SPEED (VEL_:IDAD
propo_mnar cimulacion de _re y 'fill_cion-'r_;
_ sin e_amiento.
SOLAMENTE)
DE VEt-_I_R)
_ra
Modo _ C_L
ON (ENFRL&_O ENCENDIDO)
Use COOL ON _n Hi (Nto) o Low (Bajo) FAN SPEED (VEL_IDAiD
DE VENTILADOR) _ra
enfr_amien_o,Gim _ boton h_ia COOLER _ra que el _re de interior _ e_e mas.
GIre el boron hacia el area _ul mas p_uena pare que eJaire de
I_e_ot se ,_liente m_, El _n_ol _ M
p es usado _ra mantener a temperature
_biente.
Cuando este _ocado
en el m_o COOL ON (ENFR_ADO ENCENDIDO), el _mpresor
hara ci_ entre _gado
y encend_
para mantener el sawn al mismo nive_ de temperature..
Descri_iones
de en_i_iento
Pare en_iento
_rmal.
Selec_one ei modo COOL ON (ENFRI_O
boton Mode/Temp en ia _,icion de_ _nt_.
ENCENDIDO), con el
_m enfdamiento _imo,
._|eccione el _
COOL ON (ENFRIADO ENCENDIDO), con el
boton Mode/Temp apuntan,_ hacia COOLER (MAS FRIO) (hacia e_a_ _ul mayor)..
Pare e_iamiento
mass_nqui_
& duran_ !as noc_s. _!_ione
e_modo COOL iON
(ENFRi_O
ENCEND_DO), _n el botort M_e_emp
_ntando
hacia ,elar_ _l
mas p_na_
NOTA:
_ ust_ m_rve el _t.on dieconlr_ de t#_e,qemp
FAN ONLY, espere _
Io mer_
_ la _io_
COOL _
h_ia la _n,ci_
3 minutos antes de carnbiar o_a vez a la _io_
M_ual
COOL ON.
del Propietafio
37
l
ones _
ditecci6n
funcionamis,nto
de| at_
Para ajus_r _ad[reccion del ai_
_,ntrol de Ja d[reccion de_ aire°
ueando
Las dos EengSetas hor/zon_ies para e_
_ntrol de Jas rejiHas {,epermiten
descargar el aire hac:ia la izquierda, o
algo de aire a la izquierda y otto a la
der_ha, o rode e! aire hacia e_f_nte, o
cu,alquier combinaciSn de ias _siciones
menc[onadaso
Tu_
de D_,_i_e
Remove_o
de ]a Ve_n_
Apague ei aire aco_dicionado, desconecte el co.tin el_tr[_
del toma col_iente,
rem_eva _acermdura del mar_ y los tomiHos instalados en ia pa_e superior e
inferior de los paneles, y g_&_elos pare reins_acidn,, Cie_e Ilos paneies.
M!anteni_endo el aire acondicion_
fuertemente, llevante el marco de, la ven_na, y
cuidiados_,ente,
incline el aiCe acondicionado ihacia arras, botando coalquier
agua _n,den_,da.
Des_ice el aire a_ndicio_ado
1" a ia derecha, lu_o lev&ntelo
de la ventana y remu_vale la banda del marco de la venta_a.
AsegQre_ de ,drenar TODO e[ condensado del apara,to de _re acondi_onado° Si no
Io hace, podr{a salirse mientras trar_po,_a el _rato,
ens_ciando, con el consiguiente
p,eliigrode resbalones. Este simpe paso le ahorrar& tiem_ de limpieza y hat& de su
I_gar un emtomo m_s seg_ro.
_reA
r
Mantenlmtento
y se_io
Filtro
_
Ai_
Revise per Io menos dos. veces a! rues si no es necesario limpiar et filtro .de air&
L_ pa_fcul&s detenidad se pueden acumu!ar en .el filtro impidiendo el flujo del
aire, limi_ndo el rendimiento de enfriamiento y _usan_.
la acumulaci6n de hielo
en el evaporador. Pro_der de la limpieza del filtro de aire:
1. E_miga
el _tro del! aire de la rejila fron_l
2. Lave e_ filtro _n
3, _curra
agua tibia de tem_ratura
Jigeramente el agua sobrante
tirando de! misme
mener de 40°C (i04°F).
del filtro y vuelva a instalarlo.
Limpieza del Aire ,Acondicionado
La pa_il!la fron_l p,uede ser limpiada _n
un trapo hemedo mojado en un
detergente suave°
El gabinete pu_e _r lavado con j_6n
suave o detergente y agua tibia, entonces
pulido Cera Liqluidapa_ aparatos.
Para asegurar_ una eficiencia _ntinua,
las _binas, del conden_dor
(del lade
exp,uesto a! e_erior) debe set revisado y
lavado _ri_icamente
_a _r que se
tranque con basura o po{vo de la
atmosf_ricoo
_u_
_
Come Remover la Padlla Frontal
Suelte el lade izquierdoprimero Despu_s
cuidado_mente hallede_e la pa=_ede
arHba y em_ hacia la derech& _s
lenguet_ est_n aseguradas,
Manual
del Prqpietar_
39 i
Mantenimiento
Antes _
y se,,'vic_
Llamar el SeP,_icio de Asistencla
T6cnica
Si tiene pro_emas _n su ventilador, lea las informaciones siguientes y trate de
resolver e! pro_ema. Si no puede en_ntrar
la soluci6n, des_necte e! _ntilador
y dirfjase a su suministrador.
El ventiladot
no _nciona
1. Comp_e_
que el ventflador
2. Revi_
est_ _nectado
en un enchufe corr_o.
e! fusible,
3. CompnJebe
AI ajustame
que la tensi6n
no sea demaslado a_a o baja.
e! enffiamiento,
el aire no _rece
fr{o Io s,_clen_
1, R_ise
si los ajustes de la temperature son _rrectos
2. Revi_
_mbte
si el fi_ro de aire no est_ a_s_do
el fi_roo
de polvo. En el _so
de que sf,
3. Compruebe que afuera no haya un obstdculo del fiujo de aire y si entre la.
pa_e trasera del ven_ilador y la _red o la ba_era haya es_cio
fibre .de por Io
menos 1 mm:ro (20°).
14,Cierre todas las pue_as y ventanas
_lor en la habitaci6n.
y .compruebe que n.o haya una fue_e
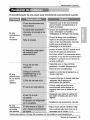
Antes. de flamar al servicio, tenga a bien revi_r
problemas y sus soluciones.
E1 acondicionado¥
_
aire _ta
funcionando
de
la siguiente iista .de
normalmente
cuando:
• E_ucha
un sonido met_lico. Lo causa el agua que recoge e_condensador en
dfas Iluviosos o en condidones
de mucha hum_ad.
Esta _racterfstic-a es_
diseSada pare ayudar a qui_r
Consuke
la _cci6n
la humedad
del Ventiiador
- Oye un clic en el termostato.
on el aire y mejorar la capacidad
de e_racci6n
Lo _usa
en ia _gina
de
38.
el ciclo del compresor que comien_
y
• Ve gotear agua de la pa_e posterior de la unidad. El agua pu_e ser r_gida
,en ila bandeja de ba_ en co.ndiciones de mucha humedad o d{as de lluvia. Es_
agua de_orda
y gotea desde la parte posterior de la unidad.
• Oye funcionar el ventilad,or mientras el compresor estd silencioso. Esto es una
caracterfsUca operativa normal.
_,re A
dot
Mantenimlen_y se_icio
El acondicionador
de aire p,u_e
es_r
func_nando
ano,_a#nente
cuando:
que .eiaire a_ndicionado
est_ _nec_ado completamente ala
_ente de ene_ia.
_g_ei_
Cheque I[_ _sible_inte_uptor de _a
_sa y reempiace _ _sibles. o
_stablezca ei interrup_r de energi.a,
Ei aire
do no
• Cuando la energ a _ _es_blez_,
espere 3 minutos pare.encender de
nuevo,el aite acondicion.ado. Con esto
evi_ que se produz_ una
sobrecarga en el _mpresor.
• presi,on e_botdn
situade en el
enchufe del cable de elimentcidn
Si eI bot6n RESETno pe_ane_
a_ivo,
suspenda el u_D de,I aire acondidonado y
i_ngase en con_cto _n un t_ni_
de
servicio cuali_do,
_gO_._
q!ue no h_a cortinas,
persianas o muebles bloqaeando el
#e_e del Bite a_ndidonado.
_us_r ei _n_oI de,tempe_tu_ a un
n_mero m_s baj,o.
Ei aire
do no en_ia
_rno
debiera
, AsegOre_ que todas las salidas ,de
aire est6n _das
pare que el aire
• Estaib,lez_ una tempera._m m_s al_.
El aire
• EItja el modo a_o dei ven_lador High
do enfria
dernasiado
Used
pu_e
Fan o enfdado al_o High Cool _n el
termos_to en el nOme_ 1 o 2.
referirse al Enemy Star p_rama
con todo de_aHe en _,,en,_gys_r._.
Menull
del P_ie_rio
4f
42
Aire Acondicionador
Goldstar re,parar6 o _'#u_6,
gratu#amente,
sulpto,ducto _ re_Jffa def,ecfu_o
en mat_es
omano cle
abra boJo oondlic4_
no_d_
,de u_ durante _ I_Odo
de. goran41fa m_lo_do
i_
_Jo.
e_¢o
a _#_ de
Ila feoha de, compta d!e_ p_od_to
oMg_na!l par pade d_ con_midlot,
E#a garantfa _lmffa_ s61!oe¢ v6Hda para e!
comprador
odg_nal de_/ioroducto, y efecflva s6_o cuando _te se ut_lce dentro d!e _os Estad_ Un_os, Inciuyendo
A_Aa. Ha'_.
y _ t_rfforios est_ouni_.
_ne
_
_:
_:
| eP_
] e6_
C__
d_÷
_ fecha
de_._de]a fe_a
_
compra.
5 _
desde Io f_
comp_a,
de
Llame ai tel¢fono 1.43_243_
y _c_e
ad_.
Par favor; te_a
d_e_b_e
e_ tl_
acondid_do),
n_eto
de m#d_o., nQ_ro
pos_
_a opd_
_ producto _#e
de _e.
y ,c_go
La m®o de o_a _o garan#a cubre e! _te de _ _#enc_
en domlc_o de t_s
I_ p_e_s, I_uy_do
e_corr#[e_,
E$_A GA_AN_A $_ OTO_GA 8_ Sg_#Cl6N
O _XCLgSi6N
_i_ TOD'A OTRA GARAN_A, _XP_SA O I_PL|CITA,
_NC_!_
_N IU_TAR C_QU|_
GARAN_TA D_ CALiD_ O I_EiDAD
_N
_N I_651fO
CO_O,
_N
M_D|DA EN QUE C_ALQUI£R GA_IA
01_O$
ESTA_$
#A_O$ _ULTAH_
_A
GAR._A
_
AC:E_AN _
O AC_i_A_,&
_MlffADA I_
|_PL_C_'A
E$ O_UGADA
IPO_ _
L,_, _$'f_ IL|M|'TADA EN DU_AC:i_N AL
U_#ACION
!D,E#_Ci6N
D_ UINA GARAN_A |_P&_C[[A O [A _XC&#$16N D_
_
LO _J_ _
_iTACiONE$
O EXC&g_|ON_$ MENCEO_D_
_#EN
NO
_ A_
Las vis#as de A_iste,Rc_a a domicll_o para entregat,
recoget y/o lnsta_ar el prod_cto,
fu_lbl_ _ su o_
o _ir
et c_do,
o _ oo_recci_
de rep_ac_
_, a'utor_:
2.
_f#_ir
y
o susfltu#
Da_os o p_obtem_ de funclonamlento
provocados
par u_ u_o _P_decuado,. abuso, func_am_ento
fueta de especiflcac_ones
ambtentales
o contr_Ho
a requ_sffos o precouc_ones
en _ Gu_a de
f_nclo_amlento,
acclde_te,
fuego,
I_undoc_on,es,
_Rst_Cl6i_
_nadiec_ada_
fuil_rza mayor,
m_lflcacbne_
o a#er_{o,_e_ _o a_i'zadas,
co,ante
el_c#_ca o te#_6n _n,correcta, o u_ cancel,
o _
_nt'os
a aq_
_ra !c_ q_ De _a_,
&
_0MEROS OELCE_
Prober _ co_a
INIE_VOS
_
gamma
P_A
C_EN_:
_ber6 entregar una copra de su rec_bo de c_pra
÷n e_ _to,
e_ _e rec_ _rv_c_o ba_o _ra#_a.
_Jame a| !-800-2_-0000,
_
horns al dla, 7 d_os a _!o
Seiec,clo_e la opcl6_ adieoua_a
de_ menQ. y ten, ga
disponible su flpo de producfo
(alte aco_d_io_ado).
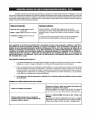
LGE_ect[on_cs
_nc,repair
or at its opHe, n replloce. wHho_t charge, your produot
_f_lr_OVe_ _O be dlefee_'ive in
mater_ai o,[ workmanship
under normal use during the wasranty period set forth below, effective
fromthe date of
o_l_
cop, s_
purch_e
of _
product,
Th_ _mfod warranty Jsgood o,#_yto Me o#g4nail putrc_ser of the prod_
and _tlve
only _en
_
in _e U_ed Star's. [ncludfng A_ka.
Hcrwa_. and U.,S,T_fl_.
WA_
_OD:
Le_:
1 Yeer #_
Pe_
1 Y_
_p_:
HOW SE_
_
Cait i-_243_
and choose _
app_op_aCe prompt Pl_
have prod_
t_e (R_
A_ Co_o_e0.
m@l
n_beh
_a_
humor,
and _P code ready°
Date of P_rc_
#am the _te
of _rch_
T_ wairro{_ed _abor covers the cost of h-Home _#_[_
5 Y_
from the Date of
Purchase.
THIS WA_r_
iS iN U£U OF ANY O_R
!IS_NDLED:
W__
_
O_ i_D,,,
INCLUD_G
W[TH_T
_I_D
BY LAW, _ IS !L_MI_ |N DURATION TO' TH_ _P_-,S WAR_W
PE_OD' _VE_
ILG_
_Y C-ON_JEN'_AL,
IND_EClr, _ IN_DE_AL
DAMA_S OF A_Y _IND, INC_
LO_' R_
_NE_
W_ TH_ _DUC[
_
_A_S DO NOT ALLOW _AT_
_
HOW LONG _
MAY NOT'A_Y
THIS_
_$c,e
c_ect
_
_T
_Y
_Y
NOT _ _JAB_ _R
_ _,
I_
[MP_ED W_
TO:
_l#S to yO_ ihome to de_lver, #ok up, and/or inst_
wi,r_g, or c_ect_on
of una_ho_zed
r_m;
and
the _u_,ct,
_n_t,
or repi/ace h_
fl_
Damages
or ,op,erat_n,g! problems
that result from m_su$e, abuse, operation
,outside environmental
to i the r_u[rements
_ p{ecauf!ons _nthe Operating G_e,
acciden_, vermin,
fire. fl_d. _mpto_r i_lati_,
acts of God. u_u_odzed
_dlflc_#n
or a#erafion. _ncor_f
_ec_ca!
cu_t
_ voyage, or commercial u_. or _ _.lr ot_r th_ I_ter'_ed purp_.
S_C_O_
C_MER:
_ITATIONo
TO'¥OUo
WA_NTY
2_
_ _]
_TER*A_
Or
O0_
CE_R
NU_:
_
_w _
_
_ _
_
_ _rr_
A copy of your Sales Receipt m_t be submitted
t_ time warr_y
sot-,4ce _ prov_di
_1!
1-800-_-00_,
_4 ha a de/, 7 _
_
h_e
your p_od_t
ty_
(Roo_,_r'_nd_oneO,
numl0,_, _i
numbe_, and _P Code;
P/No,: 3828A21004F'
at
_.
mode_
Printed in China