1
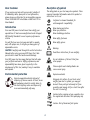
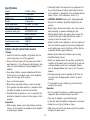
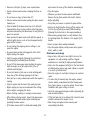
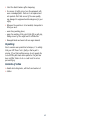
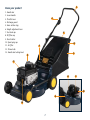
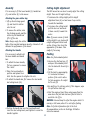
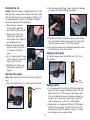
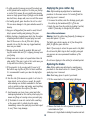
INSTRUCTION MANUAL
3.75HP
Petrol
Lawn
Mower
• Melbourne • Perth • Auckland • Hong Kong • Shanghai
• Taipei • New York • Verona • London • Paris
1
RL500
050826 ED7 JJ
Contents
Warranty
2
Full 2 Years Home Use Warranty
Introduction
3
Description of symbols
3
Specifications
4
Safety rules for petrol lawn mowers
4
Unpacking
6
Contents of carton
6
Know your product
7
Assembly
8
Cutting height adjustment
8
Fueling
8
Checking the oil
9
Starting the engine
9
Stopping the engine
9
(Does not apply to the Briggs and Stratton engine)
Whilst every effort is made to ensure your complete
satisfaction with this tool, occasionally, due to the mass
manufacturing techniques, a tool may not live up to our
required level of performance and you may need the
assistance of our service department.
This product is warranted for a 2-year period for home
domestic use from the date of the original purchase. If
found to be defective in materials or workmanship, the
tool or the offending faulty component will be replaced
free of charge with another of the same item. A small
freight charge may apply.
The warranty replacement unit is only made available by
returning the tool to the place of purchase with a
confirmed register receipt. Proof of purchase is essential.
We reserve the right to reject any claim where the
purchase cannot be verified.
This warranty does not include damage or defects to the
tool caused by or resulting from abuse, accidents,
alterations or commercial or business use.
It also does not cover any bonus accessories unless the
tool is a GMC Platinum Professional model.
Please ensure that you store your receipt in a safe place.
Conditions apply to the above warranty.
If you need direction of what constitutes a free of
charge warranty claim, please review the guide given on
the rear of the Receipt Holder. An indication is given as
to the types of claim that are permissible, and those
that are not.
Mowing advice
9
Emptying the grass catcher bag
10
Replacing the blades
10
Maintenance
10
2
Description of symbols
Dear Customer
The rating plate on your tool may show symbols. These
represent important information about the product or
instructions on its use.
If you require any help with your product, whether it
is a Warranty claim, spare part or user information,
please phone our Help Line for an immediate response.
Phone 1300 880 001 in Australia or 0800 445 721 in
New Zealand.
Conforms to relevant standards for
electromagnetic compatibility.
Introduction
Wear hearing protection.
Wear eye protection.
Wear breathing protection.
Your new GMC power tool will more than satisfy your
expectations. It has been manufactured under stringent
GMC Quality Standards to meet superior performance
criteria.
You will find your new tool easy and safe to operate,
and, with proper care, it will give you many years of
dependable service.
CAUTION. Carefully read through this entire Instruction
Manual before using your new GMC Power Tool. Take
special care to heed the Cautions and Warnings.
Your GMC power tool has many features that will make
your job faster and easier. Safety, performance, and
dependability have been given top priority in the
development of this tool, making it easy to maintain
and operate.
Wear safety footwear.
Wear safety gloves.
Warning.
Read these instructions for use carefully.
Use at a distance of at least 15m from
other people.
Thrown objects and rotating blades can
cause severe injury.
Environmental protection
Explosive material.
Recycle unwanted materials instead of
disposing of them as waste. All tools, hoses
and packaging should be sorted, taken to
the local recycling centre and disposed of
in an environmentally safe way.
Extremely hot surface. Do not touch a hot
muffler, gear box or cylinder, you may get
burned. These parts get extremely hot from
operation and remain hot for a short time after
the unit is turned off.
Caution before carrying out any operation stop
the engine and disconnect the spark plug cap.
Caution. Risk of hand and feet injuries
3
Specifications
Engine:
Speed:
Width of cut:
Blades:
Height adjustment:
Grass catcher capacity:
Equivalent Spark plugs:
Sound pressure value:
Weight:
• Thoroughly inspect the area where the equipment is to
be used and remove all objects which may be thrown
by the machine or damage the cutter assembly and the
engine (stones, sticks, metal wire, bones, etc.)
• WARNING: DANGER! Engine fuel is highly flammable:
– Store fuel in containers specifically designed for this
purpose.
– Refuel using a funnel and outdoors only. Do not smoke
while refuelling or whenever handling the fuel.
– Add fuel before starting the engine. Never remove the
cap of the fuel tank or add fuel while the engine is
running or when the engine is hot.
– If fuel is spilled, do not attempt to start the engine but
move the machine away from the area of spillage and
avoid creating any source of ignition until the fuel has
evaporated and the vapour dispersed.
– Replace all fuel tanks and containers caps securely.
• Substitute faulty silencers.
• Before use, always inspect the machine, especially the
condition of the blades, and check that the screws and
cutting assembly are not worn or damaged. Replace
worn or damaged blades and screws in sets to preserve
balance.
• Discharge openings must be guarded at all times. Do
not remove the discharge guard or hold it up while
mowing.
• It is advisable to wear suitable eye protection when
operating the mower.
Operation
• Do not operate the engine in a confined space where
dangerous carbon monoxide fumes can collect.
• Mow only in daylight or good artificial light.
• If possible, avoid operating the equipment in wet grass.
• Always be sure of your footing on slopes.
• Walk, never run and do not allow yourself to be pulled
along by the lawn mower.
3.75HP, 4 Stroke
0 - 3000min-1
18” 460mm
4 Swing back
10 Levels, 15-70mm
60L
CHAMPION RJ19LM
DENSO W9LMR-US
NGK BR2LM
96dB(A)
27kg
Safety rules for petrol lawn mowers
Training
• Read the instructions carefully. Get familiar with the
controls and proper use of the equipment.
• Only use the lawn mower for the purpose for which it
was designed, i.e. for cutting and collecting grass. Any
other use can be hazardous, causing damage to the
machine.
• Never allow children or people unfamiliar with these
instructions to use the lawn mower. Local regulations
may restrict the age of the operator.
• Never use the lawn mower:
– When people, especially children, or pets are nearby.
– If the operator has taken medicine or substances that
can affect his ability to react and concentrate.
• Remember that the operator or user is responsible for
accidents or hazards occurring to other people or their
property.
Preparation
• While mowing, always wear sturdy footwear and long
trousers. Do not operate the equipment when barefoot
or wearing open sandals.
4
• Mow across the face of slopes, never up and down.
• Exercise extreme caution when changing direction on
slopes.
• Do not mow on slopes of more than 20°.
• Exercise extreme caution when pulling the lawn- mower
towards you.
• Stop the blade if the lawn mower has to be tilted for
transportation when crossing surfaces other than grass,
and when transporting the lawn mower to and from the
area to be mowed.
• Never operate the lawn mower with defective guards, or
without safety devices, such as the stoneguard and/or
grass-catcher, in place.
• Do not change the engine governor settings or over
speed the engine.
• On power-driven models, disengage the drive clutch
before starting the engine.
• Start the engine carefully, following the instructions
and keeping feet well away from the blade.
• Do not tilt the lawn mower when starting the engine.
Start the engine on a flat surface that is free of
obstacles and tall grass.
• Do not put hands or feet near or under rotating parts.
Keep clear of the discharge opening at all times.
• Never pick up or carry a lawn mower while the engine is
running.
• Stop the engine and disconnect the spark plug wire:
– Before carrying out any work underneath the cutting
deck or before unclogging the chute;
– Before checking, cleaning or working on lawn mower;
– After striking a foreign object. Inspect the lawn mower
for damage and make repairs before restarting and
operating the lawn mower;
– If the lawn mower starts to vibrate abnormally (find
and remove the cause of the vibration immediately).
• Stop the engine:
– Whenever you leave the lawn mower unattended.
Remove the key from models with electric starters.
– Before refuelling.
– Every time you remove or replace the grass-catcher.
• Reduce the throttle before turning off the engine and
turn the fuel off when you have finished mowing,
following the instructions in the engine handbook.
• When mowing, always keep to a safe distance from
the rotating blade. This distance is the length of the
handle.
• Never cut grass while walking backwards.
• Stop the engine before pushing mower across gravel
drives, walks or roads.
Maintenance and storage
• Keep all nuts, bolts and screws tight to be sure the
equipment is in safe working condition. Regular
maintenance is essential for safety and performance.
• Never store the equipment with fuel in the tank inside
a building where vapour may reach a flame or a spark
or a source of extreme heat.
• Allow the engine to cool before storing in an enclosed
space.
• To reduce the fire hazard, keep the engine, exhaust
silencer, battery compartment and fuel storage area
free of grass, leaves, or excessive grease. Do not leave
containers with grass cuttings in rooms.
• Check the stone-guard and grass-catcher frequently for
wear and deterioration.
• If the fuel tank has to be drained, this should be done
outdoors and when the engine is cool.
• Wear strong work gloves when removing and
reassembling the blade.
5
• Check the blade’s balance after sharpening.
• For reasons of safety, do not use the equipment with
worn or damaged parts. Parts are to be replaced and
not repaired. Parts that are not of the same quality
can damage the equipment and be dangerous for your
safety.
• Whenever the machine is to be handled, transported or
tilted you must:
– wear strong working gloves;
– grasp the machine at the points that offer a safe grip,
taking account of the weight and its distribution.
• Damaged blades and worn bolts are major hazards.
Unpacking
Due to modern mass production techniques, it is unlikely
that your GMC Power Tool is faulty or that a part is
missing. If you find anything wrong, do not operate the
tool until the parts have been replaced or the fault has
been rectified. Failure to do so could result in serious
personal injury.
Contents of carton
• Handle bar locking knobs, with bolts and washers x2
• Catcher
6
1
Know your product
1. Handle bar
2. Lower handle
3. Throttle Lever
4. Discharge guard
5. Grass catcher bag
6. Height adjustment lever
7. Fuel tank cap
8. Oil filter cap
9. Recoil starter
10. Spark plug cap
11. Air filter
12. Primer bulb
13. Handle bar locking knob
3
2
13
4
5
9
11
8
7
12
6
10
7
Assembly
Cutting height adjustment
It is necessary to fit the lower handle (2), handle bar
(1), and catcher (5) to the mower.
The GMC mower has one lever to easily adjust the cutting
height. There are 10 height settings.
1. To decrease the cutting height pull the height
adjustment lever (6) out and move it up a notch,
towards the handlebar.
2. To increase the cutting height
2
pull the lever out and move
it down a notch, towards the
motor.
Note. If you are unsure of which
cutting height to use, begin with
a high setting and trial a small
section of lawn, then check the
appearance of the lawn. Then
readjust if necessary.
Attaching the grass catcher bag
1. Lift up the discharge guard
1
(4) and hook the catcher
onto the rod.
2. To remove the catcher, raise
the discharge guard, grab the
catcher by the handle and
lift it off the bar.
Note. Always empty the catcher
before it has reached maximum capacity, otherwise it will
decrease the performance of the mower.
Attaching the Handles
It is necessary to attach both
1
the lower handle and handle
bars.
1. To attach the lower handle,
first use a spanner to remove
the 4 bolts.
2. Place the lower handle in
position and replace the 4
bolts. Use the spanner to retighten the nuts.
3. To attach the handle bar, first remove the two handle
bar locking knobs (14).
3
Fuelling
Note. Use fresh unleaded petrol.
1. Unscrew the fuel tank cap (7)
1
and pour the unleaded petrol
into the tank with the aid of a
funnel.
2. Fill the tank to approximately
2.5 cm below the lowest
portion of the neck to allow
for fuel expansion. Be careful
not to over fill.
3. Be careful not to spill any petrol, if this happens, wipe
the spill with a clean rag.
4. Start the engine at least three meters away from the
area where the fuel tank has been filled in order to
avoid the risk of fire.
WARNING. Never attempt to refuel the engine while it is
running or still warm, allow it to cool before fuelling.
Note. For further information refer to the Fuel
Recommendations section in the Briggs & Stratton
instruction manual.
3
4. Position the handle bar over the lower handle and
insert the two locking knobs, and tighten to secure the
handles together.
8
Checking the oil
2. Push the primer bulb firmly 5 times (for initial starting)
or 3 times (for engine starting there after).
Caution. The lawn mower is shipped without oil. Do not
start your lawn mower before ensuring it has been filled
with the right amount of correct grade oil. Refer to the
oil recommendations section of the Briggs & Stratton
instruction manual for this information.
1. Move the lawn mower to
1
a level surface and clean
around the oil filter cap (8).
2. Remove the oil filter cap
with dipstick and wipe it
with a clean cloth. Replace it
and retighten the cap.
3. Remove the dipstick again
and check the oil level, the
oil should be at the full
3
mark.
4. If oil is required add it slowly
(the oil capacity is about 0.6
litre), do not over fill.
5. Retighten the oil filter cap
firmly before starting the
engine.
3
2
3. Pull the recoil starter (9) lightly until you feel resistance
then pull quickly until the engine starts. Do not pull the
cord with a jerk or release it until fully rewound.
4. Once the lawn mower has started and warmed up move
the throttle lever to the Run position.
Stopping the engine
To stop the engine, move the throttle lever (3) to the
stop position.
Cold Start
Run
Starting the engine
Note. Before starting the mower check the oil and fuel
levels.
1. Move the throttle lever (3) to the cold start position.
1
Cold Start
Hot
Start
Stop
Mowing advice
Cold Start
Run
Hot
Start
Stop
9
Stop
Position
1. It is recommended to use the fast throttle setting and
keep the engine running at maximum speed. This will
deliver the best cut. If the speed of the engine slows
this could indicate the mower is being overloaded, by
trying to cut to much grass. Try mowing a narrower
strip, mowing slower or raise the cutting height.
2. Sharp blades cut cleanly and efficiently, if the blade is
dull it will tear the grass. This will result in the ends
turning brown. When the blades no longer cut cleanly
either sharpen them or replace them.
Emptying the grass catcher bag
3. To safely operate the mower ensure all four wheels are
on the ground and be careful not to loose your footing
or control of the mower. Be very careful when mowing
uneven or rough ground. Keep a firm grip on the handle
bar at all times, always walk, never run with the mower.
4. For healthy growth, grass should not be cut too short.
This can cause damage to the grass and allow weeds to
develop.
5. Vary your cutting pattern from week to week, this will
help to prevent matting and graining of the grass.
6. Before checking a clogged mower deck stop the engine
completely and disconnect the spark plug cover and
then tilt the mower so the air filter side is facing
upwards. Use a stick the clear any clogged material,
never use your hands.
7. Mowing wet grass should be avoided. Wet grass will
clog the mower deck and if it is slippery you may loose
your footing.
8. Always mow across slopes not up and down them. Be
extra careful if the grass is wet as this could cause you
to slip and loose control of the mower.
9. If the ground is to dry, mowing will stir up a lot of
dust which may clog the air filter. In these conditions
it is recommended to water your lawn the day before
mowing.
10. Use the side of the mower as a guide to cut close to
large objects such as a fence or a wall. Be careful
when mowing over obstacles embedded in the lawn
such as sprinkler systems and paving, avoid anything
that sticks up above the surface of the lawn.
11. Avoid mowing over loose stones, gravel and other
landscaping material as this can be picked up by the
mower and flung out causing serious personal injury.
12. If the blades do come into contact with something
or the mower starts to vibrate stop the engine
immediately, remove the spark plug cover and inspect
to see if there is any damage.
Note. Before making any adjustment or maintenance
procedures to the mower ensure it is turned off and the
spark plug cover is removed.
1. To remove the catcher, raise the discharge guard, grab
the catcher by the handle and lift it off the bar.
2. Empty the grass from the catcher by holding it vertical,
shake it if necessary to dislodge the full contents.
Grass catcher maintenance
Warning. Check the catcher bag frequently for damage or
wear, and replace it if worn.
The fabric grass catcher requires air to flow through the
fabric for effective grass collection.
Wash it if necessary to restore the open mesh in the fabric.
Do not leave the fabric bag in direct sunlight, prolonged
sun exposure can cause permanent breakdown of the
material.
Do not leave clippings in the catcher for extended periods.
Replacing the blades
Note. Before making any adjustment or maintenance
procedures to the mower ensure it is turned off and the
spark plug cover is removed.
Note. Wear heavy gloves to protect your hands.
1. Tilt the mower back so the spark plug is facing up.
2
10
3
2. Remove the blade disc with a spanner to remove the
central blade bolt first.
3. Remove all 4 single blades including the washer and nuts.
4. Clean dirt and grass from around the blade mounting area.
5. Replace all 4 blades to
5
ensure a smooth even cut.
By replacing the washer, then
the half washer, then the nut
securing the blade firmly, (25
- 30Nm) repeat this for the
other 3 blades.
6. Replace the blade disc and
retighten the central blade
bolt tightly (50 - 59Nm).
Note. Use a wooden block to stop the blade from turning.
The 4 blades should be tightened fully but check to ensure
they can still swing back if they were to hit a solid object.
Where required tighten the bolts with a torque wrench,
the centre disc blade bolt torque: 50 - 59Nm and the four
blades torque: 25 - 30Nm.
If you do not have a torque wrench ask a mower service
dealer to tighten the blade bolts before you use the
mower.
WARNING. If the blade bolts are not tightened correctly
they could loosen and/or come out and it would be
possible for the blades to fly off while you are operating
the mower.
Maintenance
For all maintenance information refer to the Briggs &
Stratton instruction manual.
11
Carefully read the entire Instruction Manual
before using this product.
Before returning this product for a
Warranty Claim or any other reason
Please Call 1300 880 001 (Australia)
or 0800 445 721 (New Zealand)
When you make your call, please have
the following information at hand:
With continuing product development changes may
have occurred which render the product received
slightly different to that shown in this instruction
manual. The manufacturer reserves the right to
change specifications without notice. Note:
Specifications may differ from country to country.
• GMC Product Type • GMC Product Code
A GMC Service Engineer will take your call and, in
most cases, will be able to solve your problem over
the phone.
You are welcome to use this phone-in service to
make suggestions or give comments about any
GMC product.
45–55 South Centre Road
Melbourne Airport
Victoria, Australia 3045
Tel: (03) 8346 1100 Fax: (03) 8346 1200
The GMC 777 Helpline operates from 7am to
7pm, 7 days a week (EST). This allows you
to contact GMC directly with any queries and
technical questions you have regarding
our products.
Save this Manual for future reference.