1
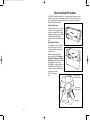
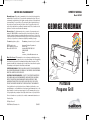
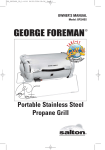
GR_GP324P_IB_7-2-05 3/7/05 4:32 PM Page 1
OWNER’S MANUAL
LIMITED ONE-YEAR WARRANTY
Warranty Coverage: This product is warranted to be free from defects in materials or
workmanship for a period of one (1) year from the original purchase date. This product warranty is extended only to the original consumer purchaser of the product and
is not transferable. For a period of one (1) year from the date of original purchase of
the product, our Repair Center will, at its option, either (1) repair the product or (2)
replace the product with a reconditioned comparable model. These remedies are the
purchaser's exclusive remedies under this warranty.
Model: GP324P
GEORGE FOREMAN
Warranty Service: To obtain warranty service, you must call our warranty service
number at 1-800-233-9054 for return instructions on how to deliver the product, in
either the original packaging or packaging affording an equal degree of protection
to the Repair Center specified below. You must enclose a copy of your sales receipt
or other proof of purchase to demonstrate eligibility for warranty coverage.
To return the appliance, ship to:
To contact us, please write to, call, or email:
ATTN: Repair Center
708 South Missouri Street
Macon, MO 63552 USA
Consumer Relations Department
PO Box 7366
Columbia MO 65205-7366 USA
1-800-233-9054
E-mail:
[email protected]
What Is Not Covered: This warranty does not cover damage resulting from misuse,
accident, commercial use, improper service or any other damage caused by anything
other than defects in material or workmanship during ordinary consumer use. This
warranty is invalid if the serial number has been altered or removed from the product.
This warranty is valid only in the United States and Canada.
LIMITATION ON DAMAGES: THERE SHALL BE NO LIABILITY FOR ANY INCIDENTAL
OR CONSEQUENTIAL DAMAGES FOR BREACH OF ANY EXPRESS OR IMPLIED WARRANTY OR CONDITION ON THIS PRODUCT.
DURATION OF IMPLIED WARRANTIES: EXCEPT TO THE EXTENT PROHIBITED BY
APPLICABLE LAW, ALL IMPLIED WARRANTIES AND CONDITIONS, INCLUDING,
WITHOUT LIMITATION, IMPLIED WARRANTIES AND CONDITIONS OF MERCHANTABILITY AND FITNESS FOR A PARTICULAR PURPOSE OR USE ON THIS
PRODUCT ARE LIMITED IN DURATION TO THE DURATION OF THIS WARRANTY.
Some jurisdictions do not allow the exclusion or limitation of incidental or consequential damages, or allow limitations on how long an implied warranty lasts, so the
above limitations or exclusions may not apply to you. This warranty gives you specific legal rights and you may have other rights under the laws of your jurisdiction.
For more information on our products, visit our website: www.maxim-toastmaster.com
Printed in China
"All Rights Reserved"
© 2005 Maxim®/Toastmaster® Inc.
P/N 61655
Portable
Propane Grill
®
GR_GP324P_IB_7-2-05 3/7/05 4:32 PM Page 3
FOR YOUR SAFETY
If you smell gas:
1.
2.
3.
4.
Shut off gas to the appliance.
Extinguish any open flame.
Open Lid.
If odor continues, immediately call your gas supplier or your
fire department.
WARNING
1. Do not store spare LP cylinder within 10 feet (3.05 m) of this
appliance.
2. Do not store or use gasoline or other flammable liquids or
vapors within 25 feet (7.62 m) of this appliance.
FOR YOUR SAFETY
1. Do not store or use gasoline or other flammable vapors and
liquids in the vicinity of this or any other appliance.
2. An LP cylinder not connected for use shall not be stored in
the vicinity of this or any other appliance.
2
19
GR_GP324P_IB_7-2-05 3/7/05 4:32 PM Page 5
IMPORTANT SAFEGUARDS
WARNING: A risk of fire or explosion exists in all propane grills. Read
this manual before use. Failure to follow all instructions may result in
serious personal injury, property damage, or death.
When using propane grills, basic safety precautions should always be
followed to reduce the risk of fire and injury to persons, including the following:
1. Read all instructions before using the grill.
2. Do not touch hot surfaces. Use handles or knobs and oven mitts or
pot holders.
3. Keep children and pets away from the grill at all times.
4. This grill is not for use by children.
5. Do not leave this grill unattended while in use.
6. Do not move the grill when in use. Allow to cool before moving,
putting on or taking off parts, and before cleaning and storing the
grill.
7. To disconnect, turn Temperature Control Knob to LOCK/OFF.
8. Do not operate any grill after the grill malfunctions, or has been
dropped or damaged in any manner. Contact Consumer Service for
return authorization, examination, repair or adjustment.
9. The use of accessory attachments not recommended by the grill
manufacturer may cause injuries.
10. This grill is for outdoor use only. NEVER operate grill in enclosed
areas, as this could lead to gas accumulating from a leak, causing
an explosion or a carbon monoxide buildup which could result in
injury or death. DO NOT USE in garages, sheds or any enclosed
areas.
11. Do not use grill for other than intended use.
12. Extreme caution must be used when moving a grill containing hot oil
or other hot liquids. Allow liquid to cool before removing. Do not
remove Grilling Rack and Flame Diffuser/Drip Tray from Grill Body
until Grill is cool.
13. Do not attempt to dislodge food or clean the grill when it is hot.
14. Fuel, such as charcoal briquettes, is not to be used with this grill.
SAVE THESE INSTRUCTIONS
THIS GRILL IS NOT FOR COMMERCIAL USE.
FOR OUTDOOR USE ONLY.
18
3
GR_GP324P_IB_7-2-05 3/7/05 4:32 PM Page 7
Additional Important Safeguards
1.
2.
3.
4.
5.
6.
7.
8.
9.
10.
11.
12.
13.
14.
15.
16.
17.
18.
19.
20.
21.
22.
23.
CAUTION: This grill generates heat and escaping steam during use. Proper
precautions must be taken to prevent the risk of burns, fires or other damage
to persons or property. Use of protective oven mitts or gloves is recommended.
All users of this grill must read and understand this Owner's Manual before
operating or cleaning this grill.
When using this grill, provide adequate air space above and on all sides for air
circulation. Do not allow this grill to touch clothing, dish towels or other flammable materials during use.
IMPORTANT: Minimum clearance of 16 inches around all sides of the grill
should always be maintained and the appliance shall not be located under overhead unprotected combustible construction.
If this grill begins to malfunction during use, immediately turn the Temperature
Control Knob to LOCK/OFF. Do not use or attempt to repair the malfunctioning
grill.
This outdoor cooking gas grill is not intended for use in or on recreational vehicles and/or boats.
The use of alcohol, prescription or non-prescription drugs may impair the consumer’s ability to properly assemble or safely operate the grill.
When cooking with oil/grease, fire extinguishing materials shall be readily
accessible. In the event of an oil/grease fire do not attempt to extinguish with
water. Use Type BC dry chemical fire extinguisher or smother fire with dirt, sand
or baking soda.
In the event of rain while cooking with oil/grease, cover the cooking grid immediately and turn off the grill burner and gas supply. Do not attempt to move the
grill.
When cooking, the grill must be on a level and stable surface in an area clear of
combustible materials. An asphalt surface (blacktop) may not be acceptable for
this purpose.
Make sure the Temperature Control Knob is in the LOCK/OFF position when
placing the Flame Diffuser/Drip Tray and Grilling Rack into position.
The grill is not intended for and should never be used as a heater.
Keep grill area clear and free from combustible materials, gasoline and other
flammable vapors and liquids.
Do not obstruct the flow of combustion and ventilation air.
Always open Lid before lighting your grill.
Do not attempt to disconnect the Regulator or any gas fitting while the unit is in
operation.
Do not wear clothing with loose flowing sleeves while lighting or using the grill.
Use barbecue tools with long, heat-resistant handles.
The Grill should never face directly into the wind.
Do not operate Grill in a high-traffic area.
After use, allow Grill to cool completely before cleaning.
We recommend storing Grill indoors or, if unable to store indoors, always cover
Grill with protective cover. Always keep out of the reach of children.
IMPORTANT: Do not use the Grill unless it is COMPLETELY assembled and all
parts are securely fastened and tightened.
4
17
GR_GP324P_IB_7-2-05 3/7/05 4:32 PM Page 9
Special Instructions for the Use of Regulator
and LP (Propane) Cylinders
• The propane grill is equipped with a regulator
CGA No. 600
having a CGA No. 600 cylinder connection
device which is for connecting to a one pound
PROPANE cylinder ONLY. See Illustration.
• Grill installation must conform with local
codes, or in the absence of local codes, with
the National Fuel Gas Code, ANSI Z223.1/NFPA
54, Storage and Handling of Liquefied
Petroleum Gases, ANSI/NFPA 58 or CSA
B149.1, Natural Gas and Propane Installation Code.
• Use grill only with LP (propane) gas. Use grill only with the regulator/valve
assembly supplied.
• Never use charcoal briquettes or lighter fluid in a gas grill.
• Discard used and empty fuel cylinder in a safe place.
• Store spare fuel canisters in a well-ventilated area away from the grill.
• Do not puncture or burn fuel canister.
• Do not operate the grill if there is a gas leak present.
• Do not enlarge orifice or burner ports when cleaning the regulator and burner.
• If you smell gas, turn Temperature Control Knob to LOCK/OFF to shut off gas to
the grill. Extinguish any open flame and open Lid. If odor continues, immediately call your gas supplier or your fire department.
• Do not store or use gasoline or other flammable vapors and liquids in the vicinity of this or any other grill.
• An LP cylinder not connected for use shall not be stored in the vicinity of this
or any other appliance.
• The LP-gas supply cylinder to be used must be constructed and marked in
accordance with the specifications for LP-gas cylinders of the U.S. Department
of Transportation (DOT) CFR 49 or the National Standard of Canada, CAN/CSAB339, Cylinders, Spheres and Tubes for the Transportation of Dangerous Goods.
• If the grill is not in use, the Temperature Control Knob must be turned to
LOCK/OFF to shut off the gas cylinder. Storage of a grill indoors is permissible
only if the cylinder is disconnected and removed from the grill. Cylinders must
be stored outdoors out of the reach of children and must not be stored in a
building, garage or any other enclosed area.
• Do not store a spare LP-gas cylinder under or near this appliance. If the
instructions are not followed exactly, a fire causing death or serious injury may
occur.
• The regulator may make a humming or whistling noise during operation. This
will not affect safety or use of grill.
• Save cylinder cap and reinstall when not in use.
• Cylinder supply system must be arranged for vapor withdrawal. The gas cylinder must be upright in use. Do not block the pressure relief valve during use or
storage.
• Always remove one pound cylinder from grill when transporting and when not
in use.
16
5
GR_GP324P_IB_7-2-05 3/7/05 4:32 PM Page 11
Getting To Know Your GP324P
Portable Propane Grill
1
2
3
4
5
6
7
8
14
9
15
12
10
11
13
16
1 Grilling Rack (P/N 22522)
2. Flame Diffuser/Drip Tray
(P/N 22523)
3. Handle (P/N 22524)
4. Lid
5. Warming Rack Assembly
(P/N 22525)
6. Flame Diffuser Support
7. Grilling Rack Support
8.
9.
10.
11.
12.
13.
14.
15.
16.
6
Grill Body
Ignitor Assembly
Flame Viewing Hole
Match Holder (P/N 21656)
Burner Assembly
Folding Leg
Venturi Tube
Temperature Control Knob
Regulator Assembly (P/N 22526)
15
GR_GP324P_IB_7-2-05 3/7/05 4:32 PM Page 13
Take-It and Grill-It Positions
The GP324P Portable Propane Grill is compact enough to transport to any
grilling location. Take-It from storage to patio, to a picnic in the park, or off
on a camping trip. The portable Propane Grill easily transforms from the
Take-It to the Grill-It position.
Storage and Transport
In this position the Grill is compact
enough for space saving storage
and easy carrying. Both Grill Legs
fold neatly and securely around the
Grill Body and the Regulator
Assembly can be stored within the
Grill.
Preparation For Grilling
Place the Grill on a flat, stable surface. Pull the Legs out on each
side and swing them down until
locked in place.
Attach the Regulator and the
propane cylinder. See Attaching
Propane Gas Cylinder and Before
First Use for details. Make sure the
Flame Diffuser is in place, the
Grilling Rack is in place above the
Flame Diffuser and the propane
cylinder is properly attached and
positioned, as shown.
The Grill is ready for
Proper Position
use.
of Propane Tank
Temperature
Control Knob
Propane
Tank
14
7
Regulator
GR_GP324P_IB_7-2-05 3/7/05 4:32 PM Page 15
Before First Use
1. Remove the grill and any packaging materials from the shipping carton.
2. Place the Grill on a flat, level surface.
3. Pull out the front Leg in a sideways motion then swing it down while lifting
up on the Grill. The Leg will 'snap' into place when properly positioned.
Repeat this procedure with the rear Leg. Raise the Lid and remove the
Warming Rack, the Grilling Rack and the Flame Diffuser.
4. Wash these parts in warm, soapy water. Rinse and dry thoroughly. Wipe the
Grill Body and Lid with a damp cloth to remove any dust.
5. Place the Flame Diffuser into the Grill Body above the Burner Assembly,
making sure it properly rests upon the two rear tabs and the center tab at
the front
6. Place the Grilling Rack above the Flame Diffuser, making sure it properly
rests upon the four triangular supports in each corner of the Grill Body.
7. Note that the Warming Rack has two support bars and requires some minor
assembly. The support bar located at the front of the Warming Rack has
extension legs that insert into the pivot points located in the Grill Body. The
support bar at the back of the Warming Rack has extensions that insert into
the pivot points located in the Lid. Position the Warming Rack above the
Grilling Rack and insert the two extension legs into their pivot points in the
Grill Body. Raise the Warming Rack and insert the two extensions at the
back of the Warming Rack into their pivot points in the Lid. When the Lid is
closed, the Warming Rack pivots down toward the Grilling Rack. As the Lid
opens, the Warming Rack pivots up, allowing free access to food on the
Grilling Rack.
Pivot Point
in Lid
Warming
Rack
Extension
Leg
Pivot Point
in Grill Body
8
PLEASE NOTE: The United States Department of Agriculture recommends that meat and poultry be cooked to the following internal temperatures to be sure any harmful bacteria has been killed. Ground turkey and
chicken should be cooked to an internal temperature of 165˚ F and
ground beef, veal, lamb and pork should be cooked to an internal temperature of 160˚ F. Chicken and turkey should be cooked to an internal
temperature of 170˚ F for white meat and 180˚ F for dark meat. Goose
and duck should be cooked to an internal temperature of 180˚ F. Fresh
beef, veal and lamb, etc. should be cooked to an internal temperature of
at least 145˚ F. Fresh pork should be cooked to an internal temperature of
at least 160˚ F. When reheating meat and poultry products, they should
also be cooked to an internal temperature of 165˚ F.
13
GR_GP324P_IB_7-2-05 3/7/05 4:32 PM Page 17
Instructions For Cleaning
CAUTION: Grill surfaces are hot during use. Allow Grilling Rack, Flame
Diffuser, Lid and Grill Body to cool completely before handling and cleaning.
1. Turn the Temperature Control Knob to the LOCK/OFF position and allow the
Grill to cool before disassembling and cleaning.
2. Remove the propane cylinder and Regulator Assembly.
3 Remove the Grilling Rack and the Flame Diffuser/Drip Tray. Empty the
Drip Tray compartments.
4. Wash both parts with warm, soapy water and a plastic scouring pad. Rinse
and dry thoroughly. Do not use steel wool, coarse scouring pads or harsh or
abrasive cleaners. If necessary, use a nylon bristle brush to loosen hardened food particles.
5. Wash exterior parts with a soft sponge and warm clear water. Nonabrasive
cleaners may also be used.
6. Use a damp cloth to clean the inside of the Lid and Grill Body.
Cleaning the Burner Assembly
IMPORTANT: Clean the burner assembly prior to use after storing, at the beginning of the grilling season or an inactive period of one month. Spiders and
insects like to build nests in burner tubes, especially during colder months. The
nests can cause fires in burner tubes or under grill.
In order to clean the inside of the Venturi tube, it's not necessary to remove the
Burner Assembly. However, remove the propane cylinder, Regulator Assembly,
Grilling Rack and Flame Diffuser/Drip Tray. Turn the Grill Body on it's left-hand
side and look into the open Venturi tube with a flashlight. If necessary, clean it
out with a pipe cleaner.
Clean the outside of the Burner Assembly with a paper towel or damp sponge.
Open any clogged holes with a thin wire.
Storing Your Propane Grill
1. Clean the Grill as instructed above.
2. Cover Grill when stored outdoors.
3. Store Grill indoors only if the propane cylinder is turned off and disconnected, removed from Grill and stored outdoors in a well-ventilated space and
out of the reach of children..
4. When removing Grill from storage, follow the Cleaning the Burner Assembly
instructions before starting the Grill.
Any servicing requiring disassembly other than the above cleaning must be performed by an authorized appliance repair technician.
Attaching Regulator Assembly and
Propane Gas Cylinder
1. Securely screw the Regulator Assembly
onto the Venturi Tube.
2. Turn the Temperature Control Knob to the
LOCK/OFF Position. Push the one pound
propane cylinder slightly into the valve
while turning counterclockwise until a
snug fit is obtained. Do not turn the
propane cylinder upside down while
attaching to the Regulator Assembly.
Propane
Cylinder
Testing for Leaks
SAFETY PRECAUTIONS:
• Test for leaks outdoors in a well ventilated area.
• Test all gas connections for leaks before
using your propane grill.
• Test for leaks every time you connect the
gas supply.
• Do not smoke while checking for leaks.
• DANGER - Do not use an open flame to
check for gas leaks. Be sure there are no sparks or open flames in the
area while you check for leaks. This will result in a fire or explosion
which can cause serious bodily injury or death, and damage to property.
1. Mix a couple tablespoons of liquid detergent with an equal amount of
water. Use mild soap and water. DO NOT USE HOUSEHOLD CLEANING
AGENTS.
2. Be sure that the Temperature Control Knob is in the LOCK/OFF position.
3. Use a clean paint brush to apply soapy solution onto connection
between gas cylinder and Regulator orifice, and watch for bubbles.
4. If bubbles form or if a bubble grows, there is a leak. Retighten connection and repeat steps (2) and (3).
NOTE: If you cannot stop a leak, remove gas cylinder and check for damaged threads, dirt and debris at the connection and gas cylinder. Also check
to see if anything is obstructing flow of gas at the connection and gas cylinder openings. Remove any obstruction that may be found and repeat leak
test.
Do NOT ship gas cylinder if product needs service or repair.
12
Regulator
Assembly
9
GR_GP324P_IB_7-2-05 3/7/05 4:32 PM Page 19
How To Use the George Foreman®
GP324P Propane Grill
How To Use the George Foreman®
GP324P Propane Grill (Cont.)
Grilling Instructions:
Checking the Ignitor:
NOTE: Always open Lid before lighting your Grill.
The Temperature Control Knob must be in the “LOCK/OFF” position. Press
the Ignitor button rapidly. A “CLICK” should be heard and a spark seen
through the Flame Viewing Hole.
Lighting Burner with Ignitor:
1. Turn Temperature Control Knob counterclockwise to “OFF“, push in, and
then turn the Temperature Control knob to "HIGH".
2. To light, rapidly push the Ignitor button down until it "clicks". Use Flame
Viewing Hole to be sure all burner ports light and stay lit.
3. If Ignitor does not work, turn the Temperature Control Knob to LOCK/OFF.
Open the Lid, remove the Grilling Rack and the Flame Diffuser to allow
the gas to dissipate. Wait five minutes, then follow the match lighting
instructions below.
Lighting Burner with Matches:
1. Secure a paper match to Match Holder,
light the match with a second lit match,
and place lit match through the Flame
Viewing Hole to the nearest burner port.
2. Turn Temperature Control Knob counterclockwise to “OFF”, push in, and
then turn the Temperature Control Knob to “HIGH”.
WARNING: If burner does not light within 5 seconds, turn Temperature
Control Knob to the LOCK/OFF position. Make sure the Lid is open and
remove the Grilling Rack and Flame Diffuser to allow the gas to dissipate.
Wait 5 minutes, then try again.
1. Light burner and turn the Temperature
High
Control Knob from HIGH to LOW. Check
the flame through the Flame Viewing
Low
Hole, making sure the burner is lit.
2. To preheat: Close the Lid and preheat on HIGH for 8 minutes. During the
first use, you may notice a slight odor caused by the curing of manufacturing oils. IMPORTANT: Do not close the Lid for more than 8 minutes,
or without food loaded on the Grilling Rack.
3. After the 8 minute preheat period, carefully open the Lid and place food
onto the Grilling Rack. Cook until done, turning at least once halfway
through cooking time for most foods. Adjust flame with Temperature
Control Knob as needed.
4. When the food is cooked, remove with heat resistant plastic or wooden
spatula or other utensil.
CAUTION: Do not leave any utensils on the Grilling Rack surface while
it is hot.
5. When finished cooking, or when the propane cylinder is empty, turn the
Temperature Control Knob to the LOCK/OFF position and remove the
propane cylinder.
6. Allow the Grill to cool before disassembling and cleaning.
Grilling Hints and Tips
•
•
•
•
•
•
•
10
Use tender cuts of meat for grilling.
Marinate tougher cuts of meat to tenderize them before grilling.
To avoid drying out meat and fish, turn only once and do not pierce.
To turn meat and fish, use a large, flat, heat resistant plastic or wooden
spatula to support the food.
Place meat or chicken to be roasted in a shallow baking pan. Using
oven mitts carefully place pan on preheated Grill, taking care not to
scratch the non-stick surface. Place Lid on the Grilling Rack.
Adjust heat setting gradually and only as necessary. Cooking foods at
too high a temperature can cause them to dry out.
When grilling fish or chicken breast fillets, tuck extremely thin parts
under to prevent over cooking.
11
GR_GP324P_IB_7-2-05 3/7/05 4:32 PM Page 17
Instructions For Cleaning
CAUTION: Grill surfaces are hot during use. Allow Grilling Rack, Flame
Diffuser, Lid and Grill Body to cool completely before handling and cleaning.
1. Turn the Temperature Control Knob to the LOCK/OFF position and allow the
Grill to cool before disassembling and cleaning.
2. Remove the propane cylinder and Regulator Assembly.
3 Remove the Grilling Rack and the Flame Diffuser/Drip Tray. Empty the
Drip Tray compartments.
4. Wash both parts with warm, soapy water and a plastic scouring pad. Rinse
and dry thoroughly. Do not use steel wool, coarse scouring pads or harsh or
abrasive cleaners. If necessary, use a nylon bristle brush to loosen hardened food particles.
5. Wash exterior parts with a soft sponge and warm clear water. Nonabrasive
cleaners may also be used.
6. Use a damp cloth to clean the inside of the Lid and Grill Body.
Cleaning the Burner Assembly
IMPORTANT: Clean the burner assembly prior to use after storing, at the beginning of the grilling season or an inactive period of one month. Spiders and
insects like to build nests in burner tubes, especially during colder months. The
nests can cause fires in burner tubes or under grill.
In order to clean the inside of the Venturi tube, it's not necessary to remove the
Burner Assembly. However, remove the propane cylinder, Regulator Assembly,
Grilling Rack and Flame Diffuser/Drip Tray. Turn the Grill Body on it's left-hand
side and look into the open Venturi tube with a flashlight. If necessary, clean it
out with a pipe cleaner.
Clean the outside of the Burner Assembly with a paper towel or damp sponge.
Open any clogged holes with a thin wire.
Storing Your Propane Grill
1. Clean the Grill as instructed above.
2. Cover Grill when stored outdoors.
3. Store Grill indoors only if the propane cylinder is turned off and disconnected, removed from Grill and stored outdoors in a well-ventilated space and
out of the reach of children..
4. When removing Grill from storage, follow the Cleaning the Burner Assembly
instructions before starting the Grill.
Any servicing requiring disassembly other than the above cleaning must be performed by an authorized appliance repair technician.
Attaching Regulator Assembly and
Propane Gas Cylinder
1. Securely screw the Regulator Assembly
onto the Venturi Tube.
2. Turn the Temperature Control Knob to the
LOCK/OFF Position. Push the one pound
propane cylinder slightly into the valve
while turning counterclockwise until a
snug fit is obtained. Do not turn the
propane cylinder upside down while
attaching to the Regulator Assembly.
Propane
Cylinder
Testing for Leaks
SAFETY PRECAUTIONS:
• Test for leaks outdoors in a well ventilated area.
• Test all gas connections for leaks before
using your propane grill.
• Test for leaks every time you connect the
gas supply.
• Do not smoke while checking for leaks.
• DANGER - Do not use an open flame to
check for gas leaks. Be sure there are no sparks or open flames in the
area while you check for leaks. This will result in a fire or explosion
which can cause serious bodily injury or death, and damage to property.
1. Mix a couple tablespoons of liquid detergent with an equal amount of
water. Use mild soap and water. DO NOT USE HOUSEHOLD CLEANING
AGENTS.
2. Be sure that the Temperature Control Knob is in the LOCK/OFF position.
3. Use a clean paint brush to apply soapy solution onto connection
between gas cylinder and Regulator orifice, and watch for bubbles.
4. If bubbles form or if a bubble grows, there is a leak. Retighten connection and repeat steps (2) and (3).
NOTE: If you cannot stop a leak, remove gas cylinder and check for damaged threads, dirt and debris at the connection and gas cylinder. Also check
to see if anything is obstructing flow of gas at the connection and gas cylinder openings. Remove any obstruction that may be found and repeat leak
test.
Do NOT ship gas cylinder if product needs service or repair.
12
Regulator
Assembly
9
GR_GP324P_IB_7-2-05 3/7/05 4:32 PM Page 15
Before First Use
1. Remove the grill and any packaging materials from the shipping carton.
2. Place the Grill on a flat, level surface.
3. Pull out the front Leg in a sideways motion then swing it down while lifting
up on the Grill. The Leg will 'snap' into place when properly positioned.
Repeat this procedure with the rear Leg. Raise the Lid and remove the
Warming Rack, the Grilling Rack and the Flame Diffuser.
4. Wash these parts in warm, soapy water. Rinse and dry thoroughly. Wipe the
Grill Body and Lid with a damp cloth to remove any dust.
5. Place the Flame Diffuser into the Grill Body above the Burner Assembly,
making sure it properly rests upon the two rear tabs and the center tab at
the front
6. Place the Grilling Rack above the Flame Diffuser, making sure it properly
rests upon the four triangular supports in each corner of the Grill Body.
7. Note that the Warming Rack has two support bars and requires some minor
assembly. The support bar located at the front of the Warming Rack has
extension legs that insert into the pivot points located in the Grill Body. The
support bar at the back of the Warming Rack has extensions that insert into
the pivot points located in the Lid. Position the Warming Rack above the
Grilling Rack and insert the two extension legs into their pivot points in the
Grill Body. Raise the Warming Rack and insert the two extensions at the
back of the Warming Rack into their pivot points in the Lid. When the Lid is
closed, the Warming Rack pivots down toward the Grilling Rack. As the Lid
opens, the Warming Rack pivots up, allowing free access to food on the
Grilling Rack.
Pivot Point
in Lid
Warming
Rack
Extension
Leg
Pivot Point
in Grill Body
8
PLEASE NOTE: The United States Department of Agriculture recommends that meat and poultry be cooked to the following internal temperatures to be sure any harmful bacteria has been killed. Ground turkey and
chicken should be cooked to an internal temperature of 165˚ F and
ground beef, veal, lamb and pork should be cooked to an internal temperature of 160˚ F. Chicken and turkey should be cooked to an internal
temperature of 170˚ F for white meat and 180˚ F for dark meat. Goose
and duck should be cooked to an internal temperature of 180˚ F. Fresh
beef, veal and lamb, etc. should be cooked to an internal temperature of
at least 145˚ F. Fresh pork should be cooked to an internal temperature of
at least 160˚ F. When reheating meat and poultry products, they should
also be cooked to an internal temperature of 165˚ F.
13
GR_GP324P_IB_7-2-05 3/7/05 4:32 PM Page 13
Take-It and Grill-It Positions
The GP324P Portable Propane Grill is compact enough to transport to any
grilling location. Take-It from storage to patio, to a picnic in the park, or off
on a camping trip. The portable Propane Grill easily transforms from the
Take-It to the Grill-It position.
Storage and Transport
In this position the Grill is compact
enough for space saving storage
and easy carrying. Both Grill Legs
fold neatly and securely around the
Grill Body and the Regulator
Assembly can be stored within the
Grill.
Preparation For Grilling
Place the Grill on a flat, stable surface. Pull the Legs out on each
side and swing them down until
locked in place.
Attach the Regulator and the
propane cylinder. See Attaching
Propane Gas Cylinder and Before
First Use for details. Make sure the
Flame Diffuser is in place, the
Grilling Rack is in place above the
Flame Diffuser and the propane
cylinder is properly attached and
positioned, as shown.
The Grill is ready for
Proper Position
use.
of Propane Tank
Temperature
Control Knob
Propane
Tank
14
7
Regulator
GR_GP324P_IB_7-2-05 3/7/05 4:32 PM Page 11
Getting To Know Your GP324P
Portable Propane Grill
1
2
3
4
5
6
7
8
14
9
15
12
10
11
13
16
1 Grilling Rack (P/N 22522)
2. Flame Diffuser/Drip Tray
(P/N 22523)
3. Handle (P/N 22524)
4. Lid
5. Warming Rack Assembly
(P/N 22525)
6. Flame Diffuser Support
7. Grilling Rack Support
8.
9.
10.
11.
12.
13.
14.
15.
16.
6
Grill Body
Ignitor Assembly
Flame Viewing Hole
Match Holder (P/N 21656)
Burner Assembly
Folding Leg
Venturi Tube
Temperature Control Knob
Regulator Assembly (P/N 22526)
15
GR_GP324P_IB_7-2-05 3/7/05 4:32 PM Page 1
OWNER’S MANUAL
LIMITED ONE-YEAR WARRANTY
Warranty Coverage: This product is warranted to be free from defects in materials or
workmanship for a period of one (1) year from the original purchase date. This product warranty is extended only to the original consumer purchaser of the product and
is not transferable. For a period of one (1) year from the date of original purchase of
the product, our Repair Center will, at its option, either (1) repair the product or (2)
replace the product with a reconditioned comparable model. These remedies are the
purchaser's exclusive remedies under this warranty.
Model: GP324P
GEORGE FOREMAN
Warranty Service: To obtain warranty service, you must call our warranty service
number at 1-800-233-9054 for return instructions on how to deliver the product, in
either the original packaging or packaging affording an equal degree of protection
to the Repair Center specified below. You must enclose a copy of your sales receipt
or other proof of purchase to demonstrate eligibility for warranty coverage.
To return the appliance, ship to:
To contact us, please write to, call, or email:
ATTN: Repair Center
708 South Missouri Street
Macon, MO 63552 USA
Consumer Relations Department
PO Box 7366
Columbia MO 65205-7366 USA
1-800-233-9054
E-mail:
[email protected]
What Is Not Covered: This warranty does not cover damage resulting from misuse,
accident, commercial use, improper service or any other damage caused by anything
other than defects in material or workmanship during ordinary consumer use. This
warranty is invalid if the serial number has been altered or removed from the product.
This warranty is valid only in the United States and Canada.
LIMITATION ON DAMAGES: THERE SHALL BE NO LIABILITY FOR ANY INCIDENTAL
OR CONSEQUENTIAL DAMAGES FOR BREACH OF ANY EXPRESS OR IMPLIED WARRANTY OR CONDITION ON THIS PRODUCT.
DURATION OF IMPLIED WARRANTIES: EXCEPT TO THE EXTENT PROHIBITED BY
APPLICABLE LAW, ALL IMPLIED WARRANTIES AND CONDITIONS, INCLUDING,
WITHOUT LIMITATION, IMPLIED WARRANTIES AND CONDITIONS OF MERCHANTABILITY AND FITNESS FOR A PARTICULAR PURPOSE OR USE ON THIS
PRODUCT ARE LIMITED IN DURATION TO THE DURATION OF THIS WARRANTY.
Some jurisdictions do not allow the exclusion or limitation of incidental or consequential damages, or allow limitations on how long an implied warranty lasts, so the
above limitations or exclusions may not apply to you. This warranty gives you specific legal rights and you may have other rights under the laws of your jurisdiction.
For more information on our products, visit our website: www.maxim-toastmaster.com
Printed in China
"All Rights Reserved"
© 2005 Maxim®/Toastmaster® Inc.
P/N 61655
Portable
Propane Grill
®