1
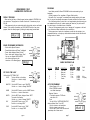
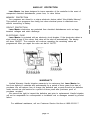
Lawn Genie
Three-Program Hybrid Controller
LM-6 LM-9 LM-12
Program
Auto
OPERATOR’S MANUAL
James Hardie
Irrigation
TABLE OF CONTENTS
Before You Begin
Introduction . . . . . . . . . . . . . . . . . . . . . . . . . . . . . . . . . . . . . . . . . . . . . . . . . . . . . . . . . . . . . . . . . . . . . . . . . . . . . . . . . . . . . . . . . . . . . . . . . . . . . . . . . . . . . . . . . ..1
Special Features ............................................................................................................... 1
Installation
Installation ......................................................................................................................
Wiring Valves ..................................................................................................................
Connecting Wires To Controller.. ...................................................................................
Installing Battery ..............................................................................................................
Transformer Connection .................................................................................................
.2
2
.3
3
3
Getting Started
4
Default Program ..............................................................................................................
.4
Erase Program ...............................................................................................................
4
Setting Time & Day .........................................................................................................
5
Programs.. .......................................................................................................................
.5
Sample Watering Plan ...................................................................................................
.5
Auto Programming .........................................................................................................
.6
Auto Start Time ..............................................................................................................
.6
Setting Days To Water.. .................................................................................................
.7
To Review ......................................................................................................................
7
Other Dial Functions .......................................................................................................
Special Features .............................................................................................................7
Manual Operation
8
Semi-Automatic Operation ..............................................................................................
.8
Manual Override.. ...........................................................................................................
.8
System Off .....................................................................................................................
Sensor Override ..............................................................................................................8
Additional Information
Troubleshooting .............................................................................................................
Back-Up Protection .......................................................................................................
Warranty.. .....................................................................................................................
.9
10
10
Thank you for purchasing the
LAWN MASTER from Hardie Irrigation.
SPECIAL FEATURES
Convenient Operation
Full Automatic, Semi-Automatic or Manual operation for controlling any watering need.
Landscape Saver
The unique ELECTRONIC CIRCUIT BREAKER in LAWN MASTER will check for
valve failure. If a short is detected the controller will display SHORT and override that
valve while continuing to water the remaining valves.
Program Saver
Advanced microprocessor electronics for protecting program memory will keep the
program during power failures, even when there is no battery back-up.
Circuit Saver
Circuit protection from surge and other transient situations.
Power Saver
Ultra low power use during operation also provides extended life during back-up
battery operation. The 9V battery will keep time accurately for up to 60 days without
main power source. Battery will last between 2-4 years under normal conditions.
Water Saver
The system % Adjustment feature lets you simply adjust watering duration for
temporary seasonal adjustments.
INSTALLATION
CONNECTING THE WIRES TO THE CONTROLLER
Remove lower panel covering, turn up and over. Line up
terminal identification area with terminal screws as shown below.
Connect the wire from valve number 1 to terminal slot number 1, connect the wire
from valve number 2 to terminal slot number 2 and so on until all valves are
connected. Connect the COMMON wire from the valves to the terminal marked
COMM.
If using a MASTER VALVE or PUMP START, see below.
-Back side of lower panel
-Terminal identification area
I
I
-Terminals
l
Note: LAWN MASTER is for indoor installation only. Do not plug transformer into the
same outlet as other high power devices such as garage door opener, power tools, etc.
Select an indoor location near a 110 volt outlet to mount your controller. Avoid
using an outlet that is controlled with an on/off switch. Mount approximately 48”
from floor.
Controller should not be exposed to water or operated at temperatures below 14 deg.
or above 113 deg. Fahrenheit.
Screw a No. 8 screw into wall leaving approximately 1/8” exposed. Use a plastic
anchor sleeve if wall is plaster board or masonry.
Slip the keyhole in the back of the controller over the exposed screw.
Screw No. 8 screws through the holes at the bottom of the controller case to secure.
WIRING THE VALVES
Connect your valves to the controller with 20 gauge plastic
jacketed wire. If distance from controller to valves is longer
than 700 feet use 16 gauge.
Thermostat wire is available in 4 and 7 strand colored
wires. You may bury wire in the ground being careful to avoid
locations which can be disturbed by digging. Use of UF wire
is recommended for underground wiring.
Extra protection is possible by pulling the wires through
PVC water pipe. All wire connections should be made using
water-proof connectors.
page 2
l
l
Master Valve Pump Start Hook-Up
In cases where a pump is to controlled by the Master Valve output, DO NOT drive the
pump directly from the controller. The Master Valve Terminal must be connected to the
coil of a 24 VAC relay. (Lawn Genie Pump Relays are relay part no. L3OOOOW)
The pump latch relay should be set up by an electrician so
that a switch closure will activate the latch relay coil, turning
on the pump. The switch contacts of the relay should be
connected to control the latch relay coil, see figure. The relay
should be mounted at least 5 feet from the controller, and
the box must be grounded.
Installation must follow all local electrical wiring codes.
Make sure master valve is selected as needed in all your
programs. Refer to watering duration (page 5)
Caution: Do not attempt to power the controller using
power from one phase of pump power. This will damage
the controller, the pump or both.
INSTALL BATTERY
LAWN MASTER is protected from time loss with a back-up battery (install the battery
after the transformer is connected.) Battery will maintain time and day up to 60 days
during a power failure. Install 9 volt alkaline battery as shown. (Battery not included).
Note: Battery will not operate valves during a power outage.
I
I
TRANSFORMER CONNECTION
Make sure transformer is disconnected from power outlet.
Connect the two lead wires from the transformer to
terminals as shown.
First (2) terminal locations: 24 VAC
Plug- in transformer, check operation.
l
l
page 3
PROGRAMS
PROGRAMMING YOUR
LAWNMASTER CONTROLLER
DEFAULT PROGRAM
When new from the factory: A default program has been installed in PROGRAM A for
your convenience. This program is set to water all valves for 10 minutes every day at
4:00 AM.
If this program works for your system simply set the time and day and you are finished.
However, if you would like to customize your LAWN MASTER with your own unique
programs, erase this default program by following the simple steps provided below.
pzEq
(ID
Lawn Master provides 3 different PROGRAMS to allow custom watering of your
landscaping.
All three programs will run, regardless of Program Switch position.
Be careful not to “over program” or accidentally start watering everything at the same
time. You may not have enough water pressure to operate more than one zone at a time.
Do a little planning before you start, refer to our sample watering plan below using your
own landscape and lay-out your “optimum watering plan” based on your plant’s needs.
Your local nursery is an excellent source of information.
When you finish programming, write out your “watering plan” or programs on the back
of your instruction envelope located inside your controller door.
Each program turns on each valve in sequence, one after the other, starting at your
programmed start time, on the days you have selected and ends when the last valve with
watering duration is finished.
0
75
ERASE PROGRAMMED INFORMATION
l
l
l
l
Set the dial to Special Features
Press the Next button until “Erase” is displayed
Press + button display will show “Confirm”
Press + button again, display will show “Done”
You may now program LAWN MASTER
_%ui_n
with custom programs using the
instructions on the following pages.
II
SAMPLE WATERING PLAN
PROGRAM
A
SET CLOCK TIME & DAY
-Set the dial to “SET TIME & DAY”
HOUR
The hour will flash on the display
Push the + or - button to change
“HOUR”
B
C
DESCRIPTION
Front lawn
Back yard
Side yard
Trees drip
Garden
IPl”XU,“%.e”I
MINUTES
Push the NEXT button to go to “MINUTES”
Push the + or - button to change “MINUTES”
AM/PM
Push the NEXT button to go to the “AM/PM” function
Push the + or - button to select choice
MONTH
Push the NEXT button, display will show “DATE”
The month will be flashing
Push the + or - button to change “MONTH”
on Next
Push the NEXT button to go to “DAY”
Push the + or-to change “DAY”
DAY
yx
1
2
3
4
5
AUTO PROGRAMMING
off
A B C
1. Select Program: A, B, or C
I
2. Each PROGRAM selected
Q
must follow these steps:
Program
Waterinq Duration
1. This sets the amount of TIME each
valve will be ON.
To set:
Turn the DIAL to “WATERING DURATION”,
disolav will show ‘Valve 1”. then “Off”.
Push the +button to set desired time.
Push the - button to set valve off.
Push the NEXT button to set next valve and
repeat steps until all valves are set.
l
l
YEAR
Push the NEXT button to go to “YEAR”
Push the + or - to change “YEAR”
page 4
WATER
DURATloNm
15 min.
5:OOAM
15 min.
10 min.
2 hrs.
5:OOPM
5 min.
4:OOAM
7:OOAM
l
l
page 5
DAYS
Odd
Mon
Everyday
Master Valve
A master valve or pump start is sometimes used in systems.
When selected ON the controller provides constant output to that
terminal when valves are on. See MASTER VALVE HOOK-UP.
(page 6) The LAWN MASTER allows you to select this option
on each program. The default is OFF for all programs.
To select your master valve ON:
Press NEXT until MASTER is displayed (after last valve)
Push ON to activate, push OFF to turn OFF.
On
Next
Off
QQ@
b
SKIP-You may select an interval from I- 30 days to water.
For example, to water once every 10 days push the + button
until display shows 10. (This option does not relate to the
days of the month or week)
DAYS OF THE WEEK-Push ON to activate “DAYS”, push
NEXT to sequence through the individual days. Use the
+ button to select the day. Use the - button to eliminate
that day.
l
l
O n N e x t 0“
8
@
$
-1
AUTO START TIME
This sets the TIME OF DAY you wish to water. Each start time will start a cycle running
each valve, one at a time, for their programmed watering duration, starting with the first
valve and continuing until the last valve has completed its watering.
To set
Turn the dial to “AUTO START TIMES”. The display will show “START A1”
To set the desired time push + button until desired time is displayed. Pushing the
- button will CANCEL that start time.
Your programming is now completed for PROGRAM A.
If you wish to use your other programs move PROGRAM
switch to position B or C and repeat the programming steps starting on page 8. Now
return to the Auto Position. During operation B, all running valves will scroll on the display.
l
l
ABC
REVIEW
To REVIEW your entire program:
Set dial to “SPECIAL FEATURES”, select “PROGRAM”,
display will show “Review”.
Push the + button, display will scroll all
programmed information.
l
(TIs>
Program
l
OTHER START TIMES
To water more than once a day:
Press NEXT to set a second or third START TIME.
Repeat the above steps for each START TIME.
On
Next
Off
OTHER DIAL FUNCTIONS
SYSTEM % ADJUSTMENT: Dial in this position for simple seasonal adjustment of all
your valve’s watering duration, When weather conditions return to normal this adjustment
can be returned to normal (100%). This change will not permanently change your original
programs.
l
l
DAYS TO WATER
This sets the DAYS of the week you wish to water.
There are 4 options you may use for convenience. Push
NEXT repeatedly to display options; press NEXT to select
the one that you prefer.
)m
0
rplnon
l
l
*~-ti=*
rw.l*u,-n
1. ODD-This option will water only ODD days
of the month. Automatically skips the 31st
day of the month. Push ON to select
l
IptnX*l,-**
l
pxcq
2. EVEN-This option will water only EVEN days of the
month.
Push ON to select.
Note: Below 100% for less watering. Above 100% for more watering. 00% is off.
JULY
)EVE::l ;;E;;i~
16 0 18 8
20 8 22
$$@26028@
page 6
To use
Select the PROGRAM you wish to adjust.
Set the dial to “SYSTEM % ADJUSTMENT’.
This indicates all valves will water at 100%
of their watering duration.
Use the + or - button to adjust, the display
will show selected change.
After adjusting return the dial to “AUTO”.
SPECIAL FEATURES
This position has three functions. In this position you
may erase all programmed information (page
programmed information (page , or set
8).
page 7
TROUBLESHOOTING
MANUAL OPERATION
SEMI-AUTOMATIC
This position will let you water your normal program
cycle at any time. Each valve’s WATER DURATION
will be operated for the program selected.
Set dial to “SEMI AUTOMATIC”
Push ON to start watering.
Push OFF to stop watering.
Push NEXT to advance to the next valve.
Return the dial to “AUTO” after watering cycle begins.
(The display will periodically show remaining time on the operating valve.)
l
l
1. All valves do
not turn on
automatically
Verify program
Check valve common wire for proper hook-up
Check for shorted valve, refer to “Controller Displays SHORT
2. Cannot Program
emove battery [check voltage]. Disconnect power to controller for 1 min.
econnect power and reprogram. Reconnect good 9v alkaline battery.
3. Controller Skips
a Cycle
erify start times, time and water days
4. No Display
emove battery [check voltage] Disconnect power to controller for 1 min.
econnect power and reprogram. Reconnect good 9V alkaline battery.
l
l
l
MANUAL OVERRIDE
This position will allow you to water any individual valve or valves for a specific time.
If you are using a master valve, you can activate for manual override.
Push the NEXT button to select the valve you wish to water
Push the + button to set the time you wish to water, the display will show your time.
Push the NEXT button to select the next valve you
h
wish to water.
Push the + button to set time, repeat setting until
all valves are set.
Push the - button to cancel any valves you do
not wish to water
If using a master valve or pump, press NEXT until
“master” is displayed (after last valve) press the + button.
The master is now on while your valves are watering.
l
l
l
l
l
SYSTEM OFF
This position will allow shut down of all water programs.
(allow 10 seconds to turn-off). For immediate shut down,
turn to “SYSTEM OFF” and push OFF button.
SENSOR OVERRIDE
Rain switches or moisture sensors are often used in automatic irrigation systems to
not allow automatic watering during rainy or wet conditions.
The Lawn Master provides convenient, sensor hook-up terminals and an override or
bypass option. The override option (OFF) lets you simply bypass the sensor for testing.
If you are not using a sensor, setting should be “OFF”.
Set dial to “SPECIAL FEATURES”
Push NEXT twice, display will show “Sensor N”
Push OFF to override. If not using a RAIN SENSOR, setting should be “OFF”.
Push ON to activate the RAIN SENSOR. Once installed the RAIN SENSOR will
override your programs.
A&
l
l
5. Valve Stays On
.
.
.
.
.
Verify watering duration.
Disconnect valve; check for manual bleed closure.
Disconnect wire to valve. If still on, valve is bad.
Check for manual mode; place controller in SYSTEM OFF
Check solenoids for obstructions or wiring shorts.
Check valve for rocks or other obstructions or torn or damaged
diaphragm.
6. Valve will not
turn on
1. Verify start times, time and water days.
2. Make sure dial is not in SYSTEM OFF
3. Verify program, Review program (page x)
4. Make sure common wire and valve wire are connected.
5. Check solenoid and valve bleed tube.
6. Check for shorted valve; refer to “Controller Displays SHORT
7. Check RAIN SENSOR status (page 8). set to OFF
7. Controller
Displays SHORT
I. Note valve number flashing.
2. Examine wiring connections for breaks or bad connections.
Repair and reconnect.
3. Examine solenoid for shorted connections. Repair and reconnect.
4. Make sure solenoid rating does not exceed capacity of controller.
5. To reset, set dial to AUTO or press any button.
l
l
-
BACK-UP PROTECTION
Lawn Master has been designed to insure operation of the controller in the event of
unexpected electrical disturbances, power loss, or valve failure.
MEMORY PROTECTION
Your programs are stored in a unique electronic device called “Non-Volatile Memory”.
This protects your programs from being lost when electrical power is disturbed even
without connecting a battery.
CIRCUIT PROTECTION
Lawn Master electronics are protected from electrical disturbances such as large
transient voltages and static discharge.
ELECTRONIC FUSE
Lawn Master is protected with an electronic circuit breaker. If the electronics detect a
short circuit at one of the valves, that valve will be shut off automatically. The display
will show ‘SHORT’. The controller will continue operating the remaining valves as
programmed. After you repair the valve set dial to “AUTO”.
WARRANTY
Limited Warranty: Hardie Irrigation warrants to its customers that Lawn Master be
free from defects in materials and workmanship for a period of three years from date of
purchase. We will replace, free of charge, the defective part or parts found to be defective
under normal use and service for a period of three years after purchase, proof of
purchase required.
We reserve the right to inspect the defective part prior to replacement. Hardie Irrigation
will not be responsible for consequential or incidental cost or damages caused by product
failure.
For additional assistance, call our Customer Service Hot-line at l-800-231-5117.
page
10
This equipment has been tested and found to comply with the limits for a class B
digital device, pursuant to Part 15 of the FCC Rules. These limits are designed to
provide reasonable protection against harmful interference in a residential installation.
This equipment generates, uses and can radiate radio frequency energy and if not
installed and used in accordance with the instructions, may cause harmful interference
to radio communications. However, there is no guarantee that interference will not
occur in a particular installation. If this equipment does cause harmful interference to
radio or television reception, which can be determined by turning the equipment off and
on, the user is encouraged to try to correct the interference by one or more of the
following measures:
* Reorient or relocate the receiving antenna.
- Increase the separation between the equipment and receiver.
* Connect the equipment into an outlet on a circuit different from that to which
the receiver is connected.
- Consult the dealer or an experienced radio/TV technician for help.
This equipment has been verified to comply with the limits for a class B computing
device, pursuant to FCC Rules. In order to maintain compliance with FCC regulations,
shielded cables must be used with this equipment. Operation with non-approved equipment or shielded cables is likely to result in interference to radio and TV reception. The
user is cautioned that changes and modifications made to the equipment without the
approval of manufacturer could void the user’s authority to operate this equipment.
I
I
A James Hardie Product
Product Inquiries and Repairs
l-800-231-5117
Part No. 769301
01994 James Hardie Irrigation