1
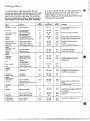
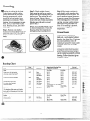
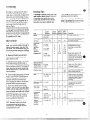
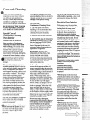
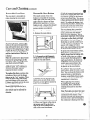
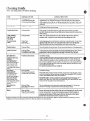
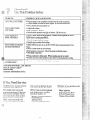
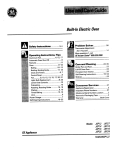
I
UseandCareof
gasmodels
Features
Usingtheoven
Specialcareof
continuous-cleaning
oven
Questions?
UsetheProblemSolver
p4
p6
pll
p15
. .
YourDirect LimetoG(7< ($+’C
:~ &~L’
‘-- ,
TheGEAmwverG-W-I-77 L/’T : L-2-,,2--/’
“.-
.
.
.
.
;
.
,“
&@
=&*.
S+dy Insmlctims . .........2-3
Featuresof!bur CNen . ........4
AutomaticC&en-mm,
C2Gckml. MinuteT’hm2r.. ...5
using Jbw chum , . . . ., ... , ..,6
Baking . . . . . “. . . . . . . ........7
Baking‘chart . . . . +. . ........8
R(mthlg, c%art . . . . . . ........9
Eln-ding,CYM3rt
. . . . . . . . . . . . =. m
special Gu%d
Cmthmws-(%aring Oven. . . H
~M=emdcleaning , , . . . . . . . II-13
CleaningChart . . . . . . . . . . .. ..14
ProblemSolver.. . . . . . . . . .. ..15
It is intendedto helpyouoperate
andmaintainyournewoven
properly.
Keepit handyforanswersto your
questions.
●
Iflbu NeedService. . . .......15
“V&irrmty
. . . . . . . . . . .13ackCover
TiiJmOF%all range
CCmtr’ck
Nycm smell gas:
1.open
2.
touch +dectrical
switches’
3.
anyopen
fhm?
call your
4.
gas
*non$tWm electricswitches
on or CMbecause sparks may
ignite the gas.
FOR
Keep the
area dew’ and
free
mm-%1
and (mK?r
and
If youdon’tunderstandsomething
or needmorehelp.write(include
yourphonenumber):
ConsumerAffairs
GeneralElectricCompany
AppliancePark
Louisville,KY40225
down the modd
and serialnumbers.
You’llfindthemon a labellocated
insidetheovenon theleft side.See
page4.
Thesenumbersare alsoon the
ConsumerProductOwnership
RegistrationCard thatcamewith
youroven.
the
pit
13cfbresendinginthiscard.
pleasewritethesenumbershere:
Model Number
Serial Number
Use thesenumbersin any
correspondenceor service
callsconcerningyouroven.
H you received
a damagedCW2n...
Immediatelycontactthe dealer(or
builder)thatsoldyouthe oven.
Sawtime
Beforeyourequest
service;. .
Checkthe ProblemSolveron
page 15.It listsminorcausesof
operatingproblemsthatyoucan
correctyourself.
this
all
e
-9
get your mm have
showyouthe
of the ovengas cut-off
valveand howto shut it offif
necessary.
and
~Haveyour wen
bya
installer,in accordancewiththe
InstallationInstructions.Any
adjustmentandserviceshouldbe
performedonlybyqualifiedgas
rangeinstallersor service
technicians.
~Plugyour ovenintoa 120-vW
wtkt only.Do not
removetheroundgroundingprong
fromthepkg. Ifi aoubtaboutthe
groundingofthehomeelectrical
system,it is yourpersonal
2
responsibilityandobligationto
haveanungrounded
outletreplaced
witha properly-grounded
threeprongoutletin accordancewith
theNationalElectricalCode.Do
notuseanextensioncordwith
thisappliance.
@Besure all packing
are removedhm the ovenbefore
operatingit, topreventfireor
smokedamageshouldthepacking
materialignite.
@~~ ~~~~your own is correctly
adjustedby a
service
or
for the
typeofgas
or ill) on =—w=
.%+
@
~hid it k to be
be convertedfromonetypeto the
other.Seekstdlation Instructions.
~$d.
&is
(%n
“-
(continued)
e~
~DWt leavechiklrenaloneor
unattendedwherean ovenis
hotor in operation. Theycould
beseriouslyburned.
~Donftallo~t’anyoneto climb,
standor hang on the door or
broihwcompartment. They
coulddamagetheovenandeven
[ipitovercausing severepersonal
injury.
QCAUTION: DO NOT STORE
ITEMSOF INTERESTTO
CHILDRENIN CABINETS
ABOVEANOVEN-CHILDREN
CLIMBINGONTHEOVENTO
REACHITEMSCOULDBE
SERIOUSLY
INJURED.
~Neverwear loosefittingor
hanginggarments whileusing
the appliance.Flammable
materialcouldbeimited if
roughtin contactwithflameor
hotovensurfacesandmaycause
severeburns.
~Neveruse your appliancefor
warmingor heatingthe room.
Prolongeduseoftheovenwithout
adequateventilationcanbe
hazardous.
~Donot use wateron grease
fires.Neverpickup a flaming
pan.Turnoffburner,thensmother
flamingpanbycoveringpan
completelywithwellfittinglid,
cookiesheetor flattray.Flaming
greaseoutsidea pancanbeput
outbycoveringwithbakingsoda
or,if available,a multi-pu~ose
drychemicalor foam.
u
not s~o~fl~~na~~e matefi~
in an oven.
~Donot let cookinggreaseor
otherflammablematerials
accumulatein or near theoven.
@Donot useovenfor a storage
area.
@Standawayfromthe oven
whenopeningovendoor.The
hot air or steamwhichescapes
can causeburns to hands,face
and/or eyes.
@Keepovenfree fromgrease
buildup.
@Placeovenshelvesin desired
positionwhileovenis cool.
~Pullingout shelfto the shelf
stop is a conveniencein lifting
heavyfinds.It isalsoa precaution
againstburns from touching
hot surfacesofthe dooror oven
walls.
@Don’tuse aluminumfoil
anywherein the ovenexceptas
describedin this book.Misuse
couldresultin a firehazardor
damagetotherange.
~Don’theat unopenedfood
containersin the oven.Pressure
couldbuildup and the container
couldburst causingan injury.
@Useonlyglasscookwarethat
is recommendedforuseingas
oven.
~Whenusing cookingor
roastingbagsin oven,follow
themanufacturer’s
directions.
~Whencookingpork?follow
ourdirectionsexactlyandalways
cookthemeatto at least170°F,
Thisassuresthat,in theremote
possibilitythattrichinamaybe
presentin themeat,it willbe
killedandmeatwillbe safeto eat.
3
@Ahvaysremovebroiler pan
frombroiler compartmentas
soonas youfinishbroiling.
Greaseleftinthepancancatch
fireifovenis usedwithout
removingthegreasefromthe
broilerpan.
~Whenbroiling9if meat is too
cioseto the flame,the fat may
ignite.Trimexcessfattoprevent
excessiveflare-ups.
@Makesure broiler pan is in
placecorrectlytoreducethe
‘. --possibilityofgreasefires.
—
@If youshouldfiavea grease
fire in the broiler pan, turnoff
oven,andkeepdrawerclosedto
containfireuntilit burnsout.
@Cleanonlyparts listedin this
Useand Care Book.
@Keepovencleanand free of
accumulationsofgreaseor
spilloverswhichmayignite.
If YouNeed Service
6 he ProblemSolver>5
eReacl6T
on page 15ofthisbook.
@Don’tattempt to repair or
replaceany part of your oven
unlessit is specifically
recommendedin this book. All
otherservicingshouldbe referred
toa qualifiedtechnician.
SAVE
!s!%
-i%sa%c:.
.
@
I
-\
—
Models JGKM5GEH (Standard Oven)
JGKC15GEH(Continuous-CleaningOven)
ModelJGKC16GEH(Continuom+CleaningOven)
See page JGKS15GEH JGKC15GEHI JGKC16GEHI
e
5
I
I
FeatureIndex
1 MinuteTimer
2 AutomaticOvenTimer
3 DigitalElectricClock
~ 4 RadialElectricClock
I 5 ovenblhts~itch
I 6 Oven SetKnob
I 7 OvenTemPKnob
1 8 OvenInteriorLight
9 Oven Shelves
10 Oven ShelfSupports
11 RemovableOvenBottom
12 RemovableOvenDoor
I 13 RemovableBroilerCompartmentDoor
I 14 BroilerPanand Rack
15 ModelandSerial Numbers
16 Continuous-CleaningOvenInterior
1 17 BroilerCom~artrnent
I
I
I
I
I
6
o
e
e
I
e
e
5
I
e
6
6
I
e
I
e
6
6
12
12
12
10, 13
2
11
10.13
4
I
5
5
5
I
I
I
I
1
e
—— e
e
@
,
I
I
e
e
I
e
I
I
e
I
I
I
e
7%6clock
JGK!315GEH& JGKC15GEH
TheMinuteTimerhas been
combinedwiththe ovenclock.Use
it to timeall yourprecisecooking
operations.You’llrecognizeit as
thepointerwhichis differentin
colorthanthe clockhands.
Minutesare markedup to 60 on the
centerring ofthe clock.
JGKS15GEH
&JGKC15GEH
TosettheClock,pushtheknobin
andturn the clockhandsto the
rightto the correcttime.Thenlet
the knobout andcontinueturning
to OFF.
2. Setthe STARTcontrol.Pushin
andturn the STARTknobto the
timeyouwanttheovento turn itself
on. (If youwantitto startcooking
immediately,do notset the Start
time.)
3. Setthe Sl_OPcontrol.Pushin
andturn the STOPknobto thetime
youwantthe ovento turn itselfoff.
Note:There mustbeat leasta half
hourdifferencebetweenthe START
andSTOPdialsforthe automatic
controlto work.
To set the Minute Timer, turnthe
knobto the left, withoutpushingin,
untilthepointerreachesthenumber
f minutesyouwantto time.
Model JGKC16GEH
To set the CIock, pushinthe center
ModelJGKC16GEH
~lleMinuteTimeris the largedial
to the leftof thedigitalclock.Use
it to timeall yourprecisecooking
operations.Thisdial also changes
thedigitalclock.
To set the Minute Timer, turn
thecenterknobclockwise,without
pushingin, untilthepointerreaches
thenumberof minutesyouwantto
time(upto 60).
At the end of the time set on
, ither Minute Minder. a buzzer
unds to tell you time is up. Turn
knobofthe MinuteTimerandturn
the knobin eitherdirectionto set
the digitalclocknumeralsto the
correcttime. (Aftersettingthe
clock,let the knobout andturn the
MinuteTimerpointerto OFF.)
AutomaticOwenTimer
ThisTimerwillautomaticallystart
and stopyourovenfor you.Here’s
whatyoudo:
L Makesurebothyourovenclock
andtheSTARTdialshowthecorrect
timeof day.Whenthe STARTknob
ispushedinandturned,itwill“pop”
intoplacewhenthe time shownon
the ovenclockis reached.
thekmob,withoutpushing in, until
thepointerreachesOFF andthe
buzzerstops.
5
4. Setthe OVENSETknobto
AUTOOVEN.
5. Setthe OVENTEMP knobto
the desiredcookingtemperature.
Nowthe ovenwillturn itselfon
immediatelyor at a later Starttime
thatyouset, cookat thetemperature
youselectedand turn itselfoffat
the Stoptime youselected.
Aftertakingfoodoutof the oven,
be sureto turn theOVENTEMP
controlto off andthe OVENSET
knobto the MAN. OVENsetting
whereit shouldbe keptfor normal
ovenuse.
The OWII
and broiler burners on
)“ouroven are lighted by electric
ignitioneliminating the need for
scmdingpilotlightswithconwmtly
burningflame.
C,4LJTION:
DO N~ MAKEANY
ATTEMPT’
TOOPERATETHE
ELECTRICIGNITIONOVEN
DURINGAN ELECTRICAL
POWERFAILURE.Resumption
ofelectricalpowerwhenOVEN
TEMPcontrolis in anyposition
otherthanOFF wiHresultin
automaticignitionof the oven
burnerand couldcausesevere
burnsif, at thetime, youwere
attemptingto lightthe burnerwith
a match.
lb Lightthe Oven Burner
Turnthe OVENTEMP knobto the
desiredtemperature.The burner
shouldignitewithin60 seconds.
M Adjustment
An air adjustmentshutterforthe
ovenburnerregulatesthe flowofair
to theflame.
Removethe broilerpan and rack,
pullthebroilercompartmentdrawer
outto the “stop”positionor remove
thebroilercompartmentshelfand
you’llfind the shutteragainstthe
backwallof thecompartment.
screwand rotatethe shut~erto allow
moreor lessair intotheburnertube
as needed.
When the right amountofair
flowsintotheburner,the flame
shouldbe steady,withapproximately
l-inchblueconesand shouldnot
extendoutoverthebaffleedges.
oval shelves
&%O~~ UsingYourOwn
1. Lookat thecontrol.Besureyou
understandhowto set it properly.
2. Checkthe insideof theoven.
Lookat the shelves.Practice
removingand replacingthem
whiletheovenis cool.
3. Readthe informationandtips
on the followingpages.
4. Keepthis bookhandywhereyou
canreferto it—especiallyduring
the first fewweeksof getting
acquaintedwithyouroven.
(hen ‘lkmperatureControl
TheOVENTEMPc&trol is
locatedon the upperovencontrol
panel.
The shelvesare designedwith
stop-locksso whenplacedcorrectly
on_theshelfsupports,theywillst~p
beforecomingcompletelyout of
the ovenand willnottilt whenyou
are removingfoodor placingfood
on them.
Whenplacingcookwareon a shelf,
pullthe shelfoutto the “stop”
position.Placethecookwareon
the shelf, then slidethe shelfback
intothe oven.Thiswilleliminate
reachingintothehotoven.
Toremovethe shelvesfromthe ove
for cleaning,pulloutto stop
position,lift upon front and pull
themout.
ShelfPositions
The ovenhas fourshelfsupports—
A (bottom),B, C and D (top).Shelf
positionsfor cookingare suggested
on Bakingand Roastingpages.
Ove~ Light
Use switchon controlpanelto turn
lighton and off.
Simplyturn the knobto the desired
cookingtemperatures,whichare
markedin 25°F.incrementson the
dial. It will normallytake30 to 60
secondsbeforethe flamecomeson.
Afterthe ovenreachesthe selected
temperature,the ovenburnercycles
offcompletely,thenon witha full
flameto keepthe oventemperature
controlled.
‘h adjust the f’low.ofair to the
burner,loosenthe Phillipshead
6
Eikm’tosetMm”Range
h“
1. Positionthe shelfor shelvesin
theoven.
2. Close oven door,turn OVEN
I“EMPknobto desiredtemperature
andpreheatovenfor about 10
minutesif preheatingis necessary.
3. Place foodin ovenon centerof
shelf.Allowat leastan inchbetween
edgeof bakewareand ovenwallor
adjacentutensils.
If cooking on two shelvesat the
sametime, placeshelvesabout4
inchesapart and staggerfoodon
them.
4. Checkfoodfordonenessat
minimumtimeonrecipe.Cook
longerif necessary.Switchoff
heatandremovefood.
reheating is important when using
temperaturesbelow225”F.and
whenbakingfoodssuch as biscuits,
cookies,cakesandother pastries.
Preheatingis notnecessarywhen
roastingor for long-timecooking
ofwholemeals.
Mostbakingis doneon the second
shelfposition(B)from the bottom.
Whenbakingthreeor four items,
,l~c~Wushelvespositionedon the
secondand fourthsetsof supports
(B& D) from bottomof oven.
Bakeangelfoodcakeson firstshelf
position(A) frombottomof oven.
Baking Tips
@Followa testedrecipeand
measurethe ingredientscarefully.
If youare usinga packagemix,
followlabeldirections.
~If moistureis noticeableon the
frontof theovenor on theoven
windowwhenfirstturningon the
oven,leavetheovendoorajarfor a
fewminutesor untiltheovenis
warm.
CAKES
Cake rises higher on one side
@Batterspreadunevenlyin pan.
e Do notopentheovendoorduring
a bakingoperation—heatwill be
lostandthebakingtimemightneed
to be extended.Thiscouldcause
poorbakingresults.
Cakes cracking on top
~ Checkoventemperature.
~Do notdisturbtheheatcirculation
in theovenwiththeuseofaluminum
foil. If foilis used,placea small
sheetof it, about10by 12inchesat
the most, on a lowershelfseveral
inchesbelowthefood.Do not
placefoilon the ovenbottom.
CommonBaking Problems
and PossibleSolutions
Pm
Burning around edges
~ Oventoofill; avoidovercrowding.
@Edgesof crusttoothin.
@Incorrectbakingtemperature.
Bottom crust soggy and unbaked
@Allowcrustand/orfillingto cool
sufficientlybeforefillingpie shell.
~Fillingmaybe toothinorjuicy.
~Fillingallowedto standin pie
shellbeforebaking.(Fillpie shells
andbakeimmediately.)
~Ingredientsandpropermeasuring
affectthe qualityof thecrust. Use a
testedrecipeand goodtechnique.
Makesurethereare no tinyholes
or tearsin a bottomcrust.“Patching”
a pie crustcouldcausesoaking.
Pie filling runs over
~ Topandbottomcrustnotwell
sealedtogether.
@Edgesof pie crustnotbuiltup
highenough.
@Toomuchfilling.
~ Checksizeof pieplate.
Pastry is tough; crust not flaky
@TOOmuchhandling.
@Fattoo softor cut in toofine.
Rolldoughlightlyandhandleas
littleas possible.”
7
@Ovenshelvesnotlevel.
@Usingwarpedpans.
@Incorrectpan size.
~Battertoothick,followrecipe
or exactpackagedirections.
~Checkfor propershelfposition.
~Checkpansizecalledfor in wipe.
~Impropermixingof cake.
Cake falls
~ Toomuchshortening,sugaror
liquid.
e Checkleaveningagent,baking
powderor bakingsodato assure
freshness.Makea habitto note
expirationdatesofpackaged
ingredients.
e Cakenotbakedlongenoughor at
correcttemperature.
~If addingoil to a cakemix, make
certainthe oil is thetypeand
amountspecified.
Crust is hard
e Checktemperature.
g Checkshelfposition.
Cake has soggy layer or streaks
at bottom
UIUnderminingingredients.
g Shorteningtoo softfor proper
creaming.
g Toomuchliquid.
Cooms
& Imxmm
Doughy center; heavy crust on
surface
~ Checktemperature.
@Checkshelfposition.
e Followbakinginstructions
carefi.dlyas givenin reliablerecipe
or on conveniencefoodpackage.
~ Flat cookiesheetswill givemore
evenbakingresults.Don’tovercrowd
foodson a bakingsheet.
8 Conveniencefoodsusedbeyond
their expirationdate.
Browning more noticeable on
one side
~ Ovendoor notclosedproperly,
checkgasketsea!.
g Checkshelfposition.
L Aluminumpansconductheatquickly.For most
conventionalbaking,light,shinyfinishesgivebestresults
becausetheyhelppreventover-browningin the timeit
takesfor heatto cookthe centerareas.Werecommend
dull(satin-finish)bottomsurfacesofpans for cakepans
- and pie plates to be sure thoseareasbrowncompletely.
2. D.trkor non-shinyfinishes,alsoglassand pyroceram,
gcwrallyabsorbheatwhichmayresultin dry, crisp
crusts.Reduceovenheat25°F.if lightercrustsare
desired.Preheatcast ironfor bakingsomefoodsfor rapid
browningwhenfoodis added.
Shelf
Positions
Oven
Temperatures
Time,
Minutes
Shiny Cookie Sheet
B, C
400°-4750
15.20
B, A
350°-4000
20-30
B
B
400°-4500
350°
20-40
45-55
Preheat cast iron pan for crisp crust.
Muffins
Popovers
Shiny Metal Pan with
satin-finish bottom
Cast Iron or Glass Pan
Shiny Metal Pan with
satin-finish bottom
Shiny Metal Muffin Pans
Deep Glass or Cast Iron Cups
A, B
B
400°-4250
375°
~()-3(3
45-60
Quick loaf bread
Yeastbread (2 loaves)
Plain rolls
Sweet rolls
Metal or Glass Loaf Pans
Metal or Glass Loaf Pans
Shiny Oblong or Muffin Pans
Shiny Oblong or Muffin Pans
B
A, B
A, B
B, A
350°-3750
375°-4250
375°-4250
350°-3750
45-60
45-60
10-25
20-30
Decrease about 5 minutes for muffin mix.
Or bake at 450”F.for 25 minutes, then at
350”F.for 10to 15minutes.
Dark metal or glass gives deepest
browning.
For thin rolls, Shelf B maybe used.
For thin rolls, Shelf B maybe used.
Cakes
(without shortening)
Angel food
Jelly roll
Sponge
Aluminum “llbe Pan
Metal Jelly Roll Pan
Metal or Ceramic Pan
A
B
A
325°-3750
375°-4000
325°-3500
30-55
10-15
45-60
Metal or Ceramic Pan
Shiny Metal Muffin Pans
Metal or Glass Loaf or
Tube Pan
Shiny Metal Pan with
satin-finish bottom
Shiny Metal Pan with
satin-finish bottom
Metal or Glass Loaf Pans
A, B
B
A, B
325°-3500
350°-3750
275°-3000
45-65
20-25
2-4 hrs.
B
350°-3750
20-35
B
350°-3750
25-30
B
350°
40-60
%ownies
3rop
Metal or Glass Pans
Cookie Sheet
B, C
B, C
325°-3500
350°-4000
25-35
10-20
refrigerator
lolled or sliced
Cookie Sheet
Cookie Sheet
B, C
B, C
400”-425°
375°-4000
6-12
7-12
A, B, C
B
350°-4000
300°-3500
30-60
30-60
B
325°
Food
Bread
Cookware
Biscuits (Win. thick)
Coffeecake
Corn bread or muffins
Gingerbread
Comments
Canned, refrigeratedbiscuits take 2 to 4
minutes less time.
Two piece pan is convenient.
Line pan with waxed paper.
Cakes
Bundt cakes
Cupcakes
Fruit cakes
Layer
Layer, chocolate
Loaf
Paper liners produce more moist crusts.
Use 300”F.and Shelf B for small or
individual cakes.
cookies
Bar cookies from mix use same time.
Use Shelf C and increase temperature
25 to 50”F.for more browning.
Fruits,
OtherDesserts
3akedapples
hstard
Puddings, rice
and custard
Glass or Metal Pans
Glass Custard Cups or
Casserole (set in pan of hot water)
Glass Custard Cups or
Casserole
Pies
Frozen
Meringue
Foil Pan on Cookie Sheet
Spread to crust edges
A
B, A
400°-4250
325°-3500
45-70
15-25
One crust
Twocrust
Pastry shell
Glass or Satin-finish Metal
Glass or Satin-finish Metal
Glass or Satin-finish Metal
A, B
B
B
400°-4250
400°-4250
450°
45-60
40-60
12-15
A, B, C
A, B, C
B
325°-4000
325°-3750
300°-3500
60-90
30-60
30-75
50-90
Reduce temperature to 300”F.for large
custard.
Cook bread or rice pudding with custard
base 80 to 90 minutes.
Large pies use 400”F.and increase time.
To quickly brown meringue use 400°F. for
8 to 10minutes.
Custard fillings require lower temperature,
longer time.
Miscellaneous
Baked potatoes
Scalloped dishes
Souffles
Set on Oven Shelf
Glass or Metal
Glass
8
Increase time for large amount or size.
oastins is ~~~~in~ by dry heat.
~endm meat or poultry can be
roasted uncovered in your oven.
Roastingtemperatures, which
shouldbe low and steady, keep
spatteringto a minimum. When
roasting, it is not necessary to sear,
baste, cover, or add water to your
meat. Roasting is easy,just f~llow
thesesteps:
Step L Positionovenshelfat
secondfrombottomposition(B)for
small size roast (3 to-5lbs.) andat
bottomposition(A)for larger
roasts.
Step2: Checkweightof roast.
Placemeatfat-side-upor poultry
breast-side-upon roastingrack in a
shallowpan. The meltingfat will
bastethe meat. Selecta panas
closeto the sizeofmeatas possible.
(Broilerpan with rack is a good
pan for this.)
Step ~: Most meats continue to
cook slightly while standing after
being removed from the oven. For
rare or medium internal doneness,
if meat is to stand 10to 20 minutes
while making gravy or for easier
carving, you may wish to remove
meat from ovenjust before it is
-
done.If no standingis planned,
cookmeatto suggested
temperature.
Step3: TurnOVENTEMP control
to desiredtemperature.Checkthe
RoastingChafi for temperatures
and approximatecookingtimes.
FrozenRoasts
Frozenroastsof beef, pork,
lamb,etc., can be startedwithout
thawing,but allow10to 25 minutes
per poundadditionaltime (10
minutesper poundfor roastsunder
5 pounds,moretimefor larger
roasts).
Thawmostfrozenpoultrybefore
roastingto ensureevendoneness.
Somecommercialfrozenpoultry
canbe cookedsuccessfullywithout
thawing.Followdirectionsgiven
on packer’slabel.
Roastingchart
Type
Oven
Temperature
Doneness
3 to5-lbs.
hfeat
Tendercuts; rib, high quality
sirloin tip, rump or top round*
325°
Lamb leg or bone-in shoulder*
325°
\’eal shnulcler,leg or loin*
PctK1oin,rib or shoulder*
Ham, pre-cooked
325°
325°
325°
Rare:
Medium:
Well Done:
Rare:
Medium:
Well Done:
Well Done:
Well Done:
To Warm:
Ham, raw
*Forboneless rolled roasts over 6-inches
thick, add 5 to 10minutes per lb. to times
gi~enabove.
325°
Well Done:
325°
375”
Well Done:
Well Done:
325°
Well Done:
Poultry
Chicken or Duck
Chicken pieces
Turkey
—
ApproximateRoastingTime
in MinutesperPound
9
Internal
Temperature‘F
6 to 8-lbs.
18-22
24-30
22-25
30-35
28-33
35-45
21-25
20-23
24-28
25-30
28-33
30-35
30-40
35-45
30-40
35-45
10minutes per lb. (any weight)
130°-1400
150°-1600
17~0-1850
130°-1400
150°-1600
170°-1850
170°-1800
170°-180”
125°-1300
Under10lbs.
10to 15-lbs.
20-30
17-20
3 to 5-lbs.
Over5 Ibs.
35-40
35-40
30-35
185°-1900
185°-1900
10to 15-lbs.
Over15lbs.
In thigh:
20-25
15-20
185°-1900
160°
——-.
Elroilingis cookingibodbydirect
h~:~tf~~i~~ ab~v~the f~(>d.Your
Tips
rangehas a convenientcompartment
below the oven for broiling. It also
has a specially designed broiler pan
and rack that allow dripping fat to
drain away from the foods and be
kept awayfrom the high heat of
the gas tlame.
Distance from the heat source may
be changedby positioningthe broiler
pan and rack on one of three shelf
positionsin the broiler compartment—
.4 (bottomof broiler compartment),
B (middle) and C (top).
~ Broilingis usuallydone with oven
and broilerdoorsclosed. I-lowcvm.
if youlikeyour steaks very rare
inside and charred on the outside,
leave the oven door slightly ajar.
Bacon
%-lb. (about S
thin slices)
How toBroil
GroundBeef
l-lb. (4 patties)
!4 to %-in. ~hick
L If meat has fat or gristle near the
edge, cut vertical slashes through it
about 2 inchesapart, but don’tcut
BeefSteaks
Food
Well Dorm
Quantity
imdlor
Thickness
@Use tongs to turn meat overpiercing n~eatlosesjuices.
~ Steaksand chops shouldbeat
least 1 inch thick-forbest broiling
results. Pan broil thinner ones.
IstSide !ndSide
Broil Time, Time,
Position Uinutes Uinutes Comments
c
31/2
c
9-1o
7-8
A
A
A
A
A
A
9
12
13
10
15
25
7
5-6
8-9
6-7
12-14
16-18
Steaks Icss than 1 inch cook
through beforebrowning.
Pan frying is rccommcndcd.
slush fat.
p5-30
Reduce times about 5 to 10
minutes per side for cut-up
chicken. Brush each side with
melted butter. Broil with skin
side down first and broil with
door closed.
‘/2-1
Space evenly.Place English
muffins cut-side-up and brush
with butter if desired.
Arrange in single layer.
Space evenly.Up to 8 patties
take about same time.
Rare
Medium
Well Done
Rare
Medium
Well Done
l-in, thick
( 1-1VZIbs.)
Chicken(450°)
1 whole
(2 [()2 \fi-lbs.),
split lengthwise
A
30-35
Bread (Toast)or
Toaster pastries
English Muffins
2-4 slices
1 pkg. (2)
2-split
c
2-3
c
3-4
Lobstertails
(6 to 8-oz. each)
2-4
B
13-16
Do not
turn
over.
Cut throughback of shell,spread
open. Brush with melted butter
before and after half time.
4. Closebroilerdoor and, for most
foods,turn OVENTEMP knobto
BROIL.Exceptionsare chicken
andhamwhichare broiledat a
setting
in order to cook food
~ol.vel”
Fish
l-lb. fillets % to
1~-in.thick
c
5
5
Handle and turn very carefully.
Brush with lemon butter before
and during cooking if desired.
Preheat broiler to increase
browning.
through before overbrowning it.
B
8
8
Precooked
Incteasetimes5 to 10minutes
per side for Ifi-in. thick or
home cured.
2 (%in.)
2 (1-in,thick),
about 1lb.
A
A
10
13
4-5
10-12
Slash fat.
Medium
Well Done
Medium
Well Done
2(1 inch)
about 10-12oz.
2 (1% inch),
about 1 lb.
B
B
B
B
8
Slash fat.
10
17
4-7
10
4-6
12-14
Wieners,
l-lb. pkg. (10)
c
6
1-2
intomeat. Werecommendthatyou
trimM to preventexcessivesmoking,
leavinga layeraboutl/8-inchthick.
2. Removebroilerpan andrack
frombroilercompartmentand
placefoodon rack.
3. Pullout broilerdraweror broiler
shelfand positionbroilerpanin
compartment.Placingfoodcloserto
flameincreasesexteriorbrowningof
food,butalso increasesspattering
andthepossibilityof fatsandmeat
juicesigniting.
5. Turn most foods once during
cooking; (the exceptionis thin fillets
of fish; oil one side, place that side
downon broilerrackand cookwithout
turning until done). Time foods for
about one-half the total cooking
time, turn food, then continue to
cook to preferred doneness.
6. TurnOVENTEMP knobto
OFF.Removebroilerpan from
compartmentandservefood
immediately.Leavepan outside
compartmentto cool.
]~z-in.thick
(2-Zi/j Ibso)
BakeryProducts
Hamslices(450° l-in. thick
Porkchops
Well Done
Lambchops
similar precooked
sausages,
bratwurst
10
10
If desired, split sausages in half
lengthwiseinto5 to 6-inchpieces.
e
Proper cm and cleaning are
imp-ortantso your oven ~%’ill
give
}You
efficient and satisfactory
service. Followthese directions
carefully in caring for it to help
assure safeand proper maintenance.
BE SURE ELECTRIC POWER
IS OFF BEFORE CLEANING
ANY PARTOF WI-R OVEN.
SpecialCareof
cwlthNmus-ckmling
(hen Interior
Models JGKCk5,JGKC16
Ymr oven has a ContinuousCleaning oven that cleans itself
while cooking. The insideof the
oven—top,sides,and back—is
finishedwitha specialcoating
which cannot be cleaned in the
usual manner with soap, detergents,
commercial oven cleaners, coarse
abrasive pads or coarse brushes.
eir use and/or the use of oven
prays will cause permanent
damage.
The special coating is a porous
ceramic material which is darkin
colorandfeels slightlyroughto the
touch. If magnified,the surface
wouldappearas peaks,valleys,and
sub-surface“tunnels:’This rough
finishtendsto preventgrease
spattersfrom forminglittlebeads
or dropletswhichrun downthe
sidewallsof a hard-surfaceoven
linerleavingunsightlystreaksthat
requirehandcleaning.Instead,
whenspatterhitsthe poroustinish
it is dispersedandis partially
absorbed.This spreadingaction
increasesthe exposureof oven
soilto heatedair, and makesit
somewhatless noticeable.
Soil may not disappear completely
andatsome time afterextended
usage, stains may appearwhich
cannotbe removed.
%:es
@p
eciai coatingworksbeston
%+mall
amountsofspatter.Itdoes
not work well with larger spills,
especially sugars, egg or dairy
mixtures.
Thespecialcoatingisnotused
onovenshelves.Shelvesshouldbe
cleanedoufsidefhe oven,toavoid
damageto thespecialcoating.
Do not scrape the porous surface
with a knife or spatula—theycould
permanentlydamagethe finish,
PorcelainOvenInterior
m clew] the
Continuous-CleaningOven:
1. Let ovenpartscool before
handling. It is recommended that
rubber gloves be worn when
cleaning oven parts manually.
Withpropercare,theporcelain
enamelwallswillretaintheirgood- Fi3sz ”–
-looking
finishformanyyears.
Soapandwaterwillnormally
S#mi&
-=
___
dothejob.Heavyspatteringor
spilloversmayrequirecleaning
witha mildabrasivecleanser.Soapy,
wetpadsmayalsobeused.Donot
allowfd spillswitha highsugaror
acidcontent(suchasmilk,tomatoes, —
sauerkraut,ffuitjuicesor piefilling’)
toremainonthesurface.Theymay
causea dullspotevenaftercleaning.
Householdammoniamaymakethe
cleaningjobeasier.Place1/2cupina
shallowglassorpotterycontainerin
a coldovenovernight.Theammonia
times willhelploosentheburned-on
greaseandfood.
If necessary,youmayusea caustic
cleaner.Followthepackage
directions.
-–A-
~11
-
2. Removeshelvesand cookware.
3. Soil visibilitymaybe reducedby
operatingthe ovenat450”F.Close
thedoor andturnOVEN TEMP
knobto450°F.Timefor at least4
hours.Repeatedcyclesmaybe
necessarybeforeimprovementin
appearanceis apparent.
REMEMBER:
DURING
THE
OPERATION
OFTHEOVEN,THE
DOOR,WINDOW
ANDOTHER
SURFACES
WILLGETHOTENOUGH
‘IOCAUSEBURNS.DO NCYI’
TOUCH.
LETTHEOVENCOOLBEFORE
REPLACING
SHELVES.
4. If a spilloveror heavysoiling
occurson the poroussurface,as
soonas practicalafterthe ovenhas
cooled,removeas muchof thesoil
as possibleusinga smallamountof
waterand a stiffbristlenylon
brush.Whenusingwater,useit
sparinglyand changeit frequently,
keepingit as cleanas possible,and
be sureto blot it up with paper
towels,cloths,or sponges.Do not
rubor scrub withpapertowels,
clothsor sponges,sincetheywill
leaveunsightlylinton the oven
finish.If waterleavesa whitering
on the finishas it dries, applywater
againandblotitwitha cleansponge,
startingat the edgeof the ringand
workingtowardthe center,
Donot use soap, detergent,
commercialovencleaner,silicone
ovensprays7coarsesteelpadsor
coarsebrushesontheporous
surface.Theseproductswillspot,
clog,andmar the poroussurface
and reduceits abilityto work.
Cautions about using
spray-onovencleaners:
Becarefil wheretheovencleaner
is sprayed.
e D. not sprayontheelectrical
controlsand switches(onmodelsso
equipped)becauseit couldcausea
shortcircuitandresultin sparking
or fire.
~Donot ~low a filmfromthe
cleanertobuilduponthetemperature
sensingbulb—itcouldcausethe
oventoheatimproperly.(Thebulb
is locatedat thetopofthe oven.)
Carefullywipethebulbcleanafter
eachovencleaning,beingcareful
nottomovethebulbas a changein
itspositioncouldaffecthowthe
ovenbakes.
~ DO not sprayanyovencleaner
ontheovendoor,handlesor any
exteriorsurfaceoftheoven,wood
or paintedsurfaces.Thecleanercan
damagethesesurfaces.
(contittuedne.vtpage)
11
Door
Theovendoor is removableto
makecleaningthe oveneasier.
0“431
The raisedsectionof tneoven
bottomis removableforcleaning.
Takeit out of theovenandyoucar
ap@~ effective
cleanersto clean
up excessivespilloversor remove
baked-onsoil—cleanersthatshou d
neverbe usednear thespecial
porousceramicoveninterior.
To remove the oven bottom:
L Removetheovenshelves.
Toremovethe door,open it a few
inchesto the specialstop position
thatwillholdthedoor open. Grasp
firmlyon eachsideand lift thedoor
straightup andoff the hinges.(Due
tothe largeamountof insulation
andthe constructionof thedoor,it
is heavy.)
Note:Be carefulnotto placehands
betweenthe springhingeandthe
ovendoor frame.The hingecould
snapback and pinchfingers.
Washwith hot, soapywater.For
stubbornspots,usea solutionof
ammoniaand water.Do not
immersethe doorin water.
lb replace the door, positionslots
in bottomof dooroverthe hinges
thatare in the “out”position.Then
lowerthe door slowlyand evenly
overboth hingesat the sametime.
If hingessnapbackagainsttheoven
frame,pull themback out.
2. Lift upwardon shelfsupports.
Swingbottomof supportstoward
centerof ovenandremove.
3. Removethe twoknurledholddownscrewsat eachfrontcorner.
If screwsare too tightto removeby
hand, use a screwdriver.
ModelJGKC16GEHalso hasa
removablebroilercompartment
doorwhich maybe removedfor
cleaning.
4. Placeyourfingersin the slotsin
the bottomandli~tup the front
edgeof the ov~i~ bottomuntilit is
clearof the ovenfrontframe.
12
5. Pullthe bottomforwardandout
of theoven,keepingthe rear ofthe
ovenbottomglidingon the bottom
of thelowestshelfglide.Thiskeeps
itfromcatchingontheburnerigniter
shield.Toreplacethe bottom,just
reversethisprocedure,makingsure
theIWOtabson the rear of theoven
bottomgo intotheslotsat the rear.
Theovenbottomhas a porcelain
enamelfinish.Tomakecleaning
easier,protecttheovenbottom
fromexcessivespillovers.Thisis
particularlyimportantwhenbaking
a fruitpieor otherfoodswithhigh
acidcontent.Hotfruit fillingsor
foodsthatare acidin contentsuch
as milk, tomatoor sauerkraut,and
sauceswithvinegaror lemon
juice, maycausepittinganddamage
to the porcelainenamelsurface.
Toprotectthe ovenbottomsurface,
placea pieceofaluminumfoil
slightlylargerthanthe bakingdish
or smallcookiesheeton a lower
rackor underthebakingdishto
catchanyboilovers.It shouldnot
completelycovertherack as this
wouldcauseunevenheat in the
oven.Aluminumfoilshouldnot
be placedon theovenbottom.
If a spilloverdoesoccuron the
ovenbottom,allowthe ovento cool
first. Youcan cleanthe bottomwith
soapandwater,a mildabrasive
cleanser,soap-filledabrasivepads,
or causticovencleanerfollowing
manufacturer’sdirections.
Whenapplyingovencleaner,
be carefulnotto get it on the
countertop,floor,continuouscleaningovenpartsor anyother
surface.
Note:Porcelainovendoor linerand
ovenbottommaybe cleanedwith a
commercialovencleaner.They
mustbe removedand cleanedaway
fromtheovento preventdamageto
the continuous-cleaningovenliner.
@
.-
..
O\Tenshelvesmaybe cleanedwith
ii mild abrasive cleanser following
manufacturer’sdirections. After
cleaning.rinse the sheiveswith clean
water and dry with a dry cloth. To
removeheavy,burned-onsoil, soapy
metalpads maybe usedfollowing
manufacturer’sdirections.After
scrubbing,washwithsoapywater,
rinseanddry.
Bmik Pall 6%Rack
Afterbroiling,removethebroiler
rackandcarefullypour off the
grease.Washand rinsethe pan
andrackin hot, soapywater.
If foodhas burnedon, sprinkle
thebroilerrack whilehot with
detergentand coverwith wetpaper
towelsor a dish cloth.That way,
burned-onfoodswillsoak loose
whilethe mealis beingserved.
notstorea soiledbroilerpan
rackin the ovenor broiler
compartment.
Before replacing any light bulb,
disconnect electric power to the
range at the main fuse or circuit
breaker paneL Let the bulb cool
completelybeforeremovingit. Do
not touch a hot bulb with a damp
cloth—thebulb will break.
Thelightbulb in yourmm is
locatedinthe upperrightcorner.
Reachin and unscrewit aftertaking
precautionsmentionedabove.
Replaceit with a high-temperature
appliancebulbofthesamewattage.
oven
the
Thetemperaturecontrolinyour
newovenhas beencarefullyadjusted
to provideaccuratetemperatures.
However,if thisovenhas replaced
oneyouhaveusedfor severalyears,
youmaynoticea differencein the
degreeof browningor the length
of timerequiredwhenusingyour
favoriterecipes.Oventemperature
controlshavea tendencyto “drift”
overa periodof yearsandsince
thisdrift is verygradual,it is not
readilynoticed.Therefore,you
mayhavebecomeaccustomedto
yourpreviousovenwhichmay
haveprovideda higheror lower
temperaturethanyouselected.
Beforeattemptingto havethe
temperatureofyournewoven
changed,be sureyouhavefollowed
thebakingtimeandtemperatureof
the recipecarefully.Then, after
youhaveused theovena fewtimes
andyoufeeltheovenis toohot
or toocool, thereis a simple
adjustmentyoucanmakeyourself
on theOVENTEMPknob.
Pull the knob off the control shaft
and look at the back side. There is
a disc in the center of the knob skirt
with a series of notcheson the inner
edge next to the knob shafi. One of
these notches is positioned over a
pointeron the side of the knob shall.
Notewhichno[chthepointeris
locatedin. Tomakean adjustment,
carefullyloosen(approximately
oneturn), butdo notcompletely
removethe twoscrewsthatholdthe
skirtto the knob.Holdthe knobin
onehandand withtheotherhand
carefullytilttheskirtuntilthe notch
in thediscclearsthepointeron the
knobshaft.
.
Toraisetheoventemperature,turn
the dial in thedirectionof the
arrowfor “Raise~’Tolowerthe
temperature,turnthe dial in the
directionof arrowfor “Lower~’
Eachnotchwillchangetheoven
temperatureapproximately25”F.
Wesuggestthatyoumakethe
adjustmentonenotchfromthe
originalsettingandcheckoven
performancebeforemakingany
additionaladjustments.
Afterthe adjustmentis made,make
surethepointeron the knobshaft
is alignedwiththenotchin thedisc.
Press skirtandknobtogetherand
retightenscrewsso theyare snug,
butbe carefulnotto overtighten.
Re-installknobon rangeand
checkperformance.Note:After
an adjustmenthasbeenmadethe
“Off” and “Broil”positionswill
notlineup withthe indicatormark
on the controlpanelas they
previouslydid. Thiscondition
is normalandwill notcreate
a problem.
Note position of
pointer to notches
before adjustment
,
#@-~
~
a
w!
,’
,‘\,
4$0h
‘~R
?&
@ \. -. . Loosen onlv the
(
locking scr~ws
(continued netipage)
13
..
.—.——-...
PART
GENERAL DNUX.T1ONS
ifiATERL$L!!
TOUSE
sIand
in
Dmin fat, cool pan irndrick sligh[ly.(Do not let soiled pm iid rack
hroik?r
compartment to cool.) Sprinldc on dcwrgent. Fill [hc pxn with warm wmcrand Sprtid
cloth or paper towelover the reck. Let pan and rack stand ft>ra few minutes. Wash; scour
if necessary. Rinse and dry. OPTION: The broiler pun and rack mayalso be ciwtncd in a
dishwasher.
Pull off knobs. Washgently but do not soak. Dry and return controls m range making sure
to match flat w-caon the knob and shaft.
outsideGlassFinish
e Soap and W’atcr
I&let@,
including
SideTrimsand
TrimStrips
Clean outside of cooicd black $Iassdoor with ii glass cleaner that does not contain
ammonia. Washother glass with cloth dampened in soapy water, Rinse and polish with a
dry cloth. If knobs we rcrnoved, do not allow Wa[erto run down inside the surface of gloss
whilc c!eaning.
Wmh, rinse, and then polish with a dry cloth. DO NCY’f
USE steel wool, abrasives,
ammonia, acids, or commercial oven cleaners which may damage the finish.
porcelainEnamel
Finish
o Paper Towel
@Dry Cicth
* Soap and Water
Avoidcleaning powders or harsh abrasives which may scratch the enamel. If acids should
spill on the range while it is hot, usc a dry paper towelor cloth to wiw up right away.
When the surface has cooled, wash and rinse. fir other spills, such as fat smatterings.etc.,
wash with soap and water when cooled and then rinse. Polish with dry cloth.
I%inted
Surfaces
* Soap and Water
Usc a mild solution of soap and water. Do not usc any harsh abrasives or cleaning powders
which may scratch or mar surface,
InsideOvenDoor*
@Soap and Water
o Soap-Filled Scouring Pdd
~ Commercial Oven Cleane
Toclean ovcrrdoor; remove by opening a few inches and grasping door at sides. Lift door
up and away from hinges. Clean with any and all mentioned materials. Replace by
gmsping door at sides and lining up door with hinges. Push door firmly into place.
OvenInterioF–
Top,SidesandBack
(ModelsJGKC15and
JGKC16)
* Stiff Bristle Nylon Brush
Cool before cleaning.
If heavy soiling has occurred on the porous suryuce,removeas much of the soil as possible
using a small amount of water and a stiff bristle nylon brush. Use water sparingly and
(
change it frequently, keeping it as c!ean as possible, and be sure to blot it up with paper
towels, cloths, or sponges. Do notruborscrub with paper towels, cloths or sponges, since
they will leave unsightly lint on the oven finish. If water leavesa white ring on the finish as
with a clean sponge, starling at the edge of the ring
it dries, apply water again and blot it
and working towardthe center.
(CAUTION: When in
USC,light bulbs can
become warm enough to
break if touched with
moist cloth or towel.
When cleaning, avoid
warm lamps with cleaning
cloths.)
OvenLiner*
OlodelJGKS15)
(CAUTION: When in
use, light bulbs can
become warm enough to
break if touched with
moist cloth or towel.
When cleaning, avoid
warm lamps with cleaning
c!oths if lamp cover k
removed.
Forspeeialcleaninginstructions,see pageU.
~ Soap and Water
Soap-Filled Scouring Pad
~ Commercial Oven Cleane
●
Cool before cleaning.
FOR LIGHT SOIL: Frequent wiping with mild soap and water (especially after cooking
meat) will prolong the time between major cleaning. Rinse thoroughly. NOI’E: Soap left
on liner causes additional stains when oven is reheated.
FOR HEAVYSOIL: Choose a nonabrasive cleaner and follow label instructions, using
thin layer of cleaner. Use of rubber gloves is recommended. Wipe or rub lightly on
stubborn spots. Rinse well. Wipe off any oven cleaner that gets on thermostat bulb. When
rinsing oven after cleaning also wipe thermostat bulb.
RemovableOven
Bottom
e Soap and Water
a Soap-Filled Scouring Pad
(Non-metallic)
The oven bottom panel can be removed for easy cleaning (see page 12).Use the same
directions for cleaning as explained above for Porcelain Enamel Finish,
Shelves
● Soap and Water
0 Soap-Filled Scouring Pad
@Commercial Oven Cleane
Remove shelves and clean them outside of the oven to avoid damaging the specially coated
oven top, sides and back. Use any and all mentioned materials. Rinse thoroughly to
remove all materials after cleaning. N~E: Some commercial oven cleaners cause
darkening and discoloration, When using for first time, test cleaner on small part of
shelf and check for discoloration before completely cleaning.
*spillage of marinades, fmit juices, and basting materials containing acids may cause discoloration. Spillovers should be blotted up immediately, with care
being taken not to touch any hot portion of the oven, When the surface is cool, clean and rinse.
14
CAUSEAND
@Plug on rangek not completelyinsertedinto the outletreceptacle.
@Circuitbreakerin househasbeen~ripped~
or fusehas beimbkwvn,
= oven controlsare notproperlyset.
~f’~~ LIGHT’ EM--JES
NO-r WORK
@Bulbis defective.Replace.
@Switchwhichoperatesovenlightis broken.Cal!for service.
F(3OD DOESNOT
BROIL PI?C)I?ERLY
@OVENTEMPknobnotsetat BROIL.BroilerwillnotoperateifCWEN
TEMPknobis turnedpastBROIL.
* Foodis beingcookedon hotpan.
~ Utensilsare not suitedfor broiling.
FOODDOESNOTROAST
ORBAKEPROPERLY
~OVENSETknobnotsetonMJ7X).
(MM whenusingAutomaticOven
Timer.
~OW3NTEMPknobnotsetcorrectly.
@Shelfpositionis incorrect.CheckRoastingandBakingpages.
~ Ovenshelfis notlevel.
@Wrongcookwareis beingused. Whenroasting,pan is too small.
@Foiltentnotused whenneededto slowdownbrowningduringroasting.
IMoEmJRE
H“JSIDEAND
=Be sureovenventductis notblockedor covered.
OUTSIDEOVEN
H J“(IU‘needmore help.. .Cw, toll free:
The GE AnswerCenter”
consumer
service
Toob[ainservice,seeyourwarranty
on thebackpageof thisbook.
1~~-re proudof our service and
If for some
wiint you to be pleased,
reason you are not happy with the
you receive, here are three
steps to follow for further help.
FIRST’,contact the people who
serviced your appliance. Explain
service
whyyouare not pleased. In most
cases,this will solvethe problem.
NEXT,if youare still notpleased,
writeallthe details—including
yourphonenumber—to:
Manager,ConsumerRelations
GeneralElectric
AppliancePark
Louisville,Kentucky40225
15
FIIVALLY,if yourproblemis still
not resolved,write:
MajorAppliance
ConsumerActionPanel
20 North WackerDrive
Chicago,Illinois60606
-%8
AI+
t
~-~::Save proof
of original
purchase
date
1s
Is N(YTCOVEFED
- .’
,
,“
.“
>L
b.
=
=—
I
&.
,,
~<
~-”
g----
such as your sales slip or cancelied check to establish warranty period. 4~~l~.-..—.
=
-==$?Ji!:—
FULL ONE-YEAR WARRANTY
For one year from date of original
purchase, we will provide, free of
charge, parts and service labor in
your home to repair or replace any
part ofthe range that fails because
of a manufacturing defect.
This warranty is extended to the
original purchaser and any succeeding owner for products purchased
for ordinary home use in the 48
mainland states, Hawaii and
Washington, D.C. In Alaska the
warranty is the same except that it
is LIMITED because you must pay
to ship the product to the service
shop or for the service technician’s
travel costs to your home.
All warranty.service will be provided
by our Factory Service Centers or
by our authorized Customer Care~
servicers during normal working
hours.
Look in the White or Yellow Pages
of your telephone directory for
GENERAL ELECTRIC COMPANY,
GENERAL ELECTRIC FACTORY
SERVICE, GENERAL ELECTRICHOTPOINT FACTORY SERVICE or
GENERAL ELECTRIC CUSTOMER
CARE@SERVICE,
@Service trips to your home to
teach you how to use the product.
~ Replacement of house fuses
or resetting of circuit breakers.
@Failure of the product if it is
used for other than its intended
purpose or used commercially,
@Damage to product caused
by accident, fire, floods or acts
of God.
WARRANTOR IS NOT RESPONSIBLE FOR CONSEQUENTIAL
DAMAGES.
Read your Use and Carematerial.
If you then have any questions
about operating the product,
please contact your dealer or our
Consumer Affairs office at the
address below or call, toll-free:
The GE Answer Center@
800.626.2000
consumer information service
~ Improper installation.
If you have an installation problem,
contact your dealer or installer.
You are responsible for providing
adequate electrical, gas, exhausting and other connecting facilities.
ilk
IIx-s
II~=
~~@
ll&:,,’=——
Some states do not allow the exclusion or limitation of incidental or consequential damages, so the above limitation or exclusion
may not apply to you. This warranty gives you specific legal rights, and you may also have other rights which vary from state to state.
To know what your legal rights are in your state, consult your local or state consumer affairs office or your state’s Attorney General.
1,,=
V#arrantOr: (N3neral El~ctric
H further help is needed C0nc3ernirq t~is
Manager-Consumer
Ilxs=
~;
~;---
Company
1!:=
~!~-:
warranty,contact:
Affairs, General Electric Company, Appliance Park, Louisville, W 40225
IIG—.
a;;~-<