1
‘-
GasRang@
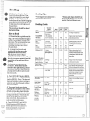
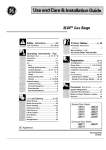
contents
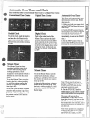
Anti-Tip Device
Appliance Registration
3,5
2
Care and Cleaning
Clock
16-22
11
Consumer Services
Control Panel
27
16
Features
Flooring Under Range
6,7
5
Self-Cleaning Operation
Shelves
Vent Duct
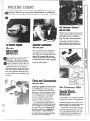
Problem Solver
Safety Instructions
Surface Cooking
Burners
Burner Grates
Leveling
Lift-Up Cooktop
5
17
Control Settings
Cookware Tips
Minute Timer
Model and Serial Numbers
11
2
Drip Pans
Flame Size
Oven
Air Adjustment
2:
Baking, Baking Guide
Broiler Pan and fick
15
9
Door Removal
Light; Bulb Replacement
18
10, 18
Preheating
Roasting, Roasting Guide
GEAppiaBc@s
;:
2-5
8,9
17,22
16,22
8
9
17,22
8
Lighting Instructions
8
Warranty
Back Cover
12, 13
17,22
Broiling, Broiling Guide
control Settings
Oven Bottom Removal
Oven Timer
19-21
10, 18
18
11
12, 13
14
GEAnsweR Cenfera
8oa62&zooo
---,>-.
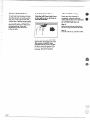
If yol~needservice.
e
●
It is intendedto helpyouoperateand
maintainyour newrangeproperly.
Keep it handy for answersto your
questions.
If youdon’tunderstandsomething
or needmore help, write (include
yourphonenumber):
Consumer Affairs
GE Appliances
AppliancePark
Louisville,KY40225
writedown themodel
and serial
numbers.
You’llfind them on a labellocated in
the burner box under the cooktop.
See pages6 and 7.
These numbers are also on the
Consumer Product Ownership
RegistrationCard that came with
your range. Beforesendingin this
card, please write these numbers
here:
To obtain service, see the
Consumer Servicespage in the
back of this book.
We’reproud of our service and
want youto be pleased. If for some
reason you are not happy with the
service you receive, here are three
steps to followfor further help.
FIRST, contact the people who
serviced your appliance. Explain
why you are not pleased. In most
cases, this will solvethe problem.
NEXT, if you are still not pleased,
write all the details-including
your phone number-–to:
Manager, Consumer Relations
GE Appliances
Appliance Park
Louisville, Kentucky40225
FINALLY, if your problem is still
not resolved, write:
Major Appliance
Consumer Action Panel
20 North Wacker Drive
Chicago, Illinois 60606
ModelNumber
Serial Number
Use these numbers in any
correspondence or service calls
concerning your range.
If you
received
a
damagedrange..
e
Immediately contact the dealer (or
builder) that sold you the range.
save
time
and money.
Beforeyou request
service.
ee
Check the Problem Solver on
page 25. It lists causes of minor
operating problems that you can
correct yourself.
t
woRTmT
SAFETYNOTICE
TheCaliforniaSafeDrinking
WaterandToxicEnforcement
ActrequirestheGovernorof’
Californiatopublisha listof
substancesknowntothestate
tocausecancer,birthdefectsor
otherreproductiveharm,and
requiresbusinessestowarn
customersofpotentialexposure
tosuchsubstances.
Gasappliancescancause
minorexposuretofourofthese
substances,namelybenzene,
carbonmonoxide,formaldehyde
andsoot,causedprimarilybythe
incompletecombustionofnatural
gasorLP fuels.Properlyadjusted
burners,indicatedbya bluish
ratherthana yellowflame,will
minimizeincompletecombustion.
Exposuretothesesubstancescan
beminimizedfurtherbyventing
withanopenwindowor usinga
ventilationfanor hood.
when You&t YourRange
~ Have the instiller showyou
the locationofthe range gas
cut-off
valveand how toshut
it offif necessary.
@Haveyour range instilled
a~~dproperly groundedby a
qllalifiedinStilIer9in accordance
withtheInstallationInstructions,
Anyadjustmentandserviceshould
beperformedonlybyqualified
gasrangeinstallersor service
Technicians.
~plug your range into a
Uo=voltgrounded outlet only.
Donotremovetheround
groundingprongfromthe p~L~g.
kin doubtaboutthe groundingof
ihehomeelectricalsystem,it IS
outletreplacedwithaproperlygroundedthree-prongoutletin
accordancewiththeNational
ElectricalCode.DO not use an
extensioncordwiththisappliance.
cantipand
injurycould
result.To
prevent
accidental
tippingOfthe
range9attich
it tothefloor
byinstalling
theAnti-TiD
devicesupplied.Tocheckiftfie
deviceis installedandengaged
properly,removethedrawer(on
modelssoequipped)andinspect
therearlevelinglegs.Makesure
theyfitsecurelyintotheslotson
thedevice.
Formodelswithouta storage
drawer,carefillytiptherange
forwardto checkiftheAnti-Tip
deviceis engagedwiththe “
levelinglegs.
Ifyoupulltherangeoutfromthe
wallforanyreason,makesure
therearlegsarereturnedtotheir
positionsin thedevicewhenyou
pushtherangeback.
@Besure all patting materiaIs
are reniovedfromthe range
beforeoperatingit, to prevent
fireor smokedamageshould
thepackingmaterialignite.
——
@Afterprolt)i]ged
use ofa
range,nighfloortemperatures
mayresultandmanyfloor
coveris~gs
willnotwithsbnd
thiskindof ~Bse.
Neverinstallthe
rangeovervinyltileor linoleum
thatcannotwithstandsuchtypeof
use.Neverinstallitdirectlyover
interiorkitchencarpeting,
usingYourRange
@Don’tleavechildrenaloneor
unattendedwherea rangeis hot
orinoperation.Theycouldbe
seriouslyburned.
@D0n2tallowanyonetoClimb$
shnd orhangonthedoor?
drawerorcooktop.Theycould
damagetherangeandeventipit
overcausingseverepersonalinjury.
e CAUTION:ITEMSOF
INTEMST m CHILDWN
SHOULDNm BE STOWD
IN cABINEm ABOW A
MNGE OR ONTHE
BAcmPLMH ORA mG&
CHILDRENCLIMBINGON
THEMNGE ~ REACH
ITEMSCOULDBE
SENOUSLYINJURED.
@ht burnergratesandother
surfacesCoolbeforetouching
themorleavingthemwhere
childrencanreachthem.
@Neverwearloosefittingor
hanginggarmenbwhileusing
theappliance.Flammable
materialcouldbe ignitedif
broughtin contactwithflameor
hotovensurfacesandmaycause
severeburns.
o For your safety9neveruse
your appliancefor Warnlimgor
heatingthe roome
——-
...
...
...-
—
EmommT
SAFETY
INSTRUCTIONS
(continued)
* Tominimize
the possibility
ofburns,ignitionofflammable
pan.Turnoff’burner,then
materials,andspillage,turnthe
smotherflamingpanbycovering
cookwarehandlestowardtheside
pancompletelywitha well-fitting or backoftherangewithout
lid, cookiesheetor aflattray.
extendingoveradjacentburners,
Flaminggreaseoutsidea pancan
@Alwaysturn surfaceburner
beputoutbycoveringwithbaking
ContmktoOBTbeforeremoving
sodaor,ifavailable,amulticookware.
purposedrychemicalor foam-type
@carefully watchfoombeing
fireextinguisher.
friedat
HI flamesetting.
e DQ~~~~~~~~
fla~~~~~~
@~~~~~~]~~~~~~~~~~f~~~
materialsin an Ovenor near
openings)oftherange.They
the Cooktop,Donot storeor use
provide
theairinletandoutlet
gasolineor other flammable
whichisnecessary
fortherange
Vapn Wdliqti& h the tictity
tooperate
properly
withcorrect
ofthis or allyother appliance.
combustion,
@DonotletcooMnggrease
&~~ ~Qg~~~~~~~~~~~~
orotherflammablematerials
coo~ngsMrfaceif the wokhas
accwdak inornearthermge.
a roundmem~ring whichis
@when eootingperkyfollow
p~aeedoverthe burner grateto
thedirectionsexactlyandalways
supportthe wok,Thisringacts
cookthemeattoaninternal
asaheattrapwhichmaydamage
temperatureofatleast170”F.
theburnergrateandburnerhead.
Thisassuresthat,in theremote
Also,it maycausetheburnerto
possibilitythattrichinamaybe
workimproperly.Thismaycause
presentinthemeat,it willbe
a carbonmonoxidelevelabove
killedandmeatwillbesafetoeat.
thatallowedbycurrentstandards,
resultingin ahealthhazard.
surface
cQoH~
@floodsfor fryingShouldbe 8s
9 Always
usethe LITE position dry as possible.Frostonfrozen
whenignitingtop burners and
foodsor moistureonfreshfoods
makesuretheburnershaveignited.
cancausehotfattobubbleupand
@~~~~~~~~~~
s~~f~~~~~~~~~s
oversidesofpan.
unattendedat high flame
@Useleastpossibleamountof
settings.Boilovercauses
fat for effectiveshallowor deep”
smokingandgreasyspillovers
fat frying.FiUingthepantootill
thatmaycatchon fire.
offatcancausespilloverswhen
foodisadded.
QAd*justtop burner name size
so it doesnot extendbeyondthe
@If a combinationofoilsor
edgeofthe cookware,Excessive
fafi willbe usedin frying9stir
flameishazardous.
togetherbeforeheating,or as
fatsmeltslowly.
GAIwaysbeat fat slowly9and
watchas it heats.
o USedeep fat thermometer
wllemeverpossibletoprevent
overl~eating
fatbeyondthe
smokingpoint.
9 Donot usewaterongrease
fires.
Neverpickup a flaming
—
*Useproperpansi~e—Avoid
pansthatareunstableoreasily
~ipped.Selectcookwarehavi~g
flatbottomslargeenoughto
properlycontainfoodavoiding
boiloversandspillovers,andlarge
enoughtocoverburnergrate.
Thiswillbothsavecleaningand
preventhazardousaccumulations
Gffood,sinceheavyspatteringor
spilloversleftonrangecanignite.
Usepanswithhandlesthatcanbe
easilygraspeda~]dremaincool,
e whenusing
giass
cookware,
makesureit isdesignedfortopof-rangecooking.
,.
..:.
I
@Do not!eaveplasticitemson
the cooktop–theymaymeltif
lefttooclosetothevent.
@Donot leaveanyitemson the
cooktop.Thehotair fromthe
ventmayigniteflammableitems
andwillincreasepressurein
closedcontainers,whichmay
causethemtoburst.
e Do notplace anyflammable
materials9such aspotholders
or paper hoxes~on theCooktop.
Anytimetheovenorbroileris
turnedon, hotairis exhausted
throughthe ovenvent.Thishot
air cancauseflammable
materialsto ignite.
-$
.—
.
—
:
~-
:
~}
:-~>
~.
;~
Flooring Under
theRange
burnersandcreatea firehaz~rd.
@If yousmellgas,turnoffthe
gasSUPPIYto the rangeandcalla
qualifiedservicetechnician.
Never
useanopenffametoIocatea leak.
Bating, Brofli~ and
Rowbg
~Donot useovenfor a storage
mea.
@S~nd awayfrom therange
whenopeningthedoorofahot
oven.Thehotairorstem
whichescapescancauseburns
tohan&9faceand/oreyes.
@p~~~~~~~~~~~~~~s
~~~~s~~~~
positionwhileovenis cool.
@filling outshelftothe
shelfstopis a eonveIIience
in
liftingheavyfoods.It isalsoa
precautionagainstburnsfrom
touchinghotsurfacesofthe
~ Don9theat unopenedfood
Containers
inthe oven. Pressure
couldbuildup andtheContiiner
Couidburst Causing an injllrya
pancancatchfireifovenisused
withoutremovingthegreasefrom
thebroilerpan.
@Whenbroiling$if n]eatis too
closetotheflame,thefatmay
ignite.Trimexcessfattoprevent
excessiveflare-ups,
@Makesure broilerpanisin
placecorrectlytoreducethe
possibilityofgreasefires.
~ If youshould havea grease
fireinthebroilerpan,turnoff
oven,andkeepovendoorclosed
tocontainfireuntilit burnsout.
@Do
not
cleanthe door gasket.
Thedoorgasketisessentialfora
goodseal.Becarefulnottorub,
damageor moveit.
@Do not
use oveneieanem.
No
commercialovencleaneror oven
linerprotectivecoatingofany
kindshouldbeusedinor around
anypartoftheoven.
a R~move the broiIer pan and
other cookwarebeforeselfcleaningtheoven.
CieaningYourRa~e
@Clean only partslistedinthis
Useand CareBook.
@Keeprangecleanandfree
of accumulations
ofgreaseor
spilloverswhichmayigdte.
Your range, like so many other
llousellold items, is heavy and
ea~~settle into soft floor coveri~lgs
such as cushioned vinyl or
carpeting. ~Nhenmovingthe range
on this type of flooring, use care,
Do not ins~ll the range over
kitclleil carpeting unlessyou
place an insulatingpad or sheetof
l/4-inch-thickplywoodbetween
the range and carpeting,
men
the floor covering ends at
the~ront o~the range, the area that
the range will rest on should be
built up with plywoodor similar
material to the same level or higher
than the floor covering.This will
allow the range to be moved for
cleaning or servicing.
bveling the Range
Leveling legs are located on each
corner of the base of the range.
Removethe bottom drawer (on
models so equipped) and you can
levelthe range on an uneven floor
To remove drawer, pull drawer
out all the way9tilt up the front
and hke it Olat.To replace wwer~
insert glides at back of drawer
beyond stop on range glides. Lift
drawer if necessary to insert easily.
Let front of drawer down, then
push into close.
Both of the rear leveling legs will
engage the Anti-Tipdevice (allow
for some side to side adjustment).
Allow a minimum clearance of 1/8”
between the range and the leveling
legsto permit installation into the
Anti-Tip device.
5
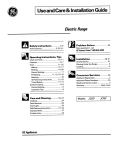
Explained
on page
JGBP24GEJ
JGBP26GEJ
8
4
4
4
4
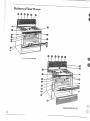
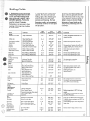
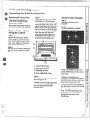
1 Model and Serial Numbers
(in burner boxunder cooktop)
2
Surface Burner Controls
3 SurfaceBurners, Gratesand Chrome
Drip Pans
8, 16,17
4 OVENSET Control
9
5 OVENTEMP Control
9
6 AutomaticOven Timer,
Clock and Minute Timer
10-11,19,20
7 SurfaceLight
9,16
8 Door Latch
20
9 Door LockedIndicator
20,21
10 Oven CleaningIndicator
21
11 Oven “On” Indicator
9
12 Surface Light Switch
9
13 Oven Vent
14 Oven Interior Light
10
15 Oven Light Switch
(letsyouturn interior ovenlight on and of~
16 Oven Shelves
(easily removed or repositioned on
shelf supports)
17 Oven Shelf Supports
18 Broiler Pan and Rack
19 RemovableOven Door
(easily removed for ovencleaning)
20 Lifi-Up CooMop
(locks in up position to simplify
cleaning underneath)
22 Storage Drawer
-~j
%..27
23 Anti-TipDevice
(see Safety Instructions)
I
I
I
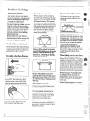
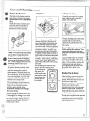
AutomaticIgnition
Yoursurface burners are lighted
by electric ignition, eliminatingthe
need for standingpilot lightswith
constantlyburning flames.
In case of a power outage, you can
light the surface burners on your
range with a match. Hold a lighted
match to the burner, then tur~ the
knob to the LITE position. CJse
extreme caution when lighting
burnem this way.
Surface burners in use when an
electrical power failure occurs wi. 1
continue to operate normally.
surface
Burner
Burner
Push the control knob in and turn
it to LITE. Youwill hear a little
clicking noise—the sound of the
electric spark igniting the burner.
I
I
Lifting
and will tift slightly away from the
burner when the burner is first
turned on. A blowing or hissing
sound may be heard.
Flame will stabilize and curve
upwar~ after a burner heats up or
30 to 45 seconds after it is turned
on. The biowing or hissing sound
will stop.
After lighting a burner:
@Check to be sure the burner you
turned on is the one you want to use.
~ Do not operate a burner for an
extended period of time without
cookware on the grate. The finish
on the grate may chip without
cookware to absorb the heat.
After theburner ignites, turn the
knob to adjust the flame size.
The flame size on a gas burner
should match the cookware you
are using.
NEVER LET THE FLAME
Controk
Knobs that turn the surface burners
on and off are located on the lower
control panei and are marked as to
which burners they control.
To Light a surface
NorRnalb~~rneroperation:
When a burner is first turned on,
you may hear a blowingor hissing
sound for 30 to 45 secondsor until
the burner heats up. This normal
sound is due to improvedinjection
of gas and air into the burner. Put a
.Pan on the burner before lightingit,
or adjust the flame to match pansize as soon as it lights,and the
blowingor hissing sound will be
much less noticeable.
~ Be sure the burners and grates are
cool before you place your hand, a
pot holder, cleaning cloths or other
materials on them.
EXTEND UP THE SIDES OF THE
COONARE. Anyflamelargerthan
the bottomof the cookwareis wasted
and ordy servesto heat the handles.
When using aluminum or
aluminum-clad stiinless steel
poti and pans, adjust the flame so
the circle it makes is about 1/2inch
smaller than the bottom of the
cookware.
Whenboiling9use this same flame
size—1/2inch smaller than the
bottom of the coolcware—nomatter
what the cookwareis made of. Foods
cook just as quickly at a gentle boil
as they do at a furious rolling boil.
A high boil creates steam and cooks
awaymoisture, flavor and nutrition.
Avoidit except for the few cooking
processes
which ned a vigorousboil.
When frying or warming foods
in sminless stee19cast iron or
ename~ware, keep the flame down
lower—to about 1/2the diameter
of the pan.
When frying in gIass or ceramic
eoohme, lowertheflameevenmore.
using
Your oven
surface
Light
Automatic Ignition
(on modelso equipped)
A full-widthfluorescentlight over
the upper control panel illuminates
thecooktop.Pressnd momentarily
hold the SURFACELIGHT switch
on the upper control panel to turn
the light on and off.
TbIlight the burners, turn the
OVEN SET knob to the desired
finction. Push in and turn the
OVEN TEMP knob to the desired
temperature. The burner should
ignite within 60 seconds.
Top”of”Range
cookware
Aluminum:
Mediurn-wei~ht
u
COO* is recommendedbecauseit
heatsquic~y and evenly.Most foods
brownevedy in an ahIminurnstiet.
Mineds in foodand waterwill stain
but will not harm aluminum. A
quick scour with a soap-filledsteel
woolpad afier each use keeps
aluminum cookware looking shiny
and new. Use saucepans with tightfitting lids for cooking with
minimum amounts of water.
CAUTION: DO NOT MAKE ANY
ATTEMPT ~ OPERATE THE
ELE~MC IGNITION OVEN
DURING AN ELECTRICAL
POWER FAILURE. Resumption
of electrical power when the OVEN
TEMP and OVEN SET controls
are in any position other than OFF
will result in automatic ignitionof
the oven or broiler burner and
could cause severe burns if, at the
time, you were attemptingto light
the burner with a match.
Cast Iron: If heated slowly,most
skillets will give satisfactoryresults.
Enamelware: Under some
conditions, the enamel of some
cookwaremaymelt. Followcookware
manufacturer’srecommendations
for cooking methods.
Beforeusi~ Youroven
Be sure you understand how to set
the controls properly. Practice
removing and replacing the shelves
while the oven is cool. Read the
information on the followingpages,
and keep this book handy.
Glass: There are two types of glass
cookware—thosefor oven use only
and those for top-of-rangecooking
(saucepans, coffeepots and
teapots). Glass conducts heat very
slowly.
Heatproof Glass Ceramic: Can
be used for either surface or oven
cooking. It conducts heat very
slowly and cools very slowly.
Check cookware manufacturer’s
directionsto be sure it can be used
on gas ranges,
The controls for your oven
are marked OVEN SET and
OVEN TEMP.
Stiinless Steel: This metal alone
has poor heating properties, and is
usually combined with copper,
aluminum or other metals for
improved heat distribution.
Combination metal ski~letsusually
work satisfactorily if they are
used with medium heat as the
man~~facturerrecommends.
Tl~eOWN SET control hassettings
for BAKE,BROIL,TIMED BAKE,
CLEAN and OFF. When youturn
the knob to the desired setting,the
proper burner is activatedfor that
operation.
BA~–Use this setting for all
normal oven operations—for
example, for cookingroastsor
casseroles. Only the bottom oven
burner operatesduring baking.
BROI&Use this setting for
broiling. Only the top (broil)
burner will operate.
TmED BA-Use
this setting
to turn the ovenon and off at
specified times when you want
cookingto start and stop. See
AutomaticOven T~meron next
page.
CLEAN—Use this setting for the
self-cleaningfinction only.
OFF—Shuts off power to the oven
controls. Oven will not operate.
The OVEN SET and OVEN TEMP
controls should be turned to OFF
whenever the ovenis not in use.
The OVENTEMP controi
maintains the temperature you set
for normal ovenoperation as well
as for broiling.
Yor normal oven operation, push
in and turn the knob to the desired
temperature which is marked in 25°
increments.It will normally take 30
to 60 seconds before the flame
comes on.
After the oven reaches the selected
temperature, the oven burner cycles
—offcompletely, then on with a
full flame-to keep the oven
temperature controlled.
~~~~ “~n”
Indicator
Light on upper control panel glows
when oven is in operation; it goes
out when the OVEN SET knob is
turned to OFF.
—
using
Yotlroven
oven
shelves
The shelvesare designed with
stop-locksso when placed correctly
on the shelf supports, they will stop
before coming completely out of
the oven and will not tilt when you
are removing food from them or
placing food on them.
When placing cookware on a shelf,
pull the shelf out to the “stop”
position. Place the cookware on
the shelf, then slide the shelf back
into the oven. This will eliminate
reaching into the hot oven.
To remove a shelf from the oven,
pull it out to the stop position, lift
up on front and pull out.
SheIfPositiom
The oven has four shelf supports—
A (bottom), B, C and D (top). Shelf
positions for cooking are suggested
on Baking and Roasting pages.
oven
Li@t
oven
vent
The light comes on automatically
when the ovendoor is opened. For
a modelwith the oven light switch
on the u~~er control~anel, turn the
light on ~nd off whe~the door is
closed.
Youroven is ventedthroughducts
at the rear of the range (see r~age6).
Do not block these ducts when
cooking in the oven—itis important
that the flowof hot air from the
oven and fresh air to the oven
burners be uninterrupted.
As your ovenheats up, the
temperature change of the air
in the ovenmay cause water
dropletsto form on the door
glass. These droplets are
harmless and will evaporateas
the ovencontinuesto heat up.
@Handes of pok andpansonthe
Cooktop
may become hot if left
too close to the vent,
@Do not leave plastic itemson
the Cooktop—theymay melt if
left too close to the Vente
@Do not leave any itemson the
cooktop. The hot air from the vent
may ignite flammable items and
will increase pressure in closed
containers, which may cause them
to burst.
.
Autimatic oven
mmer
Digitil clock
To set the clock, push the knob in
and turn the clock hands to the
right to thecorrect time. Then let
the knob out and continue turning
to OFF.
Push in the center knob of the
Minute Timer and turn the knob
in either direction to set the digital
clock numerals to the correct time.
(The Minute Timer is the large dial
to the lefi of the digitalclock.) After
setting the clock, let the knob out
and turn the Minute Timer pointer
to OFF.
This Timer=will automaticallystart
and stop your ove~~
for you. Iqere’s
what you do:
1. Make s~:reboth your rangeclock
andthe STARTdial showthe~orrect
time of day.
2. Set the START control. Push in
and turn the Y.ARTknob to the time
you want the ovento turl~on. (If
you want it to start operating
immediately,do not set the START
time.)
3. Set the STOP control. Push in
and turn the S~P knob to the time
you want the ovento turn itself off.
Minute mmer
The Minute Timer has been
combined with the range clock.
Use it to time all your precise
cooking operations. You’ll
recognize it as the pointer which is
different in color from the clock
hands.
To set the Minute Timer, turn the
knob to the left, withoutpushing
in, until the pointer reaches the
number of minutes you want to
time (up to 60).
At the end of the set time, a buzzer
sounds to tell you time is up. ~rn
the knob, withoutpushingin, until
the pointer reaches OFF and the
buzzer stops.
mnute
mer
To set the Minute Timer, turn the
center knob clockwise, without
pushingin, until the pointer reaches
the number of minutes you want to
time (up to 60).
At the end of the set time, a buzzer
sounds to tell you time is up. Turn
the knob, withoutpushingin, until
the pointer reaches OFF and the
buzzer stops.
Note: There must beat least a
half-hour difference between the
STARTand S~P dials for the
automatic control to work.
4. Set the OVEN SET knob to
TIME Band the OVEN TE’P
knob to the desired oventemperature.
The oven will turn itself on
immediately, or at a later START
time that you set if you have set the
STARTcontrol. It will operate at
the temperature you selected, and it
will turn itself off at the S~P time
you have set.
After oven operation is completed,
be sure to turn the OVEN TEMP
arid OVEN SET ho~s to OFF.
—
1. Positionthe shelf or shelvesin
the oven.
2. Close ovendoor.TurnOVENSET
knob to BAKE or TIME BAKE.
Push in and turn OVEN TEMP
knob to desired temperature.
Preheat oven for at least 15minutes
if preheating is necessary.
3. Place food in oven on center
of shelf. Allow at least 2 inches
between edge of bakewareand oven
wall or adjacent cookware.
If cooking on two shelvesat the
same time, staggerthe cookware
for best heat circulation.
4. Check food for doneness at
minimum time on recipe. Cook
longer if necessary. Switch off
heat and remove food.
@~fmoistureis noticeableon the
frontoftheovenor on theblackglass
door when first turningon theoven,
leavethe ovendoor ajar for a few
minutesor untilthe ovenis warm,
~Do not open the ovendoor during
a bakingoperation—heatwillbe lost
and the baking timemight need to
be extended. This could causepoor
bakingresults. If youmust open the
door, open it partially–only 3 or 4
inches—-andclose it as quicklyas
possible.
@Do not disturb the heat circulation
in the ovenwith the use ofaluminum
foil. If foilis used, place a small
sheet of it, about 10by 12inches at
the most, on a lowershelf several
inches belowthe food. Do not place
foil on the ovenbottom.
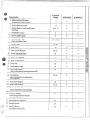
common
Bating
and Possible
Woblems
Solutiom
pm
Preheating is very important when
using temperatures below225°F.
and when baking foods such as
biscuits, cookies, cakes and other
pastries.
Preheating is not necessary when
roasting or for long-timecooking of
whole meals.
she]fPositiom
Most baking is done on the second
shelf position (B) from the bottom.
When baking three or four items,
use two shelves positioned on the
second and fourth sets of supports
(B& D) from bottom of oven.
Bake angel food cakes on ~lrstshelf
position (A) from bottom of oven.
~FO11OW
a tested recipe and
measure the ingredients carefully.
If you are using a package mix,
follow label directions.
Burning around edges
~Edges of crust too thin.
@Incorrect baking temperature.
Bottom crust soggy andunbaked
@Allow crust and/or filling to cool
sufficiently before fillingpie shell.
@Filling maybe too thin or juicy.
~ ~il]ing allowed to stand in pie shell
before baking. (Fill pie shells and
bake immediately.)
@Ingredients and proper measuring
affect the quality ofthe crust. Use a
tested recipe and good technique.
Make sure there are no tiny holes or
tears in a bottom crust. “Patching”
a piecrust could cause soaking.
CAKW
riseshigher on one side
~Batterspread unevenlyin pan.
@Ovenshelvesnotlevel.
@Usingwarped pans.
Cake
cakes cracking On @p
@Oventemperaturetoo high.
~Battertoo thick, followrecipe
or exactpackagedirections.
@Check for proper shelfposition.
o Checkpan sizecalledforin recipe.
@Improper mixingof cake.
Cake falls
@Toomuch shortening,sugaror
liquid.
@Check leaveningagent, baking
powderor bakingsoda to assure
freshness. Make a habit to note
expirationdatesofpackaged
ingredients.
@Cake not bakedlong enoughor
baked at incorrect temperature.
@If adding oil to a cake mix, make
certain the oil is the type and
amount specified.
is hard
@check temperature.
* Check shelf position.
Crust
Cake has soggy layer or streak
at bottom
s Undermining ingredients.
@Shorteningtoo softfor proper
creaming.
e Toomuch liquid.
cooms &~~scmm
Doughy center; heavy crust on
surface
o check temperature.
Pie filling Funs over
@Topand bottom crust not well
sealed together.
@Edges of pie crust not built up
high enough.
QToo much filling.
QCheck size of pie plate.
@Check shelf position.
o ~OllOW baking instructions
carefully as given in reliable recipe
or on convenience food package.
~Flat cookie sheets will give more
evenbaking results. Don’tovercrowd
foodson a bating sheet.
@Convenience foods used beyond
their expiration date.
%stry is tough; crust not flaky
o Too much handling.
QFat too soft or cut in too fine.
Roll dough lightly and handle as
little as possible.
Browning more noticeable on
one side
0 Oven door not closed properly,
check gasket seal,
QCheck shelf position.
.->
--\.-(~:;
Baking Guide
1. Preheatingis very imprmnt
when using temperatures below
225”F.and when baking foods
such as biscuifi, cookiesqcakes
and other pastries. Preheat the
ovenfor at least 15minutes.
Preheating is not necessary when
roastingor for long-timecooking
of whole meals.
2. Aluminumpans conduct heat
quickly,For most conventional
baking, light, shinyfinishes give
best resultsbecause they help
preventoverbrowning,For best
browningresults, we recommend
dull bott~msurfaces for cake pans
and pie plates.
shelf
3, Dark or non-shinyfinishesand
glass cookwaregenerally absorb
heat which may result in dry, crisp
crusts. Reduce ovenheat 25”F.if
lightercrusts arc desired. Mpid
browningof some foodscan be
achieved-bypreheatingcast-iron
cookware.
Positions
Oven
Temperatures
Time,
Minutes
ShinyCookie Sheet
B, C
400°-4750
15-20
B, A
350°-4000
20-30
B
B
400°-4500
350°
20-40
45-55
Preheat cast-ironpan for crisp crust.
Muffins
Popovers
ShinyMetal Pan with
satin-finishbottom
Cast Iron or Glass Pan
ShinyMetal Pan with
satin-finishbottom
ShinyMetal Muffin Pans
Deep Glass or Cast-Iron Cups
A,B
B
400°-4250
375°
20-30
45-60
Quick loaf bread
Yeastbread (2 loaves)
Metal or Glass Loaf Pans
Metal or Glass Loaf Pans
B
A, B
350°-3750
375°-4250
45-60
45-60
Decrease about 5 minutes for muffin mix
or bake at 450”F.for 25 minutes, then at
350”F.for 10to 15minutes.
Dark metal or glass gives deepest
browning.
ShinyOblong or Muffin Pans
ShinyOblong or Muffin Pans
A, B
B, A
375°-4250
350°-3750
10-25
20-30
For thin rolls, Shelf B maybe used,
For thin rolls, Shelf B maybe used.
A
B
A
325°-3750
375°-4000
325°-3500
30-55
10-15
45-60
Two-piecepan is convenient.
Line pan with wax paper.
A, B
B
A,B
325°-3500
350°-3750
275°-3000
45-65
20-25
2-4 hrs.
B
350°-3750
20-35
B
350°-3750
25-30
Loaf
Metalor Ceramic Pan
shinyMetal Muffin Pans
Metalor Glass Loaf or
rube Pan
lhinyMetal Pan with
atin-finishbottom
ihinyMetal Pan with
atin-finishbottom
fletalor Glass Loaf Pans
B
350°
40-60
Cookies
Brownies
Drop
fletalor Glass Pans
:ookieSheet
B, C
B, C
325°-35G0
350°-4000
25-35
10-20
Refrigerator
Rolled or sliced
ookie Sheet
ookie Sheet
B, C
B, C
400°-4250
375°-4000
6-12
7-12
A, B, C
B
350°-4000
300°-3500
30-60
30-60
B
325°
50-90
A
B, C
400°-4250
325°-3500
45-70
15-25
A, B
B
B
400°-4250
400°-4250
450°
45-60
40-60
13-16
A, B, C
A, B, C
B
325°-4000
325°-3750
300°-3500
60-90
30-60
30-75
Food
Bread
Biscuits(M-in. thick)
Coffeecake
Corn bread or muffins
Gingerbread
Plain rolls
Sweet rolls
Cakes
(without shortening)
Angel food
Jelly roll
Sponge
Cakes
Bundt cakes
Cupcakes
Fruitcakes
Layer
Layer, chocolate
Fruits,
Other Desserts
Baked apples
Custard
Cookware
AluminumTube Pan
MetalJelly Roll Pan
Metalor Ceramic Pan
Puddings, rice
and custard
lass or Metal Pans
lass Custard Cups or
asserole(set in pan of hot water)
Glass Custard Cups or
Casserole
Pies
Frozen
Meringue
Foil Pan on Cookie Sheet
Spreadto crust edges
Onc crust
Two crust
Pastrv sflell
Glass or Satin-finish Metal
Glass or Satin-finish Metal
I Glass or Satin-finish Metal Pan
Comments
Canned, refrigeratedbiscuitstfike2 to 4
minutes less time.
Paper liners produce moister crusts.
Use 300”F.and Shelf B for small or
individual cakes.
If baking four layers, use
Shelves B and D.
Bar cookies from mix use same time.
Use Shelf C and increase temperature
25° to 50°F. for more browning.
Reduce temperature to 300”F.for large
custard.
Cook bread or rice pudding with custard
base 80 to 90 minutes.
Large pies use 400”F, and increased time.
To quickly brown meringue. use 400”F. for
8 to 10minutes.
Custard fillings require lower temperature,
longer time.
Increase time for large amount or size.
Roasting
Roastingis cookingby dry heat.
Tendermeat or poultry can be
roasted uncoveredin your oven.
Roastingtemperatures, which
shouldbe low and steady,keep
spatteringto a minimum. When
roasting, it is not necessary to sear,
baste, coveror add water to your
meat. Roastingis easy,just follow
these steps:
Step 1: Positionoven shelf at
second from bottomposition (B)
for small roasts (3 to 5 pounds)and
at (A) position for larger roasts.
Step 2: Check weightof roast.
Place meat fat-side-upcr poultry
breast-side-upon roastingrack in
a shallowpan. The meltingfat will
bastethe meat. ~e~ecta panas close
to the sizeof the meatas possible.
(Broilerpan with rack is a good
pan for this,)
Step 3: Turn OVEN SET knob to
BAKE or TIME BAKEand OVEN
TEMP knob to desiredtemperature.
Check the RoastingGuide ~or
temperatures and approximate
cooking times.
Step 4: Most meatscontinueto
cook slightlywhile standingafter
being removedfrom the oven.
Stinding time recommendedfor
roastsis 10to 20 minutes. “I’his
allowsroasts to firm up and makes
them easier to carve. Internal
temperaturewill rise about 5° to
10”P.;to compensatefor temperature
increase, if desired, remove roast
from oven when its internal
temperature is 5° to 10°F.less than
tem~erature shownin the Roasting
Guide.
—-
....—
-.
—-.
-—
——
—..
--
mozen
Roasts
Frozen roasts of beef, pork,
lamb, etc., can be roasted without
thawing,but allow 15to 25 minutes
additionaltime uer Dound(allow 15
minutes additio~al~imepe~pound
for roasts under 5 pounds, more
time per pound for larger roasts).
Thaw most frozen poultry before
roasting to ensure even doneness.
Some commercial frozen poultry
can be cooked successfullywithout
thawing. Follow directions given
on packer’slabel.
Roasting
Guide
Type
-.
Oven
Temperature
Doneness
Meat
Tender cuts; rib, high quality
sirloin tip, rump or top round*
325°
Lamb leg or bone-in shoulder*
325°
Vca!shoulder, lcg or loin*
Pork loin, rib or shoulder*
Ham, precooked
325°
325°
325°
Rare:
Medium:
Well Done:
Rare:
Medium:
Well Done:
Well Done:
Well Done:
To Warm:
Ham, raw
*For boneless rolled roasts over 6 inches thick.
add 5 to 10minutes per lb. to times given above.
325°
Well done:
Chicken or Duck
Chicken pieces
325°
350°
Well Done:
Well Done:
Turkey
325°
Well Done:
Po[iltry
ApproximateRoasting Time
in Minutes per PoIInd
3 to 5 Ibs.
6 to 8 lbs.
24-35
18-25
35-39
25-31
39-45
31-33
21-25
20-23
25-30
24-28
30-35
28-33
35-45
30-40
35-45
30-40
18-23minutesper pound (any weight)
Under 10lbs.
10to M lbs.
27-35
24-27
3 t.O5 ibs.
35-40
35-40
~~ tO ~~ lbs.
16-22
over 5 lbs.
30-35
Over 15lbs.
12-19
Infernai
Temperature‘F.
130°-140°
150°-160°
170°-1850
130°-140°
150°-160°
170°-1850
170°-1800
170°-180°
115°-1250
185°-1900
185°-190”
In thigh:
185°-1900
?
Broilingis cookingfoodbydirect
heat from abovethe food. Your
rangeis designedfor waist-high
br~iling.A speeiailydesigned
broilerpan and rack allowsdripping
fatto drain awayfromthe foodsand
be keptawayfrom the highheat of
thegas flame.
Broiling
mps
Broiling
Guuide
2. Arrange food on rack and
positionthe broiler pan on the
appropriate shelf in the oven.
Placing food closer to flame
increases exterior browningof food,
but also increases spatteringand the
possibilityof fatsand meatjuices
igniting,
3. Close the ovendoor but do
not latch it. If the door latch is
moved to the right during a broil
operation, the door may Iock and
you may not be able to open it until
the ovencools.
4. TurnOVENSET knobto BROIL.
For most foods, turn OVEN TEMP
knob to BROIL. Note: Chicken and
ham are broiled at a lower setting in
order to cook food through without
over-browningit.
5. Turn most foods once during
cooking (the exception is thin fillets
of fish; oil one side, place that side
downon broilerrackand cookwithout
turning until done). Time foods for
aboutone-half the total cooking
:ime,turn food, then continue [o
;ook to preferred doneness.
;. Turn OVEN SET and OVEN
~EMP knobs to OFF. Remove
]roiler pan from oven and serve
bod immediately, Leave pan
)utsidethe oven to cooi.
shelf
Bacon
‘i~-lb.(about8
thinslices)
GroundBeef
WellDone
l-lb.(4 patties)
‘Ato %-in. thick
c
l-in. thick
(1to I %-lbs.)
c
c
How to Broil
—
1stSide 2nd Side
Time,
Time,
Position Minutes Minutes
Quantity
andlor
Thickness
The oven door should be Ciosed
during broiiing.
1. If r-neathas fator gristle near the
edge, cut vertical slashesthroughit
about2 inches apart, but don’tcut
intomeat. Werecommendthat you
trim fat to preventexcessive
smoking,leavinga layerabout
l/8-inch thick.
a ~~~~h and chops should be at
least 1 inch thick forbest broiling
results.Pan broilthinnerones.
@usetongs toturn meat over—
piercedmeat ]osesjuices.
BeefSteaks
Rare
Medium
WellDone
Rare
Medium
WellDone
Chicken (450°)
BakeryProducti
Bread(Toast)or
ToasterPastries
EnglishMuffins
hbster Taiis
(6 to 8-02.each)
D
1whole
(2 to 2 %-lbs.),
splitlengthwise
B
25-30
Z-4slices
1pkg. (2)
2-split
D
2-3
2-4
c
l-lb. fillets %to
Yz-in.thick
Ham Slices (450°,
Precooked
l-in. thick
PorkChops
WellDone
hmb Chops
Medium
WellDone
Medium
WellDone
Wieners,
similarprecooked
sausages,
bratwurst
Spaceevenly.Up to 9 patties
takeaboutshinetime.
B,C
B, C
B
Rsh
Arrangein singlelayer.
I
1%-in.thick
(2to2 %-lbs.)
c
7
5-6
8-9
6-7
9-12
16-18
Steakslessthan l-inchcook
throughbeforebrowning,
Panfrying is recommended.
Slashfat.
25-30
Reducetimesabout5 to 10
minutesper side forcut-up
chicken. Brusheach side with
meltedbutter.Broil skin-sidedown first.
‘/2
-2
Spaceevenly.Place English
muffinscut-side-upand brush
with butter if desired.
3-6
D
I
2%
5
9
12
13
10
15
25
T
Comments
I 14-17 I Do not I Cut throughbackofshell, spread
turn
open. B~sh with meltedb-utter
over.
beforebroiiin~andafterhalftime.
I
I
I
I
c
5
5
Handle and turn very carefully.
Brush with lemon butter before
and during cooking if desired.
Preheat broiler to increase
browning.
B, C
8
8
Increase times 5-10minutesper
side for 1IA-inchthick or home
cured.
2( ’Ain.)
2 (l-in. thick),
about 1lb.
c
c
10
13
2(lin.)
about 10to 12-02.
2(1fi in.),
ibout 1 lb.
B
B
B
B
8
10
10
17
C,D
6
l-lb. pkg. (10)
4-5
11-13
I
Slash fat.
4-7
~ Slash fat.
10
4-6
12-14
1-2
If desired, split sausages in half
lengthwise; cut into 5 to 6-inch
pieces.
Care andCleaning
Proper care and cleaningare
important so your range wil~give
you efficient and satisfactory
service. Followthese directions
carefilly in caring for it to help
assure safeand proper maintenance.
Beforecleaning any part of your
range (exceptfor operating the selfcleaning cycle), DISCOmCT
ELECTNC POWER To THE
RANGE at the fuse box or circuit
breaker panel, or pull the range
powercord plug f~omthe ele~tric
outlet.
When the range is cool, wash the
enamel finish with mild soap and
water or a mild abrasive cleanser
applied with a damp cloth. Rinse
the surface with clean water and
dry with a soft cloth. If you wish,
occasionally apply a thin coat of
mild cleaning wax to help protect
the finish.
There are a number of precautions
you can take to avoid marring the
surface of the range and to prevent
it from becoming dull. Don’t slide
heavy pans across it. If you spill
foods with a lot of acid (tomatoes,
sauerkraut, fruit juices, etc.) or
foods with high sugar content,
clean them up as soon as possible.
If allowed to remain, these foods
could cause a dull spot. Also, no
matter how stubborn the food stain,
never use harsh abrasive cleansers.
They could permanently damage
the enamel surface.
It’sa good idea to wipe the control
panels clean after each use of the
oven.For a morethoroughcleaning,
the controlknobscan be pulledoff
the knobstemsand ti]eglassupper
controlpanelcan he cleanedon both
sides.
To remove the glws panel:
1. Disconnectpowerto the range.
2. Removethe screwon each end of
the backsplash.
3. Removethe blackmeti stripson
each end that holdthe glassin place.
4. Removethe controlknobs,clock
knobs and screwssecuringtie light
switches.
5. Carefi~y removethe glassmd
place it on a smooth,flat sutiace.
Clean it with mild soap and water,
rinse with clean water and dry with
a soficloth.
Caution:
Do not use abrasive
cleansers, strongliquidcleanersor
ovencleanerson glassor enamel
controlpanel surfaces-they WM
damagethe fiish.
SwfaeeL@t
(onmodels so ‘eqtippd)
WHEN C~NGNG A SURFACE
LAMP, DO N~ ~UCH THE
METAL AT ENDS OF LWP.
Yoursutiace lamp is easily rep~ac-ed
witi a fluorescenttube of the same
wattage.Make sure power to the
range is disconnectedat the main
fuse or circuit breaker panel or pull
the power cord plug horn the
electric outlet.
To remove, lift the lamp cover.
Place fingerson top near each end
of the lighttube. Press down and
roll the top of the tube gentlytoward
the frontof the range until it stops.
Removethe tube gentlyfrom the
unit, makingsure it doesn’thit the
lamp cover.
To replace, place fingers on top
near each end of the light tube.
Press the bulb gently into the slots
and roll the top of tube genflytoward
the back of the range until it stops.
Then movethe lamp cover down.
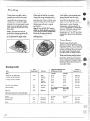
Burner Grates
Grates should be washed regularly
and, of course, after spillovers.
Wash them in hot, soapy water and
rinse with clean water. Dry the
grates with a clot~—don’tput them
back on the range wet.
To get rid of burned-on food, soak
the grates in a slightly diluted
liquid cleanser.
Although they’re durable, tl~e
grates will gradually lose their
shine, regardless of the best care
you can give them. This is due to
their continual exposure to high
temperatures,
Do not operate a burner for an
extended period of time without
cookware-on the grate. The fi~~ish
on the grate may chip without
cookware to absorb the heat.
When replacing a
pair of grates,
the irregular
m
n“
sides should
interlock in
the middle as
shown at right. +
care
andcleaning (continued)
Rawe TopBurners
o
“-”
Lift-up Cooktop
The holes inthe burners must be
kept clean at all times for proper
ignitionand an even, unhampered
flame.
Clean the burners routinelyand
especially afier bad spillovers
which could clog these holes.
Burners lift out for cleaning.
I
Clean the area under the cooktop
ofien. Built-upsoil, especially
~rease,may catch fire.
w
Note: Two screws hold each burner
pair in place to keep them from
wobblingaround during shipment.
Removeand discard the shipping
screws and lift the burners up and
out. This disengages them from the
mounting bracket under each
burner pair.
To remove burned-on food, soak
the burner in a solution of a product
used for cleaning the inside of
coffee makers, Soak the burner for
20 to 30 minutes. If the food doesn’t
rinse off completely, scrub it with
soap and water or a mild abrasive
cleanser and a damp cloth.
Do not attempt to clean burners in
an automatic dishwasher. Loosened
food soil can clog burner holes,
and the caustic action of the
dishwasher detergent can damage
the burner heads.
Before putting the burner back, dry
it thoroughly by setting it in a warm
oven for 30 minutes. Then place it
back in the range, making sure it is
properly seated on the mounting
~racket and is level.
Removethe grates and lift out the
chrome drip pans. Washthem in
hot, soapy water. Rinse them with
clean, hot water and polish them
dry with a cloth. Never use abrasive
cleaner or steel wool—they’ll
scratch the surface. Instead, soak
the drip pans for about 20 minutes
in slightlydiluted liquid cleanser or
mild solution of ammonia and water
(1/2cup of ammonia to one gallon
of water). After soaking, wash them
in hot, soapy water. Rinse with
clean water and polish with a clean,
SOficloth.
Do not attempt to clean the drip
pans in the self-cleaning oven.
When replacing
drip pans, the
notch on the rear
pan and the notch
on the front pan
should meet in
the middle.
To make cleaning easier, the entire
cooktopmaybe lifted up and
supported by lockingarms that
catch and hold the top when it’sall
the way up.
Be stlre all burners are turned off
before raising the cooktop. Then
removethe grates and drip pans,
grasp the front sides of the cooktop
and lift.
After cleaning under the cooktop
with hot, mild soapy water and a
clean cloth, put the cooktop back in
place. Lift up a little to release the
locking arms and push them in
while guiding the top back down.
Be careful not to pinch your
fingers.
Broiler mm& Rack
Afier broiling, removethe broiler
rack and carefully pour off the
grease. Wash and rinse the pan and
rack in hot, soapywater.
If food has burned on, sprin~e the
broi~errack while hot with
detergent and cover with wet paper
towelsor a dish cloth. Burned-on
foods will then soak loose while the
meal is being served.
Do not store a soiled broiler pan and
rack in the oven. Never attempt to
clean them in the oven during the
self-cleaning cycle.
17
P.
[,
oven
shelves
Oven shelvesmay be cleaned with
a mild abrasivecleanser following
manufacturer’sdirections. After
cleaning, rinse the shelveswith
clean water and dry with a clean
cloth. Toremoveheavy,burned-on
soil, soapy metalpads may be used
followingmanufacturer’sdirections.
Afier scrubbing, wash with soapy
water, rinse and dry,
Renlovabieoven
Door
Youcan remove the oven bottomto
clean anyexcessivespilloversbefore
startingihe self-clea; ing cycle.
.—
To remove the oven bottom:
To remove: Hold hand under lamp
bulb cover so it doesn’t fall when
released. With fingers of same
hand, firmly push down wire bail
until it clears cover. Lift off cover.
DO NOT REMOVE ANY SC~WS
~ REMOVE THIS COVER.
Replace bulb with a 40-watt home
appliance bulb.
To replace cover: Place cover into
groove of lamp receptacle. Lifi wire
bail up to center of cover until it
snaps into place. When in place,
wire holds cover firmly. Be certain
wire bail is not below depression in
center of cover.
‘7
1. Removethe oven shelves.
/
oven Light Bulb
The light bulb is located in the
upper left corner of the oven. Before
replacing the bulb, disconnect
electric power to the range at the
main fuse or circuit breaker panel
or unplugthe range from the electric
outlet. Let the bulb cool completely
before removing it. Do not touch a
hot bulb with a damp cloth as the
bulb will break.
The ovendoor is removableto make
the interior more accessibleduring
the replacementof the lamp bulb,
2. Removethe two knurled holddown screws at the rear of the oven.
If they are too tight to remove by
hand, use a coin or a screwdriver.
3. To lift out the oven bottom,
placeyourfingers in the slots in the
bottom and lifi the rear of the oven
bottom up and back until the oven
bottom is clear of the lip at the front.
4. Then lift the bottom up and out.
To replace the bottom, place it in
the oven with the back raised about
6 to 8 inches or until you can insert
the front of the oven bottom under
the hold-down lip at the front. Then
push the back of the oven bottom
down fully into place on the metal
flanges and insert the hold-down
screws.
Open the ovendoor fully and
removethe two Philips screwsthat
hold the door to the hinges. Then
close the door to the automaticstop
position (at about 3 inches open),
and lift the door straightup and off
the hinges. (Due to the large amount
of insulation and the construction
of the door, it is heavy.)
Note: Care should be taken not to
place hands between the spring
hinge and the oven door frame as
the hinge could snap back and
pinch fingers.
To replace the door, make sure the
hinges are in the “out” position.
Position the slots in the bottom of
the door squarely over the hinges.
Then lower the door slowly and
evenly over both hinges at the same
time. If hinges snap back against
the oven frame, pull them back out.
‘Whenthe door is in position, open
it fully and.insert the two Philips
screws.
Opemting theself-c~eaningoven
ReeolnmendedCIeaning~~me:
Moderate Soil--2 houm
(thin spi~lsand light spatter)
Heavy soil—3 houm
Excessively
Heavysoil—4hours
(heavy grease spills and spatter)
Repare the oven
Before
setting
the Controk
step1:
Removethe broiler pan, broiler
rack and other cookware from the
oven. (Oven shelves may be left in
oven. Note: Shelveswill discolor
afier the self-clean cycle.)
Step 3:
Clean spattersor soil on the oven
front frame (A), the ovendoor
outsidethe gasket(B) and the small
area at the front center of the oven
bottom. Buff these areas with a dry
cloth. Do not clean the gasket(B).
Do not let water run down through
openingin the top of the door (C).
Make sure the ovenlight bulb
cover (D) is in place. Never use
a commercial ovencleaner in or
around the self-cleaningoven.
Ill-----
setthe oven
forcleani~
step1:
‘Wrn the Oven Set knob to
CLEAN.
step2:
set the aM@tomatic
Ovcrltimer:
--—----liI
Step 2:
Removethe oven bottompanel (see
page 18)ifit is excessivelysoiled.
Clean it and put it back in the oven.
A. OveMIFront Frame
B. oven Door Gasket
c.openings ill Door
D. oven
LightBulb cover
step4:
Close the oven door and.make sure
the oven light is off.
Caution:Chromedrippans from
the top of your range should
never be cleaned in the selfcieaning oven.
@Make sure both the range clock
and the ST.T did showthe correct
time of day.
~ Decide on cleaning hours
necessary—twohours for moderate
soil, three hours for heavy soil, four
hoursforexcessivelyheavysod.
@Add these hours to present time of
day,then push in and tur~ S~P dia~
clockwise to desired stop time.
Note: The S~P dial must be set
and advanced at Ieasthalfan hour
beyond the time noted.on the
STARTdial.
Afkr self-c!ea~ling
Ti start and stopcleaningat a later
time than shown on clock, push in
and turn STARTdial to time you
wish to start. Add the hours fieeded
for cleaning to this “start” time,
then push in and turn S~P dial to
this desired time. Oven will
automaticallyturn on and off
at the set times.
msh the self-clean btch hver
to the right as far as it will go to
lock the oven door.
Sometime after cleaning is
completed, when the ovenhas
cooledand thedoorcan be unlocked,
the LOCKEI~light goes out,
step1:
Movethe latch lever to the left as
far as it will go to unlock the door,
Step 2:
firn the OVEN SET knob to OFF.
A short time later, the LOCKED
light comes on and the door locks.
The glowing LOCKED light
indicates that the ovenis hot and
the door cannot be opened. The
ovendoor gets hot during selfcleaning. DO N~ ~UCH.
care
andcleaning
Opemting
the Self=CIeaningOven(cofiti~u~d)
If YouHavetoInterrupt the
cleating cycle
step1:
Turn the STOP dial until the
pointer is at the correct time of day.
step 2:
(Allmodels)
Slide the door latch leverto the left
as far as it will go. If the LOCKED
lightis on, you must wait until the
light goes off before movingthe
latch lever. This will unlock the
oven door so it can be opened.
step3:
Turn the OVEN SET knob from
CLEAN to OFF.
Importint: Any attempt to
Uniockthe door by force while
the CLEA~NG light is on can
result in damage to the door
1locking mechanism.
Questiom and Awwers
Q.YVhywon’tmy oveB3clean
immediate~yeventhough I set
the start time correctly?
A. Check to be sure the START
time is the same as the time on the
range clock. Also check to be sure
latch lever is movedto the right as
far as it will go and the IOVENSET
knob is turned to TIME BAKEor
CLEAN.
Q. If my oven clock is not
working, can I still self-clean
my oven?
A. No. YourAutomaticOven
Timer uses the range clock to help
start and stop your self-cleaning
cycle.
Q. Can I use commercial oven
cleaners on any part of my
self-cleaning oven?
A. No cleaners or coatings should
be used around any part of this
oven. If you do use them and do not
wipe the oven absolutely clean, the
residue can scar the oven surface
and damage metal parts the next
time the oven is automatically
cleaned.
Q. Can 1 clean the Woven Gasket
around the oven door?
A. No, this gasket is essential for
a good oven seal and care must be
taken not to rub, damage or move
this gasket.
Q. What should I do if excessive
smoking occurs during cleaning?
A. This is caused by excessive soil,
and you should switch the OVEN
SET knob ~E
Open windows to rid room of “
smoke. Allow the oven to cool for
at least one hour before opening
the door. Wipe up the excess soil
and reset the clean cycle.
Q. Is the “crackling”sound I
hear during cleaning normal?
A. Yes.This is the souridofthe metal
heating and coolingduring both the
cookingand cleaning functions,
Q. Should there be any odor
during the cleaning?
A, Yes,there maybe a slight.odor
during the first few cleanings.
Failure to wipe out excessivesoil
mightalso cause a strong odor
when cleaning.
Q. What causes the hair-like
lines on the enameled surface of
my oven?
A. This is a normal condition,
resulting from heating and cooling
during cleaning. These lines do not
affect how your ovenperforms.
Q. Why do 1 have ash left in my
oven after cleaning?
A. Some types of’soil will leave
a deposit which is ash. It can be
removed with a damp spongeor
cloth.
Q. My oven shelves do not slide
easily. What is the matter?
A, After many cleanings, oven
shelves may become so clean they
do not slide easily. If you wish
shelves to slide more easily,
dampen fingers with a small
amount of cooking oil and rub
lightly over sides of shelf where
they contact shelf supports.
Q. My oven shelves have become
gray after the self-clean cycle. Is
this normal?
A. Yes. After the self-clean cycle,
the shelves may discolor and lose
some of their original luster.
care
and cleaning
operating
the
self-cleani~lg oven(Contintned)
If YouHa%’etolnterrlRpt the
Questions
cleaning cycle
and AIMwers
Q. why WO13’t
Illy oven C]eaBI
i.mmediate$yevenfhougl]I set
the start ti~~lecorrectly?
A. Check to be sure the START
time is the same as the time on the
range clock. Also check to be sure
latch lever is movedto the right as
far as it will go and the OVEN SET
knob is turned to TIME BAKE or
CLEAN.
step 1:
Turn the STOPdial until the
pointer is at the correct time of day.
step 2:
(All mOd~]S)
Slide the door latch lever to the left
as far as it will go. If the LOCKED
light is on, you must wait until the
lightgoes off beforemovingthe
latchlever. This wil~unlock the
ovendoor so it can be opened.
Q. If my OV~~ C~OCk ilS nOt
working, call I still self-clean
my oven?
A. No. YourAutomaticOven
Timer uses the rangeclock to help
start and stop your self-cleaning
cycle.
Step 3:
Turn the OVEN SET knob from
CLEAN to OFF,
Importint: Any attempt to
unlock the door by force while
the CLEANING light is on can
result in damage to the door
locking mechanism.
Q. Can I use commercial oven
cleaners on any part of nly
self-cleaning oven?
A. No cleaners or coatings should
be used around any part ~f this
oven. If you do use them and do not
wipe the oven absolutely clean, the
residue can scar the oven surface
and damage metal parts the next
time the oven is automatically
cleaned.
Q. Can I clean the WovenGasket
around the oven door?
A. No, this gasket is essential for
a good oven seal and care must be
taken not to rub, damage or move
this gasket.
IQ.What s~louldI (10if excessive
smoking occurs during cleaning?
A. This is caused by excessive soil,
and you should switch the OVEN
SET knob
Open windows to rid room of
smoke, Allow the oven to cool for
at least one hour before opening
the door. Wipe up the excess soil
and reset the clean cycle.
/
3,x::
-?j~;.
--
GE
U/C,
pub
s}l~uld
49-8163,
read:
JGBlJ24GL?J/26GEJ,pg 21,
s~f~ikc]l OVEN
SET
knob
to
()~~.
Q. Is tl~e“cracklii~g”solIn[iI
cleaning norn~al?
i~ear du~+i~~g
A, Yes.This isthe soundof the metal
heatingand coolingduring both LIIC
cookingand cleaning functions,
Q. ShotIld there be a~~yodor
during the cleaning?
A. Yes,there maybe a slightodor
during the first fewcleanings.
Failureto wipe out excessivesoil
mightalso cause a strong odor
when cleaning.
Q. What ca~nsesthe hair-like
lines on the enameled surface of
Rmy
oven?
A. This is a normal condition,
resulting from heating and cooling
during cleaning. These lines do not
affect how your ovenperforms.
Q. Why do I haveash left in my
oven after cleaning?
A. Some types of soil will leave
a deposit which is ash. It can be
removedwith a damp sponge or
cloth.
Q. My oven shelves do not slide
easily. What is the matter?
A. After many cleanings, oven
shelves may become so clean they
do not slide easily. If you wish
shelves to slide more easily,
dampen fingers with a small
amount of cooking oil and rub
lightly over sides of shelf where
they contact shelf supports.
Q. My oven shelves have become
gray after the self-clean cycle. Is
this normal?
A. Yes. After the self-clean cycle,
the shelves may discolor and lose
some of their original luster.
lnicldl~
coluln[l,
last
quest
iorl,
..—
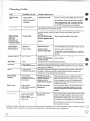
PART
MATERIALSTOUSE
GENERALDIIRECFIONS
Broiler ~n and
Wck
@Soap and Water
@Soap-FilledScouringpa{
~ Plastic Scouring Pad
@Dishwasher
DO N~ clean iBIseifcleaning oven.
L
Drain fat, cool pan and rack slightly. (Do not let soild
pan and rack stand in oven to cool. ) Sprinkle detergt>nt
on mck and pan, Fill pan with warm water and spread
cloth or paper towel over rack. Let pan and rack stand
for a few minutes. Wash; scour if necessary. Rinse and
dry. O~lON: Clean pan and rack in dishwasher,
—._
Pull off knobs. Washgently but do not soak. Dry and return controls to range, making
sure to match flat area on the knoband shaft,
ControlKnobs
@Mild Soap and Water
Outside Glass Finish
o Soap and Water
Washall glass with cloth dampened in soapy water. Rinse and polish with a dry cloth. If
knobs are removed, do not allow water to run down inside surface of glass while
cleaning,
Metal,including
SideTrims,
TrimStripsand
BrushedChrome
Cooktop(on models
so equipped)
~ Soap and Water
DO Nm USE steel wool,
abrasives,ammonia,acids
or commercialoven
cleaners.
Wash, rinse and then polish with a dry cloth,
Outer Porcelain
Enamel Surface and
Painted Surfaces*
~ Paper Towel
~Dry Cloth
e Soap and Water
USE ove~~
cleaners, cleansing
powdersor harsh
abrasives. These might
scratch the surface.
If acids should spill on the range while it is hot, use a dry
paper towel or cloth to wipe up right away.When the
surface has cooled, wash and rinse.
For other spills, such as fat smatterings,etc., wash with
soap and water when cooled and then rinse. Polish with a
dry cloth.
Inside Oven Door*
~Soap and Water
DO N~
DO N~
USE oven
cIeaners9cleansing powders
or harsh abrasives.
Removeovendoor (see page 18),Clean with soap and
water and replace.
Oven Gasket
~None
Avoidgetting ANY cleaning materials on the gasket.
OvenLiner
)Soap and Water
1Soap-FilledScouringPad
Cool before cleaning. Frequent wiping with mild soap and water will prolong the time
betweenmajor cleanings. Rinse thoroughly. N~E: Soap left on liner causes additional
$tainswhen-ovenis reheated.
She~ves
Soap and Water
Soap-FilledScouringPad
Chrome-Plated
Drip Rns
@Soap and Water
~Stiff-Bristled Brush
9Soap-FilledScouringPad
‘Non-Metallic)
~Soap and Water
)Soap-Filled Scouring Pad
Non-metallic)
StBrface BllrneB
QSolution for Cleaning
Inside of Coffee Makers
@Soap and Water
~ Mild Abrasive Cleanser
e Damp Cloth
I
Shelvescan be washed in dishwasher or cleaned by hand using soap and water. Rinse
horoughly to remove any soap after cleaning. Shelves may also be cleaned in self;Ieaning oven, but may lose some luster and discolor.
00 NW clean in self:Ieaningoven. Do not use
;teelwool, abrasives,
)mmonia, acids or
:ommercialoven cleaners.
DONW clean in selfcleaning oven.
DON~ clean in self:Ieaningoven.
Clean as described below or in dishwasher. Wipe all
chrome drip pans after each cooking so unnoticed
spatter will not burn on next time you cook. To remove
burned-on spatters, use any or all cleaning materials
mentioned. Rub lig}ztly with scouring pad to prevent
scratching of the surface.
—
Lift out when cool. Soak 5 to 10minutes if desired in
warm solution of dishwasher detergent. Scour with
materials mentioned here to remove burned-on food
particles.
Wipe off burner heads. If heavy spillover occurs, remove
burners from range (see page 17)and soak them for 20
to 30 minutes in solution of hot water and product for
cleaning inside of coffee makers, such as Dip-It brand.
If soil does not rinse off completely, scrub burners with
soap and water or a mild abrasive cleanser and a damp
cloth. Dry burners in a warm oven for 30 minutes before
returning them to the range.
,/.:.
,.-,>,
‘}’Spillage
of marinades. fruit juices, tomato sauces and basting materials containing acids may cause discoloration. Spillovers should be wiped up ‘:’:; -~
immediately. with care being taken to not touch any hoi portion of oven. When the surface is cool, clean and rinse.
L .V
—
MinorAdjwtmenti
YouCanMake
BroiEand oven BurBler
Adjwtment
-
Repeatedopeningsand closings
can cause the ovendoor to work
itself out of adjustment, One side
may close higher than the other,
and the door may not seal properly.
-.
Air
Adjustment
shutters
Air adjustmentshuttersfor the
broil and ovenburners regulatethe
flow of air to the flame.
To adjust the flow of air to either
burner,loosen the Phillips head
screw and rotate the shutter to
allowmore or less air into the
burner tube as needed.
The air adjustment shutter for the
The flame for the top @roil)
burner should be steady with
approximately l-inch blue cones
and should not extend out over the
baffle edges.
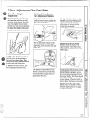
To adjust the heightof the door:
1. Removethe door (see page 18).
,
top broil) burner is in the upper
righ~-handcorner near the rear wall
of the oven.
I
...
. .
.-
2. With a thin-bladed screwdriver,
turn the screw in the opening at
the top of each door hinge. Turn
clockwiseto lower,counterclockwise
to raise each side of the door.
—
3. Replace the door, close it, and
check alignment and door seal.
The shutter for the bottom (oven)
burner is near the back wall of the
oven behind the storage drawer or
panel under the oven.
To determine ;f the bottom (oven)
burner flame is proper, remove
the oven bottom (see page 18)and
the burner baffle. The flame should
have 1/2”to 3/4” blue cones with no
yellow tipping. When the baffle is
back in place, the flame will resettle.
Visually check the color of the
flames every six months. If they
look like illustration (A) on page
25, call for service.
OvenThermosbt
Adjmtment
The temperaturecontrol in your
newovenhas been carefi~y adjusted
to provideaccurate temperatures.
However,if this oven has replaced
one you haveused for severalyears,
you may notice a differencein the
degree of browning or the length of
time required when using your
favoriterecipes. Oven temperature
controlshave a tendencyto “drift”
over a period of years and since
this drift is very gradual, it is not
readily noticed. Therefore, you
may havebecome accustomed to
your previous oven which may
haveprovided a higher or lower
temperature than you selected.
Before attempting to have the
temperature of your new oven
changed, be sure you have followed
the baking time and temperature of
the recipe carefuliy. Then, afier
you have used the oven a few times
and you feel the oven is too hot
or too cool, there is a simple
adjustment you can make yourself
on the OVEN TEMP knob.
Pull the knob off the control shafi
and look at the back side. There is
a disc in the center of the knob skirt
with a series of marks opposite a
pointer.
Loosen only the
locking screws
Note to which mark the pointer is
pointing. To makean adjustment,
carefullyloosen (approximately
one turn), but do not completely
removethe two screwsthat hold the
skirt to the knob. Hold the knob
blade in one hand and the outer
skirt in the other hand.
To raise the oven temperature,
movethe pointer in the direction of
the arrow for RAISE. To lowerthe
temperature, movethe pointer in
the direction of arrow for LOWER.
Each mark will changethe oven
temperature approximately20°F.
We suggestthat you make the
adjustment one mark from the
original setting and check oven
performance before making any
additional adjustments.
After the adjustmentis made,
press skirt and knob together and
retighten screws so they are snug,
but be carefil not to overtighten.
Re-installknob on range and
check performance.
Note: After an adjustment has
been made, the OFF and BROIL
positions will not line up with
the indicator mark on the control
panel as they previously did. This
condition is normal and will not
create a problem.
a
—=
-====_—.
—-.—
~*-.
~.
---——
~~
Questions?
UseThk RobIemSolver
POSSIBLE
CAUSEAND/ORWAT TODO
@Make suretheelectricalplugis pluggedinto a ~ive,properlygroundd poweroutlet,
mP BURNERS
Do Nm LIGHT
@Burnerholes orIside ofburner maybeclogged,Removeandcleanthem.
@Burnersnot fittedcorrectly ontomountingbrackets.Removeand rei]~stall
burnersnro~erly.
BURNERSHAVE
YELLOWOR
YELLOW-TIPPED
FLAMES
(A)YeHownames– m) Yellowtips on imer
(c) soft
blue
names––
cones—Normal for LP gas
Normal for naturalgas
Call for service
~If burner flames look Uke(A), call for service. Normal burner flames shouldlooklike
(B)or(C), depending onthetypeofgasyouuse,
LP %as,someyellowtippingon inner cones is normal.
@With
OVENDOES N~
COOK PROPERLY
@Makesure thermostat captilary bulbs (locatedin upper portion of oven)are securely
held bythe mounting clips, are nottouchingovensides, and are not coated with anything.
~Aluminum
foilbeingusedimproperly
inoven.
@Ovenventblocked on top of range.
=Incorrect cookwarebeing used. Check each cooking sectionfor cookwaretips.
@Ovenbottom not securely seatedin position.
~ OVEN TEMP knob set incorrectly or not turned on.
@Check common baking, roasting and brotiingproblems on pages 12-15.
~ Door latch moved to the right during broiling or baking can cause door to lock when
ovenis hot. Wrn ovenoff and let it cool before attemptingto open door.
DOOR WON’T OPEN
DUWNG BROILING
OR BA~NG
Nm WORK
~ Range electricalplugmustbesecurelyseatedinalivepoweroutlet.Checkforblown
fise
ortrippedcircuitbreaker.
I
OVENLIGHTDOES
Nm COMEON
I ‘Bu~bmaybelooseorburnedout.
CLOCK DOES
OVENWILLN~
SELF-CLEAN
I @Electrical plug must be plugged into a live power outlet.
I
@Automatic
Timernotsetornotsetproperly.TheS~P dialmustbesetandadvancedat
leasthalfanhourbeyondthetimenotedontheSTART
dial.
I @OVENSETknobmustbe
setatCLEANsetiing.
I ~ Oven door latch not moved to the right as far as it will go.
—
STRONG
ODOR
IQImproperair/gasratioinoven.Adjustovenburnerairshutters—-see
page 23.
-.
We’ll
B
e
There
IVitll tie
purchase OfyOur new GE a~~limce,
receive the
ssurance hat if yOu ever need in~OmatiOn Or assistance
Om GE, we’llbe here. Ml you have to dO is call—toll-free!
Whatever your questionabout any GE
major appliance, GE Answer Cente@
information service is availableto
help. Your cdl—and your question—
will be answeredpromptly and
courteously.And you can call any
time. GE Answer CenteP service is
open 24 hours a day 7 daysa week.
ConsumerServiceprofessional
provideexpert repair service,
scheduledat a time that’sconvenient
or you.ManyGE Consumer Service
rnpany-operatedlocationsoffer you
servicetoday or tomorrow,or at your
convenience(ZOOa.m. to 700 p.m.
weekda~ 9:00 am. to 2:00 p.m. Saturdays).Our factory-trainedtechnicians
knowyour appliance inside and out—
so most repairs can be handled injust
one visit.
GE
You can have the secure feeling that
GE Consumer Service will stillbe
there after your warrantyexpires. Purchase a GE contract while your warranty is stillin effect and you’~ receive
a substantialdiscount. With a muhipleyear contract, you’re assured of fiwre
service at today’s prices.
~lecommunication Device for the Deti
Upon request, GEwillprovideBraille
controlsfor a varietyof GE appliances,
and a brochure to assistin planing
barrier-free kitchen for persons with
limited mobility.
free of charge, ~all800,626.2000,
Consllmerswith impaired hearing
or speech who haveaccessto a TDD
or a conventionaltele~pewriter may
call 800-TDD-GWC(800-833-4322)
to request information or sePJice.
a
!
)
1
i~
-—.-.————.
.-
YOURGE GAS RANGE
WARRANTY
Save
proof of original purchase date such as your sales slip or caricelled check to establish warranty period.
WHAT
1sCOVERED
FULL ONE-YEARWARRANTY
For one year from date of original
purchase, we will provide,free of
charge, parts and service labor
in your home to repair or replace
any part of the range that fails
because of a manufacturing defect.
(
This warranty is extendedto
the original purchaser and any
succeeding owner for products
purchased for ordinary home use
in the 48 mainland states, Hawaii
and Washington, D.C,In Alaska the.
warranty is the same exceptthat it is
LIMITED because you must Davto
ship the product to-theservi~e~hop
or for the service technician’s travnl
costs to your home.
All warranty service will be provided
by our Factory Service Centers or
by our authorized Customer Care@
servicers during normal working
hours.
Look in the White or Yellow Pages
of your telephone directory for
GENERAL ELECTRICCOMPANY,
GENERAL ELECTRIC FACTORY
SERVICE, GENERAL ELECTRiCHOTPOINT FACTORYSERVICE or
GENERAL ELECTRICCUSTOMER
CARE@SERVICE.
1
WHAT!s NOT COVERED
@Service trips to your home to
teach you how to use the product.
Read your Use and Cam material.
If you then have any questions
about operating the product,
please contact your dealer or our
Consumer Affairs office at the
address below, or tail, toil free:
GE Answer Center”
800.626.2000
consumer information service
~ Replacement of house fuses or
resetting of circuit breakers.
~ Failure of the product if it is used
for other than its intended purpose
or used commercially.
~ Damage to product caused
by accident, fire, floods or acts
of God.
WARRANTORIS NOTRESPONSIBLE
FOR CONSEQUENTIAL DAMAGES.
@Improper installation.
If you have an installation problem,
contact your dealer or installer.
You are responsible for providing
adequate electrical, gas, exhausting
and other connecting facilities.
Some states do not allow the exclusion or limitation of incidental or consequential damages, so the above limitation or exclusion
may not apply to you. This warranty gives you specific legal rights, and you may also have other rights which vary from state to state.
To know what your Iegai rights are in your state, consult your local or state consumer affairs office or your state’s Attorney General.
warrantor:
if furif?er help
Manager—consumer
L
——
P/N56(?01180090
.—
9-90
CG
I
General
is needed
Affairs,
Electric
company
concerning
this
GE Appliances,
warranty,
Louisville,
write:
KY 4Q2~5