1
S e l f = C l e
SolidDiskElectricRange
❑
❑
!
Safe~ instructions....................3-5
Anti-Tip Device.........................................3. 32
Problem Solver .......................33.
34
More questions ?...call
GEAnswerCen&r” 800.626.2000
OperatingInstructions,Wps
Aluminum Foil...........................5. 19,20,22
Clock and Timer ...........................................13
Features........................................................6. 7
Oven .... ...................................................l3.27
Baking..................................................l 5–I 9
Broiling,BroilingGuide ....................22. 23
Control Panel............................................. 13
Light; Bulb Replacement ................. 15, 30
Roasting,RoastingGuide ...............20.21
Self-CleaningInstructions ..............24–27
Thermostat Adjustment .........................15
Timed Baking.....................................16, 17
Surface Cooking......................................8-l 2
Control Setiings...........................................9
Cookware Tips......................................8. 10
Home CanningTips .................................12
Surface Light.........................................9. 29
Careand Cleaning....................28-32
Anti-Tip Device.. ...........................................32
Broiler Pan and Rack...................................3O
Door Removal...............................................3 1
GlassTop........................................................28
Shelves ...........................................................3l
Solid Disk Surface Units.............................28
Storage Drawer ............................................3O
Consumer Services...................35
Appliance Registration..................................2
Important Phone Numbers........................35
Model and Serial Number Location...........2
WarranW ........................................BackCover
Mdek
GEAppliances
JBP29G
JB570GM
JB571GM
MNU106Re~2
a
~LP
US~LP
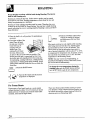
YOU...
Beforeusing your range,
read this book mreftily.
Write down the model
and serial numbers.
K you received
a damaged range...
It is intendd to help you
operate and maintiin your new
range properly.
Keep it handy for answers to
your questions.
If you don’t understand something
or need more help, write (include
your phone number):
Consumer Affairs
GE Appliances
Appliance Park
Louisville, KY 40225
You’ll find them on a label on
the front of the range behind the
storage drawer.
These numbers are dso on the
Consumer Product Ownership
Registration Card that came with
your range. Before sending in
this card, please write these
numbers here:
Immediately contact the dealer (or
builder) that sold you the range.
Mdel Number
Save time and money.
Beforeyou request
service...
Check the Problem Solver in the
back of this book. It lists causes of
minor operating problems that you
can correct yourself.
Serial Number
Use these numbers in any
correspondence or service calls
concerning your range.
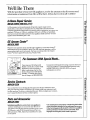
W YOU ~ED SERWCE...
To obtain service, see the Consumer Services page in
the back of this book.
We’re proud of our service and want you to be
pleased. If for some reason you are not happy with the
service you receive, here are three steps to follow for
further help.
HRST, contact the people who serviced your
appliance. Explain why you are not pleased. In most
cases, this will solve the problem.
2
~~,
if you are still not pleased, write all the
details-including your phone number—to:
Manager, Consumer Relations
GE Appliances
Appliance Park
Louisville, KY 40225
HNALLY, if your problem is still not resolved, write:
Major Appliance Consumer Action Panel
20 North Wacker Drive
Chicago, IL 60606
WORTANT
SA~W
~STRUCTIONS
Rwd M Wtm@om BeforeUskg YourWge.
I~ORTANT
S~ETY NOTICE
c The CaMorniaSafe Drinking Water and
Totic EnforcementAct requiresthe Governor
of Californiato publisha fistof substances
knownto thestateto causebirthdefectsor other
reproductiveharm,andrequiresbusinessesto
warncustomersof potentialexposureto such
substances.
●
The fiberglass insulation in se~-clean ovens
gives off a very small amount of carbon
monotide during the cleaning cycle. Exposure
E youpulltherangeoutfromthewallfor any
reason,makesurethedeviceengagesthe range
whenyoupushtherangeback.Pleasereferto the
Anti-Tipdeviceinformationin this book.Failureto
takethisprecautioncouldresultin tippingof the
rangeandinjury.
Do not leave children done+hildren should
notbe leftaloneor unattendedin anareawherean
applianceis in use.Theyshouldneverbe allowed
to sitor standon anypartof the appliance.
●
●
canbe minimizedby ventingwithan open
windowor usinga ventilationfanor hood.
●
Fluorescent light btibs contain mercury.
If yourmodelhasa surfacelamp,youmust
recyclethefluorescentlightbulbaccordingto
local,stateandfederd codes.
●
When using electrical appliances, basic safety
precautions shodd be followed, including the
following:
●
Use this appliance only for ifi intended use
●
●
as describedin thismanual.
●
Be sure your apptianceis properly instiled and
grounded by a qualifiedtechnicianin accordance
●
withtheprovidedhstilation hstructions.
s Do not attempt to repair or replace any part
of your range unless it is spec~lcally
recommendedin this book. Ml otherservicing
●
shouldbe referredto a qual~ledtechnician.
●
excessloadingof theovendoor,
attachit to thewdl orfloorby
installingtheAnti-Tipdevice
supplied.Toinsurethedeviceis
~roperly installed andengaged,
~emovethedrawerpanelandinspecttherear
levekg leg.Make~ureit fitsse~urelyintothe slot.
Always keep combustible WMcoverings,
cutins or drapes a safe distance from
your range.
Do not allow anyone to climb, stand or hang on
the door,drawer or range top. They codd
damage the range and even tip it over, musing
severe personal injury.
Never wear loose-fitting or hanging garments
while using the appliance. Harnmablematerial
●
Use ordydry pot holders—
moistor damppotholderson hot
surfacesmayresultin bumsfrom
steam.Donotletpotholderstouchhotheating
elements.Donotusea towelor otherbuky cloth,
Suchclothscancatchfireona hot surfaceunit.
OFF
All ranges m tip and injury
could resdt. To prevent
accidenti tipping of the range
from abnormalusage, including
Teachchildren not to play with the controls or
anyotherpartof therange.
Never leave the oven door open whenyouare
notwatchingtherange.
couldbe ignitedif broughtin contactwithhot
heatingelementsandmaycauseseverebums.
Before performing any service, DISCONNECT
THE RANGE POWER SUPPLYAT THE
HOUSEHOLD DISTKBUTION PANEL BY
WMOV~G ~ WSE ORS~C~G
T~ C~C~ BREAKER.
CAU~ON: ITEMS OF ~TEREST TO
C~DREN SHOULD NOT BE STORED IN
CAB~ETS ABO~ A RANGE OR ON THE
BACKSPLASH OF A RANG&C~DREN
CL~B~G
ON THE RANGE TO REACH
~EMS COULD BE SENOUSLY INJURED.
●
●
●
Always keep dish towels, dish cloths, pot
holders and other Hnensa safe distance from
your range.
Always keep wooden and plastic utensils
and -ned food a safe distance away from
your range.
For your safety, never use your appliance for
warming or heating the room.
(continued next page)
3
WORTANT
●
●
SA~~
Do not store flammable materhdsin an oven
or near the cooktop.
DO NOT STORE OR USE COMBUST~LE
MATE~LS, GASOL~ OR OT~R
FLAWBLE
VAPORSAND LIQU~S
~ THE VIC~ITY OF T~S OR ANY
OTHER APPLMNCE.
●
~STRUC~ONS
(contlnud)
\
●
Keep hood and grease ~ters clean to maintain
goodventingandto avoidgreasefries.
●
Do not let cooking grease or other flammable
materkdsaccumdate in or near the range.
,d
●
Do not use water on greasefires.
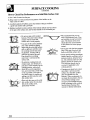
Never pick up a flaming pan. Smother
flamingpanonthe surfaceunitby
coveringpancompletelywithwellfittinglid,cookiesheetorflattray,or if available,
usedrychernicdor foam-typeextinguisher.
flaminggreaseoutsidea pancanbe putoutby
coveringwithbakingsodaor,if available,a multipurposedrychetical or foam-typefire
extinguisher.
Namein theovencanbe smotheredcompletely
by closingtheovendoorandpushingthe
CANCELbuttonor usea chemicalorfoamtypeextinguisher.
B
●
Do not touch the heating elements or interior
surface of oven and surface units. These
surfacesmaybehot enoughto burneventhough
theyaredarkin color.Duringandafteruse,do not
touch,or letclothingor otherflammablematerials
contactsurfaceunits,areasnearbysurfaceunitsor
anyinteriorareaof theoven;allowsufficienttime
forcoo~ng,frost.
Potentiallyhotsurfacesincludethecooktopand
areasfacingthecooktop,ovenventopeningand
surfacesneartheopening,andcrevicesaroundthe
ovendoor,andmetaltrimpartsabovethedoor.
Remember:The insidesurfaceoftheovenmay
behotwhenthedooris opened.
. Do not cook on a broken glass cooktop,
Spilloversor cleaningsolutionmaypenetrate
a brokencooktopandcreatea riskof electrical
shock.Contacta qual~ledtechnicianimmediately
shouldyourcooktopbecomebroken.
Use care when touching the cooktop. The glass
surfaceof thecooktopwillretainheatafterthe
controlshavebeenturnedoff.
●
4
●
Clean the cooktop with caution.
Ha wetspongeo~clothis usedto
wipespillson a hotcookingarea,be
carefulto avoidsteamburn.Somecle~sers can
producenoxiousfumesif appfiedto a hot surface.
men cooking pork, followthe directions
exactlyandalwayscookthemeatto aninternal
temperatureof at least 170°F.Thisassuresthat,
in theremotepossibilitythattrichinamaybe
presentin themeat,it willbe killedandthe meat
willbe safeto eat.
Oven
●
Stand away from range when opening oven
door. Hot air or stwhich escapes mn
cause burns to hands, face antior eyes.
. Do not heat unopened food continers.
Pressure could butid up and the container
could burst, musing an injury.
●
Keep the oven vent duct unobstructed.
s Keep the oven free from grease butidup.
●
Place the oven she~ in the desired position
w~e the oven is cool. H the shelvesmustbe
handledwhenhot,donot let potholdercontact
theheatingunitsin the oven.
●
●
~ling out the she~ to the she~ stop is a
convenience in ~iting heavy foods. It is also
a precaution against burns from touching
hot surfaces of the door or oven walls.
men using cooking or roasting bags in oven,
foflowthe manufacturer’sdirections.
s Do not use your oven to dry newspapers.
If overheated,theycancatchfue.
Do not use oven for a storage area. Items
storedin an ovencanignite.
●
●
●
Do not leave paper products, cooking utensils?
or food in the oven when not in use.
After broiling, alwaystakethebroilerpanout
of therangeandcleanit.Leftovergreasein the
broflerpancancatchfue thenexttimeyouuse
thepan.
●
Never leave jars or cans of fat drippings on or
near your oven.
Self-CleaningOven
●
Do not clean the door gasket. The doorgasket
is essentialfor a goodseal.Careshouldbe taken
notto rub,damageor movethe gasket.
s Do not use oven cleaners. No commercial
ovencleaneror ovenlinerprotectivecoating
of anykindshouldbe usedin or aroundany
partof the oven.Residuefromovencleaners
willdamagetheinsideof theovenwhentheseKcleancyclein used.
Clean ody parts listed in this Use and Care
Book.
● Before seE-claing
the oven, remove broiler
pan and other cookware.
● Do not use aluminum foil to lineovenbottoms,
●
exceptas suggestedin manual.hproper
installationof theselinersmy resultin a risk
of electricshockor fire.
●
●
●
Be sure to wipe up excess spillage before
stirting the self-cleaning operation.
H the self-cleaning mode matiunctions, turn off
and disconnect the power supply. Haveserviced
becauseofthesuddenchangein temperature.
Tominimizethe possibilityof burns, ignitionof
flammablematerialsandspillage,thehandleof a
containershouldbeturnedtowardthecenterofthe
rangewithoutextendingovernearbysotiddisk
surfaceunits.
Nevertry to cleanthe cooktopsurfacewhen it is
hot. Somecleanersproducenoxiousfumesandwet
clothscouldcausesteamburnsif usedona hot
surface.
QAlwaysturn sotiddisk surfaceunitsto OFF
●
●
beforeremovingcookware.
●
●
●
●
appli~ce is equippedwithoneor
moresoliddisksurfaceunitsof
differentsize.Selectcookwarehavingflat
bottomslargeenoughto coverthe so~ddisk
surfaceunit.Theuseof undersizedcookwarewill
exposea portionof the surfaceunitto direct
contactandmayresultin ignitionof clothing.
Roper relationshipof cookwareto surfaceunit
willdso improveefficiency.
●
Never leave the sotid disk surface units
unattended at high heat settings. Boilover
causessmokingandgreasyspi~oversthatmay
catchon fue.
. Do not cook on a broken cooktop. Spilloversor
cleaningsolutionsmaypenetratea broken
cooktopandcreatea riskof electricalshock.
Contacta qualifiedtechnicianimmediatelyshould
yourglasscooktopbecomebroken.
Keepan eyeon foods beingfried at HI or
MediumHighheat settings.
Whenflamingfoodsare under the hood,
turn the fan off. Thefan, if operating,may
spreadtheflame.
Foodsfor fryingshotid be as dry as possible.
Frostonfrozenfoodsor moistureonfreshfoodscan
causehotfatto bubbleupandoversidesofpan.
Stiace Coohg Elementi
. Useproperpansize—This
~>
Use of decorativemeti coverson soliddisk
surfaceunits is not recommended.If a covered
unitis turnedon,elementburnoutcouldresult.
by a qualfledtechnician.
G
Ody certaintypesof glass, @ass/ceramic,
earthenwareor otherglazedcontainersare
suitablefor range-topservice;othersmaybreak
●
Use fittlefat for effectivesha~owor deep-fat
frying. Filhngthepantoofulloffatcancause
sptiloverswhenfoodis added.
U a combinationofoflsor fats wiflbe usedin
frying,stirtogetherbeforeheating,orasfatsmelt
slowly.
Alwaysheatfat slowly,andwatchasit heats.
“Use deep fat thermometerwheneverpossibleto
preventoverheating
fatbeyondthesmokingpoint.
●
●
●
Nevertry to movea pan of hot fa~ especitiy a
deepfat fryer.Waitunti thefatis cool.
SAW T~SE
~STRUCTIONS
5
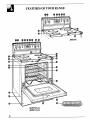
FEA-S
OF YOUR RANGE
1
JBP29G
‘
\ \\’ \
Ill
\
JBP570GM
JBP571GM
6
/
I
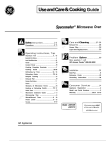
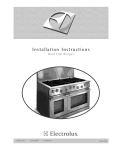
Feature Index
1 Solid Disk Element Surface Unit Controls
Explained
on page
5,9,29
2 ‘ON” Indicator Light
for Solid Disk Element Surface Units
9
3 Surface Light Switch (on some models)
9
4 Oven CANCEL button
Push it to cancel any oven operation.
5 Oven Control, Clock and Timer
6 Set Knob
Lets you set oven temperature, clock timer
and ~ or LO broil.
7 Oven Light Switch
Lets you turn the interior oven light on and
off when the door is closed.
8 Oven Vent. &ea may get hot during oven use.
9 Cooktop Surface Light (on some models)
10 Solid Disk Element Surface Units
11 Sensi-Temp m Surface Uni@ (on some models)
12 Cooktop
4, 13, 15
16,22
13
13,15-17,20
22,25,26
15
4,30
3,9,29
5, 8–12, 28
9
4,5,29
13 Automatic Oven Light Switch
The light comes on automatically when the door is opened.
15
14 Oven SheE Supports
For shelf positions, see the Baking, Roasting and
Broiling sections.
14
15 Oven Shelves with Stop-locks (curved extensions)
For safety, facing up toward the rear of the oven.
4, 14,
18,24,31
16 Bake Unit. Maybe gently lifted for wiping the oven floor.
31
17 Removable Oven Door with Broil Stop Position
Easily removed for oven cleaning.
31
18 Broiler Pan and Rack
Do not clean in the Self-Cleanin~ oven.
19 Oven Door Gasket
20 Storage Drawer
21 Model and Serial Number Location
On the front of the range behind the storage drawer.
22 Anti-Tip Detice. See the Installation Instructions.
23 Broil Unit
24 Oven Interior Light
25 Oven Door Latch Handle. Use for Self-Cleaning cycle only.
4,20,22,24,30
5,24,31
30
L
3,32
31
15,24,30
15, 16,20,22
25,26
7
a,,
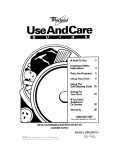
SU~ACE COO~G
Before Using YourSolid Disk Modtie for the First Time
The top working surface of sofid disk elements
have a protective coating which must be hardened
before using the elementi for the first time. To
harden this coating, the elements should be heated
without a pan for about 5 minutes at the ~ setting.
Otherwise the coating will stick to the pan.
There will be some smoke and odor; this is normal.
Heating of the element will change the stainless steel
element trim rings to a gold color.
THE ELEMENT PROTECTIVE COATING
MUST BE HARDENED TO HELP PROTECT
THE ELEMENT OVER ITS LIFE.
GeneralInformationAbout Solid Disk Elemenk
Using a solid disk element is quite similar to using an
electric coil surface unit. With both types of surface
units you will enjoy the cleanliness of electricity and
the benefits of retained heat in the elements.
However, there are differences.
● Solid disk elements reach temperature a Mttle
slower, and hold heat longer than coil unih.
Solid disk elements have very even heat distribution.
Since solid disk elements hold heat longer, you may
wish to turn the element off sooner, and take
advantage of the residual heat. The amount of
residual heat is dependent upon the quantity and
type of food, the material and thickness of the pan
and the setting used for cooking.
● The red dot in the center of the solid disk
element indicates built-in temperature fimiters
that automatically reduce the heat if a pan boils dry,
if the element is turned on without a pan or if the
pan is not making enough contact with the surface
of the element. The red dots will wear off with use
without affecting the performance of the elements.
There is retained heat in the element.
On boilovers, wait for the element to cool before
cleaning the element area.
● You must use proper flat bottomed cookware,
not cookware that is warped, rounded, or curved.
Improper cookware could cause poor cooking results.
“ Untike electric coil surface units, solid disk
elements do NOT turn red hot, even at HI setting.
You may however, notice a dull glow when the
elements are on HI and the room is dimly lit.
● Solid disk element cooking takes you a step
closer to easier cleanup because the cooking
surface is sealed against spills. There are no drip
hwls or burner boxes to clean.
●
CookwareTips
For cooking on sotid disk elements, the use of
correct cookware is very impotint.
● Aluminum cookware conducts heat faster than
other metals.
● Cast-iron and coated cast-iron containers are slow to
absorb heat, but generally cook evenly at minimum
or medium heat settings.
● Glass cookware should be used only as the
manufacturer describes.
● Do not use a wire trivet or any other kind of
heat-retarding pad between the cookware and
the element.
Good pans have a thick, flat bottom which absorbs
the heat from the element. The thick, flat bottom
provides good heat distribution from the element
to the food.
QPans with thin, uneven bottoms do not do a good
job of using the heat coming from the element.
The food to be cooked may bum and require more
time and electricity. You would also have to add
more fat or water.
Pans with uneven bottoms are not suitable.
●
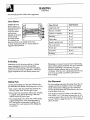
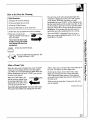
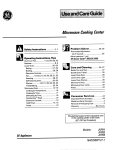
How to Set the Controls
1. Push the control knob in.
2. Turn either clockwise or
counterclockwise to the
desired heat setting.
\
\@
u
E
The control must be pushed in to set only from
the 0~ position. When the control is in ~y position
other than OFF, it may be rotated without pushing in.
Be sure you turn control to OFF when you finish
cooking.
An indicator fight will @owwhen ANY heat on any
surface unit is on.
Cooktop temperatures increases with the number
of surface units that are on. With 3 or 4 surface
unik turned on, surface temperatures are M@, so
be tirefti when touching the cooktop.
Cooting Guide for Using Heat Settings
At both OFF and
OFF
HI settings,there
is a slight niche.
When turning the
control knob to
either of these
MEDIUM
Mf:&M
positions, you
HIGH
/,\
will feel the
control “click’
MED
into the niche.
When cooking in a quiet kitchen, you may hear slight
“clicking” sounds—an indication that the heat settings
you selected are being maintained.
Switching heats to higher settings always results in a
quicker change than switching to lower settings.
~—Bring water to boil.
MEDIUM HI—Fast fry, pan broil; maintain fast boil
on large amount of food.
MED—Saute and brown; maintain slow boil on large
amount of food.
MEDIUM LO—Cook after starting at ~; cook with
little water in covered pan.
LO—Steam rice, cereal; maintain serving
temperature of most foods.
NOTE:
1. At W or MED~
HI, never leave food
unattended. Boilovers cause smoking; greasy
spillovers may catch fire.
2. At LO or MED~M LO, melt chocolate, butter on
small unit.
Sensi-Temp‘MControl (on some models)
OFF
450
,
— 400
150 —
350
200
il\
250
300
The automatic solid disk
surface unit senses the
temperature of the pan and
regulates it according to the
setting selected.
To turn the surface unit
ON, push in and turn the
knob counterclockwise.
You will feel a “click” at
the OFF position.
When turned on, the Sensi-Tempw surface unit always
begins with full power, no matter where the knob is set.
When the temperature you selected has been reached,
the surface unit cycles OFF and ON to maintain the
setting autornaticdly, similar to your oven. Even when
the knob is set at minimum, the surface unit begins on
full power until the selected heat setting is reached.
The Sensi-Tempw surface unit will not burn food
when the correct setting is selected. For example,
beans, chocolate and mashed potitoes can be left on the
Sensi-TempTMsurface unit without scorching or
burning. Food may dehydrate if left on for long periods
of time, but the heat sensing device will not let the food
or pan overheat beyond the setting.
Lamp Over the SurfaceUnit (on some models)
Push the switch to turn the light on and off.
(continuednext page)
9
S~ACE
COO~G
(continued)
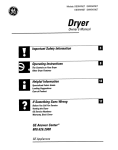
How to CheckPan Pefiomance on a Solid Disk Suflace Utit
1. Put 1 inch of water into the pan.
2. Bring water to a boil and observe the pattern of the bubbles as the
water comes to a boil.
3. A uniform pattern of bubbles across the bottom of the pan confirms
a good heat transfer and a good pan.
4. Bubbles localized in only a portion of the bottom indicate uneven contact
of the pan to the surface unit, uneven heat transferor an unsuitable pan.
~.:
~
~,?,>
,“,.
.:,
,.~!,,.:
,::,-.
,,,,,..,
~,:,.,#
.&+?;:
,>,
,,*:
4.,
,...
,
*$,y ,:.
.,+,
~
Do not use pans with rounded
bottoms. They don’t have enough
contact with the solid disk
surface unit to cook properly.
● Use pans of the conect di~eter
only: They should be slightly
larger than the solid disk surface
unit so spillovers will flow onto
the cooktop and not bake onto
the element. A damp cloth is
sufficient to remove the spill.
Pans should,not overhang=
more than 1 inch beyond the
surface unit.
● To o~tirnize cooking time and
energy usage, you should use a
pan that is sized correctly for the
cooking process, with a wellfitted lid to avoid evaporation
loss, and cook with as little water
or fat as possible. If the pan is
too small, energy is wasted and
spillage can flow onto the solid
disk surface unit.
● Place only dry pans on the solid
disk surface units. Do not place
lids on the surface units,
particularly wet lids.
●
*
, ● We recommend that you use
only a flat-bottomed wok. They
are available at your local retail
store. The bottom of the wok
should have the same diameter
as the element to ensure proper
contact.
● Do not use woks that have support
rings. This type of wok will not
heat on solid disk surface units.
● Some special cooking procedures
require-specific cookware such as
pressure cookers, deep fat fryers,
etc. All cookware must have flat
bottoms and be the correct size.
The cookware should dso be
covered, if applicable to the
cooking process.
● Canning pots should not extend
more than 1 inch beyond the
surface of a solid disk surface
units and should have flat
bottoms. When canning pots do
not meet this description, the use
of the HI heat setting causes
excessive heat buildup and may
result in damage to the cooktop.
See the Home Canning Tips
section for firther information.
Questionsand Answers
Q. May I can foods and preserves on my solid disk
surface units?
A. Yes, but ody use cookware designed for canning
purposes. Check the manufacturer’s instructions
and recipes for preserving foods. Be sure canner is
flat-bottomed and fits over the center of the solid
disk surface unit. Since canning generates large
amounts of steam, be careful to avoid bums from
steam or heat. Canning should only be done on the
surface units. Follow our recommendations in the
Home Canning Tips section.
Q. Why does the solid disk surface units smoke
when I first turn it on?
A. This initial smoking is both normal and necessary.
A rust preventative is applied to each surface unit
at the factory. When the unit is turned on for the
first time, the coating will bum off the surface unit
areas. This takes approximately 5 minutes and
should be done without any cookware on the
surface unit. Otherwise, the coating will stick to
the cookware.
Q. Why is the cooktop hot to the touch?
A. More heat is transferred to the cooktop by the solid
disk surface units than by electric coil surface units
because the surface units are clamped securely to
the cooktop. This, of course, eliminates spillovers
from getting inside the cooktop chassis. The secret
to keeping the cooktop comfortably cooler is to
turn the cooktop on only after the cookware and its
contents are placed on the surface unit. More heat
will then be transferred to the cookware and the
food rather than the cooktop. The cooktop
temperature will not cause damage to the cabinets,
countertops or cookware.
Q. Why am I overcooking my food with the new
so~d disk surface units?
A. The solid disk surface units are very energyefflcient and retain heat much longer than the coil
surface units. Food will boil or fry 3 to 5 minutes
after the controls are turned off. We recommend
that you begin cooking at lower settings than you
have in the past and gradually increase or decrease
heat as desired. The energy savings are significant.
Q. Why does it take a long time to cook my food?
A. It doesn’t. The extra time it takes compared to the
electric coil surface unit is measured in seconds,
not minutes. These few seconds are due to the
greater mass of the unit. If the food is cooking
slowly, it is because the pots and pans are warped
or have an uneven bottom surface. If flat-bottomed
pots and pans are used, cooking performance of
the solid disk surface unit closely parallels that of
the coil surface unit with less energy consumption.
Q. Can I use special cooking equipment like an
orienti wok, on my sotid disk surface units?
A. We recommend that you use only a flat-bottomed
wok. They are available at your local retail store.
The bottom of the wok should have the same
diameter as the surface unit to ensure proper
contact. Do not use woks that have support rings.
This type of wok will not heat on solid disk
surface units.
Q. Whyis the porcelainfinishon my cookware
comingo~
A. If you set your solid disk surface unit on a heat
setting higher than required for the cookware
material, and let the cookware sit too long, the
cookware’s finish may smoke, crack, pop or
bum depending on the pot or pan. Also, cooking
small amounts of dry food may damage the
cookware’s finish.
11
Canning should be done on the solid disk surface
unit’s only.
Pots that extend beyond one inch of a cooking unit’s
trim ring are not recommended for most surface
cooking. However, when canning with a water-bath
or pressure canner, larger-diameter cookware maybe
used. This is because boiling water temperatures
(even under pressure) are not harmful to cooktop
surfaces surrounding the cooking units.
HOWEVER, DO NOT USE LARGE DIAMETER
CANNERS OR OTHER LARGE DIAMETER POTS
FOR FRYING OR BOILING FOODS OTHER
T~
WATER. Most syrup or sauce mixtures—
and dl types of frying+ook at temperatures much
higher than boiling water. Such temperatures could
eventually harm cooktop surfaces surrounding the
solid disk surface units.
Obseme the Following Points in Canning
1. Be sure the canner fits over the center of the
cooking unit. If your range or its location does not
allow the canner to be centered on the cooking unit,
use smaller-diameter pots for good canning results.
2. Flat-bottomed canners must be used. Do not use
canners with flanged or rippled bottoms (often
found in enamelware) because they don’t make
enough contact with the solid disk surface unit and
take too long to boil water.
mGHT
WRONG
Flat-bottomed canners are recommended.
CAUTION:
Safe canning requires that hmicroorganisms
are destroyedand that the jars are sealed completely.
When canning foods in a water-bath canner, a gentle
but steady boil must be maintained continuously for
the required time. When canning foods in a pressure
canner, the pressure must be maintained continuously
for the required time.
Solid disk surface units heat up and cool down
more slowly than other electric surface units.
Because of this difference, after you have adjusted
the controls, it is very important to make sure the
prescribed boil or pressure levels are maintained for
the required time.
12
3. When canning, use recipes and procedures from
reputable sources. Reliable recipes and procedures
are available from the manufacturer of your canner;
manufacturers of glass jars for canning, such as
Ball and Kerr; and the United States Department of
Agriculture Extension Service.
4. Remember that canning is a process that generates
large amounts of steam. To avoid burns from steam
or heat, be careful when canning.
NOTE: If your house has low voltage, canning may
take longer than expected, even though directions
have been carefully followed. The process time will
be shortened bv:
(1) using a p~essure canner, and
(2) starting with HOT tap water for fastest heating
of large quantities of water.
The solid disk surface units have temperature
limiters that help prevent damage to the cooktop.
If the bottom of your canner is not flat, the solid disk
surface unit can overheat, triggering the temperature
limiters to turn the unit off for a time. This will stop
the boil or reduce the pressure in the canner.
Since you must make sure to process the ~nning
jars for the prescribed time, with no interruption
in processing time, you cannot can on solid disk
surface uniti if the bottom of your canner is not
flat enough.
TIMER
STOP
CLOCK TIME
CLEAN
COOK
TIME
BROIL
BAKE
nDDDDDD
Oven “On” Indicator
To Set the Clock
The word “ON’ is displayed when the BAKE or the
BRO~ button is pushed. It goes out when the oven
CANCEL button is pushed or when the oven shuts off
automatically.
The oven operation is controlled electronically.
The following instructions tell you how to operate
the electronic controls.
1. Wsh the CLOCK button.
2. Turn the SET knob to the correct time of day.
The clock is now set. The clock must be set to the
correct time of day for accurate automatic oven
timing operations.
To Set the MinutdSecond Ther
To Cancelthe Tfier
1. Push the TIMER button.
2. Turn the SET knob to the desired amount of time
(up to 9 hours and 59 minutes). The minute/second
timer will begin to count down within a few seconds.
3. When time is up, the end of cycle tone (3 long
beeps) will sound and the display will again show
the time of day.
Wsh and hold the TMER button for 3 seconds while
‘TIMER’ is displayed. This will clear the
minute/second timer function.
NOTE: The minute/second timer is a reminder only
and will not operate the oven.
You can use the minute/second timer whether or not
the oven is being used. The minute/second timer does
not interfere with oven operations.
Tones
End-of-Cycle Tone (3 long beeps—1 second on,
1 second o~: shows that a timed oven operation has
reached the Stop Time or that the minute/second timer
has counted down.
Attention Tone (series of short beeps, l/4-second on,
l/4-second off, until the proper response is given):
will sound if the oven has only been partially
programmed. For example, if you have selected a
cook time but no temperature, you will hear the
attention tone until you select a temperature or push
the CANCEL button.
Notification Tone (single, 1-second beep): indicates
the oven has stabilized at the selected temperature.
Key Tone (single, l/10-second beep): sounds when
any button is pushed.
Function Error Tone (series of very rapid beeps,
l/8-second on, l/4-second o~: display will show a
code. Cancel the function error tone by pushing the
CANCEL button. If the function error tone starts
again (after about 15 seconds), call for service.
Disconnect the range electrical supply to stop the tone.
If the function error occurred while you were
programming the oven control, push the CANCEL
button and try again.
To Cancel the Tone... If you don’t want an audible
tone when you push a button, you can eliminate the
Key Tone by pushing and holding the CANCEL button
until you hear a short beep (in approximately two
seconds). To activate the tone again, push and hold
the CANCEL button once more until you hear a short
beep. Canceling or activating the tone should only be
done when there is no oven operation programmed.
Wshing the CANCEL button will clear all functions
except the Clock and Minute/Second Timer.
13
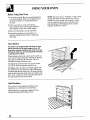
Before Using YourOven
1. Look at the controls. Be sure you understand how
to set them properly. Read over the directions for
the Oven Controls so you understand how to
use them.
2. Check oven interior. hok at the shelves.
Take a practice run at removing and replacing
them properly, to give sure, sturdy support.
3. Read over information and tips that follow.
4. Keep this book handy so you can refer to it,
especially during the first weeks of using your
new range.
Oven Shelves
The shelves are designed with stop-locks so when
placed correctly on the shelf suppo~, they will
stop before coming completely out of the oven and
will not tilt when you are removing food from them
or placing food on them.
When placing cookware on a shelf, pull the shelf out
to the “stop” position. Place the cookware on the shelf,
then slide the shelf back into the oven. This will
eliminate reaching into the hot oven.
To remove the shelf from the oven, pull it toward
you, tilt the front end upward, and pull it out.
To replace, place the shelf on the shelf support with
the stop-locks (curved extension of the shel~ facing
up and toward the rear of the oven. Tilt up the front and
push the shelf toward the back of the oven until it goes
past “stop” on the oven wall. Then lower the front of
the shelf and push it all the way back.
Shelf Positions
The oven has 4 shelf supports identified in this
illustration as A (bottom), B, C and D (top).
Shelf positions for cooking are suggested in the
Baking, Roasting and Broiling sections.
14
NOTE: You may notice a “burning” or “oily” smell
the fwst few times you turn your oven on. This is
normal in a new oven and will dissipate in a short
time. To speed the process, set a self-clean cycle
(see Operating the Self-Cleaning Oven section)
lasting a minimum of 3 hours.
I
Oven Light
The light comes on automatically when the door is opened.
Use the switch on the control panel to turn the light on and off when the
door is closed.
Do ZtYourse~—Adjustthe Oven Themostit
H you don’t think the oven is heating at the right
temperature when you are baking or roasting, you
can reset the thermostat yourseti.
When cooking food for the first time in your new
oven, use time given on recipes as a guide. Oven
thermostats, over a period of years, may “drift” from
the factory setting and the differences in timing
between an old and a new oven of 5 to 10 minutes are
not unusual. Your oven has been set correctly at the
factory and is more likely to be accurate than the oven
which it replaced.
We do not reeommend the use of inexpensive
thermometers, such as those found in the grocery
store, to check the temperature setting of your new
oven. These thermometers can vary by 2M0 degrees.
To decide how much to change the temperature,
set the oven temperature 25°F. higher or lower than
the temperature in your recipe, then bake. The results
of this “test” should give you an idea of how much the
temperature should be changed.
To Adjust the Temperature:
1. Push the BA~ button.
BAKE
D
2. Select an oven temperature between 500°F. and
550°F. with the SET knob.
3. Immediately, before “BAW’ appears, push
and hold the BAD button for about 4 seconds.
The time display will change to the oven
adjustment display.
4. The oven temperature can be adjusted up to
(+) 35°F. hotter or (-) 35°F. cooler.
Turn the SET knob to adjust the
1
temperature in 5°F. increments.
SET
1 @
If the oven control signals, push the CANCEL
button and start over.
5. When you have made the
adjustment, push the CANCEL
CANCEL
button to go back to the time of
day display. Use your oven as you
would normally.
NOTE: This adjustment will not affect the Broil
or Clean temperatures. It will be retained in memory
after a power failure.
n
I
Do not lock the oven door with the latch during baking. The latch is
used for seti-cleaning only.
Your oven temperature is controlled very accurately using an oven control
system. We recommend that you operate the range for a number of weeks
using the time given on recipes as a guide to become familiar with your new
oven’s performance. If you think an adjustment is necessary, see the Do It
Yoursel~—Adjustthe Oven Temperature section.
(continued next page)
15 I
BA~G
(continued)
How to Set YourRange for Bating
3. Push the CANCEL button when
baking is finished and then remove
To avoid possible burns, place the shelves in the
correct position before you turn the oven on.
1. Push the BAKE button.
BAKE
D
2. Turn the SET knob until the desired
temperature is displayed.
?
SET
1 @
~
To change the oven temperature during the
bake cycle, push the BAKE button and then turn
the SET knob to get the new temperamre.
If preheating is desired, do not place the food in the
oven until the 1-second beep sounds to indicate the
oven is preheated.
How to Time B*e
Do not lock the oven door with the latch
during timed baking. The latch is used for
seti-cleaning only.
The oven control allows you to turn the oven on
or off automatically at specific times that you set.
NOTE: Before beginning make sure the oven clock
shows the correct time of day.
CLOCK
n
set the clock, firstpush the CLOCK
pad. Turn the SET knob until the correct
time of day is displayed.
To
How to Set ImmediateStart and Automatic Stop
To avoid possible burns, place the shelves in the
correct position before you turn the oven on.
The oven will turn on immediately and cook for a
selected length of time. At the end of Cook Time,
the oven will turn off automatically.
COOK
1.
Wsh the COOK TIME button.
TIME
?
SET
1 @
BAKE
2. Turn the SET knob until the desired
length of baking time appears in the
display.
3. Push the BAKE button.
n
1
SET
t @
4. Turn the SET knob until the desired
temperature is displayed.
The oven will continue to cook for the programmed
amount of time, then shut off automatically.
5. Remove the food from the oven. Remember,
even though the oven shuts off automatically,
foods continue cooking after the controls are off.
NOTE:
● Foods that spoil easily such as milk, eggs, fish,
stuffings, poultry and pork should not be allowed
to sit for more than 1 hour before or after cooking.
Room temperature promotes the growth of harmful
bacteria. Be sure the oven light is off because heat
from the bulb will speed harmful bacteria growth.
● Push the STOP TIME button to find out when
the end of cycle tone will sound and the oven will
turn off.
● Push the CLOCK button to display the time of day
with out canceling the oven operation.
How to Set Delay Start and Automatic Stop
BAKE
Quick Reminder:
1. Push the COOK TIME button.
2. Turn the SET knob to set the cooking time.
3. Push the STOP T~E button.
4. Turn the SET knob until the desired stop time
appears in the display.
5. Push the BAKE button.
6. Turn the SET knob to select the oven
temperature.
To avoid possible burns, place the shelves in the
correct position before you turn the oven on.
You can set the oven control to turn the oven on
automatically, cook for a specific length of time and
turn off automatically.
For examDle: Let’s say it’s 2:00 and dinner time is
shortly aft~r 7:00. The~eeipe suggests 3 hours baking
time at 325°F. Here’s how:
COOK 1. Push the COOK TIME button.
TIME
i
SET
1 @
STOP
TIME
f
SET
1 @
2. For 3 hours of cooking time, turn
the SET knob until “3:00’ appears
in the display.
i
SET
5. Push the BAKE button.
6. Turn the SET knob until “325°”
is displayed.
1 @
At 4:00, the oven will turn on automatically. The
oven will continue to cook for the programmed
3 hours and shut off automatically at 7:00.
7. Remove the food from the oven. Remember, even
though the oven shuts off automatically, foods
continue cooking after the controls are off.
NOTE:
● The low temperature zone of this range (between
150°F. and 200°F.) is available to keep hot cooked
foods warm. Food kept in the oven longer than
2 hours at these low temperatures may spoil.
c When setting your oven for a delay start, never
let foods such as dairy products, fish, meat,
poultry, etc. sit for more than 1 hour before actual
cooking begins. Room temperature promotes the
growth of harmful bacteria. Be sure the oven light
is off because heat from the bulb will speed
bacteria growth.
(continued next page)
3. Push the STOP TIME button.
4. Set the Stop Time by turning the
SET knob until “7:W’ appears
in the display.
17
BA~G
(continued)
For best baking results, follow these suggestions:
Oven Shelves
the oven
Arrange
shelf or shelves in
the desired locations
while the oven is
cool. The correct
shelf position
depends on the kind
of food and the
browning desired.
As a general rule,
place-most foods in the middle of the oven,
on either shelf position B or C. See the chart for
suggested shelf positions.
I Npe of Food
I SheMPosition
I
I Angel food cake
1A
I
I Biscuits or muffins
I Bor C
I
I Cookies or cupcakes
I Bor C
I
I Brownies
1 Bor C
I
! Layer cakes
1 Bor C
I
I Bundt or pound cakes
I AorB
I
I
I
.
Pies or pie shells
Bor C
Frozen pies
A (on cookie sheet)
Casseroles
Bor C
Roasting
Aor B
Preheating
Preheat the oven if the recipe calls for it. Preheat
means bringing the oven up to the specified
temperature before putting in the food. To preheat,
set the oven at the correct temperature-selecting a
higher temperature does not shorten preheat time.
Preheating is necessary for good results when baking
cakes, cookies, pastry and breads. For most casseroles
and roasts, preheating is not necessary. For ovens
without a preheat indicator light or tone, preheat
10 minutes. After the oven is preheated place the food
in the oven as quickly as possible to prevent heat
from escaping.
Baking Pans
Pan Placement
Use the proper baking pan. The type of finish on the
pan determines the amount of browning that will occur.
● Dark, rough or dull pans absorb heat resulting in a
browner, crisper crust. Use this type for pies.
● Shiny, bright and smooth pans reflect heat, resulting
in a lighter, more delicate browning. Cakes and
cookies require this type of pan.
● G1assbaking dishes also absorb heat. When baking
in glass baking dishes, lower the temperature by
25°F. and use the recommended cooking time in
the recipe. This is not necessary when baking pies
or casseroles.
For even cooking and proper browning, there must be
enough room for air circulation in the oven. Baking
results will be better if baking pans are centered as
much as possible rather than being placed to the front
or to the back of the oven.
Pans should not touch each other or the walls of the
oven. Allow 1 to 1Y2 inch space between pans as well
as from the back of the oven, the door and the sides. If
you use 2 shelves, stagger the pans so 1 is not directly
above the other.
18
Baking Guides
When using prepared baking mixes, follow package recipe or instructions
for the best baking results.
Cookies
When baking cookies, flat cookie sheets (without
sides) produce better-looking cookies. Cookies baked
in a jelly roll pan (short sides dl around) may have
darker edges and pale or light browning may occur.
Do not use a cookie sheet so large that it touches the
walls or the door of the oven. Never entirely cover a
shelf with a large cookie sheet.
For best results, use only 1 cookie sheet in the oven
at a time.
Pies
Cakes
For best results, bake pies in dark, rough or dull pans
to produce a browner, crisper crust. Frozen pies in foil
pans should be placed on an aluminum cookie sheet
for baking since the shiny foil pan reflects heat away
from the pie crust; the cookie sheet helps retain it.
When baking cakes, warped or bent pans will cause
uneven baking results and poorly shaped products.
A cake baked in a pan larger than the recipe
recommends will usually be crisper, thinner and drier
than it should be. If baked in a pan smaller than
recommended, it may be undercooked and batter may
oveflow. Check the recipe to make sure the pan size
used is the one recommended.
AluminumFoil
Never entirely cover a shelf with aluminum foil.
This will dis&rb the heat circulation and result in poor
baking. A smaller sheet of foil maybe used to catch a
spillover by placing it on a lower shelf several inches
below the food.
/
,
Don’t Peek
Set the timer for the estimated cooking time and do
not open the door to look at your food. Most recipes
provide minimum and maximum baking times such
as “bake 30-40 minutes.”
DO NOT open the door to check until the
minimum time. Opening the oven door frequently
during cooking allows heat to escape and makes
baking times longer. Your baking results may also
be affected.
19
ROAS~G
Do not lock the oven door with the latch during Roasting. The latch is
used for seti-cl=ning ody.
Roasting is cooking by dry heat. Tender meat or poultry can be roasted
uncovered in your oven. Roasting temperatures,which should be low and
steady, keep spattering to a minimum.
Roasting is really a baking procedure used for meats. Therefore, the oven
controls are set for BA= or Timed Baking. You may hear a slight clicking
sound, indicating the oven is working properly. Roasting is easy; just follow
these directions:
1. Place the shelf in A or B position. No preheating is
necessary.
2. Check the weight of the
=,-~~-~, -. ,,,,,,
IIll
meat. Place the meat
:-3
fat-side-up, or poultry
‘\k>. , Y,
~breast-side-up, on
roasting rack in a
$.
shallow pan. The
Y
melting fat will baste
*
the meat. Select a pan
as close to the size of the meat as possible. (The
broiler pan with rack is a good pan for this.) Line
the broiler pan with aluminum foil when using pan
for marinating, cooking with fruits, cooking heavily
cured meats, or basting food during cooking. Avoid
spilling these materials inside the oven or inside the
oven door.
3. Wsh the BA= button.
BAKE
t
SET
5. Push the CANCEL button when
cooking or roasting is finished
CANCEL
and then remove the food from
the oven.
D
Most meats continue to cook slightly while standing,
after being removed from the oven. Standing time
recommended for roasts is 10 to 20 minutes. This
allows roasts to firm up and makes them easier to
carve. Internal temperature will rise about 5° to 10°F.;
to compensate for temperature rise, if desired, remove
the roast from oven sooner (at 5° to 10°F. less than
temperature in the Roasting Guide).
NOTE: You may wish to use Timed Baking, as
described in the Baking section of this book, to turn
the oven on and off automatically.
To change the oven temperature during the
roasting cycle, push the BA~ button and then
turn the SET knob to get the new temperature.
4. Turn the SET knob until the desired
temperature is displayed.
1 @
For Frozen Romts
Frozen roasts of beef, pork, lamb, etc., can be started
without thawing, but allow 10 to 25 minutes per pound
additional time (1Ominutes per pound for roastsunder
5 pounds, more time for largerroasts).
20
Thaw most frozen poultry before roasting to ensure
even doneness. Some commercial frozen poultry can
be cooked successfully without thawing. Follow the
directions given on the package label.
Questions and Answers
Q. Is it neeessary to check for doneness with a
meat thermometer?
A. Checking the finished intemd temperature at the
completion of cooking time is recommended.
Temperatures are shown in the Roasting Guide
section. For roasts over 8 lbs., check with
thermometer at half-hour intervals after half
the cooking time has passed.
Q. Why is my roast crumbling when I try to
carve it?
A. Roasts are easier to slice if allowed to cool 10 to
20 minutes after removing them from the oven.
Be sure to cut across the grain of the meat.
Q. Do I need to preheat my oven each time I cook a
roast or poultry?
A. It is unnecessary to preheat your oven.
Q. When buying a roast, are there any special tips
that would help me cook it more evenly?
A. Yes. Buy a roast as even in thickness as possible,
or buy rolled roasts.
Q. Can I sed the sides of my fofl “tent” when
roasting a turkey?
A. Sealing the foil will steam the meat. Leaving it
unsealed allows the air to circulate and brown
the meat.
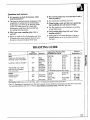
ROASTINGGU~E
~pe
Oven
Temperature Doneness
Meat
Tender cuts; rib, high quality
sirloin tip, rump or top round*
325°
Lamb leg or bone-in shoulder*
325°
Veal shoulder, leg or loin*
Pork loin, rib or shoulder*
Ham, precooked
325°
325°
325°
Well Done:
Rare:
Medium:
Well Done:
Well Done:
Well Done:
To Warm:
325°
350°
Well Done:
Well Done:
Rae:
Medium:
Podtry
Chicken or Duck
Chicken pieces
ApproximateRoastingTime
in Minutes per Pound
3 to 5 lbs.
6 to 8 lbs.
2633
18-22
22-29
35-39
40-45
30-35
21-25
20-23
2&28
25–30
28-33
30-35
3545
30-40
3545
30-40
17–20minutesperpoand(anyweight)
3 to 5 lbs.
35-40
35-40
10 to 15 lbs.
18-25
. .
Over 5 lbs.
30-35
Over 15lbs.
Internal
Temperature ‘F.
140°–1500t
150°–1600
170°–1850
140°–1500T
150°–1600
170°–1850
170°–1800
170°–1800
115°–1250
185°–1900
185°–1900
h thigh:
15-20
185°–1900
Well Done:
325°
Turkey
*For boneless rolled roasts over b inches thick, add 5 to 10 tinutes per pOUnd to times given above.
fThe U. S. Department of Agriculture says “Rare beef is popular,but you shouldknow that cookingit to only 140°F.means some
food poisoningorganismsmay survive.”(Source: Safe Food Book. YourKtchen Guide. USDARev. June 1985.)
21
Do not lock the oven door with the latch during broiling. The latch is
used for seE-cleaning only.
Broiling is cooking food by intense radiant heat from the upper unit in the
oven. Most fish and tender cuts of meat can be broiled. Follow these
directions to keep spattering and smoking to a minimum.
1. If the meat has fat or gristle near edge, cut vertical
slashes through both ~bout 2“ apart.-If desired, fat
may be trimmed, leaving layer about 1/8” thick.
2. Place tie meat on the broiler rack on the broiler pan
which comes with the range. Always use the rack
so the fat drips into the broiler pan; otherwise the
juices may become hot enough to catch fire.
3. Position the shelf on the recommended shelf
position as suggested in the Broiling Guide.
4. Leave the door oDen to
the broil stop po~ition.
The door stays open by
itself, yet proper
temperature is maintained
in the oven.
BROIL
I
5. Push the BROIL bution.
I
1 =
SEt
6. Turn the SET knob until either HI
BROIL or LO BROIL is displayed.
1 w
7. Turn food only once
during cooking. Time foods
for first side according to
the Broiling Guide.
Turn food, then use times given for second side as a
guide to preferred doneness. where 2 thicknesses
and times are given together, use first times given for
thinnest food.)
8. When broiling is completed push
the CANCEL button. Serve the
CANCEL
food immediately, md leave the
pan outside the oven to cool during
—
the meal for easiest cleaning.
D
Use of Alwinum Foti
You can use aluminum foil to line your broiler pan and broiler rack.
However, you must mold the foil tightly to the rack and cut slits in it just
like the rack.
Without the slits, the foil will prevent fat and meat juices from draining to
the broiler pan. The juices could become hot enough to catch on fire. If you
do not cut the slits, you are frying, not broiling.
(
s~b$:y$?:;
~$<~{$:y!
?-
~‘ “
‘
o
Questions & Answers
Q. When broiling, is it necessary to always use a
rack in the pan?
A. Yes. Using the rack suspends the meat over the
pan. As the meat cooks, the juices fall into the pan,
thus keeping meat drier. Juices are protected by the
rack and stay cooler, thus preventing excessive
spatter and smoking.
Q. Do I need to grease my broiler rack to prevent
meat from sticking?
A. No. The broiler rack is designed to reflect broiler
heat, thus keeping the surface cool enough to
prevent meat from sticking to the surface.
However, spraying the broiler rack lightly with a
vegetable cooking spray before cooking will make
cleanup easier.
22
Q. Should I salt the meat before broiling?
A. No. Salt draws out the juices and allows them to
evaporate. Always sdt after cooking. Turn meat
with tongs; piercing meat with a fork also allows
juices to escape. When broiling poultry or fish,
brush each side often with butter.
Q. Why are my meats not turning out as brown as
they shodd?
A. In some areas, the power (voltage) to the range
may be low. In these cases, preheat the broil unit
for 10 minutes before placing broiler pan with
food in oven. Check to see if you are using the
recommended shelf position. Broil for longest
period of time indicated in the Broiling Guide.
Turn food only once during broiling.
5. When arranging food on the pan, do not let fatty
edges, which could soil oven with fat dripping,
hang over the sides.
6. The broiler does not need to be preheated.
However, for very thin foods, or to increase
browning, preheat if desired.
7. Frozen steaks can be broiled by positioning the
oven shelf at next lowest shelf position and
increasing cooking time given in this guide 1Y2
times per side.
8. If your range is connected to 208 volts, rare steaks
may be broiled by preheating the broiler and
positioning the oven shelf 1 position higher.
1. Always use the broiler pan and rack that comes
with your range. It is designed to minimize
smoking and spattering by trapping juices in the
shielded lower part of the pan.
2. Leave the oven door open to the broil stop
position for all foods.
3. For steaks and chops, slash fat evenly around
outside edges of meat. To slash, cut crosswise
through outer fat surface just to the edge of the
meat. Use tongs to turn meat over to prevent
piercing meat and losing juices.
4. If desired, marinate meats or chicken before
broiling, or brush with barbecue sauce last 5 to 10
minutes only.
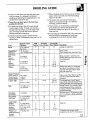
Food
Bacon
Ground Beef
WellDone
BeefSteaks
Second Side
Time, Minutes Comments
4%
Arrange in single layer.
Quantity andor
Thickness
1/2 lb. (about8
thin slices)
1 lb. (4 patties)
1/2 to 3/4 inch thick
Rare
Medium
Well Done
Rare
Medium
Well Done
1 inch thick
(1 to 1Z lbs.)
Chicken
1 whole
(2 to 2% lbs.),
split lengthwise
7
c
c
c
c
c
c
A
1%inch thick
(2 to 2%lbs.)
Bakery Products
Bread (Toast) or 2 to 4 slices
Toaster Pastries
English Muffins
Lobster Tails
1 pkg. (2)
2 (Spfit)
24
(6 to 8 oz. each)
Fish
l-lb. fillets 1/4 to
1/2 inch thick
Ham Slices
1 inch thick
[Drecooked)
Pork Chops
WellDone
c
Wieners and
similar precooked
sausages,
bratwurst
6
8
12
10
15
25
35
5
6
11
7-8
1416
2W25
Steaks less than 1 inch thick cook
through before browning. Pan frying
is recommended.
Slash fat.
l&15
Reduce time about 5 to 10 minutes
per side for cut-up chicken. Brush
each side with melted butter. Broil
skin-side-down first.
1%–2
1/2
F
c
B
13–16
3A
Do not
turn over.
c
5
5
8
10
13
2 (1/2 inch thick)
2(1 inch thick),
about 1 lb.
Space evenly. Place English muffins
cut-side-up and brush with butter,
if desired.
Cut through back of shell. Spread
open. Brush with melted butter before
broiling and after half of broihng time.
Handle and turn very carefully. Brush
with lemon butter before and during
cooking, if desired. Preheat broiler to
increase browning.
Increase time 5 to 10 minutes per side
for 1%inch thick or home cured ham
Slash fat.
,
Lamb Chops
Medium
Well Done
Medium
Well Done
I
Space evenly.
Up to 8 patties take about same time.
c
2(1 inch thick)
about 10 to 12 oz.
2(1 %inch thick),
about 1 lb.
l-lb. pkg. (10)
B
10
12
14
17
c
6
c
c
+
9
10
12
12-14
1-2
Slash fat.
If desired, split sausages in half
lengthwise;-cut into 5~to6-inch pieces.
23
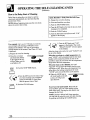
OPEM~G
T~
Nod
SELF-CLEmG
CleamngTree: 3 hours
OWN
Before a Clean Cycle
The range must be completely cool in order to set
the se~-clean cycle. You may have to allow the oven
to cool before you can slide the door latch.
1. Remove the broiler pan, broiler rack, all cookware
and any aluminum foil from the oven—they cannot
withstand the high cleaning temperatures.
NOTE: The oven shelves may be left in oven.
Shelveswill discolor and become hard to slide after
the self-clean cycle.
2. Wipe up heavy soil on the oven bottom. If you use
soap, rinse thoroughly before self-cleaning to
prevent staining.
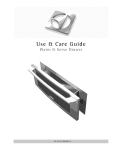
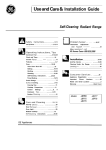
A. Oven Front Frame
B. Oven Door Gasket
C. Oven Door Latch
D. Oven Light
E. Openings in Door.
3. Clean spatters or spills on oven front frame (A),
under the front edge of the oven vent, the door liner
outside the door gasket and the front edge of the
oven cavity (about 1 inch into the oven). Use
detergent and hot water with a soap-filled steel
wool pad, then rinse well with a vinegar and water
mixture. This will help prevent a brown residue
from forming when the oven is heated. Buff these
areas with a dry cloth.
24
Do not rub or clean the door gasket (C)—the
fiberglass material of the gasket has an extremely
low resistance to abrasion. An intact and well-fitting
oven door gasket is essential for energy-efficient
oven operation and good baking results. If you
notice the gasket becoming worn, frayed or damaged
in any way or if it has become displaced on the
floor, you should have it replaced.
● Do not let water run down through openings in
top of door (E). To help prevent water from getting
in these slots when cleaning, open the door as far as
it will go.
4. Close the door and make sure the oven light (D) is
off. If the oven light is not turned off, the life of the
bulb will be shortened or it may cause the bulb to
bum out immediately.
The oven shelves may be cleaned in the seEcleaning oven. However, they will darken, lose their
luster and become hard to slide. Wipe the shelf
supports with cooking oil after self-cleaning to make
shelves slide more easily.
Do not use commercial oven cleaners or oven
protectors in or near the seti-cleaning oven.
A combination of any of these products plus the high
clean cycle temperatures may damage the porcelain
finish of the oven.
tiportant
The oven door must be closed, latched and all
controls must be set correctly for the clean cycle to
work properly.
●
How to Set Oven for Cleaning
Quick Reminder:
1. Repare the oven for cleaning.
2. Close and latch the oven door.
3. Wsh the CLEAN button.
4. Turn the SET knob to set the clean time.
1. Follow the steps to prepare the oven for cleaning.
2. Close the oven door and
slide latch handle to the right as r
far as it will go.
Never force the door latch
111111-+
han~e. Forcing the handle
may damage the door lock
mechanism.
CLEAN
The self-clean cycle will automatically begin after
“CLEAN’ is displayed and the word “ON’ appears
on the display. When the oven heats to a high
temperature, the word “LOCK’ will be displayed and
the door latch handle will be locked in position. It will
not be possible to open the oven door until the LOCK
light goes off and the oven has cooled below locking
temperature. If you cannot slide tie latch easily to
unlock the door, allow additional time for cooling.
The word “DOOr” is displayed if you try to set a
clean cycle without latching the door or if the oven
temperature is too high.
3. fish the CLEAN bufion.
n
I
Sfl
4. Turn the SET knob one half turn. The
display will show “3:30’:
1 @
After a Clan Cycle
When the clean cycle is finished, the word “CLEAN’
will go out in the display and the oven will begin to
cool. When the oven temperature has fallen below the
locking temperature, the word “LOCK’ goes out and
the door can be opened.
When the LOCK light is off
and the oven has cooled below ~
the locking temperature, slide
latch handle to the left as far as
Ullllll
it will go and open the door.
+
Never force the latch handle. The latch slides easily.
Forcing the latch handle may damage the door lock.
After a clean cycle, you may notice some white ash in
the oven. Just wipe it up with a damp cloth.
If white spots remain, remove them with a soapfilled steel wool pad. Be sure to rinse thoroughly
with a vinegar and water mixture. These deposits
are usually a sdt residue that cannot be removed by
the clean cycle.
If the oven is not clean after 1 clean cycle, the cycle
may be repeated.
(continued nextpage)
25
—
OPEMT~G Tm SELF-CLEA~G
(continued)
OWN
How to Set Delay Shrt of Cleting
Delay Start is setting the oven timer to start the
clean cycle automatically at a later time than the
present time of day.
NOTE: Before beginting make sure the oven clock
shows the correct time of day.
For example: Let’s say it’s 7:00 and you want the
oven to begin self-cleaning at 9:00 after you’re
finished in the kitchen. The oven is just soiled a
normal amount so the normal Clean Time of 3 hours
is preferred.
1. Prepare the oven for cleaning.
2. Close the oven door
and slide latch handle
to the right as far as it
will go. Make sure the
oven light is off.
STOP
TIME
3. Push the STOP TIME button.
4. Turn the SET knob to the time of day
you want cleaning to be completed
(must be more that 3X hours later
than the present time of day).
r
SET
i @
CLEAN
[
5C~sh the CLE~
1
Quick Reminder—Delay Start for SeM-Clean:
1. Prepare the oven for cleaning.
2. Close and latch the oven door.
3. Wsh the STOP TIME button.
4. Turn the SET knob to the time of day you want
cleaning to be completed.
5. Push the CLEAN button.
6. Turn the SET knob one half turn until “3:30’
appears in the display.
r
7.Turn the SET knob until “3:30’
appears in the display. The words
“DELAY CLEAN’ will also appear
in the display.
After the clean cycle starts, the word “CLEAN’ will
be on in the display.
When the oven heats to a high temperature, the
word “LOCK’ will be displayed and tie door latch
handle will be locked in position. It will not be
possible to open the oven door until the temperature
drops below the lock temperature.
When the clean cycle is finished, the word
“CLEAN’ will go out in the display and the oven
will begin to cool. When the oven temperature has
fallen below the locking temperature the word
“LOCK” goes out and the door can be opened.
SH
t @
8. When the LOCK light is
off, slide handle to the left ~
as far as it will go and
open the door.
+
U,lllll
bu~on.
Never force the latch handle. Wait until the
word “LOCK’ goes out in the display and the
latch slides easily. Forcing the door handle may
damage the door lock.
NOTE: During a delayed self-clean operation,
you can find out when the oven will start cleaning
by pushing and holding the CLEAN button.
Questionsmd Answers
Q. ~ my oven clock is not set to the correct time of
day, mn I still se~-clean my oven?
A. If the clock is not set to the correct time of day you
will not be able to set a delay clean to end at a
specific time.
Q. Can I use commercial oven cleaners on any part
of my se~-cleaning oven?
A. No cleaners or coatings should be used around any
part of this oven. If you do use them and do not
thoroughly rinse the oven with water, wiping it
absolutely clean afterwards, the residue can scar
the oven surface and damage metal parts the next
time the oven is automatically cleaned.
Q. What should I do if excessive smoking occurs
during cleaning?
A. This is caused by excessive soil. fish the
CANCEL button. Open windows to rid room of
smoke. Wait until the oven has cooled and the
word “LOCK’ is off in the display. Wipe up the
excess soil and reset the clean cycle.
Q. Is the “crackling” or ‘>opping” sound I hear
during cleaning normal?
A. Yes. This is the sound of the metal heating and
cooling during both the cooking and cleaning
functions.
Q. Should there be any odor during the cleaning?
A. Yes, there maybe an odor during the first few
cleanings. Failure to wipe out excessive soil might
also cause a strong odor when cleaning.
Q. What caus= the hair-fike Enes on the enameled
surface of my oven?
A. This is a normal condition, resulting from heating
and cooling during cleaning. These lines do not
affect how your oven performs.
Q. The word “DOOd’ appwred on the display
when I selected the Clean Cycle. What’s wrong?
A. The door latch handle must be moved all the way
to the right. Move the latch handle and cleaning
will start.
Q. Why do I have ash left in my oven
after cleaning?
A. Some types of soil will leave a deposit which is
ash. It can be removed with a damp sponge or cloth.
Q. My oven shelves do not stide easily.
What is the matter?
A. Afier self-cleaning, oven shelves may become so
clean they do not slide easily. To make shelves
slide more easily, after each self-cleaning dampen
fingers with a small amount of cooking oil and
rub lightly over sides of shelf where they contact
shelf supports.
Q. My oven shelves have become gray after the
se~-clean cycle. Is this normal?
A. Yes. After the self-clean cycle, the shelves may
lose some luster and discolor to a deep gray color.
27
Proper care and cleaning are important so your range
will give you efficient and satisfacto~ service.
Follow these directions carefully in caring for your
cooktop to assure safe and proper maintenance.
BE SURE T~T ELECTWC POWER IS OFF
BEFORE CLEAMNG Am PART OFT=
RANGE.
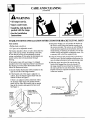
Removal of Packaging Tape
The safest way to remove adhesive left from packing
tape on new appliances to assure no damage is done
to the finish of the product is an application of a
household liquid dishwashing detergent, mineral oil
or cooking oil. Apply with a soft cloth and allow to
soak. Wipe dry and then apply an appliance polish
to thoroughly clean and protect the surface. This
procedure is also safe for the face of microwave doors
and other plastic and Lexan parts.
NOTE: The plastic tape that is not removed from the
chrome trim on oven parts cannot be removed if
baked on.
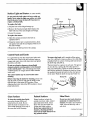
Glass Top
Wipe the glass cooktop clean after each use. Use an
all-purpose, non-abrasive cleaner. Do not use a dish
towel or sponge to wipe up the cooktop. They may
leave a film of detergent which can discolor your
cooktop when heated. If this happens, remove the film
with the recommended cleaner. We recommend that
you use paper towels or a clean cloth which is used
only for cleaning the cooktop.
For burned on spillover:
●
Remove excess soil with a razor scraper.
Wearing an oven mitt, hold the scraper at a 30°
angle to the cooktop and scrape off the soil. Be sure
to use a new, sharp razor scraper. Do not use a dull
or nicked blade.
NOTE:
QUsing a razor scraper will not damage the surface if
the 30° angle is maintained. Store the razor scraper
out of reach of children.
● Scrub the glass cooktop with an all-purpose, nonabrasive cleaner, such as Bon Arni@brand, or with a
cooktop cleaning creme. Rinse well and wipe dry.
Cook Top Cleaning Creme is available at your GE
Appliance and Parts Stores, Part No. WB64X5020.
●
Never use abrasive scouring pads or powders on
the glass cooktop. Plastic mesh pads such as Dobie@
brand may be used.
Solid Disk Sutiace Uni@
The solid disk surface units are made of high
strength cast-iron alloy.
The surface has a heat-resistantcoating to preserve
the surface of the unit. After the unit cools, any
boiled-over material on them should be removed as
soon as possible with a slightly damp cloth. The surface
unit should then be dried by switching on for a few
minutes. After it cools, wipe lightly with cooking oil.
Clean very dirty solid disk surface units with a Uttle
cleaning powder (such as Comet@cleanser) or with a
scouring pad .
28
The matte black surface can be maintained by
treating it periodically with the Cello Electrol@
polish which is available from your GE supplier.
Use the applicator to apply a very thin coating of the
polish to the entire unit surface. Turn the surface unit
on high for several minutes to bake the polish to the
unit. When the unit is cooled, rub lightly with a cloth or
paper towel to remove any excess polish. Before next
use, bum off the surface unit by means of a short
preheating period. A slight amount of smoke and odor
will occur.
Do not use covers over the sotid disk surface units.
A surface unit turned on while the cover is in place can
permanency damage the cooktop. Covers can also trap
moisture which may cause the units to rust.
Suflace Light and Starter (on some models)
Do not touch the btib when it is hot or with wet
hands. Never wipe the tight area with a wet cloth.
Electrical power must be shut off if you have to
replace a broken bulb.
To replace the btib:
1. flip the front of the hinged canopy up.
2. Remove the fluorescent light bulb. Replace the
bulb with one of the same length and wattage.
3. hwer the canopy.
To replace the stirter:
1. Open the canopy and remove the bulb as
explained above.
2. Grasp the starter, turn it counterclockwise, about
one quarter turn and lift out. Replace with one of
the same wattage.
3. Reposition the bulb and lower the canopy.
Canopy
Bulb
Statier
=::
_.
A
.\
ControlPanel and mobs
It’s a good idea to wipe the control panel after each
use of the oven. Clean with mild soap and water or
vinegar and water, rinse with clean water and polish
dry with a soft cloth.
Do not use abrasive cleansers, strong liquid
cleansers, plastic scouring pads or oven cleansers
on the control panel—they will damage the finish.
A 50/50 solution of vinegar and hot water solution
works well.
The control knobs may be removed for easier
cleaning.
Before removing the knobs for clwning, please note
that the knobs on the left side and the knobs on the
right side are in the proper 0~ position. When
replacing the knobs, check the 0~ position to insure
proper placement.
To remove the knob, pull it straight off the spring
clip. If it is difficult to remove, place a thin cloth (like
a handkerchief or a piece of string under and around
the knob edge and pull up.
The knob stem has a groove in each side. The groove
on one side has a spring clip. The other groove is
clear (see illustration). Check the inside of the knob
and find the molded rib. Replace the knob by fitting
the molded rib inside the knob into the clear groove
on the stem. Wash the knobs in soap and water or a
Clear Groove
in Stem
Glass Sufiaces
Painted Sufiaces
Metal Parts
To clean the outside glass finish,
use a glass cleaner. Rinse and
polish with a dry cloth. Do not
allow the water or cleaner to run
~own inside openings in the top of
the oven door while cleaning.
Painted surfaces include the
outside oven door, sides, control
panel and drawer front. Clean
these with soap and water or a
vinegar and water solution.
Do not use commercial oven
cleaners, cleansing powders,
steel wool or harsh abrasives on
any painted surface.
Do not use steel wool, abrasives,
ammonia or commercial oven
cleaners. To safely clean surfaces;
wash, rinse and then dry with a
soft cloth.
(continued next page)
29
CA~ Am CLEHG
(continued)
Oven Light Bdb
The light bulb is located on the
back wall of the oven. Before
replacing the bulb, disconnect
electrical power to the range at
the main fuse or circuit breaker
panel or unplug the range from the
electrical outlet. Let the bulb cool
completely before removing it. For
your safety, do not touch a hot bulb
with a damp cloth. H you do, the
bulb will break.
To remove: Unscrew the cover and
remove the bulb.
To replace: Wt in a new 40-watt
appliance bulb.
NOTE: A 40-watt appliance bulb is
smaller than a standard 40-watt
household bulb.
● Install and tighten the cover.
c Reconnect electrical power to the
range.
DO NOT ~MO~
SCMWS.
BroflerPan and Rack
After broiling, remove the broiler pan from the oven.
Remove the rack from the pan. carefully pour out the
grease in the pan into a proper container. Wash and
rinse the pan and rack in hot soapy water.
If food has burned on, spritie the rack while hot with
detergent and cover with wet Da~ertowels or a
dishcloth. Burned-on foods will-soak loose while the
meal is being served.
The broiler pan and rack may also be cleaned in
a dishwasher.
Do not store a soiled broiler pan and rack in the oven.
Do not clean in the self-cleaning oven.
RemovableStorage Drawer
The storage drawer is a good place to store cookware
and bakeware. Do not store plastics and flammable
material in the drawer.
Do not overload the storage drawer. H the drawer is
too heavy, it may slip off the track when opened. To
open the drawer, grasp the center of the handle and
pull straight out.
me storagedrawer maybe removed for cleaning under
the range.
To remove: Pull the drawer straight out and lift over
the guide stops.
To replace: Lift over the guide stops and slide the
drawer into place.
v
To clean both the inside and the outside: Wipe with
soap and water. Rinse well.
Do not use cleansing powders or harsh abrasives
which may scratch the surface.
Oven Vent
The oven vent is located at the rear of the cooktop. Do not obstruct this
opening. Keep the vent clean.
30
RemovableOven Door
The oven door is removable,
but it is heavy. You may need help
removing and replacing the door.
Do not lift the door by the handle.
This could cause the glass to break or
cause damage to the door.
To remove the door, open it a few
inches to the special stop position
that will hold the door open. Grasp
fitiy on each side and lift the door
straight up and off the hinges.
NOTE: Be careful not to place hands between the
hinge and the oven door frame as the hinge could
snap back and pinch fingers.
To replace the door, make sure the hinges are in the
special stop position. Position the slots in the bottom
of the door squarely over the hinges. Then lower the
door slowly and evenly over both hinges at the same
time. If hinges snap back against the oven frame, pull
them back out.
TO CLEAN THE DOOR:
Inside of door:
● Because the area inside the gasket is cleaned during
the self clean cycle, you do not need to clean this by
hand. Any soap left on the liner causes additional
stains when the oven is heated.
● The area outside the gasket can be cleaned with a
scouring pad.
“ Do not rub or clean the door gasket—thefiberglass
material of the gasket has an extremely low
resistance to abrasion. An intact and well-fitting
oven door gasket is essential for energy-efficient
oven operation and good baking results. E you
notice the gasket becoming worn, frayed or damaged
in any way or if it has become displaced on the door,
you should have it replaced.
Oven Shelves
Cleantheshelveswithamildabrasive
cleanser.
After cleaning, rinse the shelves with clean water and
dry with a clean cloth.
The oven shelves may be cleaned in the seHcleaning oven. However, they will darken, lose
their luster and become hard to slide. Wipe the shelf
supports with cooking oil after self-cleaning to make
shelves slide more easily.
NOTE: The gasket is designed with a gap at the
bottom to allow for proper air circulati;n~
—
L
Inside 1
Gasket
Gaske~
O~tside
Gasket
Outside of door:
● Use soap and water to thoroughly clean the top,
sides and front of the oven door. Do not let water run
down through openings in the top of the door. Rinse
well. You may also use a glass cleaner to clean the
glass on the outside of the door.
● Spillage of marinades, fruit juices, tomato sauces
and basting materials containing acids may cause
discoloration and should be wiped up immediately.
When surface is cool, clean and rinse.
● Do not use oven cleaners, cleansing powders or
harsh abrasives on the outside of the door.
NOTE: Do not clean the bake unit or the broil unit.
Any soil will bum off when the units are heated. The
bake unit can be lifted gently to clean the oven floor. If
spillover, residue, or ash accumulate around the bake
unit, gently wipe around the unit with warm water.
)1 t
!I
To remove heavy, burned on sofi, soapy metal pads
may be used. After scrubbing, wash with soapy water,
rinse and dry.
(continuednextpage)
(continued)
●
●
●
●
All ranges can tip.
Injmy codd resdt.
h~
the Anti-tipdetice
packed tith the range.
See the Instigation
Instmctions.
ST~~ITY
I
DEWCE~STALLATION~STRUC~ONS FORBRAC~T HT NO. 34M73
Tools needed:
● Phillips head screwdriver
● 13/8”
open end or adjustable wrench
The bracket attaches to floor or wall to hold either the
right or left rear leg leveler. If fastening to the floor,
be sure that the screws do not penetrate electrical
wiring or plumbing. If this cannot be determined, use
shorter screws that will not penetrate through
flooring.
If the bracket came with your range, it is shipped
attached to the lower range back. Remove and discard
the shipping screw that holds the bracket and then
follow the instructions below.
1. Decide whether the bracket will be installed on the
right or left side of the range location.
2. If the bracket side of the range is adjacent to a
cabinet, place the bracket against back wall and
cabinet as shown in Figure 1.
If there is no adjacent cabinet, determine where
the location of the range side (painted outside
panel) will be. Place the bracket with its outside
edge at this location and against the back wall.
See Figure 1.
Outside edge of
bracket to be flush
with left orrightside
Adjacent
cabinet
orfinal
location
ofrange
Bracket
::
.::
>.
,,.
K
,
\\
Wall behind range
~
@.
Make sure /’&
leg leveler
engages slot
\
Rg. 1
... ..-.
wall Plate
$,,
x,
.’\
Screw must enter wood
or metal
-1
\/~
\.:.
>
,,
.,\
,,
,.
Attachment to wall
d
\@
32
.’.
,:.
;.
ofrange
side panel
~
3. Determine whether you will anchor the bracket to
the floor or wall. Fasten the bracket securely with
the screws provided. The screws are self-drilling in
wood, plywood, particle and chip board, and most
metal framing. If attaching to masonry you can buy
suitable screws and anchors at hardware stores. Use
a masonry drill to drill the required holes.
4. Using the wrench, back out the four leg levelers at
least two turns. See the Installation Instructions for
more leveling information before positioning range
5. Slide the range into place. Be sure the rear leg
leveler fully engages the slot in the bracket. If
the range cannot be moved back far enough for
the rear leg leveler to enter the bracket, move the
bracket forward as required and attach to the floor
in the new location.
/
QUES~ONS?
USETHIS PROBLEM SOLVER
PROBLEM
‘&B~~G”
OR “0~~’
ODOR E-ING
FROM
OVEN WEN TURNED ON
OVEN LIGHT
DOES NOT WORK
OVEN WILL
NOT WORK
FOOD DOES NOT
BROL PROPERLY
FOOD DOES NOT
ROAST OR BAKE
PROPERLY
OVEN ~LL NOT
SELF-CLEAN
OVEN DOOR WON’T OPEN
~R
SELF-CLEAN CYCLE
OVEN NOT CLEAN
AFTER CLEAN CYCLE
OVEN DOOR
ACC~ENTALLY LOCKED
D~NG COO~NG
SURFACE LAMP
DOES NOT WORK
(on some models)
OVEN TEMPERATURE
TOO HOT OR TOO COLD
●
POSS~LE CAUSE
●
This is nod
in a new oven and will dissipate in time. To speed the process,
set a self-clean cycle (see the Operating the Self-Cleaning Oven section)
lasting at least 3 hours.
Light bulb is loose or defective. Tighten or replace.
● Switch operating oven light is broken. Call for service.
●
The plug on the range is not completely inserted in the electrical outlet.
● The circuit breaker in your house has been tripped, or a fuse has been blown.
● The oven controls are not properly set.
●
Oven not set on Broil.
● Oven temperature not set correctly.
● Improper shelf position being used. See the Broiling Guide.
● Food is being cooked on hot pan.
● Cookware is not suited for broiling.
● Aluminum foil used on the broil pan rack has not been fitted properly and
slit as recommended.
●
Oven not set on Bake.
● Oven temperature is not set correctly.
● Shelf position is incorrect. See the Roasting or Baking sections.
● The oven shelf is not level,
● Incorrect cookware or cookware of improper size is being used.
● A foil tent was not used when needed to slow down browning during roasting.
●
. The Stop Time must be more tahn 3‘/2 hours later than the Start Time.
The oven temperature is too high to set the self-clean operation. Allow the
range to cool and reset the controls.
● The door latch handle not moved all the way to the right.
●
●
The oven must cool below locking temperature.
QThe oven contiols are not set properly.
● Heavy spillovers should be cleaned up before starting clean cycle.
●
Push the CANCEL button. Allow the oven to cool. Never force
the door lock handle.
The fluorescent lamp is loose or defective. Adjust or replace.
● Press switch for 2 seconds. H lamp does not come on, repeat.
● The switch operating the oven light is broken. Call for service.
●
●
The oven thermostat needs adjustment. See the Do It Yoursel~–
Adjust the Oven Thermostat section.
(continued next page)
33
T~
●
PROBLEM
SURFACE~S
WLL NOT
MMNTMN A ROLL~G
BOE OR FR~G RATE IS
NOT FAST ENOUGH
POSS~LE
FOODS COOK SLOWLY
●
SOLD DISK
SURFACE ~TS
SMOKE W~E HEA~NG
Because the units heat by conduction, the cooktop surfaces may seem hotter
than you are used to. This is normal. Make sure flat-bottom pans are used.
Improper cookware being used. Pan bottoms should be flat, fairly heavy weight
and the same diameter as the surface unit selected.
Difficulty may be in the main distribution panel of your house, caused by a
blown oven-circuit fuse, a tripped oven-circuit breaker, the main fuse or the
main circuit breaker, depending on the nature of the power supply. If a circuit
breaker is involved, reset it. If the control box uses fuses, the oven fuse
(a cartridge-type) should be changed, BUT ONLY BY SOMEONE FAM~IAR
~TH ELECTMCAL C~CUITS. If after performing 1 of these procedures,
the fuse blows or circuit breaker trips again, cdl for service.
NOTE: Apartment tenants or condominium owners should ask their building
management to perform this check before calling for service.
● Cooktop surface unit controls are not properly set, or the wrong control knob
is set for the surface unit you are using.
●
Solid disk surface unit controls are not properly set.
● Use proper flat-bottom cookware that is warped, rounded or curved.
Improper cookware will cause unsatisfactory cooking results.
●
●
Some smoke and odor is normal when using solid disk surface units for
the first time and also after using Cello Electrol@cleaner.
H you need more help.. .c*l, toll free:
GE Answer Centera
800.626.2000
consumer information service
34
CAUSE
You must use pans which are absolutely flat. If light can be seen between
the pan bottom and a straight edge, the units will not transfer heat properly.
● Pan bottoms should closely match the diameter of the surface unit selected.
●
SOLD DISK SURFACE
UNTS NOT FUNCTIONING
PROPERLY
(continued)
●
COOKTOP FEELS HOT
SURFACE UNTS DO NOT
WORK PROPEMY
PROBLEMSOLmR
We’llBeThere
Wlti the purchase ofyour newGE appliance, receivethe assurancethatifyou ever need
tiorrnation or assistancefrom GE,wdll be there.All you haveto do iscall–toll-free!
lmHome
RepairSewi~
80WEXARES(80M32-2737)
AGE consumer service professional will provide expert repair semice,
scheduled at a time that’s convenient for you. Many GE Consumer Service
company-perated
locations offer you service today or tomorrow, or at your convenience (7:00 a.m. to 7:00 p.m. weekdays, 9:00 a.m. to 2:00 p.m. Saturdays).
Our factory-trained technicians know your appliance inside and out–so most
repairs can be handled in just 1 visit.
GEAnswer
Cente~
80~6262000
Whatever your question about any GE major appliance, GE Answer Center”
information service is available to help. Your call–and your question-will be
answered promptly and courteously. And you can call any time. GE Answer
Center” service is open 24 hours a day, 7 days a week.
II
ForCustomem
W& SpecialNeeds...
Ill=l.
Upon request, GE will provide
Braille controls for a variety of GE
appliances, and a brochure to
assist in planning a barrier-free
kitchen for persons witi limited
mobility. To obtain these items,
free of charge, call 800.626.2000.
Consumers with impaired hearing or speech who have
access to a TDD or a conventional teletypewriter may
call 800-TDD-GWC (800-8334322) to request
information or service.
Semite&n&a&
80M2&2224
You can have the secure feeling that GE Consumer Service will still be tiere
after your warranty expires. Purchase a GE contract while your warranty is still
in effect and you’ll receive a subs~ntial discount. With a multiple-year contract,
you’re assured of future service at today’s prices.
Pa& andAccessories
80M2&2002
hdividuti
qfied
to sefice their ow appliances
:an have needed parts or accessories sent direcdy to
heir home. The GE parts system provides access to over
47,000 par~...and all GE Genuine Renewal Parts are
fully warranted. VISA, MasterCard and Discover cards
are accepted.
User maintenance instructions contained in this booMet
cover procedures intended to be performed by any user.
Other seficinggenefly
shotid be refereed to qtied
sefice personnel. Caution must be exercised, since
improper seficing may cause unsafe operation.
YOUR GE
SOLID DISK RANGE
WARRANTY
11
Staple sales slip or cancelled check
here. Proof of original purchase date
is needed to obtain semice
under warranty.
1!
II
WHAT IS COVERED
FULL ONE-YEAR WARRANTY
For one year from date of original
purchase, we will provide, free of
charge, parts and service labor in
your home to repairor replace
any pan of the COOMOP
that fails
because of a manufacturing
dafnmt
UGIGUL.
LIMITED ADDITIONAL
FOUR-YEAR WARRANTY
For the secondthroughfifthyear
fromdate of originalpurchase,we
will provide,free of charge, a
replacementsolidelementsurface
heatingunitif the elementfails
because of a manufacturing
defect. You pay for the servicetrip
to your home and servicelabor
charges,This warrantydoes not
coverAutomaticSutiace Unit
components,wiring,or switches.
WHATIS NOTCOVERED
This warranty is extended to
the original purchaser and any
succeedingownerfor products
purchasedfor ordinaryhome use
in the 48 mainlandstates, Hawaii
and Washington,D.C. In Alaskathe
warrantyis the same exceptthat it
is LIMITED because you must pay
to shipthe productto the service
shopor for the servicetechnician’s
travel coststo your home.
All warrantyservicewill be
providedby our FactoryService
Centersor by our authorized
CustomerCar@ sewicers during
normalworkinghours.
Shouldyourapplianceneed
service,duringwarrantyperiodor
beyond,call800-GE-CARES
(800-432-2737).
describedin the Installation
Servicetripsto your hometo teach
Instructionsprovidedwiththe
you how to use the product.
product.
Read your Use and Care material.
● Replacementof housefuses or
If you then have any questions
resettingof circuitbreakers.
about operatingthe product,
please contactyourdealer or our
c Failureof the productif it is used
ConsumerAffairsofficeat the
for otherthan its intendedpurpose
addressbelow,or call, tollfree:
or usedcommercially.
GE AnswerCente@
c Damage to productcaused
800.626.2000
by accident,fire, floodsor acts
consumerinformationservice
of God.
● Improperinstallation.
WARRANTOR IS NOT
If you have an installationproblem, RESPONSIBLE FOR
CONSEQUENTIAL DAMAGES.
contactyour dealer or installer.
You are responsiblefor providing
adequateelectrical,gas, exhausting
and other connectingfacilitiesas
●
Some states do not allow the exclusion or limitation of incidental or consequential damages, so the above limitation or exclusion
may not apply to you. This warranty gives you specific legal rights, and you may also have other rights which va~ from state to state.
To know what your legal rights are in your state, consult your local or state consumer affairs office or your state’s Attorney General.
Warrantor: General Elwtric Company
If further help is needed concerning this warranty, write:
Manager+onsumer
Affairs, GE Appliances, Louisville, KY 40225
1 MNU106 Rev. 2
3-93
CG
JBP29G
JB5‘M
JB5./ . aM
Printedin the UnitedStates