1
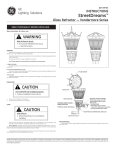
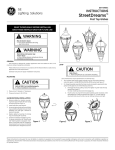
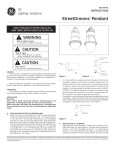
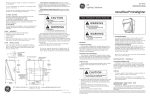
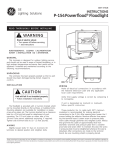
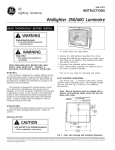
g
GEH-5955D
GE
Lighting Solutions
INSTRUCTIONS
StreetDreams™
Post Top Bases
READ THOROUGHLY BEFORE INSTALLING
Save instructions for future use.
WARNING
Risk of electric shock
• Turn power off before servicing
– see instructions
CAUTION
Risk of injury
• Wear safety glasses and gloves
during installation and servicing
General
This luminaire is designed for outdoor applications and must
adhere to 25°C (77°F) maximum ambient temperature limitation.
Make all electrical connections in accordance with the National
Electric Code and any applicable local code requirements.
Mounting
Set screw
(4 places)
1. Rotate globe
Figure 1
CAUTION
Unit will fall if not installed properly
• Follow installation instructions
1. Place unit on 3” diameter x 3” long tenon.
2. Torque set screws to 10-12 ft-lbs.
Globe removal/installation
1. Remove globe by rotating counter-clockwise approximately 90° and raising off locking ring (see Figure 1)
2. Install lamp (see Lamp Section).
3. Access to optional internal louver/shielding is available
with globe removed. Orient shielding such that light
blocked in direction intended.
4. Replace globe by lowering into locking ring and rotating
90° clockwise. Verify that orientation of globe is correct.
For proper orientation, see “Street/house side” label on
globes so equipped.
5. Install set screws (found in pack) for tamper resistant or
2G applications.
These instructions do not purport to cover all details or variations in equipment nor to provide for every possible contingency to be met in connection with installation, operation or
maintenance. Should further information be desired or should particular problems arise which are not covered sufficiently for the purchaser’s purposes, the matter should be referred to
GE Lighting Solutions.
Ballast Access
1. Access to ballast and capacitor is available by removal
of ballast cap under lamp socket (see Figure 2)
2. Rotate ballast plate
2. Press button and pull forward to open door.
3. Connect input power leads to terminal block or ballast
leads.
4. Replace ignitor, fuses and photo control with same type
and rating.
5. Close door until locked.
Lamp
CAUTION
1. Pull tab
Risk of burn
• Allow lamp/fixture to cool before
handling
Figure 2
2. To remove ballast assembly, remove lamp then depress
spring clip away from socket and rotate ballast cap
counter-clockwise approximately 5 degrees.
3. Lift ballast cap and attached components.
4. Verify supply voltage is the same as the ballast’s rated
input voltage.
I. Single voltage ballast are pre-wired per ordering
instructions and user need only connect supply
conductors to ballast leads or terminal block (if so
supplied)
II. Multi-volt (120/208/240/277 volts) ballasts are not
connected. Connect the black lead to the ballast
lead of the desired voltage.
III. Multi-watt ballasts are available in various combinations of wattages. See wiring instructions on wiring
tag inside the luminaire.
5. To replace, lower ballast assembly into fixture, rotate until
clip snaps into place.
Access Door
1. Access to ignitor, terminal board, fusing and photo control
is through the access door (Figure 3).
Use only lamps specified on nameplate. Observe lamp
manufacturer’s recommendations and restriction on lamp
operation; particularly ballast type, burning position, etc.
See Globe instructions for lamp access information.
Lamp tightness- Mogul base lamps should be securely inserted to NEMA-EEI specified torque of 35 inch-pounds, which is
best achieved by very firmly tightening to insure application of
sufficient torque. Tightening must be sufficient to fully depress
and load center contact of socket for both medium and mogul
base lamps.
Lamp Tightness- Medium Base Lamp: Lamp should be
tightened to a light firmness sufficient to depress the center
contact of the socket.
Note: Use of lubricants on lamp base or socket can cause
rapid lamp failure and voids fixture warranty.
Maintenance
Occasional cleaning of the globe is required to maintain
light levels. Frequency of cleaning will depend on ambient dirt
levels and minimum light level which is acceptable to user. The
globe should be washed in a solution of warm water and mild,
nonabrasive household detergent, rinsed with clean water and
wiped dry.
Light output of the luminaire is dependant on the operating
hours on the lamp. In applications where the light level is critical,
it may be desirable to replace lamps before they burn out. The
lamp manufacturer can provide data showing how the lamp
light output decreases with use.
Optional Door Closure
Screw Location
Figure 3
g
GE Lighting Solutions • 1-888-MY-GE-LED • www.gelightingsolutions.com
1-88 8 - 6 9 - 4 3-5 3 3
GE Lighting Solutions is a subsidiary of the General Electric Company. Evolve and other trademarks belong to GE Lighting Solutions. The GE brand and logo are trademarks of the General Electric Company.
© 2011 GE Lighting Solutions. Information provided is subject to change without notice. All values are design or typical values when measured under laboratory conditions.
35-201578-148 (8/07)