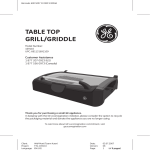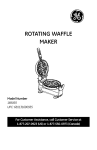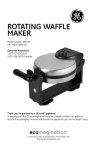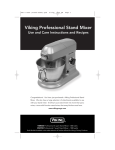
1
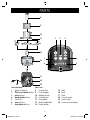
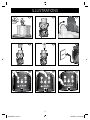
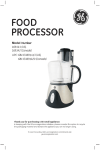
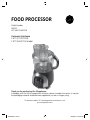
Food processor
Model Number:
169203
UPC: 681131692038
Customer Assistance
1 877 207 0923 (US)
1 877 556 0973 (Canada)
Thank you for purchasing this GE appliance.
In keeping with the GE ecomagination initiative, please consider the option to recycle
the packaging material and donate any appliance you are no longer using.
To read more about GE's ecomagination commitment, visit:
ge.ecomagination.com
169203-EN-11.indd 1
7/6/2009 12:29:34 PM
IMPORTANT SAFEGUARDS
When using electrical appliances, basic safety precautions should always be followed,
including the following:
•
•
•
•
•
•
•
•
•
•
•
•
•
•
•
•
•
•
•
•
•
Read all instructions.
To protect against risk of electrical shock, do not immerse the cord or the food
processor’s base in water or other liquid. If base or cord falls into liquid, unplug the
cord from outlet immediately. Do not reach into the liquid.
Close supervision is necessary when the food processor is used near children. Never
allow a child to use this product.
Unplug from outlet when not in use, before putting on or taking off parts, and before
cleaning.
Avoid contacting moving parts. Keep hands, hair, clothing as well as spatulas and
other utensils away from processor tools during operation, to prevent personal
injury and/or damage to the appliance. A scraper may be used but must be used
only when the food processor is not running.
Never put your fingers into the feed chute or tube. Always use food pusher.
Do not operate appliance with a damaged cord or plug, or after the appliance
malfunctions or is dropped or damaged in any manner. Call our toll-free customer
assistance number for information on examination, repair, or adjustment.
The use of attachments, not recommended by the manufacturer may cause injury
to persons.
Do not use outdoors or in a damp area.
Do not let cord hang over edge of table or counter.
Remove chopper, slicer/grater or dough kneader from food processor before
washing.
Blades of chopper and slicer/grater are sharp. Handle carefully.
Always operate food processor with lid locked in place.
When using food processor do not remove lid until the blade has stopped rotating.
Do not process for longer than the time periods recommended.
Do not fill the processing container more than 80% of its capacity.
Do not process hot foodstuffs.
Container must be properly in place before operating the appliance.
Do not place food processor on or near a hot burner (gas or electric).
Do not use appliance for other than intended use.
Do not use the appliance without the interlock construction disengaged to avoid
injury.
Save these instructions!
169203-EN-11.indd 2
7/6/2009 12:29:34 PM
ADDITIONAL SAFEGUARDS
This appliance is for HOUSEHOLD USE ONLY.
DO NOT OPERATE APPLIANCE IF THE LINE CORD SHOWS ANY DAMAGE OR IF
APPLIANCE WORKS INTERMITTENTLY OR STOPS WORKING ENTIRELY.
EXTENSION CORDS
A short power-supply cord is to be provided to reduce the risk resulting from becoming
entangled in or tripping over a longer cord. Longer detachable power-supply cords or
extension cords are available and may be used if care is exercised in their use. If a longer
detachable power-supply cord or extension cord is used,
1) The marked electrical rating of the cord set or extension cord should be at least as
great as the electrical rating of the appliance, and
2) The longer cord should be arranged so that it will not drape over the countertop or
tabletop where it can be tripped over, snagged, or pulled on unintentionally
(especially by children).
POLARIZED PLUG
This appliance has a polarized plug (one blade is wider than the other). To reduce the
risk of electric shock, this plug is intended to fit into a polarized outlet only one way. If
the plug does not fit fully into the outlet, reverse the plug. If it still does not fit, contact a
qualified electrician. Do not attempt to modify the plug in any way.
169203-EN-11.indd 3
7/6/2009 12:29:34 PM
parts
8
9
10
11
12
13
1
2
3
14
15
16
7
4
6
5
17
18
20
Control panel:
1
on/off button
2 slice/shred blade button
3 pulse button
4 dough blade button
5 Timer LED
6 timer button
7 chop blade button
19
Main unit:
8 Food pusher
9 Food stopper
10 Feeding chute
11 Container lid
12 Chop blade
13 Slice/shred blade
14 Dough blade
15
16
17
18
19
20
Stem
Bowl
Base
Control panel
Suction feet
Power cord and plug
169203-EN-11.indd 4
7/6/2009 12:29:35 PM
illustrations
a
b
c
d
eE
f
gG
hH
iJ
169203-EN-11.indd 5
7/6/2009 12:29:36 PM
Illustrations
j
Kk
l
Mm
Nn
o
p
q
r
169203-EN-11.indd 6
7/6/2009 12:29:38 PM
Illustrations
s
t
169203-EN-11.indd 7
7/6/2009 12:29:39 PM
OPERATION
Before first use
•
•
Remove all packaging materials, labels and/or stickers from your food processor.
Clean your food processor thoroughly before using for the first time ( Cleaning).
The food processor must not be connected to power during cleaning.
Warning: Do not immerse the food processor in water or any liquids (ill.
cause electric shock or damage the appliance.
t ). This may
Before operation
•
•
•
Unwind the power cord (20) from the base (17) of food processor (ill. a ).
Lead the power cord (20) through the guide on the bottom of base (17) (ill. b ).
Place the suction feet (19) on the bottom of base (17) on a flat, even and steady
surface (ill. c ).
Operating instructions
Always unplug the food processor from the outlet when putting on or taking off parts.
Before plugging in the food processor, check that the electrical circuit is not overloaded
with other appliances.
You can chop, knead, slice, or grate food with this appliance. To do so, insert the accessory
needed for the action you want to perform. Please see the following sub-chapters to find
out how to use the control panel, and how to assemble the appliance correctly.
Operating the control panel
To switch on the appliance, insert the plug into outlet. The on/off button (1) will light up.
There are two possibilities to process food:
1. To process manually:
• Push the button (2), (4) or (7), which corresponds to the action you want to
perform ( 3 following sub-chapters).
2. Programmed processing time (chop and dough function only):
• Push the timer button (6) repeatedly (ill. r ). You can select a processing time
of 15, 30, 45 or 60 seconds. The timer LED (5) indicates the selected time.
• Push the button (4) or (7) to start processing for the programmed time.
Additionally, you can always push the pulse button (3) for additional power (ill. q ).
169203-EN-11.indd 8
7/6/2009 12:29:39 PM
OPERATION
Using the chopper
• Disconnect the power plug (20) from the wall outlet.
Assembly
•
•
•
•
•
•
•
•
•
•
Place the bowl (16) on the base (17) (ill. d ).
Turn bowl (16) clockwise until it locks into place.
Place the stem (15) onto the shaft in the middle of the container (ill. e / f ).
Place the chop blade (12) on the stem (15). Turn slowly until it drops into
place (ill. g ).
Put the prepared ingredients into the bowl (16) (ill. j ).
Close the bowl (16) with the lid (11) (ill. k ). Turn the lid until the metal
pointer of the lid (11) aligns with the upper part of the stem (15) to ensure
reliable closure of lid. Close locking lid (11) by turning clockwise until
the tab is aligned with the container handle and locked into position
(ill. l ).
Slide the food stopper (9) into the feeding chute (10) (ill. m ). When inserting,
align the railings of the stopper (9) to the railings of the chute (10).
Slide the food pusher (8) into the tube opening of the food stopper (9)
(ill. n ).
Insert the power plug (20) into a wall outlet (ill. o ).
To start processing the food:
Push the chop blade button (7) or
Set the desired processing time by pushing the timer button (6) repeatedly and
push the chop blade button (7) to start.
See the function table on page 12 for maximum chopping quantities and recommended
chopping times.
Tip: Add liquid ingredients into the bowl (16) first before adding food. This way all
ingredients are mixed evenly. For best results, cut solid food into approximately
0.5 inch (1.3 cm) to 1 inch (2.5 cm) cubes. Do not process starchy vegetables like
potatoes.
•
•
To stop processing, push the on/off button (1) (ill. p ).
Wait until chop blade (12) has stopped rotating before removing lid (11).
169203-EN-11.indd 9
7/6/2009 12:29:39 PM
OPERATION
Using the slicer/grater
• Disconnect the power plug (20) from the wall outlet.
Assembly
•
•
•
•
The reversible slice/shred blade (13) has a slicing blade on one side and grating
teeth on the other. Face the desired side of the disc up.
•
•
•
•
Place the bowl (16) on the base (17) (ill. d ).
Turn bowl (16) clockwise until it locks into place.
Place the stem (15) onto the shaft in the middle of the container (ill. e / f ).
Place the slice/shred blade (13) on the stem (15).
Turn slowly until it drops into place (ill. i ).
Close the bowl (16) with the lid (11) (ill. k ). Turn the lid until the metal
pointer of the lid (11) aligns with the upper part of the stem (15) to ensure
reliable closure of lid. Close locking lid (11) by turning clockwise until
the tab is aligned with the container handle and locked into position
(ill. l ).
Insert the power plug (20) into a wall outlet (ill. o ).
To slice/grate large food, insert it directly to the feeding chute (10).
To slice/grate long, thin food, slide the food stopper (9) into the feeding chute (10)
(ill. m ). When inserting, align the railings of the stopper (9) to the railings of the
chute (10). Long food can be inserted into the tube opening of the food stopper (9).
Caution:Always use the food stopper (9) or food pusher (8) to push food in direction of
the slice/shred blade (13). Never push food through chute with hands.
•
To start processing the food:
Push the slice/shred blade button (2).
See the function table on page 12 for recommended slicing/grating times.
10
169203-EN-11.indd 10
7/6/2009 12:29:40 PM
OPERATION
Tip: To slice or grate cheese, select firm cheese such as Cheddar, Monterey jack or Swiss.
Place cheese in freezer for 30 minutes before processing.
•
•
To stop processing, push the on/off button (1).
Wait until slice/shred blade (13) has stopped rotating before removing lid (11).
Assembly
Using the kneader
• Disconnect the power plug (20) from the wall outlet.
•
•
•
•
•
•
•
•
•
•
•
•
Place the bowl (16) on the base (17) (ill. d ).
Turn bowl (16) clockwise until it locks into place.
Place the stem (15) onto the shaft in the middle of the container (ill. e / f ).
Place the dough blade (14) on the stem (15).
Turn slowly until it drops into place (ill. h ).
Put the prepared ingredients into the bowl (16) (ill. j ).
Close the bowl (16) with the lid (11) (ill. k ).
Turn lid until the metal pointer of the lid (11) is connecting with the upper
part of the stem (15) to ensure reliable closure of lid.
Close locking lid (11) by turning clockwise until the tab is aligned with the
container handle and locked into position (ill. l ).
Slide the food stopper (9) into the feeding chute (10) (ill. m ). When inserting,
align the railings of the stopper (9) to the railings of the chute (10).
Slide the food pusher (8) into the tube opening of the food stopper (9)
(ill. n ).
Insert the power plug (20) into a wall outlet (ill. o ).
To start processing the food:
Push the dough blade button (4) or
Set the desired processing time by pushing the timer button (6) repeatedly and
push the dough blade button (4) to start.
See the function table on page 12 for maximum kneading quantities and recommended
kneading times.
Tip: Add liquid ingredients into the bowl (16) first before adding food. This way all
ingredients are mixed evenly.
11
169203-EN-11.indd 11
7/6/2009 12:29:40 PM
OPERATION
•
•
To stop processing, push the on/off button (1).
Wait until dough blade (14) has stopped rotating before removing lid (11).
Function table
Tool
Chop blade
Types of food
Max vol.
Meat
17oz / 500g
Speed
15-20 sec
Cheese
8.8oz / 250g
15-20 sec
Vegetable
9 cups
Fruit
14 cups
Chocolate
14oz / 400g
15-20 sec
Fresh herbs
1 bunch
15-20 sec
Pastry, scones
14oz / 400g
40 sec /
2 min rest
Cakes (total weight)
28oz / 800g
Bread dough
14oz / 400g
flour, 8.5oz /
240g water
chop blade
dough
blade
Dough blade
Slice/shred
blade
Time
Vegetables, cheese,
potatoes, fruit
Vegetables, cheese,
fruit, chocolate
15-20 sec
15-20 sec
40 sec /
2 min rest
30 sec /
2 min rest
3 min max.
bowl filled to
the max mark
slice/shred
blade
3 min max.
Caution:Do not process for longer than recommended time.
Do not exceed recommended maximum volumes.
Warning: Always turn the food processor off and unplug when not in use.
12
169203-EN-11.indd 12
7/6/2009 12:29:40 PM
OPERATION
Shredding cheese
•
•
•
•
*
The times recommended for chilling cheese are based on a freezer temperature of 23F.
If your freezer is colder or warmer, you may need to adjust the time to chill the
cheese.
Never try to shred or slice soft cheese like Brie or hard cheese like Romano. Slicing
disc or food processor may get damaged.
Most cheese can be successfully shredded except soft cheese.
Mozzarella, is the exception, which shreds well if thoroughly chilled. Hard cheese
can only be shredded if stored at room temperature.
It is not recommended to use the slicing blade for cheese.
Cheese type
Chop
Shred
Slice
Mozzazrella
Chilled
Chilled 30 mins in freezer
No
Brie
Chilled
No
No
Cottage
Chilled
No
No
Blue
Chilled
Chilled 25 mins in freezer
No
Fontina
Chilled
Chilled 25 mins in freezer
No
Bel Paese
Chilled
Chilled 25 mins in freezer
No
Cheddar
Chilled
Chilled 20 mins in freezer
No
Provolone
Chilled
Chilled 20 mins in freezer
No
Swiss
Chilled
Chilled 20 mins in freezer
No
Parmesan
Room temperature
Room temperature
No
Roman
Room temperature
Room temperature
No
Soft Cheese
Semi Soft
Semi Hard
Hard
13
169203-EN-11.indd 13
7/6/2009 12:29:40 PM
Cleaning
Always unplug the power plug (20) from wall outlet before cleaning.
Clean the food processor after every use. This appliance contains no user serviceable
parts and requires little maintenance. Leave any servicing or repairs to qualified
personnel.
•
•
•
•
Clean base (17), control panel (18) and power cord (20) with a damp soft cloth.
Bowl (16) and lid (11) may be washed by hand in hot soapy water. Do not place in
the dishwasher. Do not use abrasives.
Clean the chop blade (12), slice/shred blade (13) and the dough blade (14) carefully.
The cutting edges are very sharp!
Always clean the parts that have come into contact with food in hot, soapy water
immediately after use.
Warning: Never immerse the food processor in water or other liquids (ill. t ).
Storage
•
•
•
•
•
Clean and dry all parts before storing.
Attach the bowl (16) to the base (17).
Attach stem (15), chop blade (12), dough blade (14), and slice/shred blade (13).
Close bowl (16) with the lid (11) but do not lock.
Also place stopper (9) and pusher (8) on the lid.
•
Never wrap cord (20) tightly around the appliance; use the cord storage on the
bottom of the base (17) (ill. s ).
Releasing suction feet
During use, the food processor is kept firmly in place by its suction feet (19).
• After use, remove all accessories from the base (17). Tilt up appliance to one side
first, and then lift up the food processor from the counter.
•
Store the food processor in its box or in a clean, dry place.
14
169203-EN-11.indd 14
7/6/2009 12:29:40 PM
Recipes
Pesto
Ingredients:
•4 Cups packed fresh basil leaves
• 2 peeled garlic clove, crushed with garlic press
•4 TBSP walnuts
• ½ cup olive oil
• 2 TSP salt
• ½ TSP coarsely ground black pepper
• 1 cup fresh grated Parmesan cheese
Instructions:
• Put chopping blade in food processor before adding ingredients.
• Place all ingredients except the Parmesan cheese in food processor.
• Close lid making sure large plunger is in place.
• Blend ingredients until smooth by pressing the pulse button one to two seconds at
a time.
• After blade stops turning remove lid and add Parmesan cheese. (For best results
spread cheese evenly over the mixture)
• Blend until all ingredients until evenly mixed by pressing the pulse button.
Salsa
Ingredients:
• 6 Roma Tomatoes
• ½ medium onion
• 2 small peeled cloves of garlic (increase or decrease to taste)
• ½ cup of fresh cilantro (remove stems)
• 2 Jalapeno or Serrano peppers (increase or decrease to taste)
• 2 TBSP lemon juice
• 1 TSP salt
• ¼ bell peppers (Remove the seeds)
Instructions:
• Put chopping blade in food processor before adding ingredients.
• Cut Roma tomatoes in fourths and distribute evenly in the jar.
• Cut ½ medium onion into 4 parts and distribute evenly in jar.
• Cut each peppers in four parts and distribute evenly in jar.
• Cut ¼ bell peppers into 4 parts and distribute evenly in jar
• Add garlic, cilantro, lemon juice, and salt
• Close lid making sure large chute is in place.
• Mix ingredients to desired consistency by pulsing the food processor one to two
seconds at a time.
15
169203-EN-11.indd 15
7/6/2009 12:29:40 PM
Recipes
Guacamole
Ingredients:
•4 avocados
• ¼ large onion
• ½ cup of fresh cilantro (remove stems)
• 2 TSP garlic powder
• 1 TBSP lemon juice
• 2 TSP salt
Instructions:
• Put chopping blade in food processor before adding ingredients.
• Cut avocado in half and remove the seed. Using a spoon scoop the avocado out of
the shell and place in the jar. Do not discard the seeds.
• Cut ¼ medium onion into 4 parts and distribute evenly in jar.
• Add garlic powder, cilantro, lemon juice, and salt
• Close lid making sure large plunger is in place.
• Mix ingredients to desired consistency by pulsing the food processor one to two
seconds at a time.
• Place Guacamole in a serving dish or in storage container. Place avocado seeds in
the guacamole. The seeds will help to keep the Guacamole fresh.
Roasted Red Pepper Hummus
Ingredients:
•4 red peppers, roasted
• 2 peeled and crushed garlic cloves
• 1 - 15 oz can garbanzo beans. (rinse and drain)
• 3 TBSP lemon juice
• 2 TBSP sesame seed paste. (tahini)
• 3 TBSP olive oil
• 2 TBSP water
• ½ TSP salt
• 1 TSP paprika
• ½ TSP coarse ground black pepper
• ¼ cup fresh cilantro
16
169203-EN-11.indd 16
7/6/2009 12:29:40 PM
Recipes
Instructions:
Roasted Red Peppers
• Pre-heat broiler
• Cut red peppers in half and remove seeds
• Place peppers cut side down on broiler pan
• Broil peppers in oven about 6 inches from heating elements.
• Allow red peppers to blacken (about 10 minutes. Check periodically to make sure
they do not over cook)
• Remove from oven and cover with aluminum foil and allow to stand until the
peppers are cool enough to handle.
• Remove the blackened skin from pepper and discard skin.
Hummus
• Put chopping blade in food processor before adding ingredients.
• Cut each red pepper into 4 pieces and distribute evenly in the jar. (Save in pieces of
roasted pepper)
• Place crushed garlic, garbanzo beans, lemon juice sesame seed paste, olive oil,
water, salt, ½ TSP paprika, ground black pepper and cilantro in the jar. Make sure
the ingredients are evenly distributed.
• Close lid making sure large plunger is in place.
• Blend ingredients to desired consistency by using the chop function of the food
processor. Stop food processor by pressing the power button when Hummus
reaches desired consistency.
• Place Hummus on serving dish. And serve with crackers or pita slices.
• To Garnish the Hummus, thinly slice the saved red pepper and place over the
Hummus.
Bean Dip
Ingredients:
• 2 – 15.5 oz cans of pinto beans
• 1 cup chicken broth. (Can substitute chicken bouillon)
• ¼ small onion chopped
• ½ cup of fresh cilantro (remove stems)
• 1 TSP vegetable oil
• 1 TSP salt
• ½ TSP garlic powder
•4 oz cream cheese. (cream cheese should be at room temperature)
•4 oz sour cream
17
169203-EN-11.indd 17
7/6/2009 12:29:40 PM
Recipes
Instructions:
Beans:
• Place 2 cans of beans with liquid into a large skillet.
• Add chopped onion, cilantro, vegetable oil, salt, and garlic powder to skillet.
• Place skillet on stove at medium high setting. Heat until start to sizzle.
• Stir ingredients frequently until onions turn translucent.
• Add chicken broth and reduce heat to medium.
• Stir occasionally until broth cooks down into beans.
• Allow to cool.
Dip
•
•
•
•
•
•
Put chopping blade in food processor before adding ingredients.
Place beans into jar distributing beans evenly in the jar.
Cut cream cheese into 4 pieces and add to jar.
Add sour cream to jar.
Close lid making sure large plunger is in place.
Mix ingredients to desired consistency by pulsing the food processor one to two
seconds at a time.
Mayonnaise
Ingredients:
• 1 large egg
• 1 TSP Dijon mustard
• ½ TSP salt
• ¼ TSP white pepper
• 1½ TSP white vinegar
• 1 cup corn oil
• 1 TBSP lemon juice
18
169203-EN-11.indd 18
7/6/2009 12:29:40 PM
Recipes
Instructions:
• Put chopping blade in food processor before adding ingredients.
• Put egg, mustard, salt and white pepper in jar.
• Close lid making sure large plunder is in place.
• Mix ingredients by using the chop function. Run until evenly mixed.
• Remove small plunger and slowly pour ¾ cup of oil in though the small chute. Allow
to mix until mixture reaches a smooth texture.
• Replace the small plunger into the small chute. Pour additional oil into to chute a
little at the time. Allow oil to drizzle through the small hole in the plunder. Continue
mixing until desired texture is achieved.
Chicken Salad
Ingredients:
• 3 lbs boneless / skinless chicken
• 1 – 2 cups mayonnaise
• ½ medium onion
• 2 TSP salt
• 2 TSP black pepper
• 1 TSP paprika
• ½ - 1 cup chopped green onions
• ½ cup toasted chopped walnuts (optional)
Instructions:
Chicken
• Put chicken, onion, 1 TSP salt and 1 TSP black pepper in a saucepot.
• Add water until water covers the chicken.
• Bring water to gentle boil. Boil chicken until thoroughly cooked.
• Remove chicken.
• Place chopping blade in food processor before adding ingredients.
19
169203-EN-11.indd 19
7/6/2009 12:29:40 PM
Recipes
Chopping chicken
• Place 1/3 of chicken in food processor.
• Chop chicken for 15 seconds or until chicken is ground to a fine mixture.
• Remove from food processor and place in mixing bowl.
• Place the remaining chicken into food processor and chop by pulsing the unit one
or two seconds at a time. Chop to desired consistency.
Chicken Salad
• Combine ground chicken, 1 TSP salt, 1 TSP black pepper with 1 cup of mayonnaise.
Mix using a spatula.
• Add chopped green onions and toasted chopped walnuts. Mix ingredients until
evenly distributed.
• Add chopped chicken and ½ cup of mayonnaise. Mix thoroughly.
• If necessary mix in additional mayonnaise to reach desired consistency.
Pimiento Cheese
Ingredients:
• 1 pound block medium sharp cheddar
• 1½ cup mayonnaise
• 1 – 4 oz jar sliced pimientos. (drained)
• ½ TSP salt
• ½ TSP black pepper
Instructions:
Shredded cheese
• Put Shredding blade in food processor.
• Place lid back on food processor. Make sure lid is properly locked.
• Cut 1 pound of cheddar cheese into blocks that fit in shoot below the safety
switch.
• Remove the large plunger and put cheese in. Use shredding function to shred
cheese.
• Replace large plunge onto the chute. Shredder disk will start turning. Allow the food
processor to shred the cheese. Do not force it. Add additional pieces of cheese
when the previous one is completed.
20
169203-EN-11.indd 20
7/6/2009 12:29:40 PM
Recipes
Pimiento Cheese
• Place shredded cheese, mayonnaise, drained pimientos, salt and black pepper into
mixing bowl.
• Mix ingredients thoroughly with a spatula.
Artichoke & Spinach Dip
Ingredients:
• 2 TSP lemon juice
• 1 – 6.5 oz jar marinated artichoke hearts. (drained)
• 10 oz frozen spinach
• ½ cup mayonnaise
• ¼ cup grated Parmesan cheese
• 2 TBSP olive oil
• 1 TSP salt
Instructions:
Spinach
• Thaw frozen spinach to room temperature.
• In a sauce pot bring 4 cups of water to a boil.
• Add spinach and 1 TSP salt to boiling water and cook until lightly cooked.
• Drain and dry spinach with paper towel.
Artichoke and Spinach Dip
• Put chopping blade in food processor before adding ingredients.
• Put spinach, artichoke hearts, 2 TSP lemon juice, mayonnaise, Parmesan cheese,
and olive oil in the jar. Distribute evenly.
• Close lid making sure large plunder is in place.
• Mix ingredients by using the chop function. Run until evenly mixed.
21
169203-EN-11.indd 21
7/6/2009 12:29:40 PM
Recipes
Peanut Butter
Ingredients:
• 2 cups roasted peanuts
• 2-3 TBSP peanut oil
• ½ TSP salt (omit if using salted peanuts)
• Sugar / sweetener (to taste)
Instructions:
• Put chopping blade in food processor before adding ingredients.
• Place salted peanut butter in jar.
• Drizzle 1 TBSP of peanut oil over the peanuts
• Close lid making sure large plunder is in place.
• Blend ingredients for 5 to 10 seconds using pulse feature.
• Use a rubber spatula to scrape mixture from the sides of the container back into
contact with the blade.
• Add ½ TBSP of peanut oil and blend ingredients for 5 to 10 seconds.
• Use rubber spatula to scrape mixture from sides of the container back into contact
with the blade.
• Repeat process adding without adding oil until mixture reaches a pasty texture.
• Add oil one TSP at a time to reach desired texture.
• When desired texture is reached sweeten to taste by adding sugar / sweetener. Use
pulse feature to mix sugar / sweetener in.
Cream of Asparagus
Ingredients:
• 1 TBSP butter
• 1 small onion (chopped)
• 2 cups asparagus (1 inch pieces)
• ½ TSP salt
• ½ TSP black pepper
• 1 - 15 oz can chicken broth
• 1 cup half-and-half
22
169203-EN-11.indd 22
7/6/2009 12:29:40 PM
Recipes
Instructions:
• In a saucepan sauté onions using butter.
• Turn the stove to med heat and add asparagus and cook 1 minute
• Add salt, pepper and chicken broth. Bring to boil stirring frequently.
• Reduce heat and simmer until Asparagus is tender.
• Put chopping blade in food processor before adding ingredients.
• Add mixture to food processor and close lid making sure the large plunger is in
place. Remove small plunger to allow steam to escape.
• Blend ingredients until mixture is smooth by using the chopping function.
• Return mixture to saucepan and add half-and-half. Heat in low to medium heat and
stir. Heat until mixture is evenly heated. Heat to serving temperature only.
Cream of Squash
Ingredients:
• 1 TBSP butter
• 1 small onion (chopped)
• 2 cups sliced yellow squash
• ½ TSP salt
• ½ TSP black pepper
• 1 - 15 oz can chicken broth
• 1 cup half-and-half
Instructions:
• In a saucepan sauté onions using butter.
• Turn the stove to med heat and add squash until squash softens
• Add salt, pepper and chicken broth. Bring to boil stirring frequently.
• Reduce heat and simmer for 5 minutes.
• Put chopping blade in food processor before adding ingredients.
• Add mixture to food processor and close lid making sure the large plunger is in
place. Remove small plunger to allow steam to escape.
• Blend ingredients until mixture is smooth by using the chopping function.
• Return mixture to saucepan and add half-and-half. Heat in low to medium heat and
stir. Heat until mixture is evenly heated. Heat to serving temperature only.
23
169203-EN-11.indd 23
7/6/2009 12:29:40 PM
Recipes
Cream of Spinach
Ingredients:
• 1 TBSP butter
• 1 small onion (chopped)
• 2 cups chopped spinach frozen (thawed to room temperature)
• ½ TSP salt
• ½ TSP black pepper
• 1 - 15 oz can chicken broth
• 1 cup half-and-half
Instructions:
• In a saucepan sauté onions using butter.
• Turn the stove to med heat and add spinach until spinach is evenly cooked
• Add salt, pepper and chicken broth. Bring to boil stirring frequently.
• Reduce heat and simmer for 5 minutes.
• Put chopping blade in food processor before adding ingredients.
• Add mixture to food processor and close lid making sure the large plunger is in
place. Remove small plunger to allow steam to escape.
• Blend ingredients until mixture is smooth by using the chopping function.
• Return mixture to saucepan and add half-and-half. Heat in low to medium heat and
stir. Heat until mixture is evenly heated. Heat to serving temperature only.
Dinner Roll
Ingredients:
• ½ Cup of water (110 degrees F)
• 1 package yeast (Do not use quick rising yeast)
• ¼ cup melted butter
• ½ cup sugar
• 1 large egg
• 1 TSP salt
• 2 – 2 ½ cups flour
24
169203-EN-11.indd 24
7/6/2009 12:29:40 PM
Recipes
Instructions:
• Combine warm water with yeast in a bowl; allow to stand for 5 minutes.
• Melt butter and add to water and yeast mixture.
• Add egg to water, yeast and butter, gently stir ingredients.
• Put dough blade in food processor before adding ingredients.
• Place 2 cups of he flour, salt and sugar in food processor jar.
• Add salt, pepper and chicken broth. Bring to boil stirring frequently.
• Close lid making sure the large plunger is in place.
• Use dough function to mix dry ingredients. (3 to 5 seconds)
• Remove small plunger.
• Slowly add liquid mixture in through the small chute.
• When dough has formed into a small ball stop unit and look at dough. If dough is
sticky or wet add a table spoon of flour and mix using dough function. Stop when
desired texture is achieved.
• Remove dough ball from food processor and lightly coat it with olive oil. Place in
bowl and cover with aluminum foil.
• Place in refrigerator for at least 2 hours.
• Grease a baking pan.
• Turn dough onto floured surface.
• Divide into 12 equal pieces.
• Roll each piece out into a smooth round ball.
• Place in rows on greased pan.
• Cover and let rise until size has doubled.
• Preheat oven to 375 degrees F.
• Bake until golden brown.
Homemade Biscuits
Ingredients:
• 2 cups sifted flour
• 3 TSP baking powder
•4 TSBP butter (softened and cut into 4 pieces
• ½ TSP salt
• ¾ butter milk
25
169203-EN-11.indd 25
7/6/2009 12:29:40 PM
Recipes
Instructions:
• Sift flour into bowl
• Mix flour with salt and baking powder
• Put dough blade in food processor before adding ingredients.
• Put dry ingredients food processor jar. Place butter on top of dry ingredients
• Close lid making sure the large plunger is in place.
• Use dough function to mix dry ingredients. (3 to 5 seconds)
• Remove the small plunger and slowly add butter milk through small chute.
• When ingredients mix into a soft dough stop the food processor.
• Turn out on slight floured surface and gently knead. Knead enough to shape.
• Roll ½ inch thick and cut with 2 inch floured biscuit cutter.
• Bake on ungreased sheet in a 400 degree oven for 12 -15 minutes.
Troubleshooting
Problem
Possible Cause
Solution
The motor works very
slowly.
Too many ingredients in
the container.
Remove some foods and
restart.
The motor does not
work.
Too many foods in the
container.
The motor is damaged.
Remove some foods and
restart.
If additional assistance is needed, please contact our Customer Assistance at
1.877.207.0923 (U.S.) or 1.877.556.0973 (Canada).
Technical data
Rated voltage:
120V ~60Hz
Rated current:4A
Rated power input:
500W
Filling capacity:
112oz (3.2kg)
Dimensions:
275mm (L) x262mm (W) x 405mm (H)
Weight (without package): 3.5kg
26
169203-EN-11.indd 26
7/6/2009 12:29:40 PM
Customer Assistance
If you have a claim under this warranty, please call our Customer Assistance Number. For faster
service, please have the model number and product name ready for the operator to assist you. This
number can be found on the bottom of your appliance and on the front page of this manual.
Model Number: __________________
Product Name: __________________
Customer Assistance Number 1.877.207.0923 (U.S.) or 1.877.556.0973 (Canada).
Keep these numbers for future reference!
For more information, please visit us at WWW.GEHOUSEWARES.COM
Two-year limited warranty
What does your warranty cover?
• Any defect in material or workmanship.
For how long after the original purchase?
• Two years.
What will we do?
• Provide you with a new one.
• For those items still under warranty but
no longer available, WAL-MART reserves
the right to replace with a similar GE
branded product of equal or greater
value.
How do you make a warranty claim?
• Save your receipt.
• Properly pack your unit. We recommend
using the original carton and packing
materials.
• Return the product to your nearest
WAL-MART store or call Customer
Assistance at 1-877-207-0923 (U.S.)
or 1-877-556-0973 (Canada).
What does your warranty not cover?
• Parts subject to wear, including, without
limitation, glass parts, glass containers,
cutter/strainer, blades, seals, gaskets,
clutches, motor brushes, and/or agitators,
etc.
• Commercial use or any other use not
found in printed directions.
• Damage from misuse, abuse, or
neglect, including failure to clean
product regularly in accordance with
manufacturer's instructions.
is a trademark of General Electric
Company and is used under the
license by Wal-Mart Stores Inc.,
Bentonville, AR 72716
169203-EN-11.indd 27
How does state law relate to this warranty?
• This warranty gives you specific legal
rights, and you may also have other rights
which vary from state to state or province
to province.
• This warranty is in lieu of any other
warranty or condition, whether express or
implied, written or oral, including, without
limitation, any statutory warranty or
condition of merchantability or fitness for
a particular purpose.
• WAL-MART, GE and the product
manufacturer expressly disclaim all
responsibility for special, incidental, and
consequential damages or losses caused
by use of this appliance. Any liability is
expressly limited to an amount equal to
the purchase price paid whether a claim,
however instituted, is based on contract,
indemnity, warranty, tort (including
negligence), strict liability, or otherwise.
Some states or provinces do not allow
this exclusion or limitation of incidental
or consequential losses, so the foregoing
disclaimer may not apply to you.
What if you encounter a problem with this
product while using it outside the country of
purchase?
• The warranty is valid only in the country of
purchase and if you follow the warranty
claim procedure as noted.
Marketed in Canada by:
Wal-Mart Canada Corp.
1940 Argentia Road, Mississauga,
Ontario L5N1P9
7/6/2009 12:29:41 PM