1
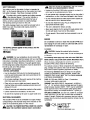
B
N
D
N G
SYSTEM
Operating
Instructions
Thankyou for purchasingthe GBCDocuBindP400.Thissystem
featuresour newexctusiveRadialBinddesign. Thisdesign
enablesyou to assembleyour documentas youpunch.making
it easierto loadpaperontothe bindingcombthanprevious
systems!TheDocuBindP400advancedpunchingtechnology
alsomakesit easierto punchmorepaperat oncewhile
providinggrealerreliability.
A. GETTING
STARTED
1. Firmlypushthe femaleend of the powercord into the
powercord receptacle(A) locatedon the backof the
machine
h
~
CAUTIDN:Makesure this step is completeprior to
pluggingthe male end of the power cord into a power
receptacle.
2. Plugthe maleend of the powercord into an appropriate
powerreceptacle.
3. Firmlyattachfoot pedalcord to receptaclelocatedon back
of machine.
B. DETERMINE
SHEET
WIDTH
1. SetEdgeGuide(B) to papersizeyou wish to bind (11",
8-1/2" lettersize,11-1/4" oversizedcover,A4 ring, A5,
JapanA4) (seefigure 1). Whenusing oversizedcovers,set
the EdgeGuideon Covers,punchall of the coversfor your
job and set aside.Movethe EdgeGuidebackto the 11"
settingto punchyour contentsthen bind.
2. Raiselid on cover(0), and pull up appropriateselector
pinsto disengagepunchpins that maynick the edgeof
your sheet.To determinewhich pins shouldbe pulledup
follow the punchsteps indicatedin section"0" using blank
test paper
C. DETERMINE
PLASTIC
CDMBSIZE
1. Slidethe BinderSizeropen(C) (seefigure 1).
2. PlacedocumentincludingcoversbehindBinderSizer.
3. Releasethe BinderSizerand selectthe comb binding
elementthat correspondswith the sizeshownby guide.
Onlycombsizesup to 1" (25 mm) are shown.Your
OocuBindcan bind documentsup to 425 sheets,or 2"
(50 mm) comb size.For best results,alwaysuse GBC
brandcoverswith GBCcolor-coordinatedbindingcombs.
4. Adjustthe PunchBackGuide(C1)to the settingthat
correspondswith the plasticcomb sizeto be used.
D. PUNCHING
PAPER
(seefigure 2)
1. UtI the Wire PaperSuppol1(0) into place(optional).
2. Alignsheetsor coversand insel1edgeto be boundinto
punchthroat (01).
3. Jog the sheetsuntil they are flush againstthe edgeguide
and the bottom of the punchthroat. Allow the paperto rest
againstthe Wire PaperSupport,or, you may
preferto hold the sheetsin placewith one hand.
4. To punch,pressthe PUNCH~ button (D2) or depress
the foot pedal(D3).The DocuBindP400punchesup to 21
sheetsof 20 Ib./80gram paperat once.Punchonly TWO
clearcoversat a time to preventjams and excessivewear.
5. If you try to punchtoo manysheetsGBC'spatented"Jam
Stopper"safeguardfeaturewill automaticallystop and
reversethe punchdie. At this time the yellow LEDindicator
will temporarilyflash. Removethe paperfrom the punch
throat and decreaseit's thicknessbeforetrying to punch
again.
E. BINDING
1. Placea PlasticCombBindingElementbehindthe Vertical
Comb(E) with the open portionof elementfacingyou (see
figure 3).
2. Rotatethe Bind Leverup (E1)towardyou until the Comb
BindingElement(E2)openssufficientlyto insertyour
document(seefigure 4).
3. Threadfront coverfinishedsidefacingdown (seefigure 5),
onto open BindingElementFingers(E3).Threadpages,
front facingdown, onto element. Repeatfor largedocumentsas required.Placethe backcover,finishedside
facing upwardon openBindingElementFingerslast.
4. Pushthe Bind Leverawayfrom you backto its original
positionto closethe bindingelement.
5. Removebook by lifting upward.Your presentationis
now complete!
6. Onceyou becomefamiliarwith your DocuBindP400,
you will find that you can bind as you punch,increasing
your productivity.
F.EMPTYCHIPDRAWER
1 EmptyChipDrawer(F) after repeateduse. Pull drawer
gentlytowardyou to open.Whenputting backin, the
drawerwill snapinto place(seefigure 6).
G. SERVICE
Shouldyour DocuBindrequireservicecontact:
Quartet,a GBCCompany
5700OldOrchardRoad
Skokie,IL 60077USA
1-800-541-0094
http://www.quartetgbc.com
SPECIFICATIONS
Dimensions
18" (W) x 81/2" (H) x 16" (0)
457mmx 216mmx 406mm
PunchCapacity"
21 sheetsof 20 Ib" paper
21 sheetsof 80gm2paper
Weight
351bs.(15.5 kg.)
BindCapacity"
425 sheetsor 2"
ElectricalPower"
115VAC.60Hz.4.3 amps,130
watts or 230VAC.50Hz.
1.3 amps
(50mm)
MaximumSheetWidth"
11.7" (297mmA4)
Dis-engagable
PunchPins: 11
3
SAFETY
MESSAGES
Yoursafetyas well as the safetyof others is importantto
GBG.In this OperatorManualand on the productare important safetymessages.Readthesemessagescarefully.
.i\. Thesafetyalert symbolprecedeseachsafetymessage
..in
this OperatorManual. This symbolindicatesa
potentialpersonalsafetyhazardthat could hurt you or
others,as well as causeproductor propertYdamage.
Thefollowingwarningis found on this unit:
Thissafetymessagemeansyou could be seriouslyhurt or
killedif you openthe productand exposeyourselfto
hazardousvoltage.
r.. CAUTION:
IN CASEOFEMERGENCY,
USETHEPOWER
..CORD
ASA MAINDISCONNECT
DEVICE!
.Unplug the DocuBindP4OObeforemoving it, or when it is
not in usefor an extendedperiodof time,
.Do not operatewith a damagedsupplycord or plug,after it
malfunctions,or after it has beendamagedin any manner.
.Do not overloadelectricaloutlets beyondtheir capacityas
this can resultin fire or electricalshock.
.Do not alter attachmentplug. Plug is configuredfor the
appropriateelectricalsupply.
.The unit is intendedfor indoor use only.
.Never push objectsinto this productthrough cabinetslots.
Do not spill liquid of any kind on this product.
.Do not operateif the producthas beenexposedto rain or
water.
SERVICE
Do not attemptto serviceor repairthe DocuBindP400yourself. Unplugthe unit and contactan authorizedGBCservice
representative
for exchangeor repair.
Thefollowingsymbolsappearon this product.and their
meaninais as followso
El3PU-NCH
CLEANING
A
CAUTION:Unplugthis productbeforecleaning.
Wipe exterioronly with a dampcloth. Do not usedetergents
or solvents
~ WARNING:Foryour protection,do not connectthe
..DocuBind
P400to electricalpoweruntil you readthese
instructionscompletely.Keeptheseinstructionsin a convenient locationfor future reference.To guardagainstinjury,
the followingbasicsafetyprecautionsmust be observedin
the set-upand use of this product.
IMPORTANTSAFEGUAROS
GENERALSAFEGUAROS
.Use the DocuBindP400only for its intendedpurposeof
punchingand bindingpaperand coversaccordingto the
indicatedspecifications.
.Do not placeanythingin the punchopeningof the machine
otherthan paperand coverstock.
.Place unit on a secure,stablework areato preventthe
machinefalling and possiblycausingpersonalinjury and
damageto the unit.
.Follow all warningsand instructionsmarkedon the product.
.Lift the machinefrom the bottom,not the cover.
.Do not lift the machineby the coveror paperholderwire.
ELECTRICAL
SAFEGUARDS
TheDocuBindP400must be connectedto a supplyvoltage
corresponding
to the electricalratingof the machineas indicatedon the serial/ratingplateor in this manual
The following notesapply only to the units rated230V50Hz.
MAINCORDSET
SELECTION
(FDR230VACMACHINES
ONLY)
Whenchoosinga detachableline cord for usewith the
OocuBindP40O,alwaysobservethe following.
Thecordsetconsistsof threecomponents;the attachment
plug, cordageand applianceinlet. Eachof thesecomponents
must meetEuropeanregulatoryapprovalsfor safety.
Thefollowing minimum electricalratingsfor the specific
cordsetare publishedfor safetypurposes.DONOTUSE
CORDSETS
THATDONOTMEETTHEFOLLOWING
MINIMUM
ELECTRICAL
REQUIREMENTS.
PLUG:3A, 250 volts, 50/60 Hz,Class1,3 conductor,
Europeansafetyagencyapproved.
CORDAGE:
TypeH05W-F3GO.75,
Harmonized
( <] HAR1;>).
The" <] I>" symbolsindicatecordageapprovedto appropriateEuropeanstandard(NOTE."HAR"may be substituted
by the approvalmarkof the Europeansafetyagencywhich
approvedthe cordage.An examplewould be" <]VOE I>-".
APPLIANCE
CONNECTOR:
3A, 250 volts, 50/60 Hz,European
safetyapproved,TypeIEC320. Cordsetshall not exceed3
metersin length.Cordsetwith componentelectricalratings
greaterthan the minimumspecifiedelectricalratingsmay be
substituted.
Q
UARTET111
1'1. CAUTION:
THEPOWER
RECEPTACLE
MUSTBELOCATED 8
.AQec:COMPANY
..NEAR
THEEOUIPMENT
ANDBEEASILYACCESSIBLE.
SKOKIE, Il60077
hnp://WWW.qu3otetgbc.com