1
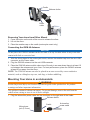
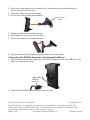
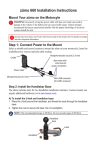
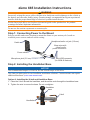
zūmo 665 Installation Instructions Warning Incorrectly wiring the power cable with bare wire leads can result in damage to the vehicle or the battery and can cause bodily injury. Garmin strongly recommends having an experienced installer with the proper knowledge of electrical systems install the unit. See the Important Safety and Product Information guide in the product box for product warnings and other important information. Do not use the suction cup mount on a motorcycle. Step 1: Connecting Power to the Mount Select a suitable and secure location to mount the zūmo on your motorcycle, based on available power sources and safe cable routing. Headphone/audio out jack (3.5 mm) Cradle Bare wires with inline fuse for power connection Power cable Microphone jack (2.5 mm) Mini-USB connector (for GXM 40 Antenna) Step 2: Installing the Handlebar Base notice The recommended torque is 50 lbf-in. Do not exceed torque of 80 lbf-in. The zūmo includes parts for two handlebar installation solutions. Custom mounts can require additional hardware (www.ram-mount.com). Option A: Installing the U-bolt and Handlebar Base: 1. Place the U-bolt around the handlebar, and thread the ends through the handlebar base. 2. Tighten the nuts to secure the base. Do not overtighten. Handlebar base U-bolt Handlebar Option B: Installing the Handlebar Base to the Clutch/Brake Clamp Bracket: Warning Incorrectly installing the handlebar base to the clutch/brake bracket can cause brake or clutch malfunction, which can result in damage to the vehicle and the risk of personal injury or death. Garmin strongly recommends having an experienced installer with the proper knowledge of clutch/brake systems install the unit. Note: Both 1/4 in. standard and M6 bolts are included. Match the size of the factory bolts on your clutch/brake clamp bracket. 1. Remove the two factory bolts on your clutch/brake clamp bracket. 2. Thread the new bolts through the handlebar base, spacers, and clamp bracket. 3. Tighten the bolts to secure the base. Clutch/brake Handlebar clamp bracket base Spacers Step 3: Attaching the Base Plate to the zūmo Mount 1. Thread the M4 × 40 mm panhead screws through the washers, cradle, spacers, and base plate. 2. Tighten the nuts to secure the base plate. Cradle Base plate Panhead screws Washers Nuts Spacers Step 4: Attaching the Base Plate to the Handlebar Base 1. Align the ball of the handlebar base and the ball of the base plate with the double-socket arm. Base plate 2. Tighten the knob slightly. Double-socket 3. Adjust for better viewing and operation. Cradle arm 4. Tighten the knob to secure the mount. Knob Step 5: Installing Your zūmo in the Mount Power cable 1. Fit the bottom of your zūmo into the cradle. 2. Tilt the zūmo back until it snaps into place. Handlebar base Cradle Release button Power cable Removing Your zūmo from Either Mount 1. Press the button on the side of the mount to release the zūmo. 2. Lift out the zūmo. 3. Place the weather cap on the cradle (motorcycle mount only). Connecting the GXM 40 Antenna Notice Do not place the GXM 40 antenna on the fuel tank or in any location where it may come into contact with fuel or excessive heat. 1. With the zūmo placed in the motorcycle mount, remove the weather cap from the mini-USB connector on the Power cable. 2. Plug the GXM 40 antenna into the mini-USB connector. 3. Place the GXM 40 antenna within clear view of the sky in an area where there is at least 10 cm between the antenna and your zūmo. For best performance, place the GXM 40 antenna at least 30 cm away from the zūmo. Note: The GXM 40 antenna can also be placed in an area covered by a non-conductive material; such as a fiberglass top-case, tank bag, or leather saddlebag. Mounting Your zūmo in an Automobile Warning See the Important Safety and Product Information guide in the product box for product warnings and other important information. This product contains a lithium-ion battery. To prevent damage, remove the unit from the vehicle when exiting or store it out of direct sunlight. 1. Plug the automotive power cable into the connector on the right side of the cradle. Release button Microphone jack (2.5 mm) Cradle Automotive power cable 2. Remove the clear plastic from the suction cup. Clean and dry your windshield and the suction cup with a lint-free cloth. 3. Place the suction cup on the windshield. 4. Flip the lever back, toward the windshield. Suction cup mount 5. Snap the cradle onto the suction cup arm. 6. Fit the bottom of your zūmo into the cradle. 7. Tilt the zūmo back until it snaps into place. 8. Plug the other end of the automotive power cable into a power outlet. Connecting the GXM 40 Antenna to the Automotive Mount 1. With the zūmo placed in the cradle, plug the GXM 40 antenna into the mini-USB port on the back of the automotive mount. Mini-USB port GXM 40 antenna 2. Place the GXM 40 antenna within clear view of the sky. © 2010 Garmin Ltd. or its subsidiaries www.garmin.com Garmin and zūmo are trademarks of Garmin Ltd. or its subsidiaries, registered in the USA and other countries. These trademarks may not be used without the express permission of Garmin. Other trademarks and trade names are those of their respective owners. ® January 2010 ® Part Number 190-01145-02 Rev. A Printed in Taiwan