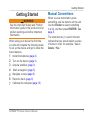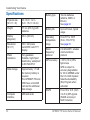
1
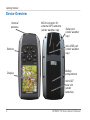
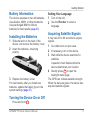
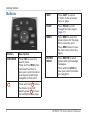
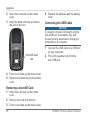
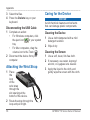
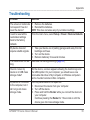
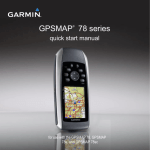
GPSMAP 78 series ® owner’s manual for use with the GPSMAP 78, GPSMAP 78S, and GPSMAP 78Sc All rights reserved. Except as expressly provided herein, no part of this manual may be reproduced, copied, transmitted, disseminated, downloaded or stored in any storage medium, for any purpose without the express prior written consent of Garmin. Garmin hereby grants permission to download a single copy of this manual onto a hard drive or other electronic storage medium to be viewed and to print one copy of this manual or of any revision hereto, provided that such electronic or printed copy of this manual must contain the complete text of this copyright notice and provided further that any unauthorized commercial distribution of this manual or any revision hereto is strictly prohibited. Information in this document is subject to change without notice. Garmin reserves the right to change or improve its products and to make changes in the content without obligation to notify any person or organization of such changes or improvements. Visit the Garmin Web site (www.garmin.com) for current updates and supplemental information concerning the use and operation of this and other Garmin products. Garmin®, BlueChart®, City Navigator®, and GPSMAP® are trademarks of Garmin Ltd. or its subsidiaries, registered in the USA and other countries. HomePort™, BaseCamp™, ANT™, and ANT+™ are trademarks of Garmin Ltd. or its subsidiaries. These trademarks may not be used without the express permission of Garmin. Windows® is a registered trademark of Microsoft Corporation in the United States and/or other countries. Mac® is a registered trademarks of Apple Computer, Inc. microSD™ is a trademark of SanDisk or its subsidiaries. Other trademarks and trade names are those of their respective owners. Table of Contents Getting Started..................... 1 Manual Conventions................... 1 Device Overview........................ 2 Battery Information..................... 3 Installing the Batteries................ 3 Turning the Device On or Off...... 3 Acquiring Satellite Signals.......... 3 Buttons....................................... 4 Navigating with Waypoints and Routes........................... 5 Waypoints................................... 5 Routes........................................ 6 Additional Maps.......................... 8 Tracks................................... 9 About Tracks.............................. 9 Navigating a Saved Track........ 10 Using the Main Pages........11 Customizing the Data Fields.....11 Restoring Default Page Settings.11 Map...........................................11 Compass.................................. 13 Using the Compass.................. 13 Using Sight ‘N Go..................... 14 Elevation Plot........................... 15 Opening the Main Menu........... 16 Trip Computer........................... 16 Main Menu Features and Settings.............................. 16 Geocaches............................... 16 Share Wirelessly...................... 17 Proximity Alarms....................... 17 Profile Change.......................... 18 Area Calculation....................... 18 Satellite..................................... 18 Additional Main Menu Tools...... 19 Customizing Your Device. 19 Customizing Data Fields.......... 19 Data Field Options.................... 20 System Settings....................... 23 Display Settings........................ 24 Setting Up Tones...................... 24 Marine Settings........................ 24 Setting up Marine Alarms......... 25 Resetting Data.......................... 26 Changing the Page Sequence. 26 Customizing the Unit Settings.. 27 Time Settings............................ 27 Position Format Settings.......... 27 Altimeter Settings..................... 28 Geocache Settings................... 29 Routing Settings....................... 29 Fitness...................................... 30 Profiles..................................... 30 Appendix............................ 30 Registering Your Device........... 30 Updating the Software.............. 31 Viewing Important Device Information............................. 31 Contacting Garmin Product Support. 31 Using the Backlight................... 31 Specifications........................... 32 Maximizing Battery Life............ 33 About the Batteries................... 33 Buying Optional Accessories.... 34 Using Optional Fitness Accessories. 34 Data Management.................... 35 Attaching the Wrist Strap.......... 38 Caring for the Device................ 38 Troubleshooting........................ 39 Index................................... 41 Getting Started warning ee the Important Safety and Product S Information guide in the product box for product warnings and other important information. When using your device the first time, you should complete the following tasks to set up the device and get to know the basic features. 1 Install the batteries (page 3). 2 Turn on the device (page 3). 3 Acquire satellites (page 3). 4 Mark a waypoint (page 5). 5 Navigate a route (page 8). 6 Record a track (page 9). 7 Calibrate the compass (page 13). GPSMAP 78 Series Owner’s Manual Getting Started Manual Conventions When you are instructed to press something, use the buttons on the unit. Use the Rocker to select something in a list, and then press ENTER. See page 5. The small arrows (>) used in the text indicate that you should select a series of items in order, for example, “Select Delete > Yes.” 1 Getting Started Device Overview Internal antenna MCX connector for external GPS antenna (under weather cap) Serial port (under weather cap) Buttons mini-USB port (under weather cap) Display Battery compartment microSD™ card slot (under batteries) 2 GPSMAP 78 Series Owner’s Manual Getting Started Battery Information The device operates on two AA batteries. Use alkaline, NiMH, or lithium batteries. Use precharged NiMH or lithium batteries for best results (page 33). Installing the Batteries 1 Slide the latch on the back of the device, and remove the battery cover. 2 Insert the batteries, observing polarity. 3 Replace the battery cover. For best results, after you install new batteries, update the battery type in the system settings (page 37). Setting Your Language 1 Turn on the unit. 2 Use the Rocker to select a language. Acquiring Satellite Signals It may take 30 to 60 seconds to acquire signals. 1 Go outdoors to an open area. 2 If necessary, turn on the device. 3 Wait while the device searches for satellites. A question mark flashes while the device determines your location. 4 Quickly press to open the backlight status page. The GPS bars indicate satellite strength. When the bars are green, the device has acquired satellite signals. Turning the Device On or Off Press and hold . GPSMAP 78 Series Owner’s Manual 3 Getting Started Buttons Button Description FIND/MOB Press FIND to open the search menu. Press and hold MOB (man overboard function) to store your current location as a waypoint and begin navigation to that point. QUIT Press QUIT to cancel or return to the previous menu or page. PAGE Press PAGE to scroll through the main pages (page 11). MENU Press MENU to open the options menu for the page that is currently open. Press MENU twice to open the main menu (from any page). ENTER/ MARK Press ENTER to select options and acknowledge messages. Press and hold MARK to save your current location as a waypoint. Press and hold to turn the device on and off. Quickly press to open the backlight status page. 4 GPSMAP 78 Series Owner’s Manual Getting Started Rocker Press up, down, right, and left to select menu options and to move the map cursor. + Press + to zoom in on the map. - Press - to zoom out on the map. Navigating with Waypoints and Routes Waypoints Waypoints are locations you record and store in the device. Creating Waypoints 1 From any page, press and hold MARK. 2 Select Done. Navigating to a Waypoint Using the Search Menu You can use the search menu to quickly find waypoints, tracks, routes, and coordinates that you have saved. 1 From any page, press FIND. 2 Select Waypoints. 3 Select a waypoint. 4 Select Go. GPSMAP 78 Series Owner’s Manual 5 Navigating with Waypoints and Routes Editing a Waypoint Before you can edit a waypoint, you must create a waypoint. 1 From the main menu, select Waypoint Manager. 2 Select a waypoint. 3 Select an attribute (such as the name or location). 4 Enter the new information. 5 Select Done. Deleting a Waypoint 1 From the main menu, select Waypoint Manager. 2 Select a waypoint. 3 Press Menu. 4 Select Delete. Viewing Tide Information 1 On the map, move the pointer to a location near which you want to search for tides. 2 Press FIND. 3 Select Tides. 6 4 Select a tide station. 5 Press MENU. 6 Select Review Point. Tide times and heights are displayed for the selected station. 7 If necessary, select an option: • To view tide information for another date, select MENU > Change Date. • To view the tide chart, select MENU > Show Chart. Routes A route is a sequence of waypoints that leads you to your final destination. Creating a Route 1 From the main menu, select Route Planner > Create Route > Select First Point. 2 Select a category. 3 Select the first point in the route. 4 Select Use. GPSMAP 78 Series Owner’s Manual Navigating with Waypoints and Routes 5 Select Select Next Point. 6 Repeat steps 2–5 until the route is complete. A route must contain at least two points. 7 Press quit to save the route. Editing the Name of a Route 1 From the main menu, select Route 2 3 4 5 Planner. Select a route. Select Change Name. Enter the new name. Select Done. • Review—shows the point on the map. • Move Down (or Up)—changes the order of the point on the route. • Insert—adds an additional point on the route. The additional point is inserted before the point you are editing. • Remove—removes the point from the route. Viewing a Route on the Map 1 From the main menu, select Route Planner. Editing a Route 1 From the main menu, select Route 2 Select a route. 3 Select View Map. 2 3 4 5 Planner. 2 Select a route. 3 Select Delete Route. Planner. Select a route. Select Edit Route. Select a point. Select an option: GPSMAP 78 Series Owner’s Manual Deleting a Route 1 From the main menu, select Route 7 Navigating with Waypoints and Routes Navigating a Route 1 Press FIND. 2 Select Routes. 3 Select a route. 4 Select Go. Viewing the Active Route 1 From the main menu, select Active Route. 2 Select a point in the route to view additional details. Stopping Navigation of a Route 1 From any page, press FIND. 2 Select Stop Navigation. Navigating a Reverse Route 1 From the main menu, select Route 2 3 4 5 6 8 Planner. Select a route. Select Reverse Route. Select the route again. Select View Map. Select Go. Additional Maps To purchase preloaded detailed map data cards, go to http://buy.garmin.com or contact your Garmin dealer. Finding an Address with City Navigator® You can use optional City Navigator maps to search for addresses, cities, and other locations. The detailed maps contain millions of points of interest, such as restaurants, hotels, and auto services. 1 Press FIND. 2 Select Addresses. 3 Enter the country. 4 Enter the city or postal code. NOTE: Not all map data provides postal code searching. 5 Select the city. 6 Enter the house number. 7 Enter the street. 8 Select Go. GPSMAP 78 Series Owner’s Manual Navigating with Waypoints and Routes Finding Marine Services 1 Press FIND. 2 Select Marine Services. 3 Select a category. 4 Select a destination. 5 Select Go. 2 Select Record, Do Not Show or Record, Show On Map. If you select Record, Show On Map, 3 4 Tracks About Tracks Your Garmin device records a track log while you are moving. You can save these tracks and navigate to them later. You can view archived or loaded tracks by selecting Track Manager from the main menu. Managing Track Log Recording 1 From the main menu, select Setup > Tracks > Track Log. GPSMAP 78 Series Owner’s Manual 5 6 a line on the map indicates your track. Select Record Method. Select an option: • Distance—records tracks at a specified distance. • Time–records tracks at a specified time. • Auto—records tracks at a variable rate to create an optimum representation of your tracks. Select Recording Interval. Select an option to record tracks more or less often. NOTE: Using the Most Often interval provides the most track detail and fills up the device memory quicker. 9 Tracks Viewing the Current Track The track being recorded is called the current track. 1 From the main menu, select Track Manager > Current Track. 2 Select an option: • View Map—shows the current track on the map. • Elevation Plot—shows the elevation plot (page 15) for the current track. Saving the Current Track 1 From the main menu, select Track Manager > Current Track. 2 Select what you want to save: Deleting a Track 1 From the main menu, select Track Manager. 2 Select a track. 3 Select Delete > Yes. Navigating a Saved Track You must record and save a track (page 10) before you can navigate using it. 1 Press FIND. 2 Select Tracks. 3 Select a saved track. 4 Select Go. • Save Track—saves the entire active track. • Save Portion—allows you to select a portion of the current track to save. Clearing the Current Track From the main menu, select Setup > Reset > Clear Current Track > Yes. 10 GPSMAP 78 Series Owner’s Manual Using the Main Pages The information needed to operate this device is found on the following pages: map, compass, main menu, and trip computer. Customizing the Data Fields You can customize the data fields that appear on the main pages. For data field descriptions, see page 20. 1 From a main page, press meNu. 2 Select Change Data Fields. 3 Select a data field. 4 Follow the on-screen instructions. Tracks Map The position icon represents your location on the map. As you travel, the position icon moves and leaves a track log (trail). Waypoint names and symbols also appear on the map. Changing the Map Orientation 1 From the map, press MENU. 2 Select Setup Map > Orientation. 3 Select an orientation: Restoring Default Page Settings • Select North Up to show north at the top of the page. • Select Track Up to show your current direction of travel at the top of the page. • Select Automotive Mode to show a perspective view. GPSMAP 78 Series Owner’s Manual 11 1 From a main page, press meNu. 2 Select Restore Defaults. 3 Press enter. Using the Main Pages Measuring Distance You can move the cursor around the map to measure distance from the current location. 1 From the map, press MENU. 2 Select Measure Distance. The device automatically begins measuring from your current location. 3 Move the cursor to a point you want to measure to. The distance appears at the top of the page. 4 Press quit to stop measuring. Map Setup Options From the map, press menu, and select Setup Map. • Map Orientation—allows you to select how the map is displayed (page 11). 12 • Guidance Text—allows you to select when to show guidance text on the map. • Advanced Map Setup ◦◦ Auto Zoom—automatically selects the appropriate zoom level for optimal use on your map. When Off is selected, you must zoom in or out manually. ◦◦ Zoom Levels—map items draw or appear at or below the selected zoom level. ◦◦ Text Size—allows you to select the text size for map items. ◦◦ Detail—allows you to select the amount of map data displayed on the device. note: Higher detail settings may cause the map to redraw slowly. • Shaded Relief—shows detail relief on the map (if available) or turns off shading. • Map Information—allows you to enable or disable the maps currently GPSMAP 78 Series Owner’s Manual Using the Main Pages loaded on the device. To purchase additional maps, see page 34. Compass When navigating to a destination, the bearing pointer points to your destination, regardless of the direction you are moving. When the bearing pointer points toward the top of the electronic compass, you are traveling directly toward your destination. If it points any other direction, turn toward that direction until the arrow is pointing toward the top of the compass. Calibrating the Compass notice Calibrate the electronic compass outdoors. Do not stand near objects that influence magnetic fields, such as cars, buildings, or overhead power lines. You should calibrate the compass after moving long distances, experiencing temperature changes, or changing the batteries. 1 From the compass, press MENU. 2 Select Calibrate Compass > Start. 3 Follow the on-screen instructions. Using the Compass You can use the compass to navigate an active route. 1 Press page. 2 Hold the device level. 3 Follow the bearing pointer to your destination. note: The three-axis compass is available only with the GPSMAP 78S and GPSMAP 78Sc. GPSMAP 78 Series Owner’s Manual 13 Using the Main Pages Using Sight ‘N Go NOTE: Sight ‘N Go is available only with the GPSMAP 78S and GPSMAP 78Sc. You can point the device at an object in the distance, such as a lighthouse, lock in the direction, and then navigate to the object. 1 From the main menu, select Sight ‘N Go. 2 Point the device at an object. 3 Select Lock Direction > Set Course. 4 Use the compass to navigate to the object. Compass Setup Options From the compass, press menu, and select Setup Heading. • Display—shows the type of directional heading on the compass: ◦◦ Directional Letters—sets the compass reading to directional letters (N, S, E, W). 14 ◦◦ Numeric Degrees—sets the compass reading to degrees (0°–359°). ◦◦ Mils—sets the compass reading to mils (0 mils–6399 mils). • North Reference—sets the north reference of the compass: ◦◦ True—sets true north as the heading reference. ◦◦ Magnetic—automatically sets the magnetic declination for your location. ◦◦ Grid—sets grid north as the heading reference (0°). ◦◦ User—sets the magnetic variation value. • Go To Line/Pointer—allows you to select how the course is displayed. ◦◦ Bearing (Small/Large) indicates the direction to your destination. ◦◦ Course indicates your relationship to a course line leading to a destination. GPSMAP 78 Series Owner’s Manual Using the Main Pages • Compass—allows you to switch from an electronic compass to a GPS compass when you are traveling at a higher rate of speed for a set period of time, or turns the compass off. • Select To Begin—starts the compass calibration (page 13). Elevation Plot note: The elevation plot page is available only with the GPSMAP 78S and GPSMAP 78Sc. Calibrating the Barometric Altimeter You can manually calibrate the barometric altimeter if you know the correct elevation or the correct pressure. 1 From the elevation plot, press menu. 2 Select Calibrate Altimeter. 3 Follow the on-screen instructions. Elevation Plot Setup Options From the elevation plot, press menu. GPSMAP 78 Series Owner’s Manual • Change Plot Type—sets the type of data shown on the elevation plot: ◦◦ Elevation/Time—records elevation changes over a period of time. ◦◦ Elevation/Distance—records elevation changes over a distance. ◦◦ Barometric Pressure—records barometric pressure over a period of time. ◦◦ Ambient Pressure—records ambient pressure changes over a period of time. • Adjust Zoom Ranges—adjusts the zoom ranges shown on the elevation plot page. • Reset—resets the elevation plot data: ◦◦ Reset Trip Data—resets all trip data. ◦◦ Delete All Waypoints—deletes all saved waypoints. 15 Using the Main Pages ◦◦ Clear Current Track—deletes the track log. ◦◦ Restore Defaults—restores the device to factory settings. Calibrate Altimeter—see page 15. Opening the Main Menu The main menu gives you access to setup screens including waypoints, tracks, and routes. See page 16 for main menu settings pages. From any page, press MENU twice. Trip Computer The trip computer displays your current speed, average speed, maximum speed, trip odometer, and other helpful statistics. Trip Computer Setup Options From the trip computer, press menu. • Reset—resets all the trip computer values to zero. For accurate information, reset the trip information before beginning a trip. 16 • Big Numbers—changes the size of the numbers shown on the trip computer page. • Change Dashboard—changes the theme and information displayed on the dashboard. note: Your customized settings are remembered by the dashboard, and will not be lost when you change profiles (page 18). Main Menu Features and Settings Geocaches Geocaching is a type of treasure hunting, in which geocachers seek hidden treasures using GPS coordinates posted on the Internet by those hiding the geocache. GPSMAP 78 Series Owner’s Manual Using the Main Pages Downloading Geocaches 1 Register your device (page 30). 2 Connect your device to your Your device can send or receive data when connected to another compatible device. You must be within 10 feet (3 m) of the compatible Garmin device. 3 Go to www.garmin.com/products Sending and Receiving Data 1 From the main menu, select Share computer (page 35). /communicator. 4 Download the Garmin Communicator plug in. 5 Go to www.garmin.com/geocache. 6 Follow the on-screen instructions to download geocaches to your device. Navigating to a Geocache 1 From the main menu, select Geocaches. 2 Select Find a Geocache. 3 Select a geocache. 4 Select Go. Share Wirelessly note: The share wirelessly feature is available only with the GPSMAP 78S and GPSMAP 78Sc. GPSMAP 78 Series Owner’s Manual Wirelessly. 2 Select Send or Receive. 3 Follow the on-screen instructions. Proximity Alarms Proximity alarms alert you when you are approaching a predetermined area. Setting a Proximity Alarm 1 From the main menu, select 2 3 4 5 6 7 Proximity Alarms. Select Create New. Select a category. Select a point. Select Use. Enter a radius. Select Done. 17 Using the Main Pages Profile Change When you are using a profile and you change settings such as data fields, units of measurement, or position settings, they are saved automatically as part of the profile you are using. For more information about customizing your profile, see page 30. Setting a Profile 1 From the main menu, select Profile Change. Your current profile is indicated on the page. 2 Select a profile. Area Calculation Calculating the Size of an Area 1 From the main menu, select Area Calculation > Start. 2 Walk around the perimeter of the area you want to calculate. 3 Select Calculate when finished. 18 After you calculate the area, you can save the track to your device and change the unit of measure. Satellite The satellite page shows your current location, GPS accuracy, satellite locations, and signal strength. Satellite Settings From the satellite page, press menu. • Use With GPS On—allows you to turn the GPS on and off. • Track Up—indicates whether satellites are shown with rings oriented with North toward the top of the screen or oriented with your current track toward the top of the screen. • Single Color—allows you to select whether the satellite page is displayed in multicolor or single color. • Set Location On Map—allows you to mark your current location on the map. This option is available only GPSMAP 78 Series Owner’s Manual Main Menu Features and Settings when you turn off GPS. You can use this location to create routes or search for saved locations. • AutoLocate® Position—calculates your GPS position using the Garmin AutoLocate feature. Additional Main Menu Tools • Calendar—displays a calendar. • Calculator—displays a calculator. • Sun and Moon—displays sunrise and sunset times along with the moon phase. • Alarm Clock—sets an audible alarm. If you are not currently using the device, you can set the device to turn on at a specific time. • Hunt and Fish—displays the predicted best dates and times for hunting and fishing at your current location. • Stopwatch—allows you to use a timer, mark a lap, and time laps. GPSMAP 78 Series Owner’s Manual • Waypoint Averaging—allows you to refine a waypoint location with multiple samples to achieve the most-accurate location possible. Customizing Your Device Customizing Data Fields You can customize the data fields displayed on each main page. 1 From a main page, press meNu. 2 Select Change Data Fields. 3 Select a data field. 4 Follow the on-screen instructions. 19 Main Menu Features and Settings Data Field Options ** Available only with the GPSMAP 78S and GPSMAP 78Sc. Data Field Bearing Description The margin of error for your exact location. For example, your GPS location is accurate to within +/12 feet. The uncalibrated environmental pressure. The average vertical distance of ascent. The maximum ascent rate in feet/meters per minute. The total elevation distance ascended. **Cadence (cadence accessory required) Course **Barometer The calibrated current pressure. **Descent - Total Battery Level The remaining battery power. Distance to Dest. Data Field Accuracy of GPS **Ambient Pressure **Ascent Average **Ascent Maximum **Ascent - Total 20 Depth **Descent Average **Descent Maximum Description The direction from your current location to a destination. Revolutions of the crank arm or strides per minute. The direction from your starting location to a destination. The depth of the water. Requires a connection to a NMEA 0183 depth-capable device to acquire data (page 24). The average vertical distance of descent. The maximum descent rate in feet/meter per minute. The total elevation distance descended. The distance to your final destination. GPSMAP 78 Series Owner’s Manual Main Menu Features and Settings Data Field Distance to Next Description The remaining distance to the next waypoint on the route. Elevation The altitude of your current location above or below sea level. **Elevation The highest elevation Maximum reached. **Elevation The lowest elevation Minimum reached. ETA at Destination The estimated time of day you will reach your final destination. ETA at Next The estimated time of day you will reach the next waypoint on the route. Glide Ratio The ratio of horizontal distance traveled to the change in vertical distance. Glide Ratio To The glide ratio required Dest. to descend from your current position and elevation to the destination elevation. GPSMAP 78 Series Owner’s Manual Data Field GPS Signal Strength Heading Description The strength of the GPS signal. The direction you are moving. **Heart Rate Your heart rate in beats (heart rate monitor per minute (bpm). required) Location (lat/lon) Displays the current position in the default position format regardless of the selected settings. . Location Displays the current (selected) position in the selected position format. Odometer A running tally of distance traveled for all trips. Off Course The distance to the left or the right by which you have strayed from the original path of travel. 21 Main Menu Features and Settings Data Field Pointer Description The data field arrow points in the direction of the next waypoint or turn. Speed The current rate of speed at which you are moving since last reset. Speed - Maximum The maximum speed reached since last reset. Speed - Moving The average speed Avg. of the device while moving since last reset. Speed - Overall Your average speed Avg. since last reset. Sunrise The time of sunrise based on your GPS position. Sunset The time of sunset based on your GPS position. 22 Data Field Temperature Water Description The temperature of the water. Requires a connection to a NMEA 0183 temperaturecapable device to acquire data (page 24). Time of Day The current time of day based on your time settings (format, time zone, and daylight saving time). Time to The estimated time Destination needed to reach your final destination. Time to Next The estimated time needed until you reach the next waypoint on the route. To Course The direction in which you must move to return to the route. Trip Odometer A running tally of the distance traveled since the last reset. Trip Time - Moving A running tally of time since the last reset. GPSMAP 78 Series Owner’s Manual Customizing Your Device Data Field Trip Time Stopped Description The time spent not moving since the last reset. Trip Time - Total A running tally of distance traveled since the last reset. Turn The angle of difference (in degrees) between the bearing to your destination and your current course. L means turn left. R means turn right. Velocity Made The speed at which Good you are closing on a destination along a route. Vert. Speed to The measurement of Dest. your rate of ascent or descent to a predetermined altitude. Vertical Speed Your rate of altitude gain or loss over time. Waypoint at Dest. The last point on a route to your destination. GPSMAP 78 Series Owner’s Manual Data Field Waypoint at Next Description The next point on your route. System Settings From the main menu, select Setup > System. • GPS—sets the GPS to Normal, WAAS/EGNOS (Wide Area Augmentation System/European Geostationary Navigation Overlay Service), or Demo Mode (GPS off). For information about WAAS, go to www.garmin.com/aboutGPS/waas .html. • Language—sets the text language on the device. note: Changing the text language does not change the language of user-entered data or map data, such as street names. • Battery Type—allows you to select the type of battery you are using. 23 Customizing Your Device • Interface—sets the format of the serial interface: ◦◦ Garmin Serial—Garmin proprietary format used to provide PVT protocol data. ◦◦ NMEA In/Out—provides standard NMEA 0183 output and input. ◦◦ Text Out—provides simple ASCII text output of location and velocity information. ◦◦ RTCM Radio Technical Commission for Maritime Services—allows the device to accept DGPS Differential Global Positioning System information from a device supplying RTCM data in an SC-104 format. Display Settings From the main menu, select Setup > Display. • Backlight Timeout—see page 33. • Battery Save—see page 33. 24 • Colors—sets the colors used on the device screens. • Main, Setup, Find Style—allows you to select how the main menu, setup menu, and search menu appear. • Screen Capture—allows you to take screen captures on the device. Setting Up Tones Your Garmin device allows you to customize the key tones, message beeps, or turn off tones. From the main menu, select Setup > Tones. Marine Settings From the main menu, select Setup > Marine. • Marine Chart Mode—allows you to select a nautical chart or a fishing chart: ◦◦ Nautical—displays various map features in different colors so that the marine POIs are more readable. The nautical chart GPSMAP 78 Series Owner’s Manual Customizing Your Device • • • • reflects the drawing scheme of paper charts. ◦◦ Fishing—(requires marine maps) displays a detailed view of bottom contours and depth soundings. Simplifies map presentation for optimal use while fishing. Spot Soundings—allows you to turn spot soundings on and set dangerous depths. Light Sectors—displays the sector in which a navigational light is visible. You can select On to show light sectors at all times, or you can select Auto to allow the chartplotter to automatically filter out light sectors depending on the zoom level. Symbol Set—allows you to show NOAA or IALA symbols on the map. Marine Alarm Setup—sets the anchor drag alarm, off course alarm, deep water alarm, and shallow water alarm. GPSMAP 78 Series Owner’s Manual Setting up Marine Alarms Setting the Anchor Drag Alarm You can set an alarm to sound when you exceed a specified drift distance while anchored. 1 From the main menu, select Setup > Marine Settings. 2 Select Anchor Drag Alarm > On. 3 Enter a distance. 4 Select Done. Setting the Off Course Alarm You can set an alarm to sound when you are off course by a specified distance. 1 From the main menu, select Setup > Marine Settings. 2 Select Off Course Alarm > On. 3 Enter a distance. 4 Select Done. 25 Customizing Your Device Setting the Deep Water or Shallow Water Alarm 1 From the main menu, select Setup > Changing the Page Sequence Marine > Marine Alarm Setup. 2 Select Shallow Water > On to set 3 4 5 6 7 an alarm to sound when the depth is less than the specified value. Enter the depth that triggers the shallow water alarm. Select Done. Select Deep Water > On to set an alarm to sound when the depth is greater than the specified value. Enter the depth that triggers the deep water alarm. Select Done. Resetting Data You can reset trip data, delete all waypoints, clear the current track, or restore default values. 1 From the main menu, select Setup > Reset. 2 Select an item to reset. 26 1 From the main menu, select Setup > 2 3 4 5 Page Sequence. Select a page. Select Move. Move the page up or down the list. Press Enter. Adding a Page 1 From the main menu, select Setup > Page Sequence. 2 Select Add Page. 3 Select a page to add. GPSMAP 78 Series Owner’s Manual Customizing Your Device Removing a Page 1 From the main menu, select Setup > Page Sequence. 2 Select a page. 3 Select Remove. 4 Press Enter. Customizing the Unit Settings You can customize units of measure for distance and speed, elevation, depth, temperature, and pressure. 1 From the main menu, select Setup > Units. 2 Select a setting. 3 Select a unit for the setting. 4 Repeat steps 2–3 for each setting you want to customize. GPSMAP 78 Series Owner’s Manual Time Settings From the main menu, select Setup > Time. • Time Format—allows you to select a 12-hour or a 24-hour display time. • Time Zone—allows you to select the time zone for the device. You can select Automatic to set the time zone automatically based on your GPS position. Position Format Settings Note: Do not change the position format or the map datum coordinate system unless you are using a map or chart that specifies a different position format. From the main menu, select Setup > Position Format. • Position Format—sets the position format in which a given location reading appears. 27 Customizing Your Device • Map Datum—sets the coordinate system on which the map is structured. • Map Spheroid—shows the coordinate system the device is using. The default coordinate system is WGS 84. Altimeter Settings From the main menu, select Setup > Altimeter. • Auto Calibration—the altimeter to self-calibrates each time you turn the device on. • Barometer Mode ◦◦ Variable Elevation—the barometer functions while you are moving. ◦◦ Fixed Elevation—the barometer functions while you are stationary. • Pressure Trending ◦◦ Save When Power On—records pressure data only when the device is turned on. This can be 28 useful when you are watching for pressure fronts. ◦◦ Save Always—records pressure data every 15 minutes, even when the device is turned off. • Plot Type ◦◦ Elevation/Time—records elevation changes over a period of time. ◦◦ Elevation/Distance—records elevation changes over a distance. ◦◦ Barometric Pressure—records barometric pressure over a period of time. ◦◦ Ambient Pressure—records ambient pressure changes over a period of time. GPSMAP 78 Series Owner’s Manual Customizing Your Device Geocache Settings From the main menu, select Setup > Geocaches. • Geocache List—allows you to show the geocache list by names or codes. • Found Geocaches—allows you to enter the number of geocaches found. Routing Settings From the main menu, select Setup > Routing. Guidance Method—allows you to select a guidance method for calculating your route. ◦◦ Off Road—calculates point-topoint routes. ◦◦ On Road For Time—calculates on-road routes that require minimal time to drive. ◦◦ On Road For Distance— calculates on-road routes that are shorter in distance. GPSMAP 78 Series Owner’s Manual • Calculates Routes for—allows you to select a transportation method in order to optimize your route. • Lock On Road—locks the current location marker on the nearest road, compensating for variances in map position accuracy (requires routable maps). • Off Road Transitions ◦◦ Auto—automatically routes you to the next point. ◦◦ Manual—allows you to select the next point on the route by using the point on the active route page. ◦◦ Distance—routes you to the next point on the route when you are within a specified distance of your current point. • Avoidance Setup—allows you to select the road type you want to avoid. 29 Customizing Your Device Fitness For more information on optional fitness accessories, see page 34. Profiles Profiles are a collection of settings that allow you to optimize your device from one type of use to another, such as moving from marine use to recreational use. You can select Marine, Recreational, or save a custom profile for your device. To change profiles, see page 18. Saving a Custom Profile You can customize your settings for a particular activity or trip. After you have made all the changes, you must save them as a custom profile. 1 From the main menu, select Setup > Profiles. 2 Select Create New Profile > OK. 30 Editing a Profile Name 1 From the main menu, select Setup > 2 3 4 5 Profiles. Select a profile. Select Edit Name. Enter the new name. Select Done. Deleting a Profile 1 From the main menu, select Setup > Profiles. 2 Select a profile. 3 Select Delete. Appendix Registering Your Device Help us better support you by completing our online registration today. • Go to http://my.garmin.com. • Keep the original sales receipt, or a photocopy, in a safe place. GPSMAP 78 Series Owner’s Manual Customizing Your Device Updating the Software by phone at (913) 397.8200 or (800) 800.1020. • In the UK, contact Garmin (Europe) Ltd. by phone at 0808 2380000. • In Europe, go to www.garmin.com /support and click Contact Support for in-country support information, or contact Garmin (Europe) Ltd. by phone at +44 (0) 870.8501241. Viewing Important Device Information Using the Backlight You must connect the device to your computer to update the software (page 35). 1 Go to www.garmin.com /products/webupdater. 2 Follow the on-screen instructions. note: This does not erase any of your data or settings. You can view the unit ID, software version, and license agreement. From the main menu, select Setup > About. Contacting Garmin Product Support The backlight is activated any time you press a button. Alerts and messages also activate the backlight. NOTE: To change the backlight settings, see page 33. Press to turn on the backlight. You can contact Garmin Product Support if you have any questions about this product. • In the USA, go to www.garmin .com/support, or contact Garmin USA GPSMAP 78 Series Owner’s Manual 31 Customizing Your Device Specifications Physical size (W × H × D) 2.6 × 6.0 × 1.2 in. (6.6 × 15.2 × 3.0 cm) Weight 7.7 oz. (218.3 g) with batteries Display (diagonal) 2.6 in. (66 mm) Resolution (W × H) 160 × 240 pixels, backlit 65K color TFT display Water resistance Fully gasketed, floatable, high impact plastic alloy, waterproof to IEC 529-IPX-7 Data storage Approximately 1.7 GB No memory battery is required. The GPSMAP 78S and 78Sc have a microSD card slot for additional data storage. Computer interface USB and serial 32 Battery type Two AA batteries (alkaline, NiMH, or lithium) See page 34. Battery life Up to 20 hours, typical usage Operating temperature range From 5°F to 158°F (from -15 to 70°C) See page 33. Radio frequency/ protocol 2.4 GHz/ANT+ wireless communications protocol GPS accuracy < 33 ft. (10 m) 95% typical use GPS is subject to accuracy degradation to 100 m 2DRMS under the U.S. DoD imposed Selective Availability (SA) Program when activated. DGPS From 10 to 16 ft. (from 3 to 5 m) 95% typical (WAAS accuracy in North America) GPSMAP 78 Series Owner’s Manual Customizing Your Device Altimeter Accuracy: ± 10 ft. (± 3 m)* Resolution: 1 ft. (.3 m) Range: from -2,000 ft. to 30,000 ft. (from -610 to 9144 m) *Subject to proper user calibration. Compass Accuracy: ± 2 degrees (± 5 degrees in extreme Northern and Southern latitudes) *Resolution: 1 degree *Subject to proper user calibration. Maximizing Battery Life Using the Battery Save Option Use the battery save option to save battery power and prolong battery life. From the main menu, select Setup > Display > Battery Save > On. Decreasing the Backlight Extensive use of screen backlighting can significantly reduce battery life. GPSMAP 78 Series Owner’s Manual You can adjust the backlight brightness and decrease the backlight timeout to maximize battery power. 1 Quickly press to open the backlight status page. 2 Use the Rocker to adjust the brightness. Adjusting the Backlight Timeout From the main menu, select Setup > Display > Backlight Timeout. About the Batteries warning See the Important Safety and Product Information guide in the product box for product warnings and other important information. The temperature rating for the device may exceed the usable range of some batteries. Alkaline batteries can rupture at high temperatures. Alkaline batteries lose a significant amount of their capacity as temperature decreases. Use lithium 33 Customizing Your Device batteries when operating the device in below-freezing conditions. Selecting the Battery Type 1 From the main menu, select Setup > System > Battery Type. 2 Select Alkaline, Lithium, or Rechargeable NiMH. Long-Term Storage When you do not plan to use the device for several months, remove the batteries. Stored data is not lost when batteries are removed. Buying Optional Accessories Go to http://buy.garmin.com, or contact your Garmin dealer for information about optional accessories, preloaded map data cards, fitness accessories, and replacement parts. 34 Using Optional Fitness Accessories NOTE: The Fitness option is available only with the GPSMAP 78S and GPSMAP 78Sc. Before you can use the fitness accessory with your device, you must install the accessory according to the instructions that are included with the accessory. You can use optional fitness accessories including a heart rate monitor or a cadence sensor with your device. These accessories use ANT+™ wireless technology to send data to the device. 1 Bring the device within range (3 m) of the ANT+ accessory. 2 From the main menu, select Setup > Fitness. 3 Select an option: • Select Heart Rate Monitor > On. • Select Bike Cadence Sensor > On. GPSMAP 78 Series Owner’s Manual Appendix You can view heart rate and cadence data by customizing your data fields (page 20). Tips for Pairing ANT+ Accessories with Your Garmin Device • Verify that the ANT+ accessory is compatible with your Garmin device. • Before you pair the ANT+ accessory with your Garmin device, move 10 m away from other ANT+ accessories. • Bring the Garmin device within range (3 m) of the ANT+ accessory. • After you pair the first time, your Garmin device automatically recognizes the ANT+ accessory each time it is activated. This process occurs automatically when you turn on the Garmin device and only takes a few seconds when the accessories are activated and functioning correctly. • When paired, your Garmin device only receives data from your accessory, and you can go near other accessories. GPSMAP 78 Series Owner’s Manual Data Management note: The device is not compatible with Windows® 95, 98, Me, or NT. It is also not compatible with Mac® OS 10.3 and earlier. File Types The device supports the following file types: • Files from BaseCamp™ or HomePort™. Go to www.garmin.com. • GPI custom POI files from the Garmin POI Loader. Installing a microSD Card You can purchase microSD memory cards from an electronics supplier, or purchase preloaded detailed map data cards from your Garmin dealer. In addition to map and data storage, the memory cards can be used to store files such as images, cartridges, geocaches, routes, waypoints, and custom POIs. 1 Slide the latch on the back of the device, and remove the battery cover and the batteries. 35 Appendix 2 Slide down and pull out the metal cover. 3 Align the metal contacts, and place the card in the slot. 4 Replace the batteries and the battery cover. Connecting the USB Cable notice To prevent corrosion, thoroughly dry the mini-USB port, the weather cap, and the surrounding area before charging or connecting to a computer. 1 Connect the USB cable to a USB port microSD card slot on your computer. 2 Pull up the weather cap from the mini-USB port. 4 Push in and slide up the metal cover. 5 Replace the batteries and the battery cover. Removing a microSD Card 1 Slide down and pull out the metal cover. 2 Remove the card from the slot. 3 Push in and slide up the metal cover. 36 GPSMAP 78 Series Owner’s Manual Appendix Mini-USB port under weather cap Serial port under weather cap microSD card slot (inside battery compartment) 3 Plug the small end of the USB cable into the mini-USB port. Your device and micro SD card (optional) appear as removable drives in My Computer on Windows computers and as mounted volumes on Mac computers. GPSMAP 78 Series Owner’s Manual Transferring Files to Your Computer After you have connected the device to your computer, you can copy and paste files from your computer into the device drives/volumes. 1 Browse your computer for the file. 2 Select the file. 3 Select Edit > Copy. 4 Open the “Garmin” or memory card drive/volume. 5 Select Edit > Paste. Deleting Files NOTICE Your device memory contains important system files and folders that should not be deleted. Before you can delete files, you must connect the device to your computer (page 35). 1 Open the “Garmin” drive or volume. 2 If necessary, open a folder or volume. 37 Appendix 3 Select the files. 4 Press the Delete key on your keyboard. Disconnecting the USB Cable 1 Complete an action: • For Windows computers, click the eject icon in your system tray. • For Mac computers, drag the volume icon to the Trash . 2 Disconnect the device from your computer. Attaching the Wrist Strap 1 Place the loop of the wrist strap through the slot opening at the bottom of the device. 2 Route the strap through the loop and pull it tight. 38 Caring for the Device NOTICE Avoid chemical cleaners and solvents that can damage plastic components. Cleaning the Device 1 Use a cloth dampened with a mild detergent solution. 2 Wipe it dry. Cleaning the Screen 1 Use a soft, clean, lint-free cloth. 2 If necessary, use water, isopropyl alcohol, or eyeglass lens cleaner. 3 Apply the liquid to the cloth, and gently wipe the screen with the cloth. GPSMAP 78 Series Owner’s Manual Appendix Troubleshooting Problem The screen or buttons do not respond. How do I reset the device? I want to reset all the customized settings back to the factory defaults. My device does not acquire satellite signals. The batteries do not last long. How do I know my device is in USB mass storage mode? My device is connected to the computer, but it will not go into mass storage mode. Solution 1. Remove the batteries. 2. Reinstall the batteries. Note: This does not erase any of your data or settings. From the main menu, select Setup > Reset > Restore Defaults. 1. Take your device out of parking garages and away from tall buildings and trees. 2. Turn on the device. 3. Remain stationary for several minutes. Decrease the backlight settings (page 33). On the device, a screen appears showing the Garmin logo and the USB symbol. On your computer, you should see a new removable disk drive in My Computer on Windows computers and a mounted volume on Mac computers. You may have loaded a corrupted file. 1. Disconnect the device from your computer. 2. Turn off the device. 3. Press and hold the Rocker while you connect the device to your computer. Continue pressing the Rocker for 10 seconds or until the device goes into mass storage mode. GPSMAP 78 Series Owner’s Manual 39 Appendix Problem I cannot see any new removable drives in my list of drives. Solution If you have several network drives mapped on your computer, Windows may have trouble assigning drive letters to your Garmin drives. See the Help file for your operating system to learn how to assign drive letters. I need replacement parts Go to http://buy.garmin.com, or contact your Garmin dealer. or accessories. I want to buy an external Go to http://buy.garmin.com, or contact your Garmin dealer. GPS antenna. 40 GPSMAP 78 Series Owner’s Manual Index A accessories 34, 40 fitness 34 microSD card 34 acquiring satellite signals 39 active route 8 alarms marine 25 proximity 17 time 19 altimeter calibrating 15 plot type 28 settings 28 ANT+ accessories 34 area calculation 18 AutoLocate 19 B backlight 4, 31, 33 BaseCamp 35 batteries 20, 23, 32 about 33 information 3 installing 3 maximizing life 33 Index selecting the type 33 storage 33 warnings 33 beeps 24 buttons 4 C calculator 19 calendar 19 calibrating altimeter 15 compass 15 caring for the device 38 long-term storage 34 compass calibrating 13 navigating 13 setup options 14 connecting USB cable 36 wireless accessories 34 wirelessly 17 creating routes 6 waypoints 5 customizing data fields 11 device settings 23–30 profiles 30 GPSMAP 78 Series Owner’s Manual D dashboard change 16 data fields 11 options 20 data storage 32 deleting files 37 profiles 30 routes 7 tracks 10 waypoints 6 display backlight 31 backlight timeout 24 screen capture 24 settings 24 display settings backlight 33 downloading software 31 E editing profiles 30 routes 7 waypoints 6 elevation plot 10, 15 barometric altimeter 15 41 Index HomePort 35 hunting and fishing times 19 settings 16 man overboard 4 map 11 changing orientation 11 datum 28 detail 12 information 12 measuring distance 12 setup options 12 showing tracks 10 viewing routes 7 map datum coordinate system 27 marine settings 24–25 MARK button 4 MCX connector 2 measuring area 18 distance 12 MENU button 4, 11, 16, 19 microSD card 32, 34–36 MOB button 4 moonphase 19 L N reset 15 setup 15 ENTER button 4 external antenna 2 F FIND button 4, 5, 8, 9, 10 fitness options 34 G Garmin Product Support 31 geocaches 16, 29 downloading 17 navigating 17 settings 28 GPS signals 3, 18, 20, 21, 32, 39 system settings 23 turning off GPS 18 H language 3, 23 M main menu 42 navigating compass 13 routes 8 to geocaches 17 to waypoints 5 tracks 10 P PAGE button 4 pages adding a page 26 removing 27 sequence 26 position format 27 power button 3, 4, 31, 33 profiles 18 change 18 creating 30 setting 18 proximity alarms 17 Q QUIT button 4 R recording tracks 9 registering your device 30 reset current track 26 data 26 defaults 26 trip data 26 waypoints 26 restoring default settings 11 GPSMAP 78 Series Owner’s Manual Index Rocker 5 routes active route 8 avoidance 29 creating 6 deleting 7 editing 7 editing name 7 guidance method 29 navigating 8 settings 29 S satellite signals 3, 18, 20, 21, 32, 39 AutoLocate 19 system settings 23 turning off GPS 18 saving tracks 10 search menu 4, 5 Sight ‘N Go 14 software updating 31 version 31 specifications 32 stopwatch 19 sun and moon times 19 system settings 23 T time alarms 19 data fields 22 settings 27 stopwatch 19 sunrise and sunset 19, 22 zone 27 times hunting and fishing 19 tones 24 tracks about 9 clearing current 10 deleting 10 navigating 10 recording 9 saving 10 viewing 10 transferring files 37 using USB 37 wirelessly 17 trip computer 16 troubleshooting 39 software 31 USB cable 39 connecting 36 disconnecting 38 W waypoints averaging 19 creating 5 deleting 6 editting 6 navigating to 5 wrist strap 38 Z zooming 5, 12 zoom ranges 15 U unit ID 31 updating GPSMAP 78 Series Owner’s Manual 43 For the latest free software updates (excluding map data) throughout the life of your Garmin products, visit the Garmin Web site at www.garmin.com. © 2010-2013 Garmin Ltd. or its subsidiaries Garmin International, Inc. 1200 East 151st Street, Olathe, Kansas 66062, USA Garmin (Europe) Ltd. Liberty House, Hounsdown Business Park, Southampton, Hampshire, SO40 9LR UK Garmin Corporation No. 68, Zhangshu 2nd Road, Xizhi Dist., New Taipei City, 221, Taiwan (R.O.C.) June 2013 Part Number 190-01165-00 Rev. E Printed in Taiwan