1
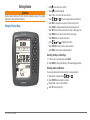
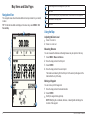
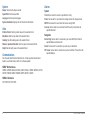
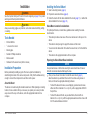
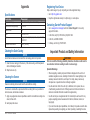
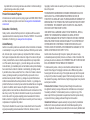
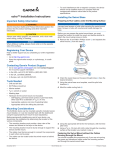
GPS 158 Owner’s Manual Table of Contents Getting Started��������������������������������������������������������������������������������������������3 Using the Device Keys���������������������������������������������������������������������������������������������� 3 Map Views and Data Pages�����������������������������������������������������������������������4 Navigation View��������������������������������������������������������������������������������������������������������� 4 Using the Map����������������������������������������������������������������������������������������������������������� 4 Compass View����������������������������������������������������������������������������������������������������������� 5 Numbers View����������������������������������������������������������������������������������������������������������� 5 Highway View������������������������������������������������������������������������������������������������������������ 5 Route View���������������������������������������������������������������������������������������������������������������� 5 Navigation���������������������������������������������������������������������������������������������������5 Navigating to a Waypoint������������������������������������������������������������������������������������������� 5 Creating a Route������������������������������������������������������������������������������������������������������� 5 Following a Route������������������������������������������������������������������������������������������������������ 6 Following a Track������������������������������������������������������������������������������������������������������� 6 Applications������������������������������������������������������������������������������������������������6 Viewing Celestial Information������������������������������������������������������������������������������������ 6 Viewing GPS Information������������������������������������������������������������������������������������������ 6 Viewing the Calendar������������������������������������������������������������������������������������������������ 6 Device Settings�������������������������������������������������������������������������������������������7 Trip���������������������������������������������������������������������������������������������������������������������������� 7 Tracks������������������������������������������������������������������������������������������������������������������������ 7 Time��������������������������������������������������������������������������������������������������������������������������� 7 Pages������������������������������������������������������������������������������������������������������������������������ 7 Map���������������������������������������������������������������������������������������������������������������������������� 7 Highway��������������������������������������������������������������������������������������������������������������������� 7 System����������������������������������������������������������������������������������������������������������������������� 8 Units�������������������������������������������������������������������������������������������������������������������������� 8 Communications�������������������������������������������������������������������������������������������������������� 8 Alarms����������������������������������������������������������������������������������������������������������������������� 8 Installation���������������������������������������������������������������������������������������������������9 Tools Needed������������������������������������������������������������������������������������������������������������� 9 Installation Preparation���������������������������������������������������������������������������������������������� 9 Installing the Swivel Mount���������������������������������������������������������������������������������������� 9 Installing the Cradle in the Swivel Mount����������������������������������������������������������������� 11 Installing the Cables and Connectors���������������������������������������������������������������������� 11 Appendix���������������������������������������������������������������������������������������������������13 Specifications���������������������������������������������������������������������������������������������������������� 13 Cleaning the Outer Casing�������������������������������������������������������������������������������������� 13 Cleaning the Screen������������������������������������������������������������������������������������������������ 13 Registering Your Device������������������������������������������������������������������������������������������ 13 Contacting Garmin Product Support������������������������������������������������������������������������ 13 Important Product and Safety Information��������������������������������������������13 Getting Started Warning See the Important Safety and Product Information beginning on page 13 for product warnings and other important information. Using the Device Keys • • • • • • • • • • • • Hold to turn the device on and off. Select to adjust the backlight. Select + and – to zoom in and out on the map. Select , , , and to move the map pointer around the map. Select NAV to navigate to a waypoint or follow a route or track. Select page to change between the map and data page views. Select QUIT to exit a menu and return to the map or data page view. Select menu once to open the menu for the current page. Select menu twice to open the main menu. Select , , , and to highlight menu items. Select ENTER to select an item or make a selection. Select MOB to mark a man-overboard waypoint. Selecting the Map or a Data Page 1 From the map or any data page, select PAGE. 2 Select MENU to change the settings for the selected page (optional). Entering Letters and Numbers You can enter letters and numbers using the on-screen keyboard. 1 Select letters or numbers using , , , and . 2 Select ENTER after each letter or number. 3 Repeat steps 1 and 2 to enter all letters. 4 Select OK to accept the entry. GPS 158 Owner’s Manual 3 Map Views and Data Pages Navigation View The navigation view shows three data fields and a map centered on your current location. TIP: To hide the data fields and display a full screen map, select MENU > Full Screen Map. ➊ ➊ ➋ ➌ ➍ ➎ The next waypoint and final waypoint in your route Data fields Distance and bearing from your present location to the location of the map pointer Coordinates of the map pointer Map scale Using the Map Adjusting the Zoom Level 1 Select + to zoom in. 2 Select – to zoom out. Measuring Distance You can measure the distance and bearing between any two points on the map. 1 Select menu > Measure Distance. 2 Move the map pointer to the first point. 3 Select ENTER. 4 Move the map pointer to the second point. The distance and bearing from the first point to the second point appear in the data field at the top of the map. ➋ Marking a Waypoint ➌ ➍ ➎ 4 You can mark up to 3000 waypoints. 1 Move the map pointer to the desired location. 2 Select ENTER. 3 Modify the waypoint data (optional). NOTE: Modifying the coordinates, distance, or bearing fields will change the location of the waypoint. GPS 158 Owner’s Manual Navigation Compass View The compass view is used to aid navigation. You can change the information displayed in the top three fields. The compass also displays the difference between your current heading ➊ and the heading necessary ➋ to follow the route or track. You can navigate to a waypoint or follow a route or track. Navigating to a Waypoint 1 Select NAV > Go To Point > Waypoints. 2 Select an option: ➊ ➋ Numbers View You can change the information displayed in all fields. Highway View The highway view displays three data fields, plus a 3D view of your current heading, including any nearby waypoints, routes, or tracks. You can change the information displayed in the top three fields and the points displayed in the highway field. Route View The route view displays a list of waypoints for the route you are navigating and a 3D view of your current heading, including any nearby waypoints, routes, or tracks. GPS 158 Owner’s Manual • To view a list of all waypoints, select By Name. • To view a list of nearby waypoints, select Nearest. 3 Select a waypoint. 4 Select Go To. Follow the on-screen directions to your destination, steering to avoid obstacles and hazards. Creating a Route You can save up to 50 routes. 1 Select MENU twice. 2 Select Route. 3 Select an unused route line. The full screen map appears. 4 Move the map pointer to the location of the first point of the route. NOTE: If the selected point is not a waypoint, it is saved as a waypoint. 5 Select ENTER. 6 Repeat steps 4 and 5 to select the remaining points on the route. 7 Select MENU to save the route. 5 Applications Following a Route 1 Select NAV > Follow Route. 2 Select a route. 3 Select an option: • To follow the route, select Activate. • To follow the route in reverse, select Invert and Activate. Follow the on-screen directions to your destination, steering to avoid obstacles and hazards. Following a Track Before you can, follow a track, you must record a track (page 7). 1 Select NAV > Follow Track. 2 Select a track. 3 Select an option: • To follow the track, select Original. • To follow the track in reverse, select Reverse. Using Man Overboard You can use the man overboard feature to mark a waypoint and instantly begin navigating back to that waypoint. Select MOB > Yes. Viewing Celestial Information 1 Select MENU twice. 2 Select Celes. 3 In the At field, select an option: • To view celestial information for your current location, select Current Position. • To view celestial information for a saved waypoint, select Waypoint, and select a saved waypoint. • To view celestial information for a location that is not a saved waypoint, select Other Position, and select the location on the map. 4 In the On field, enter the date and time for which you want to view celestial information. Viewing GPS Information To view information about GPS satellites, select GPS in the main menu. Viewing the Calendar To view the calendar, select Calen in the main menu. Stopping Navigation Before you can stop navigation, you must be navigating to a waypoint or following a route or track. Select NAV > Stop Navigation. 6 GPS 158 Owner’s Manual Device Settings Select Menu twice. Trip Reset Trip: Resets the trip meter. Reset Max Speed: Resets the maximum vessel speed recorded by the device. Reset Odometer: Resets the odometer. Reset All: Resets the trip meter, max speed, and odometer. Tracks Active Record Mode: Sets the track to record until the device memory is full, or to continue recording indefinitely, replacing the oldest track record when the memory is full. Interval: Sets the track to record points in intervals based upon distance, time, or resolution. Value: Sets the value of the distance, time, or resolution track recording interval. Erase: Delete the saved track memory. Time Time Format: Sets 12- or 24-hour time. Time Zone: Sets a time zone. Daylight Savings Time: Sets the clock to for daylight savings time. Map General Detail: Sets the level of detail displayed on the map view. Orientation: Sets the map orientation to North Up, Track Up, or Course Up. AutoZoom: Sets the map to automatically zoom in and out based on vessel speed. Color Mode: Sets to display land or water in lighter tones. Source Basemap: Sets whether a map displays in the map view. If you select Off, land and water features do not appear. Waypoints, tracks, and routes appear on the map view regardless of whether the basemap is turned on or off. Waypoints Sets the text size and zoom level for waypoints and the active route. Nav Line Heading Line: Sets to display the heading line. Bearing Line: Sets the zoom level. Course Line: Sets the zoom level. Track Sets a zoom level for saved tracks and the track log. Highway Sets the features that display on the highway view. Pages Sets which pages appear when you select PAGE. GPS 158 Owner’s Manual 7 System Beeper: Sets when the beeper sounds. Speed Filter: Sets the speed filter. Language: Sets the system language. System Information: Displays the Unit ID and other information. Units Position Format: Sets the position values to the selected format. Map Datum: Sets the map datum to the selected format. Heading: Sets the heading value to the selected format. Distance, Speed and Elevation: Sets the values to the selected format. Depth: Sets the depth values to the selected format. Communications Alarms System Clock: Sets an alarm to sound at a specified time of day. Power: Sets an alarm to sound when the voltage is below the voltage entered. DGPS: Sets an alarm to sound when the device is using DGPS. Accuracy: Sets an alarm to sound when the GPS accuracy drops below the specified threshold. Navigation Anchor Drag: Sets an alarm to sound when your vessel drifts farther than the specified distance while at anchor. Arrival: Sets an alarm to sound when you arrive at your destination. Off Course: Sets an alarm to sound when your boat is farther off course than the specified distance. Sets the serial data format and transfer mode. Contact your Garmin authorized dealer to use transfer mode, which is for software updates. NMEA® Out Sentences GPRMC, GPRMB, GPGGA, GPGSA, GPGSV, GPGLL, GPBOD, GPBWC, GPVTG, GPXTE, PGRME, PGRMZ, PGRMM, GPRTE, GPWPL, GPAPB NMEA In Sentences DPT, DBT, MTW, VHW, WPL 8 GPS 158 Owner’s Manual Installation Warning See the Important Safety and Product Information beginning on page 13 for product warnings and other important information. Caution Always wear safety goggles, ear protection, and a dust mask when drilling, cutting, or sanding. Tools Needed • • • • • • Drill and drill bits 3/8 in. wrench or socket Masking tape Number 2 Phillips screwdriver Marine sealant Hardware for the swivel mount (bolts or screws) Installation Preparation Before permanently installing any part of the device, plan the installation by determining the location of the various components. Verify that the cables are long enough to connect the components to each other and to power. About the Mount The device is mounted using the included swivel mount. When planning a mounting location, choose a location that you can see as you operate your vessel, provides easy access to the keys on the device, and is the appropriate distance from a compass. GPS 158 Owner’s Manual Installing the Swivel Mount 1 Select a mounting location (page 9). 2 Prepare the swivel-mount base (page 9). 3 Fasten the mount with the cables installed in the mount (page 11), or without the cables installed in the mount (page 10). Swivel-Mount Location Considerations For optimal performance, consider these guidelines when selecting the swivelmount location. • The location provides a clear view of the screen and access to the keys on the device. • The location is sturdy enough to support the device and the mount. • You can route the cables either from under the swivel mount, or from behind the device. • The location is the appropriate distance from a compass. Preparing the Swivel-Mount Base Installation Notice Use pan-head screws or bolts when securing the swivel-mount base. Screws or bolts with countersunk heads will damage the base. 1 After you have chosen the location to install the swivel mount (page 9), determine whether you will attach the mount to the surface using screws or bolts, and choose the appropriate fastening hardware: • To attach the base with screws, use self-tapping, pan-head wood screws, either size #8 or a diameter of 5/32 in. (4 mm), with an appropriate drill bit for the pilot hole. • To attach the base with bolts, use pan-head bolts, either size #8 or a diameter of 5/32 in. (4 mm), with the appropriate washers and nuts. Use a drill bit of the same diameter as the bolt. 9 2 Remove the 10 mm M6×1 Phillips screw ➊ and separate the swivel mount ➋ from the base ➌. ➊ 5 If you plan to route the cables from under the mounting surface, mark the location in the center ➏. 6 Using the appropriate drill bit for the hardware, drill the three pilot holes. 7 If you plan to run the power and transducer cables from under the mounting surface, use a 5/8 in. (16 mm) drill bit to drill a hole through the mounting surface at the location you marked in step 5. Fastening the Swivel Mount without the Cables Installed in the Mount Follow these steps only if you do not need to run the cables through the mounting surface and the swivel mount. 1 Place the base ➊ on the mounting surface, and fasten it using the appropriate screws or bolts ➋. ➋ ➋ ➌ ➍ 3 If you plan to route the cables from under the mounting surface, orient the base so the pass-through holes ➍ face the desired direction. 4 Using the base as a template, mark the pilot hole locations ➎. ➊ 2 Place the swivel mount on the base, and replace the 10 mm M6×1 Phillips screw. 3 Seal the cable pass-through holes with marine sealant. ➎ ➏ 10 GPS 158 Owner’s Manual Fastening the Swivel Mount with the Cables Installed in the Mount Follow these steps only if you need to run the cables through the mounting surface and the swivel mount. 1 If you are installing the cables in the mount, feed the cables through the 5/8 in. (16 mm) center hole you drilled when preparing the base. 2 Place the base on the mounting surface. 3 Route the cables through the cable pass-through holes. 4 Loosely fasten the base using the appropriate screws or bolts. 5 Place the swivel mount on the base, but do not fasten it. 6 Place the cradle into the swivel mount (page 11). 7 Pull out enough slack from the power and transducer cables so the mount can fully swivel to the desired positions when the cables are connected. 8 Remove the cradle and the swivel mount from the base. 9 Apply marine sealant to the 5/8 in. (16 mm) center hole and to the cable passthrough holes. 10 Securely fasten the base with the appropriate screws or bolts. 11 Place the swivel mount on the base, and fasten it using the included 10 mm M6×1 Phillips screw. 2 Tilt the mount to the desired viewing angle. 3 Press the locking arm down. Installing the Cradle in the Swivel Mount Installing the Cables and Connectors 1 With the locking arm ➊ in the upward position, place the cradle ➋ into the swivel mount ➌. ➋ ➊ ➌ Wiring to Power 1 Route the power cable from the swivel mount to the boat battery or fuse block. If necessary, extend the wires using 20 AWG or larger wire. 2 Connect the red wire to the positive terminal on the battery or fuse block, and connect the black wire to the negative terminal. GPS 158 Owner’s Manual 11 Connecting the Cable and Placing the Device in the Cradle 1 Compare the divot ➊ on the cable connector to the keying on 2 3 4 5 the cradle port. Push the power cable connector into the power port until it rests firmly in the port. Place the locking bracket ➋ over the cable and slide it down to lock it in place on the cradle. You will hear an audible click when the locking bracket is correctly installed. Place the base of the device in the bottom of the cradle. Tilt the device toward the cradle until it fastens in place. NMEA® 0183 Connection Diagram ➊ ➊ ➋ device is released. 2 Tilt the device forward and lift it out of the cradle. 3 Turn the cable locking ring to release the lock, and remove the cable from the port. If your device does not have an internal antenna or it came with an external antenna, you should connect the external antenna to the device. 1 Install the antenna according to the instructions. 2 Connect the antenna cable to the BNC connector on the back of the device. 12 ➊ ➋ Removing the Device From the Cradle 1 Press the release lever on the cradle until the Connecting the Antenna - + ➍ Item ➊ ➋ ➌ ➍ ➌ > > ➌ > ➍ > Description 12 VDC power source ➊ ➋ ➌ ➍ Item ➋ 3 A fuse NMEA 0183 compliant device GPS 158 Wiring harness GPS 158 Wire Function Power GPS 158 Wire Color Red NMEA 0183 Wire Function Power Ground Black Data Ground Tx White Rx/A (+) Rx Green Tx/A (+) GPS 158 Owner’s Manual Appendix Registering Your Device Specification Temperature Range Power Source Voltage Range Measurement From 5°F to 131°F (from -15°C to 55°C) 10–36 Vdc Contacting Garmin Product Support Rated Current 1A Fuse AGC/3AG - 3.0 A Case Fully gasketed, high-impact plastic, waterproof to IEC 60529 IPX-7 13.8 in. (350 mm) Specifications Compass Safe Distance Cleaning the Outer Casing Notice Avoid chemical cleaners and solvents that can damage plastic components. 1 Clean the outer casing (not the screen) of the device using a cloth dampened with a mild detergent solution. 2 Wipe the device dry. Cleaning the Screen Notice Cleaners containing ammonia will harm the anti-reflective coating. The screen is coated with a special anti-reflective coating that is very sensitive to skin oils, waxes, and abrasive cleaners. 1 Apply an eyeglass lens cleaner specified as safe for anti-reflective coatings to a clean, lint-free cloth. 2 Gently wipe the screen. GPS 158 Owner’s Manual Help us better support you by completing our online registration today. • Go to http://my.garmin.com. • Keep the original sales receipt, or a photocopy, in a safe place. • Go to www.garmin.com/support and click Contact Support for in-country support information. • In the USA, call (913) 397.8200 or (800) 800.1020. • In the UK, call 0808 2380000. • In Europe, call +44 (0) 870.8501241. Important Product and Safety Information Warnings Failure to avoid the following potentially hazardous situations could result in an accident or collision resulting in death or serious injury. Operation Warnings • When navigating, carefully compare information displayed on the unit to all available navigation sources, including information from visual sightings, local waterway rules and restrictions, and maps. For safety, always resolve any discrepancies or questions before continuing navigation. • Use the electronic chart in the unit only to facilitate, not to replace, the use of authorized government charts. Official government charts and notices to mariners contain all information needed to navigate safely. • Use this unit only as a navigational aid. Do not attempt to use the unit for any purpose requiring precise measurement of direction, distance, location, or topography. • If your unit has video input capabilities, do not attempt to operate or watch video input while operating or navigating your boat. Operating or watching the video 13 input while the boat is moving could cause an accident or collision resulting in property damage, serious injury, or death. Product Environmental Programs Information about Garmin’s product recycling program and WEEE, RoHS, REACH, and other compliance programs can be found at www.garmin.com/aboutGarmin /environment. Declaration of Conformity Hereby, Garmin, declares that this product is in compliance with the essential requirements and other relevant provisions of Directive 1999/5/EC. To view the full Declaration of Conformity, go to www.garmin.com/compliance. Limited Warranty Garmin’s non-aviation products are warranted to be free from defects in materials or workmanship for one year from the date of purchase. Within this period, Garmin will, at its sole option, repair or replace any components that fail in normal use. Such repairs or replacement will be made at no charge to the customer for parts or labor, provided that the customer shall be responsible for any transportation cost. This warranty does not apply to: (i) cosmetic damage, such as scratches, nicks and dents; (ii) consumable parts, such as batteries, unless product damage has occurred due to a defect in materials or workmanship; (iii) damage caused by accident, abuse, misuse, water, flood, fire, or other acts of nature or external causes; (iv) damage caused by service performed by anyone who is not an authorized service provider of Garmin; (v) damage to a product that has been modified or altered without the written permission of Garmin; or (vi) damage to a product that has been connected to power and/or data cables that are not supplied by Garmin. In addition, Garmin reserves the right to refuse warranty claims against products or services that are obtained and/or used in contravention of the laws of any country. This product is intended to be used only as a travel aid and must not be used for any purpose requiring precise measurement of direction, distance, location or topography. Garmin makes no warranty as to the accuracy or completeness of map data in this product. This product is intended to be used only as a travel aid and must not be used for any purpose requiring precise measurement of direction, distance, location or 14 topography. Garmin makes no warranty as to the accuracy or completeness of map data in this product. THE WARRANTIES AND REMEDIES CONTAINED HEREIN ARE EXCLUSIVE AND IN LIEU OF ALL OTHER WARRANTIES EXPRESS, IMPLIED, OR STATUTORY, INCLUDING ANY LIABILITY ARISING UNDER ANY WARRANTY OF MERCHANTABILITY OR FITNESS FOR A PARTICULAR PURPOSE, STATUTORY OR OTHERWISE. THIS WARRANTY GIVES YOU SPECIFIC LEGAL RIGHTS, WHICH MAY VARY FROM STATE TO STATE. IN NO EVENT SHALL GARMIN BE LIABLE FOR ANY INCIDENTAL, SPECIAL, INDIRECT OR CONSEQUENTIAL DAMAGES, INCLUDING, WITHOUT LIMITATION, DAMAGES FOR ANY TRAFFIC FINES OR CITATIONS, WHETHER RESULTING FROM THE USE, MISUSE OR INABILITY TO USE THE PRODUCT OR FROM DEFECTS IN THE PRODUCT. SOME STATES DO NOT ALLOW THE EXCLUSION OF INCIDENTAL OR CONSEQUENTIAL DAMAGES, SO THE ABOVE LIMITATIONS MAY NOT APPLY TO YOU. Garmin retains the exclusive right to repair or replace (with a new or newlyoverhauled replacement product) the device or software or offer a full refund of the purchase price at its sole discretion. SUCH REMEDY SHALL BE YOUR SOLE AND EXCLUSIVE REMEDY FOR ANY BREACH OF WARRANTY. To obtain warranty service, contact your local Garmin authorized dealer or call Garmin Product Support for shipping instructions and an RMA tracking number. Securely pack the device and a copy of the original sales receipt, which is required as the proof of purchase for warranty repairs. Write the tracking number clearly on the outside of the package. Send the device, freight charges prepaid, to any Garmin warranty service station. Online Auction Purchases: Products purchased through online auctions are not eligible for warranty coverage. Online auction confirmations are not accepted for warranty verification. To obtain warranty service, an original or copy of the sales receipt from the original retailer is required. Garmin will not replace missing components from any package purchased through an online auction. International Purchases: A separate warranty may be provided by international distributors for devices purchased outside the United States depending on the country. If applicable, this warranty is provided by the local in-country distributor and GPS 158 Owner’s Manual this distributor provides local service for your device. Distributor warranties are only valid in the area of intended distribution. Devices purchased in the United States or Canada must be returned to the Garmin service center in the United Kingdom, the United States, Canada, or Taiwan for service. Australian Purchases: Our goods come with guarantees that cannot be excluded under the Australian Consumer Law. You are entitled to a replacement or refund for a major failure and for compensation for any other reasonably foreseeable loss or damage. You are also entitled to have the goods repaired or replaced if the goods fail to be of acceptable quality and the failure does not amount to a major failure. The benefits under our Limited Warranty are in addition to other rights and remedies under applicable law in relation to the products. Garmin Australasia, Unit 19, 167 Prospect Highway, Seven Hills, NSW, Australia, 2147, Phone: 1800 822 235 Garmin’s Marine Warranty Policy: Certain Garmin Marine products in certain areas have a longer warranty period and additional terms and conditions. Go to www.garmin.com/support/warranty.html for more details and to see if your product is covered under Garmin’s Marine Warranty Policy. export or re-export the Software to any country in violation of the export control laws of the United States of America or the export control laws of any other applicable country. Software License Agreement BY USING THIS DEVICE, YOU AGREE TO BE BOUND BY THE TERMS AND CONDITIONS OF THE FOLLOWING SOFTWARE LICENSE AGREEMENT. PLEASE READ THIS AGREEMENT CAREFULLY. Garmin Ltd. and its subsidiaries (“Garmin”) grant you a limited license to use the software embedded in this device (the “Software”) in binary executable form in the normal operation of the product. Title, ownership rights, and intellectual property rights in and to the Software remain in Garmin and/or its third-party providers. You acknowledge that the Software is the property of Garmin and/or its third-party providers and is protected under the United States of America copyright laws and international copyright treaties. You further acknowledge that the structure, organization, and code of the Software, for which source code is not provided, are valuable trade secrets of Garmin and/or its third-party providers and that the Software in source code form remains a valuable trade secret of Garmin and/or its third-party providers. You agree not to decompile, disassemble, modify, reverse assemble, reverse engineer, or reduce to human readable form the Software or any part thereof or create any derivative works based on the Software. You agree not to GPS 158 Owner’s Manual 15 913-397-8200 1-800-800-1020 0808 238 0000 +44 870 850 1242 1-866-429-9296 43 (0) 3133 3181 0 00 32 2 672 52 54 00 45 4810 5050 00 358 9 6937 9758 00 331 55 69 33 99 0180 6 427646 00 39 02 3669 9699 0800-0233937 815 69 555 00800 4412 454 +44 2380 662 915 00 35 1214 447 460 00 34 902 007 097 00 46 7744 52020 Garmin International, Inc 1200 East 151st Street, Olathe, Kansas 66062, USA Garmin (Europe) Ltd. Liberty House, Hounsdown Business Park Southampton, Hampshire, SO40 9LR UK Garmin® and the Garmin logo are trademarks of Garmin Ltd. or its subsidiaries, registered in the USA and other countries. These trademarks may not be used without the express permission of Garmin. NMEA® is a registered trademark of the National Marine Electronics Association. Garmin Corporation No. 68, Zhangshu 2nd Road, Xizhi Dist. New Taipei City, 221, Taiwan (R.O.C.) September 2013 190-01585-00_0D Printed in Taiwan