1
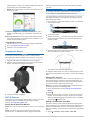
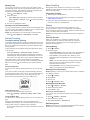
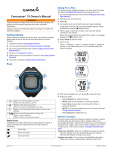
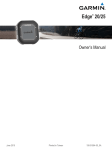
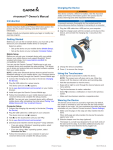
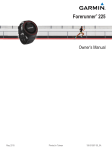
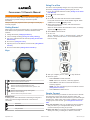
Going For a Run Forerunner® 15 Owner's Manual WARNING See the Important Safety and Product Information guide in the product box for product warnings and other important information. Always consult your physician before you begin or modify any exercise program. Getting Started When using your device for the first time, you should complete these tasks to set up the device and learn about the basic features. 1 Charge the device (Charging the Device). 2 Turn on activity tracking (Turning On Activity Tracking). 3 Put on the optional heart rate monitor (Putting On the Heart Rate Monitor). 4 Go for a run (Going For a Run). 5 Upload your run to the Garmin Connect™ site (Using Garmin Connect). 6 Get more information (Getting More Information). The device comes partially charged. You may need to charge the device (Charging the Device) before going for a run. 1 Put on the optional heart rate monitor (Putting On the Heart Rate Monitor). to turn on the device. Hold 2 3 Select . 4 Go outside, and wait while the device locates satellites. It may take a few minutes to locate satellite signals. When satellites are located, displays solid. 5 When using a heart rate monitor, wait while the device connects to the sensor. When the device detects the heart rate monitor, a message appears and displays solid. 6 Select Start to start the timer. 7 Go for a run. Time À, distance Á, pace Â, calories burned Ã, beats per minute Ä, and heart rate zone Å are recorded while the timer is running. Keys 8 After you complete your run, select 9 Select an option: À Select to turn the backlight on and off. Hold to turn the device on and off. Á Select to start and stop the timer. Select to choose the highlighted menu item.  Select to scroll through the data screens, options, and settings. à • Select Resume to restart the timer. NOTE: After a few seconds, a summary appears. • Select Save to save the run and reset the timer. A summary appears. NOTE: You can now upload your run to Garmin Connect (Using Garmin Connect). • Select Discard to delete the run. Select to scroll through activity tracking data. Select to mark a new lap. Select to return to the previous screen. Garmin Connect Status Icons A flashing icon means the device is searching for a signal. A solid icon means the signal was found or the sensor is connected. GPS status Heart rate status Foot pod status September 2014 to stop the timer. You can connect with your friends on Garmin Connect. Garmin Connect gives you the tools to track, analyze, share, and encourage each other. Record the events of your active lifestyle including runs, walks, rides, swims, hikes, triathlons, and more. To sign up for a free account, go to www.garminconnect.com /start. Store your activities: After you complete and save an activity with your device, you can upload that activity to Garmin Connect and keep it as long as you want. Analyze your data: You can view more detailed information about your activity, including time, distance, heart rate, Printed in Taiwan 190-01727-00_0C calories burned, cadence, an overhead map view, pace and speed charts, and customizable reports. NOTE: Some data requires an optional accessory such as a heart rate monitor. lubricant or gel to the center of the module where it contacts your skin. NOTICE Do not apply anti-friction gel or lubricant on the electrodes. Do not use gels or lubricants that contain sunscreen. You should wear the heart rate monitor directly on your skin, just below your sternum. It should be snug enough to stay in place during your activity. 1 Push one tab À of the strap through the slot Á in the heart rate monitor module. Track your progress: You can track your daily steps, join a friendly competition with your connections, and meet your goals. Share your activities: You can connect with friends to follow each other's activities or post links to your activities on your favorite social networking sites. 2 Press the tab down. 3 Wet the electrodes  on the back of the module to create a strong connection between your chest and the heart rate monitor module. Using Garmin Connect 1 Connect the device to your computer using the USB cable. 2 Go to www.garminconnect.com/start. 3 Follow the on-screen instructions. Charging the Device 4 Wrap the strap around your chest and attach it to the other side of the heart rate monitor module. NOTICE To prevent corrosion, thoroughly dry the contacts and the surrounding area before charging or connecting to a computer. 1 Plug the USB cable into a USB port on your computer. 2 Align the charger posts with the contacts on the back of the device, and press the charger until it clicks. The Garmin® logo should be right-side up. 5 Bring the device within 3 m (10 ft.) of the heart rate monitor. After you put on the heart rate monitor, it is active and sending data. Pairing ANT+ Sensors 3 Charge the device completely. ANT+® Sensors Your device can be used with wireless ANT+ sensors. For more information about compatibility and purchasing optional sensors, go to http://buy.garmin.com. Putting On the Heart Rate Monitor NOTE: If you do not have a heart rate monitor, you can skip this task. NOTE: The device may cause chafing when used for long periods of time. To alleviate this issue, apply an anti-friction 2 The first time you connect an ANT+ sensor to your device, you must pair the device and sensor. After the initial pairing, the device automatically connects to the sensor when you go for a run and the sensor is active and within range. NOTE: If your device was packaged with a heart rate monitor, the device and sensor are already paired. 1 Put on the heart rate monitor (Putting On the Heart Rate Monitor). 2 Select . 3 Bring the device within 1 cm of the center of the heart rate monitor, and wait while the device connects to the sensor. When the device detects the heart rate monitor, a message appears and displays solid. Setting Your Maximum Heart Rate The device uses your user profile information from the initial setup to estimate your maximum heart rate and determine your default heart rate zones. For the most accurate calorie data during your activity, you should set your maximum heart rate (if known). 1 Select > Settings > User Profile > Max. HR. 2 Enter your maximum heart rate. About Heart Rate Zones Many athletes use heart rate zones to measure and increase their cardiovascular strength and improve their level of fitness. A heart rate zone is a set range of heartbeats per minute. The five commonly accepted heart rate zones are numbered from 1 to 5 according to increasing intensity. Generally, heart rate zones are calculated based on percentages of your maximum heart rate. Fitness Goals Knowing your heart rate zones can help you measure and improve your fitness by understanding and applying these principles. • Your heart rate is a good measure of exercise intensity. • Training in certain heart rate zones can help you improve cardiovascular capacity and strength. • Knowing your heart rate zones can prevent you from overtraining and can decrease your risk of injury. If you know your maximum heart rate, you can use the table (Heart Rate Zone Calculations) to determine the best heart rate zone for your fitness objectives. If you do not know your maximum heart rate, use one of the calculators available on the Internet. Some gyms and health centers can provide a test that measures maximum heart rate. The default maximum heart rate is 220 minus your age. Setting Heart Rate Alerts If you have an optional heart rate monitor, you can set the device to alert you when your heart rate is above or below a target zone or a custom range. For example, you can set the device to alert you when your heart rate is below 150 beats per minute (bpm). 1 Select > Run Options > HR Alert. 2 Select Turn On or Edit Alert to set the alert. 3 Select an option: • To use the range of an existing heart rate zone, select a heart rate zone. • To customize the maximum value, select Custom > High > Turn On, and enter a value. • To customize the minimum value, select Custom > Low > Turn On, and enter a value. Each time you exceed or drop below the specified range or custom value, a message appears. The device also beeps if audible tones are turned on (Settings). Foot Pod Your device is compatible with the foot pod. You can use the foot pod to record pace and distance instead of using GPS when you are training indoors or when your GPS signal is weak. The foot pod is on standby and ready to send data (like the heart rate monitor). After 30 minutes of inactivity, the foot pod powers off to conserve the battery. When the battery is low, a message appears on your device. Approximately five hours of battery life remain. Going for a Run Using a Foot Pod You can run indoors using a foot pod to record pace, distance, and cadence. You can also run outdoors using a foot pod to record cadence data with your GPS pace and distance. 1 Install your foot pod according to the accessory instructions. 2 Select . 3 If necessary, turn off GPS (Training Indoors). 4 While using a foot pod, bring the device close to the sensor, and wait while the device connects to the sensor. TIP: If your foot pod is installed under your insole, you may need to bring the device close to the sole of your shoe. When the device detects the foot pod, a message appears. Select Start to start the timer. 5 6 Go for a run. 7 After you complete your run, select to stop the timer. Foot Pod Calibration The foot pod is self-calibrating. The accuracy of the speed and distance data improves after a few outdoor runs using GPS. Training Using Run and Walk Intervals NOTE: You must set up the run/walk feature before starting a run. After you start the run timer, you cannot change the settings. 1 Select > Run Options > Run/Walk > Turn On. 2 Set the run time for each interval. 3 Set the walk time for each interval. 4 Go for a run. After you turn on the run/walk feature, it is used every time you go for a run unless you turn it off or enable Virtual Pacer™ (Virtual Pacer). Changing Data Fields You can change the data field combinations for the pages that appear while the timer is running. 1 Select > Run Options > Data Fields. 2 Select the data field combination to display on the first page. 3 Select the data field combination to display on the second page. Displaying Pace or Speed You can change the type of pace and speed information that appears in the pace or speed data field. 1 Select > Run Options > Pace/Speed. 2 Select an option: • Select Pace to display your current pace. • Select Lap Pace to display the average pace for the current lap. • Select Avg. Pace to display the average pace for the current activity. • Select Speed to display your current speed. • Select Lap Speed to display the average speed for the current lap. • Select Avg. Speed to display the average speed for the current activity. Virtual Pacer Virtual Pacer is a training tool designed to help you improve your performance by encouraging you to run at the pace you set. Running With Virtual Pacer NOTE: You must set up Virtual Pacer before starting a run. After you start the run timer, you cannot change the settings. 1 Select > Run Options > Virtual Pacer. 2 Select Turn On or Edit Pace to set the pace. 3 Enter your pace. After you turn on Virtual Pacer, it is used every time you go for a run unless you turn it off or enable run/walk (Using Run and Walk Intervals). 3 Marking Laps You can set your device to use the Auto Lap® feature, which automatically marks a lap at every kilometer (mile), and you can mark laps manually. This feature is helpful for comparing your performance over different parts of an activity. 1 Select > Run Options > Laps. 2 Select an option: • Select Auto Lap > Turn On to use the Auto Lap feature. • Select Lap Key > Turn On to use to mark a lap during an activity. 3 Go for a run (Going For a Run). Pausing Your Run Automatically You can use Auto Pause to pause the timer automatically when you stop moving. This feature is helpful if your run includes stop lights or other places where you need to stop. NOTE: The paused time is not saved with your history data. Select > Run Options > Auto Pause > Turn On. ® Activity Tracking Turning On Activity Tracking The activity tracking feature records your daily step count, step goal, distance traveled, and calories burned for each recorded day. Your calories burned includes your base metabolism plus activity calories. Activity tracking can be enabled during the initial device setup, or at any time. Select > Settings > Activity Tracking > Turn On. Your step count does not appear until the device acquires satellite signals and sets the time automatically. The device may need a clear view of the sky to acquire satellite signals. Your total number of steps taken during the day appears beneath the time of day. The step count is updated periodically. TIP: You can select to scroll through your activity tracking data. About the Step Goal You must turn on activity tracking before you can use the step goal. Your device creates a daily step goal automatically, based on the previous day's step count. You can set a personalized step goal at Garmin Connect. As you move during the day, the device shows your progress toward your daily goal À. Hiding the Step Goal You can hide the step goal from the screen. Select > Settings > Activity Tracking > Goal > Hide. Using the Move Alert You must turn on activity tracking before you can use the move alert. Sitting for prolonged periods of time can trigger harmful metabolic state changes. The move alert reminds you to keep moving. After one hour of inactivity, Move! appears. Go for a short walk (at least a couple of minutes) to reset the move alert. 4 Sleep Tracking During sleep mode, the device monitors your rest. Sleep statistics include total hours of sleep, periods of movement, and periods of restful sleep. Using Sleep Tracking 1 Wear the device while sleeping. 2 Upload your sleep tracking data to the Garmin Connect site (Using Garmin Connect). 3 Enter your sleep and wake times on your Garmin Connect account to view your sleep statistics. History You can view your last seven running sessions on your Forerunner device, and you can upload and view unlimited running sessions on Garmin Connect. When the device memory is full, your oldest data is overwritten. NOTE: Run history is not recorded while the timer is stopped or paused. Personal Records When you complete a run, the device displays any new personal records you achieved during that run. Personal records include your fastest time over several typical race distances and longest run. Viewing History 1 Select > History. 2 Select an option: • Select Daily Steps to view your step count, goal, distance traveled, and calories burned for each recorded day. • Select Runs to view the date, time, distance, pace, calories burned, and lap data for your saved running sessions. NOTE: You can also view your average heart rate and heart rate zone for saved running sessions using an optional heart rate monitor. • Select Records to view your personal record time, distance, and pace over various distances. Deleting a Run from History NOTE: Deleting a run from your device history does not delete it from Garmin Connect. 1 Select > History. 2 Select Runs. 3 Select a run. 4 Select > Discard > Yes. Deleting Personal Records 1 Select > History > Records. 2 Select a record to delete. 3 Select Clear > Yes. Restoring a Personal Record You can set each personal record back to the one previously recorded. 1 Select > History > Records. 2 Select a record to restore. 3 Select Use Previous > Use Record. Data Management NOTE: The device is not compatible with Windows® 95, 98, Me, Windows NT®, and Mac® OS 10.3 and earlier. Deleting Files Device Information NOTICE If you do not know the purpose of a file, do not delete it. Your device memory contains important system files that should not be deleted. Forerunner Specifications 1 2 3 4 Operating temperature From -15º to 60ºC (from 5º to 140ºF) range Open the Garmin drive or volume. If necessary, open a folder or volume. Select a file. Press the Delete key on your keyboard. Disconnecting the USB Cable If your device is connected to your computer as a removable drive or volume, you must safely disconnect your device from your computer to avoid data loss. If your device is connected to your Windows computer as a portable device, it is not necessary to safely disconnect. 1 Complete an action: • For Windows computers, select the Safely Remove Hardware icon in the system tray, and select your device. • For Mac computers, drag the volume icon to the trash. 2 Disconnect the cable from your computer. Customizing Your Device Battery type Rechargable, built-in lithium-ion battery Battery life Up to 5 weeks in low power mode Up to 8 hours in active mode Charging temperature range From 0º to 45ºC (from 32º to 113ºF) Radio frequency/ protocol 2.4 GHz ANT+ wireless communications protocol Water rating 5 ATM* *The device withstands pressure equivalent to a depth of 50 m. For more information, go to www.garmin.com/waterrating. Heart Rate Monitor Specifications Battery type User-replaceable CR2032, 3 volts Battery life Approximately 3 years (1 hour per day) Operating temperature From -10° to 50°C (from 14° to 122°F) range Radio frequency/ protocol 2.4 GHz ANT+ wireless communications protocol Water rating 1 ATM* NOTE: This product does not transmit heart rate data while swimming. Settings To open the device settings, select > Settings. Alarm: Sets a daily alarm. Activity Tracking: Turns activity tracking on or off (Turning On Activity Tracking). Tones: Turns audible tones on or off. You can set tones for keys and alert messages. User Profile: Sets your maximum heart rate, weight, height, gender, and birth year. NOTE: Calorie and heart rate zone measurements while running (Going For a Run) are most accurate when you enter your user profile. Setup: Sets the time of day, time format, language, and units of measurement. Setting the Alarm 1 Select > Settings > Alarm. 2 Select an option: • Select Edit Alarm if the alarm is already set and you want to change the time. • Select Turn On if the alarm is not yet set. 3 Set the time, and select to accept. Setting the Time By default, the time is set automatically when the device acquires satellite signals. You can also set the time manually. 1 Select > Settings > Setup > Time > Set Time. 2 Select an option: • Select Auto to allow the device to set the time automatically when it is receiving satellite signals. • Select Manual to set the time manually, and enter the time. Training Indoors You can turn GPS off when you are training indoors or to save battery life. 1 Select > > No. The device enters timer mode. 2 Select Start to start the timer. 3 Go for a run. *The device withstands pressure equivalent to a depth of 10 m. For more information, go to www.garmin.com/waterrating. Device Care NOTICE Avoid extreme shock and harsh treatment, because it can degrade the life of the product. Avoid pressing the keys under water. Do not use a sharp object to clean the device. Avoid chemical cleaners, solvents, and insect repellents that can damage plastic components and finishes. Thoroughly rinse the device with fresh water after exposure to chlorine, salt water, sunscreen, cosmetics, alcohol, or other harsh chemicals. Prolonged exposure to these substances can damage the case. Do not store the device where prolonged exposure to extreme temperatures can occur, because it can cause permanent damage. Cleaning the Device 1 Wipe the device using a cloth dampened with a mild detergent solution. 2 Wipe it dry. Caring for the Heart Rate Monitor NOTICE A build up of sweat and salt on the strap can decrease the ability of the heart rate monitor to report accurate data. • Rinse the strap after every use. • Hand wash the strap occasionally, using a tiny amount of mild detergent, such as dishwashing liquid. NOTE: Using too much detergent may damage the strap. • Do not put the strap in a dryer. • When drying the strap, hang it up or lay it flat. User Replaceable Batteries WARNING Do not use a sharp object to remove batteries. 5 Keep the battery away from children. Never put batteries in mouth. If swallowed, contact your physician or local poison control center. Replaceable coin cell batteries may contain perchlorate material. Special handling may apply. See www.dtsc.ca.gov /hazardouswaste/perchlorate. CAUTION Contact your local waste disposal department to properly recycle the batteries. Replacing the Heart Rate Monitor Battery 1 Locate the circular battery cover on the back of the heart rate monitor. activity history to the Garmin Connect application and delete your activity history from the device. This should provide sufficient memory space for the update. Appendix Heart Rate Zone Calculations Zone % of Maximum Heart Rate Perceived Exertion Benefits 1 50–60% Relaxed, easy pace, rhythmic breathing Beginning-level aerobic training, reduces stress 2 60–70% Comfortable pace, slightly deeper breathing, conversation possible Basic cardiovascular training, good recovery pace 3 70–80% Moderate pace, more difficult to hold conversation Improved aerobic capacity, optimal cardiovascular training 4 80–90% Fast pace and a bit uncomfortable, breathing forceful Improved anaerobic capacity and threshold, improved speed 5 90–100% Sprinting pace, unsustainable for long period of time, labored breathing Anaerobic and muscular endurance, increased power 2 Use a coin to twist the cover counter-clockwise until it is loose enough to remove (the arrow points to OPEN). 3 Remove the cover and the battery. 4 Wait 30 seconds. 5 Insert the new battery with the positive side facing up. NOTE: Do not damage or lose the O-ring gasket. 6 Use a coin to twist the cover clockwise back into place (the arrow points to CLOSE). After you replace the heart rate monitor battery, you may need to pair the heart rate monitor with the device again. Troubleshooting My daily step count does not appear The daily step count is reset every night at midnight. If dashes appear instead of your step count, allow the device to acquire satellite signals and set the time automatically. Getting More Information • Go to www.garmin.com/intosports. • Go to www.garmin.com/learningcenter. • Go to http://buy.garmin.com, or contact your Garmin dealer for information about optional accessories and replacement parts. Resetting the Device If the device stops responding, you may need to reset it. This does not erase any of your data or settings. 1 Hold for 15 seconds. The device turns off. 2 Hold for one second to turn on the device. Updating the Software Before you can update your device software, you must have a Garmin Connect account, and you must download the Garmin Express™ application. 1 Connect the device to your computer using the USB cable. When new software is available, the Garmin Express application sends it to your device. 2 Follow the on-screen instructions. 3 Do not disconnect your device from the computer while the Garmin Express application downloads the software. TIP: If you are having trouble updating the software with the Garmin Express application, you may need to upload your 6 Software License Agreement BY USING THE DEVICE, YOU AGREE TO BE BOUND BY THE TERMS AND CONDITIONS OF THE FOLLOWING SOFTWARE LICENSE AGREEMENT. PLEASE READ THIS AGREEMENT CAREFULLY. Garmin Ltd. and its subsidiaries (“Garmin”) grant you a limited license to use the software embedded in this device (the “Software”) in binary executable form in the normal operation of the product. Title, ownership rights, and intellectual property rights in and to the Software remain in Garmin and/or its thirdparty providers. You acknowledge that the Software is the property of Garmin and/or its third-party providers and is protected under the United States of America copyright laws and international copyright treaties. You further acknowledge that the structure, organization, and code of the Software, for which source code is not provided, are valuable trade secrets of Garmin and/or its third-party providers and that the Software in source code form remains a valuable trade secret of Garmin and/or its third-party providers. You agree not to decompile, disassemble, modify, reverse assemble, reverse engineer, or reduce to human readable form the Software or any part thereof or create any derivative works based on the Software. You agree not to export or re-export the Software to any country in violation of the export control laws of the United States of America or the export control laws of any other applicable country. Garmin®, the Garmin logo, ANT+®, Auto Lap®, Auto Pause®, and Forerunner® are trademarks of Garmin Ltd. or its subsidiaries, registered in the USA and other countries. Garmin Connect™, Garmin Express™, and Virtual Pacer™ are trademarks of Garmin Ltd. or its subsidiaries. These trademarks may not be used without the express permission of Garmin. Mac® is a registered trademark of Apple Computer, Inc. Windows® is a registered trademark of Microsoft Corporation in the United States and other countries. This product is ANT+® certified. Visit www.thisisant.com/directory for a list of compatible products and apps. © 2014 Garmin Ltd. or its subsidiaries www.garmin.com/support