1
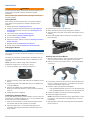
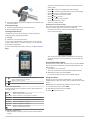
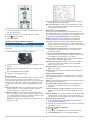
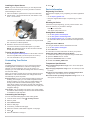
Edge 1000 ® Quick Start Manual April 2014 190-01694-01_0C Printed in Taiwan Introduction WARNING See the Important Safety and Product Information guide in the product box for product warnings and other important information. Always consult your physician before you begin or modify any exercise program. Getting Started When using your device the first time, you should complete these tasks to set up the device and learn about the basic features. 1 Charge the device (Charging the Device). 2 Install your device using the standard mount (Installing the Standard Mount) or the out-front mount (Installing the OutFront Mount). 3 Turn on the device (Turning On the Device). 4 Locate satellites (Acquiring Satellite Signals). 5 Go for a ride (Going for a Ride). 6 Upload your ride to Garmin Connect™ (Sending Your Ride to Garmin Connect). 7 Register the device (Registering Your Device). 8 Get the owner's manual (Getting the Owner's Manual). 3 Place the bike mount on the bike stem. 4 Attach the bike mount securely using the two bands Á. 5 Align the tabs on the back of the device with the bike mount notches Â. 6 Press down slightly and turn the device clockwise until it locks into place. Charging the Device NOTICE To prevent corrosion, thoroughly dry the USB port, the weather cap, and the surrounding area before charging or connecting to a computer. The device is powered by a built-in lithium-ion battery that you can charge using a standard wall outlet or a USB port on your computer. NOTE: The device will not charge when outside the temperature range of 32° to 104°F (0° to 40°C). 1 Pull up the weather cap À from the USB port Á. 2 Plug the small end of the USB cable into the USB port on the device. 3 Plug the large end of the USB cable into an AC adapter or a computer USB port. 4 Plug the AC adapter into a standard wall outlet. When you connect the device to a power source, the device turns on. 5 Charge the device completely. Installing the Standard Mount For the best GPS reception, position the bike mount so the front of the device is oriented toward the sky. You can install the bike mount on the stem or the handlebars. 1 Select a secure location to mount the device where it does not interfere with the safe operation of your bike. 2 Place the rubber disk À on the back of the bike mount. The rubber tabs align with the back of the bike mount so it stays in place. 2 Installing the Out-Front Mount 1 Select a secure location to mount the Edge device where it does not interfere with the safe operation of your bike. 2 Use the hex key to remove the screw À from the handlebar connector Á. 3 If necessary, remove the two screws on the back side of the mount Â, rotate the connector Ã, and replace the screws to change the orientation of the mount. 4 Place the rubber pad around the handlebar: • If the handlebar diameter is 25.4 mm, use the thicker pad. • If the handlebar diameter is 31.8 mm, use the thinner pad. 5 Place the handlebar connector around the rubber pad. 6 Replace and tighten the screw. NOTE: Garmin® recommends a torque specification of 7 lbfin. (0.8 N-m). You should check the tightness of the screw periodically. 7 Align the tabs on the back of the Edge device with the bike mount notches Ä. 8 Press down slightly and turn the Edge device clockwise until it locks into place. Releasing the Edge 1 Turn the Edge clockwise to unlock the device. 2 Lift the Edge off the mount. Turning On the Device The timer overlay allows you to return to the home screen during a ride. • Select to save your changes and close the page. • Select to close the page and return to the previous page. • Select to return to the previous page. • Select to return to the home screen. • Select and to scroll. • Select to search near a location. • Select to search by name. • Select to delete an item. Viewing the Connections Page The connections page displays the status of the GPS, ANT+ sensors, wireless connection, and your smartphone. From the home screen, select the status bar or swipe down from the top of the page. The first time you turn on the device, you are prompted to configure system settings and profiles. 1 Hold . 2 Follow the on-screen instructions. If your device includes ANT+™ sensors (such as a heart rate monitor, speed sensor, or cadence sensor), you can activate them during configuration. For more information about ANT+ sensors, see ANT+ Sensors. Keys The connections page appears. A flashing icon means the device is searching. You can select any icon to change the settings. Acquiring Satellite Signals The device may need a clear view of the sky to acquire satellite signals. The time and date are set automatically based on the GPS position. 1 Go outdoors to an open area. The front of the device should be oriented toward the sky. Wait while the device locates satellites. 2 It may take 30–60 seconds to locate satellite signals. À Select to enter sleep mode and wake the device. Hold to turn the device on and off. Á Select to mark a new lap.  Select to start and stop the timer. Home Screen Overview The home screen gives you quick access to all the features of the Edge device. RIDE Select to go for a ride. Train Select to change your activity profile. Going for a Ride Before you can record speed and distance, you must locate satellite signals or pair your device with an optional ANT+ speed sensor. NOTE: History is recorded only while the timer is running. 1 From the home screen, select RIDE. 2 Wait while the device locates satellites. 3 Select to start the timer. Where To? Select to search for and navigate to a location. Calendar Select to view scheduled activities and completed rides. History Select to manage your history and personal records. Courses Select to manage your courses. Segments Select to manage your segments. Workouts Select to manage your workouts. Select to view the settings menu. Using the Touchscreen • When the timer is running, tap the screen to view the timer overlay. 3 4 Swipe the screen for additional data pages. You can swipe down from the top of the data pages to view the connections page. 5 If necessary, tap the screen to view the timer overlay. 6 Select to stop the timer. 7 Select Save Ride. Sending Your Ride to Garmin Connect NOTICE To prevent corrosion, thoroughly dry the USB port, the weather cap, and the surrounding area before charging or connecting to a computer. 1 Pull up the weather cap À from the USB port Á. 2 Plug the small end of the USB cable into the USB port on the device. 3 Plug the large end of the USB cable into a computer USB port. 4 Go to www.garminconnect.com/start. 5 Follow the on-screen instructions. Garmin Connect You can connect with your friends on Garmin Connect. Garmin Connect gives you the tools to track, analyze, share, and encourage each other. Record the events of your active lifestyle including runs, walks, rides, swims, hikes, triathlons, and more. To sign up for a free account, go to www.garminconnect.com /start. Store your activities: After you complete and save an activity with your device, you can upload that activity to Garmin Connect and keep it as long as you want. Analyze your data: You can view more detailed information about your activity, including time, distance, elevation, heart rate, calories burned, cadence, an overhead map view, pace and speed charts, and customizable reports. NOTE: Some data requires an optional accessory such as a heart rate monitor. 4 Plan your training: You can choose a fitness goal and load one of the day-by-day training plans. Share your activities: You can connect with friends to follow each other's activities or post links to your activities on your favorite social networking sites. Bluetooth® Connected Features The Edge device has Bluetooth connected features for your compatible smartphone or fitness device. Some features require you to install Garmin Connect mobile on your smartphone. Go to www.garmin.com/intosports/apps for more information. NOTE: Your device must be connected to your Bluetooth enabled smartphone to take advantage of some features. LiveTrack: Allows friends and family to follow your races and training activities in real time. You can invite followers using email or social media, allowing them to view your live data on a Garmin Connect tracking page. Activity uploads to Garmin Connect: Automatically sends your activity to Garmin Connect as soon as you finish recording the activity. Course and workout downloads from Garmin Connect: Allows you to search for activities on Garmin Connect using your smartphone and send them to your device. Device to device transfers: Allows you to wirelessly transfer files to another compatible Edge device. Social media interactions: Allows you to post an update to your favorite social media website when you upload an activity to Garmin Connect. Weather updates: Sends real-time weather conditions and alerts to your device. Notifications: Displays phone notifications and messages on your device. Wi‑Fi® Connected Features The Edge device has Wi‑Fi connected features. The Garmin Connect Mobile application is not required for you to use Wi‑Fi connectivity. NOTE: Your device must be connected to a wireless network to take advantage of these features. Activity uploads to Garmin Connect: Automatically sends your activity to Garmin Connect as soon as you finish recording. Courses, workouts, and training plans: Activities previously selected from Garmin Connect are sent wirelessly to your device. Software updates: Your device wirelessly downloads the latest software update. The next time you turn on the device, you can follow the on-screen instructions to update the software. Setting Up Wi‑Fi Connectivity 1 Go to www.garminconnect.com/start, and download the Garmin Express™ application. 2 Follow the on-screen instructions to set up Wi‑Fi connectivity with Garmin Express. Connecting to a Wireless Network 1 Select > Wi-Fi. 2 If necessary, select Wi-Fi to turn on wireless technology. 3 Select Add Network to scan for available networks. 4 Select a wireless network. 5 If necessary, select to enter the network SSID and password. The device stores the network information and connects automatically when you return to this location. Saving Your Location You can save your present location, such as your home or parking spot. 1 From the home screen, select the status bar or swipe down from the top of the page. The connections page appears. 2 Select GPS > Mark Location > . The Garmin logos on the module and the strap should be right-side up. 2 Wet the electrodes Á on the back of the strap to create a strong connection between your chest and the transmitter. Following a Course From the Web Before you can download a course from Garmin Connect, you must have a Garmin Connect account (Garmin Connect). 1 Connect the device to your computer using the USB cable. 2 Go to www.garminconnect.com. 3 Create a new course, or select an existing course. 4 Select Send to Device. 5 Disconnect the device, and turn it on. 6 Select Courses. 7 Select the course. 8 Select RIDE. 3 If the heart rate monitor has a contact patch Â, wet the contact patch. 4 Wrap the strap around your chest, and connect the strap hook à to the loop Ä. Segments Following a segment: You can send segments from Garmin Connect to your device. After a segment is saved to your device, you can follow the segment. Racing against a segment: You can race against a segment, trying to match or exceed the group leader or challenger. The Garmin logos should be right-side up. 5 Bring the device within 3 m (10 ft.) of the heart rate monitor. After you put on the heart rate monitor, it is active and sending data. History Installing the Cadence Sensor History includes time, distance, calories, speed, lap data, elevation, and optional ANT+ sensor information. NOTE: History is not recorded while the timer is stopped or paused. When the device memory is full, a message appears. The device does not automatically delete or overwrite your history. Upload your history to Garmin Connect periodically to keep track of all your ride data. NOTE: If you do not have this sensor, you can skip this task. TIP: Garmin recommends you secure your bike on a stand while installing the sensor. 1 Select the band size that fits your crank arm À securely. The band you select should be the smallest one that stretches across the crank arm. 2 On the non-drive side, place and hold the flat side of the cadence sensor on the inside of the crank arm. 3 Pull the bands Á around the crank arm, and attach them to the hooks  on the sensor. Viewing Your Ride 1 From the home screen, select History > Rides. 2 Select an option. ANT+ Sensors Your device can be used with wireless ANT+ sensors. For more information about compatibility and purchasing optional sensors, go to http://buy.garmin.com. Putting On the Heart Rate Monitor NOTE: If you do not have a heart rate monitor, you can skip this task. You should wear the heart rate monitor directly on your skin, just below your breastplate. It should be snug enough to stay in place during your activity. 1 Snap the heart rate monitor module À onto the strap. 4 Rotate the crank arm to check for clearance. The sensor and bands should not contact any part of your bike or shoe. NOTE: The LED flashes green for five seconds to indicate activity after two revolutions. 5 Take a 15 minute test ride and inspect the sensor and bands to ensure there is no evidence of damage. 5 Installing the Speed Sensor NOTE: If you do not have this sensor, you can skip this task. TIP: Garmin recommends you secure your bike on a stand while installing the sensor. 1 Place and hold the speed sensor on top of the wheel hub. 2 Pull the strap À around the wheel hub, and attach it to the hook Á on the sensor. 9 Select . Device Information Registering Your Device Help us better support you by completing our online registration today. • Go to http://my.garmin.com. • Keep the original sales receipt, or a photocopy, in a safe place. Resetting the Device If the device stops responding, you may need to reset it. This does not erase any of your data or settings. Hold for 10 seconds. The device resets and turns on. Getting More Information The sensor may be tilted when installed on an asymmetrical hub. This does not affect operation. 3 Rotate the wheel to check for clearance. The sensor should not contact other parts of your bike. NOTE: The LED flashes green for five seconds to indicate activity after two revolutions. Training with Power Meters • Go to www.garmin.com/intosports for a list of ANT+ sensors that are compatible with your device (such as Vector™). • For more information, see your owner's manual. Customizing Your Device • Go to www.garmin.com/intosports. • Go to www.garmin.com/learningcenter. • Go to http://buy.garmin.com, or contact your Garmin dealer for information about optional accessories and replacement parts. Getting the Owner's Manual You can get the latest owner's manual from the web. 1 Go to www.garmin.com/support. 2 Select Manuals. 3 Follow the on-screen instructions to select your product. Getting the Owner's Manual from the Device Connect the device to your computer using the USB cable. Open the Garmin drive or volume. Open the Documents folder or volume. Double-click START_HERE.html. 1 2 3 4 Profiles Temperature Specifications The Edge has several ways for you to customize the device, including profiles. Profiles are a collection of settings that optimize your device based on how you are using it. For example, you can create different settings and views for training and mountain biking. When you are using a profile and you change settings such as data fields or units of measurement, the changes are saved automatically as part of the profile. Activity Profiles: You can create activity profiles for each type of biking. For example, you can create a separate activity profile for training, for racing, and for mountain biking. The activity profile includes customized data pages, activity totals, alerts, training zones (such as heart rate and speed), training settings (such as Auto Pause® and Auto Lap®), and navigation settings. User Profile: You can update your gender, age, weight, height, and lifetime athlete settings. The device uses this information to calculate accurate ride data. Edge operating temperature range: From -20º to 60ºC (from -4º to 140ºF) Edge charging temperature range: From 0º to 40ºC (from 32º to 104ºF) Speed sensor and cadence sensor operating temperature range: From -20º to 60ºC (from -4º to 140ºF) Heart rate monitor operating temperature range: From -5° to 50°C (from 23° to 122°F) Customizing the Data Pages You can customize data pages for each activity profile. 1 From the home screen, select > Activity Profiles. 2 Select a profile. 3 Select Data Screens. 4 Select a data page. 5 If necessary, enable the data page. 6 Select the number of data fields to appear on the page. 7 Select . 8 Select a data field to change it. 6 www.garmin.com/support +43 (0) 820 220230 + 32 2 672 52 54 0800 770 4960 1-866-429-9296 +385 1 5508 272 +385 1 5508 271 +420 221 985466 +420 221 985465 + 45 4810 5050 + 358 9 6937 9758 + 331 55 69 33 99 + 39 02 36 699699 (+52) 001-855-792-7671 0800 0233937 +47 815 69 555 00800 4412 454 +44 2380 662 915 (+35) 1214 447 460 +386 4 27 92 500 0861 GARMIN (427 646) +27 (0)11 251 9999 +34 93 275 44 97 + 46 7744 52020 +886 2 2642-9199 ext 2 0808 238 0000 +44 (0) 870 8501242 Garmin®, the Garmin logo, Auto Lap®, Auto Pause®, and Edge® are trademarks of Garmin Ltd. or its subsidiaries, registered in the USA and other countries. ANT+™, Garmin Connect™, Garmin Express™, and Vector™ are trademarks of Garmin Ltd. or its subsidiaries. These trademarks may not be used without the express permission of Garmin. The Bluetooth® word mark and logos are owned by the Bluetooth SIG, Inc. and any use of such marks by Garmin is under license. Wi‑Fi® is a registered trademark of Wi-Fi Alliance Corporation. Other trademarks and trade names are those of their respective owners. +49 (0)180 6 427646 20 ct./Anruf. a. d. deutschen Festnetz, Mobilfunk max. 60 ct./Anruf 913-397-8200 1-800-800-1020 TRA REGISTERED No: ER0130508/14 DEALER No: DA0061884/11 © 2014 Garmin Ltd. or its subsidiaries TA-2013/2182