1
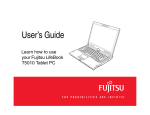
User’s Guide
Learn how to use your Fujitsu
LifeBook T730 Tablet PC
Mode d’emploi
Découvrez comment utiliser
votre PC Tablette
LifeBook Fujitsu T730
Curlin_WWAN-B6FJ-5051-02ENZ)-00.book Page 1 Tuesday, October 19, 2010 1:57 PM
User’s
Guide
Learn how to use
your Fujitsu LifeBook
T730 Tablet PC
Curlin_WWAN-B6FJ-5051-02ENZ)-00.book Page 2 Tuesday, October 19, 2010 1:57 PM
Copyright and Trademark Information
Fujitsu America, Inc. has made every effort to ensure the accuracy and completeness of this document; however, as ongoing development
efforts are continually improving the capabilities of our products, we cannot guarantee the accuracy of the contents of this document. We
disclaim liability for errors, omissions, or future changes.
Fujitsu, the Fujitsu logo, and LifeBook are registered trademarks of Fujitsu Limited.
Intel, Intel Core, Centrino, vPro, and Intel Centrino Pro are trademarks or registered trademarks of Intel Corporation or its subsidiaries in
the United States and other countries.
Microsoft, OneNote, and Windows are either registered trademarks or trademarks of Microsoft Corporation in the United States and/or
other countries.
Bluetooth is a trademark of Bluetooth SIG, Inc., USA.
PowerDirector, PowerDVD, MakeDisc, and YouCam are trademarks of CyberLink Corp.
OmniPass is a trademark of Softex, Inc.
Roxio is a trademark of Sonic Solutions.
Energy Star and the Energy Star mark are registered U.S. marks.
Adobe, Acrobat, and Acrobat Reader are either a registered trademarks or trademarks of Adobe Systems Incorporated in the United States
and/or other countries.
Norton and Norton Internet Security are trademarks or registered trademarks of Symantec Corporation in the United States and other
countries.
All other trademarks mentioned herein are the property of their respective owners.
© Copyright 2010 Fujitsu America, Incorporated. All rights reserved.
No part of this publication may be copied, reproduced, or translated, without prior written consent of Fujitsu. No part of this publication may
be stored or transmitted in any electronic form without the written consent of Fujitsu.
B6FJ-5051-02ENZ0-00
Curlin_WWAN-B6FJ-5051-02ENZ)-00.book Page 3 Tuesday, October 19, 2010 1:57 PM
WARNING
HANDLING THE CORD ON THIS PRODUCT WILL EXPOSE YOU TO LEAD, A CHEMICAL KNOWN TO THE STATE OF
CALIFORNIA TO CAUSE BIRTH DEFECTS OR OTHER REPRODUCTIVE HARM.
WASH HANDS AFTER HANDLING.
USER GUIDE FOR WIRELESS BROADBAND CONNECTION
THE WIRELESS WAN USER ’S GUIDE IS LOCATED AT:
http://solutions.us.fujitsu.com/www/content/support/mobile/support_notices
PLEASE CLICK “3G MINI-CARD GOBI2000 REGULATORY AND SAFETY INFORMATION” TO OPEN THE FULL USER GUIDE
CONTAINING WARNINGS AND PRECAUTIONS ASSOCIATED WITH RF SAFETY WHEN USING THE WWAN DEVICE.
DECLARATION OF CONFORMITY
according to FCC Part 15
Responsible Party Name:
Fujitsu America, Incorporated
Address:
1250 E. Arques Avenue,
Sunnyvale, CA 94085
Telephone:
(408) 746-6000
Declares that product:
Base Model Configuration:
LifeBook T730 Tablet PC
Complies with Part 15 of the FCC Rules.
This device complies with Part 15 of the FCC rules. Operations are subject to the following two conditions:
(1) This device may not cause harmful interference, (2) This device must accept any interference received,
including interference that may cause undesired operation.
Curlin_WWAN-B6FJ-5051-02ENZ)-00.book Page 4 Tuesday, October 19, 2010 1:57 PM
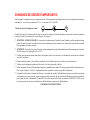
IMPORTANT SAFETY INSTRUCTIONS
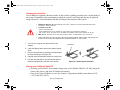
This unit requires an AC adapter to operate. Use only UL Listed I.T.E. Class II Adapters with an output rating of 19 VDC, with a current of
4.22 A (80 W).
+
AC adapter output polarity:
When using your notebook equipment, basic safety precautions should always be followed to reduce the risk of fire, electric shock and injury
to persons, including the following:
•
CAUTION - HOT SURFACE: The bottom of this notebook computer can become hot when used for long periods of time. When using
this notebook, take caution to limit long term or continuous use while resting it on exposed skin, such as the lap.
•
•
CAUTION: To reduce the risk of fire, use only No. 26 AWG or larger UL Listed or CSA Certified Telecommunication Line Cord.
Do not use this product near water for example, near a bathtub, washbowl, kitchen sink or laundry tub, in a wet basement or near a
swimming pool.
•
•
•
Avoid using a modem during an electrical storm. There may be a remote risk of electric shock from lightning.
•
For TV tuner use: To protect from overvoltages and transients on the Cable Distribution System, make sure that the outer shield of the
coaxial cable is connected to earth (grounded) at the building premise as close to the point of cable entrance as practicable, as required
per NEC Article 820.93, ANSI/NFPA 70: 2005. If you have questions about your CATV installation, contact your service provider.
Do not use a modem to report a gas leak in the vicinity of the leak.
Use only the power cord and batteries indicated in this manual. Do not dispose of batteries in a fire. They may explode. Check with local
codes for possible special disposal instructions.
SAVE THESE INSTRUCTIONS
For Authorized Repair Technicians Only
DANGER OF EXPLOSION IF LITHIUM (CLOCK) BATTERY IS INCORRECTLY REPLACED. REPLACE ONLY
WITH THE SAME OR EQUIVALENT TYPE RECOMMENDED BY THE MANUFACTURER. DISPOSE OF USED
BATTERIES ACCORDING TO THE MANUFACTURER ’S INSTRUCTION.
FOR CONTINUED PROTECTION AGAINST RISK OF FIRE, REPLACE ONLY WITH THE SAME TYPE AND
RATING FUSE.
Curlin_WWAN-B6FJ-5051-02ENZ)-00.book Page 5 Tuesday, October 19, 2010 1:57 PM
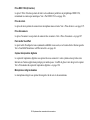
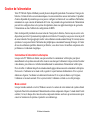
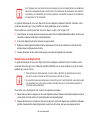
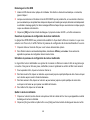
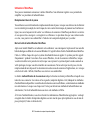
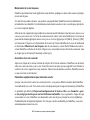
Recycling your battery
Over time, the batteries that run your mobile computer will begin to hold a charge for a shorter amount of time; this is a natural occurrence
for all batteries. When this occurs, you may want to replace the battery with a fresh one*. If you replace it, it is important that you dispose of
the old battery properly because batteries contain materials that could cause environmental damage if disposed of improperly.
Fujitsu is very concerned with environmental protection, and has enlisted the services of the Rechargeable Battery
Recycling Corporation (RBRC)**, a non-profit public service organization dedicated to protecting our environment by
recycling old batteries at no cost to you.
RBRC has drop-off points at tens of thousands of locations throughout the United States and Canada. To find the location
nearest you, go to www.RBRC.org or call 1-800-822-8837.
If there are no convenient RBRC locations near you, you can also go to the EIA Consumer Education Initiative website (http://EIAE.org/)
and search for a convenient disposal location.
Remember – protecting the environment is a cooperative effort, and you should make every effort to protect it for current and future
generations.
* To order a new battery for your Fujitsu mobile computer, go to the Fujitsu shopping site at www.shopfujitsu.com in the US or
www.fujitsu.ca/products/notebooks in Canada.
** RBRC is an independent third party to which Fujitsu provides funding for battery recycling; RBRC is in no way affiliated with
Fujitsu.
Curlin_WWAN-B6FJ-5051-02ENZ)-00.book Page 6 Tuesday, October 19, 2010 1:57 PM
Contents
Preface
About This Guide . . . . . . . . . . . . . . . . . . . . . . . . . . . . . . . . . . . . . . . . . . . . . 13
Conventions Used in the Guide . . . . . . . . . . . . . . . . . . . . . . . . . . . . . . . . . 13
Fujitsu Contact Information . . . . . . . . . . . . . . . . . . . . . . . . . . . . . . . . . . . . 14
Chapter 1
Getting to Know Your LifeBook
Overview . . . . . . . . . . . . . . . . . . . . . . . . . . . . . . . . . . . . . . . . . . . . . . . . . . . . 16
Locating the Controls and Connectors . . . . . . . . . . . . . . . . . . . . . . . . . . . . 17
Top Components . . . . . . . . . . . . . . . . . . . . . . . . . . . . . . . . . . . . . . . . . . . .
Left-Side Panel Components . . . . . . . . . . . . . . . . . . . . . . . . . . . . . . . . . . .
Right-Side Panel Components . . . . . . . . . . . . . . . . . . . . . . . . . . . . . . . . . .
Back Panel Components. . . . . . . . . . . . . . . . . . . . . . . . . . . . . . . . . . . . . . .
Bottom Components. . . . . . . . . . . . . . . . . . . . . . . . . . . . . . . . . . . . . . . . . .
20
23
25
26
28
Status Indicator Panel . . . . . . . . . . . . . . . . . . . . . . . . . . . . . . . . . . . . . . . . . 30
Power Indicator . . . . . . . . . . . . . . . . . . . . . . . . . . . . . . . . . . . . . . . . . . . . .
External Power Indicator . . . . . . . . . . . . . . . . . . . . . . . . . . . . . . . . . . . . . .
Battery Charging Indicators . . . . . . . . . . . . . . . . . . . . . . . . . . . . . . . . . . . .
Battery Level Indicator. . . . . . . . . . . . . . . . . . . . . . . . . . . . . . . . . . . . . . . .
30
31
31
31
Curlin_WWAN-B6FJ-5051-02ENZ)-00.book Page 7 Tuesday, October 19, 2010 1:57 PM
Display Panel . . . . . . . . . . . . . . . . . . . . . . . . . . . . . . . . . . . . . . . . . . . . . . . . . 33
Opening the Display Panel . . . . . . . . . . . . . . . . . . . . . . . . . . . . . . . . . . . . . 33
Using the System as a Tablet . . . . . . . . . . . . . . . . . . . . . . . . . . . . . . . . . . . 34
Adjusting Display Panel Brightness . . . . . . . . . . . . . . . . . . . . . . . . . . . . . . 37
Enabling/Disabling Ambient Light Sensor (Windows 7 only). . . . . . . . . . 38
Keyboard . . . . . . . . . . . . . . . . . . . . . . . . . . . . . . . . . . . . . . . . . . . . . . . . . . . . 39
Using the Keyboard . . . . . . . . . . . . . . . . . . . . . . . . . . . . . . . . . . . . . . . . . . 39
Touchpad/Active Digitizer/Touchscreen. . . . . . . . . . . . . . . . . . . . . . . . . . . 42
Using the Touchpad . . . . . . . . . . . . . . . . . . . . . . . . . . . . . . . . . . . . . . . . . . 42
Active Digitizer Display . . . . . . . . . . . . . . . . . . . . . . . . . . . . . . . . . . . . . . . 47
Using the Optional Capacitive Touchscreen . . . . . . . . . . . . . . . . . . . . . . . 51
Installing a Pen Tether . . . . . . . . . . . . . . . . . . . . . . . . . . . . . . . . . . . . . . . . 52
Volume Control . . . . . . . . . . . . . . . . . . . . . . . . . . . . . . . . . . . . . . . . . . . . . . . 53
Controlling the Volume . . . . . . . . . . . . . . . . . . . . . . . . . . . . . . . . . . . . . . . 53
Modular Bay Devices . . . . . . . . . . . . . . . . . . . . . . . . . . . . . . . . . . . . . . . . . . 54
Removing and Installing Modular Devices . . . . . . . . . . . . . . . . . . . . . . . . 55
LifeBook Security/Tablet PC Buttons . . . . . . . . . . . . . . . . . . . . . . . . . . . . . 56
Security Button Functions . . . . . . . . . . . . . . . . . . . . . . . . . . . . . . . . . . . . . 56
Pre-logon button functions . . . . . . . . . . . . . . . . . . . . . . . . . . . . . . . . . . . . . 57
Post-logon button functions . . . . . . . . . . . . . . . . . . . . . . . . . . . . . . . . . . . . 59
Changing Tablet PC Button Functions . . . . . . . . . . . . . . . . . . . . . . . . . . . . 61
Setting up LifeBook Security Panel . . . . . . . . . . . . . . . . . . . . . . . . . . . . . . 62
Passwords . . . . . . . . . . . . . . . . . . . . . . . . . . . . . . . . . . . . . . . . . . . . . . . . . . 62
Using Your LifeBook Security Panel . . . . . . . . . . . . . . . . . . . . . . . . . . . . . 64
Precautions . . . . . . . . . . . . . . . . . . . . . . . . . . . . . . . . . . . . . . . . . . . . . . . . . 65
Uninstalling/Re-installing the Security Panel Application. . . . . . . . . . . . . 65
7
Curlin_WWAN-B6FJ-5051-02ENZ)-00.book Page 8 Tuesday, October 19, 2010 1:57 PM
Chapter 2
Getting Started with Your LifeBook
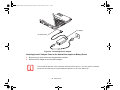
Power Sources . . . . . . . . . . . . . . . . . . . . . . . . . . . . . . . . . . . . . . . . . . . . . . . . 68
Connecting the Power Adapters . . . . . . . . . . . . . . . . . . . . . . . . . . . . . . . . . 68
Starting Your LifeBook Tablet PC . . . . . . . . . . . . . . . . . . . . . . . . . . . . . . . 70
Power On . . . . . . . . . . . . . . . . . . . . . . . . . . . . . . . . . . . . . . . . . . . . . . . . . . 70
Boot Sequence . . . . . . . . . . . . . . . . . . . . . . . . . . . . . . . . . . . . . . . . . . . . . . 71
Hard Disk Drive Passwords . . . . . . . . . . . . . . . . . . . . . . . . . . . . . . . . . . . . 72
BIOS Setup Utility . . . . . . . . . . . . . . . . . . . . . . . . . . . . . . . . . . . . . . . . . . . 72
Booting the System. . . . . . . . . . . . . . . . . . . . . . . . . . . . . . . . . . . . . . . . . . . 73
Starting Windows the first time . . . . . . . . . . . . . . . . . . . . . . . . . . . . . . . . . 74
Registering Your LifeBook Tablet PC with Fujitsu . . . . . . . . . . . . . . . . . . 75
Installing ClickMe!. . . . . . . . . . . . . . . . . . . . . . . . . . . . . . . . . . . . . . . . . . . 75
Fujitsu Driver Update Utility . . . . . . . . . . . . . . . . . . . . . . . . . . . . . . . . . . . 76
Power Management. . . . . . . . . . . . . . . . . . . . . . . . . . . . . . . . . . . . . . . . . . . . 77
Power/Suspend/Resume Switch . . . . . . . . . . . . . . . . . . . . . . . . . . . . . . . . . 77
Sleep Mode . . . . . . . . . . . . . . . . . . . . . . . . . . . . . . . . . . . . . . . . . . . . . . . . . 77
Hibernation (Save-to-Disk) Feature . . . . . . . . . . . . . . . . . . . . . . . . . . . . . . 79
Windows Power Management . . . . . . . . . . . . . . . . . . . . . . . . . . . . . . . . . . 79
Restarting the System . . . . . . . . . . . . . . . . . . . . . . . . . . . . . . . . . . . . . . . . . 79
Powering Off . . . . . . . . . . . . . . . . . . . . . . . . . . . . . . . . . . . . . . . . . . . . . . . 80
ENERGY STAR® Compliance . . . . . . . . . . . . . . . . . . . . . . . . . . . . . . . . . 80
Chapter 3
User-Installable Features
Lithium ion Battery. . . . . . . . . . . . . . . . . . . . . . . . . . . . . . . . . . . . . . . . . . . . 82
Recharging the Batteries. . . . . . . . . . . . . . . . . . . . . . . . . . . . . . . . . . . . . . . 83
Replacing the Battery . . . . . . . . . . . . . . . . . . . . . . . . . . . . . . . . . . . . . . . . . 85
Memory Stick/Secure Digital Cards . . . . . . . . . . . . . . . . . . . . . . . . . . . . . . 87
Installing Memory Stick/SD Cards. . . . . . . . . . . . . . . . . . . . . . . . . . . . . . . 88
Removing A Memory Stick/SD Card. . . . . . . . . . . . . . . . . . . . . . . . . . . . . 88
8
Curlin_WWAN-B6FJ-5051-02ENZ)-00.book Page 9 Tuesday, October 19, 2010 1:57 PM
ExpressCards. . . . . . . . . . . . . . . . . . . . . . . . . . . . . . . . . . . . . . . . . . . . . . . . . 89
Installing ExpressCards . . . . . . . . . . . . . . . . . . . . . . . . . . . . . . . . . . . . . . . 89
Removing ExpressCards. . . . . . . . . . . . . . . . . . . . . . . . . . . . . . . . . . . . . . . 90
Memory Upgrade Module . . . . . . . . . . . . . . . . . . . . . . . . . . . . . . . . . . . . . . 91
Installing Memory Upgrade Modules. . . . . . . . . . . . . . . . . . . . . . . . . . . . . 91
Removing a Memory Upgrade Module . . . . . . . . . . . . . . . . . . . . . . . . . . . 93
Checking the Memory Capacity . . . . . . . . . . . . . . . . . . . . . . . . . . . . . . . . . 93
Optical Drive . . . . . . . . . . . . . . . . . . . . . . . . . . . . . . . . . . . . . . . . . . . . . . . . . 94
Media Player Software . . . . . . . . . . . . . . . . . . . . . . . . . . . . . . . . . . . . . . . . 94
Loading Media on Your Drive . . . . . . . . . . . . . . . . . . . . . . . . . . . . . . . . . . 95
Removing Media . . . . . . . . . . . . . . . . . . . . . . . . . . . . . . . . . . . . . . . . . . . . 97
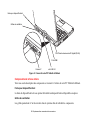
Emergency Optical
Drive Tray Release . . . . . . . . . . . . . . . . . . . . . . . . . . . . . . . . . . . . . . . . . . . 97
Using the Media Player Software . . . . . . . . . . . . . . . . . . . . . . . . . . . . . . . . 97
Using Media Player on Battery Power . . . . . . . . . . . . . . . . . . . . . . . . . . . . 99
Device Ports . . . . . . . . . . . . . . . . . . . . . . . . . . . . . . . . . . . . . . . . . . . . . . . . . . 100
Internal LAN (RJ-45) Jack . . . . . . . . . . . . . . . . . . . . . . . . . . . . . . . . . . . . . 100
Port Replicator Connector . . . . . . . . . . . . . . . . . . . . . . . . . . . . . . . . . . . . . 100
Universal Serial Bus Ports . . . . . . . . . . . . . . . . . . . . . . . . . . . . . . . . . . . . . 101
IEEE 1394 Port . . . . . . . . . . . . . . . . . . . . . . . . . . . . . . . . . . . . . . . . . . . . . . 101
Headphone Jack . . . . . . . . . . . . . . . . . . . . . . . . . . . . . . . . . . . . . . . . . . . . . 102
Microphone Jack. . . . . . . . . . . . . . . . . . . . . . . . . . . . . . . . . . . . . . . . . . . . . 103
HDMI Port . . . . . . . . . . . . . . . . . . . . . . . . . . . . . . . . . . . . . . . . . . . . . . . . . 103
External Video Port . . . . . . . . . . . . . . . . . . . . . . . . . . . . . . . . . . . . . . . . . . 103
9
Curlin_WWAN-B6FJ-5051-02ENZ)-00.book Page 10 Tuesday, October 19, 2010 1:57 PM
Chapter 4
Troubleshooting Your LifeBook
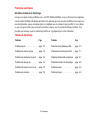
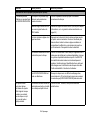
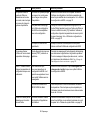
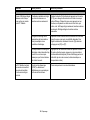
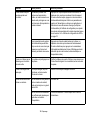
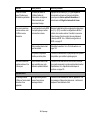
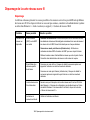
Troubleshooting. . . . . . . . . . . . . . . . . . . . . . . . . . . . . . . . . . . . . . . . . . . . . . . 105
Identifying the Problem . . . . . . . . . . . . . . . . . . . . . . . . . . . . . . . . . . . . . . . 105
Specific Problems . . . . . . . . . . . . . . . . . . . . . . . . . . . . . . . . . . . . . . . . . . . . 107
Power On Self Test Messages . . . . . . . . . . . . . . . . . . . . . . . . . . . . . . . . . . 117
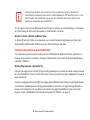
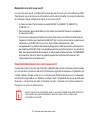
Restoring Your Pre-installed Software . . . . . . . . . . . . . . . . . . . . . . . . . . . . 121
Re-installing Individual Drivers and Applications . . . . . . . . . . . . . . . . . . . 121
Restoring the Operating System for Windows . . . . . . . . . . . . . . . . . . . . . . 122
Automatically Downloading Driver Updates . . . . . . . . . . . . . . . . . . . . . . . 125
Chapter 5
Care and Maintenance
Caring for your LifeBook Tablet PC. . . . . . . . . . . . . . . . . . . . . . . . . . . . . . 127
Cleaning your LifeBook Tablet PC . . . . . . . . . . . . . . . . . . . . . . . . . . . . . . 129
Cleaning the dust filter . . . . . . . . . . . . . . . . . . . . . . . . . . . . . . . . . . . . . . . . 130
Storing your LifeBook Tablet PC. . . . . . . . . . . . . . . . . . . . . . . . . . . . . . . . 130
Traveling with your LifeBook Tablet PC . . . . . . . . . . . . . . . . . . . . . . . . . . 131
Batteries . . . . . . . . . . . . . . . . . . . . . . . . . . . . . . . . . . . . . . . . . . . . . . . . . . . 132
Media Care . . . . . . . . . . . . . . . . . . . . . . . . . . . . . . . . . . . . . . . . . . . . . . . . . 133
Express Cards . . . . . . . . . . . . . . . . . . . . . . . . . . . . . . . . . . . . . . . . . . . . . . . 134
Chapter 6
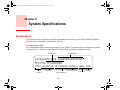
System Specifications
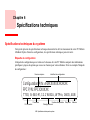
Specifications . . . . . . . . . . . . . . . . . . . . . . . . . . . . . . . . . . . . . . . . . . . . . . . . . 135
Configuration Label . . . . . . . . . . . . . . . . . . . . . . . . . . . . . . . . . . . . . . . . . . 135
Microprocessor . . . . . . . . . . . . . . . . . . . . . . . . . . . . . . . . . . . . . . . . . . . . . . 136
Chipset . . . . . . . . . . . . . . . . . . . . . . . . . . . . . . . . . . . . . . . . . . . . . . . . . . . . 136
Memory. . . . . . . . . . . . . . . . . . . . . . . . . . . . . . . . . . . . . . . . . . . . . . . . . . . . 136
Video. . . . . . . . . . . . . . . . . . . . . . . . . . . . . . . . . . . . . . . . . . . . . . . . . . . . . . 136
Digitizer . . . . . . . . . . . . . . . . . . . . . . . . . . . . . . . . . . . . . . . . . . . . . . . . . . . 137
Audio . . . . . . . . . . . . . . . . . . . . . . . . . . . . . . . . . . . . . . . . . . . . . . . . . . . . . 137
10
Curlin_WWAN-B6FJ-5051-02ENZ)-00.book Page 11 Tuesday, October 19, 2010 1:57 PM
Mass Storage Device Options. . . . . . . . . . . . . . . . . . . . . . . . . . . . . . . . . . . 137
Modular Bay Devices . . . . . . . . . . . . . . . . . . . . . . . . . . . . . . . . . . . . . . . . . 137
Features. . . . . . . . . . . . . . . . . . . . . . . . . . . . . . . . . . . . . . . . . . . . . . . . . . . . 138
Device Ports . . . . . . . . . . . . . . . . . . . . . . . . . . . . . . . . . . . . . . . . . . . . . . . . 139
Keyboard. . . . . . . . . . . . . . . . . . . . . . . . . . . . . . . . . . . . . . . . . . . . . . . . . . . 140
Power . . . . . . . . . . . . . . . . . . . . . . . . . . . . . . . . . . . . . . . . . . . . . . . . . . . . . 140
Dimensions and Weight . . . . . . . . . . . . . . . . . . . . . . . . . . . . . . . . . . . . . . . 141
Environmental Requirements . . . . . . . . . . . . . . . . . . . . . . . . . . . . . . . . . . . 141
Popular Accessories . . . . . . . . . . . . . . . . . . . . . . . . . . . . . . . . . . . . . . . . . . 141
Pre-Installed Software . . . . . . . . . . . . . . . . . . . . . . . . . . . . . . . . . . . . . . . . 142
Learning About Your Software . . . . . . . . . . . . . . . . . . . . . . . . . . . . . . . . . 143
Glossary/Regulatory
Glossary . . . . . . . . . . . . . . . . . . . . . . . . . . . . . . . . . . . . . . . . . . . . . . . . . . . . . 146
Regulatory Information . . . . . . . . . . . . . . . . . . . . . . . . . . . . . . . . . . . . . . . . 162
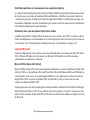
Appendix A: WLAN User’s Guide
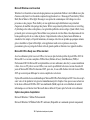
Before Using the Optional Wireless LAN . . . . . . . . . . . . . . . . . . . . . . . . . . 166
Wireless LAN Device Covered by this Document. . . . . . . . . . . . . . . . . . . 166
Characteristics of the WLAN Device . . . . . . . . . . . . . . . . . . . . . . . . . . . . . 166
Wireless LAN Modes Using this Device . . . . . . . . . . . . . . . . . . . . . . . . . . 167
Deactivating/Disconnecting the WLAN Device . . . . . . . . . . . . . . . . . . . . 169
Deactivation Using the Wireless On/Off Switch . . . . . . . . . . . . . . . . . . . . 170
Disconnection Using the Icon in the Taskbar. . . . . . . . . . . . . . . . . . . . . . . 170
Activating the WLAN Device . . . . . . . . . . . . . . . . . . . . . . . . . . . . . . . . . . 170
Configuring the Wireless LAN. . . . . . . . . . . . . . . . . . . . . . . . . . . . . . . . . . . 171
Configuring the WLAN . . . . . . . . . . . . . . . . . . . . . . . . . . . . . . . . . . . . . . . 171
Connection to the network . . . . . . . . . . . . . . . . . . . . . . . . . . . . . . . . . . . . . 171
11
Curlin_WWAN-B6FJ-5051-02ENZ)-00.book Page 12 Tuesday, October 19, 2010 1:57 PM
Troubleshooting the WLAN. . . . . . . . . . . . . . . . . . . . . . . . . . . . . . . . . . . . . 172
Troubleshooting . . . . . . . . . . . . . . . . . . . . . . . . . . . . . . . . . . . . . . . . . . . . . 172
WLAN Specifications . . . . . . . . . . . . . . . . . . . . . . . . . . . . . . . . . . . . . . . . . . 174
Specifications . . . . . . . . . . . . . . . . . . . . . . . . . . . . . . . . . . . . . . . . . . . . . . . 174
Using the Bluetooth Device. . . . . . . . . . . . . . . . . . . . . . . . . . . . . . . . . . . . . . 176
What is Bluetooth . . . . . . . . . . . . . . . . . . . . . . . . . . . . . . . . . . . . . . . . . . . . 176
Where to Find Information About Bluetooth . . . . . . . . . . . . . . . . . . . . . . . 176
Appendix B: Fingerprint Sensor Device
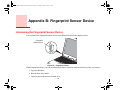
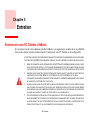
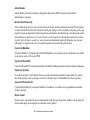
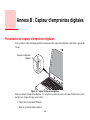
Introducing the Fingerprint Sensor Device . . . . . . . . . . . . . . . . . . . . . . . . 178
Getting Started . . . . . . . . . . . . . . . . . . . . . . . . . . . . . . . . . . . . . . . . . . . . . . 179
Installing OmniPass . . . . . . . . . . . . . . . . . . . . . . . . . . . . . . . . . . . . . . . . . . 179
User Enrollment . . . . . . . . . . . . . . . . . . . . . . . . . . . . . . . . . . . . . . . . . . . . . 182
Using OmniPass . . . . . . . . . . . . . . . . . . . . . . . . . . . . . . . . . . . . . . . . . . . . . 184
Configuring OmniPass . . . . . . . . . . . . . . . . . . . . . . . . . . . . . . . . . . . . . . . . 190
OmniPass Control Center . . . . . . . . . . . . . . . . . . . . . . . . . . . . . . . . . . . . . . 192
Troubleshooting . . . . . . . . . . . . . . . . . . . . . . . . . . . . . . . . . . . . . . . . . . . . . 194
Index . . . . . . . . . . . . . . . . . . . . . . . . . . . . . . . . . . . . . . . . . . . . . . . . . . . . . . . . 196
12
Curlin_WWAN-B6FJ-5051-02ENZ)-00.book Page 13 Tuesday, October 19, 2010 1:57 PM
Preface
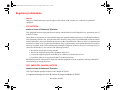
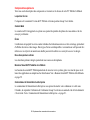
About This Guide
The LifeBook T730 Tablet PC from Fujitsu America is a powerful convertible computer. It can be used
either as a standard notebook using keyboard input, or in tablet configuration using pen input. It is
powered by an all new 2010 Intel® Core™ Processor, has a built-in color display with either an active
digitizer or optional dual digitizer, and brings the computing power of desktop personal computers to
a portable and versatile environment.
This manual explains how to operate your LifeBook T730 Tablet PC’s hardware and pre-installed
system software.
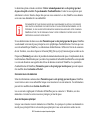
Conventions Used in the Guide
Keyboard and on-screen keys appear in brackets. Example: [Fn], [F1], [ESC], [ENTER] and [CTRL].
Pages with additional information about a specific topic are cross-referenced within the text.
For example: (“See Installation Procedure on page 43”.) Note that all cross-references are linked to the
referenced items, so by clicking the link, you will automatically go to the referenced item or page.
On-screen menu items appear in bold. Example: “Click Fujitsu Menu, and select your choice”.
13
Curlin_WWAN-B6FJ-5051-02ENZ)-00.book Page 14 Tuesday, October 19, 2010 1:57 PM
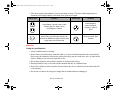
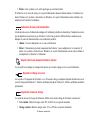
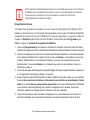
THE INFORMATION ICON HIGHLIGHTS INFORMATION THAT WILL ENHANCE YOUR UNDERSTANDING OF
THE SUBJECT MATERIAL.
THE CAUTION ICON HIGHLIGHTS INFORMATION THAT IS IMPORTANT TO THE SAFE OPERATION OF YOUR
COMPUTER, OR TO THE INTEGRITY OF YOUR FILES. PLEASE READ ALL CAUTION INFORMATION
CAREFULLY.
THE WARNING ICON HIGHLIGHTS INFORMATION THAT CAN BE HAZARDOUS TO EITHER YOU, YOUR
LIFEBOOK TABLET PC, OR YOUR FILES. PLEASE READ ALL WARNING INFORMATION CAREFULLY.
Fujitsu Contact Information
Service and Support
You can contact Fujitsu Service and Support in the following ways:
• Toll free: 1-800-8Fujitsu (1-800-838-5487)
• Website: http://www.computers.us.fujitsu.com/support
Before you place the call, you should have the following information ready so that the customer
support representative can provide you with the fastest possible solution:
•
•
•
•
Product name
Product configuration number
Product serial number
Purchase date
14 - About This Guide
Curlin_WWAN-B6FJ-5051-02ENZ)-00.book Page 15 Tuesday, October 19, 2010 1:57 PM
• Conditions under which the problem occurred
• Any error messages that have occurred
• Type of device connected, if any
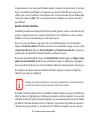
Fujitsu Shopping Online
You can go directly to the online store by going to the website at: www.shopfujitsu.com.
YOU MUST HAVE AN ACTIVE INTERNET CONNECTION TO USE THE ONLINE URL LINKS.
Limited Warranty
Your LifeBook T730 Tablet PC is backed by a Fujitsu International Limited Warranty. Check the
service kit that came with your Tablet PC for the Limited Warranty period and terms and conditions.
15 - About This Guide
Curlin_WWAN-B6FJ-5051-02ENZ)-00.book Page 16 Tuesday, October 19, 2010 1:57 PM
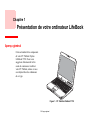
Chapter 1
Getting to Know Your LifeBook
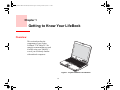
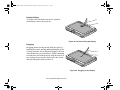
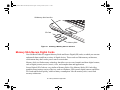
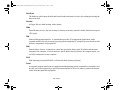
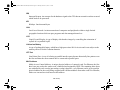
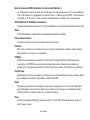
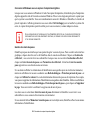
Overview
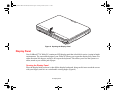
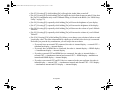
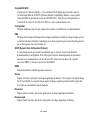
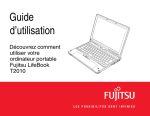
This section describes the
components of your Fujitsu
LifeBook T730 Tablet PC. We
strongly recommend that you read
it before using your Tablet PC –
even if you are already familiar
with notebook computers.
Figure 1. Fujitsu LifeBook T730 Tablet PC
16
Curlin_WWAN-B6FJ-5051-02ENZ)-00.book Page 17 Tuesday, October 19, 2010 1:57 PM
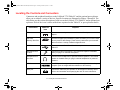
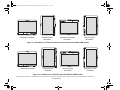
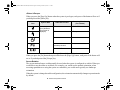
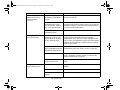
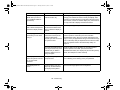
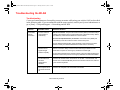
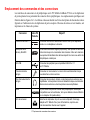
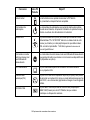
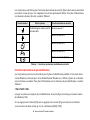
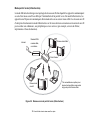
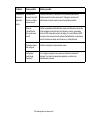
Locating the Controls and Connectors
Connectors and peripheral interfaces on the LifeBook T730 Tablet PC and the optional port replicator
allow you to connect a variety of devices. Specific locations are illustrated in Figures 2 through 6. The
table below provides a short description of each icon on the LifeBook T730 Tablet PC and/or optional port
replicator. Each of the icons is either molded into or printed on the Tablet PC or port replicator chassis.
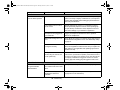
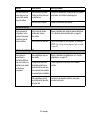
Connection
Tablet PC
Icon
Purpose
DC in connector
Connect an external power source such as the AC adapter or auto/airline
adapter.
SD Card/
Memory Stick Slot
The Secure Digital (SD) card/Memory Stick slot allows you to insert a flash
memory card for data storage. Flash memory cards allow you to transfer
data to and from a variety of different digital devices.
USB Port
Connect Universal Serial Bus 2.0 or 1.1 compliant devices to the
Tablet PC.
Microphone/Line
In Jack
Connect an external microphone. The internal microphone is disabled
when you plug in an external microphone.
Headphone/Line
Out Jack
Connect stereo headphones or powered external speakers. The internal
speaker is disabled when you plug in external headphones or powered
speakers.
HDMI
The HDMI port allows you to connect compatible digital devices with your
computer (such as a high-definition television or AV receiver).
Dock port
Connect the Tablet PC port replicator or other approved docking device.
Refer to documentation accompanying the dock for more information.
17 - Locating the Controls and Connectors
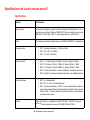
Curlin_WWAN-B6FJ-5051-02ENZ)-00.book Page 18 Tuesday, October 19, 2010 1:57 PM
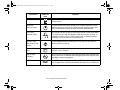
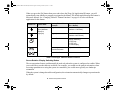
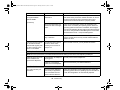
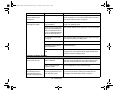
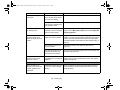
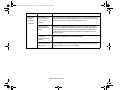
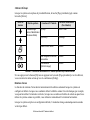
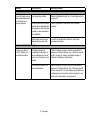
Connection
Tablet PC
Icon
Purpose
Security lock slot
The security slot allows you to secure the Tablet PC using compatible
locking devices.
Suspend/
Resume button
The Suspend/Resume button allows you to suspend Tablet PC activity
without powering off, resume your Tablet PC from suspend mode, and
power on the system when it has been shut down from Windows.
Local Area
Network (LAN)
The LAN (RJ-45) jack is used to connect the internal 10/100/1000* BaseT/Tx Ethernet to a Local Area Network (LAN) in your office or home, or
broadband devices such as a cable modem, DSL, or satellite Internet.
*1000 Mbps, commonly referred to as Gigabit Ethernet.
Wireless LAN/
Bluetooth On-Off
Switch
The WLAN/Bluetooth switch allows you to turn power to the optional
wireless devices on and off.
External Video
port
The external video port allows you to connect an external monitor or LCD
projector to your computer.
Digital Video
Interface
The DVI-D port on the optional port replicator allows you to connect a flatpanel LCD monitor or television that is equipped with a DVI-D port for ultracrisp digital images and graphics.
IEEE1394 port
The IEEE 1394 jack allows you to connect IEEE 1394 (Firewire) devices
such as digital video cameras and external hard drives to your Tablet PC.
18 - Locating the Controls and Connectors
Curlin_WWAN-B6FJ-5051-02ENZ)-00.book Page 19 Tuesday, October 19, 2010 1:57 PM
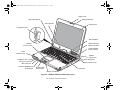
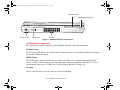
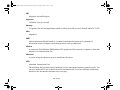
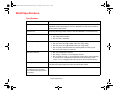
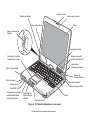
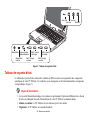
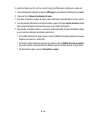
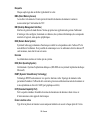
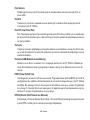
Display Latch
Optional Web Cam
Built-in Microphone
Stereo Speaker
Display Panel
Fingerprint Sensor
Stereo Speaker
LifeBook Security/
Tablet PC Buttons
Touchpad
Cursor Control
Power/Suspend/
Resume Switch
Status
Indicator Panel
Ambient
Light Sensor
Headphone Jack
Microphone Jack
Built-in Microphone
Status Indicator Panel
IEEE 1394 Jack
Wireless LAN/Bluetooth/
On/Off Switch
Memory Stick/
SD Card Slot
Keyboard
Display Latch Button
Figure 2. LifeBook Tablet PC with display open
19 - Locating the Controls and Connectors
Curlin_WWAN-B6FJ-5051-02ENZ)-00.book Page 20 Tuesday, October 19, 2010 1:57 PM
Top Components
The following is a brief description of your LifeBook Tablet PC’s top components.
Display Latch
The display latch is used to secure the tablet PC display when it is closed.
Web Camera
The optional 2.0 megapixel web cam can be used to take pictures of yourself to send over the internet.
Display Panel
The display panel is a color LED panel with backlighting for the display of text and graphics. There are
two different displays available: an active digitizer that is used with a stylus, and a dual digitizer that can
be used with either a stylus or your fingers.
Dual Stereo Speakers
The built-in dual speakers provide stereo sound.
LifeBook Security/Tablet PC Buttons
The LifeBook Security/Tablet PC Buttons provide password security for your system, as well as one-touch
application launch capability. See “LifeBook Security/Tablet PC Buttons” on page 56.
Power/Suspend/Resume Switch
The Power/Suspend/Resume switch allows you to suspend Tablet PC activity without powering off,
resume your LifeBook Tablet PC from sleep mode, and power on your Tablet PC when it has been shut
down from Windows. See “Power/Suspend/Resume Switch” on page 77.
Ambient Light Sensor
The ambient light sensor measures the light in which the computer is operating and automatically adjusts
the brightness of the display to suit the lighting conditions. See “Enabling/Disabling Ambient Light
Sensor (Windows 7 only)” on page 38.
20 - Locating the Controls and Connectors
Curlin_WWAN-B6FJ-5051-02ENZ)-00.book Page 21 Tuesday, October 19, 2010 1:57 PM
Status Indicator Panels
The Status Indicator Panels display symbols that correspond to specific components of your Tablet PC.
Status indicators are located in two locations: on the left front edge of the system (system status indicators)
and below the application buttons (button status indicators). See “Status Indicator Panel” on page 30.
Keyboard
A full-size keyboard with dedicated Windows keys. See “Keyboard” on page 39.
Display Latch Button
The display latch button allows you to unlatch the front of the display from the case.
Memory Stick/SD Card Slot
The Memory Stick/SD card slot allows you to install a Memory Stick or a Secure Digital (SD) card for
data storage. This architecture allows you to transfer data from a variety of different digital devices. See
“Installing Memory Stick/SD Cards” on page 88.
Wireless LAN/Bluetooth On/Off Switch
The wireless LAN/Bluetooth On/Off switch is used to turn on and off the optional wireless devices.
Switching the device off when not in use will help to extend battery life. See “Activating the WLAN
Device” on page 170. Note that there is no wireless WAN available for systems with the optional dual
digitizer.
IEEE 1394 (4-pin) Jack
The 4-pin 1394 jack is used to connect between your Tablet PC and an IEEE 1394 peripheral such as a
digital video camera for fast file transfer. See “IEEE 1394 Port” on page 101.
Microphone Jack
The microphone jack allows you to connect an external mono microphone. See “Microphone Jack” on
page 103.
21 - Locating the Controls and Connectors
Curlin_WWAN-B6FJ-5051-02ENZ)-00.book Page 22 Tuesday, October 19, 2010 1:57 PM
Headphone Jack
The headphone jack allows you to connect headphones. See “Headphone Jack” on page 102.
Touchpad Pointing Device
The Touchpad pointing device is a mouse-like cursor control with a left and right button. See
“Touchpad/Active Digitizer/Touchscreen” on page 42.
Fingerprint Sensor
The fingerprint sensor device allows you to log onto your system and password-protected websites and
applications by swiping your finger over the sensor. See “Introducing the Fingerprint Sensor Device” on
page 178.
Dual Built-in Microphones
The built-in microphones allows you to record voice and annotations.
22 - Locating the Controls and Connectors
Curlin_WWAN-B6FJ-5051-02ENZ)-00.book Page 23 Tuesday, October 19, 2010 1:57 PM
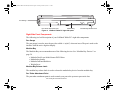
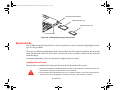
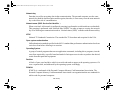
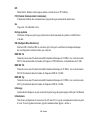
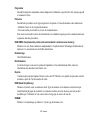
ExpressCard Slot
ExpressCard Eject Button
DC Power Jack
USB 2.0 Port
Air Vents
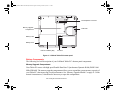
Figure 3. LifeBook Tablet PC left-side panel
Left-Side Panel Components
The following is a brief description of your LifeBook Tablet PC’s left-side components.
DC Power Jack
The DC power jack allows you to plug in the AC adapter to power your LifeBook Tablet PC and charge
the internal Lithium ion battery.
USB 2.0 Ports
The USB 2.0 ports (one on the left side, two on the rear) allow you to connect Universal Serial Bus
devices. USB 2.0 transfers data at up to 480 Mbps and is backward-compatible with USB 1.1 devices,
which transfer data at up to 12 Mbps. See “Universal Serial Bus Ports” on page 101.
Air Vents
The air vents are used to cool the system to prevent overheating.
23 - Locating the Controls and Connectors
Curlin_WWAN-B6FJ-5051-02ENZ)-00.book Page 24 Tuesday, October 19, 2010 1:57 PM
TO PROTECT YOUR TABLET PC FROM DAMAGE AND TO OPTIMIZE PERFORMANCE, BE SURE TO KEEP
ALL AIR VENTS UNOBSTRUCTED, CLEAN, AND CLEAR OF DEBRIS. THIS MAY REQUIRE PERIODIC
CLEANING, DEPENDING UPON THE ENVIRONMENT IN WHICH THE SYSTEM IS USED.
DO NOT OPERATE THE TABLET PC IN AREAS WHERE THE AIR VENTS CAN BE OBSTRUCTED, SUCH AS IN
TIGHT ENCLOSURES OR ON SOFT SURFACES LIKE A BED OR CUSHION.
ExpressCard Slot
The ExpressCard Slot allows you to install an ExpressCard. See “ExpressCards” on page 89.
ExpressCard Eject Button
The ExpressCard eject button is used for removing an ExpressCard from the slot.
24 - Locating the Controls and Connectors
Curlin_WWAN-B6FJ-5051-02ENZ)-00.book Page 25 Tuesday, October 19, 2010 1:57 PM
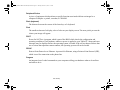
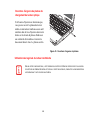
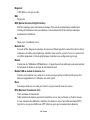
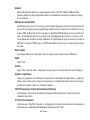
Pen Garage
Pen Tether Attachment Point
Modular Bay
Modular Bay Release Latch
Figure 4. LifeBook Tablet PC right-side panel
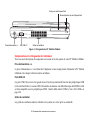
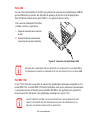
Right-Side Panel Components
The following is a brief description of your LifeBook Tablet PC’s right-side components.
Pen Garage
The pen garage is used to store the pen (also called a “stylus”) when not in use.The pen is used as the
interface with the active digitizer display.
Modular Bay
The Modular Bay can accommodate one of the following devices. See “Modular Bay Devices” on
page 54.
•
•
•
•
Modular Dual-Layer Multi-Format DVD Writer
Modular bay battery
Modular 2nd hard disk drive
Weight Saver
Modular Bay Release Latch
The modular bay release latch is used to release the modular bay device from the modular bay.
Pen Tether Attachment Point
The pen tether attachment point is used to attach your pen to the system to prevent its loss.
25 - Locating the Controls and Connectors
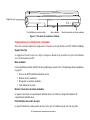
Curlin_WWAN-B6FJ-5051-02ENZ)-00.book Page 26 Tuesday, October 19, 2010 1:57 PM
Anti-Theft Lock Slot
Air Vents
Gigabit LAN (RJ-45) Jack
HDMI Port
External Video Port
USB 2.0 Ports
Figure 5. LifeBook Tablet PC back panel
Back Panel Components
Following is a brief description of your LifeBook Tablet PC’s back panel components.
Anti-theft Lock Slot
The anti-theft lock slot allows you to attach an optional physical lock down device.
Air Vents
The air vents allow air to circulate through the system to cool down the components.
26 - Locating the Controls and Connectors
Curlin_WWAN-B6FJ-5051-02ENZ)-00.book Page 27 Tuesday, October 19, 2010 1:57 PM
TO PROTECT YOUR TABLET PC FROM DAMAGE AND TO OPTIMIZE PERFORMANCE, BE SURE TO KEEP
ALL AIR VENTS UNOBSTRUCTED, CLEAN, AND CLEAR OF DEBRIS. THIS MAY REQUIRE PERIODIC
CLEANING, DEPENDING UPON THE ENVIRONMENT IN WHICH THE SYSTEM IS USED.
DO NOT OPERATE THE TABLET PC IN AREAS WHERE THE AIR VENTS CAN BE OBSTRUCTED, SUCH AS IN
TIGHT ENCLOSURES OR ON SOFT SURFACES LIKE A BED OR CUSHION.
External Video Port
The external monitor port allows you to connect an external monitor or LCD projector. See “External
Video Port” on page 103.
USB 2.0 Ports
The USB 2.0 ports allow you to connect Universal Serial Bus devices. USB 2.0 transfers data at up to
480Mbps and is backward-compatible with USB 1.1 devices, which transfer data at up to 12Mbps. See
“Universal Serial Bus Ports” on page 101.
HDMI Port
The HDMI port is used to connect compatible digital devices with your computer (such as a highdefinition television or AV receiver). See “HDMI Port” on page 103.
Gigabit LAN (RJ-45) Jack
The internal LAN (RJ-45) jack is used for an internal Gigabit (10Base-T/100Base-Tx/1000Base-T)
Ethernet LAN connection. See “Internal LAN (RJ-45) Jack” on page 100.
27 - Locating the Controls and Connectors
Curlin_WWAN-B6FJ-5051-02ENZ)-00.book Page 28 Tuesday, October 19, 2010 1:57 PM
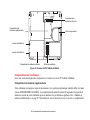
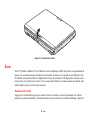
Port Replicator Connector
Memory Upgrade
Compartment
Dust Filter
Battery Latch
Battery Latch
Lithium ion Battery Bay
Air Vents
Figure 6. LifeBook Tablet PC bottom panel
Bottom Components
The following is a brief description of your LifeBook Tablet PC’s bottom panel components.
Memory Upgrade Compartment
Your Tablet PC comes with high speed Double Data Rate 3 Synchronous Dynamic RAM (DDR3 1066
MHz SDRAM). The memory upgrade compartment allows you to expand the system memory capacity of
your Tablet PC, thus improving overall performance. See “Memory Upgrade Module” on page 91. Under
normal circumstances, it should not be necessary to open this compartment.
28 - Locating the Controls and Connectors
Curlin_WWAN-B6FJ-5051-02ENZ)-00.book Page 29 Tuesday, October 19, 2010 1:57 PM
Port Replicator Connector
This connector allows you to connect the optional Port Replicator to your Tablet PC.
Dust Filter
The dust filter is used to help remove dust and dirt from your system. See “Cleaning the dust filter” on
page 130.
Air Vents
The air vents allow air to circulate through the system to cool down the components.
TO PROTECT YOUR TABLET PC FROM DAMAGE AND TO OPTIMIZE SYSTEM PERFORMANCE, BE SURE TO
KEEP ALL AIR VENTS UNOBSTRUCTED, CLEAN, AND CLEAR OF DEBRIS. THIS MAY REQUIRE PERIODIC
CLEANING, DEPENDING UPON THE ENVIRONMENT IN WHICH THE SYSTEM IS USED.
DO NOT OPERATE THE TABLET PC IN AREAS WHERE THE AIR VENTS CAN BE OBSTRUCTED, SUCH AS IN
TIGHT ENCLOSURES OR ON SOFT SURFACES LIKE A BED OR CUSHION.
Lithium ion Battery Bay
The battery bay contains the internal Lithium ion battery. It can be opened for the removal of the battery
when stored over a long period of time or for swapping a discharged battery with a charged Lithium ion
battery. See “Lithium ion Battery” on page 82.
Battery Latches
The battery latches are used to secure the Lithium ion battery in the battery bay.
29 - Locating the Controls and Connectors
Curlin_WWAN-B6FJ-5051-02ENZ)-00.book Page 30 Tuesday, October 19, 2010 1:57 PM
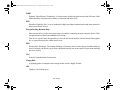
Security
NumLk
CapsLk
ScrLk
Optical/Hard
Batt 1 Level
Batt 2 Level
Drive Access
External Power
Batt 1 Charging
Batt 2 Charging
Power
Figure 7. Status Indicator Panel
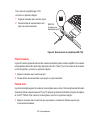
Status Indicator Panel
The Status Indicator Panel displays symbols and associated LEDs that correspond to specific components
of your Tablet PC. These symbols tell you how each of those components is operating.(Figure 7)
Power Indicator
• The Power indicator symbol shows whether your system is operational. It has several different
states, each of which tells you what mode your Tablet PC is in at that time.
• Steady On: This means that there is power to your Tablet PC and that it is ready for use.
• Flashing: This means that your Tablet PC is in Sleep mode.
30 - Status Indicator Panel
Curlin_WWAN-B6FJ-5051-02ENZ)-00.book Page 31 Tuesday, October 19, 2010 1:57 PM
• Steady Off: This means that your system is either in Hibernate mode, or that your Tablet PC has
been turned off.
If you are charging your battery, the Power indicator symbol will remain on even if your LifeBook Tablet
PC is shut off.
External Power Indicator
The external power indicator shows whether your tablet is operating from the AC adapter, the auto/airline
adapter or the batteries. This icon has two different states that can tell you what power source your
LifeBook Tablet PC is using.
• On: This means that either of the adapters are currently in use.
• Off: Power is only coming from the batteries, and you do not have an adapter connected. Even if
the system was shut down from Windows, the External Power indicator symbol will remain on if
you have an adapter connected.
Hard Drive/Optical Drive Access Indicator
The Hard Drive/Optical Drive Access indicator shows whether your internal hard drive or optical drive is
being accessed.
1
Battery Charging Indicators
The Battery Charging and Battery Level indicators state whether the Lithium ion battery (Battery 1) or the
optional modular battery (Battery 2) are installed and charging.
1
Battery Level Indicator
The Battery Level indicators display the charge level of the indicated battery pack, as follows:
• Green, solid: Battery is between 50% and 100% charged.
• Orange, solid: Battery is between 13% and 49% charged.
31 - Status Indicator Panel
Curlin_WWAN-B6FJ-5051-02ENZ)-00.book Page 32 Tuesday, October 19, 2010 1:57 PM
• Red, solid: Battery is between 0% and 12% charged.
• Orange, blinking: Blinks during battery status measurement (Four seconds after the battery is
installed).
• Red, blinking: There is a problem with the battery.
• Off: There is no battery installed.
• If the battery pack is installed while the power is turned off, the battery level indicator will display
the charge level for five seconds after it blinks orange.
• If the AC adapter is not connected or the battery pack is not fully charged when the computer is
switched to sleep mode, the indicator will blink. The LED blinks at the rate of one second on/five
seconds off.
• Batteries subjected to shocks, vibration or extreme temperatures can be permanently
damaged.
• A shorted battery is damaged and must be replaced.
Security Indicator
The Security Indicator flashes (if a password was set) when the system resumes from Off or Sleep modes.
You must enter the password that was set in the Security Panel before your system will resume operation.
NumLk Indicator
The NumLk indicator glows green when the integrated keyboard is set in ten-key numeric keypad mode.
CapsLock Indicator
The CapsLock indicator glows green when your keyboard is set to type in all capital letters.
ScrLk Indicator
The ScrLk indicator glows green when your scroll lock is active.
32 - Status Indicator Panel
Curlin_WWAN-B6FJ-5051-02ENZ)-00.book Page 33 Tuesday, October 19, 2010 1:57 PM
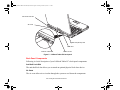
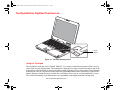
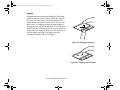
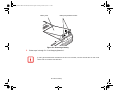
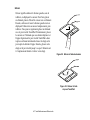
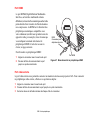
Figure 8. Opening the Display Panel
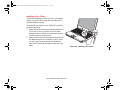
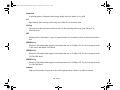
Display Panel
Your LifeBook T730 Tablet PC contains an LED display panel that is backlit for easier viewing in bright
environments. The convertible design of your Tablet PC allows you to open the display fully, rotate it in
either direction 180 degrees, and lay it face up on the keyboard. This allows you to use the system as a
tablet, much as you would a pad of paper.
Opening the Display Panel
Press the display latch to release it, then lift the display backwards, being careful not to touch the screen
with your fingers, until it is at a comfortable viewing angle. (Figure 8)
33 - Display Panel
Curlin_WWAN-B6FJ-5051-02ENZ)-00.book Page 34 Tuesday, October 19, 2010 1:57 PM
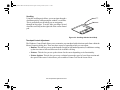
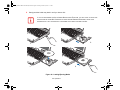
Using the System as a Tablet
If you would like to use the system as a tablet, perform the following steps.
• The display can be rotated in either direction, but when returning the system to notebook mode,
be sure to turn it back to its original position (i.e., the reverse of how you turned it when you
opened it. Turning the display in the incorrect direction could cause hinge damage. The screen
should rotate easily; if it does not rotate easily, you are probably attempting to turn it in the wrong
direction.
• In the following step, be sure to position the display perpendicular to the keyboard, otherwise
the keyboard or display cover could get scratched.
• It is important to note that no matter which mode your tablet is in, the latch should always be
engaged to prevent damage to it.
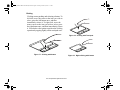
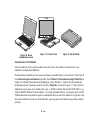
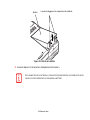
1
2
Press the latch button and lift the display until it is perpendicular to the keyboard. (Figure 10).
3
Holding the top edge of the display panel, pull it forward until it is lying nearly atop the keyboard.
4
When the display is perpendicular to the keyboard, rotate it 180 degrees in either direction (Figure 11) so that
it is facing backwards.
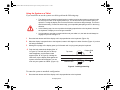
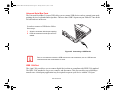
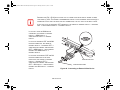
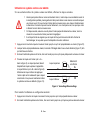
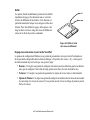
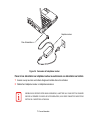
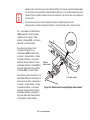
Push the latch towards the display (See “A”
in Figure 9). The latch will pivot so the top
latch disappears, and the bottom latch
appears (See “B” in Figure 9). Holding the
latch down, lay the display flush against the
system so that the latch engages. You can
now use your system as a tablet. (Figure 12)
Display Side
Top Latch
Bottom Latch
Figure 9. Latching/unlatching
To return the system to notebook configuration:
1
Press the latch button and lift the display until it is perpendicular to the keyboard.
34 - Display Panel
A
B
Curlin_WWAN-B6FJ-5051-02ENZ)-00.book Page 35 Tuesday, October 19, 2010 1:57 PM
2
When the display is perpendicular to the keyboard, rotate it 180 degrees in either direction so that it is facing
forward.
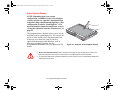
Figure 10. Fully Open Display
Figure 11. Rotating Display
Figure 12. Tablet Mode
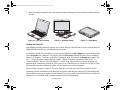
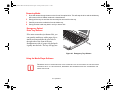
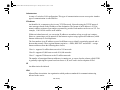
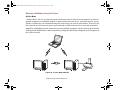
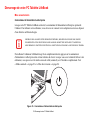
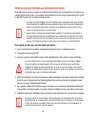
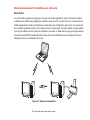
Holding the Tablet PC
Depending upon which model of Wireless LAN and/or Wireless WAN module is in your system, there are
slight differences in the way you should hold your tablet.
To determine which WLAN module is in your system, right-click on My Computer on your desktop, then
select Properties. For Windows XP systems, select the Hardware tab and click the [Device Manager]
button. For Windows 7 systems, click [Device Manager] in the left pane of the Properties window. Tap
the “+” next to Network adapters and see whether “Intel® Centrino® Advanced-N 6200 AGN” or
“Atheros AR9287 Wireless Network Adapter” is listed. If the Atheros device is listed, the tablet will
function in all orientations when the WLAN switch is on. If the Intel device is listed, or you have a Gobi
Wireless WAN module installed, the tablet will not function in certain orientations.
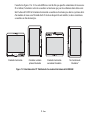
Please reference Figures 13 and 14. The only differences are that when the WLAN switch is on, the
secondary portrait orientation is non-functional in systems with an Intel Advanced-N 6200 module and
the secondary landscape orientation is non-functional in systems with a Gobi WWAN device installed. If
both devices are installed, both secondary orientation are non-functioning.
35 - Display Panel
Curlin_WWAN-B6FJ-5051-02ENZ)-00.book Page 36 Tuesday, October 19, 2010 1:57 PM
.
Landscape Orientation
Primary Portrait
Orientation
Secondary Landscape
Orientation
Non-Functional
Orientation*
Figure 13. Orientations for Tablet PCs with Intel Centrino Advanced-N 6200 AGN module
Landscape Orientation
Primary Portrait
Orientation
Non-Functional
Orientation*
Secondary Portrait
Orientation
Figure 14. Orientations for Tablet PCs with Gobi Wireless WAN module
*NOTE: This orientation is is non-functional only when the WLAN switch is activated; when the WLAN switch is off, this orientation is functional.
36 - Display Panel
Curlin_WWAN-B6FJ-5051-02ENZ)-00.book Page 37 Tuesday, October 19, 2010 1:57 PM
Adjusting Display Panel Brightness
Once you have turned on your Tablet PC, you may want to adjust the brightness level of the screen to a
more comfortable viewing level. There are three ways to adjust the brightness: keyboard, power
management utility, and Fujitsu Menu.
Using Keyboard to Adjust Brightness
Adjusting the brightness using the keyboard changes the system setting (i.e., the settings you make via the
function keys automatically changes the brightness settings in the system’s Pen and Tablet Settings).
• [Fn+F6]: Pressing repeatedly will lower the brightness of your display.
• [Fn+F7]: Pressing repeatedly will increase the brightness of the display.
Note that changing the brightness with the [Fn] key is temporary. When you resume or restart, you will
need to reset them if you used this method.
Using Power Management to Adjust Brightness (Windows 7)
Windows 7: To adjust brightness with the power management utility in Windows 7:
Click Start -> Control Panel. In View by:, select one of the icon views. Select Display, then click Adjust
brightness in the left pane. Under Select a power plan, select the plan settings you want to use. Drag
Screen brightness: bar to the left or right, depending on your preference.
Using the Fujitsu Menu to Adjust Brightness
To adjust brightness using the Fujitsu menu, click on the Fujitsu Menu icon in the system tray in the lower
right corner of the screen. Double-click Windows Mobility Center, then double-click the icon adjacent to
Display brightness. Set the screen brightness sliders for On battery and Plugged in scenarios.
IF USING AC POWER, YOUR BRIGHTNESS SETTING IS SET TO ITS HIGHEST LEVEL BY DEFAULT. IF USING
BATTERY POWER, YOUR BRIGHTNESS SETTING IS SET TO APPROXIMATELY MID-LEVEL BY DEFAULT.
THE HIGHER THE BRIGHTNESS, THE MORE POWER THE SYSTEM WILL CONSUME AND THE FASTER YOUR
BATTERIES WILL DISCHARGE. FOR MAXIMUM BATTERY LIFE, SET THE BRIGHTNESS AS LOW AS
POSSIBLE.
37 - Display Panel
Curlin_WWAN-B6FJ-5051-02ENZ)-00.book Page 38 Tuesday, October 19, 2010 1:57 PM
Enabling/Disabling Ambient Light Sensor (Windows 7 only)
Systems which are running the Windows 7 operating system have an ambient light sensor (just below the
Power/Suspend/Resume switch) that automatically senses the light conditions in which the computer is
operating. If the lighting is very bright, the brightness of the LCD will increase to make it easier to see the
display. Conversely, if it is used in a darkened room, the display will automatically dim.
NOTE THAT WHEN YOU FIRST START YOUR SYSTEM, THE AMBIENT LIGHT SENSOR IS DISABLED. YOU
WILL INITIALLY NEED TO ENABLE IT USING THE FOLLOWING STEPS.
The light sensor can be enabled or disabled from the Control Panel as follows:
1
2
3
4
Open the system Control Panel and click in the View by: field, select either large or small icons.
5
From the Sensor Properties window, you can change the sensor’s description, uninstall the sensor, or enable
or disable selected users.
Click on the Location and Other Sensors icon.
To enable or disable the Light Sensor utility, check or uncheck the box in the Enabled column.
For more information about the light sensor, click on Light Sensor icon in the Sensor column to the right of the
light sensor icon to open the Sensor Properties window.
• To change the sensor’s description, click the [Change description] button, enter the new description, and
click the [OK] button.
• To limit who can access the sensors, click Change who can access sensors, then check or uncheck the
box adjacent to the individual you would like to grant or prohibit access.
• To uninstall the sensor, click Uninstall this sensor.
38 - Display Panel
Curlin_WWAN-B6FJ-5051-02ENZ)-00.book Page 39 Tuesday, October 19, 2010 1:57 PM
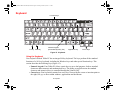
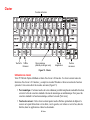
Keyboard
Function Keys
Fn Key Start Key
Numeric Keypad
(surrounded by heavy line)
Application Key
Cursor Keys
Figure 15. Keyboard
Using the Keyboard
Your Fujitsu LifeBook Tablet PC has an integral 84-key keyboard. The keys perform all the standard
functions of a 101-key keyboard, including the Windows keys and other special function keys. This
section describes the following keys (Figure 15):
• Numeric keypad: Your Tablet PC allows certain keys to serve dual purposes, both as standard
characters and as numeric and mathematical keys. The ability to toggle between the standard
character and numerical keys is controlled through the [NumLk] key.
• Cursor keys: Your keyboard contains four arrow keys for moving the cursor or insertion point to
the right, left, up, or down within windows, applications and documents.
39 - Keyboard
Curlin_WWAN-B6FJ-5051-02ENZ)-00.book Page 40 Tuesday, October 19, 2010 1:57 PM
• Function keys: The keys labeled [F1] through [F12], are used in conjunction with the [Fn] key to
produce special actions that vary depending on what program is running.
• Windows keys: These keys work with your Windows operating system and function the same as
the onscreen Start menu button, or the right button on your pointing device.
Numeric Keypad
Certain keys on the keyboard perform dual functions as both standard character keys and numeric keypad
keys. NumLk can be activated by pressing the [NumLk] keys. Turning off the NumLk feature is done the
same way. Once this feature is activated you can enter numerals 0 through 9, perform addition ( + ),
subtraction ( - ), multiplication ( * ), or division ( / ), and enter decimal points ( . ) using the keys designated
as ten-key function keys. The keys in the numeric keypad are marked on the front edge of the key to
indicate their secondary functions.
Windows Keys
Your LifeBook Tablet PC has two Windows keys, consisting of a Start key and an Application key. The
Start key displays the Start menu. This button functions the same as your onscreen Start menu button. The
Application key functions the same as your right mouse button and displays shortcut menus for the
selected item. (Please refer to your Windows Help and Support documentation in the Start menu for
additional information regarding the Windows keys.)
Cursor Keys
The cursor keys are the four arrow keys on the keyboard which allow you to move the cursor up, down,
left and right in applications. In programs such as Windows Explorer, it moves the “focus” (selects the
next item up, down, left, or right).
Function Keys
Your LifeBook Tablet PC has 12 function keys, F1 through F12. Functions assigned to these keys differ
for each application. You should refer to your software documentation to find out how these keys are used.
• The [Fn] key provides extended functions for the Tablet PC and is always used in conjunction with
another key.
40 - Keyboard
Curlin_WWAN-B6FJ-5051-02ENZ)-00.book Page 41 Tuesday, October 19, 2010 1:57 PM
• [Fn+F3]: Pressing [F3] while holding [Fn] will toggle the Audio Mute on and off.
• [Fn+F4]: Pressing [F4] while holding [Fn] will toggle the Quick Point feature on and off. Note that
the [Fn+F4] combination only works if Manual Setting is selected in the BIOS. (See “BIOS Setup
Utility” on page 72)
• [Fn+F6]: Pressing [F6] repeatedly while holding [Fn] will lower the brightness of your display.
• [Fn+F7]: Pressing [F7] repeatedly while holding [Fn] will increase the brightness of the display.
• [Fn+F8]: Pressing [F8] repeatedly while holding [Fn] will decrease the volume of your LifeBook
Tablet PC.
• [Fn+F9]: Pressing [F9] repeatedly while holding [Fn] will increase the volume of your LifeBook
Tablet PC.
• [Fn+F10]: Pressing [F10] while holding [Fn] allows you to change your selection of where to send
your display video. The order is determined by which type of external video device(s) is connected.
Each time you press the key combination, you will step to the next choice.
• If you only have an external CRT connected, the order is: internal display -> external CRT ->
simultaneous display -> internal display.
• If you only have an HDMI device connected, the order is: internal display -> HDMI display
-> simultaneous display -> internal display.
• If you have external CRT and HDMI devices connected, the order is: internal display ->
external CRT -> simultaneous internal and external CRT -> HDMI display - simultaneous
internal and HDMI display -> internal display.
• If you have an external CRT and DVI devices connected to the port replicator, the order is:
internal display -> external CRT -> simultaneous internal and external CRT -> DVI display > simultaneous internal and DVI display. -> internal display.
41 - Keyboard
Curlin_WWAN-B6FJ-5051-02ENZ)-00.book Page 42 Tuesday, October 19, 2010 1:57 PM
Touchpad/Active Digitizer/Touchscreen
Scroll
Sensor
Figure 16. Touchpad pointing device
Using the Touchpad
The touchpad is built into your LifeBook Tablet PC. It is used to control the movement of the cursor to
select items on your display panel. The touchpad is composed of a cursor control below the center of the
keyboard, two buttons below it, and a scroll sensor on the right edge of the cursor control. The left button
functions the same as a left mouse button while the right button has the same function as a right mouse
button. When used with the cursor control, the scroll sensor allows you to scroll up and down a screen.
The actual functionality of the buttons may vary depending on the application that is being used.
42 - Touchpad/Active Digitizer/Touchscreen
Curlin_WWAN-B6FJ-5051-02ENZ)-00.book Page 43 Tuesday, October 19, 2010 1:57 PM
Clicking
Clicking means pushing and releasing a button. To
left-click, move the cursor to the item you wish to
select, press the left button once, and then
immediately release it. To right-click, move the
mouse cursor to the item you wish to select, press
the right button once, and then immediately release
it. You also have the option to perform the clicking
operation by tapping lightly on the touchpad once.
Figure 18. Clicking with Touchpad
Figure 17. Clicking with button
43 - Touchpad/Active Digitizer/Touchscreen
Figure 19. Right-clicking with button
Curlin_WWAN-B6FJ-5051-02ENZ)-00.book Page 44 Tuesday, October 19, 2010 1:57 PM
Double-Clicking
Double-clicking means pushing and releasing the left
button twice in rapid succession. This procedure does
not function with the right button. To double-click, move
the cursor to the item you wish to select, press the left
button twice, and immediately release it. You can also
perform the double-click operation by tapping lightly on
the Touchpad twice.
Figure 20. Double-clicking with button
Figure 21. Double-clicking with Touchpad
• IF THE INTERVAL BETWEEN CLICKS IS TOO LONG, THE DOUBLE-CLICK WILL NOT BE EXECUTED.
• PARAMETERS FOR THE TOUCH PAD CAN BE ADJUSTED FROM THE MOUSE DIALOG BOX LOCATED IN
THE
WINDOWS CONTROL PANEL.
44 - Touchpad/Active Digitizer/Touchscreen
Curlin_WWAN-B6FJ-5051-02ENZ)-00.book Page 45 Tuesday, October 19, 2010 1:57 PM
Dragging
Dragging means pressing and holding the left button,
while moving the cursor. To drag, move the cursor to
the item you wish to move. Press and hold the left
button while moving the item to its new location and
then release it. Dragging can also be done using the
Touchpad. First, tap the Touchpad twice over the item
you wish to move making sure to leave your finger on
the pad after the final tap. Next, move the object to its
new location by moving your finger across the
Touchpad, and then release your finger.
Figure 22. Dragging with button
Figure 23. Dragging with Touchpad
45 - Touchpad/Active Digitizer/Touchscreen
Curlin_WWAN-B6FJ-5051-02ENZ)-00.book Page 46 Tuesday, October 19, 2010 1:57 PM
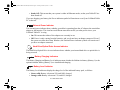
Scrolling
Using the scrolling strip allows you to navigate through a
document quickly without using the window’s scroll bars.
This is particularly useful when you are navigating
through on-line pages. To scroll, slide your finger up and
down the scroll strip on the right side of the cursor control
pad.
Figure 24. Scrolling with the Scroll Strip
Touchpad Control Adjustment
The Windows Control Panel allows you to customize your touchpad with selections made from within the
Mouse Properties dialog box. There are three aspects of operation which you can adjust:
• Buttons: This tab lets you set up the buttons for right or left handed operation, in addition to setting
up the time interval allowed between clicks in double-clicking.
• Pointers: This tab lets you set up the scheme for the cursor depending on its functionality.
• Pointer Options: This tab lets you set up a relation between the speed of your finger motion and
the speed of the cursor. It also allows you to enable a Pointer Trail for the cursor arrow.
46 - Touchpad/Active Digitizer/Touchscreen
Curlin_WWAN-B6FJ-5051-02ENZ)-00.book Page 47 Tuesday, October 19, 2010 1:57 PM
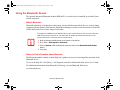
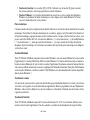
Active Digitizer Display
NOTE: Depending upon your system
configuration, in addition to the active digitizer,
you may also have a capacitive touch panel that
responds to finger touch and touch gestures. (This
configuration is called a “Dual Digitizer”.) For
more information about the touchscreen, refer to
“Using the Optional Capacitive Touchscreen” on
page 51.
The integrated active digitizer allows you to use the
included stylus as a pointing device. You can use the
stylus to click, double-click, drag items and icons,
write text, or to draw like a pen or pencil in
applications that support this behavior, such as
drawing or painting programs. See the
documentation that came with your application for
details.
Figure 25. Using the Active Digitizer Display
• DO NOT USE EXCESSIVE FORCE WHEN TAPPING OR WRITING ON THE SCREEN WITH THE STYLUS.
EXCESSIVE FORCE COULD RESULT IN DAMAGE TO THE LED AND/OR ACTIVE DIGITIZER.
• TO PURCHASE ADDITIONAL OR REPLACEMENT STYLUSES, VISIT FUJITSU’S ACCESSORIES WEBSITE AT:
WWW.SHOPFUJITSU.COM.
47 - Touchpad/Active Digitizer/Touchscreen
Curlin_WWAN-B6FJ-5051-02ENZ)-00.book Page 48 Tuesday, October 19, 2010 1:57 PM
Clicking on Active Digitizer Display
To left-click, touch the object you wish to select and
then lift the stylus tip immediately.
Figure 27. Right-clicking Active Digitizer
Right-Clicking on Active Digitizer
Figure 26. Clicking on the Active Digitizer Display
Right-click can be accomplished by holding the
front of the toggle button down while tapping on
the screen. To change the settings for the rightclick feature, go to Start -> Control Panel -> Pen
and Touch. In the Pen Options tab, select “Press
and Hold” then click the [Settings] button.
48 - Touchpad/Active Digitizer/Touchscreen
Curlin_WWAN-B6FJ-5051-02ENZ)-00.book Page 49 Tuesday, October 19, 2010 1:57 PM
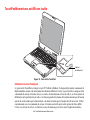
Double-Clicking
To double-click, touch the item twice, and then
immediately remove the stylus tip.
Figure 28. Double-clicking the Display
Dragging
Dragging means moving an item with the stylus by
touching the screen, moving and then lifting the stylus.
To drag, touch the Active Digitizer Display with your
stylus on the item you wish to move. While continuing
to touch the screen with the stylus, drag the item to its
new location by moving the stylus across the screen,
and then lifting the stylus to release it.
Figure 29. Dragging on the Display
49 - Touchpad/Active Digitizer/Touchscreen
Curlin_WWAN-B6FJ-5051-02ENZ)-00.book Page 50 Tuesday, October 19, 2010 1:57 PM
Calibrating the Active Digitizer Display
In order to ensure accurate tracking between the stylus and cursor, you must run the Calibration Utility
before you use the system for the first time, or after you change the display resolution.
To run the calibration utility in Windows 7:
1
2
3
4
Go to Start -> Control Panel.
Double-click the Tablet PC Settings icon and select the Display tab
Click the [Calibrate] button.
Adjust the display of your Tablet PC to a comfortable angle and find the (+) symbol in the upper-left corner of
the display.
DO NOT USE EXCESSIVE FORCE WHEN TAPPING ON THE SCREEN DURING CALIBRATION. USE OF
EXCESSIVE FORCE COULD RESULT IN DAMAGE TO THE LED AND/OR TOUCH PANEL.
5
Using the stylus, firmly touch the screen directly on the (+) symbol. Lift the stylus from the screen and the target
will move to a different location on the screen.
6
7
8
Repeat step 5 until you have selected all of the (+) symbols.
Once you have selected all the symbols, press the [OK] button.
Touch the stylus to various points on the screen to verify that the screen is correctly calibrated. If you are not
satisfied with the screen’s calibration, press the [Calibrate]) button to begin again.
50 - Touchpad/Active Digitizer/Touchscreen
Curlin_WWAN-B6FJ-5051-02ENZ)-00.book Page 51 Tuesday, October 19, 2010 1:57 PM
Using the Optional Capacitive Touchscreen
Certain configurations of this Tablet PC have an optional dual digitizer that allows you to use either the
stylus or your finger(s) as a pointing device. This type of display also allows you to use “gestures” to
perform such actions as scroll, zoom, and rotate.
• GESTURE SUPPORT IS DETERMINED BY THE APPLICATION IN USE.
• THE STYLUS TAKES PRECEDENCE OVER FINGER TOUCH. IF THE STYLUS IS WITHIN ACTIVE RANGE OF
THE SCREEN, FINGER TOUCH WILL BE DISABLED.
• WHEN ONE FINGER IS USED ON THE TOUCHSCREEN, IT BEHAVES IN THE SAME MANNER AS A STYLUS.
Right-clicking the touchscreen
To perform a right-click action using two fingers, press the first finger at the location you want to perform
a right-click, then quickly tap and release the second finger on the screen.
Gesture Mode
To initiate gesture mode, two fingers must touch the screen within one 10th of a second of each other. If
the second finger touches the screen after one 10th of a second has elapsed, the second finger is ignored.
Gesture mode ends when both fingers are removed from the screen. Note that if a gesture can’t be
recognized, no action is taken. In that case, remove both fingers from the screen and try again.
Scrolling Gesture
To scroll through long documents or on a web page, place both fingers on the screen and move them in
parallel in the same direction; if only one finger moves, no scrolling will occur. You can scroll vertically
or horizontally, depending upon the direction of the gesture.
Zoom Gesture
The zoom gesture is especially helpful when viewing pictures. To zoom in, place two fingers on the item
you want to enlarge, then spread them away from each other. To zoom out, place two fingers on the item
you want to reduce, then move them towards each other.
Rotate Gesture
To change the orientation of an object on the screen, place two fingers on the image you want to rotate,
then move them in opposite directions (as if you were turning a knob). The direction the item turns is
dependant upon the direction you move your fingers.
51 - Touchpad/Active Digitizer/Touchscreen
Curlin_WWAN-B6FJ-5051-02ENZ)-00.book Page 52 Tuesday, October 19, 2010 1:57 PM
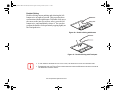
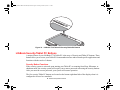
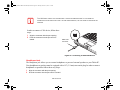
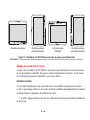
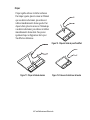
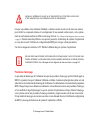
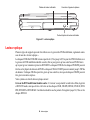
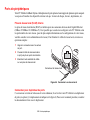
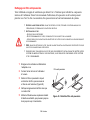
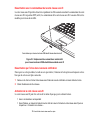
Installing a Pen Tether
To prevent dropping or losing your pen, you should
attach it to your system using the pen tether that is
included with the system.
To attach the pen tether to your Tablet PC, perform
the following steps:
1
Attach the end of the pen tether with the smaller loop
to your pen. To do so, push the end of the tether
through the hole in the pen, then thread the opposite
end of the tether through the loop.
2
Attach the end of the pen tether with the larger loop to
the attachment point on your tablet. To do so, insert
the end of the pen tether through the attachment
point, then feed the pen through the large loop in the
tether.
52 - Touchpad/Active Digitizer/Touchscreen
Figure 30. Installing a Pen Tether
Curlin_WWAN-B6FJ-5051-02ENZ)-00.book Page 53 Tuesday, October 19, 2010 1:57 PM
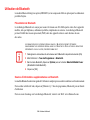
Volume Control
Your Fujitsu LifeBook Tablet PC has multiple volume controls which interact with each other.
ANY SOFTWARE THAT CONTAINS AUDIO FILES WILL ALSO CONTAIN A VOLUME CONTROL OF ITS OWN. IF
YOU INSTALL AN EXTERNAL AUDIO DEVICE THAT HAS AN INDEPENDENT VOLUME CONTROL, THE
HARDWARE VOLUME CONTROL AND THE SOFTWARE VOLUME CONTROL WILL INTERACT WITH EACH
OTHER. IT SHOULD BE NOTED THAT IF YOU SET YOUR SOFTWARE VOLUME TO
OFF, YOU WILL OVERRIDE
THE EXTERNAL VOLUME CONTROL SETTING.
Controlling the Volume
The volume can be controlled in several different ways:
• Volume can be changed or muted from within the Volume Control in the system tray.
• Volume can be controlled with the F8 and F9 functions keys. Pressing [F8] repeatedly while holding
[Fn] will decrease the volume of your Tablet PC. Pressing [F9] repeatedly while holding [Fn] will
increase the volume of your Tablet PC.
• Volume can be muted by pressing the [F3] key while holding down the [Fn] key. To restore audio,
repeat the [Fn+F3] procedure.
• Volume can be controlled by many volume controls that are set within individual applications.
• Certain external audio devices you might connect to your system may have hardware volume
controls.
Each source discussed above puts an upper limit on the volume level that must then be followed by the
other sources. We recommend that you experiment with the various volume controls to discover the
optimal sound level.
53 - Volume Control
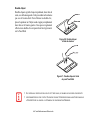
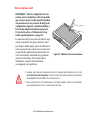
Curlin_WWAN-B6FJ-5051-02ENZ)-00.book Page 54 Tuesday, October 19, 2010 1:57 PM
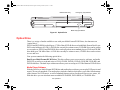
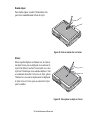
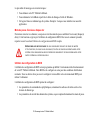
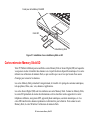
Modular Bay
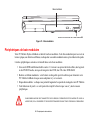
Modular Bay Release Latch
Figure 31. Modular Bay
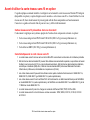
Modular Bay Devices
Your Fujitsu LifeBook Tablet PC contains a Modular Bay. The Modular Bay can house an optical drive,
a Lithium ion battery, a modular second hard disk drive and a weight saver.
Your Modular Bay will have one of the following devices installed.
• Modular Dual-Layer Multi-Format DVD Writer: This allows you to access movies, software, and
audio DVD/CDs and record to DVD, CD, and DVD-RAM discs.
• Modular Lithium ion battery: This is a rechargeable battery that can be used to power your
LifeBook Tablet PC when an adapter is not connected.
• Modular hard drive: This allows you to increase the storage capacity of your Tablet PC.
• Weight Saver: This is used to fill the bay when no device is needed.
YOU SHOULD NEVER LEAVE YOUR MODULAR BAY EMPTY WHEN THE TABLET PC IS IN OPERATION. IF
LEFT EMPTY, DUST OR FOREIGN MATTER MAY ACCUMULATE INSIDE THE TABLET PC.
54 - Modular Bay Devices
Curlin_WWAN-B6FJ-5051-02ENZ)-00.book Page 55 Tuesday, October 19, 2010 1:57 PM
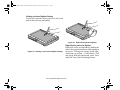
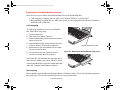
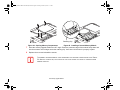
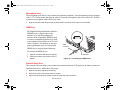
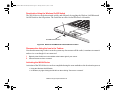
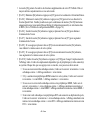
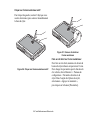
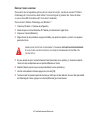
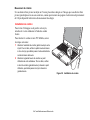
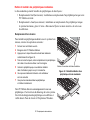
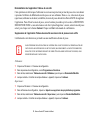
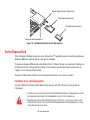
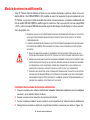
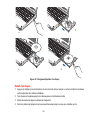
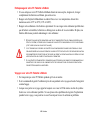
Removing and Installing Modular Devices
There are two ways to remove and install modular devices in the Modular Bay:
• Cold-swapping: swapping devices while your LifeBook Tablet PC is powered off.
• Hot-swapping: swapping devices while your system is active using the Safely Remove Hardware
icon from your system tray.
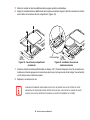
Cold-swapping
To cold-swap modular devices in your Modular
Bay follow these easy steps:
1
2
3
Close any open files.
4
While holding the latch, slide your device out until it
is clear of the bay. This will require light force.
Shut down your LifeBook Tablet PC.
Press the Modular Bay release latch in the direction
shown in Figure 32.
5
Slide the device you are installing into your Tablet
PC until it clicks into place.
6
7
It is now safe to turn your Tablet PC back on.
Modular Bay Release Latch
Figure 32. Removing/Installing Modular Bay Device
You can now access and use the device.
Your Tablet PC will automatically detect the device
and activate it within your system. The drive letters
associated with the device will be created and listed
under My Computer and Windows Explorer.
Hot-swapping
Hot-swapping is provided through the Safely Remove Hardware utility. The icon for the utility appears in
the system tray. Click on the icon and follow the on-screen instructions.
55 - Modular Bay Devices
Curlin_WWAN-B6FJ-5051-02ENZ)-00.book Page 56 Tuesday, October 19, 2010 1:57 PM
Figure 33. LifeBook T730 Tablet PC Security/Tablet PC Buttons
LifeBook Security/Tablet PC Buttons
A unique feature of your LifeBook T730 Tablet PC is the array of Security and Tablet PC buttons. These
buttons allow you to secure your Tablet PC from unauthorized use and to launch specific applications and
functions with the touch of a button.
Security Button Functions
If the security system is activated, upon starting your Tablet PC or resuming from Sleep, Hibernate, or
shutdown mode, the security system will require you to enter a password code using the security buttons.
After you enter the correct password, your system will resume operation.
The five security/Tablet PC buttons are located on the bottom right-hand side of the display when it is
configured to be used as a notebook.
56 - LifeBook Security/Tablet PC Buttons
Curlin_WWAN-B6FJ-5051-02ENZ)-00.book Page 57 Tuesday, October 19, 2010 1:57 PM
All five buttons are used when implementing security functions. Four of the buttons are used to enter the
password, and the fifth is used as an Enter button. See Table 1 for information about each of the Security
buttons.
Button Icon
System State
System is pre-boot or resuming
from suspend
Security Panel Function
Security Button 1
Security Button 2
Security Button 3
Security Button 4
Security Enter Button
Table 1. Security Panel Button Functions
Pre-logon button functions
All five buttons can be used before logging on to Windows (i.e., when the Windows logon screen is
displayed). Three of the buttons have secondary functions. See Table 2 for information about the prelogon functions.
<Tab>/<Shift><Tab>
When you press the [Page Down] button when the system is pre-logon, each press of the button will act
as if you had pressed the [Tab] key.
When you press the [Fn] button then press and release the [Page Down] button, each press of the button
will act as if you had pressed the [Shift]+[Tab] key combination.
57 - LifeBook Security/Tablet PC Buttons
Curlin_WWAN-B6FJ-5051-02ENZ)-00.book Page 58 Tuesday, October 19, 2010 1:57 PM
<Enter>/<Escape>
When you press the [Page Up] button when the system is pre-logon, each press of the button will act as if
you had pressed the [Enter] key.
Button
Icon
System State
System is prelogon (Windows
logon screen is
displayed)
Tablet PC Function
Secondary Functions
(Fn + Button)
<Tab>
<Shift><Tab>
<Enter>
<Escape>
Rotate screen
None
Used to invoke
secondary function
None
Ctl+Alt+Del Button
None
Table 2. Pre-logon Tablet PC Button Functions
When you press the [Fn] button then press and release the [Page Up] button, each press of the button will
act as if you had pressed the [Escape] key.
Screen Rotation
The screen rotation feature would normally be used when the system is configured as a tablet. When you
would like to use the tablet as an eBook, for example, you would use the portrait orientation; when
accessing spreadsheets or using the system as a notebook, you would more typically use landscape
orientation.
When the system is changed to tablet configuration, the orientation automatically changes to portrait mode
by default.
58 - LifeBook Security/Tablet PC Buttons
Curlin_WWAN-B6FJ-5051-02ENZ)-00.book Page 59 Tuesday, October 19, 2010 1:57 PM
THE SCREEN ORIENTATION DEFAULT CAN BE CHANGED BY GOING TO THE CONTROL PANEL AND
DOUBLE-CLICKING ON TABLET PC SETTINGS AND THEN CLICKING ON THE GO TO ORIENTATION ICON
AND SELECTING THE DESIRED SETTINGS IN THE DISPLAY PROPERTIES. AFTER CHANGING THE
SETTINGS, SAVE THEM IN FUJITSU TABLET CONTROLS.
When you press the [Screen Rotation] button when the system is in pre-boot, the system screen orientation
changes from portrait (vertical) to landscape (horizontal) or from landscape to portrait.
Function / Fujitsu Menu Utility Button
The [Function] button works in conjunction with the other application buttons to provide additional
functionality for the buttons. Refer to specific details above.
Post-logon button functions
All five buttons can be used after logging on to Windows. Four of the buttons have secondary functions.
See Table 3 for information about each of the post-logon functions.
Page Down / Application A Button
When you press the [Page Down] button when the system is running, each press of the button will scroll
the screen down one frame. This allows you to navigate quickly through large documents.
When you press the [Fn] button then press and release the [Page Down/Application A] button, you will
automatically start whichever program is assigned to the button. The default application for this button is
Calculator. See “Changing Tablet PC Button Functions” on page 61 to select a different application for
this button.
Page Up / Application B Button
When you press the [Page Up] button when the system is running, each press of the button will scroll the
screen up one frame. This allows you to navigate quickly through large documents.
59 - LifeBook Security/Tablet PC Buttons
Curlin_WWAN-B6FJ-5051-02ENZ)-00.book Page 60 Tuesday, October 19, 2010 1:57 PM
When you press the [Fn] button then press and release the [Page Up/Application B] button, you will
automatically start whichever program is assigned to the button. The default application for this button is
Microsoft Journal. See “Changing Tablet PC Button Functions” on page 61 to select a different
application for this button.
Button Icon
System State
System is postlogon (Windows
desktop is
displayed)
Primary Tablet PC
Function
Secondary Functions
(Fn + Button)
Page Down
User-defined Application A
(Default = Calculator)
Page Up
User-Defined Application B
(Default = MS Journal)
Screen Rotation
Display Switching:
1. LED only
2. CRT only
3. Dual Display
Secondary
Function Selection
Fujitsu Menu Utility
Ctl+Alt+Del Button
None
Table 3. Post-logon Tablet PC Button Functions
Screen Rotation /Display Switching Button
The screen rotation feature would normally be used only when the system is configured as a tablet. When
you would like to use the tablet as an eBook, for example, you would use the portrait orientation; when
accessing spreadsheets or using the system as a notebook, you would more typically use landscape
orientation.
When the system is changed to tablet configuration, the orientation automatically changes to portrait mode
by default.
60 - LifeBook Security/Tablet PC Buttons
Curlin_WWAN-B6FJ-5051-02ENZ)-00.book Page 61 Tuesday, October 19, 2010 1:57 PM
THE SCREEN ORIENTATION DEFAULT CAN BE CHANGED BY GOING TO THE CONTROL PANEL AND
PC SETTINGS AND THEN CLICKING ON THE GO TO ORIENTATION ICON
AND SELECTING THE DESIRED SETTINGS IN THE DISPLAY TAB. AFTER CHANGING THE SETTINGS, SAVE
THEM IN FUJITSU TABLET CONTROLS.
DOUBLE-CLICKING ON TABLET
When you press the [Screen Rotation /Display Switching] button, the system screen orientation changes
from portrait (vertical) to landscape (horizontal) or from landscape to portrait.
Pressing the [Fn] button while pressing the [Screen Rotation] button will switch the display output in the
following order: built-in display only, external display only, dual display.
Function / Fujitsu Menu Utility Button
The [Function] button works in conjunction with the other application buttons to provide additional
functionality for the buttons. Refer to specific details above.
Pressing the [Fn] button twice in succession causes the Fujitsu Menu Utility to appear on your screen,
allowing you to modify certain system settings.
Ctl+Alt+Del Button
Pressing and holding the [Ctl-Alt-Del] button for up to 8 seconds launches the Logon screen or the
Windows Task Manager.
Changing Tablet PC Button Functions
The Application A and B buttons can be changed to launch a program or perform an action you select. By
default, the Application A button launches the Calculator, and the Application B button launches MS
Journal.
To launch different applications or cause the Application A or B buttons to perform a specific action:
1
Click on the Tablet PC Settings icon in the Control Panel.
61 - LifeBook Security/Tablet PC Buttons
Curlin_WWAN-B6FJ-5051-02ENZ)-00.book Page 62 Tuesday, October 19, 2010 1:57 PM
2
3
4
Select the Buttons tab and select the button you would like to change from the list.
5
Click [OK], then click [OK] again. The buttons will now perform the actions you have assigned to them.
Click [Change] and open the drop down list in the Press: field.
Select the action you would like the button to perform. If you want to launch a program, click on Launch an
Application then browse to the location of the program.
Setting up LifeBook Security Panel
When you receive your Tablet PC, the security panel application is pre-installed without any passwords.
The following sections provide detailed information on your security panel, how to set, change or remove
passwords.
Numbered Buttons
Use these buttons to enter your password.
Enter Button
After entering the button strokes, push this button to enter the password into the Tablet PC.
Passwords
The user and supervisor password may be set on this Tablet PC. A supervisor password is typically the
same for all tablets and notebooks in a work group, office, or company to allow for system management.
Individual computers in a group environment should not use a common password. A password consists
of one to five button strokes plus the enter button. A valid stroke consists of pushing one or up to four
buttons simultaneously.
The following are valid button strokes:
•
•
•
•
Pushing [4] by itself
Pushing [2] and [3] at the same time
Pushing [1], [2], and [4] at the same time
Pushing [1], [2], [3], and [4] at the same time
62 - LifeBook Security/Tablet PC Buttons
Curlin_WWAN-B6FJ-5051-02ENZ)-00.book Page 63 Tuesday, October 19, 2010 1:57 PM
The following are valid passwords. The numbers within braces ({ }) are button strokes using more than
one button.
• {[2]+[3]}, [1], [Enter]
• [4], [enter]
• {[1]+[3]}, {[2]+[3]+[4]}, [1], [4], [2], [Enter]
Setting Passwords
When shipped from the factory, no passwords are set. You have a choice of having no password or setting
a supervisor and user password. You must set the supervisor password before the user password.
•
THE PURPOSE OF SUPERVISOR PASSWORD IS TO BE ABLE TO BYPASS THE USER PASSWORD IN CASE THE USER
PASSWORD IS FORGOTTEN. THE SUPERVISOR PASSWORD ALONE WILL NOT LOCK THE SYSTEM.
•
YOU MUST SET THE SUPERVISOR AND USER PASSWORDS FOR THE SECURITY PANEL TO WORK.
Setting Supervisor Password
You must have set a supervisor password before setting any user passwords. The supervisor password can
bypass the user password.
1
2
3
4
Go to the Start menu.
Click on Run.
Type in: C:\Program Files\Fujitsu\Security Panel Application\Supervisor\ FJSECS.EXE, then press [Enter]
Follow the on-screen instructions to set the Supervisor password.
Setting User Password
1
2
3
4
Go to the Start menu.
Click on All Programs.
Click on Security Panel Application -> Security Panel Application.
Follow the on-screen instructions to set the user password.
63 - LifeBook Security/Tablet PC Buttons
Curlin_WWAN-B6FJ-5051-02ENZ)-00.book Page 64 Tuesday, October 19, 2010 1:57 PM
YOU MAY CHANGE OR REMOVE THE SUPERVISOR OR USER PASSWORD BY REPEATING THE STEPS
DEFINED ABOVE.
Using Your LifeBook Security Panel
The security lock feature is in effect both when the system resumes from Off, Sleep, or Hibernation state.
You always need to push the Security Panel buttons to input the user password. Your system will not begin
the boot sequence until you enter your supervisor/user password.
From Off State
1
2
Turn on your system.
When the Security Indicator flashes, enter the password and press Enter button (e.g., if the password is 22222,
first press Button 2 five times, then press the Enter button). The Tablet PC will boot to normal operation.
From Sleep/Hibernation State
1 Press your Suspend/Resume button.
2 When the Security Indicator flashes, enter the password and press Enter button.The Tablet PC should resume
normal operation.
Incorrect Password Entry
If an invalid supervisor or user password is entered three times in succession, the system will “beep” for
about one minute. If a valid password is entered within a minute (while system beeps), the beeping will
stop and the Tablet PC will resume normal operation. If no password is entered or an invalid password is
entered while the system beeps, the system will return to its previous locked state (sleep or off) and the
Security Indicator will go off. To reactivate the Tablet PC after a password failure, you must press the
Suspend/Resume button, then enter a correct password.
64 - LifeBook Security/Tablet PC Buttons
Curlin_WWAN-B6FJ-5051-02ENZ)-00.book Page 65 Tuesday, October 19, 2010 1:57 PM
REMEMBER THE USER PASSWORD YOU SPECIFIED ON THE SECURITY PANEL APPLICATION. IF YOU
FORGET THE PASSWORD YOU WILL NOT BE ABLE TO USE YOUR COMPUTER. THE SUPERVISOR
PASSWORD CAN OVERRIDE THE USER PASSWORD.
Precautions
Opening and Closing the Cover
By default, closing the cover automatically places your system into Sleep mode.
To change the default when the cover is closed:
1
2
3
Open the system Control Panel and select Power Options. (Windows XP: Select the Advanced tab).
Click Choose what closing the lid does in the left pane.
Select the desired action for When I close the lid, then click the [Save changes] or [Apply] button (depending
upon your operating system).
Low Battery Operations
If your Tablet PC has a low battery, pushing the suspend/resume button only turns on the Security
Indicator. Your Tablet PC does not unlock, the Security Indicator turns off after one minute. To resume
normal operation, first attach a power supply to the Tablet PC. Then you may unlock the Tablet PC.
Uninstalling/Re-installing the Security Panel Application
You have two options when uninstalling the security panel application:
• Remove passwords and uninstall the security panel application software. This will disable all
security features.
• Uninstall the security panel application with password still active. This will not allow any changes
to the password.
65 - LifeBook Security/Tablet PC Buttons
Curlin_WWAN-B6FJ-5051-02ENZ)-00.book Page 66 Tuesday, October 19, 2010 1:57 PM
Uninstalling the Security Panel Application Software
Remove passwords when User wants no password protection whatsoever and doesn’t want to give
anybody the utility to set a password on their computer. In this case, if passwords (supervisor, user, or
both) are set, the passwords must first be cleared BEFORE removing the application. To clear passwords,
follow same procedure in SETTING PASSWORD CODES except this time, select REMOVE, enter
current password then click Next. When asked to confirm select Yes.
Removing Security Panel Application with Passwords Still Active
Using this feature will not allow any changes to the password.
REMOVING THE APPLICATIONS DOES NOT REMOVE THE PASSWORD. IT SIMPLY REMOVES THE ABILITY
TO CHANGE/ADD/REMOVE PASSWORDS. TO CHANGE YOUR PASSWORD YOU MUST REINSTALL THE
APPLICATION.
User:
1
2
3
4
Go to Start -> Control Panel.
Open Programs and Features in the Control Panel.
Select Security Panel for User in the list, and click Uninstall/Change.
When User Account Control box appears, click Continue.
Supervisor:
1
2
3
4
Go to Start -> Control Panel.
Open Add or Remove Programs Properties in the Control Panel.
Select the Security Panel for Supervisor in the list, and click Uninstall/Change.
When User Account Control box appears, click Continue.
66 - LifeBook Security/Tablet PC Buttons
Curlin_WWAN-B6FJ-5051-02ENZ)-00.book Page 67 Tuesday, October 19, 2010 1:57 PM
Reinstalling the Security Panel Application
To reinstall supervisor or user security application, you will need your Drivers and Applications CD. The
Utilities\Security Panel Application folder contains two separate folders: Supervisor and User. The
setup files for supervisor and user security applications are contained in those folders.
1
Go to the Utilities\Security Panel Application\ Supervisor folder on the CD and double-click the setup.exe
file. The Installing Security Panel Application window will appear. Follow the instructions on the screen.
2
Go to the Utilities\Security Panel Application\User folder on the CD and double-click the setup.exe file. The
Installing Security Panel Application window will appear. Follow the instructions on the screen.
Supervisor and user passwords can be set via Windows software using the FJSECS.exe and FJSECU.exe
files, respectively. FJSECU.exe for the user password cannot run without first setting a supervisor
password. You need to run FJSECS.exe first to set the supervisor password. Follow instructions under
Setting Passwords on page 63.
If you forget both passwords, please contact Fujitsu America Service and Support at 1-800-8FUJITSU (1800-838-5487). Fujitsu America charges a service fee for unlocking a password-restricted Tablet PC.
When calling please have a valid credit card and provide proof of ownership. You will then be given
instructions on where to ship your Tablet PC.
67 - LifeBook Security/Tablet PC Buttons
Curlin_WWAN-B6FJ-5051-02ENZ)-00.book Page 68 Tuesday, October 19, 2010 1:57 PM
Chapter 2
Getting Started with Your LifeBook
Power Sources
Your Fujitsu LifeBook Tablet PC has three possible power sources: a primary Lithium ion battery, an AC
adapter or an optional Auto/Airline adapter.
Connecting the Power Adapters
The AC adapter or optional Auto/Airline adapter provides power for operating your Tablet PC and
charging the batteries.
Connecting the AC Adapter
1 Plug the DC output cable into the DC power jack of your LifeBook Tablet PC.
2 Plug the AC adapter into an AC electrical outlet.
Connecting the Optional Auto/Airline Adapter
1 Plug the DC output cable into the DC power jack on your Tablet PC.
2 Plug the Auto/Airline adapter into the cigarette lighter of an automobile, or,
3 Plug the Auto/Airline adapter into the DC power jack on an airplane seat.
68
Curlin_WWAN-B6FJ-5051-02ENZ)-00.book Page 69 Tuesday, October 19, 2010 1:57 PM
AC Adapter
DC Power Jack
Figure 34. Connecting the AC Adapter
Switching from AC Adapter Power or the Auto/Airline Adapter to Battery Power
1
2
Be sure that you have at least one charged battery installed.
Remove the AC adapter or the Auto/Airline adapter.
THE LITHIUM ION BATTERY IS NOT CHARGED UPON PURCHASE. INITIALLY, YOU WILL NEED TO CONNECT
EITHER THE AC ADAPTER OR THE AUTO/AIRLINE ADAPTER TO USE YOUR TABLET PC.
69 - Power Sources
Curlin_WWAN-B6FJ-5051-02ENZ)-00.book Page 70 Tuesday, October 19, 2010 1:57 PM
Starting Your LifeBook Tablet PC
Power On
Power/Suspend/Resume Switch
The Power/Suspend/Resume switch is used to turn on your LifeBook Tablet PC from its off state. Once
you have connected your AC adapter or charged the internal Lithium ion battery, you can power on your
LifeBook Tablet PC.
WHEN YOU TURN ON YOUR LIFEBOOK TABLET PC BE SURE YOU HAVE A POWER SOURCE. THIS MEANS
AC OR AUTO/AIRLINE
ADAPTER IS CONNECTED AND HAS POWER.
THAT AT LEAST ONE BATTERY IS INSTALLED AND CHARGED, OR THAT THE
To turn on your LifeBook Tablet PC from its off state, slide the Power/Suspend/Resume switch, located
above the keyboard to the right. When you are done working you can either leave your Tablet PC in
Suspend mode or you can turn it off. See “Sleep Mode” on page 77 and “Powering Off” on page 80.
Figure 35. Power/Suspend/Resume Switch
70 - Starting Your LifeBook Tablet PC
Curlin_WWAN-B6FJ-5051-02ENZ)-00.book Page 71 Tuesday, October 19, 2010 1:57 PM
DO NOT CARRY YOUR LIFEBOOK TABLET PC AROUND WITH THE POWER ON OR SUBJECT IT TO SHOCKS
OR VIBRATION, AS YOU RISK DAMAGING YOUR TABLET PC.
When you power on your LifeBook, it will perform a Power On Self Test (POST) to check the internal
parts and configuration for correct functionality. If a fault is found, your LifeBook Tablet PC will emit an
audio warning and/or an error message will be displayed. See “Power On Self Test Messages” on
page 117. Depending on the nature of the problem, you may be able to continue by starting the operating
system or by entering the BIOS setup utility and revising the settings.
After satisfactory completion of the POST, your Tablet PC will load your operating system.
NEVER TURN OFF YOUR LIFEBOOK TABLET PC DURING THE POWER ON SELF TEST (POST) OR IT WILL
CAUSE AN ERROR MESSAGE TO BE DISPLAYED WHEN YOU TURN YOUR LIFEBOOK TABLET PC ON THE
NEXT TIME. See “Power On Self Test Messages” on page 117.
Boot Sequence
The procedure for starting-up your Tablet PC is termed the Bootup sequence and involves your Tablet
PC’s BIOS. When your LifeBook Tablet PC is first turned on, the main system memory is empty, and it
needs to find instructions to start up your Tablet PC. This information is in the BIOS program. Each time
you power up or restart your Tablet PC, it goes through a boot sequence which displays a Fujitsu logo until
your operating system is loaded. During booting, your Tablet PC is performing a standard boot sequence
including a Power On Self Test (POST). When the boot sequence is completed without a failure and
without a request for the BIOS Setup Utility, the system displays the operating system’s opening screen.
71 - Starting Your LifeBook Tablet PC
Curlin_WWAN-B6FJ-5051-02ENZ)-00.book Page 72 Tuesday, October 19, 2010 1:57 PM
The boot sequence is executed when:
• You turn on the power to your LifeBook Tablet PC.
• You restart your Tablet PC from the Windows Shut Down dialog box.
• The software initiates a system restart. Example: When you install a new application.
Hard Disk Drive Passwords
To provide additional security for your data, you can assign passwords to your hard disk drive(s). This
feature is managed in the system BIOS Setup Utility. See BIOS Setup Utility below for information about
accessing the utility.
REMEMBER YOUR PASSWORDS. IF YOU SET AND FORGET YOUR USER AND MASTER HARD DISK
PASSWORDS, FUJITSU WILL NOT BE ABLE TO RESET IT. YOU MAY LOSE DATA AND HAVE TO REPLACE
YOUR SYSTEM BOARD OR HARD DISK DRIVE.
BIOS Setup Utility
The BIOS Setup Utility is a program that sets up the operating environment for your LifeBook Tablet PC.
Your BIOS is set at the factory for normal operating conditions, therefore there is no need to set or change
the BIOS’ environment to operate your Tablet PC.
The BIOS Setup Utility configures:
• Device control feature parameters, such as changing I/O addresses and boot devices.
• System Data Security feature parameters, such as passwords.
Entering the BIOS Setup Utility
To enter the setup utility, do the following (or use the TrustedCore Menu, as detailed in the next section):
1
2
Turn on or restart your LifeBook Tablet PC.
To enter the BIOS Setup Utility, press the [F2] key once the Fujitsu logo appears on the screen. This will open
the main menu of the BIOS Setup Utility with the current settings displayed.
72 - Starting Your LifeBook Tablet PC
Curlin_WWAN-B6FJ-5051-02ENZ)-00.book Page 73 Tuesday, October 19, 2010 1:57 PM
3
Press the [RIGHT ARROW] or [LEFT ARROW] key to scroll through the other setup menus to review or alter
the current settings.
Using the TrustedCore Menu
When the Fujitsu logo appears on the screen. press the [Enter] key or click on the left mouse or touchpad
button; the TrustedCore Menu will appear.
The TrustedCore Menu provides shortcuts to the following menus and information screens:
• BIOS Setup
• Diagnostic Screen
• Boot Menu
• Patent Information
• System Information
• Continue Booting
Clicking on any of the fields will invoke the screen, information, or action described.
The Boot Menu can also be invoked by pressing the [F12] key when the Fujitsu logo appears on the screen.
BIOS Guide
A guide to your Tablet PC’s BIOS is available online. Please visit our service and support website at
http://www.computers.us.fujitsu.com/support, then select User’s Guides under Online Support. Select
your Product, Series, and Model, then click [Go]. Under the Manuals tab, select the BIOS Guide.
Booting the System
We strongly recommend that you not attach any external devices until you have gone through the initial
power on sequence.
When you turn on your Tablet PC for the first time, it will display a Fujitsu logo on the screen. If you do
nothing the system will load the operating system, and then the Windows Welcome will begin.
73 - Starting Your LifeBook Tablet PC
Curlin_WWAN-B6FJ-5051-02ENZ)-00.book Page 74 Tuesday, October 19, 2010 1:57 PM
Starting Windows the first time
THE FIRST TIME YOU INITIALIZE YOUR WINDOWS SYSTEM, THE SCREEN WILL BE BLANK FOR
APPROXIMATELY TWO MINUTES. THIS IS NORMAL. AFTER INITIALIZATION, A “SET UP WINDOWS” DIALOG
BOX WILL APPEAR.
IMPORTANT: DURING THE SETUP PROCEDURE, DO NOT DISCONNECT THE POWER SUPPLY, PRESS ANY
BUTTONS, OR USE ANY PERIPHERAL DEVICES SUCH AS A MOUSE, KEYBOARD, OR REMOTE CONTROL.
In order to ensure that you receive the most benefits from the Windows operating system, it should be
registered the first time you use it.
1
First of all, you will need to read and accept the End User License Agreements (EULAs).
• IF YOU REJECT THE TERMS OF THE LICENSE AGREEMENTS YOU WILL BE ASKED TO REVIEW THE
LICENSE AGREEMENTS FOR INFORMATION ON RETURNING
WINDOWS OR TO SHUT DOWN YOUR
LIFEBOOK TABLET PC.
• YOU CANNOT USE YOUR TABLET PC UNTIL YOU HAVE ACCEPTED THE LICENSE AGREEMENTS. IF YOU
STOP THE PROCESS YOUR TABLET PC WILL RETURN TO THE BEGINNING OF THE WINDOWS WELCOME
PROCESS, EVEN IF YOU SHUT YOUR TABLET PC DOWN AND START IT UP AGAIN.
2
You will be prompted to enter your User Name and Password and you will be given a chance to select an icon
for your account.
3
4
The next screen asks for a Computer Name and allows you to choose a desktop background.
5
6
On the next screen set your time and date settings.
You will next see a "Help protect Windows automatically" screen in which the default choice is "Use
recommended settings”. The other two choices are "Install important updates only" and "Ask me later". Select
from the three choices.
You will next see the "Select your computer's current location" screen. Make your selection from Home, Work
(Default), and Public location.
74 - Starting Your LifeBook Tablet PC
Curlin_WWAN-B6FJ-5051-02ENZ)-00.book Page 75 Tuesday, October 19, 2010 1:57 PM
7
The "Thank you" screen follows and an offer for free Norton Internet Security is extended. Following are several
screens while Windows checks the system performance.
8
Windows will then boot up for the first time. As noted above, the first time you initialize your system, the screen
will be blank for approximately two minutes. This is normal. During this period, do not disconnect the power
supply, press any buttons, or use any peripheral devices such as mouse, keyboard, or remote control.
Registering Windows with Microsoft
1
After Windows has booted up for the first time, the Control Panel Welcome Center will appear. If the Register
Windows Online icon is not seen in the window, click on “Show all xx items” (where “xx” is the number of topics
in the Welcome Center).
2
Click on Register Windows Online and follow the instructions that appear to register your copy of Windows.
Registering Your LifeBook Tablet PC with Fujitsu
You can register your LifeBook by going to our website at: http://solutions.us.fujitsu.com/. You will
need to be set up with an Internet Service Provider (ISP) to register online.
Installing ClickMe!
ClickMe!
BEFORE INSTALLING THE CLICKME! UTILITY, BE SURE THE WIRELESS LAN SWITCH IS TURNED ON.
The first time you boot up your system, you will see a “Primary Settings for the PC” window. This window
explains the installations which will be performed by the Click Me! utility. If you click [Execute],
ClickMe! will begin installing. If after clicking the button you receive a “User Account Control” window,
you will be asked for your permission to continue. Click [Continue] to continue. If you cancel the
operation, the ClickMe! icon will appear on your desktop for later installation.
75 - Starting Your LifeBook Tablet PC
Curlin_WWAN-B6FJ-5051-02ENZ)-00.book Page 76 Tuesday, October 19, 2010 1:57 PM
THERE MAY BE SOME THIRD-PARTY APPLICATIONS THAT DO NOT GET INSTALLED USING THE CLICKME!
UTILITY. FOR MORE INFORMATION, REFER TO YOUR GETTING STARTED GUIDE.
Fujitsu Driver Update Utility
Your system has a convenient tool called the Fujitsu Driver Update (FDU) utility. With FDU, you can
choose to automatically or manually go to the Fujitsu site to check for new updates for your system. For
more information about the FDU utility, refer to “Automatically Downloading Driver Updates” on
page 125.
76 - Starting Your LifeBook Tablet PC
Curlin_WWAN-B6FJ-5051-02ENZ)-00.book Page 77 Tuesday, October 19, 2010 1:57 PM
Power Management
Your Fujitsu LifeBook Tablet PC has many options and features for conserving battery power. Some of
these features are automatic and need no user intervention. However, others depend on the parameters you
set to best suit your operating conditions, such as those for the display brightness. Internal power
management for your Tablet PC may be controlled from settings made in your operating system, prebundled power management application, or from settings made in BIOS setup utility.
Besides the options available for conserving battery power, there are also some things that you can do to
prevent your battery from running down as quickly. For example, you can create an appropriate power
saving profile, put your Tablet PC into Sleep mode when it is not performing an operation, and you can
limit the use of high power devices. As with all mobile, battery powered computers, there is a trade-off
between performance and power savings.
Power/Suspend/Resume Switch
When your Tablet PC is active, the Power/Suspend/Resume switch can be used to manually put the Tablet
PC into Sleep mode. Push the Power/Suspend/Resume switch when the Tablet PC is active, but not
actively accessing anything, and immediately release the button.
If your Tablet PC is suspended, pushing the Power/Suspend/Resume switch returns it to active operation.
You can tell whether the system is Suspended by looking at the Power indicator. If the indicator is visible
and not flashing, your Tablet PC is fully operational. If the indicator is visible and flashing, the Tablet PC
is in Sleep mode. If the indicator is not visible, the power is off or your Tablet PC is in Hibernation mode.
Sleep Mode
Sleep mode in Windows saves the contents of your system memory during periods of inactivity by
maintaining power to critical parts. This mode turns off the CPU, display, hard drive, and all other internal
components except those necessary to maintain system memory and for restarting.
Your Tablet PC can be put in sleep mode by:
• Pressing the Power/Suspend/Resume switch when your system is turned on.
77 - Power Management
Curlin_WWAN-B6FJ-5051-02ENZ)-00.book Page 78 Tuesday, October 19, 2010 1:57 PM
• Selecting “Sleep” after clicking [Start] then clicking the small arrow at the bottom right of the
window.
• Timing out from lack of activity.
• Allowing the battery to reach the Dead Battery Warning condition.
Your Tablet PC’s system memory typically stores the file on which you are working, open application
information, and any other data required to support operations in progress. When you resume operation
from Sleep mode, your Tablet PC will return to the point where it left off. You must use the
Power/Suspend/Resume switch to resume operation, and there must be an adequate power source
available, or your Tablet PC will not resume.
n
n
n
n
IF RUNNING YOUR TABLET PC ON BATTERY POWER, BE AWARE THAT THE BATTERY CONTINUES TO
DISCHARGE WHILE YOUR TABLET PC IS IN SLEEP MODE, THOUGH NOT AS QUICKLY AS WHEN FULLY
OPERATIONAL.
DISABLING THE POWER/SUSPEND/RESUME SWITCH PREVENTS IT FROM BEING USED TO PUT THE
TABLET PC INTO SLEEP OR HIBERNATION (SAVE-TO-DISK) MODE. THE BUTTON RESUME FUNCTION
CANNOT BE DISABLED.
THE SLEEP OR HIBERNATION MODE SHOULD NOT BE USED WITH CERTAIN EXPRESSCARDS. CHECK
YOUR EXPRESSCARD DOCUMENTATION FOR MORE INFORMATION. WHEN EXPRESSCARDS OR
EXTERNAL DEVICES ARE IN USE, HIBERNATION MODE CANNOT RETURN TO THE EXACT STATE PRIOR TO
SUSPENSION, BECAUSE ALL OF THE PERIPHERAL DEVICES WILL BE RE-INITIALIZED WHEN THE SYSTEM
RESTARTS.
IF YOUR TABLET PC IS ACTIVELY ACCESSING INFORMATION WHEN YOU ENTER THE SLEEP OR HIBERNATION MODE, CHANGES TO OPEN FILES ARE NOT LOST. THE FILES ARE LEFT OPEN AND MEMORY IS
KEPT ACTIVE DURING SLEEP MODE OR THE MEMORY IS TRANSFERRED TO THE INTERNAL HARD DRIVE
DURING HIBERNATION MODE.
THE MAIN ADVANTAGE OF USING HIBERNATION IS THAT POWER IS NOT REQUIRED TO MAINTAIN YOUR
DATA. THIS IS PARTICULARLY IMPORTANT IF YOU WILL BE LEAVING YOUR TABLET PC IN A SUSPENDED
STATE FOR A PROLONGED PERIOD OF TIME. THE DRAWBACK OF USING HIBERNATION MODE IS THAT IT
LENGTHENS THE POWER DOWN AND POWER UP SEQUENCES AND RESETS PERIPHERAL DEVICES.
78 - Power Management
Curlin_WWAN-B6FJ-5051-02ENZ)-00.book Page 79 Tuesday, October 19, 2010 1:57 PM
Hibernation (Save-to-Disk) Feature
The Hibernation feature saves the contents of your Tablet PC’s system memory to the hard drive as a part
of the Suspend/Resume mode. You can enable or disable this feature.
Enable or Disable the Hibernation Feature
The default settings are not enabled. To enable or disable the Hibernation feature follow these steps:
1
2
From the Start menu, select Control Panel, then select the Power Options icon.
Select “Choose what the power button does” or “Choose what closing the lid does”, then make your selections
(Do Nothing, Sleep, Hibernate, or Shut Down).
Windows Power Management
The Power Options icon located in the Windows Control Panel allows you to configure some of the power
management settings. For example, you can use the Power Options to set the timeout values for turning
off the display and hard disks whether you are running the Tablet PC on battery power or one of the
adapters.
Restarting the System
If your system is on and you need to restart it, be sure that you use the following procedure.
1
Click the [Start] button, and then move the mouse over the small arrow at the bottom right of the right-hand
pane.
2
Select Restart from the list.
TURNING OFF YOUR LIFEBOOK TABLET PC WITHOUT EXITING WINDOWS OR TURNING ON YOUR TABLET
PC WITHIN 10 SECONDS OF THE SYSTEM BEING SHUT OFF MAY CAUSE AN ERROR WHEN YOU START
THE NEXT TIME.
79 - Power Management
Curlin_WWAN-B6FJ-5051-02ENZ)-00.book Page 80 Tuesday, October 19, 2010 1:57 PM
Powering Off
Before turning off the power, check that the hard drive/optical drive access indicator is off. If you turn off
the power while accessing a disk there is a risk of data loss. To ensure that your Tablet PC shuts down
without error, use the Windows shut down procedure.
BE SURE TO CLOSE ALL FILES, EXIT ALL APPLICATIONS, AND SHUT DOWN YOUR OPERATING SYSTEM
PRIOR TO TURNING OFF THE POWER. IF FILES ARE OPEN WHEN YOU TURN THE POWER OFF, YOU WILL
LOSE ANY CHANGES THAT HAVE NOT BEEN SAVED, AND MAY CAUSE DISK ERRORS.
Using the correct procedure to shut down from Windows allows your Tablet PC to complete its operations
and turn off power in the proper sequence to avoid errors. The proper sequence is:
1
Click the [Start] button, and then move the mouse over the small arrow at the bottom right of the right-hand
pane.
2
Select Shut Down from the list.
If you are going to store your Tablet PC for a month or more, see Care and Maintenance Section.
ENERGY STAR® Compliance
Your Fujitsu system is an ENERGY STAR® qualified mobile PC. By choosing a computer
with the latest energy-saving technology, you’re helping to preserve our environment for
future generations.
ENERGY STAR is a joint program of the U.S. Environmental Protection Agency, U.S.
Department of Energy, Natural Resources Canada, and other governments around the world
helping us save money while protecting the environment through energy efficient products and practices.
With energy costs and global warming top-of-mind for consumers, Fujitsu is committed to offering
solutions that help consumers conserve energy and improve the quality of our environment.
80 - Power Management
Curlin_WWAN-B6FJ-5051-02ENZ)-00.book Page 81 Tuesday, October 19, 2010 1:57 PM
Sleep Mode:
You will notice that your computer is initially set so that the display turns off after 15 minutes of user
inactivity, and the computer goes into Sleep mode after 20 minutes of user inactivity. When going into
Sleep mode, the computer also reduces the speed of any active Ethernet network links. To “wake” the
computer from Sleep mode, press the Suspend/Resume Button.
Energy saving benefits:
Fujitsu ENERGY STAR qualified mobile PCs use about half as much electricity as standard equipment –
saving half in utility costs. But more than that, ENERGY STAR also makes a difference for the
environment. Did you know that the average house can be responsible for twice the greenhouse gas
emissions as the average car? That’s because every time you flip on a light switch, run your dishwasher,
or turn on your PC, you use energy, which means more greenhouse gas emissions from power plants. So
the more energy we can save through energy efficiency, the more we help to reduce greenhouse gases and
the risks of global warming.
To learn more about the important ENERGY STAR program, visit: www.energystar.gov.
To read about how Fujitsu is supporting Sustainable Management along with several other environmental
activities, visit the Fujitsu Corporate Citizenship page at:
http://www.computers.us.fujitsu.com/www/content/aboutus/environmental/environment.php
81 - Power Management
Curlin_WWAN-B6FJ-5051-02ENZ)-00.book Page 82 Tuesday, October 19, 2010 1:57 PM
Chapter 3
User-Installable Features
Lithium ion Battery
Your LifeBook Tablet PC has a Lithium ion battery that provides power for operating your Tablet PC when
no external power source is available. The battery is durable and long lasting, but should not be exposed
to extreme temperatures, high voltages, chemicals or other hazards.
The Lithium ion battery operating time may become shorter if it is used under the following conditions:
• When used at temperatures that exceed a low of 5°C or a high of 35°C (41° to 95° F). Extreme
temperatures not only reduce charging efficiency, but can also cause battery deterioration. The
Charging icon on the Status Indicator panel will flash when you try to charge a battery that is outside
its operating temperature range.
• When using a high current device such as a modem, external optical drive, or the hard drive, using
the AC adapter will conserve your battery life.
DO NOT LEAVE A FAULTY BATTERY IN YOUR TABLET PC. IT MAY DAMAGE YOUR AC ADAPTER, OPTIONAL
AUTO/AIRLINE ADAPTER, ANOTHER BATTERY OR YOUR TABLET PC ITSELF. IT MAY ALSO PREVENT
OPERATION OF YOUR TABLET PC BY DRAINING ALL AVAILABLE CURRENT INTO THE BAD BATTERY.
82
Curlin_WWAN-B6FJ-5051-02ENZ)-00.book Page 83 Tuesday, October 19, 2010 1:57 PM
• ACTUAL BATTERY LIFE WILL VARY BASED ON SCREEN BRIGHTNESS, APPLICATIONS, FEATURES, POWER
MANAGEMENT SETTINGS, BATTERY CONDITION AND OTHER CUSTOMER PREFERENCES.
OPTICAL DRIVE
THE BATTERY
CHARGING CAPACITY IS REDUCED AS THE BATTERY AGES. IF YOUR BATTERY IS RUNNING LOW QUICKLY,
YOU SHOULD REPLACE IT WITH A NEW ONE.
OR HARD DRIVE USAGE MAY ALSO HAVE A SIGNIFICANT IMPACT ON BATTERY LIFE.
• UNDER FEDERAL, STATE, OR LOCAL LAW IT MAY BE ILLEGAL TO DISPOSE OF BATTERIES BY PUTTING
THEM IN THE TRASH.
PLEASE TAKE CARE OF OUR ENVIRONMENT AND DISPOSE OF BATTERIES
CHECK WITH YOUR LOCAL GOVERNMENT AUTHORITY FOR DETAILS REGARDING RECYCLING
OR DISPOSING OF OLD BATTERIES. IF YOU CANNOT FIND THIS INFORMATION ELSEWHERE, CONTACT
YOUR SUPPORT REPRESENTATIVE AT 1-800-8FUJITSU (1-800-838-5487)
PROPERLY.
Recharging the Batteries
If you want to know the condition of the primary Lithium ion battery, check the Battery Level indicator
located on the Status Indicator panel. The indicator changes as the battery level changes.
The Lithium ion battery is recharged internally using the AC adapter or Auto/Airline adapter. To recharge
the battery make sure the battery that needs to be charged is installed in your LifeBook Tablet PC and
connect the AC or Auto/Airline adapter.
MAKE SURE THAT THE PERCENTAGE CHARGE IS INDICATED BY THE BATTERY CHARGING INDICATOR ON
STATUS INDICATOR PANEL.
THE
There is no memory effect on the Lithium ion battery therefore you do not need to discharge the battery
completely before recharging. The charge times will be significantly longer if your Tablet PC is in use
while the battery is charging. If you want to charge the battery more quickly, put your Tablet PC into Sleep
mode, or turn it off while the adapter is charging the battery. (See Power Management on page 77 for more
information on Sleep mode and shutdown procedure)
83 - Lithium ion Battery
Curlin_WWAN-B6FJ-5051-02ENZ)-00.book Page 84 Tuesday, October 19, 2010 1:57 PM
USING HEAVY CURRENT DEVICES OR FREQUENT EXTERNAL OPTICAL DRIVE ACCESSES MAY PREVENT
CHARGING COMPLETELY.
Low Battery State
When the battery is running low, a low battery notification message will appear. If you do not respond to
the low battery message, the batteries will continue to discharge until they are too low to operate. When
this happens, your Tablet PC will go into Sleep mode. There is no guarantee that your data will be saved
once the Tablet PC reaches this point.
n
n
ONCE THE LOW BATTERY NOTIFICATION MESSAGE APPEARS, YOU NEED TO SAVE ALL YOUR ACTIVE
DATA AND PUT YOUR LIFEBOOK TABLET PC INTO SLEEP MODE UNTIL YOU CAN PROVIDE A NEW
POWER SOURCE. YOU SHOULD PROVIDE A CHARGED BATTERY, AN AC POWER ADAPTER, OR
AUTO/AIRLINE ADAPTER AS SOON AS POSSIBLE.
WHEN YOU ARE IN SLEEP MODE THERE MUST ALWAYS BE AT LEAST ONE POWER SOURCE ACTIVE. IF
SLEEP MODE, ANY DATA
THAT HAS NOT BEEN SAVED TO THE HARD DRIVE WILL BE LOST.
YOU REMOVE ALL POWER SOURCES WHILE YOUR LIFEBOOK TABLET PC IS IN
Dead Battery Suspend mode shows on the Status indicator just like the normal Sleep mode. Once your
Tablet PC goes into Dead Battery Suspend mode you will be unable to resume operation until you provide
a source of power either from an adapter, or a charged battery. Once you have provided power, you will
need to press the Power/Suspend/Resume switch to resume operation.
In the Dead Battery Suspend mode, your data can be maintained for some time, but if a power source is
not provided promptly, the Power indicator will stop flashing and go out, meaning that you have lost the
data that was not stored. Once you provide power, you can continue to use your Tablet PC while an adapter
is charging the battery.
84 - Lithium ion Battery
Curlin_WWAN-B6FJ-5051-02ENZ)-00.book Page 85 Tuesday, October 19, 2010 1:57 PM
Shorted Batteries
The Status Indicator panel indicator associated with the Battery Level indicator displays the operating
level available in that battery. If this display shows a flashing red LED, it means the battery is damaged
and must be replaced so it does not damage other parts of your LifeBook Tablet PC.
Replacing the Battery
With the purchase of an additional battery, you can have a fully charged spare to swap with one that is not
charged. There are two ways to swap batteries, cold-swapping and hot-swapping:
Cold-swapping Batteries
To cold-swap batteries in your battery bay, follow these easy steps (Figure 36):
1
2
3
4
5
Have a charged battery ready to install.
Shut down your Tablet PC and disconnect the AC adapter.
While pushing the battery bay release latches towards each other, slide the battery out of the bay.
Insert a new battery into the bay, and press it in firmly so that the latches click into place.
Plug in the AC adapter and turn the power on.
Hot-swapping Batteries
To hot-swap batteries in your battery bay follow these easy steps:
BE SURE TO PLUG IN AN AC ADAPTER PRIOR TO REMOVING THE BATTERY. THERE IS NO BRIDGE
BATTERY PRESENT TO SUPPORT THE SYSTEM WHILE THE BATTERY IS BEING REPLACED. IF YOU DO NOT
USE AN
1
AC ADAPTER YOU WILL LOSE ANY UNSAVED FILES.
Plug an AC Adapter into the system and connect it to a power outlet.
85 - Lithium ion Battery
Curlin_WWAN-B6FJ-5051-02ENZ)-00.book Page 86 Tuesday, October 19, 2010 1:57 PM
Battery Pack
Battery Bay Release Latches
Figure 36. Removing a Battery
2
Follow steps 3 through 5 in “Cold Swapping Batteries”.
IF THE LITHIUM ION BATTERY CONNECTOR IS NOT FULLY SEATED, YOU MAY NOT BE ABLE TO USE YOUR
TABLET PC OR CHARGE YOUR BATTERY.
86 - Lithium ion Battery
Curlin_WWAN-B6FJ-5051-02ENZ)-00.book Page 87 Tuesday, October 19, 2010 1:57 PM
SD/Memory Stick Card Slot
SD Card
Memory Stick
Figure 37. Installing a Memory Stick or SD Card
Memory Stick/Secure Digital Cards
Your LifeBook Tablet PC supports Memory Sticks and Secure Digital (SD) cards, on which you can store
and transfer data to and from a variety of digital devices. These cards use flash memory architecture,
which means they don’t need a power source to retain data.
Memory Stick is a flash memory technology that allows you to record, transfer and share digital content,
such as digital pictures, movies, music, voice, and computer data and applications.
Secure Digital (SD) Cards are very similar to Memory Sticks. Like Memory Sticks, SD Cards allow
portable storage among a variety of devices, such as cell phones, GPS systems, digital cameras, and PDAs.
SD Cards transfer data quickly, with low battery consumption. Like the memory stick, it uses flash
memory architecture.
87 - Memory Stick/Secure Digital Cards
Curlin_WWAN-B6FJ-5051-02ENZ)-00.book Page 88 Tuesday, October 19, 2010 1:57 PM
Installing Memory Stick/SD Cards
Memory Stick and SD Cards are installed in the Memory Stick/SD Card slot. To install a Memory Stick
or SD Card, follow these steps:
INSTALLING OR REMOVING A MEMORY STICK OR SD CARD DURING YOUR LIFEBOOK TABLET PC’S
SHUTDOWN OR BOOTUP PROCESS MAY DAMAGE THE CARD AND/OR YOUR LIFEBOOK TABLET PC.
DO NOT INSERT A CARD INTO A SLOT IF THERE IS WATER OR ANY OTHER SUBSTANCE ON THE CARD AS
LIFEBOOK TABLET PC, OR BOTH.
YOU MAY PERMANENTLY DAMAGE THE CARD, YOUR
1
See your specific card manual for instructions on the installation of your card. Some cards may require that your
Tablet PC is off while installing them.
2
3
4
Make sure there is no card currently in the slot. If there is, see Removing a Memory Stick/SD Card.
Insert your card into the slot with the product label facing up.
Push the card firmly into the slot until it is seated in the connector.
Removing A Memory Stick/SD Card
To remove a Memory Stick or SD Card, follow these easy steps:
SEE YOUR CARD MANUAL FOR SPECIFIC INSTRUCTIONS ON THE REMOVAL OF YOUR CARD. SOME
CARDS MAY REQUIRE YOUR LIFEBOOK TABLET PC TO BE IN SLEEP MODE OR OFF WHILE REMOVING
THEM.
1
2
Select Safely Remove Hardware from the System Tray. Highlight the card in the list, then click [Stop].
Push the Memory Stick or SD Card in until it unlatches. It will then eject from the slot for removal.
88 - Memory Stick/Secure Digital Cards
Curlin_WWAN-B6FJ-5051-02ENZ)-00.book Page 89 Tuesday, October 19, 2010 1:57 PM
ExpressCard Eject Button
ExpressCard (54 mm)
ExpressCard (34 mm)
ExpressCard Slot
Figure 38. Installing/Removing an ExpressCard
ExpressCards
Your LifeBook supports ExpressCardsTM which can perform a variety of functions depending on which
type of card you install.
There are two different width ExpressCards: 34 mm and 54 mm. The connector inside the slot is located
on the left-hand side of the slot. If you insert a 34 mm card, be sure to align it with the left side of the slot
when inserting it.
For further information, refer to the instructions supplied with your card(s).
Installing ExpressCards
ExpressCards are installed in the ExpressCard slot on the left-hand side of the system.
• INSTALLING OR REMOVING AN EXPRESSCARD DURING YOUR NOTEBOOK’S SHUTDOWN OR BOOTUP
PROCESS MAY DAMAGE THE CARD AND/OR YOUR NOTEBOOK.
• DO NOT INSERT AN EXPRESSCARD INTO A SLOT IF THERE IS WATER OR ANY OTHER SUBSTANCE ON
THE CARD AS YOU MAY PERMANENTLY DAMAGE THE CARD, YOUR NOTEBOOK, OR BOTH.
89 - ExpressCards
Curlin_WWAN-B6FJ-5051-02ENZ)-00.book Page 90 Tuesday, October 19, 2010 1:57 PM
YOU MAY BE REQUIRED TO LOG ON AS ADMINISTRATOR OR A MEMBER OF THE ADMINISTRATOR ’S
GROUP TO COMPLETE THIS PROCEDURE. IF YOUR COMPUTER IS CONNECTED TO A NETWORK,
NETWORK POLICY SETTINGS MAY ALSO PREVENT YOU FROM COMPLETING THIS PROCEDURE.
See your ExpressCard manual for instructions on the installation of your card. Some cards may require
that your notebook is off while installing them.
To install an ExpressCard, follow these steps (see Figure 38):
1
2
3
Make sure there is no ExpressCard currently in the slot. If there is, see Removing ExpressCards.
4
Push the card firmly into the slot until it is seated in the connector.
If the eject button is extended, press it in until it clicks.
Insert your ExpressCard into the slot with the product label facing up. If you are inserting a 34 mm card, be sure
to align it with the left side of the slot when inserting it.
Removing ExpressCards
See your ExpressCard manual for specific instructions on removing your card. Some cards may require
your notebook to be in Sleep Mode or Off during removal.
• REMOVE DEVICES USING THE SAFELY REMOVE HARDWARE ICON IN THE SYSTEM TRAY AT THE BOTTOM
RIGHT OF YOUR SCREEN.
• IF THE DIALOG BOX STATES THAT THE DEVICE CANNOT BE REMOVED, YOU MUST SAVE ALL OF YOUR
OPEN FILES, CLOSE ANY OPEN APPLICATIONS AND SHUT DOWN YOUR NOTEBOOK.
To remove an ExpressCard, follow these steps:
1
Unlock the card from the slot by pressing the eject button to the right of the slot in which the card is located.
When pressed, the button will pop out.
2
Firmly press the button again until it is flush with the notebook. This will eject the card slightly out of the slot
allowing you to remove the card.
90 - ExpressCards
Curlin_WWAN-B6FJ-5051-02ENZ)-00.book Page 91 Tuesday, October 19, 2010 1:57 PM
Memory Upgrade Module
Your Fujitsu LifeBook Tablet PC comes with a minimum of 1 GB of high speed Double Data Rate
Synchronous Dynamic RAM (DDR3-1066 SDRAM) factory installed. To increase your Tablet PC’s
memory capacity, you may install an additional memory upgrade module. The memory upgrade must be a
dual-in-line (DIMM) SDRAM module. To ensure 100% compatibility, purchase the SDRAM module only
from the Fujitsu web store at www.shopfujitsu.com.
• DO NOT REMOVE ANY SCREWS FROM THE MEMORY UPGRADE MODULE COMPARTMENT EXCEPT THE
ONES SPECIFICALLY SHOWN IN THE DIRECTIONS FOR INSTALLING AND REMOVING THE MEMORY
UPGRADE MODULE.
• THE MEMORY UPGRADE MODULE CAN BE SEVERELY DAMAGED BY ELECTROSTATIC DISCHARGE
(ESD). TO MINIMIZE RISK TO THE MODULE, OBSERVE THE FOLLOWING PRECAUTIONS:
• BEFORE HANDLING A MEMORY MODULE, TOUCH A GROUNDED METAL OBJECT TO DISCHARGE
STATIC ELECTRICITY BUILT UP IN YOUR BODY.
• WHEN INSTALLING OR REMOVING A MEMORY MODULE, HOLD IT BY THE EDGE SO AS NOT TO
TOUCH ANY CONTACTS OR CHIPS.
BE CAREFUL NOT TO TOUCH ANY INTERNAL COMPUTER
TERMINALS OR COMPONENTS; THE OIL FROM YOUR FINGERS COULD CAUSE A SHORT TO THE
COMPONENTS.
• BE SURE TO POWER DOWN YOUR SYSTEM BEFORE ADDING OR REMOVING MEMORY MODULES.
EVEN IF THE SYSTEM IS IN HIBERNATE OR SLEEP STATES, DATA COULD BE LOST OR THE MEMORY
COULD BE DAMAGED IF POWER IS STILL AVAILABLE TO THE SYSTEM.
Installing Memory Upgrade Modules
1
2
3
4
5
6
Turn off power to your Tablet PC, remove any power adapter (AC or auto/airline). Remove the battery.
Make sure that all the connector covers are closed.
Turn the Tablet PC bottom side up, and remove the screws from the memory upgrade module compartment.
Slide the cover towards the battery compartment slightly, then lift it and remove it (Figure 39).
Remove the memory upgrade module from the static guarded sleeve.
Align the memory upgrade module with the part side up. Align the connector edge of the memory upgrade
module with the connector slot in the compartment.(Figure 40)
91 - Memory Upgrade Module
Curlin_WWAN-B6FJ-5051-02ENZ)-00.book Page 92 Tuesday, October 19, 2010 1:57 PM
Retaining Clip
Figure 39. Opening Memory Compartment
Figure 40. Installing a Second Memory Module
7
Insert the memory upgrade module at a 45° angle. Press the connector edge of the module firmly down and
into the connector until it lodges under the retaining clip. You’ll hear a click when it is properly in place.
8
Replace the cover and reinstall the screws.
THE MEMORY UPGRADE MODULE IS NOT SOMETHING YOU ROUTINELY REMOVE FROM YOUR TABLET
PC. ONCE IT IS INSTALLED, YOU CAN LEAVE IT IN PLACE UNLESS YOU WANT TO CHANGE SYSTEM
MEMORY CAPACITY.
92 - Memory Upgrade Module
Curlin_WWAN-B6FJ-5051-02ENZ)-00.book Page 93 Tuesday, October 19, 2010 1:57 PM
Removing a Memory Upgrade Module
1
2
3
4
Perform steps 1 through 4 of Installing a Memory Upgrade Module.
Pull the clips sideways away from each side of the memory upgrade module at the same time.
While holding the clips out, remove the module by lifting it up and pulling it away from your Tablet PC.
Store the memory upgrade module in a static guarded sleeve.
Replace the cover and reinstall the screws.
Checking the Memory Capacity
Once you have changed the system memory capacity by replacing the installed module with a larger one,
be sure to check that your Tablet PC has recognized the change.
• If you are in Control Panel Category view, check the memory capacity by clicking [Start] -> Control
Panel -> System and Security -> System -> View amount of RAM and processor speed. The
amount of memory is displayed next to “Memory - RAM:”
• If you are in one of the icon views, check the memory capacity by clicking [Start] -> Control Panel
-> System. The amount of memory is displayed next to “Memory - RAM:”
There may be a variation between the actual memory size and what is displayed. This is possible if your
system is configured with an integrated Intel Graphics Media Accelerator which dynamically allocates
system memory to accelerate graphics performance.
IF THE TOTAL MEMORY DISPLAYED IS INCORRECT, CHECK THAT YOUR MEMORY UPGRADE MODULE IS
PROPERLY INSTALLED. (IF THE MODULE IS PROPERLY INSTALLED AND THE CAPACITY IS STILL NOT
CORRECTLY RECOGNIZED, SEE TROUBLESHOOTING ON PAGE 105.
93 - Memory Upgrade Module
Curlin_WWAN-B6FJ-5051-02ENZ)-00.book Page 94 Tuesday, October 19, 2010 1:57 PM
Media Holder Tray
Emergency Tray Release
Media Tray Eject Button
Figure 41. Optical Drive
Optical Drive
There is a variety of media available to use with your Multi-Format DVD Writer, also known as an
“optical drive”.
DVD-R and DVD-RW discs hold up to 4.7 GB of data (DVD-R discs used with Multi-Format Dual-Layer
DVD writer hold up to 8.5 GB). A DVD-R disc can only be written to once; DVD-RW discs can be written
to over and over. DVD-R and DVD-RW discs can be played on most standard players.CD-R and CD-RW
discs hold up to 700 MB of data. A CD-R disc can only be written to once; CD-RW discs can be written
to over and over.
Your system contains the following optical drive:
Dual-Layer Multi-Format DVD Writer: This drive allows you to access movies, software, and audio
DVD/CDs as well as to read and write to CD-R, CD-RW, DVD-R, DVD+R, DVD-RW, DVD+RW, and
DVD RAM discs. The dual-layer architecture allows you to record up to 8.5 GB of data on DVD+R discs.
Media Player Software
With the Dual-Layer Multi-Format DVD Writer and media player software you can play DVD movies and
music CDs on your notebook. The media player includes controls which allow you to take full advantage
of the features of a DVD movie, as well as standard features such as fast forward, fast reverse, pause, etc.
With this drive you can also burn onto recordable DVD-R/RW, DVD+R/RW, or CD-R/RW discs.
94 - Optical Drive
Curlin_WWAN-B6FJ-5051-02ENZ)-00.book Page 95 Tuesday, October 19, 2010 1:57 PM
•
DO NOT OPERATE YOUR OPTICAL DRIVE UNLESS YOUR LIFEBOOK NOTEBOOK IS SITTING ON A FLAT SURFACE.
USING A DRIVE WHEN THE SYSTEM IS NOT LEVEL MAY DAMAGE THE DRIVE OR PREVENT PROPER OPERATION.
•
PROLONGED USE OF THE OPTICAL DRIVE, SUCH AS WATCHING A DVD MOVIE, WILL SUBSTANTIALLY REDUCE
YOUR BATTERY LIFE IF NO EXTERNAL POWER SOURCE IS ATTACHED.
Loading Media on Your Drive
To load a disc into your optical drive:
1
Push and release the eject button on the front of the optical drive to open the holder tray. The tray will come out
of the LifeBook notebook a short distance.
2
Gently pull the tray out until a media disc can easily be placed in the tray.
• YOU SHOULD PERIODICALLY CHECK THE FUJITSU WEBSITE AT US.FUJITSU.COM/COMPUTERS FOR THE
MOST CURRENT DRIVERS.
• ALL LIFEBOOK DVD PLAYERS ARE SET TO PLAY DVD TITLES WITH REGION CODE NUMBER 1 WHICH
IS SPECIFIED FOR THE NORTH AMERICAN MARKET. THE REGION NUMBER IS A REGIONAL RESTRICTION
DVD FORUM ACTING ON HOLLYWOOD REQUIREMENTS. DIFFERENT REGION
DVD TITLES FOR PUBLICATION IN DIFFERENT AREAS OF THE
WORLD. IF THE REGIONAL CODE OF THE DVD PLAYER DOES NOT MATCH THE REGIONAL CODES ON
THE TITLES, THEN PLAYBACK IS IMPOSSIBLE.
CODE DEFINED BY THE
CODES ARE RECORDED ON VIDEO
• YOU CAN CHANGE THE REGION CODE ON THE DVD PLAYER USING THE PROPERTIES MENU OF THE
DVD SOFTWARE. NOTE, HOWEVER, THAT YOU CAN ONLY CHANGE THE REGION CODE UP TO FOUR
AFTER THE 4TH CHANGE, THE LAST CODE ENTERED BECOMES PERMANENT, AND CANNOT BE
CHANGED.
TIMES.
3
Place the media into the tray, label side up, with the hole in the center of the disc. Snap the disc onto the raised
circle in the center of the tray.
95 - Optical Drive
Curlin_WWAN-B6FJ-5051-02ENZ)-00.book Page 96 Tuesday, October 19, 2010 1:57 PM
4
Gently push the holder tray back in until you hear a click
IF YOU HAVE DISABLED THE AUTO INSERT NOTIFICATION FUNCTION, YOU WILL HAVE TO START THE
DRIVE EITHER BY USING MY COMPUTER OR FROM WITHIN WINDOWS EXPLORER, SINCE YOUR
NOTEBOOK WILL NOT AUTOMATICALLY RECOGNIZE THAT MEDIA HAS BEEN LOADED.
b.
a.
c.
d.
Figure 42. Loading/Ejecting Media
96 - Optical Drive
Curlin_WWAN-B6FJ-5051-02ENZ)-00.book Page 97 Tuesday, October 19, 2010 1:57 PM
Removing Media
1
Push and release the eject button on the front of the optical drive. This will stop the drive and the holder tray
will come out of the LifeBook notebook a short distance.
2
3
4
Gently pull the tray out until the disc can easily be removed from the tray.
Carefully remove the media disc from the holder tray.
Gently push the holder tray back in until you hear a click.
Emergency Optical
Drive Tray Release
If for some reason the eject button fails, you
can open the media tray with a paper clip or
similar tool inserted into the eject hole in
the right side of the front of the tray.
Straighten one side of a paper clip and push
it gently into the hole. The tray will pop out.
Figure 43. Emergency Tray Release
Using the Media Player Software
DEPENDING UPON ITS CONFIGURATION, YOUR SYSTEM MAY NOT HAVE THE MEDIA PLAYER SOFTWARE
PRE-INSTALLED. IF IT IS NOT INSTALLED, REFERENCE THE DOCUMENTATION THAT ACCOMPANIES THE
MEDIA APPLICATION.
97 - Optical Drive
Curlin_WWAN-B6FJ-5051-02ENZ)-00.book Page 98 Tuesday, October 19, 2010 1:57 PM
Starting a DVD Movie
1
2
3
Insert the DVD into the optical drive of the notebook. If the CD AutoRun feature activates, skip Step 2.
The first time you insert a movie into the DVD/CD-RW tray, you will be prompted to select what you want the
system to do when discs are inserted (e.g., start automatically or wait for a prompt). Until you make a selection,
you will receive the same prompt whenever you insert a disc.
Click OK to close the About DVD Player Performance dialog box and the movie will begin.
Opening the Media Player Control Panel
With most DVD-ROMs, you have the option of altering how the movie should play and what you wish to
view. You can do this by using the media player control panel and the mouse.
1
2
Right-click on the movie screen to open a dropdown menu for options.
Select View, then Player for all controls available. This will open the control panel at the bottom of the screen.
Using the Media Player Control Panel
The media player software allows you to watch the movie much like a VCR player. You can pause, rewind,
fast-forward and stop the movie at any point.
1
2
To pause the movie, click the on-screen button.
3
To fast-forward the movie, click the button to forward to a specific portion of the movie, or the button to
jump to the ending credits.
4
To stop the movie, click the button.
To rewind the movie, click the button to rewind to a specific portion of the movie, or the button to return to
the opening screen.
Exiting the Media Player
1
2
Click the located in the upper right corner of the title bar. This will open a media player dialog box.
Click Yes to stop and exit the movie, or No to close the media player dialog box and return to the movie.
98 - Optical Drive
Curlin_WWAN-B6FJ-5051-02ENZ)-00.book Page 99 Tuesday, October 19, 2010 1:57 PM
Using Media Player on Battery Power
Since optical drives consume a lot of power, your overall battery life will be significantly shorter when
operating the optical drive continuously (such as watching a DVD movie) than during standard operation.
• MANY MOVIE RUN-TIMES ARE LONGER THAN YOUR SYSTEM CAN SUPPORT ON A SINGLE BATTERY. IF
YOU ARE WATCHING A
DVD MOVIE ON BATTERY POWER YOU MAY NEED TO SWAP IN AN ADDITIONAL,
AC POWER DURING THE MOVIE TO VIEW IT IN ITS ENTIRETY.
CHARGED BATTERY OR ATTACH
• AN ADDITIONAL FULLY-CHARGED BATTERY IS HIGHLY RECOMMENDED IF YOU WILL BE WATCHING DVD
MOVIES ON BATTERY POWER. IF YOU DON’T HAVE AN ADDITIONAL BATTERY, YOU MAY PURCHASE ONE
EITHER ONLINE AT: HTTP://WWW.COMPUTERS.US.FUJITSU.COM OR BY CALLING
1-877-372-3473.
To Watch a Movie on Battery Power:
1
2
3
Have an additional full-charged battery or your AC adapter ready for use.
Start watching your DVD movie.
When the low battery warning occurs, immediately stop the movie and exit the media player.
IF YOU DO NOT STOP THE MEDIA PLAYER QUICKLY AND THE LIFEBOOK NOTEBOOK ATTEMPTS TO AUTOLIFEBOOK NOTEBOOK WILL SHUT DOWN IMPROPERLY.
IF THIS OCCURS, YOU MAY NEED TO PERFORM A HARD RESET AND FOLLOW THE INSTRUCTIONS, IF ANY,
PRESENTED TO YOU BEFORE THE SYSTEM WILL REBOOT.
SUSPEND (CRITICAL BATTERY LOW STATE) THE
4
Power down your notebook and replace the discharged battery with an additional fully-charged battery. If you
do not have an additional battery, you may attach AC power as soon as you see the low battery warning.
5
Resume operation by pressing the Suspend button again. This is not required if you attached AC power without
entering standby mode.
6
Restart your media player, locate and skip to the chapter of the movie you were last watching, then continue
watching your DVD movie.
SOME SHORTER DVD MOVIES MAY NOT REQUIRE YOU TO SWAP BATTERIES OR ATTACH AC POWER TO
COMPLETE THEM. HOWEVER, IT IS BEST TO BE PREPARED SINCE ACTUAL BATTERY LIFE WHILE
OPERATING THE OPTICAL DRIVE CANNOT BE GUARANTEED.
99 - Optical Drive
Curlin_WWAN-B6FJ-5051-02ENZ)-00.book Page 100 Tuesday, October 19, 2010 1:57 PM
Device Ports
Your Fujitsu LifeBook Tablet PC and the optional Port Replicator come equipped with multiple ports to
which you can connect external devices including: disk drives, keyboards, printers, etc.
Internal LAN (RJ-45) Jack
The internal LAN (RJ-45) jack is used for a Gigabit (10Base-T/100Base-Tx/1000Base-T) Ethernet LAN
connection. You may need to configure your Tablet PC to work with your particular network. (Please refer
to your network administrator for information on your network configuration.) To connect the LAN cable
follow these easy steps:
1
Align the connector with the port
opening.
2
Push the connector into the port
until it is seated.
3
Plug the other end of the cable
into a LAN outlet.
LAN Connector
Figure 44. Connecting the LAN
Port Replicator Connector
The port replicator connector located on the bottom of your system is used for the connection of your
Tablet PC to an optional port replicator. (See Figure 6 for location). In order to connect your Tablet PC to
this device, follow the instructions that came with your port replicator.
100 - Device Ports
Curlin_WWAN-B6FJ-5051-02ENZ)-00.book Page 101 Tuesday, October 19, 2010 1:57 PM
Universal Serial Bus Ports
The Universal Serial Bus 2.0 ports (USB) allow you to connect USB devices such as external game pads,
pointing devices, keyboards and/or speakers. There are three USB 2.0 ports on your Tablet PC: one on the
left side and two on the rear..
In order to connect a USB device follow
these steps:
1
2
Align the connector with the port opening.
Push the connector into the port until it is
seated.
Figure 45. Connecting a USB Device
DUE TO THE ONGOING CHANGES IN USB TECHNOLOGY AND STANDARDS, NOT ALL USB DEVICES
AND/OR DRIVERS ARE GUARANTEED TO WORK.
IEEE 1394 Port
The 4-pin 1394 port allows you to connect digital devices that are compliant with IEEE 1394 standard.
The IEEE 1394 standard is easy to use, connect, and disconnect. This port can allow up to 400 Mbps
transfer rate. A third-party application may be required to operate your device with the 1394 port.
101 - Device Ports
Curlin_WWAN-B6FJ-5051-02ENZ)-00.book Page 102 Tuesday, October 19, 2010 1:57 PM
THE 1394 PORT USED IN THIS SYSTEM USES A FOUR-PIN CONFIGURATION. IF YOU INTEND TO
INTERFACE WITH DEVICES WHICH USE A SIX-PIN CONFIGURATION, YOU WILL NEED TO PURCHASE AN
ADAPTER.
In order to connect a 1394 device, follow these
steps:
1
2
Align the connector with the port opening.
Push the connector into the port until it is
seated.
IEEE 1394
Connector
Figure 46. Connecting an IEEE1394 Device
Headphone Jack
The headphone jack allows you to connect headphones or powered external speakers to your Tablet PC.
Your headphones or speakers must be equipped with a 1/8” (3.5 mm) stereo mini-plug. In order to connect
headphones or speakers follow these easy steps:
1
2
Align the connector with the port opening.
Push the connector into the port until it is seated.
102 - Device Ports
Curlin_WWAN-B6FJ-5051-02ENZ)-00.book Page 103 Tuesday, October 19, 2010 1:57 PM
Microphone Jack
The microphone jack allows you to connect an external microphone. Your microphone must be equipped
with a 1/8”(3.5 mm) mono mini-plug in order to fit into the microphone jack of your Tablet PC. In order
to connect a microphone follow these easy steps:
1
Align the connector with the port opening and push the connector into the port until it is seated.
HDMI Port
The High-Definition Multimedia Interface
(HDMI) port is a digital audio/video
interface over which uncompressed
streams can be transmitted. HDMI is used
to connect compatible digital devices with
your computer (such as big-screen TVs and
video recorders). See the note on the next
page regarding the steps for selecting the
HDMI device using keyboard shortcuts.
HDMI
Connector
To connect an HDMI device:
1
2
Align the connector with the port opening.
Push the connector into the port until it is
seated.
HDMI Port
Figure 47. Connecting an HDMI device
External Video Port
The external video port allows you to connect an external monitor or LCD projector. In order to connect an
external video device, follow these easy steps:
1
2
3
Align the connector with the port opening.
Push the connector into the port until it is seated.
Tighten the two hold-down screws, located on each end of the connector.
103 - Device Ports
Curlin_WWAN-B6FJ-5051-02ENZ)-00.book Page 104 Tuesday, October 19, 2010 1:57 PM
PRESSING THE [FN] + [F10] KEYS ALLOWS YOU TO CHANGE YOUR SELECTION OF WHERE TO SEND
YOUR DISPLAY VIDEO. THE ORDER IS DETERMINED BY WHICH TYPE OF EXTERNAL VIDEO DEVICE(S) IS
CONNECTED. EACH TIME YOU PRESS THE KEY COMBINATION, YOU WILL STEP TO THE NEXT CHOICE.
IF YOU ONLY HAVE AN EXTERNAL CRT CONNECTED, THE ORDER IS: INTERNAL DISPLAY -> EXTERNAL
CRT -> SIMULTANEOUS DISPLAY -> INTERNAL DISPLAY.
IF YOU ONLY HAVE AN HDMI DEVICE
CONNECTED, THE ORDER IS: INTERNAL
DISPLAY -> HDMI DISPLAY ->
SIMULTANEOUS DISPLAY -> INTERNAL
DISPLAY.
IF YOU HAVE EXTERNAL CRT AND HDMI
DEVICES CONNECTED, THE ORDER IS:
INTERNAL DISPLAY -> EXTERNAL CRT ->
SIMULTANEOUS INTERNAL AND EXTERNAL
CRT -> HDMI DISPLAY - SIMULTANEOUS
HDMI DISPLAY ->
INTERNAL DISPLAY.
INTERNAL AND
IF YOU HAVE AN EXTERNAL CRT AND DVI
DEVICES CONNECTED TO THE PORT
REPLICATOR, THE ORDER IS: INTERNAL
DISPLAY
External Video Port
-> EXTERNAL CRT ->
SIMULTANEOUS INTERNAL AND EXTERNAL
CRT -> DVI DISPLAY -> SIMULTANEOUS
INTERNAL AND DVI DISPLAY. -> INTERNAL
DISPLAY.
External Video Cable
Figure 48. Connecting an External Video Device
104 - Device Ports
Curlin_WWAN-B6FJ-5051-02ENZ)-00.book Page 105 Tuesday, October 19, 2010 1:57 PM
Chapter 4
Troubleshooting Your LifeBook
Troubleshooting
There may be occasions when you encounter simple setup or operating problems that you can solve on the
spot, or problems with peripheral devices that can be solved by replacing the device. The information in this
section helps you isolate and resolve some of these straightforward issues and identify failures that require
service.
Identifying the Problem
If you encounter a problem, go through the following procedure before pursuing complex troubleshooting:
1
2
3
Turn off your LifeBook Tablet PC.
4
Make sure that any devices connected to the external connectors are plugged in properly. You can also
disconnect such devices, thus eliminating them as possible causes of failure.
5
6
Turn on your Tablet PC. Make sure it has been off at least 10 seconds before you turn it back on.
Make sure the AC adapter is plugged into your Tablet PC and to an active AC power source.
Make sure that any card installed in the ExpressCard slot is seated properly. You can also remove the card from
the slot, thus eliminating it as a possible cause of failure.
Go through the boot sequence.
105
Curlin_WWAN-B6FJ-5051-02ENZ)-00.book Page 106 Tuesday, October 19, 2010 1:57 PM
7
If the problem has not been resolved, refer to the Troubleshooting Table, that follows, for more detailed
troubleshooting information.
IF YOU KEEP NOTES ABOUT WHAT YOU HAVE TRIED, YOUR SUPPORT REPRESENTATIVE MAY BE
ABLE TO HELP YOU MORE QUICKLY BY GIVING ADDITIONAL SUGGESTIONS OVER THE PHONE.
8
If you have tried the solutions suggested in the Troubleshooting Table without success, contact your support
representative:
Toll free: 1-800-8Fujitsu (1-800-838-5487)
E-mail: [email protected]
Web site: http://www.computers.us.fujitsu.com/support.
Before you place the call, you should have the following information ready so that the customer support
representative can provide you with the fastest possible solution:
• Product name
• Product configuration number
• Product serial number
• Purchase date
• Conditions under which the problem occurred
• Any error messages that have occurred
• Type of device connected, if any
See the Configuration Label on the bottom of your Tablet PC for configuration and serial numbers.
106 - Troubleshooting
Curlin_WWAN-B6FJ-5051-02ENZ)-00.book Page 107 Tuesday, October 19, 2010 1:57 PM
Specific Problems
Using the Troubleshooting Table
When you have problems with your LifeBook Tablet PC, try to find the symptoms under the Problem
column of the troubleshooting table for the feature giving you difficulty. You will find a description of
common causes for that symptom under the column Possible Cause and what, if anything, you can do to
correct the condition under Possible Solutions. All possible causes or solutions may not apply to your Tablet
PC.
Troubleshooting Table
ProblemPage
ProblemPage
Audio Problems . . . . . . . . . . . . . page 108
USB Device Problems . . . . . . . . . page 110
Optical Drive Problems . . . . . . . page 108
ExpressCard Problems . . . . . . . . page 111
Port Replicator Problems . . . . . . page 109
Power Failures . . . . . . . . . . . . . . page 111
Hard Drive Problems . . . . . . . . . page 109
Shutdown and Startup Problems . page 113
Keyboard or Mouse Problems . . page 110
Video Problems . . . . . . . . . . . . . . page 114
Memory Problems . . . . . . . . . . . page 110
Miscellaneous Problems . . . . . . . page 116
107 - Troubleshooting
Curlin_WWAN-B6FJ-5051-02ENZ)-00.book Page 108 Tuesday, October 19, 2010 1:57 PM
Problem
Audio Problems
There is no sound coming
from the built-in speaker.
Possible Cause
Possible Solutions
The volume is turned too low.
Adjust the volume control on your Tablet PC and operating
system. Use the [Fn+F9] key combination on your keyboard.
Pressing [F9] repeatedly while holding [Fn] will increase the
volume of your Tablet PC.
The software volume control
is set too low.
Manually adjusting the volume (i.e., keyboard "hot keys")
should dynamically adjust the volume of the operating system (see above). If that doesn’t work, adjust the sound volume control settings in your software or application.
Headphones are plugged into
your Tablet PC.
Plugging in headphones disables the built-in speakers.
Remove the headphones.
BIOS audio settings are incorrect.
Set the BIOS setup utility to the default values within the Multimedia Device Configuration menu. See “BIOS Setup Utility”
on page 72.
Software driver is not
configured correctly.
The audio driver may be installed or reinstalled using the
Drivers and Applications CD that came with your Fujitsu LifeBook. Refer to your application and operating system documentation for help.
The speakers have been
muted using the Volume icon
in the system tray.
Click the Volume icon in the system tray on the bottom right
of the screen. (It looks like a speaker). If the Mute box has a
red circle on it, click on it to unselect it. You can also use the
[Fn+F3] key combination to toggle the volume on and off.
Pressing [F3] while holding [Fn] will toggle the audio mute.
Optical Drive Problems (optional external device)
LifeBook Tablet PC fails to
recognize DVD/CDRW/CD-ROM’s.
The disc is not pushed down
onto raised center circle of the
drive.
Open optical drive tray and re-install the disc properly.
Incorrect DVD Player or no
DVD Player software is
installed.
Install DVD Player software. (See “Media Player Software”
on page 94 for more information.)
108 - Troubleshooting
Curlin_WWAN-B6FJ-5051-02ENZ)-00.book Page 109 Tuesday, October 19, 2010 1:57 PM
Problem
LifeBook Tablet PC fails to
recognize DVD/CDRW/CD-ROM’s.
Possible Cause
Possible Solutions
Optical drive tray is not
latched shut.
Push on the front of the optical drive tray until it latches. If
that doesn’t work, pull out the modular drive latch to remove
the device from the bay, then re-insert the drive until it
latched; this ensures that the drive is properly seated.
Wrong drive designator was
used for the disc in the application.
Verify the drive designator used by the application is the
same as the one used by the operating system. When the
operating system is booted from a DVD/CD, drive designations are automatically adjusted. Note that the drive designation can be changed with the Disk Management tool located
at Administrative Tools -> Computer Management.
DVD/CD-RW/CD-ROM is
dirty or defective.
Wipe the disc with a non-abrasive CD cleaning cloth and
reinsert. If it still will not work try another DVD/CD-RW/CDROM in the drive.
The Windows auto insertion
function is active and is
checking to see if a disc is
ready to run.
This is normal. However, you may disable this feature.
(continued)
The drive access indicator
on the Status Indicator
Panel blinks regularly with
no disc in the tray or the
drive is not installed.
Port Replicator Problems
Note: Be sure to power down your LifeBook Tablet PC before adding a printer to the Port Replicator parallel port.
Tablet PC does not turn on
when installed in the
optional Port Replicator
Port Replicator AC adapter is
not plugged in.
Provide power to the Port Replicator.
Tablet PC is not properly
seated in the Port Replicator.
Remove and re-dock your LifeBook Tablet PC.
The wrong drive designator
was used by an application
when a bootable disc was
used to start the Tablet PC.
Verify drive designator used by application is in use by the
operating system. When the operating system is booted from
a CD, drive designations are automatically adjusted.
Hard Drive Problems
You cannot access your
hard drive.
109 - Troubleshooting
Curlin_WWAN-B6FJ-5051-02ENZ)-00.book Page 110 Tuesday, October 19, 2010 1:57 PM
Problem
You cannot access your
hard drive.
(continued)
Possible Cause
Security is set so your operating system cannot be started
without a password.
Possible Solutions
Verify your password and security settings.
Keyboard or Mouse Problems
The built-in keyboard does
not seem to work.
You have installed an
external keyboard or
mouse, and it does not
seem to work.
You have connected an
external keyboard or a
mouse and it seems to be
locking up the system.
The Tablet PC has gone into
Sleep mode.
Push the Power/Suspend/Resume switch.
Your application has locked
out your keyboard.
Try to use your integrated pointing device to restart your system.
Your external device is not
properly installed.
Re-install your device. See “Device Ports” on page 100.
Your operating system is not
set up with correct software
driver for that device.
Check your device and operating system documentation and
activate the proper driver.
Your operating system is not
setup with correct software
driver for that device.
Check your device and operating system documentation and
activate the proper driver.
Your system has crashed.
Try to restart your Tablet PC.
Your memory upgrade module is not properly installed.
Remove and re-install your memory upgrade module. See
“Memory Upgrade Module” on page 91.
You have a memory
failure.
Check for Power On Self Test (POST) messages. See
“Power On Self Test Messages” on page 117.
The device is not properly
installed.
Remove and re-install the device. See “Device Ports” on
page 100.
Memory Problems
Your System screen in the
Control Panel does not
show the correct amount
of installed memory.
USB Device Problems
Your system does not recognize a USB device you
have installed, or the
device does not seem to
work properly.
110 - Troubleshooting
Curlin_WWAN-B6FJ-5051-02ENZ)-00.book Page 111 Tuesday, October 19, 2010 1:57 PM
Problem
Possible Cause
Possible Solutions
Your system does not recognize a USB device you
have installed, or the
device does not seem to
work properly.
The device may have been
installed while an application
was running, so your system
is not aware of its installation.
Close the application and restart your Tablet PC.
(continued)
Your device may not have the
correct software driver active.
See your software documentation and activate the correct
driver.
Card is not properly installed.
Remove and re-install the card. See “ExpressCards” on
page 89.
Card may have been installed
while an application was running, so your Tablet PC is not
aware of its installation.
Close the application and restart your Tablet PC.
Your software may not have
the correct driver active.
See your software documentation and activate the correct
driver.
The installed battery is completely discharged or there is
no Power adapter (AC or
Auto/Airline) installed.
Check the Status Indicator Panel to determine the presence
and condition of the battery. See “Status Indicator Panel” on
page 30. Install a charged battery or a Power adapter.
The battery is installed but is
faulty.
Use the Status Indicator panel to verify the presence and
condition of the battery. See “Status Indicator Panel” on
page 30. If the battery indicates a short, remove it and
operate from another power source or replace that battery.
The battery is low.
Check the Status Indicator Panel to determine the presence
and condition of the battery. See “Status Indicator Panel” on
page 30. Use a Power adapter to operate until a battery is
charged or install a charged battery.
ExpressCard Problems
A card inserted in the
ExpressCard slot does not
work or is locking up the
system.
Power Failures
You turn on your LifeBook
Tablet PC and nothing
seems to happen.
111 - Troubleshooting
Curlin_WWAN-B6FJ-5051-02ENZ)-00.book Page 112 Tuesday, October 19, 2010 1:57 PM
Problem
You turn on your LifeBook
Tablet PC and nothing
seems to happen.
(continued)
Your LifeBook Tablet PC
turns off all by itself.
Your Tablet PC will not
work on battery alone.
Possible Cause
Possible Solutions
The power adapter (AC or
auto/airline) is not plugged in
properly.
Verify that your adapter is connected correctly. See “Power
Sources” on page 68.
The power adapter (AC or
auto/airline) has no power
from the AC outlet, airplane
jack, or car cigarette lighter.
Move the AC cord to a different outlet, check for a line switch
or tripped circuit breaker for the AC outlet. If you are using an
auto/airline adapter in a car make sure the ignition switch is
in the On or Accessories position.
The power adapter (AC or
auto/airline) is faulty.
Try a different power adapter.
The power management
parameters are set for auto
timeouts which are too short
for your operating needs.
Press any button on the keyboard, or move the mouse to
restore operation. If that fails, push the Power/Suspend/Resume switch. Check your power management settings, or close your applications and go to the Power Options
located in the Control Panel to adjust the timeout values to
better suit your needs.
You ignored a low battery
alarm until the battery entered
Dead Battery Suspend mode.
Install a power adapter, then push the Power/Suspend/Resume switch. See “Power Sources” on page 68.
You have a battery failure.
Verify the condition of the battery using the Status Indicator
panel. If the battery is shorted, replace or remove it. See
“Status Indicator Panel” on page 30.
Your power adapter has failed
or lost its power source.
Make sure the adapter is plugged in and the outlet has
power.
The installed battery is dead.
Replace the battery with a charged one or install a power
adapter.
No battery is installed.
Install a charged battery.
The battery is improperly
installed.
Verify that the battery is properly connected by re-installing it.
112 - Troubleshooting
Curlin_WWAN-B6FJ-5051-02ENZ)-00.book Page 113 Tuesday, October 19, 2010 1:57 PM
Problem
Possible Cause
Possible Solutions
Your Tablet PC will not
work on battery alone.
(continued)
Your installed battery is faulty.
Verify the condition of the battery using the Status Indicator
panel and replace or remove any batteries that are shorted.
See “Status Indicator Panel” on page 30.
The battery seems to
discharge too quickly.
The power savings features
may be disabled.
Check the Power Options menu settings and adjust according to your operating needs.
You’re running an application
that uses a lot of power due to
frequent optical drive access,
or use of a LAN ExpressCard,
WLAN, or Bluetooth device.
Use a power adapter for this application when at all possible.
The brightness is turned all
the way up.
Turn down the brightness adjustment. The higher the brightness the more power your display uses.
The battery is very old.
Replace the battery.
The battery was exposed to
high temperatures.
Replace the battery.
The battery is too hot or too
cold.
Restore the Tablet PC to normal operating temperature.
Charging icon on the Status Indicator panel will flash when
battery is outside of operating range.
Shutdown and Startup Problems
The Suspend/Resume
button does not work.
The system powers up
and displays power on
information, but fails to
load the operating system.
Suspend/Resume
button is disabled.
To enable the button, go to Control Panel -> Power Options
and click on the Advanced tab. In the Power buttons area,
select the “Change what the power button does” option.
There may be application
software. conflict
Close all applications and try the button again.
You have a secured system
requiring a password to load
your operating system.
Make sure you have the right password. Enter the setup utility and verify the Security settings and modify them as
accordingly. See “BIOS Setup Utility” on page 72.
113 - Troubleshooting
Curlin_WWAN-B6FJ-5051-02ENZ)-00.book Page 114 Tuesday, October 19, 2010 1:57 PM
Problem
Possible Cause
Possible Solutions
The boot sequence settings
of the setup utility are not
compatible with your configuration.
Set the operating source by pressing the [ESC] key while the
Fujitsu logo is on screen or use the [F2] key and enter the
setup utility and adjust the source settings from the Boot
menu. See “BIOS Setup Utility” on page 72.
Internal hard drive was not
detected.
Use the BIOS setup utility to try to auto detect the internal
hard drive.
An error message is displayed on the screen during the boot sequence.
Power On Self Test (POST)
has detected a problem.
See the Power On Self Test (POST) messages to determine
the meaning and severity of the problem. Not all messages
are errors; some are simply status indicators. See “Power On
Self Test Messages” on page 117.
Your Tablet PC appears to
change setup parameters
when you start it.
BIOS setup changes were not
saved when made and you
exited the setup utility.
Make sure you select Save Changes And Exit when exiting
the BIOS setup utility.
The BIOS CMOS hold-up battery has failed.
Contact your support representative for repairs. This is not a
user serviceable part but has a normal life of 3 to 5 years.
You have installed the LifeBook/Security Application
panel.
Check the Status Indicator Panel for presence of the Security
icon. If it is visible, enter your password See “Status Indicator
Panel” on page 30.
Display angle and brightness
settings are not adequate for
your lighting conditions.
Move the display and the brightness control until you have
adequate visibility. Pressing either the [F6] or [F7] keys while
holding down the [Fn] key also allows you to change the
brightness level of the display.
Power management timeouts
are set for short intervals and
you didn’t see the display go
on and off again.
Press a keyboard button or move the mouse to restore operation. If that fails, push the Power/Suspend/Resume switch.
(The display may be shut off by Sleep mode, Auto Suspend
or Video Timeout)
The system powers up,
and displays power on
information, but fails to
load the operating system.
(continued)
Your system display won’t
turn on when the system is
turned on or has resumed.
Video Problems
The built-in display is
blank when you turn on
your LifeBook Tablet PC.
114 - Troubleshooting
Curlin_WWAN-B6FJ-5051-02ENZ)-00.book Page 115 Tuesday, October 19, 2010 1:57 PM
Problem
Possible Cause
Possible Solutions
The built-in display is
blank when you turn on
your LifeBook Tablet PC.
(continued)
The Tablet PC is set for an
external monitor only.
Pressing [F10] while holding down the [Fn] key allows you to
change your selection of where to send your display video.
Each time you press the keys you will step to the next choice.
The choices, in order are: built-in display only, external monitor only, both built-in display and external monitor.
The Tablet PC turned on
with a series of beeps and
the built-in display is blank.
Power On Self Test (POST)
has detected a failure which
does not allow the display to
operate.
Contact your support representative.
The display goes blank by
itself after you have been
using it.
The Tablet PC has gone into
Video timeout, Sleep mode,
or Save-to-Disk mode
because you have not used it
for a period of time.
Press any button on the keyboard, or move the mouse to
restore operation. If that fails, push the Power/Suspend/Resume switch. Check your power management settings, or close your applications and go to the Power Savings
menu of the setup utility to adjust the timeout values to better
suit your operation needs. See “BIOS Setup Utility” on
page 72.
The power management timeouts may be set for very short
intervals and you failed to
notice the display come on
and go off again.
Press any button on the keyboard, or move the mouse to
restore operation. If that fails, push the Power/Suspend/Resume switch. (The display may be shut off by Sleep
Mode, Auto Suspend or Video Timeout)
Your display won’t turn on
when the system is turned
on or when it has
resumed.
The system may be password-protected.
Check the status indicator panel to verify that the Security
icon is blinking. If it is blinking, enter your password.
The display does not
close.
A foreign object, such as a
paper clip, is stuck between
the display and keyboard.
Remove all foreign objects from the keyboard.
115 - Troubleshooting
Curlin_WWAN-B6FJ-5051-02ENZ)-00.book Page 116 Tuesday, October 19, 2010 1:57 PM
Problem
The display has bright or
dark spots.
Possible Cause
Possible Solutions
If the spots are very tiny and
few in number, this is normal
for a large LCD display.
This is normal; do nothing.
If the spots are numerous or
large enough to interfere with
your operation needs.
Display is faulty; contact your support representative.
The Display is dark when
on battery power.
The Power Management utility default is set on low brightness to conserve power.
Press [Fn] + [F7] to increase brightness or click the battery
gauge, click on More power options, and select Adjust the
display brightness.
You have connected an
external monitor and it
does not display any information.
Your BIOS setup is not set to
enable your external monitor.
Toggle the video destination by pressing [Fn]+ [F10]
together, or check your BIOS setup and enable your external
monitor. (See the Video Features submenu, located within
the Advanced Menu of the BIOS. See “BIOS Setup Utility” on
page 72.
Your external monitor is not
properly installed.
Reinstall your device. See “External Video Port” on
page 103.
Your operating system is not
setup with the correct software driver for that device.
Check your device and operating system documentation and
activate the proper driver.
Your external monitor is not
compatible with your LifeBook
Tablet PC.
See your monitor documentation and the External Monitor
Support portions of the Specifications section. See “Specifications” on page 135.
Application software often has
its own set of error message
displays.
See your application manual and help displays screens for
more information. Not all messages are errors some may
simply be status.
You have connected an
external monitor and it
does not come on.
Miscellaneous Problems
Error message is displayed on the screen during the operation of an
application.
116 - Troubleshooting
Curlin_WWAN-B6FJ-5051-02ENZ)-00.book Page 117 Tuesday, October 19, 2010 1:57 PM
Power On Self Test Messages
The following is an alphabetic list of error-and-status messages that Phoenix BIOS and/or your operating
system can generate and an explanation of each message. Error messages are marked with an *. If an error
message is displayed that is not in this list, write it down and check your operating system documentation
both on screen and in the manual. If you can find no reference to the message and its meaning is not clear,
contact your support representative for assistance.
nnnn Memory Cache Passed
Where nnnn is the amount of system cache in kilobytes successfully tested by the Power On Self
Test. (This can only appear if you have an SRAM card installed.)
*Extended Memory Failed at address line: xx
Extended memory not working or not configured properly. If you have installed a memory upgrade module,
verify that it is properly installed. If it is properly installed, check your Windows Setup to be sure it is not
using unavailable memory until you can contact your support representative.
nnnn Extended RAM Passed
Where nnnn is the amount of memory in kilobytes successfully tested.
*Failure Fixed Disk n (where x=1-4)
The fixed disk is not working or not configured properly. This may mean that the hard drive type identified
in your setup utility does not agree with the type detected by the Power On Self Test. Run the setup utility
to check for the hard drive type settings and correct them if necessary. If the settings are OK and the
message appears when you restart the system, there may be a serious fault which might cause you to lose
data if you continue. Contact your support representative.
*Incorrect Drive A type – run SETUP
Type of floppy drive A: not correctly identified in Setup. This means that the floppy disk drive type
identified in your setup utility does not agree with the type detected by the Power On Self Test. Run the
setup utility to correct the inconsistency.
117 - Troubleshooting
Curlin_WWAN-B6FJ-5051-02ENZ)-00.book Page 118 Tuesday, October 19, 2010 1:57 PM
*Incorrect Drive B type – run SETUP
Type of floppy drive B: not correctly identified in Setup. This means that the floppy disk drive type
identified in your setup utility does not agree with the type detected by the Power On Self Test. Run the
setup utility to correct the inconsistency.
*Invalid NVRAM Data
Problem with NVRAM access. In the unlikely case that you see this message you may have some display
problems. You can continue operating but should contact your support representative for more information.
*Keyboard controller error
The keyboard controller test failed. You may have to replace your keyboard or keyboard controller but may
be able to use an external keyboard until then. Contact your support representative.
*Keyboard error
Keyboard not working. You may have to replace your keyboard or keyboard controller but may be able to
use an external keyboard until then. Contact your support representative.
*Stuck Key
BIOS discovered a stuck key and displays the scan code for the stuck key. You may have to replace your
keyboard but may be able to use an external keyboard until then. Contact your support representative.
*Monitor type does not match CMOS – Run SETUP
Monitor type not correctly identified in Setup. This error probably means your BIOS is corrupted, run the
setup utility and set all settings to the default conditions. If you still get this error, contact your support
representative.
*Operating system not found
Operating system cannot be located on either drive A: or drive C: Enter the setup utility and see if both the
fixed disk, and drive A: are properly identified and that the boot sequence is set correctly. Unless you have
changed your installation greatly, the operating system should be on drive C:. If the setup utility is correctly
set, your hard drive may be corrupted.
118 - Troubleshooting
Curlin_WWAN-B6FJ-5051-02ENZ)-00.book Page 119 Tuesday, October 19, 2010 1:57 PM
*Parity Check 1 nnnn
Parity error found in the system bus. BIOS attempts to locate the address and display it on the screen. If it
cannot locate the address, it displays ????. This is a potentially data destroying failure. Contact your support
representative.
*Parity Check 2 nnnn
Parity error found in the I/O bus. BIOS attempts to locate the address and display it on the screen. If it
cannot locate the address, it displays ????. This is a potentially data-destroying failure. Contact
your support representative.
*Press <F1> to resume, <F2> to SETUP
Displayed after any recoverable error message. Press the [F1] key to continue the boot process or the [F2]
key to enter Setup and change any settings.
*Previous boot incomplete – Default configuration used
Previous Power On Self Test did not complete successfully. The Power On Self Test will load default values
and offer to run Setup. If the previous failure was caused by incorrect values and they are not corrected, the
next boot will likely fail also. If using the default settings does not allow you to complete a successful boot
sequence, you should turn off the power and contact your support representative.
*Real time clock error
Real-time clock fails BIOS test. May require board repair. Contact your support representative.
*Shadow RAM Failed at offset: nnnn
Shadow RAM failed at offset nnnn of the 64k block at which the error was detected. You are risking data
corruption if you continue. Contact your support representative.
nnnn Shadow RAM Passed
Where nnnn is the amount of shadow RAM in kilobytes successfully tested.
119 - Troubleshooting
Curlin_WWAN-B6FJ-5051-02ENZ)-00.book Page 120 Tuesday, October 19, 2010 1:57 PM
*System battery is dead – Replace and run SETUP
The BIOS CMOS RAM memory hold up battery is dead. This is part of your BIOS and is a board mounted
battery which requires a support representative to change. You can continue operating but you will have to
use setup utility default values or reconfigure your setup utility every time you turn off your Tablet PC. This
battery has an expected life of 2 to 3 years.
System BIOS shadowed
System BIOS copied to shadow RAM.
*System CMOS checksum bad – Default Configuration Used
BIOS CMOS RAM has been corrupted or modified incorrectly, perhaps by an application program that
changes data stored in BIOS memory. Run Setup and reconfigure the system.
*System RAM Failed at offset: nnnn
System memory failed at offset nnnn of in the 64k block at which the error was detected. This means that
there is a fault in your built-in memory. If you continue to operate, you risk corrupting your data. Contact
your support representative for repairs.
nnnn System Memory Passed
Where nnnn is the amount of system memory in kilobytes successfully tested.
*System timer error
The timer test failed. The main clock that operates the computer is faulty. Requires repair of system board.
Contact your support representative for repairs.
Video BIOS shadowed
Video BIOS successfully copied to shadow RAM.
.
120 - Troubleshooting
Curlin_WWAN-B6FJ-5051-02ENZ)-00.book Page 121 Tuesday, October 19, 2010 1:57 PM
Restoring Your Pre-installed Software
The location of your applications, drivers, and utilities is determined by the operating system you are
running.
Microsoft Windows 7 Professional: Please use the information contained in the “Saving and Recovering
Your Factory and System Images” booklet that was packed with your system.
Microsoft Windows XP Edition: Please use the following instructions.
The Drivers and Applications Restore (DAR) CD contains sets of device drivers and Fujitsu utilities (in
specific directories) that are unique to your computer configuration for use as documented below.
IF YOU HAVE ACCESS TO THE INTERNET, VISIT THE FUJITSU SUPPORT WEBSITE AT
HTTP://WWW.COMPUTERS.US.FUJITSU.COM/SUPPORT TO CHECK FOR THE MOST CURRENT
INFORMATION, DRIVERS AND HINTS ON HOW TO PERFORM RECOVERY AND SYSTEM UPDATES.
Re-installing Individual Drivers and Applications
The Drivers and Applications CD can be used to selectively re-install drivers and/or applications that may
have been un-installed or corrupted.
THERE MAY BE CERTAIN FREE THIRD-PARTY APPLICATIONS PRE-INSTALLED ON YOUR SYSTEM THAT
ARE NOT ON THE DAR CD. THE LATEST VERSIONS OF THE APPLICATIONS CAN BE DOWNLOADED
FROM THE THIRD-PARTY’S WEBSITE.
To re-install drivers and/or applications:
1
Boot up the system and insert the DAR CD after Windows has started. A Fujitsu Installer screen is displayed
after the CD is inserted.
2
After reading the License Agreement, click [I agree].
121 - Restoring Your Pre-installed Software
Curlin_WWAN-B6FJ-5051-02ENZ)-00.book Page 122 Tuesday, October 19, 2010 1:57 PM
3
A window will appear containing a list of applications, drivers, and utilities that you can install from the Drivers
and Applications CD.
THE COMPONENTS LISTED ARE COLOR-CODED IN TERMS OF THEIR INSTALL STATUS. BLUE INDICATES
THAT THE COMPONENT CAN BE INSTALLED. GREEN INDICATES THAT THE COMPONENT NEEDS TO BE
INSTALLED SEPARATELY. GREY INDICATES A COMPONENT THAT IS ALREADY INSTALLED; GREY ITEMS
CAN BE REINSTALLED, BUT PRIOR TO INSTALLATION YOU WILL RECEIVE A REMINDER THAT THE
COMPONENT IS ALREADY INSTALLED.
4
In the list, check off all the components you want to install. If you want to install all components, click [Select
All]. Clicking [Select All] will select all of the blue-coded components; you must select grey and green
components separately.
5
Once you have selected the components you wish to install, click [Install Selected Subsystems]; the
components will be installed.
6
After the components are installed, click [OK], then click [Yes] when asked if you want to reboot the system.
Restoring the Operating System for Windows
The Recovery and Utility disc contains four utilities:
• The Recovery utility allows you to restore the system operating system (OS). The restored OS is
the same one that was originally installed on the hard disk drive. After the OS is restored, you will
need to reinstall the drivers and applications from the Drivers and Applications Restore disc and
from any application discs that were bundled with the system when you purchased it.
• The Hard Disk Data Delete utility on this disc is used to delete all data on your hard disk
and prevent it from being reused. Do not use the Hard Disk Data Delete utility unless you are
absolutely certain that you want to erase your entire hard disk, including all partitions.
• The Partition Creation utility allows you to create a new D: partition or resize existing
partitions on your hard disk. NOTE: Creating or resizing partitions with this utility will cause
all data on the hard disk to be completely erased.
• The Diagnostics utility allows the IT professional to determine device status/condition by
executing diagnostics tests on selected system components.
122 - Restoring Your Pre-installed Software
Curlin_WWAN-B6FJ-5051-02ENZ)-00.book Page 123 Tuesday, October 19, 2010 1:57 PM
Methods for accessing the utilities
Certain LifeBook models have the Recovery and Utility applets pre-installed. Other systems require that
the Recovery and Utility disc be used (or in the event the hard disk has been reformatted).
In order to determine the method for accessing the Recovery and Utility applet, perform the
following procedures in order.
Determining whether Recovery and Utility is pre-loaded
1
2
Turn on or reboot your system. When the Fujitsu logo appears, press [F12] key.
3
You can also use the TrustedCore menu to determine whether the utility is pre-loaded by powering on your
system then pressing the {Enter] key when the Fujitsu logo appears on the screen. The TrustedCore Menu will
appear and the Recovery and Utility option will appear in the menu.
From the Boot Menu that appears, check whether the <Recovery and Utility> option is present. If it is not
present, it means that the utility must be used from the disc. Proceed to “Running Recovery and Utility from the
disc” if <Recovery and Utility> is unavailable.
Running Recovery and Utility from hard disk
1
2
3
4
5
6
7
Cursor down to <Recovery and Utility> and press the [Enter] key.
While the files are being loaded from the disc, a progress bar will appear at the bottom of the screen.
When the System Recovery Options dialog opens, select a new keyboard layout, if necessary, then click [Next].
When the Operating System dialog appears, click [Next].
If necessary, enter your password, then click [OK].
When System Recovery Options window appears, click on Recovery and Utility.
The Recovery and Utility screen appears on the screen with three tabs: Diagnostics,
Recovery and Utility. Please note that Diagnostics tab is not supported on certain LifeBook/Stylistic models
when running Recovery and Utility from the hard disk. In order to restore the operating system, please insert
the “Recovery and Utility” disc in the CD/DVD drive and use the Start Recovery function under the Recovery
tab. For more information about the tabs, go to “Recovery and Utility tabs” on page 124.
123 - Restoring Your Pre-installed Software
Curlin_WWAN-B6FJ-5051-02ENZ)-00.book Page 124 Tuesday, October 19, 2010 1:57 PM
Running Recovery and Utility from the disc
•
THE USE OF THIS DISC REQUIRES THAT YOU HAVE A DEVICE CAPABLE OF READING CDS ATTACHED TO YOUR
SYSTEM. YOU WILL NEED TO ATTACH AN EXTERNAL PLAYER. FOR MORE INFORMATION ON AVAILABLE EXTERNAL
DEVICES, VISIT OUR WEB SITE AT: HTTP://SOLUTIONS.US.FUJITSU.COM/.
•
THIS DISC CAN ONLY BE USED WITH THE SYSTEM WITH WHICH IT WAS PURCHASED.
Procedure
To verify/change the boot-up priority (rather than booting-up from the hard drive or an external floppy
disk drive), perform the following steps:
1
Power on your system. When the Fujitsu logo appears on the screen. press the [Enter] key or click on the left
mouse or touchpad button; the TrustedCore Menu will appear.
2
3
4
5
6
Select the Boot Menu from the TrustedCore Menu.
Highlight the CD/DVD option.
Insert the Recovery and Utility Disc into the drive tray.
Click [OK]. While the files are being loaded from the disc, a progress bar will appear at the bottom of the screen.
When the Recovery and Utility screen appears, three tabs will be present: Diagnostics, Recovery, and Utility.
Recovery and Utility tabs
Diagnostics tab: The Diagnostics tool is designed for use by IT professionals. It is not likely you will
need to use this tool. When you select devices from the Diagnosis window then click [Execute], several
tests are performed on the selected components.
Recovery tab: The Recovery tab contains the Start Recovery tool. Note that the recovery process erases
all data from the C: drive. If you decide to use the recovery tool, be sure to back up all data that you don’t
want to lose. Also note that you must run the system using your AC adapter while running the recovery
tool. To use the Recovery tool, select the Start Recovery function, click on the [Execute] button, then
follow the instructions on the screen.
124 - Restoring Your Pre-installed Software
Curlin_WWAN-B6FJ-5051-02ENZ)-00.book Page 125 Tuesday, October 19, 2010 1:57 PM
Utility tab: The Utility tab contains three tools: System Restore, Hard Disk Data Delete and Partition
Creation.
• System Restore can help fix problems that might be making your computer run slowly or stop
responding. System Restore enables you in rolling back the system to an earlier restore point, and
does not affect any of your documents, pictures, or other personal data.
• The Hard Disk Data Delete utility is used to delete all data on the hard disk and prevent the data
from being reused. NOTE: Do not use the Hard Disk Data Delete utility unless you are
absolutely certain that you want to erase your entire hard disk, including all partitions.
• The Partition Creation utility allows you to create a D: partition or resize existing partitions on
your hard disk. NOTE: Creating or resizing partitions with this utility will cause all data on
the hard disk to be completely erased.
Automatically Downloading Driver Updates
Your system has a convenient tool called the Fujitsu Driver Update (FDU) utility. With FDU, you can
choose to automatically or manually go to the Fujitsu site to check for new updates for your system.
The FDU icon should appear in the system tray at the bottom right of your screen (roll the cursor over the
icons to find the correct one). If the icon does not appear in the system tray, go to [Start] -> All Programs,
and click on Fujitsu Driver Update; this will create the icon automatically.
To invoke the FDU menu, you can either right-click on the FDU icon or hold the pen on the icon for a
couple of seconds until the menu appears. The menu contains the following items:
Check for updates now
Allows for manual driver update search. The first time it is used, you are prompted to agree to a user
agreement. After clicking on the icon, the FDU automatically connects with the Fujitsu site to check for
updates and downloads them. While downloading, the icon has a red bar through it, indicating that it
cannot be used while the download is in process. When the update is complete, a message appears
informing you of the fact.
125 - Restoring Your Pre-installed Software
Curlin_WWAN-B6FJ-5051-02ENZ)-00.book Page 126 Tuesday, October 19, 2010 1:57 PM
Enable Automatic Update Notifications
Automatically searches for new updates on a regular basis (approximately every 3 days).
Show update history
Brings up a screen that displays a history of updates that have been made via the FDU.
About Fujitsu Driver Update
Displays the FDU version number and copyright information
Fujitsu Driver Update Readme
Displays the FDU readme.
126 - Restoring Your Pre-installed Software
Curlin_WWAN-B6FJ-5051-02ENZ)-00.book Page 127 Tuesday, October 19, 2010 1:57 PM
Chapter 5
Care and Maintenance
Caring for your LifeBook Tablet PC
If you use your Fujitsu LifeBook Tablet PC carefully, you will increase its life and reliability. This section
provides some tips for looking after the Tablet PC and its devices.
THE SYSTEM CONTAINS COMPONENTS THAT CAN BE SEVERELY DAMAGED BY ELECTROSTATIC
DISCHARGE (ESD). TO MINIMIZE RISK TO THE COMPONENTS, OBSERVE THE FOLLOWING PRECAUTIONS:
•
BEFORE DOCKING OR UNDOCKING YOUR LIFEBOOK TABLET PC (WHEN USING A PORT REPLICATOR),
IT IS A GOOD PRACTICE TO ALWAYS TOUCH A GROUNDED METAL OBJECT TO DISCHARGE STATIC
ELECTRICITY BUILT UP IN YOUR BODY.
•
•
BE SURE TO POWER DOWN YOUR SYSTEM BEFORE ADDING OR REMOVING SYSTEM COMPONENTS.
EVEN IF THE SYSTEM IS IN HIBERNATE OR SLEEP STATES, DATA COULD BE LOST OR MEMORY COULD
BE DAMAGED IF POWER IS STILL AVAILABLE TO THE SYSTEM.
WHEN INSTALLING OR REMOVING A MEMORY MODULE, HOLD IT BY THE EDGE SO AS NOT TO TOUCH
BE CAREFUL NOT TO TOUCH ANY INTERNAL COMPUTER TERMINALS OR
COMPONENTS; THE OIL FROM YOUR FINGERS COULD CAUSE A SHORT TO THE COMPONENTS.
ANY CONTACTS OR CHIPS.
•
ELECTRICAL EQUIPMENT MAY BE HAZARDOUS IF MISUSED. OPERATIONS OF THIS PRODUCT OR SIMILAR
DO NOT ALLOW CHILDREN ACCESS TO THE
INTERIOR OF ANY ELECTRICAL PRODUCTS AND DO NOT PERMIT THEM TO HANDLE ANY CABLES.
PRODUCTS, MUST ALWAYS BE SUPERVISED BY AN ADULT.
127
Curlin_WWAN-B6FJ-5051-02ENZ)-00.book Page 128 Tuesday, October 19, 2010 1:57 PM
•
•
•
•
•
Your LifeBook Tablet PC is a durable but sensitive electronic device. Treat it with respect and care.
Make a habit of transporting it in a suitable carrying case.
Do not attempt to service the computer yourself. Always follow installation instructions closely.
Keep it away from food and beverages.
To protect your Tablet PC from damage and to optimize system performance, be sure to keep all
air vents unobstructed, clean, and clear of debris. This may require periodic cleaning, depending
upon the environment in which the system is used.
• Do not operate the Tablet PC in areas where the air vents can be obstructed, such as in tight
enclosures or on soft surfaces like a bed or cushion.
• If you accidentally spill liquid on your LifeBook Tablet PC:
1
2
3
4
•
•
•
•
•
•
•
•
Turn it off.
Position it so that the liquid can run out.
Let it dry out for 24 hours, or longer if needed.
If your Tablet PC will not boot after it has dried out, call your support representative.
Do not use your Fujitsu LifeBook Tablet PC in a wet environment (near a bathtub, swimming pool).
Always use the AC adapter and batteries that are approved for your Tablet PC.
Avoid exposure to sand, dust and other environmental hazards.
Do not expose your Tablet PC to direct sunlight for long periods of time as temperatures above 140°
F (60° C) may damage your Tablet PC.
Keep the covers closed on the connectors and slots when they are not in use.
Do not put heavy or sharp objects on the computer.
If you are carrying your LifeBook Tablet PC in a briefcase, or any other carrying case, make sure
that there are no objects in the case pressing on the lid.
Never position your Tablet PC such that the optical drive is supporting the weight of the Tablet PC.
128 - Care and Maintenance
Curlin_WWAN-B6FJ-5051-02ENZ)-00.book Page 129 Tuesday, October 19, 2010 1:57 PM
Cleaning your LifeBook Tablet PC
• Always disconnect the power plug. (Pull the plug, not the cord.)
• Clean your LifeBook Tablet PC with
/ a damp, lint-free cloth. Do not use abrasives or solvents.
• Use a soft cloth to remove dust from the screen. Never use glass cleaners.
• Always shut down the computer, unplug the power adapter, and remove the battery when cleaning
or disinfecting the computer exterior, keyboard or LCD display.
NOTE: Avoid wetting the thermal suede in all cases.
Cleaning guidelines using recommended off-the-shelf cleaners
Computer exterior, computer keyboard
To clean the exterior and keyboard, use one of the following off-the-shelf products:
• Office Depot® #154-616 Notebook Cleaning Kit
• Meridrew Enterprises Klear Screen® Wipes
• 3M CL563 Cleaner Wipes
Note: After cleaning with one of these products, gently polish with a dry, soft, lint-free cloth until the
solution is no longer visible.
Disinfecting LifeBook computers
Wipe the surface with a soft cloth wipe and a 50% ethanol solution or use another ethanol-based germicide
which has been registered as a hospital disinfectant by the EPA.
•
USE OF INCORRECT CLEANERS CAN RESULT IN OPTICAL IMPAIRMENT OF THE LCD AND/OR DAMAGE TO THE
COMPUTER. ALWAYS REFER TO THE CLEANER MANUFACTURER'S GUIDELINES AND MATERIAL SAFETY DATA SHEETS
FOR PROPER HANDLING AND USE OF THE PRODUCTS.
•
NEVER USE AMMONIA, ACIDIC, OR ALKALINE CLEANERS OR ORGANIC CHEMICALS SUCH AS PAINT THINNER,
ACETONE, PROPYL OR ISOPROPYL ALCOHOL, OR KEROSENE. IT MAY DAMAGE SURFACE FINISHES AND THE
COATING OF THE
•
LCD SCREEN.
NEVER USE COMPRESSED AIR FOR CLEANING STYLISTIC AND LIFEBOOK PCS.
129 - Care and Maintenance
Curlin_WWAN-B6FJ-5051-02ENZ)-00.book Page 130 Tuesday, October 19, 2010 1:57 PM
Cleaning the dust filter
Your LifeBook is equipped with fans to make air flow inside by pulling in outside air to cool the inside of
the system. Depending on the environment in which the system is used, dust and dirt may be pulled in
along with the air. Accumulated dust and dirt could impair the function of the system.
•
REMOVE AC ADAPTER: BEFORE REMOVING THE FILTER, TURN OFF THE SYSTEM AND PERIPHERALS AND
AC ADAPTER.
DISCONNECT THE
•
CLEANING THE FILTER:
- DO NOT USE DETERGENT
- AVOID DAMAGING THE FILTER; DAMAGE TO THE FILTER IS NOT COVERED BY WARRANTY.
- USE PLASTIC TOOLS TO CLEAN THE FILTER. METAL OR WOODEN TOOLS COULD DAMAGE THE FILTER.
• ESD: BEFORE CLEANING THE FILTER, TOUCH A METAL OBJECT TO DISCHARGE STATIC ELECTRICITY.
• ALWAYS BE SURE THE DUST FILTER IS INSTALLED WHEN RUNNING YOUR SYSTEM. NOT USING THE
FILTER COULD CAUSE CONTAMINATION AND POSSIBLE DAMAGE TO THE SYSTEM.
1
Turn off your computer and disconnect the AC
adapter.
2
Close the display panel and turn the system upside
down.
3
Remove the dust filter by pressing the latch towards
the filter and lifting it out (Figure 49).
4
5
Carefully clean the dust filter and the air-cooling duct.
Put back the dust filter by inserting the end without
latch first and pushing in the filter until it latches.
Dust Filter
Figure 49. Removing the dust filter
Storing your LifeBook Tablet PC
• If storing your Tablet PC for a month or longer, turn your LifeBook Tablet PC off, fully charge the
battery, then remove and store all Lithium ion batteries.
• Store your Fujitsu LifeBook in a cool, dry location. Temperatures should remain between 13ºF
(-25ºC) and 140ºF (60ºC).
130 - Care and Maintenance
Curlin_WWAN-B6FJ-5051-02ENZ)-00.book Page 131 Tuesday, October 19, 2010 1:57 PM
• Store your Tablet PC and batteries separately. If you store your LifeBook with a battery installed,
the battery will discharge, and battery life will be reduced. In addition, a faulty battery might
damage your LifeBook.
•
ALWAYS POWER OFF THE COMPUTER BEFORE TRANSPORTING AND/OR PACKAGING IT. AFTER SHUTTING DOWN
LED PANEL INDICATES POWER OFF CONDITION (I.E., NO LIGHTS ARE
ILLUMINATED).
THE SYSTEM, WAIT UNTIL THE STATUS
•
IT IS POSSIBLE THAT THE UNIT MAY NOT AUTOMATICALLY GO TO POWER OFF OR HIBERNATE MODE WHEN YOU
THIS SITUATION MAY OCCUR DUE TO PRE-OS BOOT PASSWORD SECURITY SETTINGS OR SOME
OTHER APPLICATION RUNNING ON THE COMPUTER.
CLOSE THE LID.
•
ATTEMPTING TO TRANSPORT THE COMPUTER WHILE POWER IS ON MAY DAMAGE THE TABLET PC DUE TO SHOCK
OR OVERHEATING SINCE THE AIR VENTS MAY BE BLOCKED OR RESTRICTED.
Traveling with your LifeBook Tablet PC
• Do not transport your Tablet PC while it is turned on.
• It is recommended that you carry your Tablet PC with you while traveling, rather than checking it
in as baggage.
• Always bring your System Recovery CD that came with your Tablet PC when you travel. If you
experience system software problems while traveling, you may need it to correct any problems.
• Never put your Tablet PC through a metal detector. Have your Tablet PC hand-inspected by security
personnel. You can however, put your Tablet PC through a properly tuned X-ray machine. To avoid
problems, place your Tablet PC close to the entrance of the machine and remove it as soon as
possible or have your Tablet PC hand-inspected by security personnel. Security officials may
require you to turn your Tablet PC on, so make sure you have a charged battery on hand.
131 - Care and Maintenance
Curlin_WWAN-B6FJ-5051-02ENZ)-00.book Page 132 Tuesday, October 19, 2010 1:57 PM
• Take the necessary plug adapters if you're traveling overseas. Check the following diagram to
determine which plug adapter you'll need or ask your travel agent.
Outlet Type
Location
Outlet Type
Location
United States, Canada, parts of Latin
America, Mexico, Japan, Korea,
the Philippines, Taiwan
United Kingdom,
Ireland, Malaysia,
Singapore, parts of
Africa
Russia and the Commonwealth of Independent
States (CIS), most of Europe, parts of Latin
America, the Middle East, parts of Africa, Hong
Kong, India, most of South Asia
China, Australia, New
Zealand
Batteries
Caring for your Batteries
• Always handle batteries carefully.
• Do not short-circuit the battery terminals (that is, do not touch both terminals with a metal object).
Do not carry lose batteries in a pocket or purse where they may mix with coins, keys, or other metal
objects. Doing so may cause an explosion or fire.
• Do not drop, puncture, disassemble, mutilate or incinerate the battery.
• Recharge batteries only as described in this manual and only in ventilated areas.
• Do not leave batteries in hot locations for more than a day or two. Intense heat can shorten the life
of your battery.
• Do not leave a battery in storage for longer than 6 months without recharging it.
132 - Care and Maintenance
Curlin_WWAN-B6FJ-5051-02ENZ)-00.book Page 133 Tuesday, October 19, 2010 1:57 PM
Increasing Battery Life
•
•
•
•
•
•
•
•
Power your Tablet PC through the AC or optional auto/airline adapter whenever possible.
If your tablet runs on battery power all day, connect it to an AC adapter overnight to recharge it.
Keep brightness to the lowest level comfortable.
Set the power management for maximum battery life.
Put your Tablet PC in Sleep mode when it is turned on and you are not actually using it.
Limit your media drive access.
Disable the Media Player auto insert notification function.
Eject ExpressCards when not in use.
Media Care
Caring for your Media (DVD/CD/CD-R)
Media discs are precision devices and will function reliably if given reasonable care.
•
•
•
•
•
•
•
•
Always store your media disc in its case when it is not in use.
Always handle discs by the edges and avoid touching the surface.
Avoid storing any media discs in extreme temperatures.
Do not bend or scratch media discs or set heavy objects on them.
Do not spill liquids on media discs.
Do not get dust on media discs.
Never write on the label surface with a ballpoint pen or pencil. Always use a felt pen.
If a disc is subjected to a sudden change in temperature, condensation may form on the surface.
Wipe moisture off with a soft, lint free cloth and let it dry at room temperature. DO NOT use a hair
dryer or heater to dry media discs.
• If a disc is dirty, use only a DVD/CD cleaner or wipe it with a clean, soft, lint free cloth starting
from the inner edge and wiping to the outer edge.
133 - Care and Maintenance
Curlin_WWAN-B6FJ-5051-02ENZ)-00.book Page 134 Tuesday, October 19, 2010 1:57 PM
Caring for your Optical Drive
Your optical drive is durable but you must treat it with care. Please pay attention to the following points:
• The drive rotates the compact disc at a very high speed. Do not carry it around or subject it to shock
or vibration with the power on.
• Avoid using or storing the drive where it will be exposed to extreme temperatures.
• Avoid using or storing the drive where it is damp or dusty.
• Avoid using or storing the drive near magnets or devices that generate strong magnetic fields.
• Avoid using or storing the drive where it will be subjected to shock or vibration.
• Do not disassemble or dismantle the optical drive.
• Use of a commercially available lens cleaner is recommended for maintenance of your drive.
Express Cards
Caring for your Cards
Express Cards are durable, but you must treat them with care. The documentation supplied with your card
will provide specific information, but you should pay attention to the following points:
• To keep out dust and dirt, store cards in their protective sleeves when they are not installed in your
LifeBook Tablet PC.
• Avoid prolonged exposure to direct sunlight or excessive heat.
• Keep the cards dry.
• Do not flex or bend the cards, and do not place heavy objects on top of them.
• Do not force cards into the slot.
• Avoid dropping cards, or subjecting them to excessive vibration.
134 - Care and Maintenance
Curlin_WWAN-B6FJ-5051-02ENZ)-00.book Page 135 Tuesday, October 19, 2010 1:57 PM
Chapter 6
System Specifications
Specifications
This section provides the hardware and environmental specifications for your Fujitsu LifeBook Tablet PC.
Specifications of particular configurations will vary.
Configuration Label
The configuration label located on the bottom of your Tablet PC contains specific information regarding
the options you’ve chosen for your Tablet PC. Following is an example configuration label.
Configuration ID
Part Number
Configuration P/N: A4XXXXXXXXXXXXX
FPC P/N: FPCXXXXXX
T730, i5-540-M, 12.1 WXGA, W7Pro, 160G, 4GB
Operating System
Processor
Model #
Screen Size/Type
135
Hard Drive
Memory
Curlin_WWAN-B6FJ-5051-02ENZ)-00.book Page 136 Tuesday, October 19, 2010 1:57 PM
Microprocessor
New 2010 Intel® Core™ Processor (Refer to the system label to determine the speed of your processor).
Chipset
• Mobile Intel® QM57 Express
• Platform Control Hub (PCH)
Memory
System Memory
• DDR3-1066 MHz SDRAM dual-channel memory module.
• Two DIMM slots; upgradeable to 8 GB of total memory (4 GB x 2).
Cache Memory
Up to 4MB L3 cache on-die (depending upon CPU)
Video
Built-in color flat-panel TFT active matrix LED backlit display with simultaneous display capability.
Video Color and Resolution
12.1" Wide XGA display
• Internal: 1280 x 800 pixel resolution, 16M colors
• External: 1920 x 1200 pixel resolution, 16M colors
• Simultaneous: 1280 x 800, 16M colors
Video RAM
Intel(R) HD Graphics with dynamic frequency. Automatically distributes performance to CPU and
graphics applications that need an extra boost up to approximately 20%.
136 - Specifications
Curlin_WWAN-B6FJ-5051-02ENZ)-00.book Page 137 Tuesday, October 19, 2010 1:57 PM
Digitizer
Depending upon the configuration of your system, one of two digitizer options is included:
• Active digitizer (uses active stylus input), or,
• Dual Digitizer, consisting of active digitizer and capacitive touch panel (uses active stylus input and
two finger touch input).
Audio
• Realtek codec ALC269 with High Definition (HD) audio.
• Headphones: Stereo headphone jack, 3.5 mm, 1 Vrms or less, minimum impedance 32 Ohms
• Microphone: Stereo microphone jack, 3.5 mm, 100 mVp-p or less, minimum impedance 10K Ohms
• Two built-in speakers, 25 mm x 16 mm, 0.6 W
• Two built-in digital microphones
Mass Storage Device Options
Hard Drive
Serial ATA, 2.5”, 9.5 mm, shock-mounted with Shock Sensor utility. Capacity and speed of the hard drive
are determined by system configuration.
Modular Bay Devices
One of the following devices is pre-installed:
• Dual-Layer Multi-Format DVD Writer: 24x CD-ROM, 24x CD-R, 10x CD-RW, 8x DVD-ROM,
5x DVD-RAM, 8x DVD+/-R, 4x DVD+/-R(DL), 6x DVD-RW, 8x DVD+RW
• Modular Bay Battery
• Weight Saver
137 - Specifications
Curlin_WWAN-B6FJ-5051-02ENZ)-00.book Page 138 Tuesday, October 19, 2010 1:57 PM
Features
Integrated Pointing Device
Touchpad cursor control buttons, with scroll strip built-in
Communications
• Gigabit LAN: Intel 82577LM 10/100/1000 Gigabit Ethernet LAN
• WLAN: Optional integrated Intel Centrino Advanced-N 6200 (a/b/g/n, 2 x 2) or Atheros XSPAN
802.11bgn
• Bluetooth: Optional Bluetooth V2.1 device for wireless personal area network communication
• WWAN: Optional Wireless Wide Area Network (WWAN)
Web Camera
Optional built-in 2.0 megapixel web camera.
Security
Trusted Platform Module: The LifeBook T730 has a Trusted Platform Module (TPM) installed for added
system security.
Theft Prevention Lock: Lock slot for use with security restraint systems.
Fingerprint Reader: The fingerprint sensor uses biometric readings to ensure that only a person with a
registered fingerprint can access the system.
iAMT Support (using Intel ®vPro™ technology): Intel vPro technology is a set of features that work
together to allow for remote wired or wireless access of a computer. This technology can be used whether
or not the computer is running, and enhances the administrator's ability to maintain the system, enhance
security, and increase the cost benefits by allowing off-site service
138 - Specifications
Curlin_WWAN-B6FJ-5051-02ENZ)-00.book Page 139 Tuesday, October 19, 2010 1:57 PM
Device Ports
On the LifeBook Tablet PC:
•
•
•
•
•
•
•
•
•
•
•
Express Card slot for one Express Card
Memory Stick/SD Card slot
One 15-pin D-SUB connector for VGA external monitor (see Display specifications)
Three USB 2.0 (Universal Serial Bus) connectors for input/output devices
One DC In connector
One IEEE 1394 (4-pin type) jack
One LAN (RJ-45) connector
One HDMI port
Docking port (100-pin, to dock with port replicator)
One stereo headphone jack
One stereo microphone/line-in jack
On the Optional Port Replicator:
• One 15-pin D-SUB connector for VGA external monitor
• Four USB 2.0 connectors for input/output devices
• One LAN (RJ-45) connector
• One DC-in connector
• One DVI-D connector
• One Headphone-Out connector
139 - Specifications
Curlin_WWAN-B6FJ-5051-02ENZ)-00.book Page 140 Tuesday, October 19, 2010 1:57 PM
Keyboard
Built-in keyboard with all functions of 101 key PS/2 compatible keyboards.
•
•
•
•
•
•
•
•
Total number of keys: 84
Function keys: F1 through F12, plus Fn extension key
Two Windows keys: one Start key, one application key
Key pitch: 19 mm; key stroke: 3.0 mm
Built-in Touchpad pointing device with two left and two right buttons and scroll strip.
Built-in Palm Rest
Spill-resistant
External USB keyboard/mouse support
Power
Battery
• Standard Lithium ion battery, rechargeable, 6-cell, 10.8V, 5200 mAh
• Optional Lithium ion bay battery, rechargeable, 6-cell 10.8V, 3800 mAh
AC Adapter
Autosensing 100-240V AC, supplying 19V DC, 4.22A, 80W to the LifeBook; includes an AC cable
Power Management
Conforms to ACPI (Advanced Configuration and Power Interface).
Dimensions and Weight
Overall Dimensions
11.69"(w) x 9.17"(d) x 1.54”(h) (297 mm x 233 mm x 39.0 mm). The height dimensions include the rubber
feet.
140 - Specifications
Curlin_WWAN-B6FJ-5051-02ENZ)-00.book Page 141 Tuesday, October 19, 2010 1:57 PM
Weight
Wide-view display, active digitizer with weight saver - 3.95 lbs. (1.79 kg)
Wide-view display, active digitizer with optical drive: 4.32 lbs. (1.96 kg)
Standard display, dual-digitizer with optical drive: 4.56 lbs. (2.07 kg)
Environmental Requirements
Temperature
Operating: 41° to 95° F (5° to 35° C). Non-operating: 5° to 140° F (–15° to 60° C)
Humidity
Operating: 20% to 85%, relative, non-condensing. Non-operating: 8% to 85%, relative, non-condensing
Altitude
Operating: 10,000 feet (3,048 m) maximum
Popular Accessories
For ordering or additional information on Fujitsu accessories please visit our Web site at
www.shopfujitsu.com or call 1-800-FUJITSU.
Pre-Installed Software
Depending on your pre-installed operating system, your Tablet PC comes with pre-installed software for
playing audio and video files of various formats. In addition there is file transfer software and virus
protection software.
THE FOLLOWING LIST CONSTITUTES THE SOFTWARE THAT MAY BE INSTALLED ON YOUR COMPUTER.
THE PRE-INSTALLED SOFTWARE MAY VARY, AND IS DETERMINED BY YOUR OPERATING SYSTEM AND
CONFIGURATION.
141 - Specifications
Curlin_WWAN-B6FJ-5051-02ENZ)-00.book Page 142 Tuesday, October 19, 2010 1:57 PM
•
•
•
•
•
•
•
•
•
Adobe Reader
Norton Internet Security™ (60-day free trial)
CyberLink PowerDirector
CyberLink PowerDVD
CyberLink MakeDisc (Windows 7 models only)
CyberLink YouCam
Roxio Creator
OmniPass Fingerprint application
Fujitsu Driver Update utility
Depending upon the configuration of your system, one of the following packages will be installed:
• Microsoft Office Starter 2010 (32-bit) and Microsoft Windows Live Essentials, or,
• Microsoft Office Ready with Office Assistant
Learning About Your Software
Tutorials
All operating systems and most application software have tutorials built into them upon installation. We
highly recommend that you step through the tutorial before you use an application.
Manuals
Included with your Tablet PC you will find manuals for your installed operating system and other preinstalled software. Any manuals that are not included are available online through the software’s “Help”
menu. We recommend that you review these manuals for information on the use of these applications.
Adobe Reader
Adobe Reader allows you to view, navigate, and print PDF files across all major computing platforms.
142 - Specifications
Curlin_WWAN-B6FJ-5051-02ENZ)-00.book Page 143 Tuesday, October 19, 2010 1:57 PM
Norton Internet Security
Your system is preinstalled with a free 60-day trial version of Symantec’s Norton Internet Security™.
Internet Security is a suite of tools designed to protect your LifeBook from viruses, hackers, spam, and
spyware. It helps you protect data currently on your hard disk from destruction or contamination. The trial
version is activated upon your acceptance of software license agreement. After 60 days, you will need to
purchase a subscription from Symantec to download latest virus, spyware, and spam definitions.
CyberLink MakeDisc
(Windows 7 systems only) CyberLink MakeDisc allows you to burn data, videos and photographs to CDs
or DVDs.
CyberLink PowerDVD
CyberLink PowerDVD allows you to produce and edit home movies and slideshows on discs.
CyberLink YouCam
CyberLink YouCam allows you to capture photos or movies on the embedded webcam, add special effects
to them, and share them in a variety of formats or via social networks.
CyberLink PowerDirector
CyberLink PowerDirector allows you to edit and enhance your videos, and add special effects to them.
Roxio Creator
Roxio Creator lets you burn CDs and organize, edit and share digital photos, music, data, or videos.
OmniPass Fingerprint application
The fingerprint sensor uses Softex OmniPass which provides password management capabilities to
Microsoft Windows operating systems. OmniPass lets you use a "master password" for all Windows,
applications, and on-line passwords, and presents a convenient user interface through which you can
securely manage passwords, users, and multiple identities for each user.
143 - Specifications
Curlin_WWAN-B6FJ-5051-02ENZ)-00.book Page 144 Tuesday, October 19, 2010 1:57 PM
Fujitsu Driver Update Utility
The Fujitsu Driver Update (FDU) utility is pre-installed on your system. With FDU, you can choose to
automatically or manually go to the Fujitsu site to check for new updates for your system. See
“Automatically Downloading Driver Updates” on page 125.
Microsoft software
Depending upon your system configuration, your system is pre-installed with either Microsoft Starter 2010 and
Microsoft Windows Live Essentials, or Microsoft Office Ready with Office Assistant, as described below.
Microsoft Office Starter 2010 (32-bit)
Microsoft Office Starter 2010 includes reduced-functionality versions of Microsoft Word and Microsoft Excel that
include advertising.Microsoft PowerPoint, Microsoft Outlook, and Microsoft Publisher are not included.
Customers must purchase an Office 2010 Disc, PKC (Product Key Card), or select one of the full Microsoft Office
2010 suites to activate full-featured Office software on the PC.
Fujitsu offers a PKC (Product Key Card) for Microsoft Office Home and Student 2010 and Microsoft Office Home
and Business 2010 (32-bit). Simply enter your product key and you’re ready to go! Another option is to purchase a
full Office 2010 suite from either your computer reseller or online from Microsoft.
Microsoft Windows Live Essentials
Windows Live Essentials is a suite of programs that makes it easier and more enjoyable to use your LifeBook.
Live Essentials consists of six Live applications: Messenger, Photo Gallery, Writer, Mail, Movie Maker, and Silverlight. Messenger lets you communicate and interact with individuals and groups. Photo Gallery is a flexible
application that lets you organize, edit, and share photos. Writer can be used to generate blog entries, upload videos and photos to your blogs, and publish your entries online. Mail makes it easy for you to manage your email
accounts. Movie Maker makes great-looking movies and slide shows from your videos and photos. It’s simple to
import standard or high definition video and photos, and then have AutoMovie add animations, music, and a title
in minutes. Silverlight powers rich application experiences and delivers high quality, interactive video across the
Web and mobile devices.
144 - Specifications
Curlin_WWAN-B6FJ-5051-02ENZ)-00.book Page 145 Tuesday, October 19, 2010 1:57 PM
Microsoft Office Ready with Office Assistant
With Office Ready PCs it's now even easier to take advantage of Microsoft® Office 2007. The full versions of
Microsoft® Office Basic, Small Business and Professional 2007 are already preinstalled on your PC, so there’s
nothing to install, and all Office Ready PCs give you the option to activate a 60 day trial of Microsoft® Office
Professional 2007. All you need to do is purchase the appropriate Office 2007 license kit which allows you to "unlock" the full version of Office that you want.
Fujitsu offers a Media License Kit for Microsoft® Office Small Business 2007. Simply enter your product key and
you’re ready to go. Another option is to purchase a Microsoft® Office 2007 media-less license kit (MLK) from
either your computer reseller or online from Microsoft within 90 days of the purchase of your computer.
Operating System Options
Microsoft Windows 7 Professional
Microsoft Windows XP Tablet PC Downgrade Edition (Available by special order only).
145 - Specifications
Curlin_WWAN-B6FJ-5051-02ENZ)-00.book Page 146 Tuesday, October 19, 2010 1:57 PM
Glossary
AC Adapter
A device which converts the AC voltage from a wall outlet to the DC voltage needed to power your
LifeBook Tablet PC.
Access point
Wireless network device used to bridge wireless and wired network traffic.
ACPI
Advanced Configuration and Power Interface
Active-Matrix Display
A type of technology for making flat-panel displays which has a transistor or similar device for every
pixel on the screen.
Ad Hoc Mode
Ad Hoc Mode refers to a wireless network architecture where wireless network connectivity between
multiple computers is established without a central wireless network device, typically known as Access
Points. Connectivity is accomplished using only client devices in a peer-to-peer fashion.
146
Curlin_WWAN-B6FJ-5051-02ENZ)-00.book Page 147 Tuesday, October 19, 2010 1:57 PM
ADSL
Asymmetric Digital Subscriber Line. Technology for transporting high bit-rate services over ordinary
phone lines.
AGP
Accelerated Graphics Port. Graphics port specifically designed for graphics-intensive devices, such as
video cards and 3D accelerators.
Auto/Airline Adapter
A device which converts the DC voltage from an automobile cigarette lighter or aircraft DC power
outlet to the DC voltage needed to power your LifeBook Tablet PC.
BIOS
Basic Input-Output System. A program and set of default parameters stored in ROM which tests and
operates your LifeBook Tablet PC when you turn it on until it loads your installed operating system
from disk. Information from the BIOS is transferred to the installed operating system to provide it with
information on the configuration and status of the hardware.
Bit
An abbreviation for binary digit. A single piece of information which is either a one (1) or a zero (0).
bps
An abbreviation for bits per second. Used to describe data transfer rates.
Boot
To start-up a computer and load its operating system from disk, ROM or other storage media into
RAM.
147 - Glossary
Curlin_WWAN-B6FJ-5051-02ENZ)-00.book Page 148 Tuesday, October 19, 2010 1:57 PM
Bus
An electrical circuit which passes data between the CPU and the sub-assemblies inside your LifeBook
Tablet PC.
Byte
8 bits of parallel binary information.
Cache Memory
A block of memory built into the micro-processor which is much faster to access than your system
RAM and used in specially structured ways to make your overall data handling time faster.
CD-ROM
Compact disk read only memory. This is a form of digital data storage which is read optically with a
laser rather than a magnetic head. A typical CD-ROM can contain about 600MB of data and is not
subject to heads crashing into the surface and destroying the data when there is a failure nor to wear
from reading.
Channel
Range of narrow-band frequencies used by the WLAN device to transmit data. IEEE802.11b/g - 11
channels, 22 MHz wide channels.
CMOS RAM
Complementary metal oxide semiconductor random access memory. This is a technology for
manufacturing random access memory which requires very low levels of power to operate.
Command
An instruction which you give your operating system. Example: run a particular application or format
a floppy disk.
148 - Glossary
Curlin_WWAN-B6FJ-5051-02ENZ)-00.book Page 149 Tuesday, October 19, 2010 1:57 PM
Configuration
The combination of hardware and software that makes up your system and how it is allocated for use.
CRT
Cathode Ray Tube. A display device which uses a beam of electronic particles striking a luminescent
screen. It produces a visual image by varying the position and intensity of the beam.
Data
The information a system stores and processes.
DC
Direct current. A voltage or current that does not fluctuate periodically with time.
Default Value
A pre-programmed value to be used if you fail to set your own.
DHCP
Dynamic Host Configuration Protocol. A protocol used to automatically acquire parameters required
for the communication, such as IP address. The sender of IP address is called a DHCP server, and the
receiver is called a DHCP client.
DIMM
Dual-in-line memory module.
Disk
A spinning platter of magnetic data storage media. If the platter is very stiff it is a hard drive, if it is
highly flexible it is a floppy disk, if it is a floppy disk in a hard housing with a shutter it is commonly
called a diskette.
149 - Glossary
Curlin_WWAN-B6FJ-5051-02ENZ)-00.book Page 150 Tuesday, October 19, 2010 1:57 PM
Disk Drive
The hardware which spins the disk and has the heads and control circuitry for reading and writing the
data on the disk.
Diskette
A floppy disk in a hard housing with a shutter.
DMA
Direct Memory Access. Special circuitry for memory to memory transfers of data which do not require
CPU action.
DMI
Desktop Management Interface. A standard that provides PC management applications with a
common method of locally or remotely querying and configuring PC computer systems, hardware and
software components, and peripherals.
DNS
Domain Name System. A function to control the association between the IP address and the name
assigned to the computer. If you do not know the IP address but if you know the computer name, you
can still communicate to that computer.
DOS
Disk Operating System (MS-DOS is a Microsoft Disk Operating System).
Driver
A computer program which converts application and operating system commands to external devices
into the exact form required by a specific brand and model of device in order to produce the desired
results from that particular equipment.
150 - Glossary
Curlin_WWAN-B6FJ-5051-02ENZ)-00.book Page 151 Tuesday, October 19, 2010 1:57 PM
DVMT
Dynamic Video Memory Technology. A video memory architecture that increases the efficiency of the
motherboard by using innovative memory utilization and direct AGP.
ECP
Extended Capability Port. A set of standards for high speed data communication and interconnection
between electronic devices.
Encryption Key (Network Key)
Data encryption key used to encrypt message text and for computing message integrity checks. Data
encryption protects data from unauthorized viewing.
This device uses the same encryption key to encode and decode the data, and the identical encryption
key is required between the sender and receiver.
ESD
Electro-Static Discharge. The sudden discharge of electricity from a static charge which has built-up
slowly. Example: the shock you get from a doorknob on a dry day or the sparks you get from brushing
hair on a dry day.
FCC
Federal Communications Commission.
Floppy Disk
A spinning platter of magnetic data storage media which is highly flexible.
GB
Gigabyte. One billion bytes.
151 - Glossary
Curlin_WWAN-B6FJ-5051-02ENZ)-00.book Page 152 Tuesday, October 19, 2010 1:57 PM
Hard drive
A spinning platter of magnetic data storage media where the platter is very stiff.
I/O
Input/Output. Data entering and leaving your Tablet PC in electronic form.
I/O Port
The connector and associated control circuits for data entering and leaving your Tablet PC in
electronic form.
IDE
Intelligent Drive Electronics. A type of control interface for a hard drive which is inside the hard drive
unit.
IEEE802.11a
Wireless LAN standard that supports a maximum data rate of 54 Mbps. 802.11a devices operate in the
5 GHz lower and middle UNII bands.
IEEE802.11b
Wireless LAN standard that supports a maximum data rate of 11 Mbps. 802.11b devices operate in the
2.4 GHz ISM band.
IEEE802.11g
Wireless LAN standard that supports a maximum data rate of 54 Mbps. 802.11g devices operate in the
2.4 GHz ISM band.
Infrared
Light just beyond the red portion of the visible light spectrum which is invisible to humans.
152 - Glossary
Curlin_WWAN-B6FJ-5051-02ENZ)-00.book Page 153 Tuesday, October 19, 2010 1:57 PM
Infrastructure
A name of a wireless LAN configuration. This type of communication uses an access point. Another
type of communication is called Ad Hoc.
IP Address
An identifier for a computer or device on a TCP/IP network. Networks using the TCP/IP protocol
route messages based on the IP address of the destination. The format of an IP address is a 32-bit
numeric address written as four numbers separated by periods. Each number can be zero to 255. For
example, 1.160.10.240 could be an IP address.
Within an isolated network, you can assign IP addresses at random as long as each one is unique.
However, connecting a private network to the Internet requires using registered IP addresses (called
Internet addresses) to avoid duplicates.
The four numbers in an IP address are used in different ways to identify a particular network and a
host on that network. Three regional Internet registries -- ARIN, RIPE NCC and APNIC -- assign
Internet addresses from the following three classes.
Class A - supports 16 million hosts on each of 126 networks
Class B - supports 65,000 hosts on each of 16,000 networks
Class C - supports 254 hosts on each of 2 million networks
The number of unassigned Internet addresses is running out, so a new classless scheme called CIDR
is gradually replacing the system based on classes A, B, and C and is tied to adoption of IPv6.
IR
An abbreviation for infrared.
IrDA
Infrared Data Association. An organization which produces standards for communication using
infrared as the carrier.
153 - Glossary
Curlin_WWAN-B6FJ-5051-02ENZ)-00.book Page 154 Tuesday, October 19, 2010 1:57 PM
IRQ
Interrupt Request. An acronym for the hardware signal to the CPU that an external event has occurred
which needs to be processed.
KB
Kilobyte. One thousand bytes.
LAN
Local Area Network. An interconnection of computers and peripherals within a single limited
geographic location which can pass programs and data amongst themselves.
LCD
Liquid Crystal Display. A type of display which makes images by controlling the orientation of
crystals in a crystalline liquid.
Lithium ion Battery
A type of rechargeable battery which has a high power-time life for its size and is not subject to the
memory effect as Nickel Cadmium batteries.
LPT Port
Line Printer Port. A way of referring to parallel interface ports because historically line printers were
the first and latter the most common device connected to parallel ports.
MAC Address
Media Access Control Address. A unique physical address of a network card. For Ethernet, the first
three bytes are used as the vendor code, controlled and assigned by IEEE. The remaining three bytes
are controlled by each vendor (preventing overlap), therefore, every Ethernet card is given a unique
physical address in the world, being assigned with a different address from other cards. For Ethernet,
frames are sent and received based on this address.
154 - Glossary
Curlin_WWAN-B6FJ-5051-02ENZ)-00.book Page 155 Tuesday, October 19, 2010 1:57 PM
MB
Megabyte. One million bytes.
Megahertz
1,000,000 cycles per second.
Memory
A repository for data and applications which is readily accessible to your LifeBook Tablet PC’s CPU.
MHz
Megahertz.
MIDI
Musical Instrument Digital Interface. A standard communication protocol for exchange of
information between computers and sound producers such as synthesizers.
Modem
A contraction for MOdulator-DEModulator. The equipment which connects a computer or other data
terminal to a communication line.
Monaural
A system using one channel to process sound from all sources.
MTU
Maximum Transmission Unit
The maximum data size that can be transferred at a time through the Internet or other networks. You
can set a smaller MTU size to obtain successful communication, if you have difficulty transferring
data due to the fact that the maximum size is too large.
155 - Glossary
Curlin_WWAN-B6FJ-5051-02ENZ)-00.book Page 156 Tuesday, October 19, 2010 1:57 PM
Network key
Data that is used for encrypting data in data communication. The personal computer uses the same
network key both for data encryption and decryption, therefore, it is necessary to set the same network
key as the other side of communication.
Network name (SSID: Service Set Identifier )
When a wireless LAN network is configured, grouping is performed to avoid interference or data theft.
This grouping is performed with “Network name (SSID)”. In order to improve security, the network
key is set allowing no communication unless “Network name (SSID)” coincides with the network key.
NTSC
National TV Standards Commission. The standard for TV broadcast and reception for the USA.
Open system authentication
Null authentication method specified in the 802.11 standard that performs no authentication checks on
a wireless client before allowing it to associate.
Operating System
A group of control programs that convert application commands, including driver programs, into the
exact form required by a specific brand and model of microprocessor in order to produce the desired
results from that particular equipment.
Partition
A block of space on a hard drive which is set aside and made to appear to the operating system as if it
were a separate disk, and addressed by the operating system accordingly.
PCMCIA
PCMCIA is a trademark of the Personal Computer Memory Card International Association. The
Personal Computer Memory Card International Association is an organization that sets standards for
add-in cards for personal computers.
156 - Glossary
Curlin_WWAN-B6FJ-5051-02ENZ)-00.book Page 157 Tuesday, October 19, 2010 1:57 PM
Peripheral Device
A piece of equipment which performs a specific function associated with but not integral to a
computer. Examples: a printer, a modem, a CD-ROM.
Pitch (keyboard)
The distance between the centers of the letter keys of a keyboard.
Pixel
The smallest element of a display, a dot of color on your display screen. The more pixels per area the
clearer your image will appear.
POST
Power On Self Test. A program which is part of the BIOS which checks the configuration and
operating condition of your hardware whenever power is applied to your Tablet PC. Status and error
messages may be displayed before the operating system is loaded. If the self test detects failures that
are so serious that operation cannot continue, the operating system will not be loaded.
PPPoE
Point to Point Protocol over Ethernet. A protocol for Ethernet, using a Point-to-Point Protocol (PPP),
which is used for connection on the phone line.
Program
An integrated set of coded commands to your computers telling your hardware what to do and how
and when to do it.
157 - Glossary
Curlin_WWAN-B6FJ-5051-02ENZ)-00.book Page 158 Tuesday, October 19, 2010 1:57 PM
Protocol
Procedures and rules use to send and receive data between computers.
- Method of sending and receiving data
- Process used to handle communication errors
Conditions required for communication are organized in procedures for correct transfer of
information.
RAM
Random Access Memory. A hardware component of your LifeBook Tablet PC that holds binary
information (both program and data) as long as it has the proper power applied to it.
RAM Module
A printed circuit card with memory and associated circuitry which allows the user to add additional
memory to the computer without special tools.
Reset
The act of reloading the operating system. A reset erases all information stored in RAM.
Restart
See Reset.
Resume
To proceed after interruption. In your Tablet PC this refers to returning to active operation after having
been in one of the suspension states.
ROM
Read Only Memory. A form of memory in which information is stored by physically altering the
material. Data stored in this way cannot be changed by your Tablet PC and does not require power to
maintain it.
158 - Glossary
Curlin_WWAN-B6FJ-5051-02ENZ)-00.book Page 159 Tuesday, October 19, 2010 1:57 PM
SDRAM
Synchronous Dynamic Random Access Memory.
Serial Port
A connection to another device through which data is transferred one bit at a time on a single wire with
any other wires only for control of the device not for transfer of data.
Shared key authentication
802.11 network authentication method in which the AP sends the client device a challenge text packet
that the client must then encrypt with the correct WEP key and return to the AP. If the client has the
wrong key or no key, authentication will fail and the client will not be allowed to associate with the
AP. Shared key authentication is not considered secure, because a hacker who detects both the cleartext challenge and the same challenge encrypted with a WEP key can decipher the key.
Sleep
To make inoperative for a period of time. Your LifeBook Tablet PC uses various suspension states to
reduce power consumption and prolong the charge of your battery.
SSID
Service Set Identifier, a 32-character unique identifier attached to the header of packets sent over a
WLAN that acts as a password when a mobile device tries to connect to the BSS. The SSID
differentiates one WLAN from another, so all access points and all devices attempting to connect to a
specific WLAN must use the same SSID. A device will not be permitted to join the BSS unless it can
provide the unique SSID. Because the SSID is broadcast in plain text, it does not supply any security
to the network.
Status Indicator
A display which reports the condition of some portion of your hardware. On your LifeBook Tablet PC
this is an LCD screen just above the keyboard.
159 - Glossary
Curlin_WWAN-B6FJ-5051-02ENZ)-00.book Page 160 Tuesday, October 19, 2010 1:57 PM
Stereo (audio)
A system using two channels to process sound from two different sources.
Subnet mask
TCP-IP network is controlled by being divided into multiple smaller networks (subnets). IP address
consists of the subnet address and the address of each computer. Subnet mask defines how many bits
of IP address comprise the subnet address. The same value shall be set among computers
communicating with each other.
SVGA
Super VGA.
S-Video
Super Video. A component video system for driving a TV or computer monitor.
System Clock
An oscillator of fixed precise frequency which synchronizes the operation of the system and is counted
to provide time of day and date.
TCP/IP
Transmission Control Protocol/Internet Protocol. A standard Internet protocol that is most widely
used.
TFT
Thin Film Transistor – A technology for flat display panels which uses a thin film matrix of transistors
to control each pixel of the display screen individually.
UL
Underwriters Laboratories – An independent organization that tests and certifies the electrical safety
of devices.
160 - Glossary
Curlin_WWAN-B6FJ-5051-02ENZ)-00.book Page 161 Tuesday, October 19, 2010 1:57 PM
USB
Universal Serial Bus. Standard that allows you to simultaneously connect up to 127 USB devices such
as game pads, pointing devices, printers, and keyboards to your computer.
VRAM
Video Random Access Memory. A memory dedicated to video display data and control.
WFM
Wired for Management is Intel’s broad-based initiative to reduce the total cost of ownership (TCO) of
business computing without sacrificing power and flexibility.
Wi-Fi Compatible
Wi-Fi (Wireless Fidelity) Identifies that the product has passed the interoperability test, supplied by
the WECA (Wireless Ethernet Compatibility Alliance), which guarantees the interoperability of
wireless IEEE 802.11 LAN products. For more information on the Wi-Fi standard, go to the WECA
Web site at: www.wirelessethernet.com.
WLAN
Wireless Local Area Network. A wireless interconnection of computers and peripherals within a
single limited geographic location which can pass programs and data amongst themselves.
161 - Glossary
Curlin_WWAN-B6FJ-5051-02ENZ)-00.book Page 162 Tuesday, October 19, 2010 1:57 PM
Regulatory Information
Notice
Changes or modifications not expressly approved by Fujitsu could void this user’s authority to operate the
equipment.
FCC NOTICES
Notice to Users of Radios and Television
This equipment has been tested and found to comply with the limit for class B digital devices, pursuant to parts 15
of the FCC Rules.
These limits are designed to provide reasonable protection against harmful interference in a residential installation.
This equipment generates, uses, and can radiate radio frequency energy and, if not installed and used in accordance
with the instructions, may cause harmful interference to radio communications. However, there is no guarantee that
interference will not occur in a particular installation. If this equipment does cause harmful interference to radio or
television reception, which can be determined by turning the equipment off and on, the user is encouraged to try to
correct the interference by one or more of the following measures:
•
•
•
•
Reorient or relocate the receiving antenna.
Increase the separation between the equipment and receiver.
Connect the equipment into an outlet that is on a different circuit than the receiver.
Consult the dealer or an experienced radio/TV technician for help.
Shielded interconnect cables must be employed with this equipment to ensure compliance with the pertinent RF
emission limits governing this device.
DOC (INDUSTRY CANADA) NOTICES
Notice to Users of Radios and Television
This Class B digital apparatus complies with Canadian ICES-003.
Cet appareil numérique de classe B respecte la norme canadienne ICES-003
162 - Regulatory Information
Curlin_WWAN-B6FJ-5051-02ENZ)-00.book Page 163 Tuesday, October 19, 2010 1:57 PM
Appendix A: WLAN User’s Guide
FCC Regulatory Information
Please note the following regulatory information related to the optional wireless LAN device.
Regulatory Notes and Statements
Wireless LAN, Health and Authorization for use
Radio frequency electromagnetic energy is emitted from Wireless LAN devices. The energy levels of these emissions, however,
are far much less than the electromagnetic energy emissions from wireless devices such as mobile phones. Wireless LAN
devices are safe for use by consumers because they operate within the guidelines found in radio frequency safety standards and
recommendations. The use of Wireless LAN devices may be restricted in some situations or environments, such as:
• On board an airplane, or
• In an explosive environment, or
• In situations where the interference risk to other devices or services is perceived or identified as harmful.
In cases in which the policy regarding use of Wireless LAN devices in specific environments is not clear (e.g., airports,
hospitals, chemical/oil/gas industrial plants, private buildings), obtain authorization to use these devices prior to operating the
equipment.
163
Curlin_WWAN-B6FJ-5051-02ENZ)-00.book Page 164 Tuesday, October 19, 2010 1:57 PM
Regulatory Information/Disclaimers
Installation and use of this Wireless LAN device must be in strict accordance with the instructions included in the user
documentation provided with the product. Any changes or modifications made to this device that are not expressly approved
by the manufacturer may void the user’s authority to operate the equipment. The manufacturer is not responsible for any radio
or television interference caused by unauthorized modification of this device, or the substitution or attachment of connecting
cables and equipment other than those specified by the manufacturer. It is the responsibility of the user to correct any
interference caused by such unauthorized modification, substitution or attachment. The manufacturer and its authorized
resellers or distributors will assume no liability for any damage or violation of government regulations arising from failure to
comply with these guidelines.
This device must not be co-located or operated in conjunction with any other antenna or transmitter.
For IEEE 802.11a Wireless LAN: For operation within 5.15~5.25 GHz frequency range, it is restricted to indoor
environments, and the antenna of this device must be integral.
Federal Communications Commission statement
This device complies with Part 15 of FCC Rules.
Operation is subject to the following two conditions: (1) This device may not cause interference, and, (2) This device must
accept any interference, including interference that may cause undesired operation of this device.
FCC Interference Statement
This equipment has been tested and found to comply with the limits for a Class B digital device, pursuant to Part 15 of the FCC
Rules. These limits are designed to provide reasonable protection against harmful interference in a residential installation. This
equipment generates, uses, and can radiate radio frequency energy. If not installed and used in accordance with the instructions,
it may cause harmful interference to radio communications. However, there is no guarantee that interference will not occur in
a particular installation.
If this equipment does cause harmful interference to radio or television reception, which can be determined by turning the
equipment off and on, the user is encouraged to try and correct the interference by one or more of the following measures:
1
2
3
4
Reorient or relocate the receiving antenna.
Increase the distance between the equipment and the receiver.
Connect the equipment to an outlet on a circuit different from the one the receiver is connected to.
Consult the dealer or an experienced radio/TV technician for help.
164
Figure A-1. Ad Hoc Mode Network
Curlin_WWAN-B6FJ-5051-02ENZ)-00.book Page 165 Tuesday, October 19, 2010 1:57 PM
FCC Radio Frequency Exposure statement
The available scientific evidence does not show that any health problems are associated with using low power wireless devices. There is no
proof, however, that these low power wireless devices are absolutely safe. Low power wireless devices emit low levels of radio frequency
energy (RF) in the microwave range while being used. Whereas high levels of RF can produce health effects (by heating tissue), exposure to
low-level RF that does not produce heating effects causes no known adverse health effects. Many studies of low-level RF exposure have not
found any biological effects. Some studies have suggested that some biological effects might occur, but such findings have not been
confirmed by additional research.
The wireless LAN radio device has been tested and found to comply with FCC radiation exposure limits set forth for an uncontrolled
equipment and meets the FCC radio frequency (RF) Exposure Guidelines in Supplement C to OET65.
Export restrictions
This product or software contains encryption code which may not be exported or transferred from the US or Canada without
an approved US Department of Commerce export license. This device complies with Part 15 of FCC Rules., as well as ICES
003 B / NMB 003 B. Operation is subject to the following two conditions: (1) this device may not cause harmful interference,
and (2) this device must accept any interference received, including interference that may cause undesirable operation.
Modifications not expressly authorized by Fujitsu America, Inc. may invalidate the user's right to operate this equipment.
Canadian Notice
The device for the 5150 - 5250 MHz band is only for indoor usage to reduce the potential for harmful interference to co-channel
mobile satellite systems.
The maximum antenna gain of 6 dBi permitted (for devices in the 5250 - 5350 MHz, 5470 - 5725 MHz and 5725 - 5825 MHz
bands) to comply with the e.i.r.p. limit as stated in A9.2 of RSS210.
In addition, users are cautioned to take note that high power radars are allocated as primary users (meaning they have priority)
of 5250 - 5350 MHz and 5650 - 5850 MHz and these radars could cause interference and/or damage to LE-LAN devices.
165
Curlin_WWAN-B6FJ-5051-02ENZ)-00.book Page 166 Tuesday, October 19, 2010 1:57 PM
Before Using the Optional Wireless LAN
This manual describes the procedures required to properly set up and configure the optional integrated
Wireless LAN Mini-PCI device (referred to as "WLAN device" in the rest of the manual). Before using
the WLAN device, read this manual carefully to ensure its correct operation. Keep this manual in a safe
place for future reference.
Wireless LAN Device Covered by this Document
This document is applicable to systems containing one of the following optional devices:
• Optional integrated Intel® Centrino® Advanced-N 6200 (a/b/g/n, 2 x 2)
• Optional integrated Atheros® XSPAN 802.11bgn
Characteristics of the WLAN Device
• The WLAN device is a Mini-PCI card attached to the main board of the mobile computer.
• The WLAN device operates in license-free RF bands, eliminating the need to procure an FCC operating
license. The WLAN operates in the 2.4GHz Industrial, Scientific, and Medical (ISM) RF band and the lower,
middle, and upper bands of the 5GHz Unlicensed National Information Infrastructure (UNII) bands.
• The WLAN devices are capable of four operating modes, IEEE802.11a, IEEE802.11b, IEEE802.11g, and
IEEE802.11n (draft)
• The WLAN devices are Wi-Fi certified and operate (as applicable) at a the maximum data rate of 540 Mbps
(theoretical) in IEEE802.11n (draft) mode; 54 Mbps in IEEE802.11a or IEEE802.11g mode; and 11 Mbps in
IEEE802.11b mode.
• The WLAN devices support the following encryption methods - WEP, TKIP, CKIP, and AES encryption.
• The Wireless LAN devices are compliant with the following standards: WPA, WPA2, CCX1.0, CCX2.0,
CCX3.0, and CCX4.0.
166 Before Using the Optional Wireless LAN
Curlin_WWAN-B6FJ-5051-02ENZ)-00.book Page 167 Tuesday, October 19, 2010 1:57 PM
Wireless LAN Modes Using this Device
Ad Hoc Mode
"Ad Hoc Mode" refers to a wireless network architecture where wireless network connectivity between
multiple computers is established without a central wireless network device, typically known as Access
Point(s). Connectivity is accomplished using only client devices in a peer-to-peer fashion. That is why Ad
Hoc networks are also known as peer-to-peer networks. Ad Hoc networks are an easy and inexpensive
method for establishing network connectivity between multiple computers. Ad Hoc mode requires that the
SSID, network authentication, and encryption key settings are identically configured on all computers in
the Ad Hoc network.
Figure 50. Ad Hoc Mode Network
167 Before Using the Optional Wireless LAN
Curlin_WWAN-B6FJ-5051-02ENZ)-00.book Page 168 Tuesday, October 19, 2010 1:57 PM
Access Point (Infrastructure) Mode
Infrastructure mode refers to a wireless network architecture in which devices communicate with wireless
or wired network devices by communicating through an Access Point. In infrastructure mode, wireless
devices can communicate with each other or with a wired network. Corporate wireless networks operate
in infrastructure mode because they require access to the WLAN in order to access services, devices, and
computers (e.g., file servers, printers, databases).
Internet
Wired LAN
ADSL modem,
cable modem,
or similar
Access Point*
Wireless LAN
*An optional hub for a wired
LAN may be required depending
upon the type of access point used.
Figure 51. Access Point (Infrastructure) Mode Network
168 Before Using the Optional Wireless LAN
Curlin_WWAN-B6FJ-5051-02ENZ)-00.book Page 169 Tuesday, October 19, 2010 1:57 PM
How to Handle This Device
The WLAN device is an optional device that may come pre-installed in your mobile computer. Under
normal circumstances, it should not be necessary for you to remove or re-install it. The operating system
that your mobile computer comes with has been pre-configured to support the WLAN device.
• The Wireless LAN devices support IEEE802.11a, IEEE802.11b, IEEE802.11g, and IEEE802.11n.
• The WLAN devices operate in the 2.4 GHz ISM band and the 5 GHz lower, middle, and upper UNII bands.
• Microwave ovens may interfere with the operation of WLAN devices since they operate in the same 2.4 GHz
frequency range as IEEE802.11b/g/n devices. Interference by microwaves does not occur with IEEE802.11a
radio which operates in the 5 GHz RF band.
• Wireless devices that transmit in the 2.4 GHz range may interfere with operation of WLAN devices in
IEEE802.11b/g/n modes. Symptoms of interference include reduced throughput, intermittent disconnects,
and many frame errors. It is HIGHLY recommended that these interfering devices be powered off to ensure
proper operation of the WLAN device.
Deactivating/Disconnecting the WLAN Device
Disconnecting the WLAN device may be desired in certain circumstances (to extend battery life) or where
certain environments require it (i.e. hospitals, clinics, airplanes, etc.). The WLAN device can be
deactivated by using the Wireless On/Off Switch, and it can be disconnected in Windows using the WLAN
icon in the system tray (Note that disconnecting via the icon in the system tray does not turn off the radio;
it continues to transmit and receive even though it’s not connected.).
BEFORE USING THE WIRELESS LAN DEVICE, YOU MUST FIRST INSTALL CLICKME! TO ENSURE THAT
THE CORRECT SOFTWARE FOR YOUR DEVICE IS INSTALLED. SEE “INSTALLING CLICKME!” ON PAGE 74.
169 Before Using the Optional Wireless LAN
Curlin_WWAN-B6FJ-5051-02ENZ)-00.book Page 170 Tuesday, October 19, 2010 1:57 PM
Deactivation Using the Wireless On/Off Switch
The WLAN device can be deactivated quickly and efficiently by toggling the Wireless LAN/Bluetooth
On/Off Switch to the Off position. The switch has no effect on non-Wireless LAN models.
WLAN/Bluetooth Switch
Figure 52. Wireless LAN/Bluetooth On/Off Switch Location
Disconnection Using the Icon in the Taskbar
Note that disconnecting via the icon in the system tray does not turn off the radio; it continues to transmit
and receive even though it’s not connected.
1
2
Right-click the WLAN icon in the taskbar at the bottom right of your screen.
Choose Disconnect from a network.
Activating the WLAN Device
Activation of the WLAN device can be accomplished using the same methods as the deactivation process
• Using the Wireless On/Off Switch
• In Windows, by right-clicking the WLAN icon then clicking “Connect to a network”
170 Before Using the Optional Wireless LAN
Curlin_WWAN-B6FJ-5051-02ENZ)-00.book Page 171 Tuesday, October 19, 2010 1:57 PM
Configuring the Wireless LAN
The WLAN device can be configured to establish wireless network connectivity using the software that
is built into Windows. Support for most industry standard security solutions is contained in this software.
Pre-defined parameters will be required for this procedure. Please consult with your network
administrator for these parameters:
Configuring the WLAN
1
2
Click the Start button, then select Control Panel.
3
4
5
6
7
8
Double-click on the Wireless Network Connection icon.
9
If you require assistance, go to [Start] -> Help and Support -> Networking and the Web. Select the main topic
in which you are interested, then type in relevant keywords in the Search box.
If the Control Panel is not in Classic View, select Classic View from the left panel. Double-click the Network
Connections icon.
Click on [View Wireless Networks]
Choose a wireless network.
Click [Connect].
Enter the Network Key, if required.
Enter any required information. It may be necessary to consult with your network administrator for some of the
information.
Connection to the network
After you have configured your computer, you can connect to an active network by performing the
following steps:
1
2
3
Click on the WLAN icon in the system tray.
Select “Connect to a network”.
Select a network from the list that appears, and click the [Connect] button.
After you have configured your computer, you can connect to an active network by clicking on the
Wireless Network icon in the system tray:
171 Configuring the Wireless LAN
Curlin_WWAN-B6FJ-5051-02ENZ)-00.book Page 172 Tuesday, October 19, 2010 1:57 PM
Troubleshooting the WLAN
Troubleshooting
Causes and countermeasures for troubles you may encounter while using your wireless LAN are described
in the following table. If you are unfamiliar with the steps required, consult your System Administrator or
go to [Start] -> Help and Support -> Networking and the Web
Problem
Unavailable
network
connection
Possible Cause
Possible Solution
Incorrect network
name (SSID) or
network key
Ad hoc connection: verify that the network names (SSID’s) and network keys
(WEP) of all computers to be connected have been configured correctly. SSID’s
and WEP key values must be identical on each machine.
Access Point (Infrastructure) connection: set network name (SSID) and
network key to the same values as those of the access point.
Set the Network Authentication value identically to that of the Access Point.
Please consult your network administrator for this value, if necessary.
Weak received
signal strength
and/or link quality
Ad hoc connection: Retry connection after shortening the distance to the
destination computer or removing any obstacles for better sight.
The WLAN device
has been
deactivated or
disabled
Check if the wireless switch is turned On. Go to Start -> Control Panel, and
double-click on Windows Mobility Center. If the wireless network is off, click the
[Turn wireless on] button.
The computer to be
connected is turned
off
Check if the computer to be connected is turned ON.
Access Point (Infrastructure) connection: Retry connection after shortening the
distance to the access point or removing any obstacles for better transmission.
172 Troubleshooting the WLAN
Curlin_WWAN-B6FJ-5051-02ENZ)-00.book Page 173 Tuesday, October 19, 2010 1:57 PM
Problem
Unavailable
network
connection
(continued)
Possible Cause
Possible Solution
RF interference from
Access Points or
other wireless
networks
The use of identical or overlapping RF channels can cause interference with the
operation of the WLAN device. Change the channel of your Access Point to a
channel that does not overlap with the interfering device.
Wireless network
authentication has
failed
Re-check your Network Authentication, Encryption, and Security settings.
Incorrectly configured security settings such as an incorrectly typed WEP key,
a misconfigured LEAP username, or an incorrectly chosen authentication
method will cause the LAN device to associate but not authenticate to the
wireless network.
Incorrectly
configured network
settings
Recheck the configuration of your network settings.
Incorrect IP address
configuration
This only applies to networks using static IP addresses. Please contact your
network administrator for the correct settings.
173 Troubleshooting the WLAN
Curlin_WWAN-B6FJ-5051-02ENZ)-00.book Page 174 Tuesday, October 19, 2010 1:57 PM
WLAN Specifications
Specifications
Item
Specification
Type of network
The optional integrated Intel Centrino Advanced-N 6200 (a/b/g/n, 2 x 2) and Atheros
XSPAN 802.11bgn) WLAN devices conform to IEEE 802.11a, 802.11b/g, and 802.11n
(draft-compliant), Wi-Fi based*.
Transfer rate
(Automatic switching) 54 Mbps maximum data rate (IEEE802.11n to be determined)
Active frequency
•
•
•
802.11n (draft): 2.4 GHz or 5 GHz
802.11b/g: 2400~2473 MHz
802.11a: 4900 ~ 5850 MHz
Typical operating distances**
•
•
•
•
802.11a: 40 ft. (12 m) @ 54 Mbps; 300 ft. (91 m) @ 6 Mbps
802.11b: 100 ft. (30 m) @ 11 Mbps; 300 ft. (91 m) @ 1 Mbps
802.11g: 100 ft. (30 m) @ 54 Mbps; 300 ft. (91 m) @ 1 Mbps
802.11n (draft): Estimated double the operating distance of 802.11g and
802.11a in their respective frequencies.
Number of channels
•
•
•
802.11a: 8 independent channels
802.11b/g: 11 channels, 3 non-overlapping channels
802.11n (draft): 2.4 GHz - 3 non-overlapping channels when Channel Bonding
is not used; 2 non-overlapping channels when Channel Bonding is used.
5 GHz - 12 non-overlapping UNII channels with or without Channel Bonding
Security
Encryption Types - WEP, TKIP, AES***, WPA 1.0 compliant
Encryption Key lengths Supported: 64 bits and 128 bits 802.1x/EAP
Maximum recommended number
of computers to be connected
over wireless LAN (during ad hoc
connection)
10 units or less ****
174 WLAN Specifications
Curlin_WWAN-B6FJ-5051-02ENZ)-00.book Page 175 Tuesday, October 19, 2010 1:57 PM
*
“Wi-Fi based” indicates that the interconnectivity test of the organization which guarantees the interconnectivity of
wireless LAN (Wi-Fi Alliance) has been passed.
** The communication ranges shown above will increase or decrease depending on factors such as number of walls, reflective
material, or interference from external RF sources.
*** Encryption with network key (WEP) is performed using the above number of bits, however, users can set 40 bits/ 104
bits after subtracting the fixed length of 24 bits.
**** Depending on practical environments, the allowable number of computers to be connected may be decreased.
175 WLAN Specifications
Curlin_WWAN-B6FJ-5051-02ENZ)-00.book Page 176 Tuesday, October 19, 2010 1:57 PM
Using the Bluetooth Device
The optional Integrated Bluetooth module (BSMAN3) is a wireless device installed in selected Fujitsu
mobile computers.
What is Bluetooth
Bluetooth technology is designed as a short-range wireless link between mobile devices, such as laptop
computers, phones, printers, and cameras. Bluetooth technology is used to create Personal Area Networks
(PANs) between devices in short-range of each other.
THE WIRELESS LAN/BLUETOOTH ON/OFF SWITCH WILL POWER OFF BOTH THE OPTIONAL WIRELESS
LAN AND BLUETOOTH DEVICES AT THE SAME TIME. TO ENABLE OR DISABLE EITHER ONE OF THE
DEVICES INDIVIDUALLY, PERFORM THE FOLLOWING STEPS:
1 Slide the Wireless LAN/Bluetooth on/off switch to On position.
2 Go to Start > All Programs > Bluetooth.
3 Click on Options under the Bluetooth menu and click on the Bluetooth Radio Power
button.
4 Click [OK].
Where to Find Information About Bluetooth
The Bluetooth module contains a robust Help user’s guide to assist you in learning about operation of the
Bluetooth device.
To access the Help file, click [Start] -> All Programs, and click on Bluetooth, then select User’s Guide.
For additional information about Bluetooth Technology, visit the Bluetooth Web site at:
www.bluetooth.com.
176 Using the Bluetooth Device
Curlin_WWAN-B6FJ-5051-02ENZ)-00.book Page 177 Tuesday, October 19, 2010 1:57 PM
FCC Radiation Exposure Statement
This equipment complies with FCC radiation exposure limits set forth for an uncontrolled environment.
The Bluetooth antenna is located on the front edge of the right palm rest and is exempt from minimum
distance criteria due to its low power.
The transmitters in this device must not be co-located or operated in conjunction with any other antenna
or transmitter.
Canadian Notice
To prevent radio interference to the licensed service, this device is intended to be operated indoors and
away from windows to provide maximum shielding. Equipment (or its transmit antenna) that is installed
outdoors is subject to licensing.
Warranty
Users are not authorized to modify this product. Any modifications invalidate the warranty.
This equipment may not be modified, altered, or changed in any way without signed written permission
from Fujitsu. Unauthorized modification will void the equipment authorization from the FCC and
Industry Canada and the warranty.
177 Using the Bluetooth Device
Curlin_WWAN-B6FJ-5051-02ENZ)-00.book Page 178 Tuesday, October 19, 2010 1:57 PM
Appendix B: Fingerprint Sensor Device
Introducing the Fingerprint Sensor Device
Your system has a fingerprint sensor device at the bottom left below the display screen.
Fingerprint
Sensor Device
Figure 53. Fingerprint sensor
With a fingerprint sensor, you can avoid having to enter a username and password every time you want to:
• Log onto Windows
• Resume from sleep mode
• Cancel a password-protected screen saver
178
Curlin_WWAN-B6FJ-5051-02ENZ)-00.book Page 179 Tuesday, October 19, 2010 1:57 PM
• Log into homepages that require a username and password
After you have “enrolled” - or registered - your fingerprint, you can simply swipe your fingertip over the
sensor for the system recognize you.
The fingerprint sensor uses Softex OmniPass which provides password management capabilities to
Microsoft Windows operating systems. OmniPass enables you to use a "master password" for all
Windows, applications, and on-line passwords.
OmniPass requires users to authenticate themselves using the fingerprint sensor before granting access to
the Windows desktop. This device results in a secure authentication system for restricting access to your
computer, applications, web sites, and other password-protected resources.
OmniPass presents a convenient graphical user interface, through which you can securely manage
passwords, users, and multiple identities for each user.
Getting Started
This section guides you through the preparation of your system for the OmniPass fingerprint recognition
application. You will be led through the OmniPass installation process. You will also be led through the
procedure of enrolling your first user into OmniPass.
Installing OmniPass
If OmniPass has already been installed on your system, skip this section and go directly to “User
Enrollment” on page 182. You can determine whether OmniPass has already been installed by checking
to see if the following are present:
• The gold key-shaped OmniPass icon in the system tray at the bottom right of the screen.
• The Softex program group in the Programs group of the Start menu
System Requirements
The OmniPass application requires space on your hard drive; it also requires specific Operating Systems
(OS’s). The minimum requirements are as follows:
179 - Introducing the Fingerprint Sensor Device
Curlin_WWAN-B6FJ-5051-02ENZ)-00.book Page 180 Tuesday, October 19, 2010 1:57 PM
• Windows XP Professional operating system
• At least 35 MB available hard disk space
Installing the OmniPass Application
If OmniPass is already installed on your system, go to “User Enrollment” on page 182. Otherwise
continue with this section on software installation.
•
INSTALLATION OF THE APPLICATION REQUIRES THAT YOU HAVE AN EXTERNAL OPTICAL DRIVE ATTACHED TO
YOUR SYSTEM.
•
FOR INSTALLATION, OMNIPASS REQUIRES THAT THE USER INSTALLING OMNIPASS HAVE ADMINISTRATIVE
PRIVILEGES TO THE SYSTEM. IF YOUR CURRENT USER DOES NOT HAVE ADMINISTRATIVE PRIVILEGES, LOG OUT
AND THEN LOG IN WITH AN ADMINISTRATOR USER BEFORE PROCEEDING WITH OMNIPASS INSTALLATION.
To install OmniPass on your system you must:
1
Insert the installation media for the OmniPass application into the appropriate drive. If you are installing from
CD-ROM or DVD-ROM, you must find and launch the OmniPass installation program (setup.exe) from the
media.
2
Follow the directions provided in the OmniPass installation program. Specify a location to which you would like
OmniPass installed. It is recommended that you NOT install OmniPass in the root directory (e.g. C:\).
3
Once OmniPass has completed installation you will be prompted to restart you system. Once your system has
rebooted you will be able to use OmniPass. If you choose not to restart immediately after installation, OmniPass
will not be available for use until the next reboot.
4
The installation program automatically places an icon (Softex OmniPass) in the Windows Control Panel as well
as a golden key shaped icon in the taskbar.
Verifying Information about OmniPass
After you have completed installing OmniPass and restarted your system, you may wish to check the
version of OmniPass on your system.
To check the version information of OmniPass:
180 - Introducing the Fingerprint Sensor Device
Curlin_WWAN-B6FJ-5051-02ENZ)-00.book Page 181 Tuesday, October 19, 2010 1:57 PM
1
From the Windows Desktop, double-click the key-shaped OmniPass icon in the taskbar (usually located in the
lower right corner of the screen),
or,
Click the Start button, select Settings, and click Control Panel. Double-click Softex OmniPass in the Control
Panel, and the OmniPass Control Center will appear. If it does not appear, then the program is not properly
installed,
or,
Click the Start button, select Programs, and from the submenu select the Softex program group, from that
submenu click OmniPass Control Center.
2
Select the About tab at the top of the OmniPass Control Center. The About tab window appears with version
information about OmniPass.
Uninstalling OmniPass
FOR UNINSTALLATION, OMNIPASS REQUIRES THAT THE USER UNINSTALLING OMNIPASS HAVE
ADMINISTRATIVE PRIVILEGES TO THE SYSTEM. IF YOUR CURRENT USER DOES NOT HAVE
ADMINISTRATIVE PRIVILEGES, LOG OUT AND THEN LOG IN WITH AN ADMINISTRATOR USER BEFORE
PROCEEDING WITH OMNIPASS UNINSTALLATION.
To remove the OmniPass application from your system:
1
2
3
4
5
Click Start on the Windows taskbar. Select Settings, and then Control Panel.
Double-click Add/Remove Programs.
Select OmniPass, and then click Change/Remove.
Follow the directions to uninstall the OmniPass application.
Once OmniPass has finished uninstalling, reboot your system when prompted.
181 - Introducing the Fingerprint Sensor Device
Curlin_WWAN-B6FJ-5051-02ENZ)-00.book Page 182 Tuesday, October 19, 2010 1:57 PM
User Enrollment
Before you can use any OmniPass features you must first enroll a user into OmniPass.
Master Password Concept
Computer resources are often protected with passwords. Whether you are logging into your computer,
accessing your email, e-banking, paying bills online, or accessing network resources, you often have to
supply credentials to gain access. This can result in dozens of sets of credentials that you have to
remember.
During user enrollment a "master password” is created for the enrolled user. This master password
“replaces” all other passwords for sites you register with OmniPass.
Example: A user, John, installs OmniPass on his system (his home computer) and enrolls an OmniPass
user with username “John_01” and password “freq14”. He then goes to his webmail site to log onto his
account. He inputs his webmail credentials as usual (username “John_02” and password “lifebook”), but
instead of clicking [Submit], he directs OmniPass to Remember Password. Now whenever he returns to
that site, OmniPass will prompt him to supply access credentials.
John enters his OmniPass user credentials (“John_01” and “freq14”) in the OmniPass authentication
prompt, and he is allowed into his webmail account. He can do this with as many web sites or password
protected resources he likes, and he will gain access to all those sites with his OmniPass user credentials
(“John_01” and “freq14”). This is assuming he is accessing those sites with the system onto which he
enrolled his OmniPass user. OmniPass does not actually change the credentials of the password protected
resource. If John goes to another computer without he OmniPass account to access his webmail, he would
need to enter his original webmail credentials (“John_02” and “lifebook”) to gain access. If he attempts
his OmniPass user credentials on a system other than a system he’s enrolled on, he will not gain access.
THE ENROLLMENT PROCEDURE ASSUMES YOU HAVE NO HARDWARE AUTHENTICATION DEVICES OR
ALTERNATE STORAGE LOCATIONS THAT YOU WISH TO INTEGRATE WITH OMNIPASS. IF YOU DESIRE
SUCH FUNCTIONALITY, CONSULT THE APPROPRIATE SECTIONS OF THIS DOCUMENT.
182 - Introducing the Fingerprint Sensor Device
Curlin_WWAN-B6FJ-5051-02ENZ)-00.book Page 183 Tuesday, October 19, 2010 1:57 PM
Basic Enrollment
The Enrollment Wizard will guide you through the process of enrolling a user. Unless you specified
otherwise, after OmniPass installation the Enrollment Wizard will launch on Windows login. If you do
not see the Enrollment Wizard, you can bring it up by clicking Start on the Windows taskbar; select
Programs; select Softex; click OmniPass Enrollment Wizard.
1
Click Enroll to proceed to username and password verification. By default, the OmniPass Enrollment Wizard
enters the credentials of the currently logged in Windows user.
2
Enter the password you use to log in to Windows. This will become the “master password” for this OmniPass
user. In most cases, the Domain: value will be your Windows computer name. In a corporate environment, or
when accessing corporate resources, the Domain: may not be your Windows computer name. Click [Next] to
continue.
3
In this step OmniPass captures your fingerprint. Refer to “Enrolling a Fingerprint” on page 183 for additional
information.
4
Next, choose how OmniPass notifies you of various events. We recommend you keep Taskbar Tips on
Beginner mode taskbar tips and Audio Tips on at least Prompt with system beeps only until you get
accustomed to how OmniPass operates. Click [Next] to proceed with user enrollment. You will then see a
Congratulations screen indicating your completion of user enrollment.
5
Click [Done] to exit the OmniPass Enrollment Wizard. You will be asked if you’d like to log in to OmniPass with
your newly enrolled user; click [Yes].
Enrolling a Fingerprint
Enrolling a fingerprint will increase the security of your system and streamline the authentication
procedure.
You enroll fingerprints in the OmniPass Control Center. With an OmniPass user logged in, double-click
the system tray OmniPass icon. Select the User Settings tab and click Enrollment under the User
Settings area. Click Enroll Authentication Device and authenticate at the authentication prompt to start
device enrollment.
183 - Introducing the Fingerprint Sensor Device
Curlin_WWAN-B6FJ-5051-02ENZ)-00.book Page 184 Tuesday, October 19, 2010 1:57 PM
1
During initial user enrollment, you will be prompted to select the finger you wish to enroll. Fingers that have
already been enrolled will be marked by a green check. The finger you select to enroll at this time will be marked
by a red arrow. OmniPass will allow you re-enroll a finger. If you choose a finger that has already been enrolled
and continue enrollment, OmniPass will enroll the fingerprint, overwriting the old fingerprint. Select a finger to
enroll and click [Next].
2
It is now time for OmniPass to capture your selected fingerprint. It may take a several capture attempts before
OmniPass acquires your fingerprint. Should OmniPass fail to acquire your fingerprint, or if the capture screen
times out, click [Back] to restart the fingerprint enrollment process.
Your system has a “swipe” fingerprint sensor. A swipe sensor is small and resembles a skinny elongated
rectangle. To capture a fingerprint, gently swipe or pull your fingertip over the sensor (starting at the second
knuckle) towards yourself. Swiping too fast or too slow will result in a failed capture. The Choose Finger
screen has a [Practice] button; click it to practice capturing your fingerprint. When you are comfortable with how
your fingerprint is captured, proceed to enroll a finger.
3
Once OmniPass has successfully acquired the fingerprint, the Verify Fingerprint screen will automatically
appear. To verify your enrolled fingerprint, place your fingertip on the sensor and hold it there as if you were
having a fingerprint captured. Successful fingerprint verification will show a green fingerprint in the capture
window and the text Verification Successful under the capture window.
Using OmniPass
You are now ready to begin using OmniPass. Used regularly, OmniPass will streamline your
authentications.
Password Replacement
You will often use the password replacement function. When you go to a restricted access website (e.g.,
your bank, your web-based email, online auction or payment sites), you are always prompted to enter your
login credentials. OmniPass can detect these prompts and you can teach OmniPass your login credentials.
The next time you go to that website, you can authenticate with your fingerprint to gain access.
184 - Introducing the Fingerprint Sensor Device
Curlin_WWAN-B6FJ-5051-02ENZ)-00.book Page 185 Tuesday, October 19, 2010 1:57 PM
OmniPass Authentication Toolbar
After installing OmniPass and restarting, you will notice a dialog you have not seen before at Windows
Logon. This is the OmniPass Authentication Toolbar, and it is displayed whenever the OmniPass
authentication system is invoked. The OmniPass authentication system may be invoked frequently: during
Windows Logon, during OmniPass Logon, when unlocking your workstation, when resuming from sleep
or hibernate, when unlocking a password-enabled screensaver, during password replacement for
remembered site or application logins, and more. When you see this toolbar, OmniPass is prompting you
to authenticate.
The Logon Authentication window indicates what OmniPass-restricted function you are attempting. The
icons in the lower left (fingerprint and key) show what authentication methods are available to you.
Selected authentication methods are highlighted while unselected methods are not. When you click the
icon for an unselected authentication method, the authentication prompt associated with that method is
displayed.
When prompted to authenticate, you must supply the appropriate credentials: an enrolled finger for the
fingerprint capture window or your master password for the master password prompt (the key icon).
Remembering a Password
OmniPass can remember any application, GUI, or password protected resource that has a password
prompt.
Using the following procedure, you can store a set of credentials into OmniPass. These credentials will
then be linked to your “master password” or fingerprint.
Go to a site that requires a login (username and password), but do not log in yet. At the site login prompt,
enter your username and password in the prompted fields, but do not enter the site (do not hit [Enter],
[Submit], [OK], or Login). Right-click the OmniPass system tray icon and select Remember Password
from the submenu. The Windows arrow cursor will change to a golden key OmniPass cursor. Click the
OmniPass cursor in the login prompt area, but don’t click [Login] or [Submit].
185 - Introducing the Fingerprint Sensor Device
Curlin_WWAN-B6FJ-5051-02ENZ)-00.book Page 186 Tuesday, October 19, 2010 1:57 PM
Associating a Friendly Name
After clicking the OmniPass key cursor near the login prompt, OmniPass will prompt you to enter a
“friendly name” for this site. You should enter something that reminds you of the website, the company,
or the service you are logging into. In its secure database, OmniPass associates this friendly name with
this website.
Additional Settings for Remembering a Site
When OmniPass prompts you to enter a “friendly name” you also have the opportunity to set how
OmniPass authenticates you to this site. There are three effective settings for how OmniPass handles a
remembered site.
The default setting is Automatically click the “OK” or “Submit” button for this password protected
site once the user is authenticated. With this setting, each time you navigate to this site OmniPass will
prompt you for your master password or fingerprint authentication device. Once you have authenticated
with OmniPass, you will automatically be logged into the site.
Less secure is the option to Automatically enter this password protected site when it is activated. Do
not prompt for authentication. Check the upper box to get this setting, and each time you navigate to
this site OmniPass will log you into the site without prompting you to authenticate.
THIS SETTING IS MORE CONVENIENT IN THAT WHENEVER YOU GO TO A SITE REMEMBERED WITH THIS
SETTING, YOU WILL BYPASS ANY AUTHENTICATION PROCEDURE AND GAIN INSTANT ACCESS TO THE
SITE. BUT SHOULD YOU LEAVE YOUR SYSTEM UNATTENDED WITH YOUR OMNIPASS USER LOGGED IN,
ANYONE USING YOUR SYSTEM CAN BROWSE TO YOUR PASSWORD PROTECTED SITES AND GAIN
AUTOMATIC ACCESS.
If you uncheck both boxes in Settings for this Password Site, OmniPass will prompt you for your master
password or fingerprint authentication device. Once you have authenticated with OmniPass your
credentials will be filled in to the site login prompt, but you will have to click the website [OK], [Submit],
or [Login] button to gain access to the site.
186 - Introducing the Fingerprint Sensor Device
Curlin_WWAN-B6FJ-5051-02ENZ)-00.book Page 187 Tuesday, October 19, 2010 1:57 PM
Click Finish to complete the remember password procedure. The site location, the credentials to access
the site, and the OmniPass authentication settings for the site are now stored in the OmniPass secure
database. The OmniPass authentication settings (Settings for this Password Site) can always be changed
in Vault Management.
Logging in to a Remembered Site
Whether or not OmniPass prompts you to authenticate when you return to a remembered site is determined
by Settings for this Password Site and can be changed in Vault Management.
The following cases are applicable to using OmniPass to login to: Windows, remembered web sites, and
all other password protected resources.
With Master Password
Once you return to a site you have remembered with OmniPass, you may be presented with a master
password prompt. Enter your master password and you will be allowed into the site.
Logging into Windows with a Fingerprint Device
When logging into Windows with a fingerprint device, the fingerprint capture window will now appear
next to the Windows Login screen. Place your enrolled fingertip on the sensor to authenticate. You will
be simultaneously logged into Windows and OmniPass. The capture window will also appear if you have
used Ctrl-Alt-Del to lock a system, and the fingerprint device can be used to log back in as stated above.
IF A MACHINE IS LOCKED AND OMNIPASS DETECTS A DIFFERENT USER LOGGING BACK IN WITH A
FINGERPRINT, THE FIRST USER WILL BE LOGGED OUT AND THE SECOND USER LOGGED IN.
187 - Introducing the Fingerprint Sensor Device
Curlin_WWAN-B6FJ-5051-02ENZ)-00.book Page 188 Tuesday, October 19, 2010 1:57 PM
Password Management
OmniPass provides an interface that lets you manage your passwords. To access this GUI, double-click
the OmniPass key in the system tray. Click Vault Management; you will be prompted to authenticate.
Once you gain access to Vault Management, click Manage Passwords under Vault Settings. You will
see the Manage Passwords interface, with a list of friendly names.
You can view the credentials stored for any remembered website by highlighting the desired resource
under Password Protected Dialog and clicking Unmask Values. Should a password be reset, or an
account expire, you can remove stored credentials from OmniPass. Highlight the desired resource under
Password Protected Dialog and click Delete Page. You will be prompted to confirm the password
deletion.
The two check boxes in Manage Passwords govern whether OmniPass prompts you to authenticate or
directly logs you into the remembered site.
OmniPass will overwrite an old set of credentials for a website if you attempt to use Remember
Password on an already remembered site.
The exception to the above rule is when resetting the Windows password. If your password is reset in
Windows, the next time you login to Windows, OmniPass will detect the password change and prompt
you to “Update” or “Reconfirm” the password with OmniPass. Enter your new Windows password in the
prompt and click OK. Your OmniPass "master password" will still be your Windows password.
OmniPass User Identities
Identities allow OmniPass users to have multiple accounts to the same site (e.g., [email protected] and
[email protected]). If OmniPass did not provide you identities, you would be limited to
remembering one account per site.
To create and manage identities, double-click the OmniPass key in the system tray. Click Vault
Management; OmniPass will prompt you to authenticate. Once you gain access to Vault Management,
click Manage Identities under Vault Settings. You can only manage the identities of the currently logged
in OmniPass user
188 - Introducing the Fingerprint Sensor Device
Curlin_WWAN-B6FJ-5051-02ENZ)-00.book Page 189 Tuesday, October 19, 2010 1:57 PM
To add a new identity, click New Identity or double-click Click here to add a new identity. Name the
new identity and click [OK], then click [Apply]. You can now switch to the new identity and start
remembering passwords.
To delete an identity, highlight the identity you want to delete and click [Delete Identity], then [Apply].
WHEN YOU DELETE AN IDENTITY, ALL OF ITS ASSOCIATED REMEMBERED SITES AND PASSWORD
PROTECTED DIALOGS ARE LOST.
To set the default identity, highlight the identity you want as default and click [Set as Default]; click
[Apply] to ensure the settings are saved. If you log in to OmniPass with a fingerprint device, you will
automatically be logged in to the default identity for that OmniPass user. You can choose the identity with
which you are logging in if you login using "master password".
Choosing User Identity during Login
To choose your identity during login, type your username in the User Name: field. Press [Tab] and see
that the Domain: field self-populates. Click the Password: field to bring the cursor to it, and you will see
the pull-down menu in the Identity: field. Select the identity to login as, then click OK.
Switch User Identity
To switch identities at any time, right-click the OmniPass system tray icon and click Switch User Identity
from the submenu. The Switch Identity dialog will appear. Select the desired identity and then click OK.
Identities and Password Management
On the Manage Passwords interface of the Vault Management tab of the OmniPass Control Center,
there is a pull-down selection box labeled, Identity. This field lets you choose which identity you are
managing passwords for. When you select an identity here, only those password protected dialogs that are
associated with that identity are shown. You can perform all the functions explained in “Password
Management” on page 188.
189 - Introducing the Fingerprint Sensor Device
Curlin_WWAN-B6FJ-5051-02ENZ)-00.book Page 190 Tuesday, October 19, 2010 1:57 PM
Configuring OmniPass
This section gives an overview of both the Export/Import function and the OmniPass Control Center.
Exporting and Importing Users
YOU CANNOT IMPORT A USER INTO OMNIPASS IF THERE ALREADY IS A USER WITH THE SAME NAME
ENROLLED IN OMNIPASS.
Using OmniPass Control Center, you can export and import users in and out of OmniPass. The export
process backs up all remembered sites, credentials, and enrolled fingerprints for an OmniPass user. All
OmniPass data for a user is backed up to a single encrypted database file. During the import process, the
Windows login of the exported user is required. If the proper credentials cannot be supplied, the user
profile will not be imported.
• YOU SHOULD PERIODICALLY EXPORT YOUR USER PROFILE AND STORE IT IN A SAFE PLACE. IF
ANYTHING HAPPENS TO YOUR SYSTEM, YOU CAN IMPORT YOUR
OMNIPASS PROFILE TO A NEW
SYSTEM AND HAVE ALL YOUR REMEMBERED SETTINGS AND FINGERPRINTS INSTANTLY.
• YOU DON'T FORGET THE WINDOWS LOGIN CREDENTIALS WHEN EXPORTING. WHEN YOU EXAMINE
THE IMPORTATION, YOU ARE PROMPTED FOR AUTHENTICATION.
ALLOW A USER PROFILE TO BE IMPORTED ARE THE
EXPORTED USER.
THE CREDENTIALS THAT WILL
WINDOWS LOGIN CREDENTIALS OF THE
THEY ARE THE CREDENTIALS THAT HAD TO BE SUBMITTED WHEN THE USER
YOU WILL NEED USER NAME, PASSWORD, AND DOMAIN.
PROFILE WAS EXPORTED.
Exporting an OmniPass User Profile
To export a user, open the OmniPass Control Center, and click Import/Export User under Manage
Users.
Click Exports an OmniPass user profile. OmniPass will prompt you to authenticate. Upon successfully
authentication, you must name the OmniPass user profile and decide where to save it. An .opi file is
generated, and you should store a copy of it in a safe place.
190 - Introducing the Fingerprint Sensor Device
Curlin_WWAN-B6FJ-5051-02ENZ)-00.book Page 191 Tuesday, October 19, 2010 1:57 PM
This .opi file contains all your user specific OmniPass data, and it is both encrypted and password
protected. This user profile does NOT contain any of your encrypted data files.
Importing an OmniPass User Profile
To import an OmniPass user open the OmniPass Control Center, and click Import/Export User under
Manage Users. Click Imports a new user into OmniPass and then select OmniPass Import/Export File
(*.opi) and click Next. OmniPass will then prompt you to browse for the file you had previously exported
(.opi file). When you select the .opi file for importation, OmniPass will prompt you for authentication.
The credentials that will allow a user profile to be imported are the Windows login credentials of the
exported user. They are the credentials that had to be submitted when the user profile was exported. You
will need User Name, Password, and Domain. If you don’t remember the value for Domain, in a PC or
SOHO environment Domain should be your computer name.
OmniPass will notify you if the user was successfully imported.
Things to Know Regarding Import/Export
• Assume you export a local Windows User profile from OmniPass. You want to import that profile
to another machine that has OmniPass. Before you can import the profile, a Windows user with the
same login credentials must be created on the machine importing the profile.
Example: I have a Windows user with the username “Tom” and the password “Sunshine” on my
system. I have enrolled Tom into OmniPass and remembered passwords. I want to take all my
passwords to new system. I export Tom’s OmniPass user profile. I go to my new system and using
the Control Panel I create a user with the username "Tom" and the password "Sunshine". I can now
successfully import the OmniPass user data to the new system.
• If you export an OmniPass-only user, you can import that user to any computer running OmniPass,
provided that a user with that name is not already enrolled in OmniPass.
• If you attempt to import a user profile who has the same name as a user already enrolled in
OmniPass, the OmniPass import function will fail.
191 - Introducing the Fingerprint Sensor Device
Curlin_WWAN-B6FJ-5051-02ENZ)-00.book Page 192 Tuesday, October 19, 2010 1:57 PM
OmniPass Control Center
This section will serve to explain functions within the OmniPass Control Center that weren’t explained
earlier.
You can access the OmniPass Control Center any of three ways:
• Double-click the golden OmniPass key shaped icon in the Windows taskbar (typically in the lowerright corner of the desktop)
• Click the Start button; select the Programs group; select the Softex program group; and click the
OmniPass Control Center selection.
• Open the Windows Control Panel (accessible via Start button --> Settings --> Control Panel) and
double-click the Softex OmniPass icon.
User Management
The User Management tab has two major interfaces: Add/Remove User and Import/Export User.
Import/Export User functionality is documented in “Exporting and Importing Users” on page 190.
Add/Remove User functionality is straightforward.
If you click Adds a new user to OmniPass you will start the OmniPass Enrollment Wizard. The
Enrollment Wizard is documented in “User Enrollment” on page 182.
If you click Removes a user from OmniPass, OmniPass will prompt you to authenticate. Authenticate
with the credentials (or enrolled fingerprint) of the user you wish to remove. OmniPass will prompt you
to confirm user removal. Click OK to complete user removal.
REMOVING A USER WILL AUTOMATICALLY DESTROY ALL OMNIPASS DATA ASSOCIATED WITH THAT
USER. ALL IDENTITIES AND CREDENTIALS ASSOCIATED WITH THE USER WILL BE LOST.
IF YOU’RE SURE YOU WANT TO REMOVE THE USER, WE RECOMMEND YOU EXPORT THE USER PROFILE.
192 - Introducing the Fingerprint Sensor Device
Curlin_WWAN-B6FJ-5051-02ENZ)-00.book Page 193 Tuesday, October 19, 2010 1:57 PM
User Settings
The User Settings tab has four interfaces: Audio Settings, Taskbar Tips, and Enrollment. User settings
allow users to customize OmniPass to suit their individual preferences. Under User Settings (Audio
Settings and Taskbar Tips) you can set how OmniPass notifies the user of OmniPass events (e.g.,
successful login, access denied, etc.). The details of each setting under the Audio Settings and Taskbar
Tips interfaces are self-explanatory.
The Enrollment interface allows you to enroll fingerprints. For the procedure to enroll and authentication
device refer to Chapter 2.3. To enroll additional fingerprints, click Enroll Authentication Device, and
authenticate with OmniPass. Select the fingerprint recognition device in the Select Authentication
Device screen (it should already be marked by a green check if you have a finger enrolled) and click Next.
System Settings
The OmniPass Startup Options interface can be found in the System Settings tab. With these options you
can specify how your OmniPass Logon is tied to your Windows Logon.
The first option, Automatically log on to OmniPass as the current user, will do just as it says; during
Windows login, you will be logged on to OmniPass using your Windows login credentials. If the user
logging into Windows was never enrolled into OmniPass, upon login no one will be logged on to
OmniPass. This setting is appropriate for an office setting or any setting where users must enter a
username and password to log into a computer. This is the default setting.
With the second option, Manually log on to OmniPass at startup, OmniPass will prompt you to login
once you have logged on to Windows.
With the third option, Do not log on to OmniPass at startup, OmniPass will not prompt for a user to be
logged on.
You can manually log on to OmniPass by right-clicking the OmniPass taskbar icon and clicking Log in
User from the right-click menu.
193 - Introducing the Fingerprint Sensor Device
Curlin_WWAN-B6FJ-5051-02ENZ)-00.book Page 194 Tuesday, October 19, 2010 1:57 PM
Troubleshooting
You cannot use OmniPass to create Windows users. You must first create the Windows user, and you will
need administrative privileges to do that. Once the Windows user is created, you can add that user to
OmniPass using the same username and password
Cannot add Windows users to OmniPass
If you experience difficulties adding a Windows user to OmniPass, you may need to adjust your local
security settings. You can do this by going to Start, Control Panel, Administrative Tools, and Local
Security Settings. Expand Local Policies, expand Security Options, and double-click Network
Access: Sharing and Security Model for Local Accounts. The correct setting should be Classic Local Users Authenticate as Themselves.
Cannot add a User with a Blank Password to OmniPass
If you experience difficulties adding a user with a blank password to OmniPass, you may need to adjust
your local security settings. First attempt the procedure explained in the Cannot add Windows user to
OmniPass section. If the difficulties persist, then try the following procedure.
Click Start, Control Panel, Administrative Tools, and Local Security Settings. Expand Local
Policies, expand Security Options, and double-click Accounts: Limit local account use of blank
passwords to console login only. This setting should be set to Disabled.
Dialog appears after OmniPass authentication during Windows Logon
After installing OmniPass on your system, you can choose to logon to Windows using OmniPass. You
authenticate with OmniPass (via master password, or an enrolled security device) and OmniPass logs
you into Windows. You may, during this OmniPass authentication, see a Login Error dialog box.
This dialog box occurs when OmniPass was unable to log you into Windows with the credentials
supplied (username and password). This could happen for any of the following reasons:
• Your Windows password has changed
• Your Windows account has been disabled
194 - Introducing the Fingerprint Sensor Device
Curlin_WWAN-B6FJ-5051-02ENZ)-00.book Page 195 Tuesday, October 19, 2010 1:57 PM
If you are having difficulties due to the first reason, you will need to update OmniPass with your
changed Windows account password. Click Update Password and you will be prompted with a dialog
to reconfirm your password.
Enter the new password to your Windows user account and click OK. If the error persists, then it is
unlikely the problem is due to your Windows user account password changing.
195 - Introducing the Fingerprint Sensor Device
Curlin_WWAN-B6FJ-5051-02ENZ)-00.book Page 196 Tuesday, October 19, 2010 1:57 PM
Index
Battery Latches 29
BIOS
guide 73
setup utility 72
Bluetooth
Where to Find Information 176
Boot Sequence 71
Booting the System 73
Built-in Speakers 108
Button Icons 57, 60
A
About This Guide 13
AC
adapter 68
indicator 31
plug adapters 132
Active Digitizer 47
Air Vents 27, 29
Anti-theft lock slot 26
Auto/Airline Adapter 68, 69
Automatically Downloading Driver Updates 125
C
CapsLock 32
CD-ROM 108, 109
Click Me! 75
Cold-swapping 55
Configuration Label 135
Contact Information 14
Controls and Connectors 17
Conventions Used in the Guide 13
Cursor Keys 40
B
Battery 82
care 132
cold-swapping 85
conserving power 77
dead 112
faulty 113
hot-swapping 85
increasing life 133
level indicator 31
lithium ion battery 82
low 84
problems 112, 113
recharging 83
replacing 85
shorted 85
Standby mode 84
D
DC in connector 17
DC Output Cable 68
DC Power Jack 68
Device Ports 100
DIMM 91
196
Curlin_WWAN-B6FJ-5051-02ENZ)-00.book Page 197 Tuesday, October 19, 2010 1:57 PM
Display Panel 20, 33
brightness 37
opening 33
problems 114, 115
Dock port 17
Docking Port 100
Double-Clicking 43
Dragging 43, 45
Drivers and Application Restore CD 121
Dual Built-in Microphones 22
DVD drive
problems 108, 109
password replacement 184
remembering a password 185
uninstalling OmniPass 181
user enrollment 182
using OmniPass 184
Fujitsu Contact Information 14
Fujitsu Driver Update utility 76, 125, 144
Fujitsu LifeBook
storing 130
traveling 131
Fujitsu Shopping Online 15
Function Key
F10 41
F3 41
F4 41
F6 41
F7 41
F8 41, 53
F9 41, 53
FN 40
E
Error Messages 117
ExpressCard
problems 111
ExpressCard Eject Button 24
ExpressCard Slot 24
ExpressCards 89
installing 89
removing 90
External Monitor Port 103
External Video Port 28
External Video port 18
G
Gigabit LAN (RJ-45) Jack 27
Glossary 146
H
F
Hard Disk Drive
access indicator 31
problems 109, 110
Hard Disk Drive Passwords 72
Headphone Jack 17, 102
Hibernation Feature 79
disable/enable 79
FDU 76, 125, 144
Fingerprint Sensor 22
Fingerprint Sensor Device 178
enrolling a fingerprint 183
getting started 179
installing OmniPass 179
logging into a remembered site 187
OmniPass authentication toolbar 185
197
Curlin_WWAN-B6FJ-5051-02ENZ)-00.book Page 198 Tuesday, October 19, 2010 1:57 PM
I
LifeBook Security Panel
operating 64
passwords 62
setting up 62
uninstalling 65
LifeBook Security/Tablet PC Buttons 56
LifeBook SecurityTablet PC Buttons 20
Lithium ion Battery Bay 29
Local Area Network (LAN) 18
Memory
capacity 93
checking capacity 93
compartment 28, 91
installing 91
problems 110
upgrade module 91
Memory Stick
installing 88
removing 88
Memory Stick/Secure Digital Cards 87
Microphone Jack 17, 23, 103
Modular Bay 54
cold-swapping 55
devices 54
installing 55
removing 55
Modular Devices 55
installing 55
removing 55
Mouse
problems 110
M
N
IEEE 1394 (4-pin) Jack 21,
Internal LAN Jack 100
101
K
Keyboard 21, 39
cursor keys 39
function keys 40
numeric keypad 39
problems 110
windows keys 40
L
NumLk 32
Media Player
battery power 99
care 134
Control Panel 98
loading 95
removing 97
Software 94, 97
using 99
O
Optical Drive 94
Modular Multi-Format DVD Writer 94
tray release 97
198
Curlin_WWAN-B6FJ-5051-02ENZ)-00.book Page 199 Tuesday, October 19, 2010 1:57 PM
P
S
Pen
ScrLk 32
Scrolling 46
SD Card
installing 88
removing 88
SD/Memory Stick Slot 17
SDRAM 28, 91
Secure Digital Card
removing 88
Security Buttons
Functions 56
Security lock slot 18
Specifications 135
Audio 137
Chipset 136
Device Ports 139
Dimensions and Weight 141
Environmental Requirements 141
Keyboard 140
mass storage device options 137
Memory 136
Microprocessor 136
Power 140
Video 136
Status Indicator Panel 20, 30
Suspend/ Resume button 18
installing a pen tether 52
Pen tether 52
Pen Tether Attachment Point 25
Port Replicator
connector 29
problems 109
Post-logon button functions 59
Power
AC adapter 68
Auto/Airline adapter 68
failure 111, 112
indicator 30
management 77
off 80
on 70
problems 113
sources 68
Power Management 77
Power On Self Test 71, 117
Power/Suspend/Resume Switch 20, 77
Pre-Installed Software 142
Adobe Acrobat Reader 143
Google Toolbar 144
manuals 143
Pre-logon button functions 57
R
Registration 75
Regulatory Information 162
Restarting 79
Restoring Your Pre-installed Software 121
RJ-45 100
199
Curlin_WWAN-B6FJ-5051-02ENZ)-00.book Page 200 Tuesday, October 19, 2010 1:57 PM
T
V
Tablet Configuration 34
Tablet PC Button Functions
changing 61
Touch Screen
calibrating 50
clicking 48
dragging 49
Touchpad
pointing device 22
scroll button 22
Touchpad Control Adjustment 46
Troubleshooting 105
Volume control 53
W
Warranty 15
Windows keys 40
Application key 40
Start keys 40
Windows Power Management 79
Wireless LAN
Before Using the Wireless LAN 166
configuring 166
connection to the network 171
deactivating/disconnecting 169
modes 167
Specifications 174
Troubleshooting 172
Wireless LAN On-Off Switch 18
U
Universal Serial Bus Ports 101
USB 101, 110
USB 2.0 Ports 26, 27
USB Port 17
Using the Optional Capacitive Touchscreen 51
200
Guide
d’utilisation
Découvrez comment
utiliser votre PC
Tablette LifeBook
Fujitsu T730
Informations sur les droits d’auteurs
et les marques commerciales
La société Fujitsu America, Inc. a fait tous les efforts possibles pour vérifier l’exactitude des informations figurant dans ce document et s’assurer
qu’il n’y manque rien. Cependant, puisque nos produits font continuellement l’objet d’améliorations, nous ne pouvons garantir l’exactitude
de tout le contenu de ce document. Nous réfutons toute responsabilité relative à des erreurs, des omissions ou des modifications futures.
Fujitsu, le logo Fujitsu et LifeBook sont des marques déposées de Fujitsu Limited.
Intel, Intel Core, Centrino et Intel Centrino Pro sont des marques de commerce ou des marques déposées de la société Intel ou des ses filiales
aux États-Unis et dans d’autres pays.
Microsoft et Windows sont des marques de commerce ou des marques déposées de la société Microsoft aux États-Unis et/ou dans d’autres pays.
Bluetooth est une marque de commerce de Bluetooth SIG, Inc., USA.
PowerDirector, MakeDisc, PowerDVD et YouCam sont des marques de commerce de la société CyberLink.
OmniPass est une marque de commerce de Softex, Inc.
Roxio est une marque de commerce de Sonic Solutions.
Le nom et le logo Energy Star sont des marques déposées aux États-Unis.
Adobe, Acrobat et Acrobat Reader sont des marques de commerce ou des marques déposées de la société Adobe Systems Incorporated
aux États-Unis et/ou dans d’autres pays.
Norton et Norton Internet Security sont des marques de commerce ou des marques déposées de la société Symantec aux États-Unis
et dans d’autres pays.
Toutes les autres marques de commerce mentionnées dans le présent document sont la propriété de leur détenteur respectif.
© Copyright 2010 Fujitsu America, Incorporated. Tous droits réservés.
Aucune partie de cette publication ne peut être copiée, reproduite ou traduite sans le consentement préalable de Fujitsu. Aucune partie de cette
publication ne peut être enregistrée ou transmise électroniquement sans le consentement écrit de Fujitsu.
B6FJ-5051-01FR-00
AVERTISSEMENT
LA MANIPULATION DU CORDON DE CE PRODUIT VOUS EXPOSE AU PLOMB, UNE SUBSTANCE CHIMIQUE
QUI, SELON L’ÉTAT DE CALIFORNIE, PEUT CAUSER DES ANOMALIES CONGÉNITALES OU D’AUTRES
PROBLÈMES DE REPRODUCTION.
LAVEZ-VOUS LES MAINS APRÈS CHAQUE MANIPULATION.
GUIDE D'UTILISATION POUR LA CONNEXION SANS FIL EN LARGE BANDE
LE GUIDE D'UTILISATION DU DISPOSITIF DE RÉSEAU ÉTENDU SANS FIL EST SITUÉ À L'ADRESSE
SUIVANTE :
HTTP://SOLUTIONS.US.FUJITSU.COM/WWW/CONTENT/SUPPORT/MOBILE/SUPPORT_NOTICES
LA VERSION COMPLÈTE DU GUIDE D'UTILISATION CONTIENT DES AVERTISSEMENTS ET DES MISES EN
GARDE SUR LA SÉCURITÉ DES RADIOFRÉQUENCES LORSQU'ON UTILISE UN DISPOSITIF DE RÉSEAU
ÉTENDU SANS FIL, POUR LES CONSULTER, CLIQUEZ SUR « 3G MINI-CARD GOBI2000 REGULATORY
AND SAFETY INFORMATION ».
DÉCLARATION DE CONFORMITÉ
selon la partie 15 des règles de la FCC
Nom de la partie responsable :
Fujitsu America, Incorporated
Adresse :
1250 E. Arques Avenue,
Sunnyvale, CA 94085
Téléphone :
(408) 746-6000
Déclare que le produit :
Configuration du modèle de base :
PC Tablette LifeBook T730
est conforme aux règles établies dans la Partie 15 des règles de la FCC.
Cet appareil est conforme aux exigences de la partie 15 des règles de la FCC. L’utilisation est soumise aux deux
conditions suivantes : (1) cet appareil ne doit pas causer d’interférence nuisible ; (2) cet appareil doit accepter toutes
les interférences reçues, y compris celles pouvant causer un mauvais fonctionnement de l’appareil.
CONSIGNES DE SÉCURITÉ IMPORTANTES
Pour fonctionner, cet appareil nécessite un adaptateur secteur. Utilisez uniquement un adaptateur de classe 2 pour équipement informatique,
homologué UL, avec une sortie nominale de 19 V c.c. et un courant de 4,22 A (80 W).
+
Polarité de sortie de l’adaptateur secteur :
Pendant l’utilisation de l’ordinateur portable, observez toujours les consignes de sécurité élémentaires ci-après afin de réduire au minimum
le risque d’incendie, d’électrocution ou d’autres blessures. D’autre part :
•
•
•
•
•
•
•
ATTENTION - SURFACE CHAUDE : Le dessous de cet ordinateur peut s’échauffer lorsque l’appareil est utilisé pendant une longue
période. Lorsque vous utilisez cet ordinateur et qu’il repose à même la peau (sur les jambes nues), prenez garde à ne pas l’utiliser pendant
trop longtemps ou de manière continue.
ATTENTION : Pour réduire les risques d’incendie, utilisez uniquement un cordon d’alimentation pour télécommunications de grosseur
26 AWG ou plus, avec homologation UL ou CSA.
N’utilisez pas ce produit à proximité d’un point d’eau (baignoire, lavabo, évier de cuisine, évier de buanderie) ni dans un sous-sol humide
ou à côté d’une piscine.
Durant un orage électrique, évitez d’utiliser le modem. Il existe de faibles risques que la foudre cause une électrocution.
N’utilisez pas le modem pour signaler une fuite de gaz s’il est situé à proximité de la fuite.
Utilisez uniquement le cordon d’alimentation et les piles recommandés dans ce manuel. Ne jetez pas les piles ou les batteries dans un feu.
Elles risquent d’exploser. Vérifiez si la réglementation locale comporte des instructions spéciales d’élimination.
Si l’appareil est utilisé à titre de récepteur de télévision : si vous utilisez un système de câblodistribution, protégez-vous contre les surtensions
et les transitoires en vous assurant que la gaine extérieure du câble coaxial est relié à la terre dans le bâtiment, aussi près que possible du
point d’entrée du câble, conformément à l’article 820.93 du code électrique des États-Unis et à la norme ANSI/NFPA 70 : 2005. Si vous
avez des questions concernant votre installation de câblodistribution, contactez votre câblodistributeur.
CONSERVEZ CES INSTRUCTIONS
Avis réservé à des réparateurs qualifiés
DANGER D’EXPLOSION SI LA BATTERIE AU LITHIUM (HORLOGE) EST INCORRECTEMENT REMPLACÉE. LA PILE
DOIT ÊTRE REMPLACÉE UNIQUEMENT PAR UNE PILE IDENTIQUE OU D’UN TYPE ÉQUIVALENT RECOMMANDÉ
PAR LE FABRICANT. JETEZ LES BATTERIES USÉES CONFORMÉMENT AUX INSTRUCTIONS DU FABRICANT.
POUR BÉNÉFICIER D’UNE PROTECTION CONTINUE CONTRE LES RISQUES D’INCENDIE, LE FUSIBLE NE
DOIT ÊTRE REMPLACÉ QUE PAR UN AUTRE FUSIBLE DE MÊME TYPE ET DE MÊME CAPACITÉ.
Recyclage de la batterie
Avec le temps, l’autonomie des batteries qui alimentent votre ordinateur portable finira par diminuer ; c’est un phénomène naturel pour toutes
les batteries. Lorsque vous remarquerez cela, songez à installer une batterie neuve*. Si vous remplacez votre ancienne batterie, il est important
que vous la jetiez comme il convient car, dans le cas contraire, les matériaux qu’elle contient risquent de nuire à l’environnement.
Chez Fujitsu, nous portons une attention particulière à la protection de l’environnement et nous collaborons donc avec la
Rechargeable Battery Recycle Corporation (RBRC)**, une organisation de service publique à but non lucratif qui
s’engage dans la protection de l’environnement en recyclant les batteries et piles usagées sans aucun frais pour vous.
La RBRC dispose de dizaines de milliers de points de collecte aux États-Unis et au Canada. Pour trouver le lieu de collecte
le plus proche de chez vous, visitez www.RBRC.org ou appelez au 1-800-822-8837.
Si aucun des lieux proposés par la RBRC ne vous convient, vous pouvez en chercher un autre en visitant le site Internet de la Consumer
Education Initiative (Initiative pour l’éducation des consommateurs) de l’EIA (Electronic Industries Alliance) à http://EIAE.org.
Rappelez-vous que la protection de l’environnement est l’affaire de tous, vous devriez donc faire tout votre possible afin d’y contribuer,
pour la génération actuelle et les générations suivantes.
*
Pour commander une nouvelle batterie compatible avec votre ordinateur portable Fujitsu, visitez le site www.shopfujitsu.com si
vous résidez aux États-Unis ou www.fujitsu.ca/products/notebooks si vous résidez au Canada.
** La RBRC est une organisation indépendante dont Fujitsu finance une partie des activités de recyclage ; la RBRC n’est en aucune
façon affiliée à Fujitsu.
Table des matières
Préface
À propos de ce guide . . . . . . . . . . . . . . . . . . . . . . . . . . . . . . . . . . . . . . . . . . . 13
Conventions utilisées dans ce guide . . . . . . . . . . . . . . . . . . . . . . . . . . . . . . 13
Coordonnées pour contacter Fujitsu. . . . . . . . . . . . . . . . . . . . . . . . . . . . . . 14
Chapitre 1
Présentation de votre ordinateur LifeBook
Aperçu général . . . . . . . . . . . . . . . . . . . . . . . . . . . . . . . . . . . . . . . . . . . . . . . 16
Emplacement des commandes et des connecteurs . . . . . . . . . . . . . . . . . . . 17
Composants supérieurs. . . . . . . . . . . . . . . . . . . . . . . . . . . . . . . . . . . . . . . .
Composants sur le côté gauche de l’ordinateur . . . . . . . . . . . . . . . . . . . . .
Composants sur le côté droit de l’ordinateur . . . . . . . . . . . . . . . . . . . . . . .
Composants de la face arrière. . . . . . . . . . . . . . . . . . . . . . . . . . . . . . . . . . .
Composants sous l’ordinateur . . . . . . . . . . . . . . . . . . . . . . . . . . . . . . . . . .
20
23
25
26
28
Tableau de voyants d’état . . . . . . . . . . . . . . . . . . . . . . . . . . . . . . . . . . . . . . 30
Voyant d’alimentation . . . . . . . . . . . . . . . . . . . . . . . . . . . . . . . . . . . . . . . .
Indicateur de source d’alimentation . . . . . . . . . . . . . . . . . . . . . . . . . . . . . .
Voyants de charge en cours . . . . . . . . . . . . . . . . . . . . . . . . . . . . . . . . . . . .
Voyant de niveau de charge . . . . . . . . . . . . . . . . . . . . . . . . . . . . . . . . . . . .
30
31
31
31
Écran . . . . . . . . . . . . . . . . . . . . . . . . . . . . . . . . . . . . . . . . . . . . . . . . . . . . . . . 34
Ouverture de l’écran . . . . . . . . . . . . . . . . . . . . . . . . . . . . . . . . . . . . . . . . . . 34
Utilisation du système comme une tablette . . . . . . . . . . . . . . . . . . . . . . . . 35
Réglage de la luminosité de l’écran . . . . . . . . . . . . . . . . . . . . . . . . . . . . . . 38
Activation/Désactivation du capteur de lumière ambiante
(Windows 7 seulement) . . . . . . . . . . . . . . . . . . . . . . . . . . . . . . . . . . . . . . . 39
Clavier . . . . . . . . . . . . . . . . . . . . . . . . . . . . . . . . . . . . . . . . . . . . . . . . . . . . . . 41
Utilisation du clavier. . . . . . . . . . . . . . . . . . . . . . . . . . . . . . . . . . . . . . . . . . 41
TouchPad/Numériseur actif/Écran tactile . . . . . . . . . . . . . . . . . . . . . . . . . 44
Utilisation du pavé Touchpad . . . . . . . . . . . . . . . . . . . . . . . . . . . . . . . . . . . 44
Écran numériseur actif . . . . . . . . . . . . . . . . . . . . . . . . . . . . . . . . . . . . . . . . 49
Utilisation de l’écran tactile capacitif optionnel. . . . . . . . . . . . . . . . . . . . . 53
Installation du cordon . . . . . . . . . . . . . . . . . . . . . . . . . . . . . . . . . . . . . . . . . 54
Réglage du volume . . . . . . . . . . . . . . . . . . . . . . . . . . . . . . . . . . . . . . . . . . . . 55
Réglage du volume . . . . . . . . . . . . . . . . . . . . . . . . . . . . . . . . . . . . . . . . . . . 55
Périphériques de baie modulaire . . . . . . . . . . . . . . . . . . . . . . . . . . . . . . . . . 56
Retirer et installer des périphériques modulaires . . . . . . . . . . . . . . . . . . . . 57
Boutons Sécurité/PC Tablette du LifeBook . . . . . . . . . . . . . . . . . . . . . . . . 59
Fonctions des boutons Sécurité . . . . . . . . . . . . . . . . . . . . . . . . . . . . . . . . . 59
Fonctions des boutons de pré-identification . . . . . . . . . . . . . . . . . . . . . . . . 60
Fonctions des boutons de post-identification . . . . . . . . . . . . . . . . . . . . . . . 62
Modification des fonctions des boutons PC Tablette . . . . . . . . . . . . . . . . . 65
Configuration du tableau de sécurité LifeBook . . . . . . . . . . . . . . . . . . . . . 65
Mots de passe . . . . . . . . . . . . . . . . . . . . . . . . . . . . . . . . . . . . . . . . . . . . . . . 66
Utilisation de votre tableau de sécurité LifeBook . . . . . . . . . . . . . . . . . . . 67
Mises en garde . . . . . . . . . . . . . . . . . . . . . . . . . . . . . . . . . . . . . . . . . . . . . . 69
Désinstallation/réinstallation de l’application de sécurité . . . . . . . . . . . . . 69
7
Chapitre 2
Première mise en marche de votre ordinateur portable LifeBook
Sources d’alimentation . . . . . . . . . . . . . . . . . . . . . . . . . . . . . . . . . . . . . . . . . 72
Connexion des adaptateurs d’alimentation . . . . . . . . . . . . . . . . . . . . . . . . . 72
Démarrage de votre PC Tablette LifeBook . . . . . . . . . . . . . . . . . . . . . . . . 74
Mise sous tension . . . . . . . . . . . . . . . . . . . . . . . . . . . . . . . . . . . . . . . . . . . . 74
Procédure d’amorçage . . . . . . . . . . . . . . . . . . . . . . . . . . . . . . . . . . . . . . . . 75
Mots de passe d’accès au disque dur . . . . . . . . . . . . . . . . . . . . . . . . . . . . . 76
Utilitaire de configuration du BIOS . . . . . . . . . . . . . . . . . . . . . . . . . . . . . . 76
Démarrage du système . . . . . . . . . . . . . . . . . . . . . . . . . . . . . . . . . . . . . . . . 78
Premier démarrage de Windows. . . . . . . . . . . . . . . . . . . . . . . . . . . . . . . . . 78
Enregistrement de votre PC Tablette LifeBook chez Fujitsu . . . . . . . . . . . 79
Installation de ClickMe! . . . . . . . . . . . . . . . . . . . . . . . . . . . . . . . . . . . . . . . 80
Utilitaire de mise à jour des pilotes Fujitsu Driver Update . . . . . . . . . . . . 80
Gestion de l’alimentation . . . . . . . . . . . . . . . . . . . . . . . . . . . . . . . . . . . . . . . 81
Commutateur d’alimentation/veille/reprise . . . . . . . . . . . . . . . . . . . . . . . . 81
Mode sommeil . . . . . . . . . . . . . . . . . . . . . . . . . . . . . . . . . . . . . . . . . . . . . . 81
Mode veille prolongée (enregistrement sur le disque) . . . . . . . . . . . . . . . . 83
Gestion de l’alimentation dans Windows . . . . . . . . . . . . . . . . . . . . . . . . . . 83
Redémarrage du système . . . . . . . . . . . . . . . . . . . . . . . . . . . . . . . . . . . . . . 83
Mise hors tension . . . . . . . . . . . . . . . . . . . . . . . . . . . . . . . . . . . . . . . . . . . . 84
Conformité ENERGY STAR® . . . . . . . . . . . . . . . . . . . . . . . . . . . . . . . . . 84
Chapitre 3
Options installables par l’utilisateur
Batterie au lithium . . . . . . . . . . . . . . . . . . . . . . . . . . . . . . . . . . . . . . . . . . . . 86
Procédure de recharge des batteries . . . . . . . . . . . . . . . . . . . . . . . . . . . . . . 87
Remplacement de la batterie. . . . . . . . . . . . . . . . . . . . . . . . . . . . . . . . . . . . 89
8
Cartes mémoire Memory Stick/SD . . . . . . . . . . . . . . . . . . . . . . . . . . . . . . . 91
Installation d’une carte Memory Stick ou SD . . . . . . . . . . . . . . . . . . . . . . 92
Retrait d’une carte Memory Stick/SD . . . . . . . . . . . . . . . . . . . . . . . . . . . . 92
Cartes ExpressCard . . . . . . . . . . . . . . . . . . . . . . . . . . . . . . . . . . . . . . . . . . . 93
Installation d’une carte ExpressCard . . . . . . . . . . . . . . . . . . . . . . . . . . . . . 93
Retrait d’une carte ExpressCard . . . . . . . . . . . . . . . . . . . . . . . . . . . . . . . . . 94
Module de mémoire additionnelle . . . . . . . . . . . . . . . . . . . . . . . . . . . . . . . . 95
Installation des modules de mémoire additionnelle . . . . . . . . . . . . . . . . . . 95
Retrait d’un module de mémoire additionnelle . . . . . . . . . . . . . . . . . . . . . 97
Vérification de la capacité de mémoire . . . . . . . . . . . . . . . . . . . . . . . . . . . 97
Lecteur optique . . . . . . . . . . . . . . . . . . . . . . . . . . . . . . . . . . . . . . . . . . . . . . . 98
Logiciels du lecteur multimédia . . . . . . . . . . . . . . . . . . . . . . . . . . . . . . . . . 99
Installation d’un disque dans votre lecteur . . . . . . . . . . . . . . . . . . . . . . . . . 99
Retrait d’un disque . . . . . . . . . . . . . . . . . . . . . . . . . . . . . . . . . . . . . . . . . . . 101
Ouverture d’urgence du plateau de chargement du lecteur optique . . . . . . 102
Utilisation des logiciels du lecteur multimédia . . . . . . . . . . . . . . . . . . . . . 102
Utilisation du lecteur multimédia avec alimentation par batterie . . . . . . . . 104
Ports de périphériques . . . . . . . . . . . . . . . . . . . . . . . . . . . . . . . . . . . . . . . . . 105
Prise de réseau local (RJ-45) interne . . . . . . . . . . . . . . . . . . . . . . . . . . . . . 105
Connecteur pour duplicateur de ports. . . . . . . . . . . . . . . . . . . . . . . . . . . . . 105
Ports USB . . . . . . . . . . . . . . . . . . . . . . . . . . . . . . . . . . . . . . . . . . . . . . . . . . 106
Port IEEE 1394 . . . . . . . . . . . . . . . . . . . . . . . . . . . . . . . . . . . . . . . . . . . . . . 106
Prise d’écouteurs. . . . . . . . . . . . . . . . . . . . . . . . . . . . . . . . . . . . . . . . . . . . . 107
Prise de micro . . . . . . . . . . . . . . . . . . . . . . . . . . . . . . . . . . . . . . . . . . . . . . . 107
Port HDMI . . . . . . . . . . . . . . . . . . . . . . . . . . . . . . . . . . . . . . . . . . . . . . . . . 108
Port vidéo externe . . . . . . . . . . . . . . . . . . . . . . . . . . . . . . . . . . . . . . . . . . . . 108
9
Chapitre 4
Dépannage de votre LifeBook
Dépannage . . . . . . . . . . . . . . . . . . . . . . . . . . . . . . . . . . . . . . . . . . . . . . . . . . . 110
Identification du problème . . . . . . . . . . . . . . . . . . . . . . . . . . . . . . . . . . . . . 110
Problèmes spécifiques . . . . . . . . . . . . . . . . . . . . . . . . . . . . . . . . . . . . . . . . 112
Messages de l’auto-diagnostic de mise sous tension . . . . . . . . . . . . . . . . . 125
Restaurer vos logiciels pré-installés. . . . . . . . . . . . . . . . . . . . . . . . . . . . . . . 130
Réinstallation des applications et pilotes individuels . . . . . . . . . . . . . . . . . 130
Restauration du système d’exploitation pour les systèmes Windows . . . . 131
Téléchargement automatique des mises à jour de pilotes. . . . . . . . . . . . . . 134
Chapitre 5
Entretien
Entretien de votre PC Tablette LifeBook . . . . . . . . . . . . . . . . . . . . . . . . . . 136
Nettoyage de votre PC Tablette LifeBook . . . . . . . . . . . . . . . . . . . . . . . . . 138
Nettoyage du filtre anti-poussière. . . . . . . . . . . . . . . . . . . . . . . . . . . . . . . . 139
Entreposage de votre PC Tablette LifeBook . . . . . . . . . . . . . . . . . . . . . . . 140
Voyager avec votre PC Tablette LifeBook. . . . . . . . . . . . . . . . . . . . . . . . . 140
Batteries . . . . . . . . . . . . . . . . . . . . . . . . . . . . . . . . . . . . . . . . . . . . . . . . . . . 141
Entretien de votre lecteur multimédia. . . . . . . . . . . . . . . . . . . . . . . . . . . . . 142
Cartes ExpressCard. . . . . . . . . . . . . . . . . . . . . . . . . . . . . . . . . . . . . . . . . . . 144
Chapitre 6
Spécifications techniques
Spécifications techniques du système . . . . . . . . . . . . . . . . . . . . . . . . . . . . . 145
Étiquette de configuration. . . . . . . . . . . . . . . . . . . . . . . . . . . . . . . . . . . . . . 145
Microprocesseur . . . . . . . . . . . . . . . . . . . . . . . . . . . . . . . . . . . . . . . . . . . . . 146
Puce. . . . . . . . . . . . . . . . . . . . . . . . . . . . . . . . . . . . . . . . . . . . . . . . . . . . . . . 146
Mémoire . . . . . . . . . . . . . . . . . . . . . . . . . . . . . . . . . . . . . . . . . . . . . . . . . . . 146
Vidéo. . . . . . . . . . . . . . . . . . . . . . . . . . . . . . . . . . . . . . . . . . . . . . . . . . . . . . 146
Numériseur . . . . . . . . . . . . . . . . . . . . . . . . . . . . . . . . . . . . . . . . . . . . . . . . . 147
10
Audio . . . . . . . . . . . . . . . . . . . . . . . . . . . . . . . . . . . . . . . . . . . . . . . . . . . . . 147
Options de mémoire de masse . . . . . . . . . . . . . . . . . . . . . . . . . . . . . . . . . . 147
Périphériques de baie modulaire. . . . . . . . . . . . . . . . . . . . . . . . . . . . . . . . . 147
Caractéristiques techniques . . . . . . . . . . . . . . . . . . . . . . . . . . . . . . . . . . . . 148
Ports de périphériques. . . . . . . . . . . . . . . . . . . . . . . . . . . . . . . . . . . . . . . . . 148
Clavier. . . . . . . . . . . . . . . . . . . . . . . . . . . . . . . . . . . . . . . . . . . . . . . . . . . . . 149
Alimentation . . . . . . . . . . . . . . . . . . . . . . . . . . . . . . . . . . . . . . . . . . . . . . . . 150
Dimensions et poids . . . . . . . . . . . . . . . . . . . . . . . . . . . . . . . . . . . . . . . . . . 150
Environnement d’exploitation . . . . . . . . . . . . . . . . . . . . . . . . . . . . . . . . . . 151
Accessoires préférés des utilisateurs . . . . . . . . . . . . . . . . . . . . . . . . . . . . . 151
Logiciels pré-installés. . . . . . . . . . . . . . . . . . . . . . . . . . . . . . . . . . . . . . . . . 151
Apprendre à utiliser vos logiciels . . . . . . . . . . . . . . . . . . . . . . . . . . . . . . . . 152
Glossaire
Glossaire. . . . . . . . . . . . . . . . . . . . . . . . . . . . . . . . . . . . . . . . . . . . . . . . . . . . . 156
Renseignements sur la réglementation . . . . . . . . . . . . . . . . . . . . . . . . . . . . 170
Annexe A : Guide d’utilisation de la carte de réseau local sans fil
Avant d’utiliser la carte réseau sans fil en option . . . . . . . . . . . . . . . . . . . 174
Cartes réseau sans fil présentées dans ce document . . . . . . . . . . . . . . . . . . 174
Caractéristiques de la carte réseau sans fil . . . . . . . . . . . . . . . . . . . . . . . . . 174
Modes de réseau sans fil compatibles avec cette carte . . . . . . . . . . . . . . . . 175
Désactivation/déconnexion de la carte réseau sans fil . . . . . . . . . . . . . . . . 177
Désactivation avec le commutateur de la carte réseau sans fil . . . . . . . . . . 178
Désactivation par l’icône dans la zone de notification . . . . . . . . . . . . . . . . 178
Activation de la carte réseau sans fil . . . . . . . . . . . . . . . . . . . . . . . . . . . . . 178
11
Configuration de la carte réseau sans fil. . . . . . . . . . . . . . . . . . . . . . . . . . . 179
Configuration de la carte réseau sans fil. . . . . . . . . . . . . . . . . . . . . . . . . . . 179
Connexion au réseau. . . . . . . . . . . . . . . . . . . . . . . . . . . . . . . . . . . . . . . . . . 179
Dépannage de la carte réseau sans fil . . . . . . . . . . . . . . . . . . . . . . . . . . . . . 180
Dépannage . . . . . . . . . . . . . . . . . . . . . . . . . . . . . . . . . . . . . . . . . . . . . . . . . 180
Spécifications de la carte réseau sans fil . . . . . . . . . . . . . . . . . . . . . . . . . . . 182
Spécifications . . . . . . . . . . . . . . . . . . . . . . . . . . . . . . . . . . . . . . . . . . . . . . . 182
Utilisation de Bluetooth . . . . . . . . . . . . . . . . . . . . . . . . . . . . . . . . . . . . . . . . 184
Présentation de Bluetooth . . . . . . . . . . . . . . . . . . . . . . . . . . . . . . . . . . . . . . 184
Sources d’informations supplémentaires sur Bluetooth . . . . . . . . . . . . . . . 184
Annexe B : Capteur d’empreintes digitales
Présentation du capteur d’empreintes digitales . . . . . . . . . . . . . . . . . . . . . 186
Première mise en marche . . . . . . . . . . . . . . . . . . . . . . . . . . . . . . . . . . . . . . 187
Installation d’OmniPass . . . . . . . . . . . . . . . . . . . . . . . . . . . . . . . . . . . . . . . 187
Enregistrement des utilisateurs . . . . . . . . . . . . . . . . . . . . . . . . . . . . . . . . . . 190
Utilisation d’OmniPass . . . . . . . . . . . . . . . . . . . . . . . . . . . . . . . . . . . . . . . . 193
Configuration d’OmniPass . . . . . . . . . . . . . . . . . . . . . . . . . . . . . . . . . . . . . 198
Centre de contrôle OmniPass . . . . . . . . . . . . . . . . . . . . . . . . . . . . . . . . . . . 201
Dépannage . . . . . . . . . . . . . . . . . . . . . . . . . . . . . . . . . . . . . . . . . . . . . . . . . 203
Index . . . . . . . . . . . . . . . . . . . . . . . . . . . . . . . . . . . . . . . . . . . . . . . . . . . . . . . . 205
12
Préface
À propos de ce guide
Le PC Tablette LifeBook Série T730 de la société Fujitsu America est un ordinateur compact,
mais puissant. Il peut être utilisé en configuration d’ordinateur portable classique, avec un clavier,
ou en configuration tablette, avec un stylet. Son fonctionnement est assuré par un puissant processeur
Intel® Core™ 2010 et son écran intégré en couleurs est doté d’un numériseur actif ou d’un numériseur
double disponible en option ; cela fait de votre PC Tablette un ordinateur aussi puissant qu’un PC normal
et capable de fonctionner dans des environnements variés.
Ce manuel présente le mode d’emploi du PC Tablette LifeBook T730 et de ses logiciels intégrés.
Conventions utilisées dans ce guide
Les touches du clavier et à l’écran apparaissent entre crochets. Exemple : [Fn], [F1], [Échap],
[Entrée] et [Ctrl].
Le texte contient plusieurs renvois vers des pages contenant des informations supplémentaires sur un
sujet quelconque. (« Voir Procédure d’installation en page 43 »). Remarque : tous les renvois sont reliés
aux éléments concernés, il vous suffit donc de cliquer sur le lien et vous serez automatiquement redirigé(e)
vers l’élément ou la page en question.
Les éléments des menus à l’écran sont indiqués en caractères gras. Exemple : « Cliquez sur Menu Fujitsu,
puis faites votre sélection. »
13 - À propos de ce guide
L’ICÔNE D’INFORMATIONS MET EN ÉVIDENCE DES RENSEIGNEMENTS QUI VOUS AIDERONT À MIEUX
COMPRENDRE LE SUJET TRAITÉ.
L’ICÔNE DE MISE EN GARDE MET EN ÉVIDENCE DES INFORMATIONS IMPORTANTES POUR L’UTILISATION
VEUILLEZ LIRE
ATTENTIVEMENT TOUTES LES MISES EN GARDE.
SÉCURITAIRE DE VOTRE ORDINATEUR OU POUR L’INTÉGRITÉ DE VOS FICHIERS.
L’ICÔNE D’AVERTISSEMENT MET EN ÉVIDENCE DES INFORMATIONS SUR DES DANGERS POUR VOUS,
PC TABLETTE LIFEBOOK OU VOS FICHIERS. VEUILLEZ LIRE ATTENTIVEMENT TOUS LES
AVERTISSEMENTS.
VOTRE
Coordonnées pour contacter Fujitsu
Service et assistance
Plusieurs façons s’offrent à vous pour contacter l’équipe de service et assistance de Fujitsu :
• Appel sans frais : 1-800-8Fujitsu (1-800-838-5487)
• Site Internet : http://www.computers.us.fujitsu.com/support
Avant de nous contacter, veuillez avoir les informations suivantes à portée de main pour que notre
préposé du service à la clientèle puisse vous venir en aide le plus rapidement possible :
•
•
•
•
Nom du produit
Numéro de configuration du produit
Numéro de série du produit
Date d’achat
14 - À propos de ce guide
• Conditions dans lesquelles le problème est survenu
• Texte des messages d’erreur reçus
• Types de périphériques connectés, si applicable
Site de vente par internet de Fujitsu
Vous pouvez vous rendre sur ce site directement à : www.shopfujitsu.com.
POUR UTILISER LES HYPERLIENS, VOUS DEVEZ AVOIR UNE CONNEXION INTERNET ACTIVE.
Garantie limitée
Votre PC Tablette LifeBook T730 est accompagné d’une garantie limitée internationale de Fujitsu.
Pour connaître les conditions générales et la durée de votre garantie limitée, consultez la pochette de
service livrée avec votre ordinateur.
15 - À propos de ce guide
Chapitre 1
Présentation de votre ordinateur LifeBook
Aperçu général
Cette section décrit les composants
de votre PC Tablette Fujitsu
LifeBook T730. Nous vous
suggérons fortement de la lire
avant de commencer à utiliser
votre PC Tablette, même si vous
avez déjà utilisé des ordinateurs
de ce type.
Figure 1. PC Tablette LifeBook T730
16 - Aperçu général
Emplacement des commandes et des connecteurs
Les interfaces de connecteurs et de périphériques sur le PC Tablette LifeBook T730 et sur le duplicateur
de ports optionnel vous permettent de connecter divers périphériques. Les emplacements spécifiques sont
illustrés dans les figures 2 à 6. Le tableau ci-dessous fournit une brève description de chacune des icônes
figurant sur l’ordinateur et/ou le duplicateur de ports en option. Chacune des icônes est soit moulée, soit
imprimée sur le châssis du système.
Connexion
Icône PC
Tablette
Objectif
Connecteur entrée c. c.
Connecter une source d’alimentation externe telle qu’un adaptateur
secteur ou un adaptateur auto/avion.
Fente pour carte
Memory Stick/SD
La fente de carte Secure Digital (SD)/Memory Stick permet d’insérer une
carte mémoire pour la conservation des données. Cette carte mémoire
vous permet de transférer des données à partir de et vers une variété de
périphériques numériques.
Port USB
Connecter des périphériques compatibles USB 2.0 et 1.1
au PC Tablette.
Prise micro/entrée
de ligne
Connecter un micro externe. Le micro interne est désactivé lorsque
vous branchez un micro externe.
Prise d’écouteurs/sortie
de ligne
Connecter des écouteurs stéréos ou des haut-parleurs externes avec
amplificateur. Le haut-parleur interne est désactivé lorsque vous branchez
des écouteurs externes ou des haut-parleurs avec amplificateur.
HDMI
Le port HDMI vous permet d’utiliser des périphériques numériques
compatibles avec votre ordinateur, tels qu’une télévision haute définition
ou un récepteur AV (audio-vidéo).
Port de connexion
Branchez le duplicateur de port ou un autre dispositif d’arrimage
adapté au PC Tablette. Pour plus d’informations, reportez-vous
à la documentation fournie avec l’appareil.
17 - Emplacement des commandes et des connecteurs
Connexion
Icône PC
Tablette
Objectif
Fente d’antivol
La fente d’antivol vous permet de sécuriser le PC Tablette
en y branchant un dispositif antivol compatible.
Commutateur de
veille/reprise
Le commutateur de veille/reprise vous permet de mettre votre système
en veille sans l’éteindre, de reprendre l’utilisation du système lorsqu’il a
été mis en veille et de le faire démarrer s’il est éteint.
Réseau local
La prise de réseau local (RJ-45) est utilisée pour connecter la carte
Ethernet Base-T/Tx 10/100/1000* interne à un réseau local de votre
bureau (ou domicile) ou à des périphériques tels que câble modem,
DSL ou Internet par satellite. *1000 Mbit/s, également connue sous le
nom de Gigabit Ethernet.
Commutateur marche/
arrêt pour réseau local
sans fil/Bluetooth/
réseau étendu
Le commutateur de carte réseau local sans fil/Bluetooth/réseau étendu
vous permet de mettre sous tension ou hors tension ces dispositifs sans
fil (disponibles en option).
Port vidéo externe
Le port vidéo externe permet de connecter un moniteur externe
ou un projecteur ACL.
Interface vidéo
numérique (DVI)
Le port DVI-D situé sur le duplicateur de ports (en option) vous permet
de raccorder un moniteur ACL plat ou un poste de télévision équipé d’un
port DVI-D ; vous obtenez des graphismes et images d’une très grande
netteté.
Port IEEE 1394
Le port IEEE 1394 vous permet de connecter des périphériques
IEEE 1394 (Firewire) sur votre PC Tablette, tels que caméra
numérique ou disques durs externes.
18 - Emplacement des commandes et des connecteurs
Loquet de l’écran
Microphone intégré
Caméra web en option
Haut-parleur stéréo
Écran
Capteur d’empreintes
digitales
Haut-parleur stéréo
Tableau de sécurité/
Boutons de tablette PC
Pavé tactile TouchPad
Commande du curseur
Commutateur
d'alimentation/reprise
État de voyants d’état
Capteur de
lumière ambiante
Prise d’écouteurs
Microphone intégré
Prise de micro
Tableau de voyants d’état
Prise IEEE 1394
Commutateur pour réseau
local/Bluetooth/réseau
local sans fil étendu
Cartes Memory
Stick/Fente pour
carte SD
Clavier
Loquet de l’écran
Figure 2. PC Tablette LifeBook avec écran ouvert
19 - Emplacement des commandes et des connecteurs
Composants supérieurs
Voici une courte description des composants se trouvant sur le dessus de votre PC Tablette LifeBook.
Loquet de l’écran
Ce loquet sert à maintenir l’écran du PC Tablette en bonne position lorsqu’il est rabattu.
Caméra Web
La caméra web 2.0 mégapixels en option vous permet de prendre des photos de vous-même et de les
envoyer par Internet.
Écran
L’ordinateur est équipé d’un écran couleur à diodes électroluminescentes avec rétro-éclairage, permettant
d’afficher des textes et des images. Deux types d’écran sont disponibles : un numériseur actif pouvant être
utilisé avec un stylet et un numériseur double pouvant être utilisé avec un stylet ou avec les doigts.
Deux haut-parleurs stéréo
Les deux haut-parleurs intégrés permettent une écoute en stéréophonie.
Boutons Sécurité/PC Tablette du LifeBook
Les boutons de sécurité/PC Tablettepermettent de sécuriser votre système grâce à un mot de passe et de
lancer des applications au simple toucher d’un bouton. Voir « Boutons Sécurité/PC Tablette du LifeBook »
en page 59.
Commutateur d’alimentation/veille/reprise
Le commutateur d’alimentation/veille/reprise vous permet de mettre votre ordinateur en veille sans
l’éteindre, de reprendre l’utilisation de l’ordinateur lorsqu’il a été mis en sommeil et de le faire démarrer
s’il est éteint. Voir « Commutateur d’alimentation/veille/reprise » en page 81.
20 - Emplacement des commandes et des connecteurs
Capteur de lumière ambiante
Lorsque l’ordinateur est en cours d’utilisation, ce capteur évalue la lumière ambiante et ajuste automatiquement
la luminosité de l’écran en conséquence. Voir « Activation/Désactivation du capteur de lumière ambiante
(Windows 7 seulement) » en page 39.
Tableau de voyants d’état
Les tableaux de voyants d’état affichent des symboles qui correspondent à des composants spécifiques du
PC Tablette. Les voyants d’état sont situés à deux endroits différents : sur le devant de l’ordinateur, côté
gauche (voyants d’état relatifs au système) et sous les boutons d’applications (voyants d’état relatifs aux
boutons). Voir « Tableau de voyants d’état » en page 30.
Clavier
Clavier complet avec plusieurs touches spéciales Windows. Voir « Clavier » en page 41.
Loquet de l’écran
Le loquet vous permet de libérer l’avant de l’écran du boîtier.
Fente pour carte MemoryStick/SD
La fente pour cartes mémoire MemoryStick/SD permet de connecter une carte MemoryStick/SD pour
stocker des données. Cette architecture vous permet de transférer des données à partir d’une grande variété
de périphériques numériques. Voir « Installation d’une carte Memory Stick ou SD » en page 92.
Commutateur marche/arrêt pour réseau local sans fil/Bluetooth/réseau étendu
Ce commutateur permet de mettre sous et hors tension les dispositifs réseau local sans fil, réseau étendu
sans fil et Bluetooth en option. Pour prolonger la longévité de la batterie, éteignez ces périphériques entre
les utilisations. Voir « Activation de la carte réseau sans fil » en page 178. Notez que les systèmes avec
numériseur double en option ne peuvent être dotés d’une carte réseau sans fil.
21- Emplacement des commandes et des connecteurs
Prise IEEE 1394 (4 broches)
La prise 1394 à 4 broches permet de relier votre ordinateur portable à un périphérique IEEE 1394,
notamment un caméscope numérique. Voir « Port IEEE 1394 » en page 106.
Prise de micro
La prise de micro permet de connecter un microphone mono externe. Voir « Prise de micro » en page 107.
Prise d’écouteurs
La prise d’écouteurs vous permet de connecter des écouteurs. Voir « Prise d’écouteurs » en page 107.
Pavé tactile TouchPad
Le pavé tactile Touchpad est une commande semblable à une souris, avec bouton droit et bouton gauche.
Voir « TouchPad/Numériseur actif/Écran tactile » en page 44.
Capteur d’empreintes digitales
Le capteur d’empreintes digitales vous permet de vous connecter à votre système ainsi qu’à des sites
Internets et d’autres applications protégés par mot de passe : il suffit de glisser votre doigt sur le capteur.
Voir « Présentation du capteur d’empreintes digitales » en page 186.
Microphones intégrés doubles
Le microphone intégré vous permet d’enregistrer de la voix et des annotations.
22 - Emplacement des commandes et des connecteurs
Fente pour carte ExpressCard
Bouton d’éjection de carte ExpressCard
Prise d’alimentation c.c.
Port USB 2.0
Grilles de ventilation
Figure 3. Côté gauche du PC Tablette LifeBook
Composants sur le côté gauche de l’ordinateur
Voici une courte description des composants se trouvant sur le côté gauche de votre PC Tablette LifeBook.
Prise d’alimentation c.c.
La prise d’alimentation c.c. sert à brancher l’adaptateur secteur, lequel permet d’alimenter le PC Tablette
LifeBook et de charger la batterie interne au lithium.
Ports USB 2.0
Les ports USB 2.0 (un sur le côté gauche, deux à l’arrière) permettent de brancher des périphériques USB
(Universal Serial Bus). La norme USB 2.0 transfère des données à un débit théorique de 480 Mbit/s. Elle
est rétrocompatible avec les périphériques USB 1.1 dont le débit atteint 12 Mbit/s. Voir « Ports USB » en
page 106.
Grilles de ventilation
Les grilles de ventilation aident à refroidir votre système et à éviter qu’il ne surchauffe.
23 - Emplacement des commandes et des connecteurs
POUR PROTÉGER VOTRE ORDINATEUR DES DOMMAGES ET OPTIMISER SES PERFORMANCES, GARDEZ
TOUJOURS TOUTES LES GRILLES DE VENTILATION DÉGAGÉES, PROPRES ET SANS DÉBRIS. IL EST POSSIBLE
QUE VOUS DEVIEZ LES NETTOYER PÉRIODIQUEMENT, SELON L’ENVIRONNEMENT DANS LEQUEL VOUS
UTILISEZ L’ORDINATEUR.
NE PLACEZ PAS L’ORDINATEUR DANS UN ENDROIT OÙ LES GRILLES DE VENTILATION POURRAIENT ÊTRE
OBSTRUÉES, NOTAMMENT DANS UN PETIT ESPACE FERMÉ OU SUR UNE SURFACE MOLLE COMME UN LIT
OU UN COUSSIN.
Fente ExpressCard
Permet de brancher une carte ExpressCard. Voir « Cartes ExpressCard » en page 93.
Bouton d’éjection de carte ExpressCard
Le bouton d’éjection de carte ExpressCard permet de retirer une carte ExpressCard de la fente correspondante.
24 - Emplacement des commandes et des connecteurs
Support de stylo
Point d’attache du cordon du stylo
Baie modulaire
Bouton d’ouverture de la baie modulaire
Figure 4. Côté droit de l’ordinateur LifeBook
Composants sur le côté droit de l’ordinateur
Voici une courte description des composants se trouvant sur le côté droit de votre PC Tablette LifeBook.
Support de stylo
Le support sert à tenir le stylo (ou « stylet ») lorsque ce dernier n’est pas utilisé. Le stylo sert d’interface
avec l’écran numériseur actif.
Baie modulaire
La baie modulaire permet d’installer l’un des périphériques suivants. Voir « Périphériques de baie modulaire »
en page 56.
• Graveur de DVD multiformat double couche
• Batterie de baie modulaire
• Disque dur secondaire modulaire
• Volet réducteur de poids
Bouton d’ouverture de la baie modulaire
Le loquet d’ouverture du compartiment multifonctions sert à libérer le dispositif modulaire du
compartiment multifonctions.
Point d’attache du cordon du stylo
Le point d’attache du cordon permet de relier votre stylo à l’ordinateur pour éviter de le perdre.
25 - Emplacement des commandes et des connecteurs
Fente pour dispositif antivol
Grilles de ventilation
Port Prise de réseau sans fil Gigabit (RJ-45)
Port HDMI
Externe P
orts USB 2.0
Figure 5. Face arrière du PC Tablette LifeBook
Composants de la face arrière
Voici une courte description des composants se trouvant à l’arrière de votre PC Tablette LifeBook.
Fente pour dispositif antivol
La fente de dispositif antivol vous permet d’installer un dispositif antivol disponible en option.
Grilles de ventilation
Les grilles permettent à l’air de circuler dans le système afin de refroidir les composants.
26 - Emplacement des commandes et des connecteurs
POUR PROTÉGER VOTRE ORDINATEUR DES DOMMAGES ET OPTIMISER SES PERFORMANCES, GARDEZ
TOUJOURS LES GRILLES DE VENTILATION DÉGAGÉES, PROPRES ET SANS DÉBRIS. IL EST POSSIBLE QUE
VOUS DEVIEZ LES NETTOYER PÉRIODIQUEMENT, SELON L’ENVIRONNEMENT DANS LEQUEL VOUS
UTILISEZ L’ORDINATEUR.
NE PLACEZ PAS L’ORDINATEUR DANS UN ENDROIT OÙ LES GRILLES DE VENTILATION POURRAIENT ÊTRE
OBSTRUÉES, NOTAMMENT DANS UN PETIT ESPACE FERMÉ OU SUR UNE SURFACE MOLLE COMME UN LIT
OU UN COUSSIN.
Port vidéo externe
Le port vidéo externe permet de connecter un moniteur externe ou un projecteur ACL. Voir « Port vidéo
externe » en page 108.
Ports USB 2.0
Les ports USB 2.0 vous permettent de connecter des périphériques USB. Chaque port USB 2.0 permet
de transférer des données à une vitesse atteignant 480 Mbit/s. Il est également rétrocompatible avec les
périphériques USB 1.1, lesquels permettent des transferts de données à des vitesses atteignant 12 Mbit/s.
Voir « Ports USB » en page 106.
Port HDMI
Le port HDMI est conçu pour être utilisé avec des périphériques numériques compatibles avec votre
ordinateur, tels qu’une télévision haute définition ou un récepteur AV (audio-vidéo). Voir « Port HDMI »
en page 108.
Prise de réseau local Gigabit (RJ-45)
Cette prise est utilisée pour une connexion Gigabit Ethernet (10Base-T/100Base-Tx/1000Base-T) interne.
Voir « Prise de réseau local (RJ-45) interne » en page 105.
27 - Emplacement des commandes et des connecteurs
Connecteur pour
duplicateur de ports
Compartiment de
mémoire supplémentaire
Filtre anti-poussière
Loquet de la batterie
Loquet de la batterie
Compartiment de batterie au lithium
Grilles de ventilation
Figure 6. Dessous du PC Tablette LifeBook
Composants sous l’ordinateur
Voici une courte description des composants se trouvant sous votre PC Tablette LifeBook.
Compartiment de mémoire supplémentaire
Votre ordinateur est équipé en usine d’une mémoire vive synchrone dynamique à double débit et à haute
vitesse (SDRAM DDR3 1066 MHz). Le compartiment de mémoire permet d’augmenter la capacité de
mémoire système de votre ordinateur pour en améliorer les performances globales. Voir « Module de
mémoire additionnelle » en page 95. Normalement, vous ne devriez pas avoir à ouvrir ce compartiment.
28 - Emplacement des commandes et des connecteurs
Connecteur pour duplicateur de ports
Ce connecteur permet de brancher le duplicateur de ports en option sur votre ordinateur portable.
Filtre anti-poussière
Le filtre anti-poussière aide à éviter que la poussière et la saleté s’infiltrent dans votre ordinateur.
Voir « Nettoyage du filtre anti-poussière » en page 139.
Grilles de ventilation
Les grilles permettent à l’air de circuler dans le système afin de refroidir les composants.
POUR PROTÉGER VOTRE ORDINATEUR DES DOMMAGES ET OPTIMISER SES PERFORMANCES, GARDEZ
TOUJOURS LES GRILLES DE VENTILATION DÉGAGÉES, PROPRES ET SANS DÉBRIS. IL EST POSSIBLE QUE
VOUS DEVIEZ LES NETTOYER PÉRIODIQUEMENT, SELON L’ENVIRONNEMENT DANS LEQUEL VOUS UTILISEZ
L’ORDINATEUR.
NE PLACEZ PAS L’ORDINATEUR DANS UN ENDROIT OÙ LES GRILLES DE VENTILATION POURRAIENT ÊTRE
OBSTRUÉES, NOTAMMENT DANS UN PETIT ESPACE FERMÉ OU SUR UNE SURFACE MOLLE COMME UN LIT
OU UN COUSSIN.
Compartiment de batterie au lithium
Le compartiment de batterie contient la batterie interne au lithium. Le couvercle de cette baie peut être
ouvert pour enlever la batterie lorsque l’ordinateur doit être entreposé pendant une longue période ou pour
remplacer une batterie à plat par une autre batterie chargée. Voir « Batterie au lithium » en page 86.
Loquets de la batterie
Les loquets servent à maintenir la batterie à l’intérieur de son compartiment.
29 - Emplacement des commandes et des connecteurs
Sécurité
Verr maj
Verr num
Verr défil
Alimentation Accès au lecteur
optique/disque dur
Alimentation
externe
Batt. 1 niveau
de charge
Batt. 1 charge
en cours
Batt. 2 niveau
de charge
Batt. 2 charge
en cours
Figure 7. Tableau de voyants d’état
Tableau de voyants d’état
Le tableau de voyants d’état contient des symboles et DEL associées correspondant à des composants
spécifiques de votre PC Tablette. Ces symboles vous renseignent sur le fonctionnement des composants
correspondants. (Figure 7).
Voyant d’alimentation
• Le voyant d’alimentation indique si le système est opérationnel. Il présente différents états, chacun
d’entre eux indiquant le mode d’alimentation de votre PC Tablette au moment donné.
• Allumé en continu : le PC Tablette est sous tension et prêt à être utilisé.
• Clignotant : le PC Tablette est en mode Sommeil.
30 - Tableau de voyants d’état
• Éteint : votre système est en veille prolongée ou carrément éteint.
Si la batterie est en cours de charge, le voyant d’alimentation demeure allumé même si l’ordinateur est
éteint. Et même si le système a été éteint avec Windows, le voyant d’alimentation restera allumé si un
adaptateur est branché à l’ordinateur.
Indicateur de source d’alimentation
L’indicateur de source d’alimentation indique si l’ordinateur portable est alimenté par l’adaptateur secteur,
par un adaptateur auto/avion ou par la batterie. Cette icône peut être affichée de deux manières pour
indiquer la source d’alimentation de votre ordinateur portable.
• Allumé : l’un des adaptateurs est en cours d’utilisation.
• Éteint : l’alimentation provient uniquement des batteries ; aucun adaptateur n’est connecté. Et
même si le système a été éteint avec Windows, le voyant d’alimentation externe restera allumé si
un adaptateur est branché à l’ordinateur.
Voyant d’accès au disque dur/lecteur optique
Ce voyant d’accès indique si le disque dur interne ou le lecteur optique est en cours d’utilisation.
1
Voyants de charge en cours
Les voyants « Chargement de la batterie » et « Niveau de charge » indiquent laquelle des batteries est en
cours de chargement (Batterie 1 : batterie au lithium principale ; Batterie 2 : batterie au lithium modulaire
optionnelle).
1
Voyant de niveau de charge
Le voyant de niveau de charge de la batterie affiche le niveau de charge de la batterie comme suit :
• Vert continu : Batterie chargée entre 50% et 100% de sa capacité maximale.
• Orange continu : Batterie chargée entre 13% et 49% de sa capacité maximale.
31- Tableau de voyants d’état
• Rouge continu : Batterie chargée entre 0% et 12% de sa capacité maximale.
• Orange clignotant : Le clignotement indique qu’une mesure de chargement est en cours
(quatre secondes après l’installation de la batterie).
• Rouge clignotant : Problème de batterie.
• Éteint : Aucune batterie n’est installée.
• Lorsque la batterie est installée et que l’ordinateur n’est pas sous tension, le voyant de charge
de la pile s’affichera cinq secondes après le clignotement orange.
• Lorsque l’adaptateur secteur n’est pas branché ou que la batterie n’est pas complètement
chargée et que l’ordinateur se trouve en mode sommeil, le voyant clignote. Il clignote en
s’allumant une seconde toutes les cinq secondes.
• Les batteries soumises aux chocs, aux vibrations ou aux températures extrêmes risquent
de subir des dégâts permanents.
• Si une batterie est court-circuitée, elle est forcément abîmée et doit être remplacée.
Voyant de sécurité
Si un mot de passe a été défini, ce voyant clignote lorsque le système est réactivé à partir de l’état Hors
tension ou du mode Sommeil. Vous devez entrer le mot de passe défini dans le « Tableau de sécurité »
pour que le système redevienne opérationnel.
Voyant Verr num
Le voyant Verr num vire au vert si le clavier intégré est en mode de pavé numérique à dix touches.
Voyant Verr maj
Le voyant Verr maj vire au vert si le clavier inscrira les lettres en majuscules.
32 - Tableau de voyants d’état
Voyant Verr défil
Le voyant Verr défil vire au vert si le verrouillage du défilement est actif.
33 - Tableau de voyants d’état
Figure 8. Ouverture de l’écran
Écran
Votre PC Tablette LifeBook T730 est doté d’un écran d’affichage à DEL rétroéclairé vous permettant de
mieux voir son contenu lorsque la lumière environnante est intense. La conception convertible de votre
PC Tablette vous permet d’ouvrir complètement l’écran, de le tourner à 180 degrés dans les deux sens et
le placer face vers le haut sur le clavier. Cela vous permet d’utiliser le système comme une tablette, de la
même manière qu’avec un bloc-note en papier.
Ouverture de l’écran
Appuyez sur le bouton du loquet pour soulever l'écran et inclinez ce dernier légèrement vers l'arrière
jusqu'à une position confortable, en faisant attention de ne pas toucher à la surface d'affichage. (Figure 8).
34 - Écran
Utilisation du système comme une tablette
Si vous souhaitez utiliser le système comme une tablette, effectuez les étapes suivantes.
• L’écran peut pivoter dans un sens comme dans l’autre ; mais lorsque vous souhaitez revenir à
•
•
la configuration portable, prenez garde à le faire pivoter dans le sens inverse à celui dans lequel
vous l’avez ouvert. Si vous tournez l’écran dans le mauvais sens, vous risquez d’endommager
la charnière. L'écran doit pouvoir tourner facilement, si ce n'est pas le cas, il se peut que vous
le fassiez tourner dans le mauvais sens.
À l’étape suivante, assurez-vous de placer l’écran perpendiculairement au clavier, sinon le
clavier et le couvercle de l’écran pourraient s’égratigner.
Il est important de se rappeler que le loquet doit toujours être enclenché afin d’éviter de
l’endommager, et ce quelle que soit la disposition de votre ordinateur.
1
2
Appuyez sur le bouton du loquet et soulevez l’écran jusqu’à ce qu’il soit perpendiculaire au clavier. (Figure 10).
3
En tenant l’extrémité supérieure de l’écran, tirez vers l’avant jusqu’à ce qu’il repose pratiquement au dessus du clavier.
4
Poussez le loquet vers l’écran (voir « A »
dans la figure 9). Le loquet pivotera, faisant
disparaître le loquet supérieur et apparaître
le loquet inférieur (voir « B » dans la figure 9).
Maintenez le loquet enfoncé et appliquez
l’écran à plat contre la base afin que le loquet
s’enclenche. Vous pouvez maintenant utiliser
le système comme une tablette. (Figure 12).
Lorsque l’écran est perpendiculaire au clavier, tournez de 180 degrés dans l’une ou l’autre direction (Figure 11) afin
qu’il soit face vers l’arrière.
Loquet supérieur
Loquet inférieur
Glissement
vers l'écran
A
B
Figure 9. Verrouillage/Déverrouillage
Pour remettre l’ordinateur en configuration normale :
1
2
Appuyez sur le bouton du loquet et soulevez l’écran jusqu’à ce qu’il soit perpendiculaire au clavier.
En tenant l’extrémité supérieure de l’écran, tirez vers l’avant jusqu’à ce qu’il repose juste au-dessus du clavier.
35 - Écran
Figure 10. Écran
complètement ouvert
Figure 11. Pivoter l’écran
Figure 12. Mode tablette
Comment tenir le PC Tablette
Selon le modèle de carte et/ou de module réseau sans fil de votre système, la façon de tenir votre
ordinateur sera légèrement différente.
Pour déterminer le modèle de carte réseau sans fil qui est installé, faites un clic droit sur l’icône Poste de
travail du bureau, puis sélectionnez Propriétés. Sous Windows XP, sélectionnez l’onglet Matériel puis
cliquez sur le bouton [Gestionnaire de périphériques]. Sous Windows 7, cliquez sur [Gestionnaire de
périphériques] dans le panneau gauche de la fenêtre Propriétés. Actionnez le signe "+" situé à côté des
Adaptateurs réseau pour voir le modèle de la carte : « Intel® Centrino® Advanced-N 6200 AGN » ou «
Atheros AR9287 Wireless Network Adapter ». S'il s'agit du modèle Atheros, vous pourrez tenir votre PC
Tablette dans toutes les positions lorsque le commutateur de réseau sans fil est allumé. S'il s'agit de la carte
Intel ou du module de réseau sans fil étendu Gobi, vous ne pourrez tenir l'ordinateur que dans certaines
positions.
36 - Écran
Consultez les figures 13 et 14. La seule différence vient du fait que quand le commutateur de réseau sans
fil est allumé, l'orientation verticale secondaire ne fonctionne pas pour les ordinateurs dotés d'une carte
Intel Advanced-N 6200 et l'orientation horizontale secondaire ne fonctionne pas dans les systèmes dotés
d'un module de réseau sans fil étendu Gobi. Si les deux dispositifs sont installés, les deux orientations
secondaires ne fonctionnent pas.
Orientation horizontale
Orientation verticale
primaire Orientation
Orientation horizontale
secondaire Orientation
Non fonctionnelle
Orientation*
Figure 13. Orientations d'un PC Tablette doté d'un module Intel Advanced-N 6200 AGN
37 - Écran
Orientation horizontale
Orientation verticale
primaire Orientation
Non fonctionnelle
Orientation*
Orientation verticale
secondaire Orientation
Figure 14. Orientations d'un PC Tablette avec module de réseau sans fil étendu Gobi
*REMARQUE : Cette orientation ne fonctionne pas uniquement lorsque la carte de réseau sans fil est allumée. Dans le cas contraire, elle fonctionne.
Réglage de la luminosité de l’écran
Lorsque vous avez allumé votre PC Tablette, vous pouvez régler la luminosité de l’écran à un niveau
de visionnement plus confortable. Vous pouvez ajuster la luminosité de trois façons : avec le clavier,
avec l’utilitaire de gestion de l’alimentation, avec le menu Fujitsu.
Utilisation du clavier
Si vous réglez la luminosité en vous servant du clavier, vous modifiez les paramètres du système
(c.-à-d., le paramétrage réalisé avec les touches de fonction modifient automatiquement les paramètres
de luminosité dans les paramètres de la tablette et du stylo).
• [Fn+F6] : Appuyez plusieurs fois sur cette combinaison de touches pour diminuer la luminosité
de votre écran.
38 - Écran
• [Fn+F7] : Appuyez plusieurs fois sur cette combinaison de touches pour augmenter la luminosité
de votre écran.
Remarque : le changement de luminosité avec la touche [Fn] est temporaire. Lors d’une reprise ou d’un
redémarrage, il faudra les réinitialiser si cette méthode a été utilisée.
Utilisation de la Gestion de l'alimentation pour contrôler la luminosité de l'écran (Windows 7)
Dans Windows 7 : Pour régler la luminosité avec l'utilitaire de gestion de l'alimentation sous
Windows 7 :
Cliquez sur Démarrer - Panneau de configuration. Dans Affichage par :, sélectionnez un des affichages
par icônes. Sélectionnez Écran puis cliquez sur Régler la luminosité dans le panneau de gauche. Sous
Sélectionner un régime d'alimentation, choisissez le régime que vous souhaitez. Faites glisser la barre
Luminosité de l’écran : vers la gauche ou la droite selon votre préférence.
Utilisation du menu Fujitsu pour régler la luminosité
Pour régler la luminosité en vous servant du menu Fujitsu, cliquez sur l’icône Menu Fujitsu de la barre de
tâches dans le coin inférieur droit de l’écran. Double-cliquez sur l’icône Centre de mobilité Windows, puis
double-cliquez sur l’icône située à côté de Luminosité de l’écran. Réglez la luminosité en faisant glisser
le bouton sur la position On battery (Alimentation batterie) ou Plugged in (Alimentation secteur).
LORSQUE VOUS EMPLOYEZ UNE ALIMENTATION SECTEUR, L’ÉCRAN UTILISE PAR DÉFAUT LE NIVEAU DE
LUMINOSITÉ LE PLUS ÉLEVÉ. LORSQUE VOUS EMPLOYEZ UNE ALIMENTATION SUR BATTERIE, L’ÉCRAN
UTILISE PAR DÉFAUT UN NIVEAU DE LUMINOSITÉ MOYEN.
PLUS LA LUMINOSITÉ EST ÉLEVÉE, PLUS L’ORDINATEUR CONSOMME D’ÉNERGIE ET PLUS LA LONGÉVITÉ
DE VOTRE BATTERIE SERA RÉDUITE. SI VOUS DÉSIREZ MAXIMISER LA LONGÉVITÉ DE LA BATTERIE,
RÉGLEZ LA LUMINOSITÉ AU PLUS BAS NIVEAU POSSIBLE.
Activation/Désactivation du capteur de lumière ambiante (Windows 7 seulement)
Les ordinateurs fonctionnant avec le système d’exploitation Windows 7 sont dotés d’un capteur de
lumière ambiante (juste en dessous du commutateur d’alimentation/veille/reprise) qui mesure
automatiquement l’environnement lumineux. Si l’environnement est très éclairé, la luminosité de l’écran
ACL augmentera pour faciliter la lecture. Au contraire, dans la pénombre, la luminosité de l’écran diminuera
automatiquement.
39 - Écran
Le capteur de lumière peut être activé ou désactivé à partir du Panneau de configuration, comme suit :
1
2
3
4
Ouvrez le Panneau de configuration et cliquez sur Affichage par : puis sélectionner la taille des icônes souhaitée.
5
Dans la fenêtre « Propriétés du capteur », vous pouvez modifier la description du capteur, désinstaller le capteur
ou encore activer ou désactiver les utilisateurs sélectionnés.
Cliquez sur l’icone Capteurs d’emplacement et autres.
Pour activer ou désactiver le capteur de lumière, cochez ou décochez la case située dans la colonne « Activé ».
Pour de plus amples informations sur le capteur de lumière, cliquez sur l'icône du Capteur de lumière présente
dans la colonne des Capteurs à droite de l'icône pour ouvrir la fenêtre des Propriétés.
• Pour modifier la description du capteur, cliquez sur le bouton [Modifier la description], saisissez les nouveaux
éléments, puis cliquez sur le bouton [OK].
• Pour limiter le nombre d’utilisateurs ayant accès aux capteurs, cliquez sur Modifier les accès aux capteurs,
puis cochez ou libérez la case située à côté de l’utilisateur auquel vous souhaitez autoriser ou refuser l’accès.
• Pour désinstaller le capteur, cliquez sur Désinstaller ce capteur.
40 - Écran
Clavier
Touches de fonction
Touche F n
Touche
Démarrer
Pavé numérique
(délimité par la ligne noire)
Touche
d’application
Touches
de curseur
Figure 15. Clavier
Utilisation du clavier
Votre PC Tablette Fujitsu LifeBook est doté d’un clavier à 84 touches. Ce clavier exécute toutes les
fonctions d’un clavier à 101 touches, y compris les touches Windows et diverses touches de fonction
spéciales. Cette section décrit les touches suivantes (Figure 15).
• Pavé numérique : Certaines touches de votre ordinateur portable remplissent une double fonction,
servant à la fois de caractère standard et de touche numérique ou mathématique. Pour passer du
caractère standard à la fonction numérique, utilisez la touche [Verr num].
• Touches de curseur : Votre clavier contient quatre touches fléchées permettant de déplacer le
curseur ou le point d’insertion vers la droite, vers la gauche, vers le haut ou vers le bas, dans les
fenêtres, dans les applications et dans les documents.
41- Clavier
• Touches de fonction : Les touches [F1] à [F12] s’utilisent avec la touche [Fn] pour exécuter
des actions spéciales, selon le programme en cours d’utilisation.
• Touches Windows : Ces touches fonctionnent de concert avec votre système d’exploitation
Windows et produisent le même résultat que si vous cliquiez sur le menu Démarrer à l’écran
ou avec le bouton droit de votre pointeur.
Pavé numérique
Certaines touches du clavier remplissent une double fonction en servant de touche standard et de touche
numérique. Pour utiliser la fonction numérique de ces touches, appuyez sur [Verr num]. Pour désactiver
la fonction numérique, appuyez de nouveau sur la même touche. Lorsque cette fonction est activée, vous
pouvez saisir des chiffres de 0 à 9, exécuter des additions ( + ), des soustractions ( - ), des multiplications
( * ) et des divisions ( / ), ainsi que saisir des décimales ( , ) en vous servant des touches de fonction
désignées du pavé numérique. Les fonctions secondaires des touches du pavé numérique sont indiquées
sur leur face avant.
Touches Windows
Votre PC Tablette LifeBook comporte deux touches Windows, soit une touche [Démarrer] et une touche
[Application]. La touche [Démarrer] affiche le menu Démarrer. Ce bouton fonctionne un peu comme le
bouton de menu Démarrer de votre écran La touche [Application] fonctionne comme le bouton droit de
votre souris et affiche un menu de raccourcis s’appliquant à l’élément sélectionné. (Pour plus d’informations
sur les touches Windows, veuillez consulter l’Aide Windows et la documentation de soutien disponible
dans le menu Démarrer.)
Touches de curseur
Les touches de curseur sont les quatre touches fléchées qui permettent de déplacer le curseur vers le haut,
vers le bas, vers la gauche et vers la droite dans les applications. Dans les programmes tels que l’Explorateur
Windows, elles servent à déplacer la « mise en évidence » (sélectionne l’élément suivant en haut, en bas,
à gauche ou à droite).
Touches de fonction
Votre PC Tablette LifeBook comporte 12 touches de fonction, F1 à F12. Les fonctions affectées à ces
touches varient selon l’application. Pour les connaître, consultez la documentation du logiciel utilisé.
42 - Clavier
• La touche [Fn] permet d’accéder à des fonctions supplémentaires de votre PC Tablette. Elle est
toujours utilisée conjointement avec une autre touche.
• [Fn+F3] : Maintenez [Fn] enfoncée et appuyez sur [F3] pour activer ou désactiver la fonction Silence.
• [Fn+F4] : Maintenez la touche [Fn] enfoncée et appuyez sur [F4] pour activer ou désactiver la
fonction Quick Point. Veuillez prendre note que la combinaison de touches [Fn+F4] fonctionne
uniquement lorsque le paramètre Manual Setting (Configuration manuelle) est sélectionné dans
le BIOS. (Voir « Utilitaire de configuration du BIOS » en page 76.)
• [Fn+F6] : Gardez la touche [Fn] enfoncée et appuyez plusieurs fois sur [F6] pour diminuer
la luminosité de l’écran.
• [Fn+F7] : Gardez la touche [Fn] enfoncée et appuyez plusieurs fois sur [F7] pour augmenter
la luminosité de l’écran.
• [Fn+F8] : Si vous appuyez plusieurs fois sur [F8] tout en maintenant la touche [Fn] enfoncée,
vous réduirez le volume sonore de votre système.
• [Fn+F9] : Si vous appuyez plusieurs fois sur [F9] tout en maintenant la touche [Fn] enfoncée,
vous augmenterez le volume sonore de votre système.
• [Fn+F10] : Gardez la touche [Fn] enfoncée et appuyez sur [F10] pour changer l’emplacement de
l’affichage vidéo. L’ordre des emplacements dépend du type de périphérique(s) vidéo connecté(s)
au système. Chaque fois que vous appuyez sur ces touches, vous passez au choix suivant.
• Si vous avez un écran à tube cathodique externe, l’ordre sera le suivant : écran interne -> écran
cathodique externe -> affichage simultané -> écran interne.
• S’il y a seulement un périphérique HDMI connecté à votre système, l’ordre sera le suivant :
écran interne -> écran HDMI -> affichage simultané -> écran interne.
• Si vous avez un écran à tube cathodique externe et un périphérique HDMI, l’ordre sera le
suivant : écran interne -> écran cathodique externe -> affichage simultané écran interne et
écran cathodique externe -> écran HDMI -> affichage simultané écran interne et écran HDMI ->
écran interne.
• Si un écran à tube cathodique et un périphérique DVI sont connectés au duplicateur de ports,
l’ordre sera le suivant : écran interne -> écran cathodique externe -> affichage simultané écran
interne et écran cathodique externe -> écran DVI -> affichage simultané écran interne et écran
DVI -> écran interne.
43 - Clavier
TouchPad/Numériseur actif/Écran tactile
Capteur
de défilement
Figure 16. Pavé tactile TouchPad
Utilisation du pavé Touchpad
Le pavé tactile TouchPad est intégré à votre PC Tablette LifeBook. Ce dispositif permet de commander le
déplacement du curseur et de sélectionner des éléments affichés à l’écran. Le pavé tactile se compose d’une
commande de curseur en bas du clavier, au centre, de deux boutons en bas de celle-ci, et d’un capteur de
défilement sur la partie droite de celle-ci. Le bouton gauche fonctionne de la même manière qu’un bouton
gauche de souris tandis que le bouton droit a la même fonction que le bouton droit d’une souris. Utilisé
conjointement avec la commande de curseur, le bouton central du pavé tactile permet de faire défiler
l’écran vers le haut ou le bas. La fonction exacte des boutons peut varier selon l’application utilisée.
44 - TouchPad/Numériseur actif/Écran tactile
Cliquer
Cliquer signifie enfoncer et relâcher un bouton.
Pour cliquer à gauche, placez le curseur sur l’élément
que vous désirez sélectionner, puis enfoncez et
relâchez immédiatement le bouton gauche. Pour
cliquer à droite, placez le curseur sur l’élément que
vous désirez sélectionner, puis enfoncez et relâchez
immédiatement le bouton droit. Vous pouvez
également cliquer en frappant une fois le pavé
TouchPad avec délicatesse.
Figure 18. Cliquer à l’aide du pavé TouchPad
Figure 17. Cliquer à l’aide du bouton
Figure 19. Faire un clic droit avec le bouton
45 - TouchPad/Numériseur actif/Écran tactile
Double-cliquer
Double-cliquer signifie cliquer rapidement, deux fois de
suite, avec le bouton gauche. Cette procédure ne fonctionne
pas avec le bouton droit. Pour effectuer un double-clic,
placez le pointeur sur l’objet voulu et appuyez rapidement
deux fois sur le bouton gauche. Vous pouvez également
effectuer un double-clic en tapant deux fois légèrement
sur le TouchPad.
Figure 20. Double-cliquer
à l’aide du bouton
Figure 21. Double-cliquer à l’aide
du pavé TouchPad
• SI L’INTERVALLE ENTRE LES DEUX CLICS EST TROP LONG, LE DOUBLE-CLIC NE SERA PAS EXÉCUTÉ.
• LES PARAMÈTRES DU PAVÉ TACTILE TOUCHPAD PEUVENT ÊTRE RÉGLÉS DANS LA BOÎTE DE DIALOGUE
« PROPRIÉTÉS DE LA SOURIS » DU PANNEAU DE CONFIGURATION WINDOWS.
46 - TouchPad/Numériseur actif/Écran tactile
Glisser
Glisser signifie enfoncer le bouton gauche, sans le
relâcher, en déplaçant le curseur. Pour faire glisser
un élément, placez d’abord le curseur sur cet élément.
Ensuite, enfoncez et tenez le bouton gauche tout en
déplaçant l’élément à son nouvel emplacement, puis
relâchez. Vous pouvez également glisser un élément
avec le pavé tactile TouchPad. Premièrement, placez
le curseur sur l’élément que vous désirez déplacer et
frappez légèrement le pavé tactile TouchPad à deux
reprises en faisant attention de laisser le doigt sur le
pavé après la dernière frappe. Ensuite, glissez votre
doigt sur le pavé tactile jusqu’à ce que l’élément soit
à l’emplacement désiré et retirez votre doigt.
Figure 22. Glisser à l’aide du bouton
Figure 23. Glisser à l’aide
du pavé TouchPad
47 - TouchPad/Numériseur actif/Écran tactile
Défiler
Le capteur (bande) de défilement permet de faire défiler
rapidement les pages d’un document sans se servir de
la barre de défilement d’une fenêtre. Cette fonction est
particulièrement utile lorsque vous naviguez sur des sites
Internet. Pour faire défiler les pages, faites glisser votre
doigt en haut et en bas le long de la zone de défilement,
située sur la droite du pavé de commande.
Figure 24. Défiler à l’aide
de la zone de défilement
Réglage des commandes du pavé tactile TouchPad
Le panneau de configuration Windows vous permet de personnaliser votre pavé tactile Touchpad avec
divers paramètres disponibles dans la boîte de dialogue « Propriétés de la souris ». Il y a trois aspects
du fonctionnement du pavé tactile que vous pouvez régler :
• Boutons : Cet onglet vous permet de configurer les boutons pour une utilisation gaucher ou droitier,
ainsi que de configurer l’intervalle de temps permis entre deux clics lors des double-clics.
• Pointeurs : Cet onglet vous permet de paramétrer le régime du curseur selon sa fonctionnalité.
• Options de Pointeur : Cet onglet vous permet de configurer une relation entre la vitesse de mouvement
de votre doigt et la vitesse du curseur. Il vous permet aussi d’activer un sillage de pointeur pour la
flèche du curseur.
48 - TouchPad/Numériseur actif/Écran tactile
Écran numériseur actif
REMARQUE : Selon la configuration de votre
système, outre le numériseur actif, il est possible
que vous ayez un pavé tactile capacitif répondant
aux mouvements et aux pressions du doigt (cette
configuration est appelée « numériseur double »).
Pour de plus amples informations à propos de
l’écran tactile, allez à « Utilisation de l’écran
tactile capacitif optionnel » en page 53.
Le numériseur intégré vous permet d’utiliser le stylo
comme un pointeur. Vous pouvez utiliser le stylet
pour cliquer, double-cliquer, glisser des éléments ou
icônes ou pour dessiner comme avec un stylo ou un
crayon dans des applications qui fonctionnent avec
cette caractéristique, notamment des programmes
de dessin et de peinture. Pour de plus amples
informations, consultez la documentation
accompagnant votre application.
Figure 25. Utilisation de l’écran numériseur
• LORSQUE VOUS TOUCHEZ L’ÉCRAN AVEC LE DOIGT ET LORSQUE VOUS ÉCRIVEZ AVEC LE STYLET,
N’UTILISEZ PAS DE FORCE EXCESSIVE.
D’ENDOMMAGER L’ÉCRAN À
SI VOUS UTILISEZ UNE FORCE EXCESSIVE, VOUS RISQUEZ
DEL ET/OU L’ÉCRAN TACTILE.
• POUR ACHETER DES STYLETS ADDITIONNELS OU DE REMPLACEMENT, VISITEZ LE SITE INTERNET
DES ACCESSOIRES DE
FUJITSU À : WWW.SHOPFUJITSU.COM.
49 - TouchPad/Numériseur actif/Écran tactile
Cliquer sur l’écran numériseur actif
Pour cliquer du gauche, touchez l’objet que vous
voulez sélectionner, puis soulevez immédiatement
le bout du stylet.
Figure 27. Faire un clic droit sur
l’écran numériseur
Faire un clic droit sur l’écran numériseur
Figure 26. Cliquer sur l’écran numériseur actif
Pour faire un clic droit, maintenez le devant du
bouton du stylet enfoncé en tapotant sur l’écran.
Pour changer les paramètres pour la fonction de
clic à droite, allez à Démarrer -> Panneau de
configuration -> Paramètres d’entrée et du
stylet. Dans l’onglet des Options de stylet,
sélectionnez « Appuyer et maintenir »,
puis cliquez sur le bouton [Paramètres].
50 - TouchPad/Numériseur actif/Écran tactile
Double-cliquer
Pour double-cliquer, toucher l’élément deux fois,
puis retirez immédiatement le bout du stylet.
Figure 28. Faire un double clic sur l’écran
Glisser
Glisser signifie déplacer un élément avec le stylet en
touchant l’écran, puis en déplaçant et en soulevant le
stylet. Pour Glisser, touchez l’écran tactile avec votre
stylet sur l’élément que vous souhaitez déplacer. Tout
en continuant de toucher l’écran avec le stylet, glissez
l’élément vers son nouvel emplacement en déplaçant
le stylet à travers l’écran, puis en soulevant le stylet
pour le relâcher.
Figure 29. Faire glisser un objet sur l’écran
51- TouchPad/Numériseur actif/Écran tactile
Étalonner l’écran numériseur
Pour assurer une correspondance précise entre le curseur et le stylet, vous devez exécuter l’Utilitaire
d’étalonnage de l’écran tactile avant d’utiliser l’écran tactile pour la première fois. Faites de même
si vous avez modifié la résolution de l’écran et/ou l’orientation.
Pour exécuter l’utilitaire d’étalonnage sous Windows 7 :
1
2
3
4
Cliquez sur Démarrer -> Panneau de configuration.
Double-cliquez sur l’icône Paramètres PC Tablette, puis sélectionnez l’onglet Écran.
Cliquez sur le bouton [Étalonner].
Réglez l’écran de votre portable à un angle confortable, puis repérez le symbole (+) dans le coin supérieur
gauche de l’écran.
LORSQUE VOUS TAPOTEZ SUR L’ÉCRAN PENDANT L’ÉTALONNAGE, N’UTILISEZ PAS DE FORCE EXCESSIVE.
SI VOUS UTILISEZ UNE FORCE EXCESSIVE, VOUS RISQUEZ D’ENDOMMAGER L’ÉCRAN DEL ET/OU
L’ÉCRAN TACTILE.
5
En vous servant du stylet, touchez fermement l’écran directement sur le symbole (+). Soulevez le stylet de
l’écran et la cible se déplacera vers une position différente sur l’écran.
6
7
8
Répétez l’étape 5 jusqu’à ce que vous ayez sélectionné tous les symboles (+).
Une fois cette opération terminée, appuyez sur le bouton [OK].
Touchez le stylet sur plusieurs points de l’écran pour vérifier qu’il est bien étalonné. Si vous n’êtes pas satisfait
de l’étalonnage de l’écran, appuyez sur le bouton [Étalonner] pour recommencer.
52 - TouchPad/Numériseur actif/Écran tactile
Utilisation de l’écran tactile capacitif optionnel
Certaines configurations de ce PC Tablette comportent un numériseur double optionnel permettant
d’utiliser le stylet ou un doigt comme pointeur. Ce type d’écran permet également d’utiliser des
« mouvements » pour exécuter diverses opérations, notamment pour défiler, zoomer et pivoter.
• LA RECONNAISSANCE DES MOUVEMENTS EST ACTIVÉE SUIVANT L’APPLICATION UTILISÉE.
• LE STYLET EST PRIORITAIRE PAR RAPPORT À LA COMMUNICATION TACTILE. SI LE STYLET SE TROUVE
DANS LE RAYON D’ACTION DE L’ÉCRAN, LA COMMUNICATION TACTILE EST DÉSACTIVÉE.
• LORSQUE L’UTILISATEUR POSE UN DOIGT SUR L’ÉCRAN TACTILE, CE DERNIER RÉAGIT COMME SI LE STYLET
ÉTAIT UTILISÉ.
Faire un clic droit sur l’écran tactile
Pour exécuter un clic droit avec deux doigts, placez un doigt à l’endroit où vous désirez exécuter le clic
droit, puis tapotez rapidement une fois sur l’écran.
Mode mouvements
Pour activer le mode mouvements, deux doigts doivent toucher l’écran avec un intervalle de moins d’un
dixième de seconde. Si le deuxième doigt touche l’écran plus d’un dixième de seconde après le premier
doigt, le deuxième doigt est ignoré. Le mode mouvements est désactivé lorsque les deux doigts quittent
l’écran tactile. Si le système ne reconnaît pas un mouvement, aucune opération n’est exécutée. Dans ce
cas, retirez les deux doigts de l’écran et essayez de nouveau.
Mouvement de défilement
Si vous désirez faire défiler un document très long ou une grande page Web, placez vos deux doigts sur
l’écran tactile et déplacez-les parallèlement dans la même direction. Si un seul doigt est déplacé, l’écran
ne défile pas. Vous pouvez défiler horizontalement ou verticalement, selon la direction du mouvement.
Mouvement de zoom
Le mouvement de zoom est particulièrement utile pour voir des images. Pour faire un zoom avant, placez
deux doigts sur l’élément que vous désirez agrandir, puis écartez-les l’un de l’autre. Pour faire un zoom
arrière, placez deux doigts écartés sur l’élément que vous désirez réduire, puis rapprochez-les.
53 - TouchPad/Numériseur actif/Écran tactile
Mouvement de rotation
Si vous désirez faire pivoter un objet sur l’écran, placez deux doigts sur l’image que vous désirez faire
pivoter, puis déplacez-les en sens contraire, comme pour tourner une poignée. La direction du pivotement
de l’objet dépend de la direction du mouvement des doigts.
Installation du cordon
Pour éviter d’échapper ou de perdre votre stylo,
attachez-le à votre ordinateur à l’aide du cordon
fourni.
Pour attacher le cordon à votre PC Tablette, suivez
les étapes suivantes :
1
Attachez l’extrémité du cordon (petite boucle) à votre
stylet. Pour ce faire, enfilez la petite boucle à travers
le trou du stylo, puis faites passer l’autre extrémité du
cordon à travers la boucle.
2
Attachez la grande boucle du cordon au point
d’attache de votre ordinateur. Pour ce faire, enfilez
le bout du cordon (grande boucle) à travers le point
d’attache, puis faites passer le stylo à travers la
grande boucle.
54 - TouchPad/Numériseur actif/Écran tactile
Figure 30. Installation du cordon
Réglage du volume
Votre PC Tablette Fujitsu LifeBook est doté de plusieurs commandes de volume fonctionnant en interaction.
LES APPLICATIONS POUVANT REPRODUIRE DES FICHIERS AUDIO PROPOSENT ÉGALEMENT LEUR
PROPRE COMMANDE DE VOLUME (COMMANDE LOGICIELLE). SI VOUS INSTALLEZ UN PÉRIPHÉRIQUE
AUDIO EXTERNE DOTÉ D’UNE COMMANDE DE VOLUME INDÉPENDANTE, LA COMMANDE DE VOLUME
DE L’APPAREIL ET LA COMMANDE DE VOLUME LOGICIELLE FONCTIONNERONT EN INTERACTION.
VOUS DEVEZ TOUTEFOIS SAVOIR QUE SI VOUS COUPEZ LE VOLUME AVEC LA COMMANDE
LOGICIELLE, LA COMMANDE DE VOLUME EXTERNE SERA ÉGALEMENT DÉSACTIVÉE.
Réglage du volume
Le volume peut être réglé de plusieurs manières :
• Vous pouvez aussi ajuster et couper/remettre le volume avec l’icône de volume dans la zone
de notification.
• Le volume peut également être réglé avec les touches de fonction [F8] et [F9]. Si vous appuyez
plusieurs fois sur [F8] tout en maintenant la touche [Fn] enfoncée, vous réduirez le volume sonore
de votre système. Si vous appuyez plusieurs fois sur [F9] tout en maintenant la touche [Fn] enfoncée,
vous augmenterez le volume sonore de votre PC Tablette.
• Gardez la touche [Fn] enfoncée et appuyez sur la touche [F3] pour couper le son. Pour rétablir
le son, appuyez de nouveau sur [Fn+F3].
• Le volume peut aussi être réglé avec les commandes de volume proposées par diverses applications.
• Certains périphériques audio pouvant être connectés à votre système sont dotés de commandes
de volume.
Chaque commande de volume ci-dessus impose une limite supérieure s’appliquant aux autres commandes.
Nous vous recommandons d’essayer les différentes commandes pour découvrir le réglage vous convenant
le mieux.
55 - Réglage du volume
Baie modulaire
Bouton d’ouverture de la baie modulaire
Figure 31. Baie modulaire
Périphériques de baie modulaire
Votre PC Tablette Fujitsu LifeBook est doté d’une baie modulaire. Cette baie modulaire peut recevoir un
lecteur optique, une batterie au lithium, un disque dur secondaire modulaire ainsi qu’un réducteur de poids.
L’un des périphériques suivants a été installé dans votre baie modulaire.
• Graveur de DVD multiformat double couche : Ce lecteur vous permet de lire des films, des logiciels
et des DVD/CD audio, ainsi que d’enregistrer des DVD, des CD et des DVD-RAM.
• Batterie au lithium modulaire : cette batterie rechargeable peut être utilisée pour alimenter votre
PC Tablette LifeBook lorsque aucun adaptateur n’y est connecté.
• Disque dur modulaire : ce disque vous permet d’augmenter la capacité de stockage de votre PC Tablette.
• Volet réducteur de poids : ce volet permet de remplir la baie lorsque vous n’y insérez aucun
périphérique.
LA BAIE MODULAIRE NE DOIT JAMAIS ÊTRE VIDE LORSQUE L’ORDINATEUR EST EN MARCHE. SI VOUS LA
LAISSEZ VIDE, DE LA POUSSIÈRE ET DES CORPS ÉTRANGERS PEUVENT S’INFILTRER DANS L’ORDINATEUR.
56 - Périphériques de baie modulaire
Retirer et installer des périphériques modulaires
La baie modulaire permet d’installer des périphériques de deux façons :
• Remplacement à froid (hors tension) : installation ou remplacement d’un périphérique lorsque votre
PC Tablette est éteint.
• Remplacement à chaud (sous tension) : installation ou remplacement d’un périphérique lorsque
le système fonctionne, grâce à l’icône « Déconnecter/Éjecter en toute sécurité » de votre zone
de otification.
Remplacement hors tension
Pour installer un périphérique modulaire avec le système hors
tension, exécutez les opérations suivantes :
1
2
3
Fermez tous les fichiers ouverts.
4
Tout en tenant le loquet, retirez complètement le périphérique
de la baie. Vous devrez utiliser une force légère.
5
Insérez le périphérique que vous désirez installer
dans l’ordinateur jusqu’à ce qu’il s’enclenche.
6
Vous pouvez maintenant rallumer votre ordinateur
en toute sécurité.
7
Vous pourrez ensuite accéder au périphérique
et l’utiliser normalement.
Éteignez votre PC Tablette LifeBook.
Appuyez sur le loquet d’ouverture de la baie modulaire
conformément à la Figure 32.
Votre PC Tablette détectera automatiquement le nouveau
périphérique et l’activera lors du démarrage de votre système.
Une lettre de désignation du périphérique sera attribuée et
visible dans le Poste de travail et l’Explorateur Windows.
57 - Périphériques de baie modulaire
Bouton d’ouverture de la baie modulaire
Figure 32. Retrait/installation d’un
périphérique de baie modulaire
Remplacement sous tension
Pour remplacer un périphérique à chaud, employez l’utilitaire « Déconnecter ou éjecter un périphérique
en toute sécurité ». L’icône de cet utilitaire est disponible dans la zone de notification. Cliquez sur l’icône
et suivez les instructions s’affichant à l’écran.
58 - Périphériques de baie modulaire
Figure 33. Boutons Sécurité/PC Tablette du PC Tablette LifeBook Série T730
Boutons Sécurité/PC Tablette du LifeBook
Votre PC Tablette LifeBook Série T730 présente l’avantage unique d’avoir de nombreux boutons Sécurité
et PC Tablette. Ces boutons vous permettent de protéger votre ordinateur contre toute utilisation non
autorisée et de lancer des applications et actions spécifique au simple toucher d’un bouton.
Fonctions des boutons Sécurité
Si le système de sécurité est activé au démarrage de votre PC Tablette ou à partir du mode Sommeil, Veille
prolongée ou Hors tension, vous devrez entrer un mot de passe à l’aide des boutons de sécurité. Une fois
le mot de passe valide entré, le système reprend son fonctionnement.
Cinq boutons de sécurité/application tablette sont situés sur le côté inférieur droit de l’écran lorsqu’il est
configuré pour une utilisation en ordinateur portable classique.
59 - Boutons Sécurité/PC Tablette du LifeBook
Les cinq boutons sont utilisés pour l’activation des fonctions de sécurité. Quatre des boutons sont utilisés
pour entrer un mot de passe et le cinquième l’est en tant que bouton d’Entrée. Pour plus d’informations
sur chacun des boutons Sécurité, consultez Tableau 1.
Icône du bouton
État du système
Pré-démarrage ou reprise à partir
du mode Veille
Fonction du tableau de sécurité
Bouton de sécurité 1
Bouton de sécurité 2
Bouton de sécurité 3
Bouton de sécurité 4
Bouton de sécurité [Entrée]
Tableau 1. Fonctions des boutons du tableau de sécurité
Fonctions des boutons de pré-identification
Les cinq boutons peuvent tous être utilisés pour la phase d’identification préalable à l’ouverture d’une
session Windows (càd avant que l’écran d’identification Windows ne s’affiche). Quatre de ces boutons
ont une fonction secondaire. Pour plus d’informations sur les fonctions de pré-identification, consultez
Tableau 2.
<Tab>/<Shift><Tab>
Lorsque le système est en phase de pré-identification, la touche [Page suivante] agit comme la touche
de tabulation [Tab].
Si vous appuyez sur le bouton [Fn] tout en appuyant sur la touche [Page suivante] et en relâchant,
vous exécuterez la même action qu’avec la combinaison [Shift]+[Tab].
60 - Boutons Sécurité/PC Tablette du LifeBook
<Entrée>/<Échap>
Lorsque le système est en phase de pré-identification, la touche [Page précédente] agit comme
la touche [Entrée].
Icône de
bouton
État du système
Pré-démarrage
(écran d’identification
Windows affiché)
Fonctions PC Tablette
Fonctions secondaires
(Fn + Bouton)
<[Tab]>
<Shift><Tab>
<[Entrée]>
<[Échap]>
Faire tourner l’écran
Aucune
Sert à appeler la fonction
secondaire
Aucune
Combinaison
[Ctrl+Alt+Suppr]
Aucune
Tableau 2. Fonctions des boutons PC Tablette pendant la pré-identification
Si vous appuyez sur le bouton [Fn] tout en appuyant sur la touche [Page précédente] et en la relâchant,
vous exécuterez la même action qu’avec la combinaison [Échap].
Rotation d’écran
La fonction de rotation d’écran devrait normalement être utilisée seulement lorsque le système est
configuré en tablette. Lorsque vous souhaitez utiliser la tablette comme livre électronique, par exemple,
vous pourriez utiliser l’orientation verticale ; lorsque vous accédez aux feuilles de calculs ou quand vous
utilisez le système comme un portable, vous utiliseriez normalement l’orientation horizontale.
Lorsque le système est placé en configuration tablette, l’orientation change automatiquement au mode
vertical par défaut.
61- Boutons Sécurité/PC Tablette du LifeBook
L'ORIENTATION PAR DÉFAUT DE L'ÉCRAN PEUT ÊTRE CHANGÉE EN OUVRANT LE PANNEAU DE
CONFIGURATION, EN DOUBLE-CLIQUANT SUR L'ICÔNE COMMANDS DU PC TABLETTE FUJITSU, PUIS EN
SÉLECTIONNANT LES PARAMÈTRES VOULUS DANS LES PROPRIÉTÉS D'AFFICHAGE. APRÈS AVOIR
MODIFIÉ LES PARAMÈTRES, SAUVEGARDEZ-LES.
Si vous appuyez sur la touche [Rotation d’écran] lorsque le système est en pré-démarrage, l’orientation
de l’écran change de Verticale à Horizontale ou d’Horizontale à Verticale.
Bouton Fonction / Utilitaire du Menu Fujitsu
Le bouton [Fonction] s’utilise en conjonction avec les autres boutons d’application pour fournir des
fonctionnalités additionnelles. Référez-vous aux détails spécifiques plus haut.
Fonctions des boutons de post-identification
Les cinq boutons peuvent tous être utilisés une fois l’identification Windows effectuée. Quatre de ces
boutons ont une fonction secondaire. Pour plus d’informations sur les fonctions de post-identification,
consultez le Tableau 3.
Bouton [Page suivante / Application A]
Lorsque vous appuyez sur la touche [Page suivante] pendant que le système fonctionne, chaque pression
de la touche défilera l’écran vers le bas d’un écran. Cela vous permet de naviguer rapidement à travers de
larges documents.
Lorsque vous appuyez sur la touche [Fn] tout en appuyant et relâchant la touche [Page suivante/Application A],
vous démarrez automatiquement tout programme attibué à cette touche. L’application par défaut de ce
bouton est la Calculatrice. Si vous désirez sélectionner une application différente pour cette touche,
reportez-vous à « Modification des fonctions des boutons PC Tablette » en page 65.
62 - Boutons Sécurité/PC Tablette du LifeBook
Bouton [Page précédente / Application B]
Lorsque vous appuyez sur le bouton [Page précédente] pendant que le système fonctionne, chaque
pression du bouton fait défiler l’écran vers le haut d’un écran à la fois. Cela vous permet de naviguer
rapidement à travers de larges documents.
Lorsque vous appuyez sur la touche [Fn] tout en appuyant et relâchant la touche [Page précédente/
Application B], vous démarrez automatiquement tout programme attibué à cette touche. L’application
par défaut pour ce bouton est Journal MS. Reportez-vous à Voir « Modification des fonctions des boutons
PC Tablette » en page 65 pour attribuer une application différente à cette touche.
Icône du
bouton
État du système
Post-démarrage
(bureau Windows
affiché)
Fonctions PC
Tablette principales
Fonctions secondaires
(Fn + Bouton)
Page suivante
Application A définie
par l’utilisateur
(Par défaut = calculatrice)
Page précédente
Application B définie
par l’utilisateur
(Par défaut = Journal MS)
Rotation d’écran
Changement d’affichage :
1. ACL uniquement
2. CRT (rayons cathodiques)
uniquement
3. Affichage mixte
Utilisation de la fonction
secondaire
Utilitaire de menu Fujitsu
Combinaison
[Ctrl+Alt+Suppr]
Aucune
Tableau 3. Fonctions des boutons PC Tablette pendant la post-identification
63 - Boutons Sécurité/PC Tablette du LifeBook
Bouton Rotation de l’écran/Changement d’affichage
La fonction de rotation d’écran devrait normalement être utilisée seulement lorsque le système est
configuré en tablette. Lorsque vous souhaitez utiliser la tablette comme livre électronique, par exemple,
vous pourriez utiliser l’orientation verticale ; lorsque vous accédez aux feuilles de calculs ou quand vous
utilisez le système comme un portable, vous utiliseriez normalement l’orientation horizontale.
Lorsque le système est placé en configuration tablette, l’orientation change automatiquement au mode
vertical par défaut.
L'ORIENTATION PAR DÉFAUT DE L'ÉCRAN PEUT ÊTRE CHANGÉE EN OUVRANT LE PANNEAU DE
CONFIGURATION, EN DOUBLE-CLIQUANT SUR L'ICÔNE COMMANDS DU PC TABLETTE FUJITSU, PUIS EN
SÉLECTIONNANT LES PARAMÈTRES VOULUS DANS LES PROPRIÉTÉS D'AFFICHAGE. APRÈS AVOIR
MODIFIÉ LES PARAMÈTRES, SAUVEGARDEZ-LES.
Lorsque vous appuyez sur la touche [Rotation d’écran / Changement d’affichage], l’orientation de l’écran
du système change de Verticale à Horizontale ou d’Horizontale à Verticale.
Le fait d’appuyer sur la touche [Fn] puis d’appuyer sur le bouton [Rotation de l’écran] en gardant la
première enfoncée fera alterner l’affichage d’un mode à l’autre, comme suit : écran intégré seulement,
écran externe seulement, les deux.
Bouton Fonction / Utilitaire du Menu Fujitsu
Le bouton [Fonction] s’utilise en conjonction avec les autres boutons d’application pour fournir des
fonctionnalités additionnelles. Référez-vous aux détails spécifiques plus haut.
Appuyez deux fois sur le bouton [Fn] et vous verrez apparaître l’utilitaire de menus Fujitsu sur votre écran,
vous permettant de modifier certains paramètres du système.
Combinaison [Ctrl+Alt+Suppr]
Si vous appuyez sur le bouton [Ctrl-Alt-Del] pendant au moins 8 millisecondes, l’écran d’identification
ou le gestionnaire des tâches Windows apparaîtra.
64 - Boutons Sécurité/PC Tablette du LifeBook
Modification des fonctions des boutons PC Tablette
Les boutons Applications A et B peuvent être changés pour lancer un programme ou effectuer une tâche
que vous choisissez. Par défaut, le bouton Application A lance la Calculatrice et le bouton Application B,
le Journal MS.
Pour lancer différentes applications ou amener les boutons Applications A et B à effectuer une tâche
spécifique :
1
2
3
4
Dans le Panneau de configuration, cliquez sur l’icône « Paramètres des boutons tablette ».
5
Cliquez sur [OK], puis cliquez à nouveau sur [OK]. Les boutons effectueront maintenant les actions que vous
leur avez assignées.
Sélectionnez l’onglet Boutons tablette et, dans la liste, cliquez sur le bouton que vous souhaitez modifier.
Cliquez sur [Changer] et ouvrez la liste déroulante dans le champ Press :.
Sélectionnez l’action que vous voulez voir le bouton effectuer. Si vous voulez lancer un programme, cliquez sur
[Lancer une Application] puis naviguez vers l’emplacement du programme.
Configuration du tableau de sécurité LifeBook
Lorsque vous recevez votre PC Tablette LifeBook, l’application du tableau de sécurité est préinstallée,
mais sans aucun mot de passe défini. Les rubriques suivantes décrivent en détail le tableau de sécurité
et la façon de configurer, de changer ou de supprimer des mots de passe.
Boutons numérotés
Utilisez ces boutons pour entrer votre mot de passe.
Bouton Entrée
Après avoir entré les codes numérotés, appuyez sur ce bouton pour enregistrer le mot de passe dans
le PC Tablette.
65 - Boutons Sécurité/PC Tablette du LifeBook
Mots de passe
Des mots de passe d’utilisateur et de superviseur peuvent être définis sur l’ordinateur. Afin de faciliter la
gestion des systèmes, le mot de passe de superviseur est habituellement le même sur tous les PC Tablette
d’un groupe de travail, d’un bureau ou d’une entreprise. Toutefois, les ordinateurs individuels utilisés dans
un environnement de groupe ne devraient pas utiliser un mot de passe commun. Un mot de passe se compose
de une à cinq frappes de bouton, suivies du bouton Entrer. Une frappe valide peut faire intervenir un seul
bouton ou jusqu’à quatre boutons simultanément.
Voici des exemples de frappes valides :
• Bouton [4] enfoncé seul
• Boutons [2] et [3] enfoncés en même temps
• Boutons [1], [2] et [4] enfoncés en même temps
• Boutons [1], [2], [3] et [4] enfoncés en même temps
Voici maintenant des mots de passe valides. Les codes entre accolades ({ }) font intervenir plus d’un bouton.
• {[2]+[3]}, [1], [Entrée]
• [4], [Entrée]
• {[1]+[3]}, {[2]+[3]+[4]}, [1], [4], [2], [Entrée]
Définition des mots de passe
Lorsque le portable est expédié de l’usine, aucun mot de passe n’est défini. Vous avez le choix de le laisser
tel quel ou de définir un mot de passe de superviseur et d’utilisateur. Vous devez définir le mot de passe
de superviseur avant celui de l’utilisateur.
•
•
LE MOT DE PASSE DU SUPERVISEUR PERMET DE CONTOURNER LE MOT DE PASSE D’UTILISATEUR AU CAS OÙ
CE DERNIER SERAIT OUBLIÉ. UTILISÉ SEUL, LE MOT DE PASSE DE SUPERVISEUR NE VERROUILLE PAS LE SYSTÈME.
LES DEUX MOTS DE PASSE (SUPERVISEUR ET UTILISATEUR) DOIVENT ÊTRE DÉFINIS POUR QUE LE TABLEAU
DE SÉCURITÉ FONCTIONNE.
66 - Boutons Sécurité/PC Tablette du LifeBook
Définition du mot de passe de superviseur
Vous devez détenir un mot de passe de superviseur avant de paramétrer tout mot de passe d’utilisateur. Le
mot de passe de superviseur permet de contourner le mot de passe d’utilisateur.
1
2
3
4
Allez au menu Démarrer.
Cliquez sur Exécuter.
Entrez : C:\Program Files\Fujitsu\Security Panel Application\Supervisor\FJSECS.EXE, puis appuyez
sur [Entrée].
Suivez les instructions affichées à l’écran pour définir le mot de passe de superviseur.
Définition du mot de passe d’utilisateur
1
2
3
4
Allez au menu Démarrer.
Cliquez sur Tous les programmes.
Cliquez sur Application Tableau de sécurité -> Application Tableau de sécurité.
Suivez les instructions affichées à l’écran pour définir le mot de passe d’utilisateur.
VOUS POUVEZ CHANGER OU SUPPRIMER LE MOT DE PASSE DE SUPERVISEUR OU D’UTILISATEUR
EN RÉPÉTANT LES ÉTAPES PRÉCÉDENTES.
Utilisation de votre tableau de sécurité LifeBook
La fonction de verrouillage de sécurité est activée à la mise sous tension du système, de même qu’à sa
reprise depuis le mode Sommeil ou Veille prolongée. Il faut toujours utiliser les boutons du tableau de
sécurité pour entrer le mot de passe d’utilisateur. Votre système n’entamera la séquence d’amorçage
qu’après l’entrée du mot de passe de superviseur ou d’utilisateur.
67 - Boutons Sécurité/PC Tablette du LifeBook
Lorsque le système est hors tension
1
2
Mettez le système sous tension.
Lorsque le voyant de sécurité clignote, entrez le mot de passe puis appuyez sur le bouton [Entrée]
(par exemple : si le mot de passe est 22222, appuyez d’abord cinq fois sur le bouton 2, puis sur le
bouton [Entrée]. Le PC Tablette démarrera normalement.
Lorsque le système est en mode Sommeil ou Veille prolongée
1 Appuyez sur le commutateur veille/reprise.
2 Lorsque le voyant de sécurité clignote, entrez le mot de passe, puis appuyez sur le bouton [Entrée] ;
l’ordinateur doit alors reprendre son fonctionnement normal.
Entrée d’un mot de passe incorrect
Après trois échecs successifs de saisie d’un mot de passe de superviseur ou d’utilisateur, le système
émet des bips pendant environ une minute. Si le mot de passe entré durant cet intervalle (pendant les bips)
est valide, le signal sonore s’arrête et le PC Tablette reprend son fonctionnement normal. Si aucun mot
de passe n’est saisi, ou si un mot de passe incorrect est à nouveau saisi, le système retourne à son état
précédent (mode Sommeil ou Hors tension) et le voyant de sécurité s’éteint. Pour réactiver le portable
après un échec de la saisie du mot de passe, vous devez appuyer sur le commutateur veille/reprise, puis
saisir un mot de passe valide.
68 - Boutons Sécurité/PC Tablette du LifeBook
N’OUBLIEZ PAS LE MOT DE PASSE D’UTILISATEUR DÉFINI DANS L’APPLICATION TABLEAU DE SÉCURITÉ.
SINON, VOUS NE POURREZ PLUS UTILISER L’ORDINATEUR. LE MOT DE PASSE DE SUPERVISEUR PERMET
TOUTEFOIS DE CONTOURNER LE MOT DE PASSE D’UTILISATEUR.
Mises en garde
Ouverture et fermeture du couvercle de l’écran
Par défaut, le fait de fermer le couvercle met automatiquement votre système en mode Sommeil.
Pour changer le mode par défaut lorsque le couvercle est fermé :
1
Ouvrez le Panneau de configuration, sélectionnez Options d'alimentation. (Dans Windows XP : Cliquez sur
l’onglet Avancés).
2
3
Dans le panneau de gauche, cliquez sur Choisir ce que fait la fermeture du couvercle.
Sélectionnez l'action désirée pour Lorsque je ferme le couvercle, puis cliquez sur le bouton [Sauvegarder les
changements] ou [Appliquer] (selon le système d'exploitation).
Fonctionnement avec une batterie faible
Si la batterie de votre PC Tablette est faible, le fait d’enfoncer le commutateur veille/reprise active
simplement le voyant de sécurité. Votre portable ne se déverrouille pas et le voyant de sécurité s’éteint
après une minute. Pour revenir au fonctionnement normal, branchez d’abord une source d’alimentation à
l’ordinateur. Vous pouvez alors le déverrouiller.
Désinstallation/réinstallation de l’application de sécurité
Deux méthodes peuvent être utilisées pour désinstaller l’application Tableau de sécurité :
• Supprimez les mots de passe et désinstaller l’application. Cette méthode désactive toutes les
fonctions de sécurité.
• Désinstaller l’application Tableau de sécurité avec le mot de passe toujours actif. Si cette option
est choisie, plus aucune modification du mot de passe ne sera possible.
69 - Boutons Sécurité/PC Tablette du LifeBook
Désinstallation de l’application Tableau de sécurité
Cette opération est utile lorsque l’utilisateur ne veut aucune protection par mot de passe et ne veut donner
à personne l’utilitaire de définition de mot de passe sur son ordinateur. Dans ce cas, si des mots de passe
(superviseur, utilisateur ou les deux) sont définis, les mots de passe doivent être effacés AVANT de supprimer
l’application. Pour effacer les mots de passe, suivez la même procédure qu’à la section « DÉFINITION
DES MOTS DE PASSE », mais sélectionnez cette fois l’option Supprimer ; ensuite, entrez le mot de passe
actuel, puis cliquez sur le bouton Suivant. Cliquez sur Oui à la demande de confirmation.
Suppression de l’application Tableau de sécurité avec des mots de passe encore actifs
L’utilisation de cette fonction ne permettra aucune modification du mot de passe.
LA SUPPRESSION DES APPLICATIONS NE SUPPRIME PAS LE MOT DE PASSE. LA DÉSINSTALLATION DE
L’APPLICATION NE SUPPRIME PAS LE MOT DE PASSE, MAIS SIMPLEMENT LA CAPACITÉ DE MODIFIER,
D’AJOUTER ET DE SUPPRIMER DES MOTS DE PASSE. POUR CHANGER VOTRE MOT DE PASSE, VOUS
DEVREZ RÉINSTALLER L’APPLICATION.
Utilisateur :
1
2
3
4
Cliquez sur Démarrer -> Panneau de configuration.
Dans le panneau de configuration, ouvrez Programmes et fonctions.
Dans la liste, sélectionnez Tableau de sécurité / Utilisateur, puis cliquez sur Désinstaller/Modifier.
Lorsque la boîte « Contrôle du compte utilisateur » apparaît, cliquez sur Continuer.
Superviseur :
1
2
3
4
Cliquez sur Démarrer -> Panneau de configuration.
Dans le Panneau de configuration, cliquez sur Ajouter ou supprimer des propriétés de programme.
Dans la liste, sélectionnez Tableau de sécurité / Superviseur, puis cliquez sur Désinstaller/Modifier.
Lorsque la boîte « Contrôle du compte utilisateur » apparaît, cliquez sur Continuer.
70 - Boutons Sécurité/PC Tablette du LifeBook
Réinstallation du tableau de sécurité
La réinstallation de l’application de sécurité du superviseur ou de l’utilisateur exige le disque de pilotes
et d’applications. Le dossier Utilitaire/Application Tableau de sécurité contient deux dossiers distincts :
Superviseur et Utilisateur. Les fichiers de configuration des applications de sécurité du superviseur et de
l’utilisateur y sont placés.
1
Sur le disque, ouvrez le dossier Utilitaires/Application Tableau de sécurité/Superviseur, puis double-cliquez
sur le fichier setup.exe. La fenêtre d’installation de l’application Tableau de sécurité s’affiche. Suivez les directives
fournies à l’écran.
2
Sur le disque, ouvrez le dossier Utilitaires/Application Tableau de sécurité/Utilisateur, puis double-cliquez
sur le fichier setup.exe. La fenêtre d’installation de l’application Tableau de sécurité s’affiche. Suivez les
directives fournies à l’écran.
Les mots de passe de superviseur et d’utilisateur peuvent être configurés par l’intermédiaire de Windows
dans les fichiers FJSECS.exe et FJSECU.exe, respectivement. Le programme FJSECU.exe pour le mot
de passe de l’utilisateur ne peut pas être exécuté si le mot de passe du superviseur n’est pas défini. Il vous
faut exécuter FJSECS.exe en premier pour configurer le mot de passe du superviseur. Suivez les directives
fournies sous « Définition des mots de passe » page 66.
Si vous oubliez les deux mots de passe, veuillez communiquer avec le service à la clientèle et de soutien
de Fujitsu America au 1-800-8FUJITSU (1-800-838-5487). La société Fujitsu America exige des frais de
service pour le déverrouillage d’un PC Tablette protégé par mot de passe. Au moment d’appeler, veuillez
avoir sous la main une carte de crédit valide et une preuve de propriété. On vous indiquera ensuite où
expédier votre ordinateur.
71- Boutons Sécurité/PC Tablette du LifeBook
Chapitre 2
Première mise en marche de votre
ordinateur portable LifeBook
Sources d’alimentation
Votre PC Tablette LifeBook Fujitsu peut utiliser trois sources d’alimentation différentes :
une batterie au lithium principale, un adaptateur secteur et un adaptateur auto/avion.
Connexion des adaptateurs d’alimentation
L’adaptateur secteur ou l’adaptateur auto/avion optionnel permet de faire fonctionner votre PC Tablette
et de charger les batteries.
Connexion de l’adaptateur secteur
1 Branchez le câble de sortie c.c. dans la prise d’alimentation c.c. de votre ordinateur.
2 Branchez l’adaptateur secteur sur une prise électrique secteur (c.a.).
Connexion de l’adaptateur auto/avion disponible en option
1 Branchez le câble de sortie c.c. sur la prise d’alimentation c.c. de votre ordinateur.
2 Branchez l’adaptateur auto/avion dans l’allume-cigare d’une automobile, ou
3 Branchez l’adaptateur auto/avion sur la prise d’alimentation c.c. de votre siège d’avion.
72 - Sources d’alimentation
Adaptateur secteur
Prise d’alimentation c.c.
Figure 34. Connexion de l’adaptateur secteur
Passer d’une alimentation sur adaptateur secteur ou auto/avion à une alimentation sur batterie
1
2
Assurez-vous qu’au moins une batterie chargée est installée dans votre ordinateur.
Débranchez l’adaptateur secteur ou l’adaptateur auto/avion.
LORSQUE VOUS RECEVEZ VOTRE NOUVEL ORDINATEUR, LA BATTERIE AU LITHIUM N’EST PAS CHARGÉE.
LORS DE LA PREMIÈRE UTILISATION DE VOTRE ORDINATEUR, VOUS DEVEZ CONNECTER L’ADAPTATEUR
SECTEUR OU L’ADAPTATEUR AUTO/AVION.
73 - Sources d’alimentation
Démarrage de votre PC Tablette LifeBook
Mise sous tension
Commutateur d’alimentation/veille/reprise
Lorsque votre PC Tablette LifeBook est éteint, le commutateur d’alimentation/veille/reprise permet de
l’allumer. Pour allumer votre ordinateur, vous devez avoir connecté votre adaptateur secteur ou disposer
d’une batterie au lithium chargée.
LORSQUE VOUS ALLUMEZ VOTRE ORDINATEUR PORTABLE, ASSUREZ-VOUS D’AVOIR UNE SOURCE
D’ALIMENTATION. VOUS DEVEZ DONC AVOIR AU MOINS UNE BATTERIE INSTALLÉE ET CHARGÉE OU
AVOIR BRANCHÉ L’ADAPTATEUR SECTEUR OU L’ADAPTATEUR AUTO/AVION À UNE PRISE SOUS TENSION.
Pour allumer l’ordinateur LifeBook lorsqu’il est complètement éteint, appuyez sur le commutateur
d’alimentation/ veille/reprise situé en haut à droite du clavier. Lorsque vous avez terminé d’utiliser votre
ordinateur, vous pouvez soit le mettre en mode veille (sommeil), soit l’éteindre complètement. Voir
« Mode sommeil » en page 81 et « Mise hors tension » en page 84.
Figure 35. Commutateur d’alimentation/veille/reprise
74 - Démarrage de votre PC Tablette LifeBook
LORSQUE LE LIFEBOOK EST ALLUMÉ, NE LE TRANSPORTEZ PAS ET PROTÉGEZ-LE DES CHOCS
ET DES VIBRATIONS CAR VOUS RISQUERIEZ ALORS DE L’ENDOMMAGER.
Lorsque vous allumez votre ordinateur LifeBook, ce dernier exécute un auto-test de mise sous tension
pour vérifier les composants internes et la configuration. Si une anomalie est découverte, votre système
émet un avertissement audio et/ou affiche un message d’erreur. Voir « Messages de l’auto-diagnostic de mise sous tension
» en page 125. Selon la nature du problème, vous pourrez poursuivre le démarrage du système d’exploitation
ou vous devrez ouvrir l’utilitaire de configuration du BIOS pour corriger certains paramètres.
Une fois les diagnostics terminés, le PC Tablette LifeBook charge le système d’exploitation.
VOUS NE DEVEZ JAMAIS ÉTEINDRE VOTRE ORDINATEUR PORTABLE DURANT L’AUTO-TEST DE MISE SOUS
TENSION. AUTREMENT, LA PROCHAINE FOIS QUE VOUS ALLUMEREZ L’ORDINATEUR, CE DERNIER AFFICHERA
UN MESSAGE D’ERREUR. Voir « Messages de l’auto-diagnostic de mise sous tension » en page 125.
Procédure d’amorçage
La procédure de démarrage de l’ordinateur invoque une procédure d’amorçage qui fait d’abord appel au
BIOS. La première fois que l’ordinateur LifeBook est allumé, la mémoire principale du système est vide
et doit trouver les instructions de démarrage de l’ordinateur. Ces informations se trouvent dans le programme
BIOS. Chaque fois que vous démarrez ou redémarrez votre ordinateur, il exécute une procédure d’amorçage
et l’écran affiche le logo Fujitsu jusqu’à ce que le système d’exploitation soit chargé. Durant l’amorçage,
votre système exécute une procédure d’amorçage standard y compris un auto-test de mise sous tension.
Si la procédure d’amorçage est exécutée sans échec et sans demande d’accès à l’utilitaire de configuration
du BIOS, le message de bienvenue du système d’exploitation s’affiche.
75 - Démarrage de votre PC Tablette LifeBook
La procédure d’amorçage est exécutée lorsque :
• Vous allumez votre PC Tablette LifeBook.
• Vous redémarrez le LifeBook à partir de la boîte de dialogue d’arrêt de Windows.
• Un logiciel lance un redémarrage du système. Exemple : Lorsque vous installez une nouvelle
application.
Mots de passe d’accès au disque dur
Pour mieux sécuriser vos données, vous pouvez créer des mots de passe contrôlant l’accès au(x) disque(s)
dur(s). Cette fonction est gérée par l’utilitaire de configuration BIOS. Pour savoir comment procéder,
reportez-vous à la section Utilitaire de configuration du BIOS ci-après.
RETENEZ BIEN VOS MOTS DE PASSE. SI VOUS CONFIGUREZ DES MOTS DE PASSE DE MAÎTRE
ET D’UTILISATEUR, PUIS QUE VOUS LES OUBLIEZ, FUJITSU NE POURRA PAS RÉINITIALISER VOTRE
SYSTÈME. VOUS RISQUERIEZ ALORS DE PERDRE DES DONNÉES ET DE DEVOIR REMPLACER VOTRE
CARTE SYSTÈME OU VOTRE DISQUE DUR.
Utilitaire de configuration du BIOS
L’utilitaire de configuration du BIOS est un programme qui définit l’environnement de fonctionnement
de votre PC Tablette LifeBook. Votre BIOS a été configuré en usine pour des conditions d’utilisation
normales. Vous ne devriez donc pas avoir à configurer ni à modifier votre environnement BIOS pour
utiliser l’ordinateur.
L’utilitaire de configuration du BIOS permet de configurer :
• Les paramètres de commande des périphériques, notamment les adresses d’entrée-sortie et les
lecteurs de démarrage.
• Les paramètres de sécurité des données du système, ce qui comprend notamment les mots de passe.
76 - Démarrage de votre PC Tablette LifeBook
Accès à l’utilitaire de configuration du BIOS
Pour accéder à l’utilitaire de configuration, procédez de la manière suivante (ou servez-vous du menu
TrustedCore tel que décrit à la section suivante) :
1
2
3
Allumez ou redémarrez votre PC Tablette LifeBook.
Pour accéder à l’utilitaire, appuyez sur la touche [F2] lorsque le logo Fujitsu apparaît à l’écran. Le menu principal
de l’utilitaire de configuration du BIOS s’affichera avec les paramètres courants.
Avec la [TOUCHE FLÉCHÉE À DROITE] ou la [TOUCHE FLÉCHÉE À GAUCHE], parcourez les autres menus
de configuration et vérifiez/modifiez les paramètres actuels.
Utilisation du menu TrustedCore
Lorsque le logo Fujitsu apparaît à l’écran, appuyez sur la touche [Entrée] ou cliquez avec le bouton gauche
de la souris ou du pavé tactile TouchPad. Le menu TrustedCore s affichera.
Ce menu fournit des raccourcis vers les menus et écrans d’informations suivants :
• Configuration du BIOS
• Écran de diagnostic
• Menu de la procédure d’amorçage
• Informations relatives aux brevets
• Informations sur le système
• Poursuivre la procédure d’amorçage
Lorsque vous cliquez sur l’un des choix du menu, le système affiche les renseignements demandés ou exécute
l’action correspondante.
Vous pouvez aussi invoquer le menu de la procédure d’amorçage en appuyant sur la touche [F12] lorsque
le logo Fujitsu apparaît à l’écran.
77 - Démarrage de votre PC Tablette LifeBook
Guide d’information sur le BIOS
Un guide d’information sur le BIOS de votre ordinateur portable est disponible en ligne.
Pour y accéder, veuillez visiter notre site de service à la clientèle et d’assistance à
http://www.computers.us.fujitsu.com/support : sous Online Support (Soutien en ligne),
sélectionnez User’s Guides (Guides d’utilisation). Sélectionnez votre produit, sa série et son modèle,
puis cliquez sur [Go]. Sous l’onglet Manuals (Manuels), sélectionnez BIOS Guide (Guide du BIOS).
Démarrage du système
Il est fortement recommandé de ne pas installer de périphérique externe avant que la procédure de démarrage
ne soit entièrement terminée.
La première fois que vous allumez votre PC Tablette LifeBook, l’écran affiche le logo Fujitsu. Si vous
n’intervenez pas, l’ordinateur charge le système d’exploitation et lance la procédure d’ouverture Windows.
Premier démarrage de Windows
LORS DE VOTRE PREMIÈRE INITIALISATION DU SYSTÈME SOUS WINDOWS, L’ÉCRAN SERA VIDE
CELA EST NORMAL. APRÈS L’INITIALISATION, UNE BOÎTE DE
DIALOGUE « CONFIGURATION DE WINDOWS » APPARAÎT.
PENDANT ENVIRON DEUX MINUTES.
IMPORTANT : PENDANT LA PROCÉDURE DE CONFIGURATION, NE DÉBRANCHEZ PAS LE CORDON
D’ALIMENTATION, N’APPUYEZ SUR AUCUN BOUTON ET N’UTILISEZ AUCUN PÉRIPHÉRIQUE TEL QUE
LA SOURIS, LE CLAVIER OU UNE TÉLÉCOMMANDE.
Pour profiter au maximum de votre système d’exploitation Windows, il vous est suggéré de l’enregistrer
lors de sa première utilisation.
1
Premièrement, vous devrez lire et accepter les contrats de licence d’utilisation.
• SI VOUS REFUSEZ D’ACCEPTER LE CONTRAT DE LICENCE, LE SYSTÈME VOUS DEMANDE DE REVOIR
LE CONTRAT DE LICENCE ET D’Y LIRE LES INFORMATIONS TRAITANT DU RETOUR DE
À SON FABRICANT, OU DE SIMPLEMENT ÉTEINDRE LE
PC TABLETTE LIFEBOOK.
WINDOWS
• VOUS NE POURREZ L’UTILISER QUE SI VOUS ACCEPTEZ LE CONTRAT DE LICENCE. SI VOUS N’ALLEZ
PAS AU BOUT DE CETTE PROCÉDURE, VOTRE
PC TABLETTE RETOURNE À L’ÉCRAN DE BIENVENUE
WINDOWS, MÊME SI VOUS ESSAYEZ DE L’ÉTEINDRE ET DE LE REDÉMARRER.
78 - Démarrage de votre PC Tablette LifeBook
2
Vous serez invité à entrer votre nom d’utilisateur et votre mot de passe, puis vous pourrez choisir une icône
pour votre compte.
3
4
L’écran suivant demande de fournir un nom d’ordinateur et vous permet de choisir un environnement de bureau.
Vous verrez ensuite un écran « Aider à protéger automatiquement Windows » dans lequel le choix par défaut
est « Utiliser les paramètres recommandés ». Les deux autres choix sont : « Installer uniquement des mises à
jour importantes » et « Demandez-moi plus tard ». Sélectionnez parmi les trois choix.
5
6
Réglez vos paramètres d’heure et de date sur l’écran suivant.
7
L'écran « Merci » suit et une offre gratuite de Norton Internet Security est proposée. Plusieurs écrans se
suivent pendant que Windows vérifie la performance du système.
8
Windows démarre alors pour la première fois. Conformément aux indications ci-dessus, lors de votre première
initialisation du système, l’écran sera vide pendant environ deux minutes. Cela est normal. Durant cette
période, ne débranchez pas le cordon d’alimentation, n’appuyez sur aucun bouton et n’utilisez aucun
périphérique tel que la souris, le clavier ou une télécommande.
Vous verrez ensuite l’écran « Sélectionnez l’emplacement actuel de votre ordinateur ». Choisissez parmi
Domicile, Travail (par défaut) et Lieu public.
Enregistrement de votre système d’exploitation Windows chez Microsoft
1
Après le premier démarrage de Windows, le Centre d’accueil du panneau de configuration apparaît. Si vous
ne voyez pas l’icône Enregistrer Windows en ligne dans la fenêtre, cliquez sur « Afficher les xx éléments »
(où « xx » est le nombre de sujets disponibles dans le Centre d’accueil).
2
Cliquez sur [Enregistrer Windows en ligne] et suivez les instructions qui apparaissent pour enregistrer votre
copie de Windows.
Enregistrement de votre PC Tablette LifeBook chez Fujitsu
Pour enregistrer votre ordinateur LifeBook, vous pouvez aller sur notre site Internet :
http://solutions.us.fujitsu.com/. Pour vous enregistrer en ligne, vous devez avoir
un compte valide auprès d’un fournisseur d’accès Internet.
79 - Démarrage de votre PC Tablette LifeBook
Installation de ClickMe!
ClickMe!
AVANT D’INSTALLER L’UTILITAIRE CLICK ME!, VÉRIFIEZ SI LE COMMUTATEUR DE RÉSEAU SANS FIL EST
À LA POSITION DE MARCHE.
Lors du premier démarrage de votre ordinateur, vous verrez une fenêtre « Paramètres principaux de
l’ordinateur ». Cette fenêtre explique les installations qui seront effectuées par l’utilitaire Click Me! Si
vous cliquez sur [Exécuter], Click Me! commencera à s’installer. Après avoir cliqué sur le bouton, si une
fenêtre « Contrôle de compte d’utilisateur » apparaît, il faudra donner votre permission pour continuer.
Cliquez sur [Continuer] pour poursuivre. Si vous annulez cette opération, l’icône Click Me! apparaîtra
sur votre bureau pour une installation future.
IL EXISTE PEUT-ÊTRE DES APPLICATIONS FOURNIES PAR D’AUTRES FABRICANTS QUI NE SONT
CLICK ME! POUR OBTENIR DAVANTAGE DE RENSEIGNEMENTS,
REPORTEZ-VOUS AU GUIDE D’INTRODUCTION.
PAS INSTALLÉES PAR L’UTILITAIRE
Utilitaire de mise à jour des pilotes Fujitsu Driver Update
Votre système dispose d’un outil pratique appelé Utilitaire de Mise à jour des pilotes Fujitsu (FDU ou Fujitsu
Driver Update). Avec FDU, vous pouvez choisir d’aller automatiquement ou manuellement sur le site de
Fujitsu pour obtenir les mises à jour récentes de votre système. Pour obtenir davantage de renseignements
concernant l’utilitaire FDU, reportez-vous à « Téléchargement automatique des mises à jour de pilotes »
en page 134.
80 - Démarrage de votre PC Tablette LifeBook
Gestion de l’alimentation
Votre PC Tablette Fujitsu LifeBook possède plusieurs dispositifs permettant d’économiser l’énergie des
batteries. Certains d’entre eux sont automatiques et ne nécessitent donc aucune intervention. Cependant,
d’autres dépendent de paramètres que vous pouvez configurer en fonction de vos conditions d’utilisation,
notamment en ce qui concerne la luminosité de l’écran. Les paramètres de gestion interne de l’alimentation
peuvent être configurés dans votre système d’exploitation, dans une application intégrée de gestion de
l’alimentation ou dans l’utilitaire de configuration du BIOS.
Outre les dispositifs précédents de conservation de l’énergie de la batterie, d’autres moyens sont à votre
disposition pour éviter l’épuisement trop rapide de votre batterie. Par exemple, vous pouvez créer un profil
de conservation de l’énergie approprié, mettre votre ordinateur en mode sommeil lorsqu’il n’exécute aucune
opération et vous pouvez limiter l’utilisation des périphériques consommant beaucoup d’énergie. À l’instar
de tous les ordinateurs portables alimentés par batterie, vous devez trouver le meilleur compromis entre
performance et rendement énergétique.
Commutateur d’alimentation/veille/reprise
Lorsque votre PC Tablette est allumé, vous pouvez utiliser le commutateur veille/reprise pour placer
manuellement votre système en mode veille. Assurez-vous alors que l’ordinateur n’est pas en train d’accéder
à des données, puis enfoncez et relâchez immédiatement le commutateur d’alimentation/veille/reprise.
Pour « réveiller » l’ordinateur lorsqu’il est en mode sommeil, appuyez de nouveau sur le commutateur veille/reprise.
Pour savoir si l’ordinateur est en mode veille, regardez le voyant lumineux d’alimentation. Si le voyant est
allumé sans clignoter, l’ordinateur est entièrement fonctionnel. Si le voyant est allumé et qu’il clignote,
l’ordinateur est en mode sommeil. Si le voyant est éteint, l’ordinateur est éteint ou en veille prolongée.
Mode sommeil
Lorsque le mode sommeil est activé, Windows conserve le contenu de votre mémoire de système durant
la période d’inactivité en maintenant l’alimentation de certains composants critiques. Ce mode éteint l’unité
centrale, l’écran, le disque dur et tous les autres composants internes sauf ceux qui sont nécessaires pour
conserver la mémoire du système et permettre son redémarrage.
81- Gestion de l’alimentation
Votre PC Tablette peut être mis en sommeil de plusieurs façons :
• En appuyant sur le commutateur d’alimentation/veille/reprise (si l’ordinateur est allumé).
• En sélectionnant « Sommeil » après avoir cliqué sur le bouton [Démarrer] puis en cliquant
sur la petite flèche située en bas à droite de la fenêtre.
• Lorsque le délai d’inactivité est atteint.
• En laissant la charge de la batterie descendre au niveau Avertissement de batterie faible.
Dans ces situations, la mémoire de système de l’ordinateur enregistre généralement le fichier sur lequel vous
travaillez, des informations sur les applications ouvertes et d’autres données nécessaires aux opérations en
cours. Lorsque vous quittez le mode veille, l’ordinateur retournera à l’état où vous l’avez laissé. Pour reprendre
l’utilisation de l’ordinateur, vous devez employer le commutateur d’alimentation/veille/reprise et vous
devez disposer d’une source d’alimentation valide.
•
•
•
SI L’ORDINATEUR UTILISE L’ALIMENTATION PAR BATTERIE, N’OUBLIEZ PAS QUE LA BATTERIE CONTINUE À SE
DÉCHARGER MÊME EN MODE VEILLE, MAIS PLUS LENTEMENT QU’EN MODE DE FONCTIONNEMENT NORMAL.
SI VOUS DÉSACTIVEZ LE COMMUTATEUR D’ALIMENTATION/VEILLE/REPRISE, VOUS NE POURREZ PLUS L’UTILISER
POUR METTRE L’ORDINATEUR EN MODE SOMMEIL OU EN VEILLE PROLONGÉE (ENREGISTREMENT SUR
LE DISQUE). LA FONCTION DE REPRISE DU BOUTON NE PEUT PAS ÊTRE DÉSACTIVÉE.
IL EST POSSIBLE QU’AVEC CERTAINES CARTES EXPRESSCARD, VOUS NE PUISSIEZ PAS PLACER L’ORDINATEUR EN
MODE SOMMEIL OU EN VEILLE PROLONGÉE (« ENREGISTREMENT SUR LE DISQUE »). POUR DE PLUS AMPLES
INFORMATIONS, CONSULTEZ LA DOCUMENTATION DE VOTRE CARTE EXPRESSCARD. LORSQUE DES CARTES
EXPRESSCARD OU DES PÉRIPHÉRIQUES EXTERNES SONT UTILISÉS, L’ORDINATEUR NE PEUT RETROUVER
EXACTEMENT SON ÉTAT ANTÉRIEUR APRÈS AVOIR ÉTÉ EN VEILLE PROLONGÉE CAR TOUS LES PÉRIPHÉRIQUES
•
•
EXTERNES SONT RÉINITIALISÉS DURANT LA PROCÉDURE DE REPRISE DE L’ORDINATEUR.
SI VOTRE ORDINATEUR ACCÈDE ACTIVEMENT À DES INFORMATIONS AU MOMENT OÙ VOUS LE METTEZ EN MODE SOMMEIL
OU EN MODE VEILLE PROLONGÉE, LES MODIFICATIONS AUX FICHIERS OUVERTS NE SERONT PAS PERDUES. LORSQUE
VOUS ACTIVEZ LE MODE SOMMEIL, LES FICHIERS SONT LAISSÉS OUVERTS ET LA MÉMOIRE DEMEURE ACTIVE. SI VOUS
CHOISISSEZ LE MODE VEILLE PROLONGÉE, LA MÉMOIRE EST TRANSFÉRÉE SUR LE DISQUE DUR INTERNE.
LE PRINCIPAL AVANTAGE DU MODE VEILLE PROLONGÉE EST QU’AUCUNE ÉNERGIE N’EST NÉCESSAIRE POUR
CONSERVER VOS DONNÉES. CET AVANTAGE EST PARTICULIÈREMENT IMPORTANT SI VOUS COMPTEZ LAISSER
VOTRE ORDINATEUR EN VEILLE PENDANT DE LONGUES PÉRIODES. LES PRINCIPAUX INCONVÉNIENTS DE LA
VEILLE PROLONGÉE SONT UNE PLUS LONGUE DURÉE DES PROCÉDURES DE MISE EN VEILLE ET DE REPRISE,
AINSI QUE LA RÉINITIALISATION DES PÉRIPHÉRIQUES.
82 - Gestion de l’alimentation
Mode veille prolongée (enregistrement sur le disque)
Le mode de veille prolongée enregistre le contenu de la mémoire du système sur le disque dur du PC Tablette.
Cette fonction peut être activée et désactivée.
Activation et désactivation de la fonction de veille prolongée
Dans la configuration par défaut, cette fonction n’est pas activée. Pour activer ou désactiver la fonction
de veille prolongée, exécutez les opérations suivantes :
1
2
Dans le menu Démarrer, ouvrez le panneau de configuration et cliquez sur l’icône Options d’alimentation.
Puis sélectionnez « Choisir ce que fait le bouton d’alimentation » ou « Choisir ce que fait la fermeture du
couvercle », puis faites votre sélection (Ne rien faire, Sommeil, Veille prolongée ou Arrêter).
Gestion de l’alimentation dans Windows
L’icône des options d’alimentation disponible dans le Panneau de configuration Windows vous permet de
configurer certains paramètres de gestion de l’alimentation. Par exemple, vous pouvez utiliser les Options
d’alimentation pour régler les valeurs de temporisation (délai d’inactivité) afin d’éteindre l’écran et les
disques durs selon que l’ordinateur est alimenté par batterie ou par l’un des adaptateurs.
Redémarrage du système
Si votre système est allumé et que vous désirez le redémarrer, vous devez exécuter les opérations
suivantes :
1
Cliquez sur le bouton [Démarrer], puis positionnez le curseur sur la petite flèche située en bas à droite
du panneau de droite.
2
Dans la liste, sélectionnez Redémarrer.
SI VOUS ARRÊTEZ VOTRE ORDINATEUR SANS FERMER WINDOWS OU SI VOUS L’ALLUMEZ MOINS
DE 10 SECONDES APRÈS L’AVOIR ARRÊTÉ, VOUS RISQUEZ DE PROVOQUER UNE ERREUR LORS
DU PROCHAIN DÉMARRAGE DU SYSTÈME.
83 - Gestion de l’alimentation
Mise hors tension
Avant de mettre l’ordinateur hors tension, assurez-vous que le voyant d’accès au disque dur/lecteur
optique est éteint. Si vous arrêtez l’ordinateur alors qu’un disque est en cours d’utilisation, vous risquez
de perdre des données. Pour vous assurer que l’ordinateur s’arrête sans erreur, utilisez la procédure d’arrêt
Windows.
AVANT DE COUPER L’ALIMENTATION ÉLECTRIQUE, N’OUBLIEZ PAS DE FERMER TOUS LES FICHIERS,
DE QUITTER TOUTES LES APPLICATIONS ET D’ARRÊTER VOTRE SYSTÈME D’EXPLOITATION. SI DES
FICHIERS SONT OUVERTS LORSQUE VOUS COUPEZ L’ALIMENTATION, VOUS PERDREZ TOUTES LES
MODIFICATIONS N’AYANT PAS ÉTÉ ENREGISTRÉES ET VOUS RISQUEZ DE CAUSER DES ERREURS DE
DISQUE.
Si vous arrêtez votre système depuis Windows, vous permettez à l’ordinateur LifeBook de terminer les
opérations en cours, vous lui permettez aussi d’exécuter les opérations de mise hors tension dans le bon
ordre et vous évitez les risques d’erreur. La procédure appropriée est la suivante :
1
Cliquez sur le bouton [Démarrer], puis positionnez le curseur sur la petite flèche située en bas à droite du
panneau de droite.
2
Dans la liste, sélectionnez [Arrêter].
Si vous comptez entreposer votre PC Tablette pendant un mois ou plus, consultez la section Entretien.
Conformité ENERGY STAR®
Votre système Fujitsu est un ordinateur mobile homologué par ENERGY STAR®. En
choisissant un ordinateur doté de la dernière technologie d’économie de l’énergie, vous
contribuez à préserver notre environnement pour les générations futures.
Le programme ENERGY STAR a été mis en place conjointement par l’U.S. Environmental
Protection Agency (Agence de protection de l’environnement américaine), l’U.S. Department of
Energy (Département de l’énergie américain), Ressources naturelles Canada, ainsi que d’autres
gouvernements dans le monde. Grâce aux pratiques et aux produits éco-efficients que ce
programme préconise, il est possible de faire des économies et de protéger l’environnement.
84 - Gestion de l’alimentation
Dans un contexte où les coûts énergétiques et le réchauffement climatique sont parmi les premières
préoccupations des consommateurs, Fujitsu s’engage à proposer des solutions pour les aider à préserver
l’énergie et à améliorer la qualité de notre environnement.
Mode sommeil :
Vous remarquerez que d’après la configuration initiale de votre ordinateur, l’écran s’éteint après 15 minutes
d’inactivité, et que l’ordinateur lui-même entre en mode sommeil après 20 minutes d’inactivité. Lorsque
l’ordinateur entre en mode sommeil, il réduit la vitesse de fonctionnement de toute l’interface de réseau
Ethernet. Pour « réveiller » l’ordinateur et le faire sortir du mode sommeil, appuyez sur le commutateur
de veille/reprise.
Avantages liés à l’économie d’énergie :
Les ordinateurs portables Fujitsu homologués par ENERGY STAR utilisent environ deux fois moins
d’électricité qu’un matériel standard, ce qui permet de diviser la facture d’électricité par deux. Mais ce n’est
pas tout, en effet, ENERGY STAR fait également la différence en termes de protection de l’environnement.
Saviez-vous qu’un ménage moyen peut émettre deux fois plus de gaz à effet de serre qu’une voiture ordinaire ?
Cela s’explique ainsi : lorsque vous manipulez l’interrupteur d’une lampe, que vous faites marcher votre
lave-vaisselle ou que vous mettez en route votre PC, vous utilisez de l’énergie, et cela entraîne un surcroît
d’émissions de gaz à effet de serre par les centrales électriques. Donc, plus nous économisons l’énergie
grâce à l’éco-efficience, plus nous contribuons à diminuer les gaz à effet de serre et les risques de
réchauffement climatique.
Pour de plus amples informations sur cet important programme ENERGY STAR, visitez :
www.energystar.gov.
Pour en apprendre plus sur la façon dont Fujitsu soutient la Gestion durable et d’autres activités
de protection de l’environnement, visitez la page Internet de Fujitsu Corporate Citizenship à :
http://www.computers.us.fujitsu.com/www/content/aboutus/environmental/environment.php
85 - Gestion de l’alimentation
Chapitre 3
Options installables par l’utilisateur
Batterie au lithium
Votre PC Tablette possède une batterie au lithium qui en permet le fonctionnement lorsque vous n’avez
pas accès à une source d’alimentation externe. Cette batterie est robuste et durable, mais elle ne doit pas
être exposée à des températures extrêmes, à des tensions élevées, à des produits chimiques ou à d’autres
situations dangereuses.
Si la batterie au lithium est utilisée dans les conditions suivantes, son autonomie peut en être réduite :
• Utilisée à des températures en deçà de 5°C ou au-delà de 35°C (41°F à 95°F). Les températures extrêmes
ne diminuent pas seulement l’efficacité du chargement, elles risquent également de provoquer la
détérioration de la batterie. Si vous tentez de charger une batterie sous une température ambiante
dépassant les seuils de tolérance, vous voyez clignoter l’icône de charge en cours sur le tableau de
voyants d’état.
• Lorsque vous vous servez d’un dispositif à courant élevé tel qu’un modem, un lecteur optique
externe ou un disque dur, l’utilisation de l’adaptateur secteur vous permettra de conserver la durée
de vie de la batterie.
NE LAISSEZ JAMAIS UNE BATTERIE DÉFECTUEUSE DANS PC TABLETTE. ELLE POURRAIT ENDOMMAGER
L’ADAPTATEUR SECTEUR, L’ADAPTATEUR AUTO/AVION DISPONIBLE EN OPTION, LA DEUXIÈME BATTERIE
SI VOUS EN POSSÉDEZ UNE OU L’ORDINATEUR LUI-MÊME. UNE BATTERIE ENDOMMAGÉE PEUT
ÉGALEMENT NUIRE AU FONCTIONNEMENT DE L’ORDINATEUR EN UTILISANT TOUT LE COURANT
DISPONIBLE.
86 - Batterie au lithium
• L’AUTONOMIE RÉELLE DE LA BATTERIE PEUT VARIER SELON LA LUMINOSITÉ DE L’ÉCRAN, SELON LES
APPLICATIONS, LES FONCTIONS ET LES PARAMÈTRES DE GESTION DE L’ALIMENTATION QUE VOUS UTILISEZ,
SELON L’ÉTAT DE LA BATTERIE ET SELON D’AUTRES PRÉFÉRENCES QUE VOUS POUVEZ CONFIGURER.
L’UTILISATION DU LECTEUR OPTIQUE OU DU DISQUE DUR PEUT ÉGALEMENT AVOIR UN IMPACT SIGNIFICATIF
EN OUTRE, LA CAPACITÉ DE CHARGE DE LA BATTERIE DIMINUE
AVEC L’USAGE. SI VOTRE BATTERIE PERD RAPIDEMENT SA CHARGE, REMPLACEZ-LA PAR UNE NEUVE.
SUR LA DURÉE DE VIE DE LA BATTERIE.
• IL EST POSSIBLE QUE DES LOIS FÉDÉRALES, PROVINCIALES OU LOCALES INTERDISENT DE JETER DES
BATTERIES DANS LES DÉCHETS DOMESTIQUES. CONTRIBUEZ À LA PROTECTION DE L’ENVIRONNEMENT ET
JETEZ VOS BATTERIES USÉES CONFORMÉMENT AUX LOIS EN VIGUEUR.
POUR OBTENIR DES INFORMATIONS
SUR LE RECYCLAGE ET LA MISE AUX REBUTS DES VIEILLES BATTERIES, CONSULTEZ LES AUTORITÉS
LOCALES OU PROVINCIALES COMPÉTENTES.
SI VOUS N’ARRIVEZ PAS À TROUVER CES INFORMATIONS,
1-800-8FUJITSU (1-800-838-5487).
CONTACTEZ UN PRÉPOSÉ DU SERVICE À LA CLIENTÈLE AU
Procédure de recharge des batteries
Pour connaître le niveau de charge de votre batterie au lithium principale, vérifiez le voyant de batterie
dans le tableau de voyants d’état. Ce voyant change selon le niveau de charge de la batterie.
La batterie au lithium peut être rechargée avec l’adaptateur secteur ou avec l’adaptateur auto/avion. Pour
recharger une batterie, assurez-vous qu’elle est bien installée dans le PC Tablette LifeBook et connectez
l’adaptateur secteur ou l’adaptateur auto/avion.
ASSUREZ-VOUS QUE LE VOYANT DE BATTERIE EN CHARGE SUR LE TABLEAU DE VOYANTS D’ÉTAT
INDIQUE BIEN LE NIVEAU DE CHARGE EN COURS.
Puisque les batteries au lithium n’ont aucun effet de mémoire, il n’est pas nécessaire de décharger
complètement votre batterie avant de la recharger. La durée de charge sera nettement plus longue si vous
utilisez le PC Tablette pendant que la batterie se charge. Si vous désirez charger la batterie le plus rapidement
possible, placez votre ordinateur en mode sommeil ou éteignez-le pendant que la batterie se charge. (Pour
de plus amples informations sur le mode sommeil et la procédure d’arrêt, reportez-vous à Gestion de
l’alimentation en page 81).
87 - Batterie au lithium
SI VOUS UTILISEZ DES PÉRIPHÉRIQUES À FORTE CONSOMMATION D’ÉNERGIE OU SI VOUS ACCÉDEZ
FRÉQUEMMENT AU LECTEUR OPTIQUE EXTERNE, LA BATTERIE RISQUE DE NE PAS SE CHARGER
COMPLÈTEMENT.
Batterie faible
Lorsque la batterie est faible, le système affiche un avis de batterie faible. Si vous ne prêtez pas attention
à cet avis de batterie faible, la batterie continuera à se décharger jusqu’à ce qu’elle ne puisse plus faire
fonctionner le système. Lorsque cela se produit, l’ordinateur se place en mode sommeil. Dans un tel cas,
rien ne garantit que toutes vos données seront sauvegardées.
LORSQUE L’AVIS DE BATTERIE FAIBLE APPARAÎT, VOUS DEVEZ ENREGISTRER TOUTES VOS DONNÉES
ACTIVES ET PLACER VOTRE ORDINATEUR LIFEBOOK EN MODE SOMMEIL JUSQU’À CE QUE VOUS PUISSIEZ
DISPOSER D’UNE AUTRE SOURCE D’ALIMENTATION. VOUS DEVEZ CONNECTER LE PLUS RAPIDEMENT
POSSIBLE UNE BATTERIE CHARGÉE, UN ADAPTATEUR SECTEUR OU UN ADAPTATEUR AUTO/AVION.
LORSQUE L’ORDINATEUR EST EN MODE SOMMEIL, IL DOIT TOUJOURS DISPOSER D’UNE BONNE SOURCE
D’ALIMENTATION. SI VOUS RETIREZ TOUTES LES SOURCES D’ALIMENTATION ALORS QUE L’ORDINATEUR
EST EN MODE SOMMEIL, TOUTES LES DONNÉES N’AYANT PAS ÉTÉ SAUVEGARDÉES SONT PERDUES.
Si l’ordinateur se place en mode « veille car batterie épuisée », le voyant d’état apparaît comme si l’ordinateur
était en mode sommeil normal. Lorsque l’ordinateur est en mode Veille de batterie épuisée, il est impossible
d’en reprendre l’utilisation avant d’avoir connecté une source d’alimentation valide provenant d’un adaptateur
ou d’une batterie chargée. Lorsque vous avez connecté une alimentation valide, vous devez ensuite appuyer
sur le commutateur d’alimentation/veille/reprise pour reprendre l’utilisation de l’ordinateur.
Lorsque l’ordinateur est en mode veille de batterie épuisée, vos données peuvent être sauvegardées pendant
une certaine période, mais si vous ne connectez pas rapidement une source d’alimentation valide, le voyant
d’alimentation cesse de clignoter et s’éteint. Vous avez alors perdu toutes les données n’ayant pas été
enregistrées. Dès que vous fournissez une source d’alimentation, vous pouvez poursuivre l’utilisation
du PC Tablette pendant que la batterie se recharge.
88 - Batterie au lithium
Batterie court-circuitée
Le tableau de voyants d’état comprend un voyant de charge indiquant le niveau de charge disponible de
la batterie. Si ce voyant affiche une DEL rouge clignotante, cela signifie que la batterie est endommagée :
elle doit donc être remplacée pour éviter qu’elle ne nuise à d’autres composants de votre ordinateur.
Remplacement de la batterie
Si vous achetez une batterie supplémentaire de rechange, vous pourrez remplacer la batterie principale
si elle vient à se décharger complètement. Deux méthodes s’offrent à vous pour remplacer votre batterie :
le remplacement hors tension et le remplacement sous tension.
Remplacement hors tension
Pour remplacer la batterie alors que le système est hors tension, exécutez les opérations suivantes
(figure 36) :
1
2
3
4
5
Trouvez une batterie chargée, prête à l’installation.
Arrêtez l’ordinateur et débranchez l’adaptateur secteur.
Poussez les loquets du compartiment de batterie l’un vers l’autre et faites glisser la batterie à l’extérieur.
Insérez une nouvelle batterie et appuyez jusqu’à ce que vous sentiez l’enclenchement des loquets.
Branchez l’adaptateur secteur et allumez l’ordinateur.
Remplacement sous tension
Pour remplacer la batterie alors que le système est sous tension, exécutez les opérations suivantes :
AVANT D’ENLEVER LA BATTERIE, ASSUREZ-VOUS QUE L’ADAPTATEUR SECTEUR EST BIEN CONNECTÉ.
L’ORDINATEUR NE DISPOSE D’AUCUNE BATTERIE TEMPORAIRE POUR FAIRE FONCTIONNER LE SYSTÈME
DURANT LE REMPLACEMENT DE LA BATTERIE. SI VOUS N’UTILISEZ PAS L’ADAPTATEUR SECTEUR, VOUS
PERDREZ TOUTES LES DONNÉES NON ENREGISTRÉES.
1
Branchez l’adaptateur secteur sur votre ordinateur, puis sur une prise électrique sous tension.
89 - Batterie au lithium
Batterie
Loquets de dégagement du compartiment de la batterie
Figure 36. Retrait de la batterie
2
Suivez les étapes 3 à 5 de la section « Remplacement hors tension ».
SI LE CONNECTEUR DE LA BATTERIE AU LITHIUM N’EST PAS BIEN ENFONCÉ, VOUS RISQUEZ DE NE PAS
POUVOIR UTILISER L’ORDINATEUR OU RECHARGER LA BATTERIE.
90 - Batterie au lithium
Fente pour carte Memory Stick/SD
Carte SD
Carte Memory Stick
Figure 37. Installation d’une carte Memory Stick ou SD
Cartes mémoire Memory Stick/SD
Votre PC Tablette LifeBook peut accueillir des cartes Memory Stick et Secure Digital (SD) sur lesquelles
vous pouvez stocker et transférer des données vers et à partir de divers dispositifs numériques. Ces cartes
utilisent une architecture de mémoire flash, ce qui veut dire que vous n’avez pas besoin d’une source
d’énergie pour conserver les données.
Les cartes Memory Stick permettent l’enregistrement, le transfert et le partage de contenus numériques,
tels que photos, films, sons, voix, données et applications.
Les cartes Secure Digital (SD) sont très similaires aux cartes Memory Stick. Comme les Memory Stick,
les cartes SD permettent de stocker des informations et de les transférer sur des appareils très variés :
téléphones cellulaires, navigateurs GPS, appareils photo numériques, assistants numériques, etc. Les
cartes SD transfèrent les données rapidement et sollicitent très peu la batterie. Tout comme la carte
Memory Stick, la carte SD utilise l’architecture de mémoire flash.
91- Cartes mémoire Memory Stick/SD
Installation d’une carte Memory Stick ou SD
Les cartes MemoryStick et SD s’installent dans le lecteur de carte prévu à cet effet. Pour installer une carte
Memory Stick ou SD, procédez comme suit :
L’INSERTION OU LE RETRAIT D’UNE CARTE PENDANT QUE LE PC TABLETTE LIFEBOOK EST EN COURS
DE DÉMARRAGE OU D’ARRÊT PEUT ENDOMMAGER LA CARTE OU L’ORDINATEUR.
N’INSÉREZ PAS DE CARTE DANS LA FENTE S’IL Y A DE L’EAU OU TOUTE AUTRE SUBSTANCE SUR LA
PC TABLETTE
OU LES DEUX.
CARTE, CAR VOUS POURRIEZ ENDOMMAGER DE FAÇON PERMANENTE LA CARTE, VOTRE
1
Le guide d’utilisation de la carte mémoire vous indiquera comment l’installer. Certaines cartes pourraient
nécessiter que votre ordinateur soit éteint pendant que vous les insérez.
2
Avant d’insérer votre carte, assurez-vous qu’aucune autre carte n’est déjà installée dans la fente. Si une carte
s’y trouve, reportez-vous à la rubrique Retrait d’une carte Memory Stick ou SD.
3
4
Enfoncez la carte dans la fente, étiquette vers le haut.
Poussez fermement la carte dans la fente jusqu’à ce qu’elle soit logée dans le connecteur.
Retrait d’une carte Memory Stick/SD
Pour retirer une carte Memory Stick ou SD, procédez comme suit :
LE GUIDE D’UTILISATION DE LA CARTE MÉMOIRE VOUS INDIQUERA COMMENT LA RETIRER. CERTAINES
PC TABLETTE SOIT EN MODE SOMMEIL OU QU’IL SOIT
ÉTEINT PENDANT QUE VOUS LES RETIREZ.
CARTES POURRAIENT NÉCESSITER QUE VOTRE
1
Dans la zone de notification, cliquez sur l’icône « Retirer le périphérique en toute sécurité ». Dans la liste,
mettez la carte en surbrillance, puis cliquez sur Stop.
2
Appuyez sur la carte Memory Stick ou SD pour la déverrouiller. La carte s’éjecte ensuite de la fente pour que
vous puissiez la retirer.
92 - Cartes mémoire Memory Stick/SD
Bouton d’éjection de carte ExpressCard
Carte ExpressCard (54 mm)
Carte ExpressCard (34 mm)
Fente pour carte ExpressCard
Figure 38. Installation/retrait d’une carte ExpressCard
Cartes ExpressCard
Votre ordinateur LifeBook accepte les cartes ExpressCardTM, lesquelles peuvent exécuter de nombreuses
fonctions différentes selon le type de carte que vous installez.
Il existe deux largeurs différentes de cartes ExpressCard : 34 mm et 54 mm. Le connecteur à l’intérieur de
la fente est situé sur le côté gauche de la fente. Si vous insérez une carte de 34 mm, assurez-vous de
l’aligner avec le côté gauche de la fente.
Pour plus d’informations, référez-vous aux instructions fournies avec votre(vos) carte(s).
Installation d’une carte ExpressCard
Les cartes ExpressCard sont à insérer dans la fente prévue à cet effet, située sur le côté gauche de
l’ordinateur.
• L’INSTALLATION OU LE RETRAIT D’UNE CARTE EXPRESSCARD PENDANT LE DÉMARRAGE OU L’ARRÊT
DE L’ORDINATEUR PORTABLE PEUT ENDOMMAGER LA CARTE ET/OU L’ORDINATEUR.
• N’INSÉREZ PAS UNE CARTE EXPRESSCARD DANS LA FENTE S’IL Y A DE L’EAU OU TOUTE AUTRE
SUBSTANCE SUR LA CARTE, CAR VOUS POURRIEZ ENDOMMAGER DE FAÇON PERMANENTE LA CARTE,
VOTRE ORDINATEUR OU LES DEUX.
93 - Cartes ExpressCard
IL EST POSSIBLE QUE VOUS DEVIEZ OUVRIR UNE SESSION EN TANT QU’ADMINISTRATEUR OU MEMBRE DU
GROUPE DE L’ADMINISTRATEUR AFIN D’EXÉCUTER CETTE PROCÉDURE. SI L’ORDINATEUR EST CONNECTÉ
À UN RÉSEAU, LES PARAMÈTRES DE POLITIQUE DU RÉSEAU POURRAIENT ÉGALEMENT VOUS EMPÊCHER
DE COMPLÉTER CETTE PROCÉDURE.
Le guide d’utilisation de votre carte ExpressCard vous indiquera comment l’installer. Certaines cartes
pourraient nécessiter que votre portable soit éteint pendant que vous les installez.
Pour installer une carte ExpressCard, suivez les étapes ci-après (voir la figure 38) :
1
Avant d’insérer votre carte, assurez-vous qu’aucune autre carte n’est déjà installée dans la fente. Si c’est le cas,
consultez la rubrique Retrait d’une carte ExpressCard.
2
3
Si la touche d’éjection est sortie, enfoncez-la jusqu’au déclic.
4
Poussez fermement la carte dans la fente jusqu’à ce qu’elle soit logée dans le connecteur.
Enfoncez la carte ExpressCard dans la fente, étiquette vers le haut. Si vous insérez une carte de 34 mm,
alignez-la avec le côté gauche de la fente.
Retrait d’une carte ExpressCard
Le guide d’utilisation de votre carte ExpressCard vous indiquera comment la retirer. Certaines cartes
pourraient nécessiter que votre ordinateur portable LifeBook soit en mode sommeil ou qu’il soit éteint
pendant que vous les retirez.
• POUR RETIRER LES PÉRIPHÉRIQUES, UTILISEZ L’ICÔNE « RETIRER UN PÉRIPHÉRIQUE EN TOUTE
SÉCURITÉ
» DANS LA ZONE DE NOTIFICATION EN BAS À DROITE DE L’ÉCRAN.
• SI LA BOÎTE DE DIALOGUE INDIQUE QUE LE DISPOSITIF NE PEUT PAS ÊTRE RETIRÉ, VOUS DEVEZ ALORS
SAUVEGARDER TOUS VOS FICHIERS OUVERTS, FERMER TOUTES LES APPLICATIONS OUVERTES ET
ÉTEINDRE VOTRE ORDINATEUR.
Pour retirer une carte ExpressCard, exécutez les opérations suivantes :
1
Déverrouillez la carte en appuyant sur la touche d’éjection située à droite de la fente dans laquelle la carte se
trouve. Après avoir été enfoncé, le bouton d’éjection sort automatiquement.
2
Appuyez fermement sur la touche une fois encore jusqu’à ce qu’elle soit alignée avec le boîtier de l’ordinateur
portable. Cela permettra d’éjecter légèrement la carte hors de la fente, afin que vous puissiez la retirer.
94 - Cartes ExpressCard
Module de mémoire additionnelle
Votre PC Tablette Fujitsu LifeBook est fourni avec une mémoire dynamique synchrone à haute vitesse et à
double débit de 1 Go (SDRAM DDR3-1066), installée en usine. Pour augmenter la capacité mémoire de votre
PC Tablette, vous pouvez installer un module (barrette) d’extension mémoire. La mémoire additionnelle doit
être un module SDRAM (DIMM) à double rangée de connexions. Pour vous assurer d’avoir une compatibilité
à 100 %, achetez le module SDRAM uniquement auprès de la boutique virtuelle Fujitsu à l’adresse suivante :
www.shopfujitsu.com.
• N’ENLEVEZ AUCUNE VIS DU COMPARTIMENT DU MODULE DE MÉMOIRE ADDITIONNELLE À L’EXCEPTION
DE CELLES SPÉCIFIQUEMENT INDIQUÉES DANS LES DIRECTIVES D’INSTALLATION ET DE RETRAIT
CORRESPONDANTES.
• LE MODULE DE MÉMOIRE ADDITIONNELLE PEUT ÊTRE FORTEMENT ENDOMMAGÉ PAR UNE DÉCHARGE
ÉLECTROSTATIQUE
SUIVANTES
:
(DES). POUR MINIMISER CE RISQUE, VEUILLEZ PRENDRE LES PRÉCAUTIONS
• AVANT DE MANIPULER UN MODULE DE MÉMOIRE, TOUCHEZ UN OBJET MÉTALLIQUE MIS À LA
TERRE POUR DÉCHARGER L’ÉLECTRICITÉ STATIQUE QUI S’EST ACCUMULÉE DANS VOTRE CORPS.
• LORSQUE VOUS INSTALLEZ OU RETIREZ UN MODULE DE MÉMOIRE, TENEZ-LE PAR LE BORD DE FAÇON
À NE TOUCHER AUCUN CONTACT NI AUCUNE PUCE. ASSUREZ-VOUS DE NE TOUCHER AUCUNE BORNE
DE CONNEXION NI AUCUN COMPOSANT INTERNE DE L’ORDINATEUR.
LA PEAU DÉGAGE UNE
SUBSTANCE HUILEUSE QUI POURRAIT CAUSER UN COURT-CIRCUIT AUX COMPOSANTS.
• ASSUREZ-VOUS DE METTRE VOTRE SYSTÈME HORS TENSION AVANT D’AJOUTER OU DE RETIRER
DES MODULES DE MÉMOIRE.
MÊME SI LE SYSTÈME EST EN SOMMEIL OU EN VEILLE PROLONGÉE,
DES DONNÉES RISQUENT D’ÊTRE PERDUES ET LA MÉMOIRE POURRAIT ÊTRE ENDOMMAGÉE SI LE
COURANT QUI ALIMENTE LE SYSTÈME N’EST PAS COUPÉ.
Installation des modules de mémoire additionnelle
1
Coupez le courant de votre ordinateur et débranchez l’adaptateur d’alimentation (adaptateur secteur ou adaptateur
auto/avion), le cas échéant. Retirez la batterie.
2
3
4
Assurez-vous que tous les couvercles du connecteur sont fermés.
Tournez l’ordinateur portable à l’envers et retirez la vis du compartiment du module de mémoire additionnelle.
Faites glisser le couvercle en direction du compartiment de batterie, soulevez-le puis retirez-le. (Figure 39).
95 - Module de mémoire additionnelle
5
6
Retirez le module de mémoire additionnelle de sa gaine protectrice antistatique.
Alignez le module de mémoire additionnelle avec la pièce vers le haut. Alignez le bord du connecteur du module
avec la fente du connecteur dans le compartiment. (Figure 40).
Clé de serrage
Figure 39. Ouverture du compartiment
de mémoire
Figure 40. Installation d’un second
module de mémoire
7
Insérez le module de mémoire additionnelle en oblique, à 45°. Poussez fermement le bord du connecteur du
module vers le bas et appuyez sur le connecteur jusqu’à ce qu’il se loge sous la clé de serrage. Vous entendrez
un clic lorsque celui-ci sera bien en place.
8
Replacez le couvercle et les vis.
LE MODULE DE MÉMOIRE ADDITIONNELLE N’EST PAS UN ÉLÉMENT QUE VOUS RETIREZ DE VOTRE
ORDINATEUR DE FAÇON ROUTINIÈRE. APRÈS L’INSTALLATION, VOUS POUVEZ LE LAISSER EN PLACE
JUSQU’À CE QUE VOUS DÉCIDIEZ DE CHANGER LA CAPACITÉ DE MÉMOIRE DU SYSTÈME.
96 - Module de mémoire additionnelle
Retrait d’un module de mémoire additionnelle
1
2
3
4
Exécutez les étapes 1 à 4 de la section « Installation d’un module de mémoire additionnelle ».
Tirez les attaches latérales en les orientant vers les côtés pour les éloigner du module.
En maintenant les ergots écartés, retirez la barrette en la tirant vers l’extérieur de l’ordinateur.
Rangez le module de mémoire additionnelle dans une gaine protectrice antistatique.
Replacez le couvercle et les vis.
Vérification de la capacité de mémoire
Lorsque vous avez changé la capacité de mémoire du système en remplaçant le module installé par un
module plus puissant, assurez-vous que votre ordinateur a reconnu le changement.
• Si vous êtes en mode « Panneau de configuration par catégories », vous pouvez vérifier la capacité
de mémoire en cliquant sur [Démarrer] - Panneau de configuration - Système et sécurité - Système
- Consulter la capacité de RAM et la vitesse du processeur.
• Si vous êtes en mode d'affichage classique, vous pouvez vérifier la capacité en cliquant sur
Démarrer - Panneau de configuration - Système.
Il peut y avoir un écart entre la capacité de mémoire installée et celle qui est affichée. Cette situation peut
découler du fait que votre système est configuré avec un contrôleur vidéo Intel Graphics Media Accelerator
intégré qui alloue la mémoire système de manière dynamique afin d’accélérer les performances graphiques.
SI LA MÉMOIRE TOTALE AFFICHÉE EST INCORRECTE, VÉRIFIEZ SI LE MODULE DE MÉMOIRE
ADDITIONNELLE EST BIEN INSTALLÉ. SI LE MODULE EST BIEN INSTALLÉ MAIS QUE LA CAPACITÉ N’EST
TOUJOURS PAS BIEN RECONNUE, CONSULTEZ LA SECTION DÉPANNAGE EN PAGE 110.
97 - Module de mémoire additionnelle
Plateau du lecteur multimédia
Ouverture d’urgence du plateau
Touche d’éjection du lecteur multimédia
Figure 41. Lecteur optique
Lecteur optique
Plusieurs types de supports peuvent être utilisés avec le graveur de DVD multiformat, également connu
sous le nom de « lecteur optique ».
Les disques DVD-R et DVD-RW ont une capacité de 4,7 Go (jusqu’à 8,5 Go pour les DVD-R utilisés avec
le graveur de DVD multiformat double couche). On ne peut graver qu’une seule fois un DVD-R alors
qu’on peut graver à maintes reprises les DVD-RW. Les disques DVD-R et les disques DVD-RW peuvent
être lus sur la plupart des lecteurs de DVD. Les disques CD-R et CD-RW peuvent contenir jusqu’à 700 Mo
de données. Un disque CD-R ne peut être gravé qu’une seule fois, alors que les disques CD-RW peuvent
être gravés à maintes reprises.
Votre système est doté du lecteur optique suivant :
Graveur de DVD multiformat double couche : Ce lecteur vous permet d’accéder à des films, logiciels
et DVD/CD audio, ainsi que de lire et d’écrire sur des disques CD-R, CD-RW, DVD-R, DVD+R, DVDRW, DVD+RW et DVD-RAM. L’architecture double couche permet d’enregistrer jusqu’à 8,5 Go sur les
disques DVD+R.
98 - Lecteur optique
Logiciels du lecteur multimédia
Grâce au graveur de DVD multiformat double couche et aux logiciels du lecteur multimédia, vous pouvez
écoutez des films DVD et des CD de musique sur votre ordinateur. Le lecteur multimédia inclut des
commandes vous permettant de profiter au maximum des fonctions d’un film DVD, ainsi que des fonctions
standard telles que l’avance rapide, marche arrière rapide, pause, etc. Grâce à ce lecteur vous pouvez
également graver des disques DVD-R/RW, DVD+R/RW ou CD-R/RW.
•
•
NE FAITES FONCTIONNER VOTRE LECTEUR OPTIQUE QUE SI VOTRE ORDINATEUR PORTABLE
LIFEBOOK SE TROUVE SUR UNE SURFACE PLATE. L’UTILISATION D’UN LECTEUR LORSQUE LE
SYSTÈME N’EST PAS À NIVEAU RISQUE D’ENDOMMAGER LE LECTEUR OU D’EMPÊCHER SON
FONCTIONNEMENT APPROPRIÉ.
UNE UTILISATION PROLONGÉE D’UN LECTEUR OPTIQUE (NOTAMMENT POUR VOIR UN FILM DVD)
RÉDUIRA CONSIDÉRABLEMENT LA LONGÉVITÉ DE VOTRE BATTERIE, À MOINS QUE VOUS N’UTILISIEZ
UNE SOURCE D’ÉNERGIE EXTERNE.
Installation d’un disque dans votre lecteur
Pour installer un disque dans votre lecteur optique :
1
Appuyez et relâchez la touche d’éjection située à l’avant du lecteur optique afin d’ouvrir le plateau de chargement.
Le plateau sortira légèrement du portable LifeBook.
2
Tirez doucement le plateau de chargement jusqu’à ce qu’un disque puisse y être déposé facilement
99 -
• VISITEZ RÉGULIÈREMENT LE SITE WEB DE FUJITSU À L’ADRESSE US.FUJITSU.COM/COMPUTERS POUR
OBTENIR LES MISES À JOUR DE PILOTES LES PLUS RÉCENTES.
• TOUS LES LECTEURS DE DVD LIFEBOOK SONT COMPATIBLES AVEC LES TITRES DE DVD DONT LE
NUMÉRO DE RÉGION EST
1, CORRESPONDANT AU MARCHÉ NORD-AMÉRICAIN. LE NUMÉRO DE RÉGION
EST UN CODE DE RESTRICTION RÉGIONAL DÉFINI PAR LE FORUM DES DVD QUI AGIT SELON LES
HOLLYWOOD. DIFFÉRENTS CODES RÉGIONAUX SONT ENREGISTRÉS SUR LES TITRES
SI LE CODE
RÉGIONAL DU LECTEUR DE DVD NE CORRESPOND PAS AUX CODES RÉGIONAUX DES TITRES, LA
LECTURE EST IMPOSSIBLE.
EXIGENCES DE
DE DVD VIDÉO POUR PUBLICATION DANS DIFFÉRENTES RÉGIONS À TRAVERS LE MONDE.
• VOUS POUVEZ CHANGER LE CODE RÉGIONAL DU LECTEUR DE DVD EN UTILISANT LE MENU
PROPRIÉTÉS DU LOGICIEL DE DVD. TOUTEFOIS, VEUILLEZ PRENDRE NOTE QUE VOUS NE POUVEZ
CHANGER LE CODE RÉGIONAL QUE QUATRE FOIS. APRÈS LE QUATRIÈME CHANGEMENT, LE DERNIER
CODE RÉGIONAL ENTRÉ DEVIENT PERMANENT ET NE PEUT PLUS ÊTRE CHANGÉ.
3
Placez le disque dans le plateau de chargement, l’étiquette vers le haut, avec l’orifice au milieu du disque.
Enfoncez le disque dans le cercle surélevé situé au centre du plateau.
4
Fermez le plateau de chargement en le poussant doucement jusqu’à ce que vous entendiez un clic.
SI VOUS AVEZ DÉSACTIVÉ LA FONCTION AVIS D’INSERTION AUTOMATIQUE, VOUS DEVREZ FAIRE DÉMARRER
LE LECTEUR SOIT À PARTIR DU POSTE DE TRAVAIL SOIT AVEC L’EXPLORATEUR WINDOWS, CAR
L’ORDINATEUR PORTABLE NE RECONNAÎTRA PAS AUTOMATIQUEMENT QUE LE DISQUE A ÉTÉ CHARGÉ.
100
b.
a.
c.
d.
Figure 42. Chargement/éjection d’un disque
Retrait d’un disque
1
Appuyez et relâchez la touche d’éjection située à l’avant du lecteur optique. Le lecteur s’arrêtera et le plateau
sortira légèrement de l’ordinateur LifeBook.
2
3
4
Tirez doucement le plateau jusqu’à ce le disque puisse en être facilement retiré.
Retirez doucement le disque du plateau de chargement.
Fermez le plateau de chargement en le poussant doucement jusqu’à ce que vous entendiez un clic.
101
Ouverture d’urgence du plateau de
chargement du lecteur optique
Si le bouton d’éjection ne fonctionne pas,
vous pouvez ouvrir le plateau du lecteur
média en insérant un trombone ou un outil
similaire dans le trou d’éjection situé tout à
droite sur le devant du plateau. Redressez
une extrémité du trombone et insérez-la
doucement dans le trou. Le plateau sortira.
Figure 43. Ouverture d’urgence du plateau
Utilisation des logiciels du lecteur multimédia
SELON VOTRE CONFIGURATION, IL EST POSSIBLE QUE VOTRE SYSTÈME NE DISPOSE PAS D’UN LOGICIEL
DE LECTEUR MULTIMÉDIA PRÉINSTALLÉ. SI CELUI-CI N’EST PAS INSTALLÉ, CONSULTEZ LA DOCUMENTATION
ACCOMPAGNANT L’APPLICATION MULTIMÉDIA.
102
Démarrage d’un film DVD
1
Insérez le DVD dans le lecteur optique de l’ordinateur. Si la fonction « Exécution automatique » s’enclenche,
ignorez l’étape 2.
2
Lorsque vous insérerez un film dans le tiroir de DVD/CD-RW pour la première fois, on vous invitera à choisir ce
que vous aimeriez que le système fasse lorsque les disques sont insérés (par exemple, démarrer automatiquement
ou attendre le message-guide). Ce même message s’affichera chaque fois que vous insérerez un disque jusqu’à
ce que vous fassiez votre sélection.
3
Cliquez sur [OK] pour fermer la boîte de dialogue « À propos du lecteur de DVD », et le film commencera.
Ouverture du panneau de configuration du lecteur multimédia
La plupart des DVD-ROM vous permettent de modifier la façon dont le film est visionné et ce que vous
aimeriez voir. Pour cela, il suffit d’utiliser le panneau de configuration du lecteur multimédia et la souris.
1
2
Cliquez à droite sur l’écran du film pour ouvrir le menu déroulant des options.
Pour afficher toutes les commandes disponibles, sélectionnez Afficher, puis Lecteur. Vous verrez alors
apparaître le panneau de configuration dans le bas de l’écran.
Utilisation du panneau de configuration du lecteur multimédia
Le logiciel du lecteur multimédia vous permet de visionner un film tout comme le fait un magnétoscope
à cassettes. Vous pouvez faire une pause, rembobiner, avancer rapidement ou arrêter un film à tout moment.
1
2
Pour suspendre le film, cliquez sur le bouton d’écran .
Pour faire reculer le film, cliquez sur lebouton pour revenir jusqu’à un point spécifique de votre choix ou cliquez
sur le bouton pour revenir à l’écran de bienvenue.
3
Pour faire avancer le film, cliquez sur le bouton pour avancer jusqu’à un point spécifique de votre choix
ou cliquez sur le bouton . pour passer aux crédits de fermeture.
4
Pour arrêter le film, cliquez sur le bouton .
Quitter le lecteur multimédia
1
Cliquez sur le bouton situé dans le coin supérieur droit de la barre de titre. Vous voyez apparaître une boîte
de dialogue du lecteur multimédia.
2
Cliquez sur [Oui] pour arrêter et quitter le film ou sur [Non] pour fermer la boîte de dialogue et retourner au film.
103
Utilisation du lecteur multimédia avec alimentation par batterie
Étant donné que les lecteurs optiques consomment beaucoup d’énergie, la longévité de votre batterie sera
considérablement plus courte si vous utilisez continuellement le lecteur optique (notamment pour regarder
un film DVD) que lors d’un fonctionnement normal.
• LA DURÉE D’UN GRAND NOMBRE DE FILMS EST SUPÉRIEURE À L’AUTONOMIE D’UNE SEULE BATTERIE.
•
SI VOUS REGARDEZ UN FILM DVD AVEC UNE ALIMENTATION PAR BATTERIE, VOUS AUREZ PROBABLEMENT
BESOIN D’UNE BATTERIE ADDITIONNELLE CHARGÉE OU DE BRANCHER UN ADAPTATEUR SECTEUR
DURANT LE FILM POUR POUVOIR LE VOIR EN ENTIER.
UNE BATTERIE SUPPLÉMENTAIRE COMPLÈTEMENT CHARGÉE EST FORTEMENT RECOMMANDÉE SI
VOUS PRÉVOYEZ REGARDER DES FILMS DVD AVEC UNE ALIMENTATION PAR BATTERIE. SI VOUS NE
POSSÉDEZ PAS UNE BATTERIE SUPPLÉMENTAIRE, VOUS POUVEZ VOUS EN PROCURER UNE SOIT EN
LIGNE À HTTP://WWW.COMPUTERS.US.FUJITSU.COM, SOIT EN APPELANT AU 1-877-372-3473.
Pour regarder un film avec une alimentation par batterie :
1
2
3
Ayez à votre disposition une batterie supplémentaire chargée à fond ou un adaptateur secteur.
Commencez la lecture du film DVD.
Lorsque le voyant de batterie faible s’allume, arrêtez immédiatement le film et quittez le lecteur multimédia.
SI VOUS N’ARRÊTEZ PAS LE LECTEUR MULTIMÉDIA RAPIDEMENT ET QUE LE PORTABLE LIFEBOOK
TENTE DE S’ARRÊTER AUTOMATIQUEMENT (ÉTAT CRITIQUE DE BATTERIE FAIBLE), LE PORTABLE
LIFEBOOK S’ÉTEINDRA DE FAÇON INAPPROPRIÉE. SI CETTE SITUATION SE PRODUIT, VOUS DEVRIEZ
EXÉCUTER UN REDÉMARRAGE À FROID ET SUIVRE LES INSTRUCTIONS, LE CAS ÉCHÉANT, QUI VOUS SONT
PRÉSENTÉES AVANT QUE LE SYSTÈME NE REDÉMARRE.
4
Mettez votre ordinateur hors tension et remplacez la batterie déchargée par la batterie supplémentaire chargée
à fond. Si vous ne disposez pas d’une batterie supplémentaire, vous pouvez brancher un adaptateur secteur
dès que vous voyez l’indicateur de faible batterie.
5
Pour reprendre l’utilisation de l’ordinateur, appuyez à nouveau sur le commutateur d’alimentation/veille/reprise.
Cette opération n’est pas nécessaire si vous avez connecté un adaptateur secteur sans utiliser le mode veille.
6
Redémarrez votre lecteur multimédia et retrouvez l’endroit où vous avez laissé le film, puis continuez à le regarder.
CERTAINS FILMS PLUS COURTS PEUVENT ÊTRE ENTIÈREMENT VUS SANS NÉCESSITER DE BATTERIE
SUPPLÉMENTAIRE OU LE BRANCHEMENT D’UN ADAPTATEUR SECTEUR. TOUTEFOIS, IL EST PRÉFÉRABLE
D’ÊTRE PRÊT PUISQUE LA LONGÉVITÉ RÉELLE DE LA BATTERIE PENDANT LE FONCTIONNEMENT DU
LECTEUR OPTIQUE NE PEUT PAS ÊTRE GARANTIE.
104
Ports de périphériques
Votre PC Tablette LifeBook Fujitsu et le duplicateur de port optionnel sont équipés de plusieurs ports auxquels
vous pouvez brancher des dispositifs externes tels que : lecteurs de disque, claviers, imprimantes, etc.
Prise de réseau local (RJ-45) interne
La prise de réseau local interne (RJ-45) est utilisée pour une connexion de réseau local Gigabit Ethernet
(10Base-T/100Base-Tx/1000Base-T). Il est possible que vous deviez configurer votre PC Tablette selon
les particularités de votre réseau. (pour de plus amples informations sur la configuration de votre réseau,
veuillez consulter votre administrateur de réseau). Pour brancher le câble de réseau local, exécutez ces
opérations simples :
1
Alignez le connecteur avec l’ouverture
du port.
2
Poussez la fiche de connexion dans
le port jusqu’à ce qu’elle s’enclenche.
3
Branchez l’autre extrémité du câble
sur une prise de réseau local.
Connecteur de réseau local
Figure 44. Connexion à un réseau local
Connecteur pour duplicateur de ports
Ce connecteur est situé sur le dessous de votre ordinateur, il sert à relier votre PC tablette à un duplicateur
de ports (en option). (L’emplacement est indiqué sur la figure 6). Pour savoir comment procéder, consultez
la documentation livrée avec le duplicateur.
105 - Ports de périphériques
Ports USB
Les ports Universal Serial Bus 2.0 (USB) vous permettent de connecter divers périphériques USB tels
que des tablettes de jeu externes, des dispositifs de pointage, des claviers et/ou des haut-parleurs.
Votre PC Tablette est doté de trois ports USB 2.0 : un à gauche et deux à l’arrière.
Pour connecter un dispositif d’interface
parallèle, exécutez ces opérations :
1
Alignez le connecteur avec l’ouverture
du port.
2
Poussez la fiche de connexion dans
le port jusqu’à ce qu’elle s’enclenche.
Figure 45. Connexion d’un périphérique USB
EN RAISON DES CHANGEMENTS CONTINUS APPORTÉS À LA TECHNOLOGIE ET AUX NORMES USB, IL
EST IMPOSSIBLE DE GARANTIR LA COMPATIBILITÉ DE TOUS LES DISPOSITIFS ET/OU LECTEURS USB.
Port IEEE 1394
Le port 1394 à 4 broches vous permet de connecter des périphériques numériques compatibles avec la
norme IEEE 1394. La norme IEEE 1394 facilite l’utilisation, ainsi que les connexions et déconnexions.
Ce port permet un taux de transfert pouvant atteindre 400 Mbit/s. Une application tiers pourrait être
nécessaire pour faire fonctionner votre périphérique numérique avec un port 1394.
LE PORT 1394 DE CE SYSTÈME UTILISE UNE CONFIGURATION À QUATRE BROCHES. SI VOUS
COMPTEZ L’INTERFACER AVEC DES PÉRIPHÉRIQUES UTILISANT UNE CONFIGURATION À SIX
BROCHES, VOUS DEVRIEZ ALORS ACHETER UN ADAPTATEUR.
106 - Ports de périphériques
Pour connecter un périphérique 1394,
exécutez ces opérations simples :
1
2
Alignez le connecteur avec l’ouverture du port.
Poussez la fiche de connexion dans le port
jusqu’à ce qu’elle s’enclenche.
IEEE 1394
Connecteur pour
duplicateur de ports
Figure 46. Branchement d’un périphérique IEEE 1394
Prise d’écouteurs
La prise d’écouteurs permet de connecter des écouteurs ou des haut-parleurs externes amplifiés. Vos écouteurs
ou haut-parleurs doivent être munis d’une mini-prise stéréo de 3,5 mm (1/8 po). Pour connecter des écouteurs
ou des haut-parleurs, exécutez ces opérations simples :
1
2
Alignez le connecteur avec l’ouverture du port.
Poussez la fiche de connexion dans le port jusqu’à ce qu’elle s’enclenche.
Prise de micro
La prise de microphone permet de connecter un microphone mono externe. Votre microphone doit être muni
d’une mini- fiche de connexion mono de 1/8 po (3,5 mm) pour qu’il puisse être branché sur la prise microphone
de votre PC Tablette. Pour connecter un microphone, exécutez ces opérations simples :
1
Alignez le connecteur avec l’ouverture du port, puis pousser le connecteur à l’intérieur jusqu’à ce qu’il
s’y enclenche correctement.
107 - Ports de périphériques
Port HDMI
Le port HDMI (High-Definition Multimedia
Interface, ou Interface multimédia à haute
définition) est une interface numérique audio/vidéo
permettant de faire transiter des flux de données
non compressées. Le HDMI sert à brancher des
périphériques numériques compatibles avec
votre ordinateur (un téléviseur grand écran et des
appareils vidéo, par exemple). Lisez la remarque
vous indiquant comment sélectionner le
périphérique HDMI à l’aide des raccourcis
clavier, en page suivante.
HDMI
Connecteur pour
duplicateur de ports
Pour brancher un périphérique HDMI :
1
2
Port HDMI
Alignez le connecteur avec l’ouverture du port.
Poussez la fiche de connexion dans le port
jusqu’à ce qu’elle s’enclenche.
Figure 47. Branchement d’un périphérique HDMI
Port vidéo externe
Le port vidéo externe vous permet de connecter un moniteur externe ou un projecteur ACL. Pour connecter
un périphérique vidéo externe, effectuez ces opérations simples :
1
2
3
Alignez le connecteur avec l’ouverture du port.
Poussez la fiche de connexion dans le port jusqu’à ce qu’elle s’enclenche.
Serrez les deux vis de fixation situées de chaque côté du connecteur.
108 - Ports de périphériques
LORSQUE VOUS APPUYEZ SUR LES TOUCHES [FN] + [F10], VOUS POUVEZ CHANGER L’EMPLACEMENT
DE L’AFFICHAGE VIDÉO. L’ORDRE DES EMPLACEMENTS DÉPEND DU TYPE DE PÉRIPHÉRIQUE(S) VIDÉO
CONNECTÉ(S) AU SYSTÈME. CHAQUE FOIS QUE VOUS APPUYEZ SUR CES TOUCHES, VOUS PASSEZ AU
CHOIX SUIVANT.
SI VOUS AVEZ UN ÉCRAN À TUBE CATHODIQUE EXTERNE, L’ORDRE SERA LE SUIVANT :
-> ÉCRAN CATHODIQUE EXTERNE -> AFFICHAGE SIMULTANÉ -> ÉCRAN INTERNE.
ÉCRAN INTERNE
S’IL Y A SEULEMENT UN PÉRIPHÉRIQUE
HDMI CONNECTÉ À VOTRE SYSTÈME,
L’ORDRE SERA LE SUIVANT : ÉCRAN
INTERNE -> ÉCRAN HDMI -> AFFICHAGE
SIMULTANÉ -> ÉCRAN INTERNE.
SI VOUS AVEZ UN ÉCRAN À TUBE
CATHODIQUE EXTERNE ET UN
HDMI, L’ORDRE SERA
: ÉCRAN INTERNE -> ÉCRAN
CATHODIQUE EXTERNE -> AFFICHAGE
PÉRIPHÉRIQUE
LE SUIVANT
SIMULTANÉ ÉCRAN INTERNE ET ÉCRAN
CATHODIQUE EXTERNE -> ÉCRAN
HDMI ->
Câble de
vidéo externe
AFFICHAGE SIMULTANÉ ÉCRAN INTERNE
ET ÉCRAN
HDMI -> ÉCRAN INTERNE.
SI UN ÉCRAN À TUBE CATHODIQUE ET UN
Port vidéo externe
PÉRIPHÉRIQUE DVI SONT CONNECTÉS AU
DUPLICATEUR DE PORTS, L’ORDRE SERA
LE SUIVANT
: ÉCRAN INTERNE -> ÉCRAN
-> AFFICHAGE
CATHODIQUE EXTERNE
SIMULTANÉ ÉCRAN INTERNE ET ÉCRAN
Figure 48. Branchement d’un périphérique vidéo externe
CATHODIQUE EXTERNE -> ÉCRAN DVI ->
AFFICHAGE SIMULTANÉ ÉCRAN INTERNE
ET ÉCRAN
DVI -> ÉCRAN INTERNE.
109 - Ports de périphériques
Chapitre 4
Dépannage de votre LifeBook
Dépannage
Il est possible que vous rencontriez parfois des problèmes simples de configuration ou d’exploitation pouvant
être résolus sur le champ, ou des problèmes au niveau d’un périphérique pouvant être résolus en remplaçant
l’équipement. Les informations contenues dans cette section vous aideront à isoler et résoudre certains de
ces problèmes simples et à identifier les pannes qui nécessitent une réparation.
Identification du problème
Si vous éprouvez un problème, consultez la procédure suivante avant d’entreprendre un processus de
dépannage complexe :
1
2
Éteignez votre PC Tablette LifeBook.
3
Assurez-vous que toute carte insérée dans la fente pour carte ExpressCard est bien en place. Vous pouvez
également enlever la carte de la fente pour vous assurer qu’elle n’est pas la raison de la panne.
4
Assurez-vous que tous les périphériques connectés aux connecteurs externes sont bien branchés. Vous pouvez
également déconnecter ces périphériques pour vous assurer qu’ils ne sont pas à l’origine de la panne.
5
Mettez votre PC Tablette en marche. Assurez-vous qu’il soit resté hors fonction pendant 10 secondes au moins
avant de le remettre en marche.
Assurez-vous que l’adaptateur secteur est connecté à votre ordinateur portable et à une source d’alimentation
secteur active.
110 - Dépannage
6
7
Laissez s’exécuter la procédure d’amorçage.
Si le problème n’a pas été résolu, consultez le tableau suivant pour obtenir des renseignements plus détaillés
concernant le dépannage.
SI VOUS PRENEZ EN NOTE TOUT CE QUE VOUS ESSAYEZ, LE SERVICE D’ASSISTANCE POURRA
VOUS AIDER PLUS RAPIDEMENT EN VOUS DONNANT DES SUGGESTIONS SUPPLÉMENTAIRES
AU TÉLÉPHONE.
8
Si vous avez essayé les solutions suggérées par le tableau de dépannage sans succès, communiquez avec
le service d’assistance :
Numéro sans frais : 1-800-8Fujitsu (1-800-838-5487)
Courriel : [email protected]
Site Internet : http://www.computers.us.fujitsu.com/support.
Avant de nous contacter, veuillez avoir les informations suivantes à portée de main pour que notre préposé
du service à la clientèle puisse vous venir en aide le plus rapidement possible :
• Nom du produit
• Numéro de configuration du produit
• Numéro de série du produit
• Date d’achat
• Conditions dans lesquelles le problème est survenu
• Texte des messages d’erreur reçus
• Types de périphériques connectés, si applicable
Pour les numéros de série et de configuration, consultez l’étiquette de configuration sur le dessous de votre
ordinateur.
111 - Dépannage
Problèmes spécifiques
Utilisation du tableau de dépannage
Lorsque vous éprouvez des problèmes avec votre PC Tablette LifeBook, essayez de trouver les symptômes
sous la colonne Problème du tableau suivant pour la fonction qui vous cause des problèmes. Vous trouverez
une description des causes communes pour ce symptôme sous la colonne Cause possible ; le cas échéant,
ce que vous pouvez faire pour corriger la situation se trouve sous la colonne Solutions possibles. Il est
possible que certaines causes et solutions possibles ne s’appliquent pas à votre ordinateur.
Tableau de dépannage
Problème
Page
Problème
Page
Problèmes audio . . . . . . . . . . . . . . . . .page 113
Problèmes de périphérique USB . . . . page 116
Problèmes de lecteur optique . . . . . . .page 114
Problèmes de carte ExpressCard. . . . page 117
Problèmes de duplicateur de ports . . .page 115
Problèmes d’alimentation électrique. . page 117
Problèmes de disque dur . . . . . . . . . . .page 115
Problèmes d’arrêt et de démarrage . . page 120
Problèmes de clavier ou de souris . . . .page 115
Problèmes vidéo . . . . . . . . . . . . . . . . . page 122
Problèmes de mémoire . . . . . . . . . . . .page 116
Problèmes divers . . . . . . . . . . . . . . . . page 124
112 - Dépannage
Problème
Cause possible
Solutions possibles
Problèmes audio
Aucun son ne sort du
haut-parleur incorporé.
Le volume est réglé à un niveau
très bas.
Réglez le volume de votre ordinateur et de votre système
d’exploitation. Pour ce faire, utilisez la combinaison de
touches [Fn+F9] sur votre clavier. Si vous appuyez plusieurs
fois sur [F9] tout en maintenant la touche [Fn] enfoncée,
vous augmenterez le volume sonore de votre PC Tablette.
Le volume logiciel est réglé
à un niveau trop bas.
Le réglage manuel du volume avec les touches du clavier
devrait changer dynamiquement le niveau de volume du
système d’exploitation (voir ci-dessus). Si cela ne fonctionne
pas, réglez les paramètres de volume dans l’application
utilisée.
Des écouteurs sont branchés
sur votre PC Tablette.
Le branchement d’écouteurs désactive le haut-parleur
incorporé. Retirez les écouteurs.
Les paramètres audio du BIOS
ne sont pas valides.
Réglez l’utilitaire de configuration du BIOS sur les valeurs
par défaut dans le menu Multimedia Device Configuration
(Configuration du lecteur multimédia). Voir « Utilitaire de
configuration du BIOS » en page 76.
Un pilote est mal configuré.
Le pilote audio peut être installé ou réinstallé à l’aide du
CD de pilotes et d’applications livré avec votre LifeBook
Fujitsu. Consultez la documentation de votre application
et de votre système d’exploitation pour obtenir de l’aide.
Les haut-parleurs ont été
bloqués en utilisant l’icône
Volume située dans la zone
de notification.
Cliquez sur l’icône Volume dans la zone de notification, en
bas à droite de l’écran. (elle ressemble à un haut-parleur).
Si la case Mute (Sourdine) est entourée d’un cercle rouge,
cliquez dessus pour la déselectionner. Vous pouvez aussi
utiliser la combinaison de touches [Fn+F3] pour activer
ou désactiver le volume. Appuyez sur [F3] en enfonçant la
touche [Fn] pour activer ou désactiver la fonction Silence
(ou Muet).
113 - Dépannage
Problème
Cause possible
Solutions possibles
Problèmes de lecteur optique (périphérique en option)
L’ordinateur portable
LifeBook ne reconnaît pas
les DVD/CD-RW/CD-ROM.
Le voyant d’accès
au lecteur optique
du tableau de voyants
d’état clignote lorsque
le lecteur ne contient
pas de disque ou qu’il
n’y a pas de lecteur
optique installé.
Le disque n’est pas bien logé
dans le cercle surélevé au
centre du lecteur.
Ouvrez le plateau du lecteur optique et réinstallez
correctement le disque.
Mauvais logiciel lecteur de DVD
ou aucun logiciel lecteur de
DVD installé.
Installez un logiciel de lecture de DVD (Pour de plus amples
informations, voir « Logiciels du lecteur multimédia » en
page 99.)
Le tiroir du lecteur optique n’est
pas bien fermé.
Appuyez sur le devant du tiroir du lecteur optique jusqu’à
ce que le verrou s’enclenche. Si cela ne fonctionne pas,
déverrouillez et retirez le lecteur optique modulaire du
compartiment multifonction, puis réinsérez-le jusqu’à ce
qu’il s’enclenche. Cela permet de bien le brancher.
Un mauvais identificateur d’unité
a été utilisé pour le disque.
Vérifiez si l’identificateur d’unité utilisé par l’application est le
même que celui utilisé par le système d’exploitation. Lorsque
le système d’exploitation démarre à partir d’un DVD/CD,
les identifications des lecteurs sont automatiquement
ajustées. Veuillez noter que l’identification d’une unité peut
être changée avec l’outil Gestion des disques situé dans
Outils administratifs-> Gestion de l’ordinateur.
Le DVD/CD-RW/CD-ROM est
sale ou défectueux.
Essuyez le disque avec un chiffon de nettoyage doux,
puis réinsérez-le. S’il ne fonctionne toujours pas, essayez
un autre disque (DVD/CD-RW/CD-ROM) dans le lecteur.
La fonction Windows d’insertion
automatique est active et vérifie
si un disque est prêt à être lu.
Cela est normal. Toutefois, vous pouvez désactiver
cette fonction.
114 - Dépannage
Problème
Cause possible
Problèmes de duplicateur de ports
Solutions possibles
Remarque : Assurez-vous d’arrêter votre ordinateur portable LifeBook avant d’ajouter une imprimante au port parallèle
du duplicateur de ports.
Le PC Tablette ne
fonctionne pas lorsqu’il est
installé sur le duplicateur
de ports optionnel.
L’adaptateur c.a. du duplicateur
de ports n’est pas branché.
Alimentez le duplicateur de ports.
L’ordinateur n’est pas bien logé
dans le duplicateur de ports.
Retirez votre ordinateur et reconnectez-le.
Un mauvais identificateur
d’unité a été utilisé par une
application lorsqu’un disque
d’amorçage a été utilisé pour
démarrer votre ordinateur.
Assurez-vous que la lettre d’unité utilisée par l’application
est bien celle qu’utilise le système d’exploitation. Lorsque
le système d’exploitation est démarré à partir d’un CD, les
identifications du lecteur sont ajustées automatiquement.
Les paramètres de sécurité
exigent un mot de passe pour le
démarrage du système
d’exploitation.
Vérifiez votre mot de passe et vos paramètres de sécurité.
Problèmes de disque dur
Vous ne pouvez
pas accéder à
votre disque dur.
Problèmes de clavier ou de souris
Le clavier intégré ne
semble pas fonctionner.
Vous avez installé un
clavier ou une souris
externe et il/elle ne
semble pas fonctionner.
Le PC Tablette est tombé
en mode sommeil.
Appuyez sur le commutateur
d’alimentation/veille/reprise.
Votre application a verrouillé
votre clavier.
Essayez d’utiliser votre dispositif de pointage intégré
pour redémarrer votre système.
Votre périphérique externe
n’est pas bien installé.
Réinstallez votre périphérique. Voir « Ports de
périphériques » en page 105.
Votre système d’exploitation
n’utilise pas le bon pilote
pour ce périphérique.
Consultez la documentation du périphérique et du système
d’exploitation, puis installez le pilote approprié.
115 - Dépannage
Problème
Vous avez connecté un
clavier externe ou une
souris et il/elle semble
bloquer le système.
Cause possible
Solutions possibles
Votre système d’exploitation
n’utilise pas le bon pilote pour
ce périphérique.
Consultez la documentation du périphérique et du système
d’exploitation, puis installez le pilote approprié.
Votre système s’est planté.
Essayez de redémarrer votre système.
Votre module de mémoire
additionnelle n’est pas
bien installé.
Enlevez et réinstallez votre module de mémoire additionnelle.
Voir « Module de mémoire additionnelle » en page 95.
Votre mémoire est défaillante.
Vérifiez les messages de l’auto-diagnostic de démarrage
(POST). Voir « Messages de l’auto-diagnostic de mise sous tension
» en page 125.
Problèmes de mémoire
Dans le panneau de
configuration, l’écran
Système n’indique pas
le montant correct de
mémoire installée.
Problèmes de périphérique USB
Votre système ne
reconnaît pas le
périphérique USB que
vous avez installé ou le
périphérique ne semble
pas fonctionner
correctement.
Votre périphérique n’est pas
bien installé.
Retirez et réinstallez votre périphérique. Voir « Ports de
périphériques » en page 105.
Le périphérique a peut-être
été installé pendant qu’une
application était en exécution,
par conséquent votre système
ne reconnaît pas son installation.
Fermez l’application et redémarrez votre ordinateur
portable.
Votre périphérique pourrait
ne pas disposer du bon pilote
de logiciel actif.
Consultez la documentation relative à votre logiciel
et activez le bon pilote.
116 - Dépannage
Problème
Cause possible
Problèmes de carte ExpressCard
Une carte insérée dans la
fente de carte ExpressCard
ne fonctionne pas ou
bloque le système.
Solutions possibles
La carte est mal installée.
Retirez et réinstallez la carte. Voir « Cartes ExpressCard »
en page 93.
La carte a peut-être été installée
pendant qu’une application était
en exécution et votre ordinateur
portable n’a donc pas détecté
son installation.
Fermez l’application et redémarrez votre ordinateur
portable.
Votre logiciel pourrait ne pas
disposer du bon pilote actif.
Consultez la documentation relative à votre logiciel
et activez le bon pilote.
Problèmes d’alimentation électrique
Lorsque vous allumez
votre PC Tablette, rien
ne semble se produire.
La batterie installée est
complètement déchargée ou
aucun adaptateur de courant
(secteur ou d’auto/avion) n’est
installé.
Vérifiez le tableau de voyants d’état pour déterminer la
présence et l’état de la batterie. Voir « Tableau de voyants
d’état » en page 30. Installez une batterie chargée ou
branchez un adaptateur d’alimentation.
La batterie est installée, mais
elle est défectueuse.
Vérifiez le tableau de voyants d’état pour déterminer la
présence et l’état de la batterie. Voir « Tableau de voyants
d’état » en page 30. Si le voyant indique que la batterie est
endommagée (court-circuitée), retirez-la et passez à une
autre source d’alimentation, ou remplacez-la.
117 - Dépannage
Problème
Lorsque vous allumez
votre PC Tablette, rien
ne semble se produire.
(suite)
Cause possible
Solutions possibles
La batterie est faible.
Vérifiez le tableau de voyants d’état pour déterminer la
présence et l’état de la batterie. Voir « Tableau de voyants
d’état » en page 30. Utilisez un adaptateur d’alimentation
en attendant que la batterie se charge ou installez une
batterie chargée.
L’adaptateur secteur ou
auto/avion est mal branché.
Vérifiez si votre adaptateur est branché de façon
appropriée. Voir « Sources d’alimentation » en page 72.
L’adaptateur de courant
(secteur ou auto/avion) ne
reçoit pas d’énergie de la prise
secteur, de la prise de siège
d’avion ou de l’allume-cigare
de voiture.
Branchez le cordon d’alimentation secteur dans une autre
prise murale et vérifiez si un interrupteur ou un disjoncteur
coupe le courant. Si vous utilisez un adaptateur auto/avion
dans un véhicule, assurez-vous que la clé de contact est à
la position On (marche) ou Acc. (accessoires).
L’adaptateur de courant
(secteur ou auto/avion)
est défectueux.
Essayez un autre adaptateur d’alimentation.
118 - Dépannage
Problème
Votre PC Tablette s’éteint
tout seul.
Le PC Tablette ne
fonctionne pas lorsqu’il est
alimenté uniquement par
batterie.
Cause possible
Solutions possibles
Les paramètres de gestion
d’alimentation sont réglés à
des temporisations (délais
d’inactivité) automatiques trop
courtes par rapport à vos
besoins d’exploitation.
Appuyez sur n’importe quelle touche sur le clavier, ou
déplacez votre souris pour restaurer le fonctionnement.
Si cela ne fonctionne pas, appuyez sur le commutateur
d’alimentation/veille/reprise Vérifiez vos paramètres de
gestion d’alimentation, ou fermez vos applications et
consultez les propriétés des Options d’alimentation du
Panneau de configuration pour ajuster les valeurs de
temporisation afin qu’elles répondent mieux à vos besoins.
Vous n’avez pas tenu compte
d’un avertissement de batterie
faible ; l’ordinateur est donc
maintenant en mode « veille car
batterie épuisée ».
Installez un adaptateur d’alimentation puis appuyez sur le
commutateur d’alimentation/veille/reprise. Voir « Sources
d’alimentation » en page 72.
Votre batterie est défectueuse.
Vérifiez l’état des batteries à l’aide du Tableau de voyants
d’état. Si la batterie est court-circuitée, remplacez-la ou
retirez-la. Voir « Tableau de voyants d’état » en page 30.
Votre adaptateur d’alimentation
est tombé en panne ou a perdu
sa source d’énergie.
Assurez-vous que l’adaptateur est branché et que la prise
est alimentée.
La batterie est épuisée.
Remplacez la batterie par une batterie chargée ou branchez
un adaptateur d’alimentation.
Aucune batterie n’est installée.
Installez une batterie chargée.
La batterie n’est pas bien
installée.
Vérifiez si la batterie est bien connectée en la réinstallant.
Votre batterie est défectueuse.
Consultez le tableau de voyants d’état pour connaître l’état
de la batterie et remplacez ou retirez la batterie si elle est
court-circuitée. Voir « Tableau de voyants d’état » en
page 30.
119 - Dépannage
Problème
La batterie semble se
décharger très vite.
Cause possible
Solutions possibles
Les fonctions d’économies
d’énergie sont peut-être
désactivées.
Consultez le menu Options d’alimentation du Panneau de
configuration pour changer les paramètres en fonction de
vos besoins.
Une des applications que vous
exécutez utilise beaucoup
d'énergie en raison d'un accès
fréquent à un lecteur ou de
l’utilisation d'une carte
ExpressCard pour réseau local,
d’un dispositif de réseau sans fil
ou du dispositif Bluetooth.
Utilisez un adaptateur de courant pour cette application
chaque fois que vous le pouvez.
La luminosité est réglée au
maximum.
Réduisez la luminosité. Plus la luminosité est élevée,
plus l’écran d’affichage consomme de l’énergie.
La batterie est très vieille.
Remplacez la batterie.
La batterie a été exposée à des
températures élevées.
Remplacez la batterie.
La batterie est trop chaude ou
trop froide.
Rétablissez le PC Tablette à la température d’exploitation
normale. L’icône de chargement sur le tableau de voyants
d’état clignote lorsque la batterie est en dehors de la plage
de fonctionnement.
Problèmes d’arrêt et de démarrage
Le commutateur de
veille/reprise ne fonctionne
pas.
Le commutateur veille/reprise
est désactivé.
Dans le -> Panneau de configuration, cliquez sur ->
Options d'alimentation puis sur l'onglet Avancé. Dans la
zone Alimentation, sélectionnez l’option « Changer ce que
fait le bouton d’alimentation ».
Il est possible qu’il y ait un
conflit entre logiciels.
Fermez toutes les applications et essayez le bouton
à nouveau.
120 - Dépannage
Problème
Le système se met en
marche et affiche les
informations sur la mise
en marche, mais n’est pas
en mesure de charger le
système d’exploitation.
Cause possible
Solutions possibles
Vous avez un système protégé
qui requiert un mot de passe
pour charger votre système
d'exploitation.
Assurez-vous d'avoir le bon mot de passe. Accédez à
l'utilitaire de configuration et vérifiez les paramètres de
sécurité, puis modifiez-les en conséquence. Voir « Utilitaire
de configuration du BIOS » en page 76.
Les paramètres d’amorçage
de l’utilitaire de configuration
du BIOS sont incompatibles
avec votre configuration.
Configurez la source d’exploitation en appuyant sur la
touche [Échap] pendant que le logo Fujitsu est affiché sur
l’écran ou utilisez la touche [F2], accédez à l’utilitaire de
configuration et ajustez les paramètres de source à partir
du menu Amorçage. Voir « Utilitaire de configuration du
BIOS » en page 76.
Le disque dur interne n’est
pas détecté.
Essayez de détecter automatiquement le disque dur
interne en utilisant l’utilitaire de configuration du BIOS.
Un message d’erreur
s’affiche sur l’écran durant
la procédure d’amorçage.
L’auto-diagnostic de mise sous
tension (POST) a détecté un
problème.
Consultez les messages de l’auto-diagnostic de démarrage
pour déterminer la signification et la gravité du problème.
Tous les messages n’indiquent pas des erreurs ; certains
sont simplement des indicateurs d’état. Voir « Messages de
l’auto-diagnostic de mise sous tension » en page 125.
Votre PC Tablette semble
changer les paramètres de
configuration lorsque vous
le démarrez.
Les modifications que
vous avez apportées à la
configuration du BIOS n’ont
pas été sauvegardées et vous
avez quitté l’utilitaire sans les
sauvegarder.
Assurez-vous de sélectionner l’option Sauvegarder les
changements et quitter lorsque vous quittez l’utilitaire
de configuration du BIOS.
La batterie de rétention du
BIOS CMOS fait défaut.
Communiquez avec le service d’assistance concernant
les réparations. Cela n’est pas une pièce réparable par
l’utilisateur mais elle est censée avoir une durée normale
de vie de 3 à 5 ans.
Vous avez installé le Tableau
de sécurité et d’applications
du LifeBook.
Consultez les indicateurs d’état pour voir si l’icône de
sécurité est affichée. Le cas échéant, saisissez votre mot
de passe Voir « Tableau de voyants d’état » en page 30.
L’écran ne s’allume pas au
démarrage ou à la sortie
du mode Veille.
121 - Dépannage
Problème
Problèmes vidéo
L’écran d’affichage intégré
demeure vide lorsque
vous mettez en marche
votre PC Tablette.
Le PC Tablette s’est mis
en marche en émettant
une série de tonalités
et votre écran intégré
est vide.
Cause possible
Solutions possibles
L'ordinateur portable est réglé
pour fonctionner avec un
moniteur externe seulement.
Gardez la touche [Fn] enfoncée et appuyez sur la touche
[F10] pour changer votre sélection et choisir où envoyer
votre affichage. Chaque fois que vous appuyez sur ces
touches, vous passez au choix suivant. Les choix, par
ordre, sont : affichage intégré seulement, moniteur externe
seulement, affichage intégré et moniteur externe
ensemble.
L’angle de l’affichage et les
paramètres de luminosité ne
sont pas adaptés à vos
conditions d’éclairage.
Déplacez l’écran et actionnez la commande de luminosité
jusqu’à ce que vous ayez une visibilité adéquate. Pour
régler la luminosité, maintenez la touche [Fn] enfoncée
et appuyez sur [F6] ou [F7].
La temporisation d’affichage a
été réglée à des intervalles trop
courts et vous n’avez pas
remarqué que l’écran s’allume
et s’éteint souvent.
Appuyez sur une touche du clavier ou déplacez la souris.
Si cela ne fonctionne pas, appuyez sur le commutateur
d’alimentation/veille/reprise (l’écran d’affichage peut avoir
été arrêté par le mode sommeil, veille automatique ou
temporisation vidéo).
L’auto-test de démarrage
(POST) a détecté une
défaillance qui ne permet pas
à l’écran de fonctionner.
Communiquez avec le service d’assistance.
122 - Dépannage
Problème
L’écran devient vide par
lui-même après avoir
été utilisé.
Cause possible
Solutions possibles
L’ordinateur portable s’est
retrouvé en temporisation
vidéo, en mode sommeil ou en
mode veille prolongée car vous
ne l’avez pas utilisé pendant un
certain moment.
Appuyez sur n’importe quelle touche sur le clavier, ou
déplacez votre souris pour restaurer le fonctionnement.
Si cela ne fonctionne pas, appuyez sur le commutateur
d’alimentation/veille/reprise Vérifiez vos paramètres de
gestion de l’alimentation, ou fermez vos applications et
allez dans le menu Économies d’énergie (ou Options
d’alimentation) de l’utilitaire de configuration pour ajuster
les valeurs de temporisation afin qu’elles répondent mieux
à vos besoins. Voir « Utilitaire de configuration du BIOS »
en page 76.
Les temporisations de gestion
de l’alimentation peuvent être
trop courtes et vous n’avez pas
remarqué que l’écran s’est
allumé, puis éteint de nouveau.
Appuyez sur n’importe quelle touche sur le clavier, ou
déplacez votre souris pour restaurer le fonctionnement.
Si cela ne fonctionne pas, appuyez sur le commutateur
d’alimentation/veille/reprise (l’écran d’affichage peut avoir
été arrêté par le mode sommeil, veille automatique ou
temporisation vidéo).
L’écran ne s’allume pas au
démarrage ou à la sortie
du mode veille.
Le système est protégé par mot
de passe.
Vérifiez le tableau de voyants d’état pour vous assurer que
l’icône Sécurité clignote. Le cas échéant, entrez votre mot
de passe.
L’écran d’affichage ne se
ferme pas.
Un corps étranger, tel qu’un
trombone, est coincé entre
l’écran et le clavier.
Retirez tous les objets étrangers du clavier.
L’écran affiche des zones
claires ou sombres.
Si ces zones sont très petites et
si leur nombre est restreint,
cela est normal pour un grand
écran ACL.
Ne faites rien.
Si les zones sont nombreuses
ou suffisamment grandes pour
perturber vos besoins
d’exploitation,
l’écran est défectueux : communiquez avec le service
d’assistance.
123 - Dépannage
Problème
Cause possible
Solutions possibles
L’écran est sombre
lorsqu’il fonctionne sur
l’alimentation par batterie.
La valeur par défaut de
l’utilitaire Gestion de
l’alimentation est réglée sur
Faible luminosité pour
économiser l’énergie.
Appuyez sur les touches [Fn] + [F7] pour augmenter
la luminosité ou cliquez sur la jauge de la batterie,
puis cliquez sur Autres options d’alimentation, et
sélectionnez enfin Régler la luminosité de l’écran.
Vous avez connecté un
moniteur externe, mais
il n’affiche aucune
information.
La configuration de votre BIOS
n’est pas réglée pour activer
votre moniteur externe.
Basculez la destination vidéo en appuyant en même temps
sur [Fn] + [F10], ou vérifiez la configuration du BIOS et
validez votre moniteur externe. Consultez le sous-menu
Video Features (Fonctions vidéo) du menu Advanced
(Avancé) du BIOS. Voir « Utilitaire de configuration du
BIOS » en page 76.
Votre moniteur externe n’est
pas bien installé.
Réinstallez le moniteur. Voir « Port vidéo externe » en
page 108.
Le système d’exploitation
n’utilise pas le bon pilote.
Consultez la documentation du périphérique et du système
d’exploitation, puis installez le pilote approprié.
Votre moniteur externe n’est
pas compatible avec votre
ordinateur portable LifeBook.
Consultez la documentation de votre moniteur, ainsi que
les conseils concernant le moniteur externe dans la section
Spécifications. Voir « Spécifications techniques du
système » en page 145.
Les applications génèrent
souvent leurs propres
messages d’erreur.
Consultez la documentation et l’aide de l’application. Tous
les messages n’indiquent pas des erreurs ; certains sont
simplement des indicateurs d’état.
Vous avez connecté un
moniteur externe et il ne
s’allume pas.
Problèmes divers
Un message d’erreur
s’affiche sur l’écran durant
l’exécution d’une
application.
124 - Dépannage
Messages de l’auto-diagnostic de mise sous tension
Voici une liste alphabétique des messages d’erreur et d’état que le BIOS Phoenix et/ou votre système
d’exploitation peuvent générer ainsi qu’une explication pour chacun d’eux. Les messages d’erreurs sont
marqués d’un *. Si un message d’erreur est affiché et ne se trouve pas dans la liste, prenez-le en note et
vérifiez-le dans la documentation de votre système d’exploitation (à l’écran et dans le manuel imprimé).
Si vous ne trouvez aucune référence au message et que sa signification n’est pas claire, contactez le service
d’assistance.
nnnn Mémoire cache acceptée
nnnn est la capacité de la mémoire cache du système en kilo-octets testée avec succès par l’auto-test de mise
sous tension (ce message apparaîtra seulement si vous avez une carte SRAM installée).
*Échec du test de mémoire étendue à la ligne : xx
La mémoire étendue ne fonctionne pas ou n’est pas bien configurée. Si vous avez installé un module de
mémoire additionnelle, vérifiez s’il est bien installé. Si c’est le cas, vérifiez la configuration de Windows
pour vous assurer qu’il ne tente pas d’utiliser de la mémoire non disponible, puis communiquez avec le
service d’assistance.
nnnn RAM étendue acceptée
nnnn est la capacité de mémoire en kilo-octets qui a été testée avec succès.
*Échec du disque fixe n (où x=1 à 4)
Le disque fixe ne fonctionne pas ou n’est pas bien configuré. Cela pourrait signifier que le type de disque
dur identifié dans votre utilitaire de configuration ne concorde pas avec le type détecté par l’auto-diagnostic
de mise sous tension. Exécutez l’utilitaire de configuration pour vérifier les paramètres du type de disque
dur et corrigez-les si nécessaire. Si les paramètres sont corrects et que le message apparaît lorsque vous
redémarrez votre système, il pourrait y avoir une grave erreur qui peut vous faire perdre des données si vous
continuez. Communiquez avec le service d’assistance.
125 - Dépannage
*Type de lecteur A incorrect - exécutez CONFIGURATION
Type de lecteur de disquette A : mal identifié dans la Configuration. Cela pourrait signifier que le type de
lecteur de disquette identifié dans votre utilitaire de configuration ne concorde pas avec le type détecté par
l’auto-diagnostic de mise sous tension. Exécutez l’utilitaire de configuration pour corriger cette irrégularité.
*Type de lecteur B incorrect - exécutez CONFIGURATION
Type de lecteur de disquette B : mal identifié dans la Configuration. Cela pourrait signifier que le type de
lecteur de disquette identifié dans votre utilitaire de configuration ne concorde pas avec le type détecté par
l’auto-diagnostic de mise sous tension. Exécutez l’utilitaire de configuration pour corriger cette irrégularité.
*Données NVRAM non valides
Problème d’accès à la mémoire NVRAM. Au cas où ce message s’afficherait, ce qui est peu probable, vous
pourriez avoir certains problèmes d’affichage. Vous pouvez continuer à utiliser votre ordinateur mais vous
devriez communiquer avec le service d’assistance pour plus d’informations.
*Erreur du contrôleur de clavier
Le test du contrôleur de clavier a échoué. Vous pourriez avoir besoin de remplacer votre clavier ou le
contrôleur de votre clavier mais vous pourriez utiliser un clavier externe en attendant. Communiquez avec
le service d’assistance.
*Erreur de clavier
Le clavier ne fonctionne pas. Vous pourriez avoir besoin de remplacer votre clavier ou le contrôleur de votre
clavier mais vous pourriez utiliser un clavier externe en attendant. Communiquez avec le service
d’assistance.
*Touche bloquée
Le BIOS a découvert une touche bloquée et affiche le code de balayage pour la touche bloquée. Vous
pourriez avoir besoin de remplacer votre clavier mais vous pourriez utiliser un clavier externe en attendant.
Communiquez avec le service d’assistance.
126 - Dépannage
*Le type de moniteur ne correspond pas au CMOS - exécutez CONFIGURATION
Le type de moniteur n’est pas bien identifié dans la Configuration. Cette erreur signifie probablement que
le BIOS est corrompu. Exécutez l’utilitaire de configuration et réglez tous les paramètres aux conditions
par défaut. Si vous obtenez toujours cette erreur, communiquez avec le service d’assistance.
*Système d’exploitation introuvable
Le système d’exploitation ne peut pas être localisé ni sur le lecteur A: ni sur le lecteur C: Accédez à l’utilitaire
de configuration et vérifiez si le disque fixe et le lecteur A: sont bien identifiés et si la séquence d’amorçage est
bien configurée. Le système d’exploitation devrait être sur le lecteur C: sauf si vous avez changé sensiblement
votre installation. Si l’utilitaire de configuration est bien installé, votre disque dur pourrait être corrompu.
*Contrôle de parité 1 nnnn
Erreur de parité trouvée dans le bus système. Le BIOS essaye de localiser l’adresse et de l’afficher sur
l’écran. S’il n’arrive pas à localiser l’adresse, l’écran affichera ???? Cette défectuosité risque de détruire
des données. Communiquez avec le service d’assistance.
*Contrôle de parité 2 nnnn
Erreur de parité trouvée dans le bus d’entrée-sortie. Le BIOS essaye de localiser l’adresse et de l’afficher
sur l’écran. S’il n’arrive pas à localiser l’adresse, l’écran affichera ???? Cette défectuosité risque de détruire
des données. Communiquez avec le service d’assistance.
*Appuyez sur <F1> pour reprendre, sur <F2> pour CONFIGURER
Affiché après tout message d’erreur récupérable. Appuyez sur [F1] pour continuer le démarrage ou sur [F2]
pour accéder à l’utilitaire de configuration du BIOS et modifier la configuration.
*Amorçage précédent incomplet – Configuration par défaut utilisée
L’auto-diagnostic de mise sous tension précédent n’a pas été complété avec succès. L’auto-diagnostic
de mise sous tension chargera les valeurs par défaut et proposera d’exécuter la Configuration. Si l’erreur
précédente a été causée par des valeurs incorrectes et que celles-ci ne sont pas corrigées, le prochain amorçage
aura de fortes possibilités d’échouer également. Si l’utilisation des paramètres par défaut ne vous permet
pas d’exécuter avec succès la séquence d’amorçage, vous devriez éteindre le système et communiquer avec
le service d’assistance.
127 - Dépannage
*Erreur de l’horloge de temps réel
L’horloge de temps réel a échoué le test du BIOS. Une réparation de la carte mère pourrait être nécessaire.
Communiquez avec le service d’assistance.
*Échec de la mémoire fantôme RAM au décalage : nnnn
La mémoire fantôme RAM a échoué au décalage nnnn du bloc 64k à partir duquel l’erreur a été détectée.
Vous risquez de subir une corruption des données si vous continuez. Communiquez avec le service
d’assistance.
nnnn Mémoire RAM fantôme acceptée
nnnn est la capacité de la mémoire fantôme RAM en kilo-octets qui a été testée avec succès.
*Batterie du système épuisée. Remplacez-la et exécutez la CONFIGURATION
La batterie de rétention de la mémoire RAM du CMOS BIOS est épuisée. Celle-ci fait partie de votre BIOS
et c’est une batterie enfichable qui requiert l’aide d’un technicien d’assistance pour la changer. Vous pouvez
continuer à utiliser votre ordinateur mais vous aurez à utiliser les valeurs par défaut de votre utilitaire de
configuration ou à reconfigurer votre utilitaire de configuration chaque fois que vous éteignez votre
ordinateur. Cette batterie a une durée de vie prévue de 2 à 3 ans.
Système BIOS doublé
Système BIOS copié sur la mémoire RAM fantôme.
*Total de contrôle du CMOS incorrect - Utilisation de la configuration par défaut
La mémoire RAM du CMOS BIOS a été corrompue ou mal modifiée, peut-être par un programme
d’application qui change les données stockées dans la mémoire du BIOS. Exécutez la configuration
et reconfigurez le système.
*Échec de la mémoire RAM système au décalage : nnnn
La mémoire du système a échoué au décalage nnnn du bloc 64k à partir duquel l’erreur a été détectée. Cela
veut dire qu’il y a une erreur dans votre mémoire intégrée. Si vous continuez d’utiliser votre ordinateur, vous
risquez de corrompre vos données. Communiquez avec le service d’assistance concernant les réparations.
128 - Dépannage
nnnn de la mémoire RAM système accepté
nnnn est la capacité de la mémoire système en kilo-octets qui a été testée avec succès.
*Erreur du temporisateur du système
Le test du temporisateur a échoué. L’horloge principale qui fait fonctionner l’ordinateur est défectueuse.
Une réparation de la carte mère est nécessaire. Communiquez avec le service d’assistance concernant
les réparations.
BIOS vidéo doublé
Le BIOS vidéo a été copié avec succès dans la mémoire RAM fantôme.
129 - Dépannage
Restaurer vos logiciels pré-installés
L'emplacement de vos applications, pilotes et utilitaires est déterminé par le système d'exploitation
lorsque l'ordinateur est en cours d'utilisation.
Microsoft Windows 2000 Professionnel : Veuillez utiliser les informations contenues dans le manuel «
Sauvegarde et restauration des images d'origine et de système » fourni avec votre ordinateur.
Microsoft Windows XP Édition : Veuillez suivre les instructions ci-après.
Le disque de pilotes et de restauration d'applications (PRA) contient des pilotes de périphérique et des
utilitaires Fujitsu (dans des répertoires distincts) propres à la configuration de votre ordinateur et qui
doivent être utilisés conformément aux instructions ci-dessous.
SI VOUS AVEZ ACCÈS À INTERNET, VISITEZ LE SITE D’ASSISTANCE DE FUJITSU À
HTTP://WWW.COMPUTERS.US.FUJITSU.COM/SUPPORT POUR CONSULTER LES INFORMATIONS
LES PLUS RÉCENTES ET OBTENIR LES DERNIÈRES VERSIONS DES PILOTES AINSI QUE DES CONSEILS
SUR LA RESTAURATION ET LA MISE À JOUR DU SYSTÈME.
Réinstallation des applications et pilotes individuels
Le disque de pilotes et applications peut être utilisé pour réinstaller de façon sélective les pilotes
et/ou applications qui auraient pu être désinstallés ou corrompus.
IL EST POSSIBLE QUE CERTAINES APPLICATIONS TIERCES GRATUITES PRÉ-INSTALLÉES SUR VOTRE
SYSTÈME NE SE TROUVENT PAS SUR LE DISQUE PRA. LES TOUTES DERNIÈRES VERSIONS DE CES
APPLICATIONS PEUVENT ÊTRE TÉLÉCHARGÉES À PARTIR DU SITE INTERNET DE LEUR FABRICANT.
Pour réinstaller des pilotes et/ou applications :
1
Lancez le système et insérez le disque PRA après que Windows a démarré. Un écran d’installation Fujitsu
s’affiche une fois que le disque est inséré.
2
Lorsque vous avez lu le contrat de licence, cliquez sur [J’accepte].
130 - Restaurer vos logiciels pré-installés
3
Une fenêtre apparaîtra contenant une liste d’applications, de pilotes et d’utilitaires que vous pouvez installer
à partir du disque de pilotes et d’applications.
LES COMPOSANTS CITÉS SONT CHROMOCODÉS EN FONCTION DE LEUR ÉTAT D’INSTALLATION. LE BLEU
INDIQUE QUE LE COMPOSANT PEUT ÊTRE INSTALLÉ. LE VERT INDIQUE QUE LE COMPOSANT DOIT ÊTRE
INSTALLÉ SÉPARÉMENT. LE GRIS INDIQUE QUE LE COMPOSANT EST DÉJÀ INSTALLÉ (LES ÉLÉMENTS EN
GRIS PEUVENT ÊTRE RÉINSTALLÉS, MAIS AVANT L’INSTALLATION, VOUS RECEVREZ UN RAPPEL VOUS
INDIQUANT QUE LE COMPOSANT EST DÉJÀ INSTALLÉ).
4
Dans la liste, cochez tous les composants que vous voulez installer. Si vous voulez installer tous les composants,
cliquez sur [Sélectionner tout]. Si vous cliquez sur Sélectionner tout, le système sélectionne tous les composants
codés en bleu. Les composants en vert et en gris doivent être sélectionnés séparément.
5
Lorsque vous avez sélectionné les composants que vous désirez installer, cliquez sur [Installer les soussystèmes sélectionnés] ; les composants seront installés.
6
Lorsque les composants sont installés, cliquez sur [OK], puis sur [Oui] lorsqu’on vous demandera si vous voulez
redémarrer votre système.
Restauration du système d’exploitation pour les systèmes Windows
Le disque d’utilitaires et de restauration contient quatre utilitaires :
• L’utilitaire Restauration vous permet de restaurer le système d’exploitation (SE) de votre ordinateur.
Une fois restauré, le SE est le même que celui qui était installé sur le disque dur à l’origine. Après
avoir restauré le SE, vous devrez réinstaller les pilotes et les applications à partir du disque de pilotes
et de restauration des applications ainsi que de tous disques qui étaient fournis avec l’ordinateur
lorsque vous l’avez acheté.
• L’utilitaire Supprimer les données sur le disque dur permet de supprimer toutes les données sur
votre disque dur et d’en empêcher leur réutilisation. N’utilisez pas l’utilitaire « Supprimer les données
sur le disque dur », à moins que vous soyez absolument certain de vouloir effacer votre disque dur
en entier, y compris toutes les partitions.
• L’utilitaire Créer des partitions vous permet de créer une nouvelle partition D: ou de modifier la
taille des partitions déjà créées sur votre disque dur. REMARQUE : Si vous créez des partitions
ou si vous en modifiez la taille, toutes les données contenues sur votre disque dur seront
totalement supprimées.
131 - Restaurer vos logiciels pré-installés
• L’utilitaire Diagnostics permet à un professionnel de l’informatique de déterminer l’état des
périphériques et des composants de système sélectionnés en les soumettant à des tests de diagnostic.
Méthodes pour accéder aux utilitaires
Certains modèles LifeBook sont déjà dotés des applets Restauration et utilitaires, pré-installés. Sur d’autres
systèmes, il faudra recourir au disque de restauration et d’utilitaires (dans le cas où le disque dur a été formaté).
Afin de déterminer la méthode permettant d’accéder à la fonctionnalité Restauration et Utilitaires, suivez
les procédures ci-après dans l’ordre.
Comment déterminer si la fonctionnalité Restauration et Utilitaires est déjà installée
1
2
3
Allumez ou redémarrez votre système. Lorsque le logo Fujitsu apparaît, appuyez sur la touche [F12].
Dans le menu Amorçage qui apparaît, vérifiez si l’option <Restauration et Utilitaires> est présente. Si elle n’y
est pas, cela signifie que la fonctionnalité doit être utilisée à partir du disque. Reportez-vous alors à « Exécution
de la fonctionnalité Restauration et Utilitaires à partir du disque. » <Restauration et Utilitaires>.
Vous pouvez également utiliser le menu TrustedCore pour savoir si l’utilitaire est pré-chargé en mettant
l’ordinateur sous tension avec la touche [Entrée] lorsque le logo Fujitsu apparaît à l’écran. Le menu TrustedCore
apparaîtra, et l’option Restauration et Utilitaires s’y affichera.
Exécution de la fonctionnalité Restauration et Utilitaires à partir du disque dur
1
2
3
4
5
6
Avec le curseur, allez en bas de page jusqu’à <Restauration et Utilitaires>, puis appuyez sur [Entrée].
Une barre de progression apparaîtra en bas de l’écran pendant le transfert des fichiers à partir du disque.
Lorsque la boîte de dialogue « Options de restauration du système » apparaît, choisissez une nouvelle
configuration de clavier si nécessaire, puis cliquez sur [Suivant].
Lorsque la boîte de dialogue Système d’exploitation apparaît, cliquez sur [Suivant].
Si nécessaire, entrez votre mot de passe, puis cliquez sur [OK].
Lorsque la fenêtre Options de restauration du système apparaît, cliquez sur « Restauration et Utilitaires ».
132 - Restaurer vos logiciels pré-installés
7
L’écran « Restauration et Utilitaires » apparaît avec trois onglets : Diagnostics, Restauration et Utilitaires.
Veuillez noter que l’onglet Diagnostics n’est pas pris en charge par certains modèles LifeBook/Stylistic lorsque vous
exécutez la fonction Restauration et Utilitaires à partir du disque dur. Pour restaurer le système d’exploitation,
veuillez insérer le disque « Restauration et Utilitaires » dans le lecteur de CD/DVD et utiliser la fonction « Démarrer
la restauration » sous l’onglet « Restauration ». Pour de plus amples informations à propos des onglets, allez à
« Onglets Restauration et Utilitaires » en page 133.
Exécution de la fonctionnalité Restauration et Utilitaires à partir du disque.
•
•
POUR POUVOIR UTILISER CE DISQUE, VOTRE SYSTÈME DOIT DISPOSER D’UN LECTEUR POUVANT LIRE DES CD.
VOUS DEVEZ DONC BRANCHER UN LECTEUR EXTERNE. POUR PLUS D’INFORMATIONS SUR LES DISPOSITIFS
EXTERNES DISPONIBLES, VISITEZ NOTRE SITE INTERNET DE VENTE AU : HTTP://SOLUTIONS.US.FUJITSU.COM/.
CE DISQUE PEUT SEULEMENT ÊTRE UTILISÉ SUR LE SYSTÈME AVEC LEQUEL IL A ÉTÉ ACHETÉ.
Procedure
Si vous désirez vérifier/changer la priorité d’amorçage (plutôt que de démarrer à partir d’un disque dur ou
d’un lecteur de disquette externe), exécutez les opérations suivantes :
1
Lorsque le logo Fujitsu apparaît à l'écran, appuyez sur la touche [Entrée] ou cliquez avec le bouton gauche de
la souris ou du pavé tactile TouchPad. Le menu SecureCore s'affichera.
2
3
4
5
Dans le menu TrustedCore, sélectionnez le menu Amorçage.
6
Lorsque l’écran Restauration et utilitaires apparaît, trois onglets sont présents : Diagnostics, Restauration
et Utilitaires.
Surlignez l’option CD/DVD.
Mettez le disque de restauration et d’utilitaires sur le plateau du lecteur.
Cliquez sur [OK]. Une barre de progression apparaîtra en bas de l’écran pendant le transfert des fichiers à partir
du disque.
Onglets Restauration et Utilitaires
Onglet Diagnostics : L’outil de diagnostics est conçu pour être utilisé par des informaticiens professionnels.
Il y a peu de chances que vous ayez besoin de l’utiliser. Lorsque vous sélectionnez des dispositifs dans la
fenêtre Diagnostic et que vous cliquez ensuite sur [Exécuter], ceux-ci sont soumis à plusieurs tests.
133 - Restaurer vos logiciels pré-installés
Onglet Restauration : L’onglet Restauration comprend l’outil « Démarrer la restauration ». Rappelez-vous
que le processus de restauration supprime toutes les données du disque C:. Si vous décidez d’utiliser l’outil
de restauration, assurez-vous d’avoir sauvegardé au préalable toutes les données que vous ne voulez pas
perdre. De même, prenez note que l’ordinateur doit être branché sur le secteur pour exécuter la procédure
avec l’outil de restauration. Pour utiliser l’outil Restauration, sélectionnez la fonction « Démarrer la
restauration », cliquez sur le bouton [Exécuter], puis suivez les instructions à l’écran.
Onglet Utilitaires : L’onglet Utilitaires comprend trois outils : « Restaurer le système », « Supprimer les
données sur le disque dur » et « Créer des partitions ».
• Avec Restaurer le système, il est possible de résoudre les problèmes qui pourraient ralentir le
fonctionnement de votre ordinateur ou l’empêcher de réagir. Cet outil vous permet de remettre
le système à un état antérieur, cela n’affecte en rien vos documents, images ou autres données
personnelles.
• L’utilitaire Supprimer les données sur le disque dur permet de supprimer toutes les données
sur votre disque dur et d’en empêcher leur réutilisation. REMARQUE : N’utilisez pas l’utilitaire
« Supprimer les données sur le disque dur », à moins que vous soyez absolument certain de
vouloir effacer votre disque dur en entier, y compris toutes les partitions.
• L’utilitaire Créer des partitions vous permet de créer une nouvelle partition D: ou de modifier la
taille des partitions déjà créées sur votre disque dur. REMARQUE : Si vous créez des partitions
ou si vous en modifiez la taille, toutes les données contenues sur votre disque dur seront
totalement supprimées.
Téléchargement automatique des mises à jour de pilotes
Votre système dispose d’un outil pratique appelé Utilitaire de Mise à jour des pilotes Fujitsu (FDU ou Fujitsu
Driver Update). Avec FDU, vous pouvez choisir d’aller automatiquement ou manuellement sur le site de
Fujitsu pour obtenir les mises à jour récentes de votre système.
134 - Restaurer vos logiciels pré-installés
L’icône FDU doit apparaître dans la zone de notification en bas à droite de votre écran (faites défiler votre
curseur sur les icônes pour trouver l’icône appropriée). Si l’icône FDU n’apparaît pas dans cette zone, vous
pouvez la lancer à partir de Démarrer -> Tous les programmes, puis en cliquant sur Mise à jour des pilotes
Fujitsu (cette opération créera automatiquement l’icône).
Pour appeler le menu FDU, vous pouvez soit faire un clic droit sur l’icône FDU soit maintenir le stylet sur
l’icône pendant deux secondes jusqu’à ce que le menu apparaisse. Le menu contient les éléments suivants :
Vérifier les mises à jour maintenant
Permet une recherche manuelle des mises à jour de pilotes. La première fois que vous l’utiliserez, on vous
demandera d’accepter un contrat de licence. Après avoir cliqué sur l’icône, l’utilitaire FDU se connectera
automatiquement au site Fujitsu pour vérifier les mises à jour et les télécharger. Pendant le processus de
téléchargement, l’icône affiche une barre rouge indiquant qu’elle ne peut pas être utilisée pendant que le
téléchargement est en cours. Lorsque la mise à jour est terminée, un message apparaît pour vous en informer.
Activer les notifications de mises à jour automatiques
Recherches automatiques de nouvelles mises à jour sur une base régulière (environ tous les 3 jours).
Afficher l’historique des mises à jour
Affiche un écran qui présente un historique des mises à jour effectuées par l’utilitaire FDU.
À propos de l’utilitaire FDU
Affiche le numéro de version de l’utilitaire FDU et des informations relatives aux droits d’auteur.
Fichier Lisez-moi de l’utilitaire FDU
Affiche le fichier Lisez-moi de l’utilitaire FDU.
135 - Restaurer vos logiciels pré-installés
Chapitre 5
Entretien
Entretien de votre PC Tablette LifeBook
Si vous prenez soin de votre ordinateur portable LifeBook, vous augmenterez sa durée de vie et sa fiabilité.
Cette section fournit certains conseils relatifs à l’entretien de votre PC Tablette et de ses dispositifs.
LE SYSTÈME CONTIENT DES COMPOSANTS POUVANT ÊTRE FORTEMENT ENDOMMAGÉS PAR UNE DÉCHARGE
ÉLECTROSTATIQUE (DES). POUR MINIMISER CE RISQUE, VEUILLEZ PRENDRE LES PRÉCAUTIONS SUIVANTES :
•
•
•
•
AVANT DE CONNECTER OU DE DÉCONNECTER VOTRE PC TABLETTE LIFEBOOK (LORSQUE VOUS UTILISEZ
UN DUPLICATEUR DE PORTS), IL EST TOUJOURS RECOMMANDÉ DE TOUCHER UN OBJET MÉTALLIQUE MIS
À LA TERRE AFIN DE DÉCHARGER L’ÉLECTRICITÉ STATIQUE QUI S’EST ACCUMULÉE DANS VOTRE CORPS.
ASSUREZ-VOUS DE METTRE VOTRE SYSTÈME HORS TENSION AVANT D’AJOUTER OU DE RETIRER DES
COMPOSANTS DU SYSTÈME. MÊME SI LE SYSTÈME EST EN ÉTAT DE SOMMEIL OU DE VEILLE
PROLONGÉE, DES DONNÉES POURRAIENT ÊTRE PERDUES ET LA MÉMOIRE ENDOMMAGÉE SI LE COURANT
QUI ALIMENTE LE SYSTÈME N’EST PAS COUPÉ.
LORSQUE VOUS INSTALLEZ OU RETIREZ UN MODULE DE MÉMOIRE, TENEZ-LE PAR LE BORD DE FAÇON
À NE TOUCHER AUCUN CONTACT NI AUCUNE PUCE. ASSUREZ-VOUS DE NE TOUCHER AUCUNE BORNE
DE CONNEXION NI AUCUN COMPOSANT INTERNE DE L’ORDINATEUR. LA PEAU DÉGAGE UNE SUBSTANCE
HUILEUSE QUI POURRAIT CAUSER UN COURT-CIRCUIT AUX COMPOSANTS.
TOUT ÉQUIPEMENT ÉLECTRIQUE PEUT ÊTRE DANGEREUX S’IL EST UTILISÉ DE FAÇON INAPPROPRIÉE. LE
FONCTIONNEMENT DE CE PRODUIT OU D’AUTRES PRODUITS SIMILAIRES DOIT TOUJOURS SE FAIRE SOUS
LA SUPERVISION D’UN ADULTE. NE PERMETTEZ PAS AUX ENFANTS D’ACCÉDER À L’INTÉRIEUR DE TOUT
PRODUIT ÉLECTRIQUE ET NE LEUR PERMETTEZ PAS D’EN MANIPULER LES CÂBLES.
136 - Entretien
• Votre PC Tablette est durable, mais c’est un appareil électronique sensible. Traitez-le avec respect
et précaution.
• Prenez l’habitude de transporter votre ordinateur dans une mallette convenable.
• N’essayez pas de réparer l’ordinateur vous-même. Suivez toujours les instructions d’installation
à la lettre.
• Gardez-le loin de la nourriture et des boissons.
• Pour protéger votre ordinateur des dommages et optimiser ses performances, gardez toujours les
grilles de ventilation dégagées, propres et sans débris. Il est possible que vous deviez les nettoyer
périodiquement, selon l’environnement dans lequel vous utilisez l’ordinateur.
• Ne placez pas l’ordinateur dans un endroit où les grilles de ventilation pourraient être obstruées,
notamment dans un petit espace fermé ou sur une surface molle comme un lit ou un coussin.
• Si vous renversez par accident un liquide sur votre PC Tablette LifeBook :
1
2
3
4
Éteignez-le.
Positionnez-le de sorte que le liquide puisse sortir.
Laissez-le sécher pendant 24 heures, ou plus si nécessaire.
S’il ne démarre pas une fois sec, contactez le service d’assistance clients.
• N’utilisez pas votre PC Tablette LifeBook Fujitsu dans un environnement très humide (à proximité
d’une baignoire, d’une piscine).
• Utilisez toujours l’adaptateur secteur d’origine et des batteries approuvées pour votre ordinateur.
• Évitez d’exposer l’ordinateur au sable, à la poussière et à d’autres matières.
• N’exposez pas votre ordinateur portable à la lumière directe du soleil pendant de longues périodes,
car les températures de plus de 60°C (140°F) pourraient l’endommager.
• Gardez les caches des connecteurs et des fentes fermés lorsque ceux-ci ne sont pas en utilisation.
• Ne déposez pas d’objets lourds ou tranchants sur l’ordinateur.
• Si vous transportez votre ordinateur dans un porte-documents, ou toute autre mallette, assurez-vous
qu’aucun objet dans l’étui n’appuie sur le couvercle.
• Ne placez jamais votre ordinateur de façon à ce que le lecteur optique supporte le poids du portable.
137 - Entretien
Nettoyage de votre PC Tablette LifeBook
• Débranchez toujours la prise électrique (tirez la fiche, pas le cordon).
• Nettoyez votre PC Tablette LifeBook
avec un chiffon humide, non pelucheux. N’utilisez pas
/
de solvant ou d’abrasif.
• Utilisez un tissu doux pour enlever la poussière de l’écran. N’utilisez jamais de liquide lave-vitre.
• Avant de nettoyer ou de désinfecter l’extérieur de votre ordinateur, le clavier ou l’écran ACL,
prenez garde à toujours éteindre le système, à débrancher l’adaptateur secteur et à retirer la batterie.
REMARQUE : Dans tous les cas, évitez de mouiller le revêtement de type peau retournée.
Suivez les procédures de nettoyage en utilisant des produits nettoyants recommandés disponibles
dans le commerce.
Extérieur et clavier de l’ordinateur
Pour nettoyer l’extérieur et le clavier, utilisez l’un des nettoyants suivants :
• Kit de nettoyage pour ordinateur portable Office Depot® N° 154-616
• Lingettes Klear Screen® de Meridrew Entreprises
• Lingettes de nettoyage 3M CL563
Remarque : Après avoir nettoyé votre système avec l’un de ces produits, faites-le reluire et retirez les
traces de produit à l’aide d’un tissu doux non-pelucheux.
Désinfection des ordinateurs LifeBook
Nettoyez la surface de l’ordinateur à l’aide d’un tissu doux imbibé d’une solution d’éthanol à 50% ou d’un
autre germicide à base d’éthanol homologué par l’EPA (« Environment Protection Agency », ou Agence
américaine de protection de l’environnement) en tant que désinfectant hospitalier.
•
•
•
SI VOUS N’UTILISEZ PAS LES BONS PRODUITS, L’AFFICHAGE DE L’ÉCRAN ACL OU L’ORDINATEUR LUI-MÊME PEUT EN
ÊTRE ENDOMMAGÉ. POUR SAVOIR COMMENT UTILISER ET MANIPULER CONVENABLEMENT LES PRODUITS NETTOYANTS,
PRENEZ GARDE À TOUJOURS CONSULTER LES PROCÉDURES DE NETTOYAGE DU FABRICANT, AINSI QUE LES FICHES
TECHNIQUES DE SÉCURITÉ.
N’UTILISEZ JAMAIS DE NETTOYANTS À BASE ALCALINE, D’AMMONIAQUE, D’ACIDE, OU DE PRODUITS CHIMIQUES
BIOLOGIQUES TELS QUE DISSOLVANTS POUR PEINTURE, ACÉTONE, ALCOOL PROPYLE OU ISOPROPYLE, OU PÉTROLE.
LA FINITION DES SURFACES DE L’ORDINATEUR ET LA PELLICULE DE PROTECTION DE L’ÉCRAN ACL POURRAIENT EN
ÊTRE ENDOMMAGÉES.
N’UTILISEZ JAMAIS D’AIR COMPRIMÉ POUR LE NETTOYAGE DES PC LIFEBOOK ET STYLISTIC.
138 - Entretien
Nettoyage du filtre anti-poussière
Votre LifeBook est équipé de ventilateurs qui attirent l’air à l’intérieur pour refroidir les composants
internes de l’ordinateur. Selon l’environnement d’utilisation, de la poussière et de la saleté peuvent
pénétrer avec l’air. Si elles s’accumulent, elles peuvent nuire au bon fonctionnement du système.
•
•
•
RETIRER L’ADAPTATEUR SECTEUR : AVANT DE RETIRER LE FILTRE, ÉTEIGNEZ LE SYSTÈME AINSI QUE LES
PÉRIPHÉRIQUES, ET DÉBRANCHEZ L’ADAPTATEUR SECTEUR.
NETTOYAGE DU FILTRE :
- N’UTILISEZ PAS DE DÉTERGENT
- ÉVITEZ D’ENDOMMAGER LE FILTRE, CE RISQUE N’EST PAS COUVERT PAR LA GARANTIE.
- UTILISEZ DES OUTILS EN PLASTIQUE POUR NETTOYER LE FILTRE. LES OUTILS EN MÉTAL OU EN BOIS RISQUENT
DE L’ENDOMMAGER.
DES : AVANT DE NETTOYER LE FILTRE, TOUCHER UN OBJET EN MÉTAL AFIN D’ÉVACUER L’ÉLECTRICITÉ STATIQUE
QUI S’EST ACCUMULÉE DANS VOTRE CORPS.
• ASSUREZ-VOUS TOUJOURS QUE LE FILTRE ANTI-POUSSIÈRE EST INSTALLÉ AVANT DE METTRE VOTRE
SYSTÈME EN MARCHE. DANS LE CAS CONTRAIRE, VOUS RISQUEZ DE CONTAMINER VOTRE SYSTÈME
ET DE L’ENDOMMAGER.
1
Éteignez votre ordinateur et débranchez
l’adaptateur c.a.
2
Fermez l’écran et tournez l’ordinateur
à l’envers.
3
Retirez le filtre en poussant le loquet
en direction du filtre, puis soulevez-le
et tirez-le vers l’extérieur (Figure 49).
4
Nettoyez soigneusement le filtre ainsi que
le conduit d’air.
5
Mettez le filtre ànouveau en placeen insérant
d’abord une extrémité, puis poussez jusqu’au
bout jusqu’à ce qu’il s’enclenche.
139 - Entretien
Filtre anti-poussière
Figure 49. Retrait du filtre anti-poussière
Entreposage de votre PC Tablette LifeBook
• Si vous entreposez votre PC Tablette LifeBook durant un mois ou plus, éteignez-le, chargez
complètement les batteries au lithium, puis enlevez-les.
• Rangez votre Fujitsu LifeBook dans un endroit frais et sec. Les températures doivent être
maintenues entre -25ºC et 60ºC (13°F et 140°F).
• Rangez votre ordinateur et les batteries séparément. Si vous rangez votre ordinateur portable alors
que la batterie est installée, la batterie se déchargera et sa durée de vie sera réduite. De plus, une
batterie défectueuse pourrait endommager votre ordinateur.
•
•
•
ÉTEIGNEZ TOUJOURS VOTRE ORDINATEUR AVANT DE LE TRANSPORTER ET/OU DE L’EMBALLER. APRÈS AVOIR
ÉTEINT LE SYSTÈME, ATTENDEZ QUE LE PANNEAU DE VOYANTS D’ÉTAT INDIQUE BIEN LE STATUT HORS TENSION
(C’EST À DIRE QU’AUCUN VOYANT N’EST ALLUMÉ).
IL EST POSSIBLE QUE L’APPAREIL NE SE METTE PAS AUTOMATIQUEMENT EN MODE HORS TENSION OU VEILLE
CETTE SITUATION PEUT SE PRODUIRE EN FONCTION
DES PARAMÈTRES DE SÉCURITÉ PAR MOT DE PASSE QUI GÈRENT LA PRÉ-INITIALISATION DU SYSTÈME OU D’UNE
AUTRE APPLICATION EN COURS D’UTILISATION SUR L’ORDINATEUR.
PROLONGÉE APRÈS QUE VOUS AVEZ FERMÉ LE COUVERCLE.
SI VOUS TENTEZ DE TRANSPORTER L’ORDINATEUR SANS L’ÉTEINDRE, VOUS RISQUEZ DE L’ENDOMMAGER EN LE
SOUMETTANT À DES CHOCS OU EN L’AMENANT EN ÉTAT DE SURCHAUFFE CAR LES GRILLES DE VENTILATION
PEUVENT ÊTRE BLOQUÉES OU OBSTRUÉES.
Voyager avec votre PC Tablette LifeBook
• Ne transportez pas votre PC Tablette pendant qu’il est en marche.
• Il est recommandé de garder l’ordinateur près de vous pendant votre voyage au lieu de l’enregistrer
comme bagage.
• Lorsque vous partez en voyage, apportez toujours avec vous le CD de remise en état du système
fourni avec votre ordinateur portable. Si vous éprouvez des problèmes de logiciel d’exploitation
pendant votre voyage, vous pourriez en avoir besoin pour trouver la solution au problème.
140 - Entretien
• Ne faites jamais passer votre ordinateur au détecteur de métal. Faites inspecter votre ordinateur
manuellement par le personnel de sécurité. Par contre, le disque dur peut être soumis à un appareil
radioscopique. Pour éviter les problèmes, placez votre ordinateur à proximité de l’entrée de
l’appareil et retirez-le aussitôt que possible, ou faites-le inspecter manuellement par le personnel de
sécurité. Il se peut que les responsables de la sécurité vous demandent d’allumer votre ordinateur,
alors assurez-vous que vous avez une batterie chargée à disposition.
• Apportez avec vous les adaptateurs de fiches nécessaires lorsque vous voyagez outre-mer. Vérifiez
le diagramme suivant pour déterminer quel adaptateur de fiche vous serait nécessaire ou renseignez-vous
auprès de votre agent de voyage.
Type de prise
Emplacement
Type de prise
Emplacement
Canada, États-Unis, Mexique, certains pays
d’Amérique latine, Japon, Corée, Taïwan,
Philippines
Royaume-Uni, Irlande,
Malaisie, Singapour,
certains pays d’Afrique
Russie et Communauté des États indépendants
(CEI), la plupart des pays d’Europe, certains
pays d’Amérique Latine, Moyen-Orient, certains
pays d’Afrique, Hongkong, Inde, la plupart des
pays de l’Asie du Sud
Chine, Australie,
Nouvelle-Zélande
Batteries
Entretien de vos batteries
• Manipulez toujours les batteries avec soin.
141 - Entretien
• Ne court-circuitez pas les terminaux des batteries (c’est à dire, ne touchez pas les deux terminaux
avec des objets métalliques). Ne transportez pas des batteries dans votre poche ou sac à main car
elles pourraient entrer en contact avec de la monnaie, des clés ou d’autres objets métalliques. Cela
pourrait causer une explosion ou un incendie.
• Il ne faut jamais laisser tomber, percer, désassembler, abîmer ou incinérer une batterie.
• Rechargez les batteries uniquement selon les instructions de ce manuel et seulement dans
des endroits aérés.
• Ne laissez pas les batteries dans des endroits chauds pendant plus d’une journée ou deux.
Les grandes chaleurs risquent de raccourcir la durée de vie de votre batterie.
• Ne rangez pas la batterie pendant plus de 6 mois sans la recharger.
Augmenter la durée de vie des batteries
• Alimentez votre PC Tablette avec l’adaptateur secteur ou l’adaptateur d’auto/avion optionnel
chaque fois que vous le pouvez.
• Si votre ordinateur portable fonctionne sur l’alimentation par batterie pendant toute une journée,
branchez-le sur l’adaptateur secteur durant la nuit pour recharger la batterie.
• Gardez la luminosité au niveau le plus bas possible.
• Réglez la gestion de la consommation d’énergie pour une durée de vie maximale de la batterie.
• Lorsque votre PC Tablette est allumé et que vous ne l’utilisez pas, mettez-le en mode sommeil.
• Limitez votre accès au lecteur multimédia.
• Désactivez la fonction de notification d’insertion automatique du lecteur média.
• Éjectez les cartes ExpressCard lorsqu’elles ne sont pas utilisées.
Entretien de votre lecteur multimédia
Entretien de votre lecteur multimédia (DVD/CD/CD-R)
Les disques multimédias sont des dispositifs précis qui fonctionneront de manière fiable si vous en prenez
bien soin.
142 - Entretien
•
•
•
•
•
•
•
Rangez toujours vos disques multimédias dans leurs étuis lorsqu’ils ne sont pas utilisés.
Tenez toujours les disques par les bords et évitez d’en toucher la surface.
Évitez de ranger les disques multimédias dans des endroits où les températures sont extrêmes.
Ne courbez pas les disques multimédias, ne les rayez pas et ne déposez pas d’objets lourds par dessus.
Ne renversez pas de liquide sur les disques multimédias.
Ne laissez pas la poussière s’accumuler sur les disques multimédias.
N’écrivez jamais sur la surface de l’étiquette avec un stylo à bille ou un crayon. Utilisez toujours
un crayon-feutre.
• Si un disque subit un changement soudain de température, il est possible qu’une condensation se
forme sur la surface. Essuyez l’humidité avec un chiffon doux et non pelucheux, puis laissez le
disque sécher à température ambiante. N’UTILISEZ PAS de sèche-cheveux ou d’autre appareil
chauffant pour sécher les disques multimédia.
• Si un disque est sale, utilisez seulement un nettoyant pour DVD/CD ou essuyez-le avec un chiffon
doux, propre et non pelucheux : commencez par le bord intérieur et essuyez en direction du bord
extérieur.
Entretien du lecteur optique
Votre lecteur optique est durable, mais vous devez en prendre soin. Veuillez faire attention aux points
suivants :
• Le lecteur fait pivoter le disque compact à une vitesse très élevée. Lorsqu’il fonctionne, évitez de le
déplacer ou de le soumettre à des chocs ou à des vibrations.
• Évitez d’utiliser ou de ranger le lecteur dans un endroit où il serait exposé à des températures extrêmes.
• Évitez d’utiliser ou de ranger le lecteur dans un endroit humide ou poussiéreux.
• Évitez d’utiliser ou de ranger le lecteur à proximité d’aimants ou de dispositifs qui génèrent de forts
champs magnétiques.
• N’utilisez pas et ne rangez pas le lecteur dans des endroits exposés à des chocs ou à des vibrations.
• Ne désassemblez pas ou ne démontez pas le lecteur optique.
• L’usage d’un nettoyant spécial pour lentilles est recommandé pour l’entretien du lecteur.
143 - Entretien
Cartes ExpressCard
Entretien de vos cartes
Les cartes ExpressCard sont durables, mais vous devez en prendre soin. La documentation fournie avec
votre carte vous donnera des renseignements spécifiques, mais vous devriez aussi faire attention aux
points suivants :
• Pour les protéger de la poussière et de la saleté, rangez vos cartes dans leur étui de protection
lorsqu’elles ne sont pas installées sur votre PC Tablette LifeBook.
• Évitez toute exposition prolongée aux rayons du soleil ou à une chaleur excessive.
• Gardez les cartes au sec.
• Ne fléchissez pas ou ne courbez pas les cartes et n’y placez pas d’objet lourd.
• Ne faites pas entrer par force une carte dans une fente.
• Évitez de faire tomber les cartes ou de les exposer à des vibrations excessives.
144 - Entretien
Chapitre 6
Spécifications techniques
Spécifications techniques du système
Cette partie présente les spécifications techniques du matériel et de l’environnement de votre PC Tablette
LifeBook Fujitsu. Selon les configurations, les spécifications techniques peuvent varier.
Étiquette de configuration
L’étiquette de configuration qui est située sur le dessous de votre PC Tablette comporte des informations
spécifiques à propos des options que vous avez choisies pour votre ordinateur. Voici un exemple d’étiquette
de configuration :
Numéro de pièce
Identifiant de configuration
Configuration P/N: A4XXXXXXXXXXXXX
FPC P/N: FPCXXXXXX
T730, i5-540-M, 12.1 WXGA, W7Pro, 160G, 4GB
N° de modèle
Processeur
Système d’exploitation Disque dur
Taille/type d’écran
145 - Spécifications techniques du système
Mémoire
Microprocesseur
Nouveaux Processeurs Intel® Core™ (reportez-vous à l’étiquette du système pour connaître la vitesse
du processeur)
Puce
• Mobile Intel® QM57 Express
• Platform Control Hub (PCH)
Mémoire
Mémoire système
• Module mémoire vive à double canal SDRAM DDR3 1066 MHz
• Deux fentes mémoire DIMM avec possibilité de mise à niveau jusqu’à 8 Go de mémoire totale
(4 Go x 2).
Mémoire cache
Jusqu'à 4 Mo de mémoire cache L3 intégrée (selon l'UC).
Vidéo
Écran couleur plat TFT rétroéclairé à DEL et à matrice active, avec possibilité d’affichage simultané
sur deux moniteurs.
Couleur et résolution Vidéo
Modèle XGA Crystal View de 12,1 po
• Interne : Résolution 1 280 x 800 pixels, 16 mln couleurs
• Externe : Résolution 1 920 x 1200 pixels, 16 mln couleurs
• En simultané : Résolution 1 280 x 800 pixels, 16 mln couleurs
Mémoire vive vidéo
Graphiques Intel® HD avec fréquence dynamique. Distribution automatique de puissance informatique à
l'UC et aux applications graphiques ayant besoin d'un surplus de puissance atteindre 20 % en plus.
146 - Spécifications techniques du système
Numériseur
Selon la configuration de votre système, l’une de ces options de numérisation est disponible :
• Numériseur actif (fonctionne avec le stylet actif), ou
• Numériseur double, comprenant le numériseur actif et le pavé tactile à technologie capacitive
(impulsion par le stylo actif et impulsion par le doigt).
Audio
• Codec Realtek ALC269 avec système audio haute définition (HD)
• Écouteurs : Écouteurs stéréo/sortie audio, 3,5 mm, 1 Vrms ou moins, impédance minimale de 32 ohms
• Microphone : Prise de microphone stéréo, 3,5 mm, 100 mVp-p ou moins, impédance minimale
de 10 Kohms
• Deux haut-parleurs intégrés de 25 mm x 16 mm, d’une puissance de 0,6 W
• Deux microphones numériques intégrés
Options de mémoire de masse
Disque dur
Tampon de données ATA en série ; 9,5 mm (2,5 po) résistant aux chocs, avec utilitaire Capteur de chocs.
La capacité et la vitesse du disque dur sont déterminées par la configuration du système.
Périphériques de baie modulaire
L’un des périphériques suivants est déjà installé :
• Graveur de DVD multiformat double couche : CD-ROM 24x, CD-R 24x, CD-RW 10x, DVD-ROM
8x, DVD-RAM 5x, DVD +/-R 8x, DVD +/-R 4x (DL), DVD-RW 6x, DVD+RW 8x
• Batterie de baie modulaire
• Volet réducteur de poids
147 - Spécifications techniques du système
Caractéristiques techniques
Dispositif de pointage intégré
Boutons de commande du curseur TouchPad avec zone intégrée pour le défilement
Communications
• Réseau local Gigabit (ou Giga-octet) : Intel 82577LM 10/100/1000 Gigabit Ethernet LAN
• Réseau local sans fil : Carte intégrée Intel® Centrino® Advanced-N 6200 (a/b/g/n, 2 x 2), en
option ou Atheros XSPAN 802.11bgn
• Bluetooth : Périphérique Bluetooth en option V2.1 pour communications personnelles sur réseau
local sans fil
• WWAN : Réseau étendu sans fil en option
Caméra Web
Webcam optionnelle de 2.0 mégapixels, intégrée Platform.
Sécurité
Puce Trusted Platform Module (TPM) : Le LifeBook T730 est pourvu d’une puce Trusted Platform
Module (TPM), installée pour plus de sécurité sur le système.
Verrouillage antivol : Fente pouvant être utilisée pour installer un dispositif antivol.
Capteur d’empreintes digitales : Le capteur d'empreintes digitales utilise des données biométriques
pour s'assurer que seule une personne ayant enregistré une empreinte peut accéder au système.
Soutien iAMT (utilisation de la technologie Intel ®vPro™) : La technologie Intel vPro est un ensemble
de fonctionnalités associées permettant d'accéder à distance à un ordinateur, par fil ou sans fil. Cette
technologie peut être utilisée que l'ordinateur soit allumé ou non, elle facilite la tâche de l'administrateur,
améliore la sécurité et réduit les coûts en permettant l'accès hors site.
148 - Spécifications techniques du système
Ports de périphériques
Sur le PC Tablette LifeBook :
• Lecteur de carte ExpressCard
• Lecteur de carte MemoryStick/SD
• Connecteur analogique D-SUB à 15 broches pour moniteur VGA externe (cf. Spécifications techniques
d’affichage)
• Trois connecteurs USB 2.0 (Universal Serial Bus) pour périphériques en entrée/sortie
• Une prise d’entrée c.c.
• Une prise IEEE 1394 (à 4 broches)
• Un connecteur de réseau local (RJ-45)
• Un port HDMI
• Port de connexion (à 100 broches pour assurer la connexion avec le duplicateur de ports)
• Une prise écouteur stéréo
• Une prise microphone stéréo/entrée audio
Sur le duplicateur de ports en option :
•
•
•
•
•
•
Connecteur D-SUB 15 broches pour moniteur VGA externe
Quatre connecteurs USB 2.0 pour périphériques d’entrée/sortie
Un connecteur de réseau local (RJ-45)
Une entrée c.c.
Un connecteur DVI-D
Un connecteur de sortie écouteurs
Clavier
Clavier intégré avec toutes les fonctions de claviers compatibles PS/2 de 101 touches.
• Nombre total de touches : 84
• Touches de fonction : Touches F1 à F12 avec une touche Fn pour fonctions étendues
149 - Spécifications techniques du système
• Deux touches Windows : Une touche Démarrage, une touche Applications
• Pas de touche : 19 mm ; course : 3,0 mm
• Dispositif de pointage TouchPad intégré avec deux boutons gauches, deux boutons droits
et une zone de défilement
• Repose-main intégré
• Résistant aux éclaboussures
• Prise en charge de clavier/souris USB externe
Alimentation
Batterie
• Batterie rechargeable standard au lithium, 6 accumulateurs ; 10,8 V ; 5200 mAh
• Batterie rechargeable en option au lithium, 6 accumulateurs ; 10,8 V ; 3800 mAh
Adaptateur secteur
Autodétection 100-240 V c.a., fournissant 19 V c.c.; 4,22 A ; 80 W au portable LifeBook, y compris
un câble c.a.
Gestion de l’alimentation
Conforme à la norme ACPI (Advanced Configuration and Power Interface, ou Interface avancée
de configuration et de gestion de l’énergie)
Dimensions et poids
Dimensions générales
Environ 297 mm de largeur x 233 mm de profondeur x 39 mm d'épaisseur (11,69 po x 9,17 po x 1,54 po).
La hauteur comprend les pattes en caoutchouc.
150 - Spécifications techniques du système
Poids
Ecran large, numériseur actif avec réducteur de poids – 1,79 kg (3,95 lb)
Ecran large, numériseur actif avec lecteur optique : 1,96 kg (4,32 lb)
Ecran standard, numériseur actif double avec lecteur optique : 2,07 kg (4,56 lb)
Environnement d’exploitation
Température
Utilisation : 5° à 35°C (41° à 95°F). Stockage : -15° à 60° C (5° à 140° F)
Humidité
Utilisation : 20 % à 85 % d’humidité relative, sans condensation Stockage : 8 % à 85 % d’humidité
relative, sans condensation
Altitude
Utilisation : 3 048 m (10 000 pieds) maximum
Accessoires préférés des utilisateurs
Pour commander des accessoires Fujitsu ou obtenir des renseignements supplémentaires, visitez le site
www.shopfujitsu.com ou composez le 1-800-FUJITSU.
Logiciels pré-installés
Selon votre système d’exploitation pré-installé, votre ordinateur est livré avec des logiciels inclus afin de
vous permettre d’écouter des fichiers audio et de visionner des fichiers vidéo de formats divers. De plus,
un logiciel de transfert de fichiers et un logiciel anti-virus sont fournis.
LA LISTE SUIVANTE ÉNONCE LES PROGRAMMES QUI PEUVENT ÊTRE INSTALLÉS SUR VOTRE
ORDINATEUR. CES PROGRAMMES PEUVENT ÊTRE DIFFÉRENTS EN FONCTION DU SYSTÈME
D’EXPLOITATION ET DE LA CONFIGURATION.
151 - Spécifications techniques du système
• Adobe Reader
• Norton Internet Security™ (essai gratuit de 60 jours)
• CyberLink PowerDirector
• CyberLink PowerDVD
• CyberLink Makedisc (modèles Windows 7 uniquement)
• CyberLink YouCam
• Roxio Creator
• OmniPass (application de reconnaissance des empreintes digitales)
• Utilitaire de mise à jour des pilotes Fujitsu Driver Update
Selon la configuration de votre système, un des progiciels suivants sera installé :
• Microsoft Office Starter 2010 (32 bits) et Microsoft Windows Live Essentials; ou
• Microsoft Office Ready avec Office Assistant
Apprendre à utiliser vos logiciels
Tutoriaux
Tous les systèmes d’exploitation et la plupart des logiciels d’application ont des tutoriaux intégrés dès leur
installation. Nous vous recommandons vivement de passer en revue le tutorial avant d’utiliser une application.
Guides
Sont compris dans votre PC Tablette, les guides d’utilisation pour votre système d’exploitation et les autres
applications pré-installées. Tous les manuels non fournis avec votre ordinateur sont disponibles via le menu
Aide de l’application concernée. Nous vous recommandons de passer en revue ces guides d’utilisation
pour obtenir des informations sur l’utilisation des logiciels.
152 - Spécifications techniques du système
Adobe Reader
Adobe Reader permet de consulter et d’imprimer des fichiers PDF sur toutes les plateformes
informatiques courantes.
Norton Internet Security
Votre LifeBook est livré avec une version d’essai de 60 jours de Norton Internet Security™ de Symantec.
La suite Norton Internet Security fournit des outils pour protéger votre système des virus, des pirates, des
logiciels espions et du pourriel. Il aide à la protection des données actuellement sur votre disque dur contre
toute infection ou destruction. La version d’essai est activée après acceptation du contrat de licence du
logiciel. Après 60 jours, vous devrez vous procurer un abonnement auprès de Symantec pour pouvoir
télécharger les signatures de virus, de logiciels espions et de pourriel les plus récentes.
CyberLink MakeDisc
(Systèmes Windows 7 uniquement) CyberLink MakeDisc vous permet de graver des données, des vidéos
et des photos sur des CD ou des DVD.
CyberLink PowerDVD
CyberLink PowerDVD vous permet de réaliser et d’éditer des films personnels et des présentations sur disques.
CyberLink YouCam
La webcam intégrée CyberLink YouCam vous permet de prendre des photos ou des films, d’y ajouter
des effets spéciaux, et de les partager sous divers formats ou par l’intermédiaire de réseaux sociaux.
CyberLink PowerDirector
CyberLink PowerDirector vous permet d’éditer et d’améliorer vos vidéos en les agrémentant notamment
d’effets spéciaux.
Roxio Creator
Roxio Creator vous permet de graver facilement des CD ainsi que d'organiser, d'éditer et de partager des
photos numériques, de la musique, des données, ou des vidéos.
153 - Spécifications techniques du système
OmniPass (application de reconnaissance des empreintes digitales)
Le capteur d’empreintes digitales utilise le logiciel Softex OmniPass qui fournit des fonctions de gestion
de mot de passe aux systèmes d’exploitation Microsoft Windows. OmniPass vous permet d’utiliser un
« mot de passe principal, ou maître » pour toutes les applications Windows et mots de passe en ligne, avec
une interface d’utilisateur conviviale permettant de gérer en toute sécurité les mots de passe, les utilisateurs
et les identités multiples pour chaque utilisateur.
Utilitaire de mise à jour des pilotes Fujitsu Driver Update
L’utilitaire Fujitsu Driver Update (FDU) est fourni avec votre système. Avec FDU, vous pouvez choisir
d’aller automatiquement ou manuellement sur le site de Fujitsu pour obtenir les mises à jour récentes de
votre système. Voir « Téléchargement automatique des mises à jour de pilotes » en page 134.
Logiciels Microsoft
Selon la configuration de votre système, nous avons préinstallé dans votre système soit Microsoft Starter
2010 et Microsoft Windows Live Essentials, soit Microsoft Office Ready avec Office Assistant,
conformément aux indications ci-dessous.
Microsoft Office Starter 2010 (32-bit)
Microsoft Office Starter 2010 est une suite logicielle comprenant les versions simplifiées de Word 2010
et d'Excel 2010 avec des publicités. Microsoft PowerPoint, Microsoft Outlook et Microsoft Publisher ne
sont pas fournis. Pour activer la version intégrale d'Office sur votre ordinateur, vous devrez acheter un
disque Office 2010, la carte de clé produit (PKC ou Product Key Card), ou choisir une des suites
complètes de Microsoft Office 2010.
Fujitsu propose une carte de clé produit pour les éditions Famille et Etudiant 2010 et Famille et Entreprise
2010 de Microsoft Office (32-bit). Il vous suffit de saisir la clé produit et c'est parti ! Vous pouvez aussi
acheter la suite complète de Microsoft Office 2010 chez un revendeur informatique ou en ligne sur le site
de Microsoft.
154 - Spécifications techniques du système
Microsoft Windows Live Essentials
Windows Live Essentials est une suite de programmes vous permettant d'utiliser votre LifeBook avec plus
d'aisance et de plaisir. Live Essentials comprend six applications Live : Messenger, Photo Gallery, Writer,
Mail, Movie Maker et Silverlight. Messenger vous permet de communiquer et d'échanger avec des
personnes ou des groupes. Photo Gallery est une application souple d'utilisation vous permettant
d'organiser, de modifier et de partager des photos. Writer vous permet de publier des textes sur votre blog,
d'y télécharger des vidéos et des photos, et en général de publier des textes en ligne. Quant à Mail, il vous
permet de gérer votre messagerie. Movie Maker vous permet de créer des films et des diaporamas de très
bonne qualité à partir de vos vidéos et photos. L'importation de vidéos et photos haute définition ou
standard est très simple, et l'ajout d'animations, de musique et de titres ne prendra que quelques minutes
grâce à AutoMovie. Quant à Silverlight, cette application rendra votre expérience encore plus
passionnante grâce au partage de fichiers vidéo de grande qualité sur Internet et sur appareils mobiles.
Microsoft® Office Ready avec Office Assistant
Avec les ordinateurs prêts à recevoir Office, il est encore plus facile de profiter du pack Office 2007 de
Microsoft®. Les versions complètes d’Office Basic (Édition de base), Small Business (PME) et
Professionnel 2007 de Microsoft® sont préinstallées sur votre ordinateur, donc il n'y a aucune installation
à faire. Avec ces PC prêts à recevoir Office, vous avez la possibilité d'activer une version d'essai de 60
jours de Microsoft® Office Professionnel 2007, pour cela, il vous suffit d'acheter le kit de licence Office
2007 qui convient pour débloquer la version complète de votre choix.
Fujitsu offre un kit de licence multimédia pour Microsoft® Office Petite Entreprise 2007. Vous n'avez qu'à
saisir votre clé de produit et le logiciel est immédiatement prêt à l'emploi. Vous pouvez aussi acheter un
kit de licence Microsoft® Office 2007 sans multimédia (MLK) auprès de votre détaillant de matériel
informatique ou sur Internet chez Microsoft dans un délai de 90 jours après l'achat de votre ordinateur.
Options du système d’exploitation
Microsoft Windows 7 Édition Professionnelle
Microsoft Windows XP Édition Tablet PC antérieure (Disponible sur commande spéciale uniquement)
155 - Spécifications techniques du système
Glossaire
Glossaire
ACL
Affichage à cristaux liquides. Type d’écran produisant des images par contrôle de l’orientation
de cristaux dans un liquide cristallin.
ACPI (Advanced Configuration and Power Interface)
Interface avancée de configuration et de gestion de l’énergie.
Adaptateur auto/avion
Un dispositif qui convertit le courant continu d’un allume-cigare de voiture ou une prise c.c.
d’avion en courant continu à la tension voulue pour alimenter votre PC Tablette LifeBook.
Adaptateur secteur
Appareil convertissant une tension c.a. provenant d’une prise murale en tension c.c. nécessaire
à l’alimentation de votre PC Tablette LifeBook.
Adresse IP
Un identifiant pour un ordinateur ou un périphérique sur un réseau TCP/IP. Les réseaux qui utilisent le
protocole TCP/IP acheminent des messages en fonction de l’adresse IP de la destination. Le format
d’une adresse IP est une adresse numérique de 32 bits qui s’écrit avec quatre nombres séparés par des
points. Chaque numéro peut aller de 0 à 255. Par exemple, 1.160.10.240 pourrait être une adresse IP.
Au sein d’un réseau isolé, vous pouvez attribuer des adresses IP au hasard tant que chacune d’elles
reste unique. Toutefois, la connexion d’un réseau privé à Internet exige l’utilisation d’adresses IP
enregistrées (appelées adresses Internet) afin d’éviter les doublons.
156 - Glossaire
Les quatre numéros dans une adresse IP sont utilisés de différentes façons pour identifier un réseau
particulier et un serveur hôte. Trois registres régionaux Internet (ARIN, RIPE NCC et APNIC)
attribuent des adresses Internet à partir des trois classes suivantes :
Classe A : accepte 16 millions de serveurs sur chacun des 126 réseaux.
Classe B : accepte 65 000 serveurs sur chacun des 16 000 réseaux.
Classe C : accepte 254 serveurs sur chacun des 2 millions de réseaux.
Le nombre d’adresses Internet non attribuées commence à manquer, aussi un nouveau schéma sans
classe, appelé CIDR, remplace de plus en plus le système basé sur les classes A, B et C et est rattaché
à l’adoption de la norme IPv6.
Adresse MAC (Media Access Control)
Adresse de contrôle d’accès au média. Adresse physique unique d’une carte réseau. Pour Ethernet,
les trois premiers octets sont utilisés pour indiquer le code du vendeur, contrôlé et attribué par l’IEEE.
Les trois autres octets sont contrôlés par chaque fabricant (pour empêcher toute superposition) ; en
conséquence, chaque carte Ethernet reçoit une adresse physique unique au monde, ce qui permet de
la distinguer parmi d’autres cartes. Lorsque la technologie Ethernet est utilisée, des trames sont
envoyées et reçues en fonction de cette adresse.
ADSL (Asymmetric Digital Subscriber Line)
Ligne numérique à paire asymétrique. Technologie de transport de services à haut débit sur des lignes
téléphoniques ordinaires.
AGP (Accelerated Graphics Port)
Littéralement : « Port graphique accéléré ». Port local spécialement conçu pour les périphériques
utilisant beaucoup d’images graphiques, notamment les cartes vidéo et les accélérateurs 3D.
Amorçage
Démarrage d’un ordinateur et chargement de son système d’exploitation dans la mémoire vive (RAM),
à partir du disque, de la mémoire ROM ou d’autres supports de stockage.
157 - Glossaire
Authentification à clé partagée
Méthode d’authentification réseau établie par la spécification 802.11, selon laquelle le point d’accès
transmet au client un paquet texte que le client doit crypter avec la bonne clé de réseau et renvoyer au
point d’accès. Si le client possède la mauvaise clé ou s’il n’en a pas, l’authentification échouera et il
ne sera pas autorisé à s’associer au point d’accès. L’authentification à clé partagée n’est pas considérée
comme une méthode sûre, car un pirate qui accède au texte en clair et au texte crypté avec la clé WEP
pourrait déchiffrer celle-ci.
Authentification ouverte
Méthode d’authentification établie dans la norme 802.11 selon laquelle un client sans fil n’est pas
authentifié avant de pouvoir s’associer.
Batterie au lithium
Type de batterie rechargeable ayant une puissance et une durée de vie importantes compte tenu
de sa taille, et ne subissant pas l’effet de mémoire qui caractérise les batteries au nickel-cadmium.
BIOS
Acronyme signifiant Basic Input-Output System. Programme et ensemble de paramètres par défaut
stockés dans la mémoire morte : il effectue des diagnostics et fait fonctionner votre PC Tablette
LifeBook lorsque vous le mettez sous tension et agit ainsi jusqu’à ce que votre système d’exploitation
se soit chargé à partir du disque. Les informations du BIOS sont transférées au système d’exploitation
pour lui fournir des données sur la configuration et l’état du matériel.
Bit
Contraction de « Binary digit ». Unité simple d’information pouvant adopter la valeur 1 (un) ou 0 (zéro).
bit/s
Abréviation de « bits par seconde ». Unité utilisée pour mesurer le débit de transfert de données.
Bus
Circuit électrique qui transmet des données entre l’unité centrale et les sous-ensembles à l’intérieur
du PC Tablette LifeBook.
158 - Glossaire
Canal
Plage de fréquences à bande étroite utilisée par la carte réseau sans fil pour transmettre des données.
IEEE 802.11b/g : 11 canaux dans la bande de 22 MHz.
Cathodique (CRT – Cathode Ray Tube, ou Tube à rayons cathodiques)
Tube à rayons cathodiques. Moniteur dont l’affichage est assuré par un faisceau de particules électroniques
qui frappe l’écran luminescent. Une image est produite par la variation de la position et de l’intensité
du faisceau.
c.c.
Courant continu. Courant qui ne fluctue pas périodiquement dans le temps.
CD-ROM
Disque compact à mémoire morte. Forme de stockage de données numériques lues optiquement
par un faisceau laser plutôt que par une tête magnétique. Généralement, un CD-ROM peut contenir
environ 600 Mo de données et permet d’éviter les problèmes d’écrasement de la tête qui détruisent
des données, ainsi que l’usure durant la lecture.
Clé de chiffrement (clé réseau)
Clé de chiffrement utilisée pour coder les textes de messages et pour effectuer les vérifications
de l’intégrité des messages. La clé de chiffrement protège les données contre les interceptions
non autorisées.
Ce dispositif utilise la même clé de chiffrement pour coder ou décoder les données ; cette dernière
est obligatoire pour que l’émetteur et le receveur puissent communiquer.
Clé de réseau
Clé utilisée pour le chiffrement des données sur le réseau. La clé de réseau étant utilisée par l’ordinateur
personnel pour crypter et décrypter les données, l’émetteur et le récepteur doivent utiliser la même clé.
Commande
Instruction que vous transmettez au système d’exploitation. Exemple : exécuter une application
particulière ou formater une disquette.
159 - Glossaire
Compatibilité Wi-Fi
Contraction de « Wireless Fidelity ». Une conformité Wi-Fi indique que le produit a réussi le
test d’interopérabilité de la WECA (Wireless Ethernet Compatibility Alliance), ce qui garantit
l’interopérabilité de produits de réseau sans fil IEEE 802.11. Pour plus de renseignements sur
la norme Wi-Fi, visitez le site Web de la WECA à : www.wirelessethernet.com.
Configuration
Éléments matériels et logiciels qui composent le système et en définissent son fonctionnement.
DES
Décharge électrostatique. Décharge électrostatique soudaine provenant d’une charge statique qui s’est
accumulée lentement. Exemple : la décharge reçue d’une poignée de porte ou les étincelles générées
par un brossage des cheveux par temps sec.
DHCP (Dynamic Host Configuration Protocol)
Il s’agit d’un protocole qui permet à un ordinateur qui se connecte sur un réseau d’obtenir
dynamiquement sa configuration. Il est utilisé pour récupérer automatiquement des paramètres
nécessaires à la communication, tels des adresses IP. L’émetteur d’une adresse IP s’appelle
un serveur DHCP, et celui qui reçoit est un client DHCP.
DIMM
Barrette de mémoire à double rangée de connexions.
Disque
Support circulaire et plat pour le stockage magnétique de données. S’il est rigide, il est appelé disque
dur. S’il est flexible, il est appelé disque souple. Un disque souple logé dans un boîtier rigide doté
d’un volet est communément appelé disquette.
Disque dur
Support rotatif, circulaire, plat et très rigide pour le stockage magnétique de données.
Disque souple
Support rotatif, circulaire, plat et très souple pour le stockage magnétique de données.
160 - Glossaire
Disquette
Disque souple logé dans un boîtier rigide doté d’un volet.
DMA (Direct Memory Access)
Accès direct à la mémoire. Circuit spécial de transferts de données de mémoire à mémoire
ne nécessitant pas l’intervention de l’UC.
DMI (Desktop Management Interface)
Interface de gestion du mode bureau. Norme qui permet aux applications de gestion d’ordinateur
d’interroger et de configurer, localement ou à distance, des systèmes informatiques, des composants
matériels et logiciels, ainsi que des périphériques.
DNS (Domain Name System)
Système d’adressage par domaines Fonction qui contrôle la correspondance entre l’adresse IP et le
nom attribué à l’ordinateur. Il est possible de communiquer avec les ordinateurs dont les adresses IP
sont inconnues, mais dont le nom est connu.
Données
Les informations stockées et traitées par un système.
DOS (Disk Operating System)
Littéralement « Système d’exploitation de disque » (MS-DOS est un système d’exploitation de disque
Microsoft).
DVMT (Dynamic Video Memory Technology)
Technologie DVMT ou de mémoire vive pour les fonctions vidéo. Topologie de mémoire vidéo
permettant d’améliorer l’efficacité de la carte mère grâce à une utilisation innovante de la mémoire et
à une exploitation en direct de l’AGP (port graphique accéléré).
ECP (Extended Capability Port)
Port à capacités étendues. Ensemble de normes de transmission de données à haute vitesse et
d’interconnexions entre appareils électroniques.
Écran à matrice active
Type d’écran plat où un transistor ou un composant similaire est associé à chaque pixel de l’écran.
161 - Glossaire
E/S
Entrée/Sortie. Données électroniques entrant et sortant de votre PC Tablette.
FCC (Federal Communication Commission)
Commission fédérale des communications (organisation gouvernementale américaine).
Go
Giga-octet. Un milliard d’octets.
Horloge système
Oscillateur à fréquence précise qui synchronise le fonctionnement du système et établit l’heure
et la date.
IDE (Intelligent Drive Electronics)
Interface IDE L’interface IDE se caractérise par le fait que le contrôleur électronique du disque
dur est intégré dans le même boîtier que ce dernier.
IEEE 802.11a
Norme de réseau sans fil autorisant un débit maximum théorique de 54 Mbit/s. Les cartes de norme
802.11a fonctionnent dans les bandes de fréquences UNII inférieures et intermédiaires de 5 GHz.
IEEE 802.11b
Norme de réseau sans fil autorisant un débit maximum théorique de 11 Mbit/s. Les cartes de norme
802.11b fonctionnent dans les bandes de fréquences ISM de 2,4 GHz.
IEEE 802.11g
Norme de réseau sans fil autorisant un débit maximum théorique de 54 Mbit/s. Les cartes de norme
802.11g fonctionnent dans les bandes de fréquences ISM de 2,4 GHz.
Infrarouge
Lumière dont la fréquence est juste en deçà de la partie rouge du spectre optique visible par l’œil humain.
Infrastructure
Nom d’une configuration de réseau local (LAN) sans fil. Ce type de communication utilise un point
d’accès. Il existe également un autre type de communications appelé « Ad hoc ».
162 - Glossaire
IR
Abréviation de « infrarouge ».
IrDA (Infrared Data Association)
Association pour le transfert de données par infrarouge. Une organisation de constructeurs qui
développe les normes de communication utilisant l’infrarouge pour transmettre les données.
IRQ (Interrupt Request)
Demande d’interruption. Il s’agit d’un signal envoyé par le matériel à l’unité centrale indiquant
qu’il y a nécessité de traiter un évènement externe qui vient de se produire.
Ko
Kilo-octet. Mille octets.
LAN (Local Area Network)
Réseau local. Interconnexion d’ordinateurs et de périphériques dans un emplacement délimité
et permettant l’échange de programmes et de données.
Lecteur de disque
Dispositif qui fait tourner le disque et qui contient les têtes et les circuits de commande permettant
la lecture et l’écriture de données sur le disque.
Masque de sous-réseau
Le réseau TCP/IP est commandé à l’aide d’une division en plusieurs sous-réseaux. Une adresse IP
se compose d’une adresse de sous-réseau et de l’adresse de l’ordinateur. Le masque de sous-réseau
détermine le nombre de bits formant l’adresse de sous-réseau dans l’adresse IP. La même valeur doit
être utilisée pour tous les ordinateurs qui doivent communiquer sur le réseau.
Mémoire
Dépôt de données et d’applications auquel l’unité centrale de votre PC Tablette LifeBook
a directement accès.
Mémoire cache
Bloc de mémoire intégré au microprocesseur, auquel il est beaucoup plus rapide d’accéder
qu’à la mémoire vive et utilisé de manière spéciale pour accélérer le débit global des données.
163 - Glossaire
Mégahertz
1 000 000 de cycles par seconde.
MHz
Méga-hertz
MIDI (Musical Instrument Digital Interface)
Interface numérique pour instruments de musique. Protocole de communication standard pour
l’échange d’informations entre un ordinateur et un instrument doté d’une interface numérique,
notamment un synthétiseur.
Mo
Méga-octet. Un million d’octets.
Mode Ad Hoc
Le mode Ad Hoc désigne une topologie de réseau sans fil dans laquelle la connectivité entre les divers
ordinateurs est établie sans périphérique central de réseau sans fil, ou point d’accès. La connectivité
est établie uniquement à l’aide de périphériques clients dans une configuration égal à égal.
Modem
Contraction de « MOdulateur-DEModulateur ». L’appareil qui relie un ordinateur ou un autre terminal
de traitement de données à une ligne de télécommunication.
Module RAM ou module de mémoire vive
Carte de circuit imprimé avec mémoire et circuit associé qui permet à l’utilisateur d’ajouter de la
mémoire supplémentaire à l’ordinateur sans outil spécial.
Mono
Système qui utilise un seul canal pour traiter le son provenant de toutes les sources.
MTU (Maximum Transmission Unit)
Unité maximum de transmission
Taille maximum de données pouvant être transférées en une fois par Internet ou d’autres réseaux.
Si vous rencontrez des difficultés à transférer des données à cause d’une taille maximum (MTU)
trop élevée, vous pouvez définir une MTU inférieure pour que la communication aboutisse.
164 - Glossaire
Nom de réseau (ou SSID, abréviation de « Service Set Identifier »)
La configuration d’un réseau local sans fil fait appel à un regroupement pour éviter les interférences
et le vol de données. Ce regroupement est effectué avec le « Nom de réseau (SSID) ». Pour améliorer
la sécurité, la clé de réseau n’autorise aucune communication si le SSID ne lui correspond pas.
NTSC (National TV Standards Commission).
Commission nationale des normes TV. Norme de diffusion et de réception télévisuelle aux États-Unis.
Octet.
Unité d’information comprenant 8 bits d’informations binaires parallèles.
Pas de touche (clavier).
La distance entre les centres des touches de lettres d’un clavier.
Partition.
Bloc d’espace réservé sur un disque dur, que le système d’exploitation considère comme étant un
disque distinct et qu’il gère en conséquence.
PCMCIA.
PCMCIA est une marque de commerce de la Personal Computer Memory Card International
Association. La PCMCIA (association internationale des cartes de mémoire pour ordinateur
personnel) est l’organisme qui définit les normes relatives aux cartes d’extension pour ordinateurs.
Périphérique.
Équipement qui effectue une fonction spécifique associée à un ordinateur mais qui ne fait pas partie
de cet ordinateur. Exemples : imprimante, modem, CD-ROM.
Pilote.
Programme qui traduit les commandes envoyées par les applications et le système d’exploitation
aux périphériques externes dans la forme exacte exigée par une marque et un modèle particulier
afin de produire les résultats voulus avec le matériel employé.
Pixel.
Le plus petit élément d’affichage, point de couleur à l’écran. Plus la densité de pixels est élevée,
plus l’image est nette.
165 - Glossaire
Point d’accès
Périphérique de réseau sans fil servant de pont de communication entre un réseau sans fil et un
réseau câblé.
Port E/S
Connecteur et circuits de commande associés utilisés par les données électroniques qui entrent
et sortent de votre PC Tablette.
Port LPT (Line Printer Port)
Port d’imprimante par ligne. Expression désignant les ports d’interface parallèle, car les imprimantes
par ligne ont été les premiers types, et plus tard les types les plus communs, de périphériques connectés
aux ports parallèles.
Port série
Connexion à un autre périphérique par lequel les données sont transférées à raison d’un bit à la fois
sur un seul fil conducteur, les autres fils conducteurs servant à la commande du périphérique et non au
transfert de données.
Port série RAM (Random Access Memory)
Mémoire à accès direct, ou mémoire vive. Composant matériel de votre PC Tablette LifeBook qui
stocke des informations binaires (programme et données) tant qu’il est alimenté par une source de
courant.
POST (Power On Self Test)
Auto-diagnostic (ou auto-test) de mise sous tension. Programme faisant partie du BIOS, qui vérifie la
configuration et les conditions de fonctionnement de votre matériel chaque fois que votre PC Tablette
est allumé. Des messages d’état et d’erreur peuvent être affichés avant que le système d’exploitation
ne se charge. Si l’autotest détecte une panne qui est si importante que le fonctionnement ne peut pas
continuer, le système d’exploitation ne sera pas chargé.
PPPoE (Point to Point Protocol over Ethernet)
Littéralement, « Protocole Ethernet Point à Point » Protocole Ethernet faisant appel au protocole point
à point (PPP) et utilisé pour la connexion à une ligne téléphonique.
166 - Glossaire
Programme
Ensemble intégré de commandes codées indiquant à l’ordinateur ce qui doit être fait, ainsi que quand
et comment le faire.
Protocole
Ensemble de procédures et de règles régissant la réception et l’envoi de données entre ordinateurs.
- Méthode d’envoi et de réception de données
- Processus utilisé pour traiter les erreurs de communication
Pour assurer un transfert correct des informations, les conditions requises pour la communication sont
organisées dans des procédures.
RAM CMOS (Complementary metal oxide semiconductor random access memory)
Mémoire vive avec Semi-conducteur complémentaire à l’oxyde de métal. Technologie de fabrication de
mémoire vive nécessitant une très faible alimentation.
Redémarrage
Voir Réinitialisation.
Réinitialisation
Le fait de charger à nouveau le système d’exploitation. Une réinitialisation efface toutes les
informations stockées dans la mémoire vive.
Reprise
Continuer après une interruption. Dans le cas de votre PC Tablette, ceci signifie la reprise des activités
normales à partir de l’un des modes de veille.
ROM (Read Only Memory)
Mémoire en lecture seule, ou mémoire morte Type de mémoire où les données sont stockées par
transformation physique de la matière. Les données stockées de cette façon ne peuvent pas être
modifiées par l’ordinateur et leur conservation n’exige pas de source de courant.
SDRAM
Mémoire vive dynamique synchrone. C’est un type de mémoire vive.
167 - Glossaire
Sommeil
Mode dans lequel l’ordinateur est temporairement inactif. Votre PC Tablette LifeBook utilise
plusieurs modes de veille permettant de réduire la consommation électrique et prolonger la charge
de votre batterie.
SSID (Service Set Identifier)
Identificateur de services à 32 caractères ajouté à l’entête des paquets transmis sur un réseau sans fil,
qui sert de mot de passe lorsqu’un périphérique mobile tente de se connecter à l’ensemble de services
de base (BSS, ou Basic Service Set en anglais). L’identifiant SSID distingue un réseau sans fil d’un
autre, de telle manière que tous les points d’accès et périphériques qui tentent de se connecter à un
réseau donné doivent utiliser le même identifiant. Un périphérique ne peut être autorisé à accéder au
BSS que s’il fournit le SSID unique. Le SSID étant diffusé en texte clair, il n’assure aucune sécurité
du réseau.
Stéréo (audio)
Système qui utilise deux canaux pour traiter le son provenant de deux sources différentes.
SVGA
Super VGA.
S-Vidéo
Super Vidéo. Système vidéo à composantes servant à gérer un écran de téléviseur ou d’ordinateur.
Système d’exploitation
Groupe de programmes de contrôle qui convertissent les commandes des applications, y compris les
pilotes, dans la forme exacte exigée par une marque et un modèle particuliers de processeur afin de
produire les résultats voulus avec le matériel employé.
TCP/IP (Transmission Control Protocol/Internet Protocol)
Littéralement, « Protocole de Contrôle de Transmission/Procole Internet ». Protocole Internet
standard le plus utilisé.
TFT (Thin Film Transistor)
Abréviation de « Thin Film Transistor ». Technologie d’écrans plats qui utilise une mince matrice de
transistors pour commander individuellement chaque pixel de l’écran.
168 - Glossaire
UL (Underwriters Laboratories)
L’« Underwriters Laboratories » est un organisme indépendant qui effectue les tests de sécurité
électrique des appareils et accorde les homologations correspondantes.
USB
Bus série universel. Norme permettant de connecter simultanément à un ordinateur jusqu’à
127 périphériques USB comme des manettes de jeu, des dispositifs de pointage, des imprimantes
ou des claviers.
Valeur par défaut
Valeur préprogrammée à utiliser si vous n’en définissez pas une autre.
Voyant d’état
Voyant indiquant l’état de certains composants de votre système. Sur votre PC Tablette LifeBook, il
s’agit d’un écran à cristaux liquides situé juste au-dessus du clavier.
VRAM (Video Random Access Memory)
Mémoire vive vidéo. Mémoire réservée aux données et au contrôle d’affichage vidéo.
WFM (Wired for Management)
Abréviation de « Wired for Management ». Vaste programme d’Intel visant à réduire les coûts globaux
de l’informatique de gestion, sans sacrifier la puissance et la souplesse.
WLAN (Wireless Local Area Network)
Réseau local sans fil. Interconnexion sans fil d’ordinateurs et de périphériques dans un emplacement
géographiquement délimité et permettant l’échange de programmes et de données.
169 - Glossaire
Renseignements sur la réglementation
Avis
Les changements ou modifications qui ne sont pas expressément approuvés par Fujitsu pourraient annuler le droit
des utilisateurs d’utiliser le matériel.
AVIS DE LA FCC
Avis aux utilisateurs de postes radio et de téléviseurs
Cet appareil a été testé et jugé conforme aux limites établies pour le matériel numérique de classe B, selon la Partie
15 des règlements de la FCC.
Ces limites sont conçues pour assurer une protection raisonnable contre les interférences nuisibles dans un environnement
résidentiel. Cet appareil génère, utilise et émet de l’énergie radiofréquence et, si son installation et son utilisation
ne sont pas conformes aux instructions, il peut être la cause de parasites nuisibles aux communications radio. Il n’est
toutefois pas garanti qu’aucune interférence ne sera observée dans un environnement particulier. Si ce matériel
cause des interférences nuisibles à la réception des ondes de radio ou de télévision, ce qui peut être vérifié en le
mettant hors tension puis sous tension, l’utilisateur devra tenter de les corriger en procédant comme suit :
•
•
•
•
Réorienter ou déplacer l’antenne réceptrice.
Accroître la distance entre l’appareil et le récepteur.
Brancher l’appareil sur une prise reliée à un circuit différent de celui sur lequel le récepteur est branché.
Consulter le vendeur ou un technicien radio/télévision expérimenté pour obtenir de l’aide.
Des câbles de liaison à paires torsadées blindées doivent être utilisés pour assurer la conformité aux limites
d’émission RF qui gouvernent ce dispositif.
AVIS DOC (INDUSTRIE CANADA)
Avis aux utilisateurs de postes radio et de téléviseurs
Cet appareil numérique de classe B respecte la norme canadienne ICES-003.
This class B digital apparatus complies with Canadian ICES-003.
170 - Renseignements sur la réglementation
Annexe A : Guide d’utilisation de la carte
de réseau local sans fil
Renseignements sur la réglementation de la FCC
Veuillez prendre note des renseignements suivants sur la réglementation relative à la carte réseau sans
fil en option.
Remarques et déclarations réglementaires
Santé et autorisation d’utilisation – Carte réseau sans fil
Une carte réseau sans fil émet de l’énergie électromagnétique radiofréquence. Les niveaux d’énergie de ces émissions sont toutefois
beaucoup moins élevés que ceux d’autres appareils sans fil, tels que les téléphones cellulaires. La carte réseau sans fil peut être
utilisée en toute sécurité car son fonctionnement est conforme aux recommandations et aux normes de sécurité en matière de
radiofréquences. L’usage d’une carte réseau sans fil peut être limité dans certaines situations ou certains environnements, notamment :
• Carte intégrée Intel® Centrino® Advanced-N 6200 (a/b/g/n, 2 x 2), en option
• Carte intégrée Atheros® XSPAN 802.11bgn, en option
Lorsque la politique d’utilisation des cartes réseaux sans fil de certains lieux à risque n’est pas bien définie (par exemple, dans
les aéroports, les hôpitaux, les usines de produits chimiques, les raffineries de pétrole ou de gaz et dans les édifices privés),
obtenez d’abord une autorisation.
171
Renseignements sur la réglementation et avis de non-responsabilité
Cette carte réseau sans fil doit être installée et utilisée conformément aux instructions de la documentation livrée avec le
produit. Toute modification apportée sans l’approbation expresse du fabricant peut annuler le droit de l’utilisateur de s’en
servir. Le fabricant n’est pas responsable des interférences avec la réception des ondes de radio ou de télévision causées par
une modification non autorisée ou par le remplacement ou le raccord de câbles et de matériel de connexion autres que ceux
prescrits par le fabricant. Il incombe à l’utilisateur de remédier aux interférences causées par une telle modification, substitution
ou connexion non autorisée. Le fabricant et ses revendeurs ou distributeurs autorisés ne peuvent être tenus responsables des
dommages ni de toute infraction à la réglementation gouvernementale résultant du non-respect de ces directives.
Cet appareil ne doit pas être utilisé avec ou à proximité immédiate d’une antenne ou d’un émetteur.
Avis concernant les réseaux sans fil IEEE 802.11a : Le matériel destiné à un usage sur la bande 5,15~5,25 GHz doit être
utilisé uniquement à l’intérieur et son antenne doit être intégrale.
Déclarations concernant la réglementation de la FCC
Ce matériel est conforme aux limites définies dans la Partie 15 des règlements de la FCC.
Son fonctionnement est soumis aux deux conditions suivantes : (1) cet appareil ne doit pas causer d’interférence nuisible ;
(2) cet appareil doit accepter toutes les interférences reçues, y compris celles pouvant causer un mauvais fonctionnement
de l’appareil.
Déclaration concernant les dispositions de la FCC sur les interférences
Cet appareil a été testé et reconnu conforme aux limites établies pour le matériel numérique de classe B, selon la Partie 15 des
règlements de la FCC. Ces limites sont conçues pour assurer une protection raisonnable contre les interférences nuisibles dans
un environnement résidentiel. Cet appareil génère, utilise et peut émettre de l’énergie radiofréquence. S’il n’est pas installé et
utilisé conformément aux instructions, il peut causer des interférences nuisibles aux communications radio. Il n’est toutefois
pas garanti qu’aucune interférence ne sera observée dans un environnement particulier.
Si ce matériel cause des interférences nuisibles à la réception des ondes de radio ou de télévision, ce qui peut être vérifié
en le mettant hors tension puis sous tension, l’utilisateur devra tenter de les corriger en procédant comme suit :
1
2
3
4
Réorienter ou déplacer l’antenne réceptrice.
Éloigner le matériel du récepteur.
Brancher le matériel sur une prise alimentée par un circuit différent de celui du récepteur.
Consulter le vendeur ou un technicien radio/télévision expérimenté pour obtenir de l’aide.
172
Déclaration concernant la réglementation de la FCC sur l’exposition aux radiofréquences
Selon les données scientifiques disponibles, il n’existe pas de problèmes de santé liés à l’utilisation des périphériques sans fil de faible puissance.
En revanche il n’existe pas non plus de preuves qui démontrent que ces périphériques sont absolument dépourvus de risques. Les périphériques sans
fil de faible puissance ÉMETTENT, lors de leur utilisation, un taux de radiofréquence faible au même niveau que la plage des micro-ondes.
Alors que des niveaux élevés de RF risquent d’entraîner des effets néfastes sur la santé (en chauffant les tissus), l’exposition à un faible niveau
de RF ne provoque pas les effets calorifiques qui ont un effet adverse sur la santé. De nombreuses études portant sur l’exposition à de faibles
taux de RF n’indiquent aucun effet biologique. Certaines études laissent entendre que des effets biologiques sont possibles, mais ces conclusions
n’ont pas été confirmées par des recherches supplémentaires.
La carte de réseau local sans fil a été testée et les résultats obtenus sont conformes aux limites établies par la FCC en matière d’exposition
au rayonnement d’un équipement non contrôlé ; ainsi que les directives de la FCC en matière d’exposition aux radiofréquences selon le
Supplément C du Bulletin lOET65.
Restrictions concernant l’exportation
Ce produit ou logiciel contient du code de chiffrement qui ne peut être exporté ou transféré du Canada ou des États-Unis sans
un permis d’exportation du département du commerce des États-Unis. Ce matériel est conforme à la Partie 15 des règlements
de la FCC, ainsi qu’à la norme ICES 003 B/NMB 003 B. Son fonctionnement est soumis aux deux conditions suivantes : (1) cet
appareil ne doit pas causer d’interférence nuisible ; (2) cet appareil doit accepter toutes les interférences reçues, y compris celles
pouvant causer un mauvais fonctionnement de l’appareil. Toute modification n’ayant pas été expressément approuvée par la
société Fujitsu America, Inc. peut annuler le droit de l’utilisateur de se servir du matériel.
Avis pour le Canada
Le matériel destiné à un usage sur la bande 5 150 - 5 250 MHz doit être utilisé uniquement à l’intérieur afin de réduire les risques
de brouillage nuisible causé aux systèmes mobiles par satellite fonctionnant sur un même canal.
Un gain d’antenne de 6 dBi est autorisé (pour le matériel utilisant les bandes 5 250 - 5 350 MHz, 5 470 - 5 725 MHz et
5 725 - 5 825 MHz), conformément à la limite p.i.r.e. maximale permise selon l’annexe A9.2 afférent aux périphériques RSS210.
En outre, les utilisateurs doivent prendre garde au fait que les radars de grande puissance sont considérés comme des utilisateurs
principaux (ce qui signifie qu’ils sont prioritaires) des bandes 5 250 - 5 350 MHz et 5 650 - 5 850 MHz et qu’ils pourraient
causer des interférences ou des dommages aux appareils de réseau exempts de licence.
173
Avant d’utiliser la carte réseau sans fil en option
Ce guide explique comment installer et configurer correctement la carte réseau sans fil mini-PCI intégrée
(disponible en option), ci-après désignée sous le nom de « carte réseau sans fil ». Avant d’utiliser la carte
réseau sans fil, lisez attentivement le présent guide afin de bien comprendre son fonctionnement.
Conservez ce guide en lieu sûr afin de pouvoir vous y référer ultérieurement.
Cartes réseau sans fil présentées dans ce document
Ce document s’applique aux systèmes équipés de l’un des deux composants suivants en option :
• Carte réseau intégrée Intel WiFi Link 5100 AGN (802.11a/b/g/version préliminaire n)
• Carte réseau intégrée Intel WiFi Link 5300 AGN (802.11a/b/g/version préliminaire n),
• Carte Atheros HB91 (802.11b/g/version préliminaire n)
Caractéristiques de la carte réseau sans fil
• La carte réseau sans fil est une carte au format Mini-PCI connectée à la carte mère de l’ordinateur portable.
• Elle fonctionne dans les bandes RF pouvant être utilisées sans autorisation spéciale, ce qui élimine le besoin
d’obtenir une licence de la FCC pour les radiocommunications. Elle fonctionne dans la bande industrielle,
scientifique et médicale (ISM) de 2,4 GHz et dans les bandes UNII (Unlicensed National Information
Infrastructure) inférieures, intermédiaires et supérieures (5 GHz).
• Les cartes réseau sans fil peuvent être utilisées selon quatre modes de fonctionnement : IEEE 802.11a,
IEEE 802.11b, IEEE 802.11g et IEEE 802.11n (version préliminaire).
• Les cartes réseau sans fil sont certifiées Wi-Fi et fonctionnent à un débit maximal théorique de 540 Mbit/s
en mode IEEE 802.11n (version préliminaire), de 54 Mbit/s en mode IEEE 802.11a ou IEEE 802.11g et de
11 Mbit/s en mode IEEE 802.11b.
• La carte réseau sans fil prend en charge les modes de chiffrement WEP, TKIP, CKIP et AES.
• La carte réseau sans fil est conforme aux normes suivantes : WPA, WPA2, CCX1.0, CCX2.0, CCX3.0
et CCX4.0.
174 - Avant d’utiliser la carte réseau sans fil en option
Modes de réseau sans fil compatibles avec cette carte
Mode Ad hoc
Le mode Ad hoc désigne une topologie de réseau sans fil dans laquelle la connectivité entre les divers
ordinateurs est établie sans périphérique central de réseau sans fil, ou point d’accès. La connectivité est
établie uniquement à l’aide de périphériques clients dans une configuration égal à égal. Les réseaux Ad
hoc sont donc également connus sous le nom de réseaux d’égal à égal. Un réseau Ad hoc est une méthode
aisée et peu coûteuse de relier plusieurs ordinateurs en réseau. Le mode Ad hoc exige que les paramètres
de nom de réseau SSID, d’authentification réseau et de clé de chiffrement soient configurés de façon
identique sur tous les ordinateurs du réseau.
Figure 51. Réseau en mode Ad hoc
175 - Avant d’utiliser la carte réseau sans fil en option
Mode point d’accès (Infrastructure)
Le mode Infrastructure désigne une topologie de réseau sans fil dans laquelle les appareils communiquent
au sein d’un réseau sans fil ou câblé par l’intermédiaire d’un point d’accès. En mode Infrastructure, les
appareils sans fil peuvent communiquer directement entre eux ou sur un réseau câblé. Les réseaux sans fil
d’entreprise fonctionnent en mode Infrastructure car ils nécessitent une connexion au réseau local sans fil
pour accéder aux ordinateurs, aux périphériques et aux services (par exemple, serveurs de fichier,
imprimantes et bases de données).
Internet
Modem ADSL
Réseau local câblé
modem câble,
ou similaire
Point d’accès*
Réseau local
sans fil
*Un concentrateur en option pour
réseau local peut être requis selon
le type de point d’accès utilisé.
Figure 52. Réseau en mode point d’accès (Infrastructure)
176 - Avant d’utiliser la carte réseau sans fil en option
Manipulation de la carte réseau sans fil
La carte réseau local sans fil est un dispositif en option qui peut être fourni avec votre ordinateur portable.
Normalement, vous ne devriez pas avoir besoin de la retirer ou de la réinstaller. Le système d’exploitation
de l’ordinateur est déjà configuré pour utiliser la carte réseau sans fil.
• Le réseau local sans fil fonctionne dans les modes IEEE 802.11a, IEEE 802.11b, IEEE 802.11g
et IEEE 802.11n.
• Elles fonctionnent dans la bande ISM de 2,4 GHz et dans les bandes UNII inférieures, intermédiaires
et supérieures (5 GHz).
• Les fours micro-ondes peuvent interférer avec la carte réseau sans fil car ils utilisent la même bande de
fréquences (2,4 GHz) que les spécifications IEEE 802.11b/g/n. Les fours micro-ondes ne causent aucune
interférence en mode IEEE 802.11a car celui-ci utilise la bande radiofréquence de 5 GHz.
• Les appareils sans fil qui émettent dans la bande de fréquences de 2,4 GHz peuvent nuire au fonctionnement
des périphériques IEEE 802.11b/g/n. Les symptômes associés aux interférences incluent une réduction du
débit, des coupures intermittentes de connexion et un nombre important d’erreurs de trames. Il est FORTEMENT
recommandé de mettre hors tension les appareils générant des interférences afin d’assurer le bon
fonctionnement de la carte réseau sans fil.
Désactivation/déconnexion de la carte réseau sans fil
La désactivation de la carte réseau sans fil peut être souhaitable dans certaines circonstances (pour prolonger
la vie de la batterie) ou dans des endroits où l’utilisation des appareils électroniques est réglementée (par
exemple : hôpitaux, cliniques, avions, etc.). La carte réseau sans fil peut être désactivée avec le commutateur
marche/arrêt correspondant ou avec Windows, en utilisant l’icône correspondante dans la zone de notification
(Remarque : cette deuxième procédure n’éteindra pas la radio : l’émission et la réception continueront
bien que la carte réseau ait été désactivée).
AVANT D’UTILISER VOTRE CARTE RÉSEAU SANS FIL, VOUS DEVEZ D’ABORD INSTALLER CLICK ME! POUR
VOUS ASSURER QUE LE BON PROGRAMME DE CARTE EST INSTALLÉ. VOIR « INSTALLATION
DE CLICKME! » EN PAGE 80.
177 - Avant d’utiliser la carte réseau sans fil en option
Désactivation avec le commutateur de la carte réseau sans fil
La carte réseau sans fil peut être désactivée rapidement et efficacement en mettant le commutateur de carte
réseau sans fil à la position OFF (arrêt). Le commutateur de la carte réseau sans fil n’a aucun effet sur les
modèles pour réseau local câblé.
Commutateur pour réseau local sans fil/Bluetooth/réseau étendu sans fil
Figure 53. Emplacement du commutateur marche/arrêt
pour réseau local sans fil/Bluetooth/réseau étendu sans fil
Désactivation par l’icône dans la zone de notification
Notez qu’avec cette procédure, la radio ne sera pas éteinte, l’émission et la réception sont toujours actives
bien que la carte ne soit plus connectée.
1
2
Faites un clic droit sur l’icône Carte réseau sans fil dans la zone de notification en bas à droite de l’écran.
Choisir Se déconnecter d’un réseau.
Activation de la carte réseau sans fil
La carte réseau sans fil peut être activée de la même façon que pour sa désactivation.
• Avec le commutateur correspondant
• Sous Windows, en cliquant à l’aide du bouton droit de la souris l’icône de la carte réseau sans fil puis en
cliquant sur « Connexion à un réseau »
178 - Avant d’utiliser la carte réseau sans fil en option
Configuration de la carte réseau sans fil
La carte réseau sans fil en option peut être configurée pour établir la connectivité du réseau sans fil en
utilisant le logiciel intégré dans Windows. Ce logiciel prend également en charge la plupart des solutions
de sécurité standard.
Certains paramètres prédéfinis seront requis pour cette procédure. Pour les obtenir, consulter votre
administrateur de réseau :
Configuration de la carte réseau sans fil
1
2
3
4
5
6
7
8
9
Cliquez sur le bouton Démarrer, puis sélectionnez Panneau de configuration.
Si le Panneau de configuration n'est pas en affichage classique, sélectionnez « Basculer vers l'affichage
classique » sur le panneau de gauche. Double-cliquez sur l'icône Connexions réseau.
Double-cliquez sur l'icône Connexions réseau sans fil.
Cliquez sur [Afficher les réseaux sans fil]
Choisissez un réseau sans fil.
Cliquez sur [Connexion].
Entrez la clé de réseau si nécessaire.
Entrez les informations requises. Il se peut que vous deviez consulter votre administrateur de réseau pour
certaines informations.
Si vous avez besoin d'aide, allez au menu Démarrer - Aide et soutien (ou support) - Gestion du réseau et Web.
Sélectionnez le sujet qui vous intéresse, puis tapez les mots-clés s'y rapportant dans la case Rechercher.
Se connecter à un réseau
Après avoir configuré votre ordinateur, vous pouvez vous connecter à un réseau actif en réalisant les
étapes suivantes :
1
2
3
Cliquez sur l’icône de la carte réseau sans fil de la zone de notification.
Sélectionnez « Connexion à un réseau ».
Sélectionnez un réseau dans la liste qui apparaît et cliquez sur le bouton [Connexion]
Connexion au réseau
Une fois la configuration effectuée, vous pouvez vous connecter à un réseau actif en cliquant sur l’icône
« Connexion réseau sans fil » de la zone de notification.
179 - Configuration de la carte réseau sans fil
Dépannage de la carte réseau sans fil
Dépannage
Le tableau ci-dessous présente les causes possibles et les mesures correctives pour différents problèmes
de réseau sans fil. Si les étapes à réaliser ne vous sont pas connues, consultez votre administrateur système
ou allez dans Démarrer -> Aide et soutien (ou support) -> Gestion du réseau et Web.
Problème
Connexion de
réseau non
disponible
Cause possible
Nom de réseau
(SSID) ou clé WEP
non valide
Solution possible
Connexion en mode Ad hoc : Assurez-vous que le SSID et la clé WEP de tous
les ordinateurs du réseau ont été configurés correctement. Les noms de réseau et
les valeurs de la clé WEP doivent être identiques sur chaque ordinateur.
Connexion en mode point d’accès (Infrastructure) : Attribuez aux
ordinateurs le même SSID et la même clé WEP que ceux du point d’accès.
Attribuez la même valeur d’authentification réseau que celle du point d’accès.
Consultez votre administrateur de réseau si cette valeur est requise.
Signal faible et/ou
mauvaise qualité
de la liaison
Connexion en mode Ad hoc : Essayez de rétablir la connexion après avoir
rapproché l’ordinateur ou retiré les éventuels obstacles.
La carte réseau sans
fil est désactivée
Assurez-vous que l’interrupteur de la carte réseau sans fil est sur ON. Allez
dans Démarrer -> Panneau de configuration, puis double-cliquez sur Centre
de mobilité Windows. Si le réseau sans fil est éteint, cliquez sur le bouton
« Allumer le réseau sans fil ».
L’ordinateur à
connecter est éteint.
Vérifiez si l’ordinateur est allumé.
Connexion en mode point d’accès (Infrastructure) : Essayez de rétablir la
connexion après avoir rapproché le point d’accès ou retiré les éventuels
obstacles.
180 - Dépannage de la carte réseau sans fil
Problème
Connexion de
réseau non
disponible
(suite)
Cause possible
Solution possible
Interférences RF
provenant de points
d’accès ou d’autres
réseaux sans fil
L’utilisation de canaux RF identiques ou se chevauchant peut nuire au
fonctionnement de la carte réseau sans fil. Changez le canal de votre
point d’accès en tenant compte du canal du périphérique nuisible.
Échec de
l’authentification
de la carte réseau
sans fil.
Vérifiez les paramètres d’authentification réseau, de chiffrement et de sécurité.
Si les paramètres de sécurité sont mal configurés, en raison, par exemple,
d’une clé WEP comportant une faute de frappe, d’un nom d’utilisateur LEAP
incorrect ou d’un mauvais choix de méthode d’authentification, la carte réseau
sans fil s’associera au réseau sans fil mais ne s’y authentifiera pas.
Paramètres réseau
mal configurés
Vérifiez la configuration des paramètres réseau.
Configuration
incorrecte de
l’adresse IP
Ceci s’applique uniquement aux réseaux qui utilisent des adresses IP
statiques. Pour obtenir les paramètres appropriés, consultez votre
administrateur de réseau.
181 - Dépannage de la carte réseau sans fil
Spécifications de la carte réseau sans fil
Spécifications
Élément
Spécification
Type de réseau
La carte réseau intégrée en option Intel Centrino Advanced-N 6200 (a/b/g/n, 2 x 2),et
la carte réseau local sans fil Atheros XSPAN (802.11bgn) sont conformes aux normes
IEEE 802.11a, 802.11b/g, et 802.11n (version préliminaire), et certifiées Wi-Fi*.
Débit
(Commutation automatique) débit maximum de 54 Mbit/s (IEEE 802.11n à déterminer)
Fréquence active
•
•
•
802.11n (version préliminaire) : 2,4 GHz ou 5 GHz
802.11b/g : 2 400 ~ 2 473 MHz
802,11a : 4 900 ~ 5 850 MHz
Portée nominale**
•
•
•
•
802,11a : 12 mètres (40 pi) à 54 Mbit/s ; 91 mètres (300 pi) à 6 Mbit/s
802.11b : 30 mètres (100 pi) à 11 Mbit/s ; 91 mètres (300 pi) à 1 Mbit/s
802,11g : 30 mètres (100 pi) à 54 Mbit/s ; 91 mètres (300 pi) à 1 Mbit/s
802.11n (version préliminaire) : selon les estimations, les portées des modes
802.11g et 802.11a, dans leurs fréquences respectives, sont multipliées par deux.
Nombre de canaux
•
•
•
802,11a : 8, indépendants
802.11b/g : 11, dont 3 sans chevauchement
802.11n (version préliminaire) : 2,4 GHz - 3 sans chevauchement si la liaison
entre canaux n’est pas utilisée, 2 sans chevauchement si laliaison entre canaux est
utilisée. 5 GHz - 12 canaux UNII sans chevauchement avec ou sans utilisation
de la liaison entre canaux
Sécurité
Types de chiffrement – compatible avec WEP, TKIP, AES*** et WPA 1.0 Longueurs
de clé de chiffrement prises en charge : 802.1x/EAP 64 bits et 128 bits
182 - Spécifications de la carte réseau sans fil
Nombre maximum recommandé
d’ordinateurs connectés au réseau
local sans fil (en mode Ad hoc)
10 ou moins****
* « Type Wi-Fi » indique que le test d’interconnectivité de la Wi-Fi Alliance (organisation garantissant l’interconnectivité
des réseaux sans fil) a réussi.
** La portée peut varier selon certains facteurs (par exemple, nombre de murs, réflectivité des matériaux ou interférences
provenant d’autres sources de radiofréquences).
*** Le chiffrement par clé de réseau (WEP) est effectué avec le nombre de bits indiqué ci-dessus, mais l’utilisateur peut
définir une clé de 40 ou 104 bits après avoir soustrait la longueur fixe de 24 bits.
**** Selon l’environnement, le nombre maximum d’ordinateurs peut être inférieur.
183 - Spécifications de la carte réseau sans fil
Utilisation de Bluetooth
Le module Bluetooth intégré en option (BSMAN3) est un composant offert en option pour les ordinateurs
portables Fujitsu.
Présentation de Bluetooth
La technologie Bluetooth est conçue pour assurer la liaison sans fil à faible portée entre divers appareils
mobiles, tels que téléphones, ordinateurs portables, imprimantes et caméras. La technologie Bluetooth
permet d’établir des réseaux personnels (PAN) entre des appareils situés à courte distance les uns
des autres.
LE COMMUTATEUR DE L’INTERFACE RÉSEAU SANS FIL / BLUETOOTH PERMET D’ÉTEINDRE
SIMULTANÉMENT LES INTERFACES RÉSEAU SANS FIL ET BLUETOOTH. POUR ACTIVER OU DÉSACTIVER
SÉPARÉMENT L’UN OU L’AUTRE, PROCÉDEZ COMME SUIT :
1 Faites glisser le commutateur de carte réseau sans fil/Bluetooth à la position de marche (ON).
2 Allez à Démarrer > Tous les Programmes > Bluetooth.
3 Dans le menu Bluetooth, cliquez sur Options puis sur le bouton Bluetooth Radio Power
(Alimentation Radio Bluetooth).
4 Cliquez sur [OK].
Sources d’informations supplémentaires sur Bluetooth
Le module Bluetooth contient un guide de l’utilisateur complet qui vous aidera à maîtriser son fonctionnement.
Pour accéder au fichier d’aide, cliquez sur [Démarrer] -> Tous les programmes, Bluetooth, puis sur Guide
d’utilisation.
Pour en savoir davantage sur la technologie Bluetooth, visitez le site Web : www.bluetooth.com.
184 - Utilisation de Bluetooth
Énoncé de la FCC relatif à l’exposition aux rayonnements
Cet équipement respecte les normes de la FCC relatives à l’exposition aux rayonnements, définies pour
un environnement non contrôlé. L’antenne Bluetooth est située sur le rebord avant du repose-mains droit
et est exempte des critères de distance minimale en raison de sa faible puissance.
Les émetteurs de ce périphérique ne doivent pas être utilisés avec ou à proximité immédiate d’une antenne
ou d’un autre émetteur.
Avis pour le Canada
Pour éviter que ce service fourni sous licence soit perturbé par des interférences radio, ce matériel doit être
utilisé à l’intérieur et à distance des fenêtres. Si l’équipement (ou l’antenne de transmission) est installé
à l’extérieur, une licence peut être nécessaire.
Garantie
Les utilisateurs ne sont pas autorisés à modifier ce produit. Toute modification annule la garantie.
Cet équipement ne peut être modifié, altéré ou changé en aucune façon sans l’autorisation écrite de Fujitsu.
Toute modification non autorisée annulera les autorisations d’équipement de la FCC et d’Industrie Canada,
de même que la garantie.
185 - Utilisation de Bluetooth
Annexe B : Capteur d’empreintes digitales
Présentation du capteur d’empreintes digitales
Votre système est doté d’un dispositif de reconnaissance des empreintes digitales, situé en bas à gauche de
l’écran.
Capteur d’empreintes
digitales
Figure 54. Capteur d’empreintes digitales
Grâce au capteur d’empreintes digitales, il n’est plus nécessaire de saisir votre nom d’utilisateur et votre
mot de passe chaque fois que vous voulez :
• Ouvrir une session dans Windows
• Reprise à partir du mode sommeil
186
• Annuler un économiseur d’écran protégé par mot de passe
• Ouvrir une session dans des pages d’accueil nécessitant un nom d’utilisateur et un mot de passe
Après avoir « inscrit » – ou enregistré – votre empreinte digitale, il vous suffit de glisser le bout de votre
doigt sur le capteur pour que le système vous reconnaisse.
Le capteur d’empreintes digitales utilise le logiciel Softex OmniPass qui fournit des fonctions de gestion
de mot de passe aux systèmes d’exploitation Microsoft Windows. OmniPass vous permet d’utiliser un
« mot de passe principal » pour tous les écrans en ligne, toutes les applications Windows et d’autres
applications demandant un mot de passe.
OmniPass demande aux utilisateurs de s’authentifier à l’aide du capteur d’empreintes digitales avant de
leur donner accès au bureau Windows. Ce périphérique comporte un système d’authentification sécurisé
qui limite l’accès à votre ordinateur, à vos applications, à vos sites Web et aux autres ressources protégées
par mot de passe.
OmniPass présente une interface graphique conviviale, qui permet de gérer de façon sécuritaire les mots
de passe, les comptes utilisateur et les identités multiples pour chaque utilisateur.
Première mise en marche
Cette section vous montre comment préparer votre système à l’installation de l’application de reconnaissance
d’empreintes digitales OmniPass. Vous y trouverez des conseils qui vous guideront au long de la procédure
d’installation. Elle indique également de façon détaillée comment enregistrer votre premier utilisateur
dans OmniPass.
Installation d’OmniPass
Si l’application OmniPass a déjà été installée sur votre système, sautez cette section et allez directement
à « Enregistrement des utilisateurs » en page 190. Pour savoir si l’application OmniPass est déjà installée,
vérifiez si les éléments suivants sont présents :
• Une icône OmniPass, dorée et en forme de clé, figure dans la zone de notification, dans le coin
inférieur droit de l’écran.
• L’application Softex apparaît dans le groupe de Programmes du menu Démarrer.
187 - Présentation du capteur d’empreintes digitales
Configuration minimale
L’application OmniPass nécessite de l’espace sur votre disque dur ainsi qu’un système d’exploitation (SE)
spécifique. Les exigences minimales sont les suivantes :
• Système d’exploitation Windows XP Professionnel
• Au moins 35 Mo d’espace disque disponible
Installation de l’application OmniPass
Si l’application OmniPass est déjà installée sur votre système, allez directement à « Enregistrement des
utilisateurs » en page 190. Autrement, continuez à suivre les instructions de cette section concernant
l’installation du logiciel.
•
•
POUR INSTALLER LE LOGICIEL, VOUS DEVEZ AVOIR UN LECTEUR OPTIQUE EXTERNE RACCORDÉ À VOTRE
ORDINATEUR.
L’UTILISATEUR DÉSIRANT INSTALLER OMNIPASS DOIT DISPOSER DE DROITS D’ADMINISTRATEUR DANS LE
SYSTÈME. SI VOUS N’AVEZ PAS DE TELS DROITS, FERMEZ LA SESSION ET OUVREZ-EN UNE AUTRE AVEC UN NOM
D’UTILISATEUR POSSÉDANT CES DROITS AVANT DE POURSUIVRE L’INSTALLATION D’OMNIPASS.
Pour installer OmniPass dans votre système, vous devez exécuter les opérations suivantes :
1
Insérez le disque d’installation de l’application OmniPass dans le lecteur approprié. Si vous installez OmniPass
à partir d’un CD-ROM ou d’un DVD-ROM, vous devez trouver et lancer le programme d’installation (setup.exe)
se trouvant sur le disque.
2
Suivez les instructions figurant dans le programme d’installation. Indiquez l’endroit où vous souhaitez installer
OmniPass. Il est recommandé de NE PAS installer l’application dans le répertoire racine (par exemple : C:\).
3
Une fois l’installation d’OmniPass terminée, vous serez invité à redémarrer votre système. Vous pourrez ensuite
utiliser OmniPass. Si vous décidez de ne pas redémarrer votre système immédiatement après l’installation,
OmniPass ne sera pas disponible avant le prochain redémarrage.
4
Le programme d’installation place automatiquement une icône (Softex OmniPass) dans le panneau de
configuration Windows, ainsi qu’une icône dorée en forme de clé dans la zone de notification.
188 - Présentation du capteur d’empreintes digitales
Vérification des informations concernant votre version d’OmniPass
Après avoir installé OmniPass et redémarré votre système, vous pouvez décider de vérifier la version
du logiciel.
Pour vérifier votre version d’OmniPass :
1
À partir du bureau Windows, double-cliquez sur l’icône en forme de clé OmniPass dans la barre des tâches
(située habituellement dans le coin inférieur droit de l’écran),
ou
cliquez sur le bouton Démarrer, sélectionnez Paramètres, puis cliquez sur Panneau de configuration.
Double-cliquez sur Softex OmniPass dans le panneau de configuration et vous verrez apparaître le Centre de
contrôle OmniPass. Si ce n’est pas le cas, le programme n’est pas correctement installé,
ou
bien cliquez sur le bouton Démarrer, sélectionnez Programmes, puis Softex dans le groupe de programmes
du sous menu et cliquez ensuite sur Centre de contrôle OmniPass.
2
Sélectionnez l’onglet À propos de en haut du Centre de contrôle OmniPass. Une fenêtre indiquant la version
du logiciel OmniPass apparaît.
Désinstallation d’OmniPass
L’UTILISATEUR DÉSIRANT DÉSINSTALLER OMNIPASS DOIT DISPOSER DE DROITS D’ADMINISTRATEUR
SI VOUS N’AVEZ PAS DE TELS DROITS, FERMEZ LA SESSION ET OUVREZ-EN UNE
AUTRE AVEC UN NOM D’UTILISATEUR POSSÉDANT CES DROITS AVANT DE POURSUIVRE LA
DÉSINSTALLATION D’OMNIPASS.
DANS LE SYSTÈME.
Pour supprimer l’application OmniPass de votre système :
1
2
3
4
5
Cliquez sur [Démarrer] dans la barre des tâches. Sélectionnez Paramètres, puis Panneau de configuration.
Double-cliquez sur Ajouter ou supprimer des Programmes.
Sélectionnez OmniPass et cliquez ensuite sur [Modifier/Supprimer].
Suivez les instructions de désinstallation de l’application OmniPass.
Après la désinstallation d’OmniPass, redémarrez votre système lorsque vous y êtes invité.
189 - Présentation du capteur d’empreintes digitales
Enregistrement des utilisateurs
Avant de pouvoir utiliser les fonctions d’OmniPass, vous devez d’abord enregistrer un utilisateur dans
l’application.
Concept du mot de passe principal
Les ressources d’un ordinateur sont souvent protégées par des mots de passe. Lorsque vous vous
connectez à votre ordinateur, que vous consultez vos courriels, que vous effectuez des opérations
bancaires sur Internet, que vous payez des factures en ligne ou que vous accédez aux ressources
d’un réseau, il vous est souvent demandé de vous identifier. Il se peut alors que vous ayez besoin
de dizaines de mots de passe dont vous devez vous rappeler.
Lors de l’enregistrement d’un utilisateur, un « mot de passe principal » est créé à son intention. Ce mot de
passe « remplace » tous les autres mots de passe des sites sur lesquels l’utilisateur s’enregistre avec OmniPass.
Exemple : Un utilisateur, Jean, installe OmniPass sur son système (son ordinateur de maison) et inscrit
un utilisateur OmniPass avec le nom d’utilisateur « Jean_01 » et mot de passe « freq14 ». Il se rend ensuite
sur son site Internet de courriel pour ouvrir une session dans son compte. Il entre, comme d’habitude, son
nom d’utilisateur et son mot de passe (par exemple, « Jean_02» et « lifebook »), mais au lieu de cliquer
sur Ouvrir session, il demande à OmniPass de Mémoriser le mot de passe. Dorénavant, chaque fois qu’il
retournera sur ce site, OmniPass l’invitera à fournir ses informations d’identification.
Jean saisira alors les informations OmniPass (« Jean_01 » et « freq14 ») dans l’invite d’authentification
d’OmniPass et pourra accéder à son compte de courriel. Il peut répéter cette opération avec autant de sites
Web ou de ressources protégées par mot de passe qu’il le souhaite et pourra accéder à tous ces sites à l’aide
des informations d’identification de l’utilisateur (« Jean_01 » et « freq14 »). Pour ce faire, il devra utiliser
le système sur lequel il s’est enregistré à titre d’utilisateur OmniPass. En fait, OmniPass ne change pas les
informations d’identification de la ressource protégée par mot de passe. Si Jean veut accéder à son courriel
depuis un ordinateur sur lequel le compte OmniPass n’existe pas, il devra saisir ses informations
d’identification originales (« Jean_02 » et « lifebook»). Dans ce cas, s’il tente d’utiliser ses informations
d’identification OmniPass, l’accès au site lui sera refusé.
190 - Présentation du capteur d’empreintes digitales
CETTE PROCÉDURE D’ENREGISTREMENT REPOSE SUR L’HYPOTHÈSE QUE VOUS NE VOULEZ INTÉGRER
À OMNIPASS AUCUN PÉRIPHÉRIQUE D’AUTHENTIFICATION OU AUTRE EMPLACEMENT DE STOCKAGE.
SI VOUS SOUHAITEZ DISPOSER DE CETTE FONCTIONNALITÉ, CONSULTEZ LES SECTIONS
CORRESPONDANTES DU PRÉSENT DOCUMENT.
Enregistrement de base
L’Assistant d’enregistrement vous guidera à travers les étapes d’enregistrement d’un utilisateur. Sauf
indication contraire de votre part, l’Assistant d’enregistrement sera lancé après l’installation d’OmniPass
au moment de l’ouverture d’une session Windows. Si l’assistant n’apparaît pas, vous pouvez le lancer en
cliquant sur [Démarrer] dans la barre de tâches Windows. Sélectionnez ensuite Programmes, puis
Softex et cliquez sur Assistant d’enregistrement OmniPass.
1
Cliquez sur [Enregistrement] pour procéder à la vérification de l’utilisateur et du mot de passe. Par défaut,
l’Assistant d’enregistrement entre les informations d’identification de l’utilisateur Windows actuellement connecté.
2
Entrez le mot de passe qui vous sert à ouvrir une session dans Windows. Il deviendra le « mot de passe principal »
de cet utilisateur OmniPass. Dans la plupart des cas, la valeur de Domaine : correspondra au nom de votre
ordinateur Windows. Dans un environnement d’entreprise, ou lorsque vous accédez à des ressources
professionnelles, il se peut que Domaine : ne corresponde pas au nom de votre ordinateur. Cliquez sur
[Suivant] pour continuer.
3
Au cours de cette étape, OmniPass prend votre empreinte digitale. Pour de plus amples informations, reportez-vous
à « Enregistrement d’une empreinte digitale » en page 192.
4
Ensuite, choisissez comment OmniPass doit vous avertir de différents événements. Nous vous recommandons
de laisser Astuces de la barre de tâches sur Astuces de la barre des tâches en mode débutant et Invites
audio sur au moins Invite avec signaux sonores uniquement, jusqu’à ce que le fonctionnement d’OmniPass
vous soit familier. Cliquez sur [Suivant] pour procéder à l’enregistrement de l’utilisateur. Un écran de
félicitations, indiquant que l’enregistrement de l’utilisateur est terminé, apparaîtra.
5
Cliquez sur [Terminé] pour quitter l’assistant d’enregistrement. Il vous sera demandé si vous voulez vous
connecter à OmniPass avec les informations d’utilisateur nouvellement enregistrées. Cliquez sur [Oui].
191 - Présentation du capteur d’empreintes digitales
Enregistrement d’une empreinte digitale
L’enregistrement d’une empreinte digitale augmentera la sécurité de votre système et simplifiera la
procédure d’authentification.
L’enregistrement des empreintes digitales se fait à partir du Centre de contrôle OmniPass. Après vous être
connecté à titre d’utilisateur OmniPass, cliquez deux fois sur l’icône OmniPass dans la zone de notification.
Sélectionnez l’onglet Paramètres utilisateur, puis cliquez sur [Enregistrement] dans la zone Paramètres
utilisateur. Cliquez sur [Enregistrer le périphérique d’authentification] et authentifiez-vous à l’invite
d’authentification d’OmniPass. Le système ouvre la procédure d’enregistrement du périphérique.
1
Pendant la procédure d’enregistrement initial de l’utilisateur, vous serez invité à sélectionner le doigt qui
sera enregistré. Les doigts déjà enregistrés seront marqués d’un crochet vert. Le doigt sélectionné pour
l’enregistrement sera marqué d’une flèche rouge. OmniPass vous permet de réenregistrer un doigt. Si vous
choisissez un doigt qui a déjà été enregistré et que vous poursuivez la procédure d’enregistrement, OmniPass
enregistre l’empreinte digitale actuelle à la place de l’ancienne empreinte. Sélectionnez un doigt à enregistrer
et cliquez sur [Suivant].
2
Il est temps pour OmniPass de prendre l’empreinte que vous avez choisie. Plusieurs tentatives peuvent être
nécessaires avant qu’OmniPass prenne votre empreinte digitale. Si OmniPass n’y parvient pas ou si l’écran de
capture de l’empreinte digitale expire, cliquez sur [Précédent] pour redémarrer le processus d’enregistrement
d’empreinte digitale.
Votre système est équipé d’un capteur d’empreintes digitales « à glissement ». Les capteurs à glissement sont
de taille réduite et ressemblent à un mince rectangle allongé. Pour prendre une empreinte digitale, faites glisser
ou tirez doucement vers vous le bout de votre doigt sur le capteur (à partir de la deuxième articulation).
Un glissement trop rapide ou trop lent pourrait faire échouer la prise d’empreintes. L’écran Choisir un doigt
dispose d’un bouton [Pratique] ; cliquez dessus pour pratiquer la prise de votre empreinte digitale. Lorsque
vous maîtrisez la prise d’empreintes digitales, vous pouvez procéder à l’enregistrement d’un doigt.
3
Lorsque OmniPass a correctement pris l’empreinte digitale, l’écran Vérifier l’empreinte digitale s’affiche
automatiquement. Pour vérifier l’enregistrement de votre empreinte, placez le bout de votre doigt sur le capteur
comme lors d’une prise d’empreinte digitale. Si l’empreinte a été vérifiée avec succès, une empreinte digitale
verte apparaît dans la fenêtre de prise et le texte Vérification réussie s’affiche en dessous.
192 - Présentation du capteur d’empreintes digitales
Utilisation d’OmniPass
Vous pouvez maintenant commencer à utiliser OmniPass. Son utilisation régulière vous permettra de
simplifier vos procédures d’authentification.
Remplacement du mot de passe
Vous utiliserez souvent la fonction de remplacement du mot de passe. Lorsque vous allez sur un site Internet
à accès restreint (par exemple, de votre banque, de votre courrier électronique, de paiement ou d’enchères en
ligne), vous serez toujours invité à entrer vos références de connexion. OmniPass peut détecter ces invites
et vous pouvez lui « enseigner » à enregistrer vos références. La prochaine fois que vous visiterez un de
ces sites, vous pourrez vous authentifier à l’aide de votre empreinte digitale pour y accéder.
Barre d’outils d’authentification OmniPass
Après avoir installé OmniPass et redémarré votre ordinateur, vous remarquerez la présence d’une nouvelle
boîte de dialogue au début de votre session Windows. Il s’agit de la barre d’outils d’authentification OmniPass.
Celle-ci s’affiche chaque fois que le système d’authentification est appelé. Ce système peut être appelé
fréquemment : pendant l’ouverture d’une session Windows, lors de la connexion à OmniPass, lorsque
vous déverrouillez votre poste de travail, lorsque vous reprenez le système depuis le mode sommeil ou
veille prolongée, lorsque vous déverrouillez un économiseur d’écran activé par mot de passe, lors du
remplacement du mot de passe d’un site mémorisé ou des noms de connexion d’applications, etc. Lorsque
cette barre d’outils s’affiche, OmniPass vous invite à vous authentifier.
La fenêtre Authentification de la connexion indique la fonction restreinte par OmniPass à laquelle vous
tentez de vous connecter. Les icônes en bas à gauche (empreinte digitale et clé) indiquent les méthodes
d’authentification disponibles. Les méthodes sélectionnées sont en surbrillance, contrairement aux méthodes
non sélectionnées. Lorsque vous cliquez sur l’icône pour obtenir une méthode d’authentification non
sélectionnée, l’invite d’authentification associée à cette méthode s’affiche.
À l’invite d’authentification, vous devez fournir les informations d’identification appropriées : un doigt
enregistré dans la fenêtre d’empreintes digitales ou votre mot de passe principal dans la case de mot de
passe principal (l’icône en forme de clé).
193 - Présentation du capteur d’empreintes digitales
Mémorisation d’un mot de passe
OmniPass peut mémoriser toute application, toute interface graphique ou toute autre ressource protégée
par un mot de passe.
À l’aide de la procédure suivante, vous pourrez sauvegarder dans OmniPass toutes les informations
permettant de vous identifier. Ces informations seront ensuite associées à votre « mot de passe principal »
ou à votre empreinte digitale.
Allez sur un site comportant une procédure de connexion (nom d’utilisateur et mot de passe), mais ne vous
connectez pas tout de suite. À l’invite de connexion au site, entrez votre nom d’utilisateur et votre mot de
passe dans les champs appropriés, mais n’entrez pas sur le site (n’appuyez pas sur [Entrer], [Envoyer], [OK],
ou Connexion). Cliquez avec le bouton droit de la souris sur l’icône OmniPass de la zone de notification
et sélectionnez Mémoriser le mot de passe dans le sous-menu. Le curseur fléché Windows devient un
curseur OmniPass en forme de clé dorée. Cliquez sur ce curseur dans la zone d’invite de connexion, mais
ne cliquez pas sur le bouton [Connexion] ou [Envoyer].
Association d’un nom convivial
Après avoir cliqué sur le curseur en forme de clé près de l’invite de connexion, OmniPass vous invitera à
entrer un « nom convivial » pour ce site. Vous devez entrer un terme qui vous rappelle le site Internet, la
société ou le service auquel vous vous connectez. Dans sa base de données sécurisée, OmniPass associe
ce nom convivial au site Internet.
Paramètres supplémentaires pour mémoriser un site
Lorsque vous êtes invité à entrer un « nom convivial », vous pouvez définir la manière dont OmniPass
vous authentifie sur ce site. Trois choix sont à votre disposition pour chaque site mémorisé par OmniPass.
Le paramètre par défaut est Cliquer automatiquement sur le bouton « OK » ou « Soumettre » pour
ce site protégé par mot de passe une fois l’utilisateur authentifié. Avec ce paramètre, chaque fois que
vous accédez à ce site, OmniPass vous demandera votre mot de passe principal ou votre périphérique
d’authentification d’empreintes digitales. Une fois que vous êtes authentifié par OmniPass, vous serez
automatiquement connecté au site.
194 - Présentation du capteur d’empreintes digitales
La deuxième option est moins sécuritaire : Entrer automatiquement sur ce site protégé par mot
de passe lorsqu’il est activé. Ne pas demander d’authentification. Cochez la case supérieure pour
sélectionner ce choix. Ensuite, chaque fois que vous vous connectez à ce site, OmniPass vous donnera
accès sans vous demander de vous authentifier.
CE PARAMÈTRE EST PLUS PRATIQUE CAR DÈS QUE VOUS DEMANDEZ UN SITE QUI Y EST ASSOCIÉ,
VOUS SAUTEZ LA PROCÉDURE D’AUTHENTIFICATION ET VOUS ACCÉDEZ INSTANTANÉMENT AU SITE.
CEPENDANT, SI VOUS LAISSEZ VOTRE ORDINATEUR SANS SURVEILLANCE AVEC VOTRE CONNEXION
OMNIPASS ACTIVÉE, TOUTE PERSONNE UTILISANT VOTRE SYSTÈME PEUT ENTRER SUR LES SITES
PROTÉGÉS EN USURPANT VOTRE IDENTITÉ.
Si vous désélectionnez les deux cases dans Paramètres pour ce site protégé par mot de passe, OmniPass
vous demande votre mot de passe principal ou votre périphérique d’authentification. Une fois que vous
avez été authentifié par OmniPass, vos informations d’identification s’affichent à l’invite de connexion
du site. Toutefois, vous devez cliquer sur le bouton [OK], [Envoyer] ou [Connexion] pour accéder au site.
Cliquez sur [Terminer] pour achever la procédure de mémorisation du mot de passe. L’emplacement du site,
les informations d’identification pour y accéder et les paramètres d’authentification OmniPass correspondant
à ce site sont désormais sauvegardés dans la base de données sécurisée d’OmniPass. Les paramètres
d’authentification d’OmniPass (Paramètres pour ce site protégé par mot de passe) peuvent toujours
être modifiés dans Gestion du coffre-fort.
Connexion à un site mémorisé
Selon les informations contenues dans Paramètres pour ce site protégé par mot de passe, OmniPass
vous invitera ou non à vous authentifier lorsque vous retournerez à un site mémorisé. Ces informations
peuvent être modifiées dans Gestion du coffre-fort.
Les cas suivants s’appliquent à l’utilisation d’OmniPass pour se connecter à : Windows, aux sites
mémorisés et à toutes les autres ressources protégées par mot de passe.
Avec mot de passe principal
Lorsque vous retournez à un site mémorisé avec OmniPass, il se peut que le système vous demande un
mot de passe principal. Entrez votre mot de passe principal et vous serez autorisé à accéder au site.
195 - Présentation du capteur d’empreintes digitales
Connexion à Windows avec un capteur d’empreintes digitales
Lorsque vous vous connectez à Windows à l’aide d’un capteur d’empreintes, la fenêtre de prise d’empreintes
digitales apparaît à côté de l’écran de connexion Windows. Placez votre doigt enregistré sur le capteur pour
que le système vous identifie. Vous serez simultanément connecté à Windows et OmniPass. La fenêtre de
prise d’empreinte s’affiche également si vous avez utilisé Ctrl-Alt-Suppr pour verrouiller le système. En
outre, le capteur d’empreintes peut être utilisé pour vous reconnecter, comme indiqué ci-dessus.
SI UN ORDINATEUR EST VERROUILLÉ ET QU’OMNIPASS DÉTECTE UN UTILISATEUR DIFFÉRENT SE
RECONNECTANT AVEC SON EMPREINTE DIGITALE, LE PREMIER UTILISATEUR SERA DÉCONNECTÉ
ET LE SECOND CONNECTÉ.
Gestion des mots de passe
OmniPass propose une interface qui vous permet de gérer vos mots de passe. Pour accéder à cette interface
graphique, cliquez deux fois sur la clé OmniPass dans la zone de notification. Cliquez sur Gestion du
coffre-fort ; vous serez invité à vous authentifier. Lorsque vous avez accédé à Gestion du coffre-fort,
cliquez sur Gérer les mots de passe sous Paramètres du coffre-fort. L’interface Gérer les mots de
passe apparaît avec une liste de noms conviviaux.
Si vous désirez afficher les informations d’identification sauvegardées pour un site Internet mémorisé,
mettez en surbrillance la ressource souhaitée sous Boîte de dialogue « Protection par mot de passe » et
cliquez sur Afficher les valeurs. En cas de réinitialisation d’un mot de passe ou d’expiration d’un compte,
vous pouvez supprimer les informations d’identification sauvegardées dans OmniPass. Mettez en surbrillance
la ressource souhaitée sous Boîte de dialogue « Protection par mot de passe », puis cliquez sur Supprimer
la page. Vous serez invité à confirmer la suppression du mot de passe.
Les deux cases à cocher dans Gérer les mots de passe déterminent si OmniPass vous invite à vous
authentifier ou vous connecte directement au site mémorisé.
Si vous tentez d’utiliser Mémoriser le mot de passe sur un site déjà connu, OmniPass efface les anciennes
informations d’identification.
196 - Présentation du capteur d’empreintes digitales
Le remplacement de votre mot de passe Windows constitue l’exception à la règle ci-dessus. Si votre mot
de passe est réinitialisé dans Windows, le changement sera détecté par OmniPass qui vous invitera à
« Mettre à jour » ou à « Reconfirmer » le mot de passe. Entrez votre nouveau mot de passe Windows dans
l’invite, puis cliquez sur [OK]. Votre « mot de passe principal » Omnipass sera toujours votre mot de
passe Windows.
Identités d’utilisateur OmniPass
Les identités permettent aux utilisateurs OmniPass de posséder plusieurs comptes sur un même site (par
exemple, [email protected] et [email protected]). Si OmniPass ne vous a pas fourni
d’identités, vous ne pourrez mémoriser qu’un seul compte par site.
Pour créer et gérer des identités, cliquez deux fois sur la clé OmniPass dans la zone de notification.
Cliquez sur Gestion du coffre-fort. OmniPass vous invite à vous authentifier. Lorsque vous avez accédé
à Gestion du coffre-fort, cliquez sur Gérer les identités sous Paramètres du coffre-fort. Vous pouvez
seulement gérer les identités de l’utilisateur OmniPass actuellement connecté.
Pour ajouter une nouvelle identité, cliquez sur Nouvelle identité ou double-cliquez sur Cliquer ici pour
ajouter une nouvelle identité. Nommez la nouvelle identité et cliquez sur [OK], puis sur [Appliquer].
Vous pouvez désormais basculer vers la nouvelle identité et démarrer la mémorisation des mots de passe.
Pour supprimer une identité, mettez en surbrillance l’identité à supprimer et cliquez sur [Supprimer
l’identité], puis cliquez sur [Appliquer].
LORSQUE VOUS SUPPRIMEZ UNE IDENTITÉ, TOUS LES SITES MÉMORISÉS ET LES BOÎTES DE DIALOGUE
« PROTECTION PAR MOT DE PASSE » ASSOCIÉS À L’IDENTITÉ SONT PERDUS.
Pour définir l’identité par défaut, mettez en surbrillance l’identité souhaitée puis cliquez sur [Définir par
défaut] et cliquez sur [Appliquer] pour vérifier que les paramètres sont bien enregistrés. Si vous accédez
à OmniPass à l’aide d’un capteur d’empreintes digitales, vous serez automatiquement connecté à l’identité
par défaut de l’utilisateur OmniPass associé à l’empreinte. Si vous utilisez la procédure de connexion à
l’aide du « mot de passe principal », vous pouvez choisir l’identité avec laquelle vous vous connectez.
197 - Présentation du capteur d’empreintes digitales
Choix de l’identité de l’utilisateur lors de la connexion
Pour choisir votre identité lors de la connexion, tapez votre nom d’utilisateur dans le champ Nom
d’utilisateur :. Appuyez sur [Tab] et assurez-vous que le champ Domaine : se remplit automatiquement.
Cliquez sur le champ Mot de passe : pour pointer le curseur dessus et vous verrez le menu déroulant dans
le champ Identité :. Sélectionnez l’identité souhaitée puis cliquez sur [OK].
Changement d’identité de l’utilisateur
Pour changer les identités à tout moment, cliquez avec le bouton droit de la souris sur l’icône OmniPass
dans la zone de notification, puis cliquez sur Changer l’identité de l’utilisateur dans le sous-menu. La
boîte de dialogue Changer d’identité apparaît. Sélectionnez l’identité souhaitée puis cliquez sur [OK].
Gestion des mots de passe et des identités
Sur l’interface Gérer les mots de passe de l’onglet Gestion du coffre-fort du Centre de contrôle OmniPass,
il existe une liste de sélection déroulante nommée Identité. Ce champ vous permet de choisir l’identité
pour laquelle vous désirez gérer les mots de passe. Lorsque vous sélectionnez une identité dans cette liste,
le système affiche seulement les boîtes de dialogue « Protection par mot de passe » associées à cette identité.
Vous pouvez effectuer toutes les fonctions expliquées dans « Gestion des mots de passe » en page 196.
Configuration d’OmniPass
Cette section vous donne un aperçu de la fonction Exportation/Importation et du Centre de contrôle
OmniPass.
Exportation et importation d’utilisateurs
VOUS NE POUVEZ PAS IMPORTER UN UTILISATEUR DANS OMNIPASS SI UN UTILISATEUR PORTANT LE
MÊME NOM Y EST DÉJÀ ENREGISTRÉ.
198 - Présentation du capteur d’empreintes digitales
Vous pouvez importer et exporter des utilisateurs dans et hors d’OmniPass à l’aide du Centre de contrôle.
Le processus d’exportation permet de sauvegarder tous les sites mémorisés, les informations d’identification
et les empreintes enregistrées d’un utilisateur OmniPass. Toutes les données OmniPass d’un utilisateur
sont sauvegardées dans un fichier de base de données crypté unique. Durant le processus d’importation,
vous devez utiliser les informations de connexion Windows de l’utilisateur exporté. Si les informations
d’identification appropriées ne sont pas fournies, le profil utilisateur ne sera pas importé.
• VOUS DEVEZ EXPORTER PÉRIODIQUEMENT VOTRE PROFIL UTILISATEUR ET LE SAUVEGARDER DANS
UN ENDROIT SÛR. S’IL DEVAIT ARRIVER QUELQUE CHOSE À VOTRE SYSTÈME, VOUS POUVEZ IMPORTER
VOTRE PROFIL
OMNIPASS SUR UN NOUVEAU SYSTÈME ET DISPOSER INSTANTANÉMENT DE TOUS
VOS PARAMÈTRES ET EMPREINTES DIGITALES MÉMORISÉS.
• N’OUBLIEZ PAS VOS INFORMATIONS D’IDENTIFICATION WINDOWS UTILISÉES LORS DE L’EXPORTATION.
LORSQUE VOUS PROCÉDEZ À L’IMPORTATION D’UN PROFIL UTILISATEUR, OMNIPASS VOUS INVITE À
VOUS AUTHENTIFIER. LES INFORMATIONS D’IDENTIFICATION PERMETTANT D’IMPORTER UN PROFIL
SONT LES RÉFÉRENCES DE CONNEXION WINDOWS DE L’UTILISATEUR EXPORTÉ. CES RÉFÉRENCES
SONT CELLES QU’IL FALLAIT SOUMETTRE LORSQUE LE PROFIL D’UTILISATEUR A ÉTÉ EXPORTÉ.
VOUS AUREZ BESOIN DU NOM D’UTILISATEUR, DU MOT DE PASSE ET DU DOMAINE.
Exporter un profil d’utilisateur OmniPass
Pour exporter un profil utilisateur, ouvrez le Centre de contrôle OmniPass et cliquez sur Importer/exporter
un utilisateur sous Gérer les utilisateurs.
Cliquez sur Exporter un profil utilisateur OmniPass. OmniPass vous invitera à vous authentifier. Une
fois l’authentification réussie, vous devez nommer le profil utilisateur OmniPass et décider où l’enregistrer.
Un fichier .opi est généré et vous devez en sauvegarder une copie dans un endroit sûr.
Ce fichier .opi contient toutes vos données d’utilisateur OmniPass. Il est crypté et protégé par mot de
passe. Ce profil utilisateur ne contient AUCUN de vos fichiers de données cryptés.
199 - Présentation du capteur d’empreintes digitales
Importer un profil d’utilisateur OmniPass
Pour importer un profil utilisateur, ouvrez le Centre de contrôle OmniPass et cliquez sur [Importer/exporter
un utilisateur] sous Gérer les utilisateurs. Cliquez sur [Importer un nouvel utilisateur dans OmniPass],
sélectionnez « Fichier d’importation/exportation OmniPass » (*.opi) puis cliquez sur [Suivant]. OmniPass
vous invite ensuite à rechercher le fichier exporté auparavant (fichier .opi). Lorsque vous sélectionnez le
fichier .opi pour l’importer, OmniPass vous invite à vous authentifier. Les informations d’identification
permettant d’importer un profil sont les références de connexion Windows de l’utilisateur exporté. Ces
références sont celles qu’il fallait soumettre lorsque le profil d’utilisateur a été exporté. Vous aurez besoin
du Nom d’utilisateur, du Mot de passe et du Domaine. Si vous avez oublié la valeur pour Domaine, celleci doit correspondre au nom de votre ordinateur dans un environnement PC ou SOHO.
OmniPass vous informe si le profil utilisateur a été correctement importé.
Informations importantes sur les opérations d’importation et d’exportation
• Supposons que vous exportez un profil d’utilisateur Windows local depuis OmniPass. Vous voulez
importer ce profil sur un autre ordinateur doté d’OmniPass. Avant de pouvoir importer le profil,
un utilisateur Windows avec les mêmes références de connexion doit être créé sur l’ordinateur
important le profil.
Exemple : J’ai un utilisateur Windows avec le nom d’utilisateur « Thomas » et le mot de passe
« Soleil » sur mon système. J’ai enregistré « Thomas » dans OmniPass et mémorisé des mots de
passe. Je veux transférer tous mes mots de passe vers le nouveau système. J’exporte le profil
utilisateur OmniPass de Thomas. J’accède à mon nouveau système et à l’aide du panneau de
configuration, je crée un utilisateur avec le nom d’utilisateur « Thomas » et le mot de passe
« Soleil ». Je peux maintenant importer les données utilisateur OmniPass dans le nouveau système.
• Si vous exportez un utilisateur propre à OmniPass, vous pouvez importer cet utilisateur dans
tout ordinateur exécutant OmniPass, à condition qu’un utilisateur portant le même nom n’y
soit pas déjà enregistré.
• Si vous tentez d’importer un profil utilisateur portant le même nom qu’un utilisateur déjà enregistré
dans OmniPass, le processus d’importation échoue.
200 - Présentation du capteur d’empreintes digitales
Centre de contrôle OmniPass
Cette section a pour but de présenter les fonctions du Centre de contrôle OmniPass qui n’ont pas
été expliquées auparavant.
Vous pouvez accéder au Centre de contrôle OmniPass de trois façons :
• Double-cliquez sur l’icône OmniPass en forme de clé dorée dans la zone de notification Windows
(généralement située dans le coin inférieur droit du bureau).
• Cliquez sur le bouton Démarrer, sélectionnez Tous les programmes, puis le groupe de
programmes Softex et enfin cliquez sur la sélection Centre de contrôle OmniPass.
• Ouvrez le Panneau de configuration Windows (accessible à partir du bouton Démarrer –>
Paramètres –> Panneau de configuration) et double-cliquez sur l’icône Softex OmniPass.
Gestion des utilisateurs
L’onglet « Gestion des utilisateurs » comporte deux interfaces principales : Ajouter/supprimer un utilisateur
et Importer/exporter un utilisateur. La fonctionnalité Importer/exporter un utilisateur est expliquée
dans « Exportation et importation d’utilisateurs » en page 198. La fonctionnalité Ajouter/supprimer un
utilisateur est explicite.
Si vous cliquez sur Ajouter un nouvel utilisateur à OmniPass, vous démarrez l’Assistant d’enregistrement
OmniPass. L’Assistant d’enregistrement est expliqué dans « Enregistrement des utilisateurs » en page 190.
Si vous cliquez sur Supprimer un utilisateur OmniPass, vous êtes invité à vous authentifier.
Authentifiez-vous à l’aide des informations d’identification (ou de l’empreinte digitale enregistrée)
de l’utilisateur à supprimer. OmniPass vous invite à confirmer la suppression de l’utilisateur.
Cliquez sur [OK] pour terminer le processus de suppression.
LA SUPPRESSION D’UN UTILISATEUR DÉTRUIT AUTOMATIQUEMENT TOUTES LES DONNÉES OMNIPASS
ASSOCIÉES À CET UTILISATEUR. TOUTES LES IDENTITÉS ET TOUTES LES INFORMATIONS D’IDENTIFICATION
DE L’UTILISATEUR SERONT PERDUES.
SI VOUS ÊTES CERTAIN DE DEVOIR SUPPRIMER L’UTILISATEUR, NOUS VOUS RECOMMANDONS D’EXPORTER
LE PROFIL UTILISATEUR.
201 - Présentation du capteur d’empreintes digitales
Paramètres utilisateur
L’onglet « Paramètres utilisateur » comporte trois interfaces : Paramètres audio, Astuces de la barre de
tâches et Enregistrement. Les paramètres utilisateur permettent aux utilisateurs de personnaliser OmniPass
pour répondre à leurs préférences individuelles. Sous Paramètres utilisateur (Paramètres audio et
Astuces de la barre de tâches), vous pouvez configurer la manière dont OmniPass informe l’utilisateur
des événements d’OmniPass (par exemple, connexion réussie, accès refusé, etc.). Les détails de chaque
paramètre sous les interfaces Paramètres audio et Astuces de la barre des tâches sont explicites.
L’interface Enregistrement vous permet d’enregistrer des empreintes digitales. Si vous désirez des
informations sur la procédure d’enregistrement d’un périphérique d’authentification, reportez-vous au
Chapitre 2.3. Pour enregistrer des empreintes digitales supplémentaires, cliquez sur Enregistrer un
périphérique d’authentification et authentifiez-vous dans OmniPass. Sélectionnez le périphérique de
reconnaissance d’empreintes digitales dans l’écran Sélectionner un périphérique d’authentification
(il doit être déjà marqué d’une coche verte si vous avez enregistré un doigt), puis cliquez sur [Suivant].
Paramètres de système
Vous trouverez l’interface Options de démarrage dans l’onglet « Paramètres de système ». Les options
de cette interface vous permettent de spécifier la manière dont votre ouverture de session OmniPass est
associée à votre ouverture de session Windows.
La première option, Se connecter automatiquement à OmniPass en tant qu’utilisateur actuel, est
explicite. Lors de l’ouverture d’une session Windows, vous êtes connecté à OmniPass à l’aide de vos
références de connexion Windows. Si l’utilisateur ouvrant une session Windows n’a jamais été enregistré
dans OmniPass, personne n’est connecté à OmniPass au moment de la connexion. Ce paramètre convient
à une configuration de bureau ou à toute configuration nécessitant la saisie d’un nom d’utilisateur et d’un
mot de passe pour utiliser l’ordinateur. Il s’agit du paramètre par défaut.
Avec la deuxième option, Se connecter manuellement à OmniPass au démarrage, OmniPass vous
invite à vous connecter une fois que vous avez ouvert une session Windows.
202 - Présentation du capteur d’empreintes digitales
Si vous choisissez la troisième option, Ne pas se connecter à OmniPass au démarrage, OmniPass
n’invite pas l’utilisateur à se connecter.
Vous pouvez vous connecter manuellement à OmniPass en cliquant avec le bouton droit de la souris sur
l’icône d’OmniPass dans la zone de notification et sur Connecter l’utilisateur dans le menu généré.
Dépannage
Vous ne pouvez pas utiliser OmniPass pour créer des utilisateurs Windows. Vous devez d’abord créer
l’utilisateur Windows, ce qui nécessite des droits d’administrateur. Une fois l’utilisateur Windows créé,
vous pouvez l’ajouter dans OmniPass avec le même nom d’utilisateur et le même mot de passe.
Impossible d’ajouter des utilisateurs Windows dans OmniPass
Si vous rencontrez des difficultés pour ajouter un utilisateur Windows dans OmniPass, vous devrez
peut-être modifier vos paramètres de sécurité locale. Pour ce faire, allez à Démarrer, Panneau de
configuration, Outils d’administration et Paramètres de sécurité locale. Ouvrez Stratégies locales
et Options de sécurité, puis double-cliquez sur Accès réseau : Modèle de partage et de sécurité pour
les comptes locaux. La configuration correcte doit être Classique – Les utilisateurs locaux
s’authentifient eux-mêmes.
Impossible d’ajouter un utilisateur avec un mot de passe vide dans OmniPass
Si vous rencontrez des difficultés pour ajouter un utilisateur avec un mot de passe vide dans OmniPass,
vous devrez peut-être modifier vos paramètres de sécurité locale. Essayez d’abord la procédure
expliquée dans la section Impossible d’ajouter un utilisateur Windows dans OmniPass. Si le problème
persiste, essayez la procédure suivante.
Cliquez sur [Démarrer], Panneau de configuration, Outils d’administration et Paramètres de
sécurité locale. Ouvrez Stratégies locales et Options de sécurité, puis double-cliquez sur Comptes :
restreindre l’utilisation de mots de passe vierges par le compte local à l’ouverture de session
console. Ce paramètre doit être configuré sur Désactivé.
203 - Présentation du capteur d’empreintes digitales
Durant la procédure d’ouverture d’une session Windows, une boîte de dialogue s’affiche après
l’authentification OmniPass
Après avoir installé OmniPass sur votre système, vous pouvez choisir de vous connecter à Windows à
l’aide d’OmniPass. Vous vous authentifiez avec OmniPass (à l’aide du mot de passe principal ou d’un
périphérique de sécurité enregistré) et OmniPass vous connecte à Windows. Au cours du processus
d’authentification, il se peut que la boîte de dialogue Erreur de connexion s’affiche.
Cette boîte de dialogue apparaît si OmniPass n’a pas réussi à vous connecter à Windows à l’aide des
informations d’identification fournies (nom d’utilisateur et mot de passe). Ceci peut arriver dans les
circonstances suivantes :
• Votre mot de passe Windows a changé.
• Votre compte Windows a été désactivé.
Si vous rencontrez des difficultés à cause de la première raison, vous devrez mettre à jour OmniPass
avec votre mot de passe de compte Windows modifié. Cliquez sur Mettre à jour le mot de passe et une
boîte de dialogue vous invitera à reconfirmer votre mot de passe.
Entrez le nouveau mot de passe Windows et cliquez sur [OK]. Si l’erreur persiste, il est peu probable
que le problème soit dû à la modification de votre mot de passe Windows.
204 - Présentation du capteur d’empreintes digitales
Index
court-circuitée 89
défectueuse 119
entretien 141
épuisée 119
faible 88
mode veille 88
problèmes 119, 120
recharge 87
remplacement 89
remplacement hors tension 89
remplacement sous tension 89
voyant de niveau 31
voyants de niveau 31
BIOS
guide 78
utilitaire de configuration 76
Bluetooth
Informations supplémentaires 184
Bouton d’éjection de carte ExpressCard 24
Boutons de sécurité
Fonctions 59
Boutons de sécurité/PC Tablette LifeBook 20, 59
A
À propos de ce guide 1, 13
Adobe Reader 152
Adaptateur auto/avion 72, 73
Alimentation
Adaptateur auto/avion 72
adaptateur secteur 72
gestion 81
mise hors tension 84
mise sous tension 74
panne 117, 118
problèmes 120
sources 72
voyant 30
Amorçage du système 78
Auto-diagnostic de mise sous tension 75, 125
B
Baie modulaire 56
installation 57
périphériques 56
remplacement hors tension 57
retrait 57
Batterie 86
augmentation de la durée de vie 142
batterie au lithium 86
conservation de l’énergie 81
C
Câble de sortie c.c. 72
Capteur d’empreintes digitales 22, 186
barre d’outils d’authentification OmniPass 193
connexion à un site mémorisé 195
désinstallation d’OmniPass 189
205
enregistrement d’une empreinte digitale 192
enregistrement des utilisateurs 190
installation d’OmniPass 187
mémorisation d’un mot de passe 194
première mise en marche 187
remplacement du mot de passe 193
utilisation d’OmniPass 193
Carte ExpressCard
problèmes 117
Carte Memory Stick
installation 92
retrait 92
Carte SD
installation 92
retrait 92
Carte Secure Digital
retrait 92
Cartes ExpressCard 93
installation 93
retrait 94
Cartes mémoire MemoryStick/Secure Digital 91
Cartes PC
fente 24
CD de pilotes et de restauration des applications 130
CD-ROM 114
Clavier 21, 41
pavé numérique 41
problèmes 115
touches de curseur 41
touches de fonction 42
touches Windows 42
Click Me! 80
Commandes et connecteurs 17
Commutateur d’alimentation/
veille/reprise 20, 39, 81
206
Commutateur de veille/reprise 18
Compartiment de batterie au lithium 29
Configuration Tablette 35
Connecteur entrée c. c. 17
Conventions utilisées dans ce guide 13
Coordonnées 14
Coordonnées pour contacter Fujitsu 14
Cordon du stylo 54
D
Défiler 48
Dépannage 110
DIMM 95
Disque dur
problèmes 115
voyant d’accès 31
Double-cliquer 45
Duplicateur de ports
Connecteur pour duplicateur de ports 29
problèmes 115
E
Écran 20, 34
luminosité 38
ouverture 34
problèmes 122, 123
Écran tactile
cliquer 50
étalonnage 52
glisser 51
Emplacement du commutateur Marche/
Arrêt de carte réseau local sans fil 18
Enregistrement 79
Étiquette de configuration 145
F
retrait 101
supplémentaires 99, 102
utilisation 104
Lecteur optique 98
Graveur de DVD multiformat modulaire 98
ouverture du plateau 102
Logiciels pré-installés 151
Loquets de la batterie 29
FDU 80, 134, 154
Fente d’antivol 18
Fente de dispositif antivol 26
Fente pour carte ExpressCard 24
Fente pour cartes Memory Stick/SD 17
Fonction de veille prolongée 83
activation/désactivation 83
Fonctions des boutons de post-identification 62
Fonctions des boutons de pré-identification 60
Fonctions des boutons PC Tablette
modification 65
M
Mémoire
capacité 97
compartiment 28, 96
installation 95
module de mémoire additionnelle 95
problèmes 116
vérification de la capacité de mémoire 97
Messages d’erreurs 125
Microphones intégrés doubles 22
Microsoft Works 155
Mots de passe d’accès au disque dur 76
G
Garantie 15
Gestion de l’alimentation 81
Gestion de l’alimentation dans Windows 83
Glisser 45, 47
Glossaire 156
Grilles de ventilation 27, 29
H
N
Haut-parleurs incorporés 113
Numériseur 49
I
O
Icônes de bouton 60, 63
Ordinateur portable Fujitsu LifeBook
rangement 139
voyager avec votre ordinateur 140
L
Lecteur de DVD
problèmes 114
Lecteur multimédia
alimentation par batterie 104
entretien 143
Panneau de configuration 103
P
Pavé tactile TouchPad
bouton de défilement 22
dispositif de pointage 22
207
Périphériques modulaires 57
installation 57
retrait 57
Point d’attache du cordon du stylo 25
Port de connexion 17, 105
Port IEEE 1394 106
Port pour moniteur externe 108
Port USB 17
Port vidéo externe 18, 28
Ports de périphériques 105
Ports USB (Universal Serial Bus) 106
Ports USB 2.0 26, 27
prise 81
Prise d'écouteurs 107
Prise d’alimentation c.c. 72
Prise d’écouteurs 17
Prise de micro 17, 23, 107
Prise de réseau local Gigabit (RJ-45) 27
Prise de réseau local interne 105
Prise IEEE 1394 (4 broches) 22
Procédure d’amorçage 75
Réseau local sans fil
Avant d’utiliser la carte réseau sans fil 174
configuration 174
Connexion au réseau 179
Dépannage 180
désactivation/déconnexion 177
modes 175
Spécifications 182
Restaurer vos logiciels pré-installés 130
RJ-45 105
S
SDRAM 28, 95
Secteur
adaptateur 72
adaptateurs de fiches 141
voyant 31
Site de vente par internet de Fujitsu 15
Souris
problèmes 115
Spécifications 145
Alimentation 150
Audio 147
Clavier 149
Dimensions et poids 150
Environnement d’exploitation 151
Mémoire 146
Microprocesseur 146
options de stockage de masse 147
Ports de périphériques 148
Puce 146
Vidéo 146
Stylet
installation du cordon 54
R
Redémarrage 83
Réglage des commandes du pavé TouchPad 48
Réglage du volume 55
Remplacement hors tension 57
Renseignements sur la réglementation 170
Réseau local 18
208
T
U
Tableau de sécurité LifeBook
désinstallation 69
mots de passe 66
paramétrage 65
utilisation 67
Tableau de voyants d’état 20, 30
Téléchargement automatique des
mises à jour de pilotes 134
Touche de fonction
[F10] 43
[F3] 43
[F4] 43
[F6] 43
[F7] 43
[F8] 43, 55
[F9] 43, 55
Fn 43
Touches de curseur 42
Touches Windows 42
Touche Application 42
Touches Démarrer 42
USB 106, 116
problèmes 116
Utilisation de l’écran tactile capacitif optionnel 53
Utilitaire de mise à jour des pilotes
Fujitsu Driver Update 80, 134, 154
V
Verr défil 33
Verr maj 32
Verr num 32
209