1
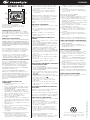
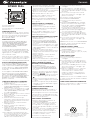
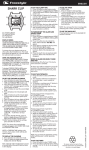
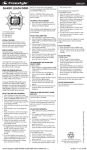
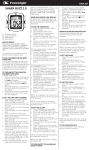
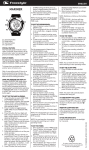
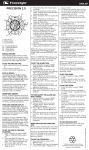
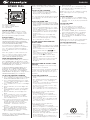
ENGLISH
S4
S1
TO DISPLAY THE CALENDAR
1.Rotate S3 button to select time mode.
2.Press S1 button to toggle between time display and calendar display.
S3
S2
Note: Calendar will be displayed for around
6 seconds before the watch switches back
to time display.
S1. Start/stop Button
S2. Lap/reset Button
S3. Jog wheel/Mode Button
S4. Light Button
SPECIAL FEATURE
This Freestyle product features unique
Hydro Pushers®: these pushers can be
pressed under water to a dynamic water
pressure (not water depth) of 3 ATM.
DISPLAY MODES
The watch has four display modes:
HOME TIME (TIME) / FOREIGN TIME (TM-2),
HOME TIME ALARM (ALM1) / FOREIGN
TIME ALARM (ALM2), STOPWATCH (STW)
and COUNTDOWN TIMER (TMR).
To change from one display mode to
another, rotate the jog wheel or S3 button
once. The mode description will appear
for 2 seconds before the selected mode is
activated.
Note: The jog wheel can be rotated clockwise or counterclockwise, but the mode
sequence will only follow order listed in
above DISPLAY MODES paragraph.
HOME AND FOREIGN DISPLAY
To display FOREIGN TIME, press S2 button
when HOME TIME is displayed. The mode
description (TM-2) will appear shortly before
FOREIGN TIME is displayed. To change back
to HOME TIME, press S2 button.
To display FOREIGN TIME ALARM, press
S2 button when HOME TIME ALARM is
displayed. The mode description (ALM 2)
will appear shortly before the FOREIGN
TIME ALARM is displayed. To change back to
HOME TIME ALARM, press S2 button.
TO SET THE TIME AND CALENDAR
1.Rotate S3 button to select time mode.
2.Press S2 button to toggle between HOME TIME and FOREIGN TIME mode to set.
3.Press and hold S2 button for 2 seconds until the “SET” message appears and the second digits will blink.
4.Press S1 button to reset the second digits to 00.
5.Rotate S3 button, the minute digits will blink.
6.Press S1 button to set the minute digits. Holding down the button speed up the process.
7.Rotate S3 button, the hour digits will blink.
8.Press S1 button to set the hour digits.
9.Follow the same pattern to set date, month, day (of the week), hour format and calendar format.
10.To set the hour format, press S1 button to toggle between 12-hour and 24-hour format. The P.M. indicator may be displayed to indicate the time period 12:00 P.M. – 11:59 P.M. in 12-hour format.
11.To set the calendar format, press S1 button to toggle between M-D (month-
date) and D-M (date-month) format.
12.When finished making all the settings, press S2 button to confirm.
NOTE: The chosen hour and calendar
formats will apply to both HOME TIME mode
and FOREIGN TIME mode.
TO SET THE ALARM TIME
1.Rotate S3 button to select alarm mode.
2.Press S2 button to toggle between HOME TIME ALARM and FOREIGN TIME ALARM mode to set.
3.Press and hold S2 button for 2 seconds until the “SET” message appears and the minute digits will blink.
4.Press S1 button to set the minute digits. Holding down the button will speed up the process.
5. Rotate S3 button, the hour digits will blink.
6.Press S1 button to set the hour digits.
7.When finished making all the settings, press S2 button to confirm.
where it left off.
5.To reset to zero, press S1 button to stop counting, then press S2 button to reset the counter to zero.
NOTE: You can leave the stopwatch running
while switching over to other operating
modes.
TO SET THE TIMER
1.Rotate S3 button to select TIMER mode.
2.Press S2 button to alter the timer setting among 1, 3, 5, 10, 15, 20, 25, 30, 45 and 60 minutes.
TO USE THE TIMER
In TIMER mode,
1.Press S1 button to start counting.
2.To stop counting, press S1 button once. Press S1 button again to resume from where it left off.
3.To reload the TIMER, press S1 button to stop counting and then press S2 button.
4.After reaching zero in a countdown, a tune will be emitted. To stop the tune, press any button, the TIMER will reload automatically.
NOTE: You can leave the timer running while
switching over to other operating modes.
TO TURN ON/OFF THE ALARM AND
TO USE THE BACKLIGHT
HOURLY CHIME
Press S4 button to turn on the backlight for
In alarm mode,
1.Press S2 button to toggle between HOME around 3 seconds.
TIME ALARM and FOREIGN TIME ALARM mode to set.
2.Press S1 button once to activate the will alarm. Alarm indicator appear.
3.Press again to activate the hourly chime. will appear.
Chime indicator
4.Press the third time to activate both
functions. Both of the indicators will appear.
5.Press the fourth time to deactivate both functions. Both of the indicators will disappear.
WHEN AN ALARM OR HOURLY CHIME
GOES OFF
A tune will go off by the hour if the hourly
chime function is activated.
An alarm tune will be emitted for around 20
seconds at the designated time when the
alarm is activated. To stop the tune, press
any button.
TO USE THE STOPWATCH
1.Rotate S3 button to select STOPWATCH mode.
2.The stopwatch will then be displayed in its current state – reset, running, or stopped.
3.To resume a counting, press S1 button to resume from where it left off.
4.To start a new counting, reset the stop
watch to zero first.
Press S1 button to stop counting, then press S2 button to reset counter to zero.
For the measurement of elapsed time:
In STOPWATCH mode,
1.Press S1 button to start counting.
2.To stop counting, press S1 button once. Press S1 button again to resume from where it left off.
3.To reset to zero, press S1 button to stop counting, then press S2 button to reset the counter to zero.
For the measurement of split time:
In STOPWATCH mode,
1.Press S1 button to start counting.
2.While the stopwatch is running, press S2
button once to register a lap. The stop
watch is still running in the background.
To display the currently accumulated time, press S2 button again.
3.Repeat the last step until all the laps have been registered.
4.To stop counting, press S1 button once. Press S1 button again to resume from To reduce carbon foot print, these
Freestyle instructions are printed with
soy inks on recycled paper.
FS1074-SPEED DIAL-AG6873-R01
SPEED DIAL
NOTE: In FOREIGN TIME settings, only
minutes, hours, date, month and day are
open to setting.
ESPAÑOL
S4
S1
S3
S2
S1. Botón para iniciar/parar
S2. Botón de vuelta/puesta a cero
S3. Rosca para girar/botón de modo
S4. Botón de luz
CARACTERÍSTICA ESPECIAL
Este producto de Freestyle tiene el Hydro
Pusher ® original: un botón que se puede
pulsar bajo el agua hasta en una presión de
agua dinámica (no profundidad en el agua)
de 3 ATM.
MODOS DE VISUALIZACIÓN
El reloj tiene cuatro vistas: HORA EN CASA
(TIME) / HORA EN EL EXTRANJERO (TM-2),
ALARMA PARA LA HORA EN CASA (ALM1) /
ALARMA PARA LA HORA EN EL EXTRANJERO (ALM2), PARAR RELOJ (STW) y CUENTA
ATRÁS (TMR).
Para cambiar de una vista a otra, gire la
rosca o el botón S3 una vez. La descripción
del modo aparecerá durante 2 segundos
antes de activar el modo seleccionado.
Nota: la rosca se puede girar en ambos
sentidos, pero la secuencia de modos sólo
seguirá el orden establecido en el párrafo
sobre MODOS DE VISUALIZACIÓN.
PANTALLA PARA CASA Y EL EXTRANJERO
Para ver la HORA EN EL EXTRANJERO,
gire la rosca S2 cuando vea en la pantalla
HOME TIME (hora en casa). La descripción
del modo (TM-2) aparecerá brevemente
en la pantalla antes de ver la HORA EN
EL EXTRANJERO. Para volver a HORA EN
CASA, pulse el botón S2.
Para ver la ALARMA EN EL EXTRANJERO, pulse el botón S2 cuando vea en la
pantalla HOME TIME ALARM (alarma en el
extranjero). La descripción del modo (ALM2)
aparecerá brevemente en la pantalla antes
de ver la ALARMA EN EL EXTRANJERO.
Para volver a HORA EN CASA, pulse el
botón S2.
CÓMO AJUSTAR LA HORA Y EL
CALENDARIO
1. Gire la rosca S3 para seleccionar el
modo de hora.
2. Pulse el botón S2 para cambiar entre los
modos de HORA EN CASA y HORA EN
EL EXTRANJERO.
3. Mantenga pulsado el botón S2 durante
2 segundos. Verá la palabra “SET”, y
parpadearan los dígitos de los segundos.
4. Pulse el botón S1 para volver a poner los
dígitos de los segundos en 00.
5. Gire la rosca S3. Los dígitos de los
minutos parpadearán.
6. Pulse el botón S1 una vez. Los dígitos de
los minutos aumentarán en una unidad.
Mantenga pulsado el botón para acelerar
el proceso.
7. Gire la rosca S3. Los dígitos de las horas
parpadearán.
8. Pulse el botón S1 para ajustar los dígitos
de la hora.
9. Haga lo mismo para configurar el
formato de la fecha, el mes, el día de
la semana, el formato de la hora y el
calendario.
10. Para ajustar el formato de la hora, pulse
el botón S1 para cambiar entre los
formatos de 12 horas y de 24 horas.
Se mostrará el indicador de pm para
señalar la hora en formato de 12 horas.
NOTA: El formato elegido para la hora y el
calendario se usará tanto para el modo de
hora en casa y en el extranjero.
NOTA: En la configuración de la HORA
EXTRANJERA, sólo podrá ajustar los
minutos, las horas, la fecha, el mes y
el día.
PARA VER EL CALENDARIO
1. Gire la rosca S3 para seleccionar el modo
de hora.
2. Pulse el botón S1 para cambiar entre
las pantallas de visualización de hora y
calendario.
NOTA: El calendario se verá durante 6
segundos antes de que el reloj vuelva a
mostrar la hora.
CÓMO CONFIGURAR LA HORA DE LA
ALARMA
1. Gire la rosca S3 para seleccionar el modo
de ALARMA.
2. Pulse el botón S2 para cambiar entre los
modos de ALARMA EN CASA y ALARMA
EN EL EXTRANJERO.
3. Mantenga pulsado el botón S2 durante 2
segundos. Verá la palabra “SET”, y parpadearan los dígitos de los minutos.
4. Pulse el botón S1 una vez. Los dígitos de
los minutos aumentarán en una unidad.
Mantenga pulsado el botón para acelerar
el proceso.
5. Gire la rosca S3. Los dígitos de las horas parpadearán.
6. Pulse el botón S1 para ajustar los dígitos
de la hora.
7. Después de hacer todos los ajustes
necesarios, pulse el botón S2 para
confirmarlo.
rumpir la cuenta. Pulse el botón S1 otra
vez para retomar la cuenta ahí donde
se quedó.
3. Pulse el botón S1 para interrumpir la
cuenta y después pulse el botón S2 para
volver a cero.
Para medir el tiempo dividido,
En modo CUENTA ATRÁS
1. Pulse el botón S1 para empezar a contar.
2. Mientras la CUENTA ATRÁS está en
marcha, pulse el botón S2 una vez para
guardar la cuenta. El cronómetro seguirá
contando por detrás.
Para mostrar el tiempo acumulado hasta
el momento, pulse S2 otra vez.
3. Repita el último paso hasta que se hayan
guardado todas las vueltas.
4. Pulse el botón S1 una vez para interrumpir la cuenta. Pulse el botón S1 otra
vez para retomar la cuenta ahí donde
se quedó.
5. Pulse el botón S1 para interrumpir la
cuenta y después pulse el botón S2 para
volver a cero.
NOTA: Puede dejar la CUENTA ATRÁS en
marcha y cambiar a otros modos operativos.
CÓMO CONFIGURAR EL TEMPORIZADOR
1. Gire la rosca S3 para seleccionar el modo
TEMPORIZADOR.
2. Pulse el botón S2 para configurar el
temporizador entre 1, 3, 5, 10, 15, 20, 25,
30, 45 y 60 minutos.
CÓMO USAR EL TEMPORIZADOR
En el modo de TEMPORIZADOR,
1. Pulse el botón S1 para empezar a contar.
2. Pulse el botón S1 una vez para interrumpir la cuenta. Pulse el botón S1 otra
vez para retomar la cuenta ahí donde
se quedó.
3. Para resetear el TEMPORIZADOR, pulse
el botón S1 una vez para interrumpir la
cuenta. Ahora pulse el botón S2 para
volver a cero.
4. Después de llegar a cero en una cuenta
atrás, sonará un pitido durante veinte seCÓMO APAGAR Y ENCENDER LA ALARMA Y
gundos. Para interrumpir el pitido, pulse
EL REPIQUE DE LA HORA
cualquier botón. El TEMPORIZADOR se
En el modo de ALARMA,
cargará de nuevo automáticamente.
1. Pulse el botón S2 para cambiar entre los
modos de ALARMA EN CASA y ALARMA
NOTA: Puede dejar el TEMPORIZADOR en
EN EL EXTRANJERO.
marcha y cambiar a otros modos operativos.
2. Pulse el botón S1 para activar la alarma
diaria. Aparecerá el indicador de alarma CÓMO USAR LA LUZ DE FONDO
.
Pulse el botón S4 para encender la luz de
3. Pulse el botón otra vez para activar el
repique de la hora. Aparecerá el indicador fondo durante unos 3 segundos.
del repique de la hora .
4. Pulse una tercera vez para activar
ambas funciones. Aparecerán ambos
indicadores.
5. Pulse una cuarta vez para desactivar
ambas funciones. Desaparecerán ambos
indicadores.
AL SALTAR UNA ALARMA Y EL REPIQUE
DE LA HORA
Cuando se active la función de repique en
cada hora, saltará una melodía.
Con la alarma activada, el sonido de alarma
saltará a la hora fijada durante 20 segundos.
Para parar el tono, pulse cualquier botón.
CÓMO USAR LA CUENTA ATRÁS
1. Gire la rosca S3 para seleccionar el modo
de CUENTA ATRÁS.
2. Aparecerá el cronómetro en el estado en
que esté: en marcha, a cero o parado.
3. Pulse el botón S1 para retomar la cuenta
ahí donde se quedó.
4. Para iniciar una cuenta nueva, primero
hay que poner el cronómetro a cero.
Pulse el botón S1 para interrumpir la
cuenta y después pulse el botón S2 para
volver a cero.
Para medir el tiempo transcurrido,
En modo CUENTA ATRÁS
1. Pulse el botón S1 para empezar a contar.
2. Pulse el botón S1 una vez para inter-
Para reducir la huella del carbono,
las instrucciones de Freestyle se han
imprimido con tinta de soja en papel
reciclado.
FS1074-SPEED DIAL-AG6873-R01
SPEED DIAL
11. Para ajustar el formato del calendario,
pulse el botón S1 para cambiar entre
los formatos M-D (mes-día) y D-M
(día-mes).
12. Después de hacer todos los ajustes
necesarios, pulse el botón S2 para
confirmarlo.
DEUTSCH
S4
S1
S3
S2
S1. Taste „Start/Stopp”
S2. Taste „Runde/Zurücksetzen”
S3. Jog-Taste/Modus-Taste
S4. Taste „Licht”
SONDERFUNKTIONEN
Dieses Freestyle Produkt bietet den einzigartigen Hydro-Drücker ®: Diese Drücker
können auch unter Wasser bis zu einem dynamischen Wasserdruck (nicht Wassertiefe)
bis zu 3 ATM gedrückt werden.
ANZEIGEMODI
Die Uhr hat vier Anzeigenmodi: ORTSZEIT
(TIME) / FREMDZEIT(TM-2), WECKFUNKTION ORTSZEIT (ALM1) / WECKFUNKTION
FREMDZEIT
(ALM2), STOPPUHR (STW) und ZEITKONTROLLE/TIMER (TMR).
Drücken Sie Taste S3 oder Jog-Taste einmal
um von einer Anzeige zur nächsten zu
wechseln. Die Beschreibung des Modus
wird 2 Sekunden lang angezeigt bevor der
entsprechende Modus aktiviert wird.
Hinweis: Die Jog-Taste kann mit oder gegen
den Uhrzeigersinn gedreht werden, jedoch
wird die Reihenfolge nur wie im Abschnitt
ANZEIGEMODI beschrieben.
ANZEIGE ORTSZEIT UND FREMDZEIT
Um die FREMDZEIT anzuzeigen drücken
Sie Taste S2 wenn die ORTSZEIT angezeigt
wird. Die Beschreibung des Modus (TM-2)
wird kurz erscheinen; anschließend wird
die FREMDZEIT angezeigt. Drücken Sie
die Taste S2 um wieder zur ORTSZEIT zu
wechseln.
Um die WECKFUNTION FREMDZEIT
anzuzeigen drücken Sie Taste S2 wenn die
WECKFUNKTION ORTSZEIT angezeigt wird.
Die Beschreibung des Modus (ALM2) wird
kurz erscheinen; anschließend wird die
WECKFUNKTION FREMDZEIT angezeigt.
Drücken Sie die Taste S2 um wieder zur
ORTSZEIT zu wechseln.
ZEIT UND KALENDER EINSTELLEN
1. Drehen Sie den Knopf S3 um den
Zeitmodus zu wählen
2. Drücken Sie Taste S2 um zwischen
ORTSZEIT und FREMDZEIT zu wechseln.
3. Drücken Sie Taste S2 2 Sekunden
lang bis der Hinweis „SET“ (Einstellen)
angezeigt wird. Die Sekundenanzeige
wird blinken.
4. Drücken Sie Taste S1 um die Sekundenanzeige auf „00” zurückzusetzen.
5. Drehen Sie den Knopf S3 einmal. Die
Minutenanzeige wird blinken.
6. Drücken Sie Taste S1 um die Ziffern um
jeweils eine Einheit zu erhöhen. Halten
Sie die Taste gedrückt um die Anzeige
schneller vorzubewegen.
7. Drehen Sie den Knopf S3 einmal. Die
Stundenanzeige wird blinken.
8. Drücken Sie Taste S1 um die Stunden
einzustellen.
9. Folgen Sie den gleichen Schritten um
den Tag, Monat, Wochentag, sowie das
Stunden- und Datumsformat einzustellen.
10. Um das Stundenformat zu wählen,
drücken Sie Taste S1 um zwischen
12-Stunden und 24-Stundenformat zu
wählen.
Die „PM”-Anzeige erscheint um die Zeit
im 12-Stunden-Format anzuzeigen.
11. Um das Datumsformat einzustellen,
drücken Sie Taste S1 um zwischen M-D
(Monat-Datum) und D-M (Datum-Monat)
zu wechseln.
12. Wenn Sie alle Einstellungen abgeschlossen haben, drücken Sie Taste S2 zur
Bestätigung.
HINWEIS: Das gewählte Format für die
Stunden- und Datumsanzeige wird in beiden
Modi für Ortszeit und Fremdzeit angezeigt.
HINWEIS: Bei der Einstellung der FREMDZEIT können nur Minuten, Stunden, Tag,
Monat, und Datum eingestellt werden.
KALENDER ANZEIGEN:
1. Drehen Sie den Knopf S3 um den Zeitmodus zu wählen
2. Drücken Sie Taste S1 um zwischen
Zeitanzeige und Kalenderanzeige zu
wechseln.
Hinweis: Der Kalender wird etwa sechs
Sekunden lang angezeigt, danach wechselt
die Uhr wieder in den normalen Zeitanzeigemodus zurück.
WECKZEIT EINSTELLEN
1. Drehen Sie den Knopf S3 um den Weckmodus zu wählen.
2. Drücken Sie Taste S2 um zwischen
WECKFUNKTION ORTSZEIT und WECKFUNKTION FREMDZEIT zu wechseln.
3. Drücken Sie Taste S2 2 Sekunden lang bis
der Hinweis „SET“ (Einstellen) angezeigt
wird. Die Minutenanzeige wird blinken.
4. Drücken Sie Taste S1 um die Ziffern um
jeweils eine Einheit zu erhöhen. Halten
Sie die Taste gedrückt um die Anzeige
schneller vorzubewegen.
5. Drehen Sie den Knopf S3 einmal. Die
Stundenanzeige wird blinken.
6. Drücken Sie Taste S1 um die Stunden
einzustellen.
7. Wenn Sie alle Einstellungen abgeschlossen haben, drücken Sie Taste S2 zur
Bestätigung.
WECKFUNKTION UND STUNDENSIGNAL
AN-/AUSSTELLEN:
Im Weckmodus:
1. Drücken Sie Taste S2 um zwischen
WECKFUNKTION ORTSZEIT und WECKFUNKTION FREMDZEIT zu wechseln.
2. Drücken Sie Taste S1 einmal um die tägliche Weckfunktion zu aktivieren. Symbol
wird erscheinen.
Weckfunktion 3. Die Taste S1 nochmal drücken um das
Stundensignal zu aktivieren. Symbol
Stundensignal wird erscheinen.
4. Die Taste S1 zum dritten Mal drücken um
beide Funktionen zu aktivieren. Beide
Symbole werden erscheinen.
5. Taste S1 zum vierten Mal drücken um
beide Funktionen zu deaktivieren. Beide
Symbole werden erlöschen.
WENN DAS ALARMSIGNAL ODER
STUNDESIGNAL ERTÖNT
Ein Signal wird stündlich ertönen wenn die
Stundensignal-Funktion aktiviert ist.
Um die abgelaufene Zeit zu messen:
Im Modus STOPPUHR,
1. Drücken Sie Taste S1 um die Zeitmessung
zu starten.
2. Drücken Sie S1 nochmals um die
Zeitmessung zu stoppen. Drücken Sie S1
noch einmal um ab der letzten Messung
weiter zu messen.
3. Um die Stoppuhr zurückzusetzen,
drücken Sie Taste S1 um die Zeitmessung
zu stoppen und anschließend S2.
Messung der Zwischenzeit (Split Time):
Im Modus STOPPUHR,
1. Drücken Sie Taste S1 um die Zeitmessung
zu starten.
2. Während die Stoppuhr zählt, drücken
Sie Taste S2 einmal um die Rundenzeit
abzulesen. Die STOPPUHR läuft im
Hintergrund weiter.
Drücken Sie nochmals Taste S2 um
die aktuelle, kumulative Rundenzeit
anzuzeigen.
3. Wiederholen Sie den letzten Schritt bis
alle Runden angezeigt wurden.
4. Drücken Sie S1 nochmals um die Zeitmessung zu stoppen. Drücken Sie S1
noch einmal um ab der letzten Messung
weiter zu messen.
5. Um die Stoppuhr zurückzusetzen,
drücken Sie Taste S1 um die Zeitmessung
zu stoppen und anschließend S2.
HINWEIS : Sie können die STOPPUHR weiter
laufen lassen wenn Sie in andere Modi
wechseln.
TIMER EINSTELLEN
1. Drehen Sie den Knopf S3 um den TIMERModus zu wählen
2. Drücken Sie Taste S2 um den Timer auf 1,
3, 5, 10, 15, 20, 25, 30, 45 oder 60 Minuten
zu stellen.
TIMER BENUTZEN
Im TIMER Modus:
1. Drücken Sie Taste S1 um die Zeitmessung
zu starten.
2. Drücken Sie S1 nochmals um die
Zeitmessung zu stoppen. Drücken Sie S1
noch einmal um ab der letzten Messung
weiter zu messen.
3. Um den TIMER zurückzusetzen, drücken
Sie Taste S1 um die Zeitmessung zu stoppen und anschließend Taste S2.
4. Wenn nach der Zählung Null erreicht wird,
ertönt für zwanzig Sekunden ein Signalton. Drücken Sie jede beliebige Taste um
den Signalton abzustellen. Der TIMER
wird sich automatisch zurücksetzen.
HINWEIS : Sie können den TIMER weiter
laufen lassen wenn Sie in andere Modi
wechseln.
HINTERGRUNDBELEUCHTUNG BENUTZEN
Drücken Sie Taste S4 um die Hintergrundbeleuchtung für etwa 3 Sekunden
anzuschalten.
Wenn die Weckfunktion aktiviert ist, wird ein
Signalton zur vorbestimmten Zeit 20 Sekunden lang ertönen. Drücken Sie irgendeine
Taste um den Signalton abzustellen.
ZEITMESSUNG MIT DER STOPPUHR
1. Drehen Sie den Knopf S3 um den Modus
STOPPUHR zu wählen.
2. Die Stoppuhr wird dann im aktuellen
Status – Rücksetzen, zählend, gestoppt
– angezeigt.
3. Drücken Sie Taste S1 um die Zeitmessung
wieder aufzunehmen.
4. Um eine neue Zeitmessung zu starten,
setzen Sie die Stoppuhr zuerst wieder
auf „Null“.
Drücken Sie Taste S1 um die Zeitmessung
zu stoppen und dann Taste S2 um den
Zähler wieder auf „Null“ zurückzusetzen.
Diese Freestyle-Gebrauchsanweisung
wurde mit Tinte auf Sojabasis auf
Recycling-Papier gedruckt um den
Kohleausstoß zu reduzieren.
FS1074-SPEED DIAL-AG6873-R01
SPEED DIAL
FRANÇAIS
S4
S1
S3
S2
S1. Bouton Démarrer / Arrêter
S2. Bouton Temps intermédiaire /
Réinitialiser
S3. Molette / Bouton Mode
S4. Bouton d’éclairage
CARACTERISTIQUE SPECIALE
Ce produit Freestyle offre la fonction unique
d’Hydro Pusher ® : ces boutons peuvent
être pressés dans l’eau sous une pression
dynamique (ce qui n’est pas la profondeur
sous l’eau) de 3 ATM.
MODES D’AFFICHAGE
La montre offre six modes d’affichage :
HEURE LOCALE (HEURE) / HEURE
INTERNATIONALE (HEURE-2), ALARME
HEURE LOCALE (ALM1) / ALARME HEURE
INTERNATIONALE (ALM2), CHRONOMETRE
(STW) et MINUTEUR (TMR).
Pour changer le mode d’affichage, faites
tourner la molette ou appuyez une fois sur
le bouton S3. Le code descriptif du mode
apparaîtra durant 2 secondes avant que le
mode sélectionné soit activé. Remarque: La molette peut être tournée
dans le sens des aiguilles d’une montre
ou dans le sens contraire, mais l’ordre des
modes reste le même que celui qui est indiqué dans le paragraphe ci-dessus « MODES
D’AFFICHAGE ».
AFFICHAGE DE L’HEURE LOCALE ET DE
L’HEURE INTERNATIONALE
Pour afficher l’HEURE INTERNATIONALE,
appuyez sur le bouton 2 lorsque l’HEURE
LOCALE est affichée. Le code descriptif du
mode (TM-2) apparaîtra brièvement avant
que l’HEURE INTERNATIONALE s’affiche.
Pour afficher de nouveau l’HEURE LOCALE,
appuyez sur le bouton S2.
Pour afficher l’ALARME HEURE INTERNATIONALE, appuyez sur le bouton S2 lorsque
l’ALARME HEURE LOCALE est affichée. Le
code descriptif du mode (ALM2) apparaîtra
brièvement avant que l’ALARME HEURE
INTERNATIONALE s’affiche. Pour afficher
de nouveau l’ALARME HEURE LOCALE,
appuyez sur le bouton S2.
REGLAGE DES HEURES ET DU
CALENDRIER
1. Faites tourner le bouton S3 pour sélectionner le mode de l’heure.
2. Appuyez sur le bouton S2 pour choisir
entre HOME TIME (HEURE LOCALE) ou
FOREIGN TIME (HEURE INTERNATIONALE).
3. Appuyez et maintenez le bouton S2
durant environ deux secondes, le message “SET” (REGLER) s’affichera et les
chiffres 2 secondes clignoteront.
Appuyez sur le bouton S1 pour réinitialiser les chiffres des secondes à 00.
5. Faites tourner le bouton S3, les chiffres
des minutes clignoteront.
6. Appuyez une fois sur le bouton S1 pour
augmenter les chiffres d’une unité.
Maintenez le bouton enfoncé pour accélérer la procédure.
7. Faites tourner le bouton S3, les chiffres
des heures clignoteront.
8. Appuyez sur le bouton S1 pour régler les
chiffres des heures.
9. Suivez la même procédure pour régler
REMARQUE: En mode de réglage de
l’HEURE INTERNATIONALE, seules les minutes, les heures, la date, le mois et le
jour peuvent être réglés.
AFFICHAGE DU CALENDRIER
1. Faites tourner le bouton S3 pour sélectionner le mode de l’heure.
2. Appuyez sur le bouton S1 pour permuter
entre le mode d’affichage de l’heure et le
mode d’affichage du calendrier.
Remarque: Le calendrier s’affichera durant
environ 6 secondes avant que la montre ne
retourne au mode d’affichage de l’heure.
REGLAGE DE L’HEURE DE L’ALARME
1. Faites tourner le bouton S3 pour sélectionner alarme.
2. Appuyez sur le bouton S2 pour permuter entre le mode HOME TIME ALARM
(ALARME HEURE LOCALE) et FOREIGN
TIME ALARM (ALARME HEURE INTERNATIONALE).
3. Appuyez et maintenez le bouton S2 durant
environ 2 secondes, le message “SET”
(REGLER) s’affichera et les chiffres des
minutes clignoteront.
4. Appuyez une fois sur le bouton S1 pour
augmenter les chiffres d’une unité. Maintenez le bouton enfoncé pour accélérer
la procédure.
5. Faites tourner le bouton S3, les chiffres
des heures clignoteront.
6. Appuyez sur le bouton S1 pour régler les
chiffres des heures.
7. Après avoir effectué tous les réglages, appuyez sur le bouton S2 pour confirmer.
POUR ACTIVER / DESACTIVER L’ALARME
ET LE CARILLON
En mode Alarme,
1. Appuyez sur le bouton S2 pour permuter
entre le mode HOME TIME (ALARME
HEURE LOCALE) et FOREIGN TIME
ALARM (ALARME HEURE INTERNATIONALE).
2. Appuyez une fois sur le bouton S1 pour
activer l’alarme. L’indicateur d’alarme
apparaîtra.
3. Appuyez de nouveau sur le bouton pour
activer le carillon horaire. L’indicateur de
carillon apparaîtra.
4. Appuyez une troisième fois sur le bouton
pour activer les deux fonctions. Les deux
indicateurs apparaîtront.
5. Appuyez une quatrième fois sur le bouton
pour désactiver les deux fonctions. Les
deux indicateurs disparaîtront.
LORSQUE L’ALARME OU LE CARILLON
RETENTIT
Un bip sonore retentira toutes les heures
lorsque la fonction de carillon est activée.
2. Le chronomètre affichera le statut en
cours – réinitialisé, compteur en cours ou
compteur arrêté. .
3. Pour réactiver le compteur, appuyez sur le
bouton S1 et le compteur se remettra en
marche à partir du point où il a été arrêté. 4. Pour démarrer le compteur, réinitialisez
tout d’abord le chronomètre à zéro.
Appuyez sur le bouton S1 pour arrêter le
compteur puis appuyez sur le bouton S2
pour réinitialiser le chronomètre à zéro.
Pour mesurer un temps intermédiaire,
En mode CHRONOMETRE, 1. Appuyez sur le bouton S1 pour démarrer
le compteur.
2. Pour arrêter le compteur, appuyez sur
le bouton S1. Appuyez de nouveau sur le
bouton S1 pour remettre le compteur en
marche à partir du point où il a été arrêté. 3. Pour réinitialiser le compteur à zéro,
appuyez sur le bouton S1 pour arrêter le
compteur puis appuyez sur le bouton S2.
Pour mesurer les temps intermédiaires,
En mode CHRONOMETRE,
1. Appuyez sur le bouton S1 pour démarrer
le compteur.
Alors que le compteur est en cours,
appuyez sur le bouton S2 pour enregistrer
un temps intermédiaire. Le compteur du
chronomètre continue à tourner dans
le fond.
2. Pour afficher le temps accumulé en
cours, appuyez de nouveau sur le bouton
S2.
3. Répétez la dernière étape jusqu’à ce que
tous les temps intermédiaires aient été
enregistrés.
4. Pour arrêter le compteur, appuyez sur
le bouton S1. Appuyez de nouveau sur le
bouton S1 pour remettre le compteur en
marche à partir du point où il a été arrêté. 5. Pour réinitialiser le compteur à zéro,
appuyez sur le bouton S1 pour arrêter le
compteur puis appuyez sur le bouton S2.
REMARQUE: Vous pouvez laisser le chronomètre en marche tout en permutant sur
un autre mode.
REGLAGE DU MINUTEUR
1. Faites tourner le bouton S3 pour sélectionner le mode TIMER (MINUTEUR).
2. Appuyez sur le bouton S2 pour modifier le
réglage du minuteur entre 1, 3, 5, 10, 15,
20, 25, 30, 45 et 60 minutes.
UTILISATION DU MINUTEUR
En mode TIMER (MINUTEUR),
1. Appuyez sur le bouton S1 pour démarrer
le compteur.
2. Pour arrêter le compteur, appuyez sur
le bouton S1. Appuyez de nouveau sur le
bouton S1 pour remettre le compteur en
marche à partir du point où il a été arrêté. 3. Pour réinitialiser le minuteur, appuyez
sur le bouton S1 pour arrêter le compteur
puis appuyez sur le bouton S2.
4. Une fois que le minuteur a atteint zéro,
une sonnerie retentira durant 20 secondes. Pour arrêter la sonnerie, appuyez
sur n’importe quel bouton. Le minuteur
se réinitialisera automatiquement.
REMARQUE: Vous pouvez laisser le
minuteur en marche tout en permutant sur
un autre mode.
UTILISATION DU RETRO ECLAIRAGE
Appuyez sur le bouton S4 pour activer le
rétro éclairage durant 3 secondes.
Une sonnerie d’alarme retentira à l’heure
réglée durant environ 20 secondes lorsque
l’alarme est activée. Pour arrêter la sonnerie
d’alarme, appuyez sur n’importe quel
bouton.
UTILISATION DU CHRONOMETRE
1. Faites tourner le bouton S3 pour sélectionner le mode STOPWATCH
(CHRONOMETRE).
Pour réduire l’émission de carbone
dans l’atmosphère, ces instructions
Freestyle sont imprimées avec des
encres de soja sur du papier recyclé.
FS1074-SPEED DIAL-AG6873-R01
SPEED DIAL
la date, le mois, le jour (de la semaine),
le format des heures et le format du
calendrier. 10. Pour régler le format des heures, appuyez sur le bouton S1 pour permuter
entre le format 12 heures et 24 heures.
L’indicateur P.M s’affiche pour indiquer la
deuxième partie d’une journée en format
12 heures.
11. Pour régler le format du calendrier,
appuyez sur le bouton S1 pour permuter
entre M - D (mois-date) et D - M
(date-mois).
12. Après avoir effectué tous les réglages,
appuyez sur le bouton S2 pour confirmer.
REMARQUE: Le format choisi pour les heures et pour le calendrier s’appliquera pour
les deux réglages local et international.
ITALIANO
S4
S1
S3
S2
S1. Tasto Start/stop
S2. Tasto Giro/reset
S3. Tasto Rotella a scatto/Modalità
S4. Tasto Luce
FUNZIONE SPECIALE
Questo prodotto Freestyle contiene la funzione unica Hydro Pusher ® : questi pulsanti
possono essere premuti sott’acqua ad una
pressione idrodinamica (non profondità
dell’acqua) di 3 ATM.
MODALITA’ DISPLAY
L’orologio ha quattro modalità di display: ORA NAZIONALE (TIME) / ORA ESTERA
(TM-2), ALLARME ORA NAZIONALE (ALM1) / ALLARME ORA ESTERA (ALM2),
CRONOMETRO (STW) e TIMER CONTO
ALLA ROVESCIA (TMR).
Per passare da una modalità di display ad
un’altra, ruotare una volta la rotella a scatto
o il tasto S3. La descrizione della modalità
apparirà per 2 secondi prima che la modalità selezionata si attivi.
Nota: la rotella a scatto può essere ruotata
in senso orario o antiorario, ma la sequenza
delle modalità seguirà solamente l’ordine
elencato nel paragrafo MODALITA’ DISPLAY.
DISPLAY ORA NAZIONALE ED ESTERA
Per mostrare l’ORA ESTERA, premere il
tasto S2 quando appare l’ORA NAZIONALE.
La descrizione della modalità (TM-2) apparirà poco prima che appaia l’ORA ESTERA.
Per tornare all’ORA NAZIONALE, premere
il tasto S2.
Per far apparire l’ALLARME ORA ESTERA
giornaliero, premere il tasto S2 quando
appare l’ALLARME ORA NAZIONALE. La
descrizione della modalità (ALM2) apparirà poco prima che appaia l’ALLARME ORA
ESTERA. Per tornare a ORA NAZIONALE,
premere il tasto S2.
COME IMPOSTARE ORA E CALENDARIO
1. Ruotare il tasto S3 per selezionale la
modalità dell’ora.
2. Premere il tasto S2 per passare dalla
modalità ORA NAZIONALE alla modalità
ORA ESTERA e viceversa.
3. Premere e tenere premuto per 2 secondi
il tasto S2 fino a che appare il messaggio
“SET” (IMPOSTARE) e i numeri dei
Secondi lampeggiano.
4. Premere il tasto S1 per resettare i numeri
dei Secondi a 00.
5. Ruotare il tasto S3, i numeri dei Minuti
lampeggeranno.
6. Premere una volta il tasto S1 per
aumentare i numeri di un’unità. Premere
a lungo il tasto farà avanzare la lancetta
più velocemente.
7. Ruotare il tasto S3, i numeri dell’Ora
lampeggeranno.
8. Premere il tasto S1 per impostare i
numeri dell’Ora.
9. Seguire lo stesso procedimento per
impostare Data, Mese, Giorno (della settimana), formato dell’ora e formato del
calendario.
10.Per impostare il formato dell’ora, premere il tasto S1 per passare dal formato
12-ore al formato 24-ore e viceversa.
Il segnale PM potrebbe apparire per
indicare l’ora nel formato 12-ore.
QUANDO SCATTA L’ALLARME O LA
SUONERIA GIORNALIERA
All’ora prevista suonerà una melodia se è
attivata la funzione della suoneria oraria.
All’ora designata sarà emesso una melodia
di allarme di 20 secondi quando viene attivato l’allarme. Per interrompere la melodia,
premere un tasto qualsiasi.
COME USARE IL CRONOMETRO
1. Ruotare il tasto S3 per selezionare la
modalità CRONOMETRO.
2. Il cronometro apparirà nel suo stato attuale - azzerato, in funzione o fermo.
3. Per riprendere il conteggio, premere il
tasto S1 per riprendere da dove era stato
interrotto.
4. Per iniziare un nuovo conteggio, prima di
tutto resettare il cronometro a zero.
Premere il tasto S per interrompere il
conteggio, poi premere il tasto S2 per
resettare il contatore a zero.
Per misurare il tempo trascorso,
Nella modalità CRONOMETRO,
Per ridurre l’impatto ambientale,
queste istruzioni Freestyle sono
stampate con inchiostri di soia su
carta riciclata .
FS1074-SPEED DIAL-AG6873-R01
SPEED DIAL
11.Per impostare il formato calendario,
1. Premere il tasto S1 per iniziare il
premere il tasto S1 per passare dal
conteggio.
formato M-D (mese-data) al formato D-M 2. Per interrompere il conteggio, premere
(data-mese) e viceversa.
una volta il tasto S1. Premere di nuovo il
12.Dopo aver terminato tutte le impostazioni,
tasto S1 per riprendere da dove era stato
premere il tasto S2 per confermarle.
interrotto.
3. Per resettare a zero, premere il tasto
NOTA: I formati dell’ora e del calenS1 per interrompere il conteggio e poi
dario prescelti si applicheranno sia alle
premere il tasto S2.
impostazioni nazionale che estera.
Per misurare il tempo intermedio,
NOTA: Nelle impostazioni ORA ESTERA, si
Nella modalità CRONOMETRO,
possono impostare solo minuti, ora, data,
1. Premere il tasto S1 per iniziare il
mese e giorno.
conteggio.
2. Mentre il CRONOMETRO sta contando,
COME MOSTRARE IL CALENDARIO
premere una volta il tasto S2 per regis1. Ruotare il tasto S3 per selezionare la
trare un giro. Intanto il CRONOMETRO
modalità dell’ora.
continua a contare nello sfondo.
2. Premere il tasto S1 per passare dalla
Per mostrare il tempo attualmente acmodalità display dell’ora al display del
cumulato, premere di nuovo il tasto S2.
calendario e viceversa.
3. Ripetere quest’ultimo passaggio fino a
che sono stati registrati tutti i giri.
Nota: Il calendario apparirà per circa sei
4. Per interrompere il conteggio, premere
secondi prima che l’orologio torni alla
una volta il tasto S1. Premere di nuovo il
modalità display dell’ora.
tasto S1 per riprendere da dove era stato
interrotto.
COME IMPOSTARE L’ORARIO DI ALLARME
5. Per resettare a zero, premere il tasto
1. Ruotare il tasto S3 per selezionare la
S1 per interrompere il conteggio e poi
modalità allarme.
premere il tasto S2.
2. Premere il tasto S2 per passare dalla
modalità ALLARME ORA NAZIONALE
NOTA:
Potete lasciare che il CRONOMETRO
alla modalità ALLARME ORA ESTERA e
continui a contare mentre passate ad altre
viceversa.
modalità
di funzionamento.
3. Premere e tenere premuto per 2 secondi
il tasto S2 fino a che appare il messaggio
“SET” (IMPOSTARE) e i numeri dei Minuti COME IMPOSTARE IL TIMER
1. Ruotare il tasto S3 per selezionare la
lampeggiano.
modalità TIMER.
4. Premere una volta il tasto S1 per
2.
Premere il tasto S2 per scegliere
aumentare i numeri di un’unità. Premere
l’impostazione timer tra 1, 3, 5, 10, 15, 20,
a lungo il tasto farà avanzare la lancetta
25, 30, 45 e 60 minuti.
più velocemente.
5. Ruotare il tasto S3, i numeri dell’Ora
COME USARE IL TIMER
lampeggeranno.
Nella modalità TIMER,
6. Premere il tasto S1 per impostare i
1. Premere il tasto S1 per iniziare il
numeri dell’Ora.
conteggio.
7. Dopo aver terminato tutte le impostazioni,
2. Per interrompere il conteggio, premere
premere il tasto S2 per confermarle.
una volta il tasto S1. Premere di nuovo il
tasto S1 per riprendere da dove era stato
COME ACCENDERE/SPEGNERE
interrotto.
L’ALLARME E LA SUONERIA ORARIA
3.
Per
resettare il TIMER, premere il tasto
Nella modalità allarme,
S1 per interrompere il conteggio e poi
1. Premere il tasto S2 per passare dalla
premere il tasto S2.
modalità ALLARME ORA NAZIONALE
4. Dopo aver raggiunto zero nel conto alla
alla modalità ALLARME ORA ESTERA e
rovescia, verrà emesso un segnale
viceversa.
acustico di venti secondi. Per inter2. Premere una volta il tasto S1 per attivare
rompere il segnale acustico, premere
l’allarme giornaliero. Apparirà il segnale
un tasto qualsiasi, e il TIMER ripartirà
.
di allarme automaticamente.
3. Premere di nuovo per attivare la suoneria
oraria. Apparirà il segnale di suoneria NOTA: Potete lasciare che il TIMER continui
.
a contare mentre passate ad altre modalità
4. Premere una terza volta per attivare entrambe le funzioni. Appariranno entrambi di funzionamento.
i segnali.
COME USARE LA RETROILLUMINAZIONE
5. Premere una quarta volta per disattivare
Premere il tasto S4 per accendere la retroilentrambe le funzioni. Entrambi i segnali
luminazione per circa 3 secondi.
scompariranno.
PORTUGUÊS
S4
S1
S3
S2
S1. Botão Iniciar/Parar
S2. Botão Volta/ Reiniciar
S3. Botão rotativo/ Botão Modo
S4. Botão Luz
CARACTERÍSTICA ESPECIAL
Este produto Freestyle apresenta um
exclusivo Hydro Pusher ® (Botão de Accionamento Hidro): estes botões podem ser
premidos dentro de água para obter uma
pressão de água dinâmica (não profundidade de água) de 3ATM.
MODOS DE EXIBIÇÃO
O relógio tem quatro modos de exibição:
FUSO DO PAÍS (T1) / FUSO ESTRANGEIRO
(T2), ALARME FUSO DO PAÍS (ALM1) /
ALARME FUSO ESTRANGEIRO (ALM2),
CRONÓMETRO (CRM) e TEMPORIZADOR
COM CONTAGEM DECRESCENTE (TMR).
Para passar de um modo a outro rode o
botão rotativo S3 uma vez. A descrição de
modo aparecerá por 2 segundos antes de
activar o modo seleccionado.
Nota: O botão rotativo pode ser rodado no
sentido horário e anti-horário, mas a sequêcia do modo só seguirá a ordem indicada
acima no parágrafo sobre os MODOS DE
EXIBIÇÃO.
MOSTRADOR NACIONAL E
INTERNACIONAL
Para mostrar o FUSO ESTRANGEIRO, carregue no botão S2 quando o FUSO DO PAÍS
for exibido. A descrição de modo (TM-2)
aparecerá por instantes antes do FUSO
ESTRANGEIRO. Para mudar para FUSO DO
PAÍS, carregue no botão S2.
Para mostrar ALARME FUSO ESTRANGEIRO, carregue no botão S2
quando se exibir ALARME FUSO DO PAÍS.
A descrição (ALM2) surge brevemente
antes do ALARME FUSO ESTRANGEIRO ser
mostrado. Para mudar para FUSO DO PAÍS,
carregue em S2.
PARA ACERTAR A HORA E CALENDÁRIO
1. Rode o botão S3 para seleccionar o
modo de hora.
2. Prima em S2 para alternar entre os
modos FUSO DO PAÍS e FUSO ESTRANGEIRO
3. Carregue e mantenha o botão S2 por 2
segundos até a mensagem “ACERTAR”
aparecer e os segundos piscarem.
4. Carregue em S1 para os dígitos de
segundos serem postos a 00.
5. Rode o botão S3, os minutos piscam.
6. Prima em S1 uma vez para aumentar os
dígitos numa unidade. Mantenha o botão
para ser mais depressa.
7. Rode o botão S3, os dígitos das horas
piscam.
8. Carregue no botão S1 para acertar as
horas.
9. Proceda da mesma maneira para
acertar a Data, Mês, Dia (da semana),
formatos de hora e calendário.
10. Para acertar o formato da hora, carregue no botão S1 para alternar entre o
formato de 12-horas e 24-horas.
O Indicador PM pode ser exibido para
indicar a hora no formato de 12 horas.
NOTA: A hora escolhida e formatos de
calendário aplicam-se tanto às definições
nacionais como internacionais.
NOTA: No acerto de FUSO ESTRANGEIRO,
apenas minutos, horas, data, mês e dia
estão disponíveis para acerto.
PARA EXIBIR O CALENDÁRIO
1. Rode o botão S3 para seleccionar o
modo da hora.
2. Carregue no botão S1 para alternar
entre o modo de exibição das horas e o
calendário.
Nota: O calendário será exibido durante
cerca de seis segundos antes de o relógio
voltar ao modo de exibição da hora.
PARA ACERTAR O DESPERTADOR
1. Rode o botão S3 para seleccionar o
modo de alarme.
2. Prima o botão S2 para alternar entre os
modos ALARME FUSO PAÍS e ALARME
FUSO ESTRANGEIRO.
3. Carregue e mantenha o botão S2
durante 2 segundos até “SET” aparecer e
os dígitos dos minutos piscarem.
4. Prima o botão S1 uma vez para aumentar os dígitos uma unidade. Mantendo o
botão carregado acelera o processo.
5. Rode o botão S3, os dígitos das horas
ficam intermitentes.
6. Prima o botão S1 para definir as horas.
7. Após ter feito todas as definições,
carregue no botão S2 para confirmar as
definições.
LIGAR/DESLIGAR O DESPERTADOR E
MELODIA HORÁRIA
No modo de despertador,
1. Carregue no botão S2 para alternar
entre os modos ALARME FUSO PAÍS e
ALARME FUSO ESTRANGEIRO.
2. Prima no botão S1 uma vez para activar
o alarme horário. O indicador de alarme
aparece.
3. Carregue novamente para activar a
melodia horária. O indicador de melodia
aparecerá.
4. Carregue uma terceira vez para activar
ambas as funções. Aparecem ambos os
indicadores.
5. Carregue pela quarta vez para desactivar
ambas as funções. Aparecem ambos os
indicadores.
2. Para a parar, carregue no botão S1 uma
vez. Prima novamente o botão S1 para
continuar onde parou.
3. Para por a zero, carregue no botão S1
para parar a contagem e depois no botão
S2.
Para a medição do tempo parcial,
No modo CRONÓMETRO,
1. Prima no botão S1 para iniciar a contagem.
2. Enquanto o CRONÓMETRO estiver a
funcionar, carregue no botão S2 uma vez
para registar uma volta. O CRONÓMETRO continua a funcionar em segundo
plano.
Para mostrar o tempo corrente acumulado, carregue no botão S2 de novo.
3. Repita o último passo até todas as voltas
tiverem sido registadas.
4. Para a parar, carregue no botão S1 uma
vez. Prima novamente o botão S1 para
continuar onde parou.
5. Para por a zero, carregue no botão S1
para parar a contagem e depois carregue no botão S2.
NOTA: Pode deixar o CRONÓMETRO a funcionar enquanto passa para outros modos
de funcionamento.
ACERTAR O TEMPORIZADOR
1. Rode o botão S3para seleccionar o modo
TEMPORIZADOR.
2. Carregue no botão S2 para alterar a
configuração do temporizador entre 1, 3,
5, 10, 15, 20, 25, 30, 45 e 60 minutos.
USAR O TEMPORIZADOR
No modo de TEMPORIZADOR,
1. Carregue no botão S1 para iniciar a
contagem.
2. Para parar a contagem, carregue no
botão S1uma vez. Prima S1 novamente
para continuar onde ficou.
3. Para reiniciar o TEMPORIZADOR, prima
o botão S1 para parar a contagem e
depois carregue em S2.
4. Após ter chegado a zero numa
contagem, um bip de vinte segundos é
emitido. Para parar o aviso sonoro carregue em qualquer botão, o TEMPORIZADOR reinicia-se automaticamente.
NOTA: Pode deixar o TEMPORIZADOR a
correr enquanto muda para outros modos
de funcionamento.
USAR A CONTRALUZ
Carregue no botão S4 para ligar a luz de
fundo durante cerca de 3 segundos.
QUANDO UM ALARME OU MELODIA
HORÁRIA SE DESLIGAM
Uma melodia ouve-se de hora a hora se a
função de melodia horária estiver activada.
Um alarme de 20 segundos será emitido
na altura definida quando o alarme for
activado. Para parar a melodia, carregue em
qualquer botão.
USAR O CRONÓMETRO
1. Rode o botão S3 para seleccionar o
modo CRONÓMETRO.
2. O cronómetro será exibido no seu estado
corrente – reiniciar, em execução ou
parado.
3. Para continuar a contagem, carregue
no botão S1 para continuar desde a
paragem.
4. Para começar uma nova contagem,
reinicie primeiro o cronómetro.
Prima o botão S1 para parar a contagem,
depois no botão S2 para repor o
cronómetro a zero.
Para a medição do tempo decorrido,
No modo CRONÓMETRO,
1. Carregue no botão S1 para começar a
contagem.
Para reduzir a emissão de carbono,
estas instruções Freestyle foram
impressas com tinta de soja em papel
reciclado.
FS1074-SPEED DIAL-AG6873-R01
SPEED DIAL
11. Para definir o formato de calendário,
carregue no botão S1 para alternar
entre M-D (mês-dia) e o formato D-M
(dia-mês).
12. Após ter feito todas as configurações,
carregue em S2 para confirmar as
definições.
日本語
S4
S1
S3
S2
S1. スタート/ストップボタン
S2. ラップ/リセットボタン
S3.ジョグホイール/モードボタン
S4. ライトボタン
特別機能
Freestyleの本製品にはHydro Pusher®が
搭載されています。
これらのボタンは動水
圧3ATM
(水深ではありません)
下で押す
ことができます。
表示モード
この時計には次の4つの表示モードが
あります。
ホームタイム(TIME) / 海外タイ
ム(TM-2)、
ホームタイムアラーム(ALM1) /
海外タイムアラーム(ALM2)、
ストップウォ
ッチ(STW)、
カウントダウンタイマー(TMR)
表示モードを変換するには、
ジョグホイー
ルまたはS3ボタンを1回回転させてくだ
さい。
モード記号が2秒間表示され、
選択
したモードがオンになります。
注:ジョグホイールは時計回りあるいは
反時計回りに回転させることができます。
ただし、
モードの表示順序は上記の通り
の順でしか表示されません。
ホーム/海外タイム表示
海外タイムを表示するには、
ホームタイ
ムが表示の時にS2ボタンを押します。
モ
ード記号
(TM-2)
が表示されてから海外タ
イムが表示されます。
ホームタイムに戻
す場合はS2ボタンを押します。
海外タイムアラームを表示するには、
ホ
ームタイムアラーム表示の時にS2ボタン
を押します。
モード記号
(ALM2)
が表示さ
れてから海外タイムアラームが表示され
ます。
ホームタイムに戻す場合はS2ボタ
ンを押します。
時刻・カレンダーを合わせる
1. S3ボタンを回転させてタイムモードを 選択します。
2. S2ボタンを押すとホームタイムと海
外タイムモードが切り替わります。
3. S2ボタンを2秒間長押しして
「SET」
の
文字が表示されると、
秒桁が点滅しま
す。
4. S1ボタンを押して秒刻を00にリセッ
トします。
5. S3ボタンを回転させると、
分桁が点滅
します。
6. S1を1回ずつ押すと1分ずつ時間を進
めることができます。
ボタンを長押し
ると早く進みます。
7. S3ボタンを回転させると、
時桁が点滅
します。
8. S1ボタンを押して時刻を設定します。
9. 同じ作業を、
日付・曜日・時間フォーマ
ット・日付フォーマットについてそれ
ぞれ繰り返して行ってください。
10. 時間フォーマットの設定は、
S1ボタン
を押して12時間表示と24時間表示を
切り替えてください。
注: 選択した日付フォーマットと時間フォ
ーマットはホームタイム、
海外タイムの設
定両方に適用されます。
タイムの測定は以下のように行います。
STOPWATCHモードでは、
1. S1ボタンを押すとカウントが始まりま
す。
2. カウントをストップするにはS1ボタン
を1回押します。
もう一度S1を押すと、
ストップした時点から再び測定が始ま
ります。
3. ゼロにリセットするには、
S1を押して
測定をストップしてからS2を押しま
す。
注: 海外タイム
(FOREIGN TIME)は、
月・
スプリットタイムの測定は以下のように
日・時間・分・曜日のみの設定が可能です。 行います。
STOPWATCHモードでは、
カレンダーを表示する
1. S1ボタンを押すとカウントが始まりま
1. S3ボタンを回転させてタイムモード
す。
を 選択します。
2. ストップウォッチがカウントしている
2. S1ボタンを押すと時刻表示とカレン
間にS2ボタンを1回押してラップを登
ダー表示が切り替わります。
録します。
その場合、
ストップウォッチ
は同時にカウントを行っています。
注:カレンダーが約6秒間表示されてから
その時点での合計タイムを表示する
時刻表示に戻ります。
場合は、
S2をもう一度押します。
3. 全てのラップの登録が終わるまで、
最
アラームを設定する
後のステップを繰り返してください。
1. S3ボタンを回転させてアラームモー 4. カウントをストップするにはS1ボタン
ドを選択します。
を1回押します。
もう一度S1を押すと、
2. S2ボタンを押すとホームタイムアラー
ストップした時点から再び測定が始
ムと海外タイムアラームモードが切り
まります。
替わります。
5. ゼロにリセットするには、
S1を押して
3. S2ボタンを2秒間長押しして
「SET」
の
測定をストップしてからS2を押しま
文字が表示されると、
分桁が点滅しま
す。
す。
4. S1を1回ずつ押すと1分ずつ時間を進 注:ストップウォッチの使用中に他のモー
めることができます。
ボタンを長押し ドに切り替えることができます。
すると早く進みます。
5. S3ボタンを回転させると、
時桁が点滅 タイマーを設定する
します。
1. S3ボタンを回転させてタイマーモー
6. S1ボタンを押して時刻を設定します。
ドを選択します。
7. 全ての設定が終わったらS2を押して 2. S2ボタンを押すと、
タイマーの設定時
設定を終了します。
間を1, 3, 5, 10, 15, 20, 25, 30, 45 ,60 分
から選択することができます。
アラームと毎時チャイムのオン/オフ設定
アラームモードにします。
タイマーを使う
1. S2ボタンを押すとホームタイムアラー タイマーモードにします。
ムと海外タイムアラームモードが切り 1. S1ボタンを押すとカウントが始まりま
替わります。
す。
2. S1を1回押すとアラームがオンになり 2. カウントをストップするにはS1ボタン
ます。
アラーム記号
を1回押します。
もう一度S1を押すと、
が表示さ
ストップした時点から再び測定が始
れます。
まります。
3. もう一度ボタンを押すと毎時チャイム
がオンになります。
チャイム記号
3. タイマーをもう一度セットするに
は、
S1ボタンを押してカウントをスト
が表示されます。
ップしてからS2ボタンを押します。
4. もう一度ボタンを押すと両機能がオ
ンになります。
両方の記号が表示され 4. タイマーがゼロになると20秒間お知
らせ音が鳴ります。
お知らせ音を止め
ます。
る場合はボタンを押してください。
ど
5. もう一度ボタンを押すと両機能がオフ
のボタンでもかまいません。
タイマー
になります。
両方の記号が非表示にな
が自動的にリロードします。
ります。
アラーム・時刻お知らせチャイムを鳴らす
毎時チャイム機能がオンになっている場
合は一時間ごとに音がなります。
指定の時間に20秒間アラーム音が鳴りま
す。
音を止めたいときは、
いずれかのボタ
ンを押してください。
ストップウォッチを使う
1. S3ボタンを回転させてSTOPWATCH
(ストップウォッチ) モードを選択しま
す。
2. その時点でのストップウォッチの状態
(リセット/測定中/停止の状態)
が表
示されます。
3. ストップした時点から再び測定を開
始するにはS1ボタンを押します。
4. 新しく測定を開始する場合は、
ストッ
プウォッチをゼロにリセットします。
S1を押して測定をストップしてからS2
ボタンを押してゼロにリセットしてく
ださい。
注:タイマーの使用中に他のモードに切り
替えることができます。
バックライトを使う
S4ボタンを押すと3秒間バックライトが
点灯します。
カーボンフットプリントの減少を目的と
してFreestyleの取扱説明書は大豆イ
ンキとリサイクル紙を使用しています
FS1074-SPEED DIAL-AG6873-R01
SPEED DIAL
PM表示は12時間表示の場合に表示
されます。
11. 日付フォーマットの設定は、
S1ボタン
を押すとM-D
(月-日)
表示と D-M (日月) 表示が切り替わります。
12. 全ての設定が終わったらS2を押して
設定を終了します。