1
8588 001 000
(340224)
Owner's manual
Model
Multitracker
L
1
ON
STANDBY
POWER
R
LINE OUT
3
2
4
DC IN
12V
REC TRACK
000
PAN
PAN
L
L
R
L
R
LINE OUT
/PHONES
PAN
PAN
L
R
R
MAX
MIN
METER
MAX
MAX
MAX
MIN
MIN
MIN
+6
+6
+3
+3
0
0
-5
-5
-10
-10
POWER
REC
1
2
3
4
REC
LINE
MIC
INPUT
PLAY
REW
FF
STOP
PAUSE
PHONES
Thank you for purchasing our Fostex Model X-12.
The X-12 is an easy-to-use cassette tape four-track 4 channel multitracker with that great Fostex sound.
Because the X-12 features simple and easily handled functions, anyone
operating a multitracker for the first time can create a great recording.
Before operating the unit, please read through this manual to
understand correct operation procedures and to assure you smooth
operation for many years to come.
Model X-12 Owner's Manual
CAUTION:
CAUTION
TO PREVENT ELECTRIC SHOCK, MATCH WIDE BLADE
RISK OF ELECTRIC SHOCK
DO NOT OPEN
OF PLUG TO WIDE SLOT, FULLY INSERT.
ATTENTION:
POUR EVITER LES CHOCS ELECTRIQUES,
CAUTION: TO REDUCE THE RISK OF ELECTRIC SHOCK,
INTRODUIRE LA LAME LA PLUS LARGE DE LA FICHE
DANS LA BORNE CORRESPONDANTE DE LA PRISE
DO NOT REMOVE COVER (OR BACK).
ET POUSSER JUSQU' AU FOND.
NO USER - SERVICEABLE PARTS INSIDE.
The lightning flash with arrowhead symbol,
within an equilateral triangle, is intended to alert
REFER SERVICING TO QUALIFIED SERVICE PERSONNEL.
the user to the presence of uninsulated
"dangerous voltage" within the product's
enclosure that may be of sufficient magnitude
to constitute a risk of electric shock to persons.
"WARNING"
The exclamation point within an equilateral
triangle is intended to alert the user to the
"TO REDUCE THE RISK OF FIRE OR ELECTRIC
SHOCK, DO NOT EXPOSE THIS APPLIANCE TO RAIN
OR MOISTURE."
presence of important operating and
maintenance (servicing) instructions in the
literature accompanying the appliance.
9.
SAFETY INSTRUCTIONS
Heat - The appliance should be situated away from heat sources
such as radiators, heat registers, stoves, or other appliances
(including amplifiers) that produce heat.
1. Read Instructions - All the safety and operating instructions
should be read before the appliance is operated.
10. Power Sources - The appliance should be connected to a power
supply only of the type described in the operating instructions or as
2. Retain Instructions - The safety and operating instructions should
be retained for future reference.
3. Heed Warnings - All warnings on the appliance and in the
operating instructions should be adhered to.
marked on the appliance.
11. Grounding or Polarization - The precautions that should be taken
so that the grounding or polarization means of an appliance is not
4. Follow Instructions - All operating and use instructions should
be followed.
defeated.
12. Power Cord Protection - Power supply cords should be routed so
5. Water and Moisture - The appliance should not be used near
water - for example, near a bathtub, washbowl, kitchen sink,
that they are not likely to be walked on or pinched by items placed
upon or against them, paying particular attention to cords at plugs,
convenience receptacles, and the point where they exit from the
appliance.
laundry tub, in a wet basement, or near a swimming pool, and
the like.
13. Cleaning - The appliance should be cleaned only as recommended
by the manufacturer.
6. Carts and Stands - The appliance should be used only with a
cart or stand that is recommended by the manufacturer.
14. Nonuse Periods - The power cord of the appliance should be
unplugged from the outlet when left unused for a long period of
time.
15. Object and Liquid Entry - Care should be taken so that objects do
not fall and liquids are not spilled into the enclosure through
openings.
16. Damage Requiring Service - The appliance should be serviced by
qualified service personnel when:
An appliance and cart combination should be moved with care.
Quick stops, excessive force, and uneven surfaces may cause
the appliance and cart combination to overturn.
A.
B.
The power supply cord or the plug has been damaged; or
Objects have fallen, or liquid has been spilled into the appliance;
7. Wall or Ceiling Mounting - The appliance should be mounted to
a wall or ceiling only as recommended by the manufacturer.
C.
or
The appliance has been exposed to rain; or
D.
8. Ventilation - The appliance should be situated so that its location
or position dose not interfere with its proper ventilation. For
The appliance does not appear to operate normally or exhibits
a marked change in performance; or
E. The appliance has been dropped, or the enclosure damaged.
17. Servicing - The user should not attempt to service the appliance
example, the appliance should not be situated on a bed, sofa,
rug, or similar surface that may block the ventilation openings;
beyond that described in the operating instructions.
All other servicing should be referred to qualified service personnel.
or, placed in a built-in installation, such as a bookcase or cabinet
that may impede the flow of air through the ventilation openings.
2
Model X-12 Owner's Manual
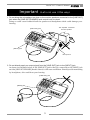
* Do not let water or other liquids, flammable
materials, or metal objects such as pins get
inside the X-12.
These things may cause electrical shock or
short circuit the X-12, and damage it.
If the X-12 should become wet, unplug the
AC adaptor from the AC outlet, and contact
your authorized service station.
Table of Contents
Precautions.........................................................................3
Before Using the X-12........................................................4
Important <Let's not use it this way>..............................5
Names and Functions.......................................................6
* When turning the power on, turn the X-12
on first before turning on any equipment
connected to it. Doing so will avoid possible
damage to the other equipment.
Also, when connecting or disconnecting
cables to or from the X-12’s input or output
jacks, make sure that the [LINE OUT/PHONES]
volume is set to “0.”
Basic Operation (recording).........................................9
Basic Operation (playback)...........................................11
Advanced Operation (multiple recording)..................12
1.Overdubbing.........................................................12
2.Mixdown................................................................15
Using a tape recorded on a
boom box or cassette deck........................................16
Block Diagram.................................................................18
* When the AC adaptor is connected to an AC
outlet, it will continue to draw small amounts
of power even if the switch is set to off
(STANDBY). If you will not be using the X-12
for an extended period of time, be sure to
unplug the AC adaptor from the outlet.
Accessories (option).......................................................19
Location
Troubleshooting...........................................................17
Maintenance.................................................................17
Specifications..............................................................18
* Avoid using the X-12 in the following
locations:
* Locations of extreme low or high
temperatures, or extreme changes in
temperature.
Precautions (please read before use)
* Locations with excessive moisture or dust.
Power supply
* Locations where direct sunlight falls for
an extended time, or near a stove or other
source of heat.
* When unplugging the AC adaptor from the
outlet, be sure to grasp the adaptor.
Attempting to unplug it by pulling on the
AC cable may damage the wiring.
* Locations where electrical voltage varies.
* It is dangerous to use any power cable that
is cut or frayed. If the power cable is
damaged, immediately stop using it, and
have it repaired.
* Unstable locations or where there is
heavy vibration.
* Near strong magnetic fields (on top of a
television or speaker).
* Do not plug in or unplug the AC adaptor
with wet hands. Doing so may result in
dangerous electric shock.
* Do not open the unit or touch any parts
inside. Doing so may result in a dangerous
electric shock, and could damage the X-12.
3
Model X-12 Owner's Manual
Before Using the X-12
<Differences between multitracker and
cassette deck recording>
Hint!
You can perform multitrack recording
using a tape that was recorded on a boom
box or a cassette deck. Refer to page 16
for more details.
Boom boxes and stereo cassette decks
record on both the A and B sides of cassette
tape. As shown in Fig. 1, the cassette tape
is divided in 4 tracks of which 2 are used
for the A side and the remaining 2 for the
B side (4 track 2 channel).
<Handling cassette tapes>
Cassette tape suitable for recording:
The X-12 is designed to perform best with
high-position cassette tape (TYPE II, HIGH).
We recommended these or their
equivalent.
The tape in C-120 versions (60 minutes
each side) is too thin and not suitable for
repeated recording or playback. Use C-90
or shorter tapes for stable performance.
<Fig. 1> Boom box / Cassette deck
R ch
B side
L ch
R ch
L ch A side
Using write-protection tabs:
On the spine of a cassette tape are writeprotection tabs that are used to prevent
any recorded data from being erased
accidentally.
You may want to break the tab for side A
and side B of a cassette tape that you have
already recorded, since the X-12 uses all
four tracks at the same time.
If you later wish to record data on a tape
with broken tabs, apply a piece of scotch
tape to cover the tab hole.
A multi-tracker as shown in Fig. 2, all four
tracks can be recorded without turning
over the cassette (four track 4 channel).
For the X-12, the 4 tracks are recorded
one at a time (some multitrackers can
record multiple number of tracks in each
pass). Also, in multitrackers, since all
tracks are recorded in the same direction,
if such a cassette tape is played back in a
radio cassette or cassette deck, tracks 1
and 2 will be heard correctly but if the
tape is turned over, tracks 3 and 4 will be
heard in reverse.
<Fig. 2> Multitracker, such as X-12
Write-protection tabs
Track 4
Track 3
Track 2
Track 1
** Advice **
Fresh or recorded tapes should not be
kept in locations of strong magnetic
fields (near speakers and TV sets) and
stored in dust free and non-humid
locations.
A side
4
Model X-12 Owner's Manual
Important
<Let's not use it this way>
1. Do not bring the microphone too close to the monitor speakers connected to the [LINE OUT]
jack when the [LINE OUT/PHONES] level control knob is raised.
Doing so could cause feedback from the speaker and headphone which could damage your
hearing.
The amplifier contained
monitor speaker
[LINE OUT] jack
[INPUT] jack
Microphone
2. Do not directly apply an output signal from the [LINE OUT] jack to the [INPUT] jack.
As shown in schematic below, if the [LINE OUT] jack is directly connected to the [INPUT] jack
and the [LINE OUT/PHONES] knob is raised, it will cause oscillation. Should you be monitoring
by headphone, this could hurt your hearing.
[LINE OUT] jack
[INPUT] jack
5
Model X-12 Owner's Manual
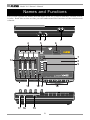
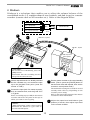
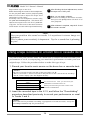
Names and Functions
This section explains the names and functions of the X-12, such as switches, controls, and I/
O jacks. Read this section so that you will understand the functions of the switches and
controls.
1
1
3
5
4
L
2
ON
STANDBY
POWER
R
LINE OUT
3
2
6
4
DC IN
12V
REC TRACK
000
PAN
PAN
14
L
L
R
L
R
LINE OUT
/PHONES
PAN
PAN
L
R
R
7
8
9
MAX
MIN
METER
MAX
MAX
MAX
MIN
MIN
MIN
+6
+6
+3
+3
0
0
-5
-5
-10
-10
POWER
REC
1
2
3
4
REC
LINE
MIC
INPUT
REW
FF
PHONES
13
17 16
PLAY
12 11
10
15
6
STOP
PAUSE
Model X-12 Owner's Manual
1. AC adaptor connector [DC IN]
5. Record track selector [REC TRACK]
Connect the AC adaptor included in the
package.
The recording track can be selected.
Only one track can be selected at a time.
<CAUTION>
<NOTE>
Be sure to use the included AC adaptor or
an equivalent model. Using an AC adaptor
with a different rated voltage or a different
plug polarity may cause a fire or damage
to the product.
The following figure indicates that the
output voltage of the AC adaptor is DC
(direct current) 12V (volt), that the plug
polarity is + (positive) in the center and (negative) outside. Be sure to use an AC
adaptor that complies with this indication.
[REC TRACK] selector does not switch "OFF"
the recording track. Since the track to be
recorded is always in the selected state, be
careful not to accidentally erase a
prerecorded sound.
6. Counter / Reset button [RESET]
The counter indicates the tape count.
Pressing the [RESET] button will reset the
counter to "000."
7. Line out / Headphone level knob
[LINE OUT/PHONES]
This knob enables you to adjust the output
level at the [LINE OUT L, R] jacks and the
[PHONES] jack.
DC IN
12V
8. Cassette lid / Cassette tray
AC outlet
Insert a cassette tape here.
9. Level meter
This meter indicates the input level.
10. Transport control buttons
DC IN connector
AC adaptor
Record button [REC]
Press the button after you select a track using
the [REC TRACK] selector.
The [PLAY] button will be automatically
pressed, and the unit will enter the recording
mode. This button is disabled if the cassette
tape in the tray has a broken or removed writeprotection tab.
2. Power switch [POWER]
Use this switch to turn the power on/off
(STANDBY) to the X-12.
<CAUTION>
When the AC adaptor is plugged into an
AC outlet, a very small current flows in the
unit even if you turn off (STANDBY) the
power switch. If you are not going to use
the X-12 for a long period of time, remove
the AC adaptor plugged into the AC.
Pause button [PAUSE]
To resume playback or recording, press this
button again.
Stop button [STOP]
Press this button to stop tape transport.
Fast Forward button [F F]
Press this button to fast forward the tape.
3. Line output jack [LINE OUT L, R]
Rewind button [REW]
This jack outputs a signal adjusted by the [LINE
OUT/PHONES] knob. Connect this jack to the
input jack of a master recorder for mixdown.
Press this button to rewind the tape.
Play button [PLAY]
Press this button to playback the tape.
When you press the [REC] button, this button
will be automatically engaged and the unit will
enter recording mode.
4. Record track select indicator
The recording track selected by the [REC TRACK]
selector will be indicated in red.
7
Model X-12 Owner's Manual
11. Record indicator [REC]
< Gain control rule of thumb >
This indicator will light red in recording mode
(or record pause mode).
The gain is adjusted by rotating the [LINE-MIC]
knob while watching the lighting condition of
the level meter LED as the signal is input.
Gain of "MIC" is obtained at full CW rotation of
the [LINE-MIC] knob and "LINE" at full CCW
rotation.
Ideal gain is obtained by setting the level meter
reading such that the "+6" LED does not light
up. Should the "+6" LED lights up frequently,
it is an indication that gain is too high and will
result in distortion if recording is continued in
this manner.
Basically, the knob should be adjusted toward
"MIC" when a low level sound source such as a
mic is connected, and toward "LINE" when
connecting the output of an effects unit to which
a keyboard or electric base is connected.
"Recording mode" means one of the tracks
has been selected by the [REC TRACK]
selector, the [REC] button has been pressed,
and recording is in progress.
"Record pause mode" means you have
pressed the [PAUSE] button during the
recording mode, and the tape transport is
stopped (recording standby mode).
12. Power indicator [POWER]
This indicator will light green when you turn
on the [POWER] switch.
13. Playback level fader [1 - 4]
These faders enable you to adjust the playback
level of each track.
14. Playback Panpot knob [PAN]
LINE (-10dBV)
These knobs enable you to adjust the stereo
image of the playback sound for each track.
MIC (-50dBV)
The X-12 uses the following connection plugs:
15. Headphone jack [PHONES]
Connect monitoring headphones here.
You can adjust the headphone volume using
the [LINE OUT/PHONES] knob.
Stereo phone plug (stereo type)
Use this plug to connect to the [PHONES] jack.
Tip (L)
16. Input jack [INPUT]
Sleeve (ground)
Sound sources such as an external mic and
keyboard are connected here.
Input gain should be trimmed accordingly with
the [LINE-MIC] knob located nearby.
Ring (R)
Phone plug (monaural type)
17.Gain control knob [LINE-MIC]
Use this plug to connect to the [INPUT] jack.
Adjust the gain for best S/N ratio.
The output signal level from the sound sources
(mic, keyboard, guitar, etc.) should be set in
such a way that the output of the source should
be neither too high or low. The difference can
be corrected with the gain control.
Tip (Hot)
Sleeve (ground)
RCA pin jack (monaural type)
Use this plug to connect to the [LINE OUT L, R]
jacks on the rear panel.
Tip (Hot)
Sleeve (ground)
8
Model X-12 Owner's Manual
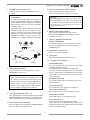
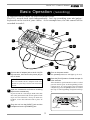
Basic Operation
(recording)
As explained above, there are four recordable tracks.
The X-12, records each track independently. Let's try recording your mic/guitar/
keyboard on the track of your choice. As an example here, the mic sound will be
recorded in track 1.
11
10
7
4
1
6
2
9
10 12
3
11
5
8
1
Connect the AC adaptor jack to the X-12's [DC
IN] connector, and connect the power plug to
the AC outlet.
<CAUTION>
Do not handle the AC adaptor with wet
hands or you may receive an electrical
shock.
2
4
Turn on the power switch.
5
Press the [PLAY] button to forward the tape for
a few seconds.
The [POWER] indicator will light up in red.
This should be performed in order to wind
past the leader part at the beginning of the
cassette tape. If a used tape is not rewound
completely, press the [REW] button to rewind
the tape to the beginning and perform Step
5.
Open the cassette lid and insert a recording
tape into the cassette tray.
If you record on a used tape, make sure that
the write-protection tabs on the spine of the
tape are not removed. If any of them are
broken, cover the tab hole with a piece of
tape.
3
Plug the mic into the [INPUT] jack and the
headphone into the [PHONES] jack.
Magnetic tape
9
Leader part
Model X-12 Owner's Manual
6
When the leader part is forwarded, press
the [RESET] button to set the counter to
"000."
7
Select the track to be recorded with the [REC
TRACK] selector.
Select track 1 (the indicator will change to
red) or whatever track you prefer to record
on.
10
Put X-12 in the record standby mode.
11
When the [LINE OUT/PHONES] knob is
slowly advanced, the input monitor sound
will be heard in the headphone.
This will change to red light and track 1 can
be recorded.
While monitoring the sound in the
headphone, watch the level meter and adjust
the recording to a suitable level.
Because the recording level cannot be
adjusted with a fader, optimum recording
levels must be determined by the sound
volume applied to the mic or by adjusting
the distance to the mic.
1
<NOTE>
Do not move the [REC TRACK] selector
during recording. If this is moved
accidentally during recording, the
recording track will switch.
8
Try speaking into the mic.
9
For optimum gain, adjust the [LINE-MIC]
knob CW (toward "MIC").
<CAUTION>
If you must monitor for a long time, be
careful not to raise the [LINE OUT/PHONES]
knob too high. If you monitor for long
hours at high volumes, it could impair
your hearing.
The level meter LED will blink.
Adjust the [LINE-MIC] knob such that the level
meter "+3" LED is illuminated at maximum
sound volume.
When recording line level sound sources such
as a keyboard and electric guitar, the
optimum gain is obtained by rotating the
[LINE-MIC] knob CCW (toward "LINE").
+6
+3
+3
0
0
-5
-5
-10
-10
12
After confirming the level, release the
[PAUSE] button (The [PAUSE] button is
pressed again) to start recording.
13
If recording is to be momentarily stopped,
press the [PAUSE] button. If recording is to
be ended, press the [STOP] button.
Following the procedures up to this point,
the sound applied to the microphone has
been recorded on track 1 as shown in
schematic below.
Now, let's try recording another sound source
to another track with the same procedures.
Also, lets playback the recorded sound on
each track as described below.
METER
+6
First, press the [PAUSE] button, then the
[RECORD] button. The [PLAY] button will be
engaged automatically at the same time.
The tape will remain paused in the record
mode.
If this LED blinks frequently,
it indicates that input level is
too high.
Set the gain so that LED's
within this range remain lit.
Track 4
<NOTE>
Track 3
Track 2
Track 1
Be careful not to continue recording, if
the level meter "+6" LED lights up
frequently, as this will indicate the sound
can be distorted.
Microphone
10
Model X-12 Owner's Manual
Basic Operation
(playback)
You can play back the recorded Track 1.
3
3
3
2
1
1
Press the [REW] button to rewind the tape
to the beginning of the tape (counter "000").
2
Press the [PLAY] button to start playing back
the tape from the "000" position.
For playback of the sound recorded on the
various tracks (1 - 4), the fader/[PAN] knobs
corresponding to each track number is used
i.e. track 1 playback sound by the channel 1
knob, the track 2 playback sound by the
channel 2 knob, and so on.
<CAUTION>
Be careful not to press the [REC] button
by mistake.
Note that the recording track is always in
the selected state.
3
Track 2
Track 3
Track 1
Slowly raise the channel 1 playback level
fader for track 1, then adjust the sound
balance with the playback [PAN] knob.
The same as when recording, the headphone
volume will increase as the [LINE OUT/PHONES]
knob is slowly raised.
The sound image can be moved left or right
by rotating the [PAN] knob in either direction.
Track 4
<CAUTION>
For playback of tape recorded on a boom box
or cassette deck, the channel 1 and 2 faders
and [PAN] knobs will be used regardless to
whether the A side or B side is to be played
back.
When monitoring the sound via headphones
for a long period of time, do not set the level
too high. Otherwise, your hearing may be
damaged.
11
Model X-12 Owner's Manual
Advanced Operation
At this point, we assumed that you understand recording and playback of each track after
studying the [Basic Operation] section and are ready to move on.
Next up, we'll work on more advanced functions such as multitrack recording - called
"overdubbing" - which is fundamental in multiple recording, then the mixdown process when
sounds recorded to the four tracks will be mixed to stereo, and finally, copying (dubbing) of the
mix to a master recorder (stereo cassette deck, etc.).
1. Overdubbing
Overdubbing is a recording technique used to add a recorded performance to previously recorded
tracks while listening (monitoring) to them.
For example, you might record a rhythm section (such as a drum machine) on Track 1 by
following the basic recording procedure, then record an electric bass on Track 2 while listening
to the recorded rhythm. In this way, you can record performances on all four tracks, one by
one. This section uses an example in which Track 1 has the drum machine already recorded.
Follow the recording steps described in the Basic Operation chapter and use the drum machine
instead of the microphone. We are going to overdub the electric bass on Track 2, the keyboard
on Track 3, and vocal on Track 4.
Step-1
Step-2
While playing back and listening to Track 1 (drum
machine), overdub the electric bass to Track 2.
While playing back and listening to Track 1 (drum
machine) and Track 2 (electric bass), overdub
the keyboard to Track 3.
Track 4
Track 4
Track 3
Track 2
Track 1
Track 3
Track 2
Track 1
E. Bass
Drum Machine
Step-3
While playing back and listening to Track 1,
Track 2 and Track 3, overdub the vocal to Track
4.
Track 4
Track 3
Track 2
Track 1
Vocal
Keyboard
E. Bass
Drum Machine
12
Keyboard
E. Bass
Drum Machine
Model X-12 Owner's Manual
Overdubbing the electric bass to Track 2 while listening to Track 1 (drum machine)
Before you start overdubbing, practice your electric bass performance while monitoring the
drum machine recording in Track 1 through the headphones.
5
7
6
1
4
5
3
1
Electric bass
Effects unit
2
1
Insert the tape on which the drum machine
has already been recorded, and rewind the
tape to the recording start position "000."
2
3
4
5
8
10
8
9
7
Using the [REC TRACK] selector, select track
2 for recording.
The output of the effects unit to which the
electric bass is connected is plugged into
the [INPUT] jack.
8
Press the [PAUSE] button, the press the [REC]
button.
Rotate the [LINE-MIC] knob CCW ("LINE") to
match the effects unit output level.
9
The X-12 will enter record pause mode.
Press the [PAUSE] button again to cancel record
pause mode and start recording.
Overdub the electric bass on Track 2,
accompanying the drum machine on Track
1, while watching the recording level.
Adjust the recording level of the electric bass.
Play the electric bass to check to see how the
level meter is responding. (Use the output
volume on the bass so that the level is not
too high.) Use the [LINE OUT/PHONES] knob
to adjust the headphone volume to an
appropriate level.
<NOTE>
Do not move the [REC TRACK] selector
during recording. If this is moved
accidentally during recording, the
recording track will be switched.
After you set the recording level, playback
the tape from the "000" point and rehearse
your bass accompanying the drum machine
recording on Track 1.
10
After you finish recording, press the [STOP]
button or the [PAUSE] button to stop the tape.
If you have pressed the [PAUSE] button, press
the [STOP] button to release the [REC] button
and [PLAY] button, then press the [PAUSE]
button again.
Use playback level fader 1 and the playback
[PAN] knob 1 to adjust the monitoring level
and balance of Track 1.
6
5
After you finish rehearsing, rewind the tape
to the "000" point.
13
Model X-12 Owner's Manual
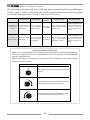
The following table indicates the switch and knob settings used for overdubbing to
Tracks 3 and 4. Refer to this table and to the steps described on the previous page
to overdub the keyboard to Track 3 and vocal to Track 4.
[REC TRACK]
selector
Playback level fader
Playback [PAN] knob
Plug the keyboard Adjust to optimum
o u t p u t t o t h e level by CCW rotation
(LINE) of the knob.
[INPUT] jack.
Select track 3
for recording.
Adjust playback levels of
tracks 1 and 2 with playback
faders 1 and 2.
Adjust the playback sound
for comfortable monitoring
(Refer to <Using the
Playback [PAN] knob>
below).
Overdubbing the Plug the mic into the Adjust to optimum
level by rotating the
Vocal to Track 4 [INPUT] jack.
knob CW (MIC).
Select track 4
for recording.
Adjust playback levels in
tracks 1 - 3 with playback
level faders 1, 2 and 3.
Adjust the playback sound
for comfortable monitoring
(Refer to <Using the
Playback [PAN] knob>
below).
Sound source
Overdubbing the
keyboard to
Track 3
[LINE-MIC] knob
<Using the Playback [PAN] knob>
When you are monitoring the recording sound and playback sound simultaneously,
refer to the table below for the relationship between the position of the [PAN] knob
and the sound balance.
Adjust the balance according to your needs. The recording sound will be always
positioned in the center.
[PAN] position
Monitoring sound position
Center
PAN
Both playback sound and recording sound will be
centered.
L
R
Hard "R"
PAN
The playback sound will be positioned on the right
and the recording sound will be centered.
L
R
Hard "L"
PAN
The playback sound will be positioned on the left
and the recording sound will be centered.
L
R
14
Model X-12 Owner's Manual
2. Mixdown
Mixdown is a technique that enables you to adjust the volume balance of the
overdubbed tracks 1-4, combine them to two channels, and dub (copy) to a master
recorder (cassette deck or MD recorder etc.). Refer to the diagram below:
Track 4 (Vocal)
Track 3 (Keyboard)
LINE OUT
MIX
Master Recorder
Track 2 (Electric bass)
Track 1 (Drum machine)
X-12
4
4
LINE OUT L, R jacks
2
1
LINE IN L, R jacks
MINI component
stereo system
4
3
1
<CAUTION>
Be careful not to mistakenly press the
[REC] button.
Remember that the recording track is
always in the selected state.
1
Insert a tape with tracks 1-4 already recorded
into the cassette tray, and rewind the tape
up to the playback start point (reset the
counter to "000").
2
Connect the input jack of a master recorder,
such as cassette deck, and the [LINE OUT
L, R] jacks.
2
3
3
Set the master recorder to the record standby
mode. (That is, press the [PAUSE] button so
that the level meter will respond, then set the
recorder in record pause mode.)
The method for setting the recorder in record
standby mode will vary depending on the
recorder you are using.
Refer to the instruction manual of the master
recorder for more information.
Insert a recording tape (or MD) in the master
recorder and locate the point on the tape at
which you wish to start copying.
4
<NOTE>
"Mini-components" which can be used for
mixdown are limited to types able to
record external inputs.
15
Adjust the output level and balance (pan
position) of tracks, then adjust input level
on the master recorder.
Model X-12 Owner's Manual
Play back the tape on the X-12.
While monitoring the sound via the headphones,
use the playback fader and the playback [PAN]
knob of each track to adjust the output level
and balance of the tracks.
Gradually raise the headphone volume using
the [LINE OUT/PHONES] knob. This knob also
adjusts the output level at the X-12's [LINE OUT
L, R] jacks. Set the level so that the level meter
of the master recorder will respond moderately.
5
After finishing the level adjustments, rewind
the tape to the "000" point.
6
Now you can begin mixdown.
7
After mixdown is complete, stop the X-12 and
the master recorder.
First start recording on the master recorder,
then press the [PLAY] button on the X-12 to
start playback.
<Note>
You can position the sound on tracks 1-4 anywhere in stereo image on
mixdown.
This is where your creatively is important. Try for a sound that is pleasing
to you!
Using a tape recorded on a boom box or cassette deck
You can record your favorite music on a boom box or cassette deck and overdub your
performance or vocal, accompanying your musician's performance to make your own
original tape. Follow the procedure below to make this type of tape.
1. Record your favorite music source on the boom box or cassette deck.
<NOTE>
Be sure to record on only one side of the tape (side A or B).
That is, use Track 1 and 2 to record on the jam box or the cassette deck, and keep
Tracks 3 and 4 empty. (See the diagram below.)
Track 4
Track 3
Do not record now. Later, you will record your
performance or vocal here on the X-12.
Track 2 (R channel)
Record your favorite song to Tracks 1 and 2 on the
Track 1 (L channel)
boom box or cassette deck.
2. Insert the recorded tape in the X-12, and follow the "Overdubbing"
procedure described previously to record your performance or vocal
to Tracks 3 and 4.
<NOTE>
Note that the law prohibits recording copyrighted or broadcast music, except for
recordings intended only for personal use.
16
Model X-12 Owner's Manual
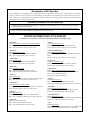
Troubleshooting
Check Point
Symptom
Corrective Action
The power is not turned on
when you press the power Is the AC adaptor plugged in securely?
switch on.
Is the head dirty?
Sound flutters or skips.
Check the connection at the AC outlet and
the [DC IN] jack of the X-12.
Clean the head.
Are you using a type of tape other than high
Use a high-position tape.
position?
The sound distorted or
Is the level appropriate for the input signal?
clipping.
Use the [LINE-MIC] knob to set the optimum
level.
The [REC] button is not Is the write-protection tab on the cassette
tape broken?
pushed in.
Place a strip of scotch tape over the broken
tab.
The sound cannot be heard Is the [LINE OUT/PHONES] knob turned
through the headphones.
up?
Turn the [LINE OUT/PHONES] knob.
You cannot record to a
Is the [REC TRACK] selector set correctly?
desired track.
Set the [REC TRACK] selector repeatedly
until the desired track is selected.
Maintenance
or even damage the tape by pulling it out of
the cassette. Since cassette tape is very thin, it
is especially dangerous to use a cassette deck
with dirty pinch rollers. As with the head, it is
important to always keep these parts clean.
Clean them using a cotton swab or gauze soaked
in cleaning solution or isopropyl alcohol. Never
use organic solvents such as lacquer thinner,
since this will severely damage the pinch rollers.
* Cleaning the exterior
For normal cleaning, use a dry cloth.
For stubborn dirt, moisten a cloth in diluted
detergent, wring it out firmly, and wipe the dirt
off. Then polish with a dry cloth.
Never use solvents such as alcohol, thinner or
benzene, since these will damage the printing
and finish of the exterior.
* Demagnetizing the head
* Cleaning the head
After long periods of use, the head begins to
develop a magnetic field in addition to the oxide
residue described above. This can also occur if
a magnet or a magnetized object (scissors, etc.)
is allowed to come near the head or touch it. If
the head or capstans become magnetized,
frequency response will be degraded and noise
will increase.
In extreme cases, noise can be created on
previously recorded tapes that you playback,
rendering them useless. Once a month or so,
you should use a demagnetizer (head eraser)
to demagnetize the head. Carefully read and
follow the instructions included with your
demagnetizer, and do not allow it to come near
recorded tapes.
As the X-12 is used, the record/playback head
will become coated with oxide residue from the
tapes. If this residue is allowed to build up,
recordings will contain more noise, and
dropouts may occur during playback.
To prevent this, regular cleaning is important.
Use a commercially available cleaning kit etc.
to clean the head. If cleaning the head does
not restore the sound quality, it is possible that
the head is worn. Contact an authorized Fostex
service station for repair.
* Cleaning the pinch roller and capstan
The capstan and pinch roller are important
parts that hold the tape and move it along at
the correct speed. As with the head, these parts
can also become dirty with oxide residue and
dust, which will cause increased wow or flutter,
17
Model X-12 Owner's Manual
Frequency Response
Specifications
Mixer section
Recorder section
INPUT
: 20Hz ~ 20kHz
: 40Hz ~ 10kHz
Heads
Connector (x1)
: ø6mm PHONE jack
Input Impedance
: 20kΩ or higher
Reference Input Level : -50dBV ~ -10dBV
(adjustable with the GAIN knob)
Rec/Play
: 4-track, 4-channel
recording/playback
: 4-track, 4-channel erase
Erase
LINE OUT (L, R)
Connector (x2)
: RCA pin jack
Output Load Impedance: 10kΩ or higher
Reference Output Level : -10dBV
Power Supply
: Fostex AC Adaptor, AD-12A
DC12V (12 ~ 16V), 8W
Weight
: Approx. 1.1kg (excluding
the AC adaptor)
Dimensions (mm) : 275 (W) x 68 (H) x 177 (D)
Accessories : Owner's manual x1, AC adaptor x1
PHONES
Connector (x1)
: ø6mm STEREO
PHONE jack
Output Load Impedance: 16Ω or higher
Maximum Output
: 10mW (at 32Ω )
* Specifications and appearance are subject to
change without notice for product improvement.
Recording Tape
: Less than C-90
Record Tracks
Tape Speed
: 4 tracks, one direction
: 4.76cm/s
(TYPE II/HIGH position)
Block Diagram
5DOT BARGRAPH
PLAY BACK
LEVEL
RECORDER
INPUT
REC TRACK
-50dBV ~ -10dBV
TRK 1
TRK 2
TRK 3
TRK 4
LEVEL
PAN
LINE OUT / PHONES
LEVEL
∑
L
LINE OUT
TRK 1
-10dBV
∑
R
TRK 2
LINE-MIC
PHONES
TRK 3
16Ω 10mW
TRK 4
18
Model X-12 Owner's Manual
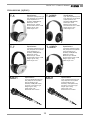
Accessories (option)
T-5
Specifications
T-7
Specifications
M321
Type: Semi-Open/Dynamic type
Freq. Response: 20~20,000Hz
Output Impedance: 44Ω
Sensitivity: 96dB (dB/mW)
Rated Input: 30mW
Maximum Input: 100mW
Sound Pressure Level: 116dB
Weight: Approx. 220g
Cable Length: 2.5m
Type: Semi-Open/Dynamic type
Freq. Response: 20~20,000Hz
Output Impedance: 77Ω
Sensitivity: 98dB (dB/mW)
Rated Input: 23mW
Maximum Input: 100mW
Sound Pressure Level: 118dB
Weight: Approx. 230g
Cable Length: 2.5m
Specifications
Type: Uni-direction/Dynamic type
Freq. Response: 90~16,000Hz
Output Impedance: 500Ω
Sensitivity: -56dB (0dB=1V/Pa)
Connector: 3 Pin Cannon type
Weight: Approx. 240g
Cable Length: 5.0m
Dimensions: ø55 x 169mm
T-20RP
T-40RP
M521
19
Specifications
Type: Semi-Open/RP Dynamic
Freq. Response: 20~25,000Hz
Output Impedance: 50Ω
Sensitivity: 96dB (dB/mW)
Rated Input: 10mW
Maximum Input: 200mW
Sound Pressure Level: 119dB
Weight: Approx. 340g
Cable Length: 3.0m
Specifications
Type: Semi-Open/RP Dynamic
Freq. Response: 25~25,000Hz
Output Impedance: 50Ω
Sensitivity: 93dB (dB/mW)
Rated Input: 10mW
Maximum Input: 200mW
Sound Pressure Level: 116dB
Weight: Approx. 360g
Cable Length: 3.0m
Specifications
Type: Uni-direction/Dynamic type
Freq. Response: 60~16,000Hz
Output Impedance: 500Ω
Sensitivity: -54dB (0dB=1V/Pa)
Connector: 3 Pin Cannon type
Weight: Approx. 285g
Cable Length: 5.0m
Dimensions: ø54 x 168mm
Declaration of EC Directive
This equipment is compatible with the EMC Directive (89/336/EEC) - Directive on approximation of member
nation's ordinance concerning the electromagnetic compatibility and with the Low Voltage Directive (73/23/
EEC) - Directive on approximation of member nation's ordinance concerning electric equipment designed to be
used within the specified voltage range.
The Affect of Immunity on This Equipment
The affect of the European specification EN50082-1 (coexistence of electromagnetic waves - common immunity specification)
on this equipment are as shown below.
* In the electrical fast transient / burst requirements, radiated electromagnetic field requirements and static electricity discharging environment, this could be affected by generation of noise in some cases.
FOSTEX DISTRIBUTORS LIST IN EUROPE
* Including non - EU countries. * underlined: contracted distributors (as of August, 2000)
<AUSTRIA>
<ITALY>
NAME: ATEC Audio-u. Videogeraete VertriebsgesmbH.
ADD: Im Winkel 5, A-2325 Velm, Austria
TEL: (+43) 2234-74004, FAX: (+43) 2234-74074
NAME: General Music S. p. A.
ADD:Via delle Rose, 12 S. Giovanni M. (RN), Italy
TEL: (+39) 0541-959511, FAX: (+39) 0541-957404
<BELGIUM>
<THE NETHERLANDS>
NAME: Sound Industries NV
ADD: Bijvennestraat 1A, B3500 Hasselt, Belgium
TEL: (+32) 11-232355, FAX: (+32) 11-232172
NAME: IEMKE ROOS AUDIO B. V.
ADD: Kuiperbergweg 20, 1101 AG Amsterdam, The Netherlands
TEL: (+31) 20-697-2121, FAX: (+31) 20-697-4201
<DENMARK>
NAME: SC Sound ApS
ADD: Malervej 2, DK-2630 Taastrup, Denmark
TEL: (+45) 4399-8877, FAX: (+45) 4399-8077
<FINLAND>
NAME: Noretron Oy Audio
ADD: P. O. Box 22, FIN-02631 Espoo, Finland
TEL: (+358) 9-5259330, FAX: (+358) 9-52593352
<FRANCE>
NAME: Musikengro
ADD: ZAC de Folliouses, B. P. 609, 01706 Les Echets, France
TEL: (+33) 472 26 27 00, FAX: (+33) 472 26 27 01
<GERMANY>
NAME: Studiosound & Music GmbH
ADD: Industriestrasse 20, D-35041 Marburg, F. R. Germany
TEL: (+49) 6421-92510, FAX: (+49) 6421-925119
<GREECE>
NAME: Bon Studio S. A.
ADD: 6 Zaimi Street, Exarchia, 106.83 Athens, Greece
TEL: (+30) 1-3809605-8, 3302059, FAX: (+30) 1-3845755
<ICELAND>
NAME: I. D. elrf. electronic Ltd.
ADD: Armula 38 108 Reykjavik, Iceland
TEL: (+354) 588 5010, FAX: (+354) 588 5011
<NORWAY>
NAME: Siv. Ing. Benum A/S
ADD: P. O. Box 145 Vinderen, 0319 Oslo 3, Norway
TEL: (+47) 22-139900, FAX: (+47) 22-148259
<PORTUGAL>
NAME: Caius - Tecnologias Audio e Musica, Lda.
ADD: Rua de Santa Catarina, 131 4000 Porto, Portugal
TEL: (+351) 2-2086009/2001394
FAX: (+351) 2-2054760/2087488
<SPAIN>
NAME: Multitracker. S. A.
ADD: C/Garcilaso No. 9, Madrid 28010, Spain
TEL: (+34) 91-4470700, 91-4470898, FAX: (+34) 91-5930716
<SWEDEN>
NAME: Professional Television AB
ADD: Kavallerivagen 24, 172 48 Sundbyberg, Sweden
TEL: (+46) 8-59798000, FAX: (+46) 8-59798001
<SWITZERLAND>
NAME: Audio Bauer Pro AG
ADD: Bernerstrasse-Nord 182, CH-8064 Zurich, Switzerland
TEL: (+41) 1-4323230, FAX: (+41) 1-4326558
<UK>
NAME: SCV London
ADD: 3A 6-24 Southgate Road, London N1 3JJ, England, UK
TEL: (+44) 171-923-1892, FAX: (+44) 171-241-3644