1
438100
8588076000
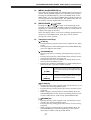
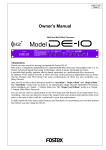
Owner’s Manual
CD-R/RW Master Recorder
MEMORY
ACCESS
LOCATE
2
1
space
PLAY MODE
FILE SEL
PROGRAM SET
DIR SEL
REPEAT
(KYBD ONLY)
MIN
PHONES
MAX
MIN
MAX
MIN
INPUT LEVEL
6
JKL
EXIT/NO
PUSH
MENU/ENTER/YES
+10
MNO
SKIP/CURSOR
8
PQRS
OPEN/CLOSE
USB
EDIT TIME
CLEAR
GHI
7
POWER
DEF
REC RDY
R
SHIFT
3
ABC
5
4
L
MEMORY SET
DISPLAY
CONTRAST
9
TUV
0
WXYZ
symbol
REC END
ABS 0
MAX
RECORD
STOP/HOME
PLAY
REWIND
F FWD
CD-R/RW MASTER RECORDER CR500 (Safety instructions/Contents)
CAUTION:
CAUTION
TO PREVENT ELECTRIC SHOCK, MATCH WIDE BLADE
OF PLUG TO WIDE SLOT, FULLY INSERT.
RISK OF ELECTRIC SHOCK
DO NOT OPEN
ATTENTION:
POUR EVITER LES CHOCS ELECTRIQUES,
INTRODUIRE LA LAME LA PLUS LARGE DE LA FICHE
DANS LA BORNE CORRESPONDANTE DE LA PRISE ET
POUSSER JUSQU' AU FOND.
CAUTION: TO REDUCE THE RISK OF ELECTRIC SHOCK,
DO NOT REMOVE COVER (OR BACK).
NO USER - SERVICEABLE PARTS INSIDE.
REFER SERVICING TO QUALIFIED SERVICE PERSONNEL.
The lightning flash with arrowhead symbol, within an
equilateral triangle, is intended to alert the user to the
presence of uninsulated "dangerous voltage" within the
product's enclosure that may be of sufficient magnitude to
constitute a risk of electric shock to persons.
"WARNING"
The exclamation point within an equilateral triangle is
intended to alert the user to the presence of important
operating and maintenance (servicing) instructions in the
literature accompanying the appliance.
"TO REDUCE THE RISK OF FIRE OR ELECTRIC
SHOCK, DO NOT EXPOSE THIS APPLIANCE TO RAIN
OR MOISTURE."
12. Power Cord Protection - Power supply cords should be
routed so that they are not likely to be walked on or pinched
by items placed upon or against them, paying particular
attention to cords at plugs, convenience receptacles, and
the point where they exit from the appliance.
13. Cleaning - The appliance should be cleaned only as
recommended by the manufacturer.
14. Nonuse Periods - The power cord of the appliance should
be unplugged from the outlet when left unused for a long
period of time.
15. Object and Liquid Entry - Care should be taken so that objects
do not fall and liquids are not spilled into the enclosure through
openings.
16. Damage Requiring Service - The appliance should be
serviced by qualified service personnel when:
SAFETY INSTRUCTIONS
1. Read Instructions - All the safety and operating instructions
should be read before the appliance is operated.
2. Retain Instructions - The safety and operating instructions
should be retained for future reference.
3. Heed Warnings - All warnings on the appliance and in the
operating instructions should be adhered to.
4. Follow Instructions - All operating and use instructions should
be followed.
5. Water and Moisture - The appliance should not be used
near water - for example, near a bathtub, washbowl, kitchen
sink, laundry tub, in a wet basement, or near a swimming
pool, and the like.
6. Carts and Stands - The appliance should be used only with
a cart or stand that is recommended by the manufacturer.
A. The power supply cord or the plug has been damaged; or
B. Objects have fallen, or liquid has been spilled into the appliance;
or
C. The appliance has been exposed to rain; or
D. The appliance does not appear to operate normally or
exhibits a marked change in performance; or
E. The appliance has been dropped, or the enclosure damaged.
17. Servicing - The user should not attempt to service the
appliance beyond that described in the operating instructions.
All other servicing should be referred to qualified service
personnel.
18. The appliance should be situated away from drops of water
or spray of water.
19. Objects containing liquid such as vase must not be put on
the appliance.
20. The appliance is not completely isolated from the power
supply even if the power switch is at off position.
21. Apparatus shall not be exposed to dripping or splashing
and no objects filled with liquids, such as vases, shall be
placed on the apparatus.
22. Only use attachments/accessories specified by the
manufacturer.
23. An appliance with a protective earth terminal should be
connected to a mains outlet with a protective earth
connection.
24. An appliance should be placed in a position where an AC
plug / inlet can be easily pulled out by hand.
25. Main plug is used as the disconnection device. It shall remain
readily operable and should not be obstructed during
intended use. To be completely disconnected the apparatus
from supply mains, the mains plug of the apparatus shall be
disconnected from the mains socket outlet completely.
An appliance and cart combination should be moved with
care. Quick stops, excessive force, and uneven surfaces
may cause the appliance and cart combination to overturn.
7. Wall or Ceiling Mounting - The appliance should be mounted
to a wall or ceiling only as recommended by the
manufacturer.
8. Ventilation - The appliance should be situated so that its
location or position dose not interfere with its proper
ventilation. For example, the appliance should not be situated
on a bed, sofa, rug, or similar surface that may block the
ventilation openings; or, placed in a built-in installation, such
as a bookcase or cabinet that may impede the flow of air
through the ventilation openings.
9. Heat - The appliance should be situated away from heat
sources such as radiators, heat registers, stoves, or other
appliances (including amplifiers) that produce heat.
10. Power Sources - The appliance should be connected to a
power supply only of the type described in the operating
instructions or as marked on the appliance.
11. Grounding or Polarization - The precautions that should be
taken so that the grounding or polarization means of an
appliance is not defeated.
2
CD-R/RW MASTER RECORDER CR500 (Safety instructions/Contents)
Important Safety Instructions
1)
Read these instructions.
2)
Keep these instructions.
3)
Heed all warnings.
4)
Follow all instructions.
5)
Do not use this apparatus near water.
6)
Clean only with dry cloth.
7)
Do not block any ventilation openings.
Install in accordance with the
manufacturer's instructions.
8)
Do not install near any heat sources such
as radiators, heat registers, stoves, or
other apparatus (including amplifiers) that
produce heat.
9)
Do not defeat the safety purpose of the
polarized or grounding-type plug.
A polarized plug has two blades with one
wider than the other. A grounding type
plug has two blades and a third grounding
prong. The wide blade or the third prong
are provided for your safety.
If the provided plug does not fit into your
outlet, consult an electrician for
replacement of the obsolete outlet.
10)
Protect the power cord from being walked
on or pinched particularly at plugs,
convenience receptacles, and the point
where they exit from the apparatus.
3
11)
Only use attachments/accessories
specified by the manufacturer.
12)
Use only with the cart, stand, tripod,
bracket, or table specified by the
manufacturer, or sold with the apparatus.
When a cart is used, use caution when
moving the cart/apparatus combination
to avoid injury from tip-over.
13)
Unplug this apparatus during lightning
storms or when unused for long periods
of time.
14)
Refer all servicing to qualified service
personnel. Servicing is required when the
apparatus has been damaged in any
way, such as power-supply cord or plug
is damaged, liquid has been spilled or
objects have fallen into the apparatus, the
apparatus has been exposed to rain or
moisture, does not operate normally, or
has been dropped.
CD-R/RW MASTER RECORDER CR500 (Safety instructions/Contents)
Table of contents
About this manual ....................................................................................................7
Precautions ...............................................................................................................7
Precautions on installation .....................................................................................8
Chapter-1
Overview ...........................................................................................9
Main features ..........................................................................................................10
Chapter-2
Preparation before using the CR500 ..........................................13
Power connection ..................................................................................................14
Realtime clock setting ...........................................................................................14
Initial format of a CD-R/RW disc ...........................................................................16
Usable discs .............................................................................................................16
Format types ...........................................................................................................16
Handling of CD-R/RW disc ...................................................................................16
Setting a disc ...........................................................................................................17
Initial format of a disc ...........................................................................................18
Adjusting display contrast ...................................................................................22
Chapter-3
Names and functions ....................................................................23
Front panel section ................................................................................................24
Rear panel section .................................................................................................29
Screen details .........................................................................................................30
Home screen (available in stop or playback mode) .........................................30
Input monitor screen (available while in record ready or recording) ..........32
MENU mode screen ................................................................................................34
Chapter-4
Connection .....................................................................................35
Connecting to other devices ................................................................................36
Analog audio connection (balanced/unbalanced) ..........................................36
Digital audio connection (AES/EBU, S/P DIF) ....................................................36
Fader start connection ..........................................................................................37
USB keyboard connection ....................................................................................37
Chapter-5
Recording .......................................................................................39
Before starting recording .....................................................................................40
Closing and finalizing ............................................................................................40
Preparation for recording .....................................................................................41
4
CD-R/RW MASTER RECORDER CR500 (Safety instructions/Contents)
Connecting a sound source ..................................................................................41
Selecting the input .................................................................................................42
Adjusting recording levels ....................................................................................42
Recording a WAV file ..............................................................................................44
Starting recording ..................................................................................................44
Stopping recording ................................................................................................44
Checking the recorded audio file ........................................................................45
Playing back a recorded audio file ......................................................................45
Closing a disc ..........................................................................................................46
Recording a CD-DA track (Creating an audio CD) .............................................47
Starting recording ..................................................................................................47
Stopping recording ................................................................................................47
Checking the recorded audio track .....................................................................48
Playing back a recorded audio track ...................................................................48
Finalizing a disc ......................................................................................................49
Selecting a song to be played back .....................................................................50
<Method 1>: Using the [SKIP/CURSOR
] keys ......................................50
<Method 2>: Using the [MEMORY/ MEMORY SET ] key group ..................................50
<Method 3>: Using the “FILE SEL” screen ...........................................................51
Chapter-6
Playback/Locate ............................................................................53
About play mode ....................................................................................................54
Playback in the ALL PLAY mode ..........................................................................55
Playback in the SINGLE PLAY mode ...................................................................55
Cueing/digital scrub ..............................................................................................56
Cueing ......................................................................................................................56
Digital scrub ............................................................................................................56
Playback in the PROGRAM PLAY mode .............................................................57
Creating the play list ..............................................................................................58
Deleting a song from the play list ........................................................................60
Deleting all songs in the play list .........................................................................60
Playback in the MEMORY PLAY mode ................................................................61
Assigning audio data to a memory ......................................................................62
Replacing the audio file in a memory bank .......................................................63
Editing a memory name ........................................................................................64
Editing the start time/end time by entering time data ....................................64
Editing the start time/end time using the digital scrub function ...................65
Deleting memory play data ..................................................................................66
5
CD-R/RW MASTER RECORDER CR500 (Safety instructions/Contents)
Playing back an ISO9660 formatted disc ............................................................67
Locate/skip functions ............................................................................................68
Locating an audio file (or audio track) ....................................................................68
Skipping between audio file (or audio track) .......................................................69
Locating the specific ABS time ....................................................................................69
Locating a point by entering a time ..........................................................................70
Chapter-7
MENU mode ....................................................................................71
About MENU mode ................................................................................................72
SYS SETUP menu ..................................................................................................73
Basic procedure for using the SYS SETUP menu ................................................74
Default file name setting [Default File Name] ....................................................75
Input selections [Select Input] ..............................................................................76
Digital output signal format selection [Digital Out] ..........................................77
Peak hold time setting [Peak Hold] ......................................................................77
Reference level setting [Ref. Level] ......................................................................78
USB keyboard type setting [Keyboard Sel] .........................................................78
Saving SYS SETUP data [Sys User Save] ...............................................................79
Loading SYS SETUP data [Sys User Load] ............................................................79
Initializing system memory data [Sys Default Set] ...........................................80
Initializing flash memory [Sys Initial Memory] .................................................80
ROM version checking [Version] .........................................................................81
PLAY SETUP menu ................................................................................................82
Basic procedure for using the PLAY SETUP menu .............................................82
Play mode selection [Play Mode] .........................................................................83
Repeat mode on/off [Repeat] ...............................................................................83
Auto play mode on/off [Auto Play] .....................................................................84
Auto play on/off when powered on [Power On Play] .......................................84
DISK UTILITY menu ...............................................................................................85
Formatting a disc [Format] ...................................................................................86
Rewriting the file system [Rewrite File Sys] ........................................................88
Editing a file name [Edit File Name] .....................................................................89
Deleting an unnecessary audio file [Delete File] ...............................................90
Restoring a deleted audio file [Restore Del. File] ...............................................91
Finalizing a disc [Finalize] .....................................................................................92
Chapter-8
Specifications ................................................................................93
6
CD-R/RW MASTER RECORDER CR500
About this manual
This manual intends to be used as a guide for using the Fostex CR500 CDR/RW master recorder.
This manual is written assuming that you have experience of using professional digital recorders and basic knowledge of digital recording.
By reading "Chapter 1: Overview" and "Chapter 3: Names and functions",
you may roughly understand the outline of the CR500 and how to use the
CR500.
Chapter 3 can be used as the index because we not only briefly describe
functions of each control but also show the page where details are described.
"Chapter 2: Preparation before using the CR500" describes information
for using the CR500 for the first time, such as realtime clock setting and
initial formatting of the CD-R/RW disc.
Precautions
• For supplying the power to the unit, only use the Fostex power cable.
If you use any other power cable, the unit may not work correctly and
there is a serious risk of damage to the unit.
• Only use a power cable supplied by Fostex.
If you wish to use the unit in a country where the voltage of the AC
power outlet does not match your power cable, ask your local Fostex
dealer or service station for purchasing an appropriate power cable.
Note that the unit can be used both in 50 Hz and 60 Hz areas.
• Make sure that the voltage of your AC power outlet matches the
voltage requirements of the unit.
• When disconnecting the power cable, make sure that the unit [POWER]
switch is set to "OFF".
Disconnecting the power cable while the power is "ON" may damage
memory data because the unit always communicates with memory data.
• While the unit is accessing to a disc (for example, during recording),
never turn off the power. Make sure that the unit completely stops
accessing to the disc before you turn off the power. Otherwise, recorded
data may be lost, as well as the disc may be damaged.
<Note>: Note that Fostex assumes no responsibility on data loss or whatsoever due to use of the unit.
<Note>: Fostex is not responsible for any "direct damage" or "indirect damage" caused by using the unit.
• Do not let water or other liquid, or metal objects such as pins,
accidentally enter the inside of the unit (especially inside of the disc
tray) because this may lead to electric shock or damage. Should water
enter the inside of the unit, turn off the power, unplug the power cable,
and consult your dealer or the nearest FOSTEX service station.
7
CD-R/RW MASTER RECORDER CR500
• Do not drop the unit or give it a strong shock. The internal circuits,
display, panels may be damaged. Handle the unit with great care
because it is a precision machine.
• To prevent possible electric shock and damage to the unit, do not
remove the cover or reach the inside of the unit.
• Do not give a strong shock to the LCD display. The liquid used inside
the LCD display is toxic. If the liquid is spilled, do not suck it in.
If it is stained to your hand or skin, wash immediately with plenty of
water.
<About replacing the lithium battery>
The CR500 uses a lithium battery internally. To replace the battery, ask
your dealer or the nearest FOSTEX service station. If the battery is not correctly replaced, there may be a risk of explosion, etc.
Precautions on installation
Do not install the unit in the following conditions.
*
*
*
*
*
In a extremely hot or cold place
In a moist place
In a shaky or unstable place
In a dusty place
In a strong magnetic field or near a device which generates a
magnetic field
* In the direct sunshine
* In the direct rain or water
• Notes on moisture condensation
When you bring the unit from a cold place to a warm place, moisture
may condense on the drive, display, panels, etc. In such a case, leave
the unit for a while until it warms up and evaporates any moisture.
8
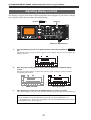
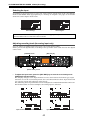
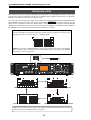
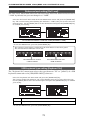
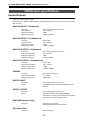
CD-R/RW MASTER RECORDER CR500 (Overview)
Chapter-1: Overview
This chapter describes the main features of the CR500.
9
CD-R/RW MASTER RECORDER CR500 (Overview)
Main features
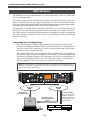
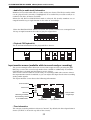
The CR500 is a two-track digital master recorder which uses a CD-R or CD-RW disc
as a recording medium.
The CR500 supports both the BWF-P (interleave) and CD-DA formats for file formats of CD-R/RW discs. It also supports the UDF rev.1.02 (Universal Disk Format),
CD-DA (Compact Disc Digital Audio) and ISO9660 file systems, enabling high quality
recording and playback (playback only with a ISO9660 disc).
By finalizing a CD-R/RW disc recorded by the CR500, you can export files on the
disc to a PC. You can also play back a finalized CD-DA disc by an audio CD player.
The CR500 offers versatile playback functions including auto play and program
play. By using these functions, you can also use the CR500 as a long continuous
playback machine.
• Supporting two recording formats
The CR500 supports both the BWF (Broadcast Wave Format) and CD-DA
(Compact Disc Digital Audio) formats as recording formats of CD-R/RW discs.
You can record WAV audio files to a BWF formatted disc, and record audio
tracks to a CD-DA formatted disc.
By closing a BWF disc, you can export a file to a Windows PC and divide the
file into two mono-track files using the WAV Manager, a freeware application
by Fostex (for details about the WAV Manager, ask your Fostex distributer or
dealer). By finalizing a CD-DA disc, you can export tracks to a Windows or
Mac OS computer, as well as can play it back by a CD player.
<Note>: In this manual, each audio data file recorded on a BWF formatted disc is
called an "audio file", while each audio data file recorded on a CD-DA formatted
disc is called an "audio track".
MEMORY
LOCATE
1
PLAY MODE
2
space
CONTRAST
5
GHI
MIN
USB
PHONES
MAX
MIN
R
MAX
MIN
EXIT/NO
PUSH
MENU/ENTER/YES
+10
MNO
SKIP/CURSOR
8
PQRS
9
TUV
0
WXYZ
symbol
REC END
ABS 0
MAX
RECORD
INPUT LEVEL
STOP/HOME
PLAY
REWIND
F FWD
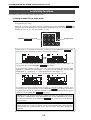
CD-DA
BWF
Finalized CD-R disc
Exportable to
Windows machines
PC
6
JKL
7
(KYBD ONLY)
EDIT TIME
REC RDY
OPEN/CLOSE
POWER
DEF
CLEAR
4
DIR SEL
REPEAT
SHIFT
3
ABC
FILE SEL
PROGRAM SET
L
MEMORY SET
DISPLAY
ACCESS
Exportable to both
Windows and Mac OS
machines
<Note>: An audio track
recorded on a CD-DA formatted CD-RW disc may
not be played back by a
normal CD player.
CD player
Computer
10
CD-R/RW MASTER RECORDER CR500 (Overview)
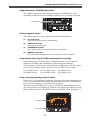
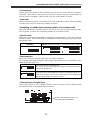
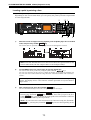
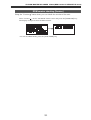
• High-performance CD-R/RW drive built in.
The CR500 is equipped with a high-performance CD-R/RW drive. The
anti-buffer-underrun function enables reliable stereo recording/playback.
ACCESS
CD-R/RW drive
PLAY MOD
PROGRAM S
REPEAT
L
R
OPEN/CLO
POWER
USB
(KYBD ONLY)
MIN
PHONES
MAX
MIN
MAX
MIN
MAX
INPUT LEVEL
• Various playback modes
The CR500 supports various playback modes described below.
(1)
ALL PLAY mode
Plays back all disc tracks continuously.
(2)
SINGLE PLAY mode
Plays back a single track.
(3)
PROGRAM PLAY mode
Plays back tracks of the playback list you program.
(4)
MEMORY PLAY mode
Plays back the memorized track by the instant start function.
• Supporting a wide range of Fs/Bit combinations for recording
When formatting a CD-R/RW disc to the BWF format, you can choose a
desired recording Fs/Bit combination from among the following.
A file is then recorded by the selected Fs/Bit combination to the disc. (Note
that a CD-DA formatted disc can only record 44.1kHz/16 bit tracks.)
(1) 44.1kHz/16 bit,
(4) 48kHz/24 bit,
(2) 44.1kHz/24 bit,
(5) 88.2kHz/24 bit,
(3) 48kHz/16 bit,
(6) 96kHz/24 bit
• Easy-to-see large display and level meters
From a 132 x 64 dot matrix LCD display, you can see the time information, as
well as the status of the unit setting. The dot-LED level meters (L and R) allow
you to check recording or playback levels precisely.
The meter peak hold time is set to three seconds by default, however, you
can set it between zero and nine seconds in one second steps using the “Peak
Hold” menu item of the “SYS SETUP” menu in the MENU mode (see page 77).
LCD display
Level meters
11
CD-R/RW MASTER RECORDER CR500 (Overview)
• A USB keyboard can be used for file name entry, etc.
The CR500 is equipped with the [USB] port for connecting an USB keyboard.
You can enter a file name, directly bring up a menu screen, and control the
transport from the USB keyboard (see page 37).
[USB] port
ACCESS
PLAY MOD
PROGRAM SE
REPEAT
L
R
OPEN/CLO
POWER
MIN
USB
(KYBD ONLY)
MAX
MIN
MAX
MIN
MAX
INPUT LEVEL
PHONES
• Versatile analog and digital connectability
For analog input and output connection, both the balanced XLR and
unbalanced RCA connectors are provided. For digital input and output
connection, the balanced XLR connectors which can handle the AES/EBU or
S/P DIF format digital signals are provided.
ANALOG INPUT
L
R
[ANALOG INPUT] connector
[ANALOG OUTPUT] connector
BALANCED [+4dBu]
L
L
R
R
UNBALANCED [-10dBV]
ANALOG OUTPUT
R
L
BALANCED [+4dBu]
DIGITAL
INPUT
OUTPUT
GPI
[DIGITAL INPUT] connector
[DIGITAL OUTPUT] connector
1:GND 2:HOT 3:COLD
• For worldwide use
The CR500 has the [AC IN] connector, to which a separate power cable is
connected. You can use the CR500 anywhere in the world by using an
appropriate power cord.
[AC IN] connector
CAUTION
RISQUE DE CHOC ELECTRIQUE
AVIS: NE
PAS OUVRIR
WARNING:
TO REDUCE THE RISK OF FIRE OR ELECTRIC
SHOCK, DO NOT EXPOSE THIS EQUIPMENT
TO RAIN OR MOISTURE.
AC IN
AC
IN
• Fader start function
The CR500 provides the fader start function. By connecting a fader start
control terminal of a mixing console to the [GPI] connector, you can control
play and stop of the CR500 from the mixing console.
[GPI] connector
ANALOG INPUT
L
R
BALANCED [+4dBu]
L
L
R
R
UNBALANCED [-10dBV]
ANALOG OUTPUT
R
L
BALANCED [+4dBu]
DIGITAL
INPUT
OUTPUT
GPI
1:GND 2:HOT 3:COLD
12
CD-R/RW MASTER RECORDER CR500 (Preparation before using the CR500)
Chapter-2: Preparation before using the CR500
This chapter explains preparation before using the CR500 for the first time, including
power connection, internal clock setting and initial formatting of a CD-R/RW disc.
You must do these things correctly in order to use the CR500. Read this chapter before
using the CR500.
Table of contents
Power connection ...........................................................................................................14
Realtime clock setting ....................................................................................................14
Initial format of a CD-R/RW disc ....................................................................................16
Usable discs ................................................................................................16
Format types ..............................................................................................16
Handling of CD-R/RW disc ......................................................................16
Setting a disc ..............................................................................................17
Initial format of a disc ...............................................................................18
Adjusting display contrast ............................................................................................22
13
CD-R/RW MASTER RECORDER CR500 (Preparation before using the CR500)
Power connection
Connect the supplied power cable to the [AC IN] connector on the rear panel first, and
then to the AC outlet.
ANALOG INPUT
L
R
L
L
R
R
ANALOG OUTPUT
R
L
CAUTION
BALANCED [+4dBu]
RISQUE DE CHOC ELECTRIQUE
AVIS: NE
PAS OUVRIR
WARNING:
UNBALANCED [-10dBV]
TO REDUCE THE RISK OF FIRE OR ELECTRIC
SHOCK, DO NOT EXPOSE THIS EQUIPMENT
TO RAIN OR MOISTURE.
BALANCED [+4dBu]
AC IN
AC
IN
DIGITAL
INPUT
OUTPUT
GPI
1:GND 2:HOT 3:COLD
Power cable
<Notes>: Connect the CR500 to the AC outlet of the voltage indicated on the rear
panel. If you use the unit in another country where the power voltage or AC connector type is different, consult your dealer or local Fostex service station.
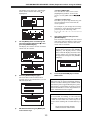
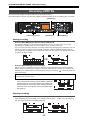
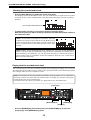
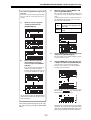
Realtime clock setting
After making power connection, turn on the CR500 and make setting of the realtime
clock.
The realtime clock data is used for date/time of creation of an audio file which is
made when you make a recording to a BWF formatted CD-R/RW disc.
By default, the realtime clock is set according to local date/time of the factory. Therefore, set the clock correctly according to your local date/time before using.
6
MEMORY
LOCATE
2
1
space
CONTRAST
PLAY MODE
FILE SEL
PROGRAM SET
DIR SEL
(KYBD ONLY)
PHONES
MAX
MIN
MAX
MIN
PUSH
MENU/ENTER/YES
+10
MNO
SKIP/CURSOR
9
TUV
0
WXYZ
symbol
REC END
ABS 0
MAX
RECORD
INPUT LEVEL
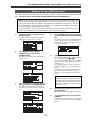
Press the [POWER] switch to turn on
the CR500.
STOP/HOME
8
1
1)
6
JKL
8
PQRS
OPEN/CLOSE
MIN
EDIT TIME
CLEAR
GHI
7
USB
DEF
REC RDY
R
EXIT/NO
SHIFT
3
ABC
5
4
REPEAT
POWER
MEMORY SET
DISPLAY
ACCESS
L
2,3,4,5,6,7
2)
PLAY
REWIND
F FWD
6
Press the [ENTER/YES] key.
The unit enters the MENU mode and the
display now shows the MENU list screen
on which "SYS SETUP " is highlighted.
Soon after turning on the power of the
unit, the display shows the screen below.
The time display shows "-m--s---ms",
showing that the CR500 started up with
no disc loaded on the drive.
3)
14
While "SYS SETUP " is highlighted, press
the [ENTER/YES] key again.
CD-R/RW MASTER RECORDER CR500 (Preparation before using the CR500)
The display now shows the "SYS SETUP"
menu, where "Default File Name " is
highlighted.
• Using the [MENU] dial:
You can edit the value at the cursor
(highlighted) position. To move the
cursor, use the [SKIP CURSOR
key.
]
• Using the numeric keys:
Each time you press any numeric key, the
entered numbers move left from the
cursor position.
For example, if you change the currently
held data to "06Y 04M 01D 10h 00m 00s",
press keys in the following order.
0 -> 6 -> 0 -> 4 -> 0 -> 1 -> 1 -> 0 -> 0 -> 0
-> 0 -> 0
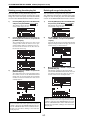
7)
4)
The clock starts running from the entered
date/time, while the display returns to the
screen which shows current clock data
which runs in realtime.
Use the [MENU] dial to scroll through the
menu and highlight "Adjust RTC ", then
press the [ENTER/YES] key.
The display now shows current clock data
which runs in realtime.
<Note>: If you enter illegal data in
step 6) above and press the [ENTER/
YES] key, the display shows "Void
data!" and the display returns to the
screen where you can edit data. Enter legal data and press the [ENTER/
YES] key.
8)
5)
Press the [ENTER/YES] key again.
The clock data at the moment when
pressing the key is hold and now you can
edit the clock data.
After editing date/time data, press the
[ENTER/YES] key.
Press the [STOP/HOME] key to exit the
MENU mode.
<Lithium battery replacement>
The unit has an internal lithium battery
which is used for driving the realtime clock.
The battery life is approximately five years.
The battery replacement is done by local
Fostex distributor's service department or
their authorized service agent.
<Note>: The file creation date of the CR500
is recorded according to the internal
realtime clock. However, because "GMT" of
"UDF" is set to offset zero, there may be an
error when reading the creation date by a
PC.
flashing
6)
Edit date/time data using the [MENU] dial
or the numeric keys.
15
UDF: Universal Disk Format
GMT:Greenwich Mean Time
CD-R/RW MASTER RECORDER CR500 (Preparation before using the CR500)
Initial format of the CD-R/RW disc
Usable discs
With the CR500, you can use a CD-R or CD-RW disc which has any of the following
logos. Also we recommend using discs manufactured by the following makers.
Recommended makers:
CD-R (Use 12x or higher disc):
Sony, TDK, Taiyo yuden, RICOH,
Mitsubishi chemical, Maxell
CD-RW (Use 4x ~ 12x disc):
Sony, TDK, RICOH, Mitsubishi chemical
ReWritable
Recordable
ReWritable
Recordable
Format types
When you format a CD-R/RW disc with the CR500, you can choose either of the following two format types.
• BWF type:
Choose this type when you make a recording in the WAV file format. With a BWF
formatted CD-R/RW disc, you can make additional recordings until you finalize the
disc, as far as the disc has an enough space. The closed disc can be read by a Windows
computer (see page 20 for details).
• CD-DA type:
Choose this type when you make an audio CD.
With a CD-DA formatted CD-R/RW disc, you can make additional recordings until you
finalize the disc, as far as the disc has an enough space. The finalized disc can be read
by a Windows or Mac OS computer, as well as can be played back by a normal CD
player (see page 20 for details).
Handling of CD-R/RW discs
•
Handle a disc with care by holding them by
the rim or by a finger through the center hole,
rather than touching the surface. Do not get
fingerprints, dust, scratch, etc. on the signal
side.
•
Do not affix any labels or stickers to the label
side of the disc. Do not make a scratch on
the label side. A scratch may make recording
or playback impossible. Do not write on the
label side of a disc with a hard pen such as a
ballpoint pen and a pencil. Only use a soft
pen.
•
Do not use a curved or cracked disc, which
may cause malfunction of the drive.
•
If dust or fingerprint is attached to the signal
side, wipe the disc gently with a soft dry cloth
or a cloth with ethyl alcohol from the center
towards the out-side edge. Do not wipe it from
the outside towards the center.
•
Read the instructions supplied with a disc be
fore using.
16
CD-R/RW MASTER RECORDER CR500 (Preparation before using the CR500)
Setting a disc
After turning on the CR500, press the [OPEN/CLOSE] key to open the disc tray.
After setting a CD-R/RW disc to the tray, press the [OPEN/CLOSE] key again closes the
disc tray.
ACCESS
PLAY MODE
PROGRAM SET
REPEAT
L
<Note>: When setting a disc
to the tray, make sure that
the label side is up.
R
OPEN/CLOSE
POWER
USB
(KYBD ONLY)
MIN
MAX
PHONES
MIN
MAX
MIN
MAX
INPUT LEVEL
[OPEN/CLOSE] key
After closing the tray, the unit loads the disc in the following manners depending on
the disc condition. If the disc is illegal, the unit rejects the disc and opens the disc tray.
•
Unformatted CD-R/RW disc
The unit recognizes that the disc is unformatted and shows "Blank Disk" on the
display, followed by the "Format" menu item of the "DISK UTILITY" menu in the
MENU mode.
•
Unused formatted CD-R/RW disc
If you set an unused BWF formatted disc, the unit scans the disc and starts up with
the screen showing that no BWF file exists on the disc.
If you set an unused CD-DA formatted disc, the unit scans the disc and starts up
with the screen showing "Blank Disk", followed by the "Format" menu screen of the
"DISK UTILITY" menu in the MENU mode.
•
Recorded CD-R/RW disc
If you set a BWF formatted (or CD-DA formatted) CD-R/RW disc on which any audio
file (or audio track) is recorded, the earliest recorded audio file (or audio track) on
the disc is loaded.
If the "Power On Play" item of the "PLAY SETUP" menu in the MENU mode is set to
"On", the CR500 automatically starts playback immediately after it starts up when
you turn on the power (see page 81).
•
CD-DA format audio CD (including a commercially available CD)
If you set an audio CD disc of the Red Book format, the unit starts up at the
beginning of track 1. Only playback is possible with an audio CD.
Note that some copy-protected audio CDs may not be played back.
•
ISO9660 formatted disc
If you set an ISO9660 formatted CD-ROM, CD-R or CD-RW disc, you can only play
back a WAV file (BWF) on the disc (see page 67).
When you attempt to remove a disc after making recording, a confirmation screen for
closing the disc (for a BWF formatted disc) or finalizing the disc (for a CD-DA disc)
appears.
To export a WAV file on the BWF formatted disc to your computer, you have to close
the disc. To play back an audio track on the CD-DA formatted disc by a normal CD
player or to export an audio track to your computer, you have to finalize the disc (see
pages 46 and 49).
17
CD-R/RW MASTER RECORDER CR500 (Preparation before using the CR500)
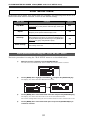
Initial format of a disc
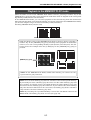
The following description shows how to do the initial format of an unused disc, assuming that the CR500 is turned on and no disc is set on the disc tray.
<The recordable time and the maximum number of tracks>
The table on the right
shows the approximate
recordable time and the
maximum number of
tracks after formatting a
700 MB CD-R/RW disc.
Note that the actual recordable time is slightly
different depending on
discs.
Format type
Recordable time
CD-DA (44.1/16)
Maximum number of
tracks
Approx. 79 min.
Max. 99 tracks
BWF (44.1/16)
Approx. 66 min.
Max. 97 tracks
BWF (44.1/24)
Approx. 44 min.
Max. 97 tracks
BWF (48/16)
Approx. 61 min.
Max. 97 tracks
BWF (48/24)
Approx. 40 min.
Max. 97 tracks
BWF (88.2/24)
Approx. 22 min.
Max. 97 tracks
BWF (96/24)
Approx. 20 min.
Max. 97 tracks
<Note>: The recordable time of a BWF formatted disc
decreases not only by making recording but also by
closing the disc (see page 46) and by rewriting the file
system data (see page 88).
You can check the recordable time and the maximum number of tracks on
the input monitor screen.
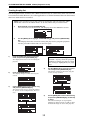
4
2
MEMORY
LOCATE
1
PLAY MODE
2
space
CONTRAST
R
5
GHI
(KYBD ONLY)
MIN
PHONES
MAX
MIN
MAX
MIN
6
JKL
PUSH
MENU/ENTER/YES
+10
MNO
SKIP/CURSOR
8
PQRS
OPEN/CLOSE
USB
EDIT TIME
REC RDY
7
POWER
DEF
CLEAR
4
DIR SEL
REPEAT
EXIT/NO
SHIFT
3
ABC
FILE SEL
PROGRAM SET
3,4,5,6,7,8
MEMORY SET
DISPLAY
ACCESS
L
4
9
TUV
0
WXYZ
symbol
REC END
ABS 0
MAX
RECORD
INPUT LEVEL
Press the [OPEN/CLOSE] key to open the
disc tray.
2)
Set an unformatted CD-R/RW disc and press
the [OPEN/CLOSE] key to close the disc tray.
PLAY
REWIND
F FWD
4
1,2
1)
STOP/HOME
On this screen, you can format the disc
after setting the disc volume label and
format type.
We recommend to set the volume label
because it can be used as the default file
name when making recording to a BWF
formatted disc.
If you do not edit the volume label, skip
the next three steps and go to step 6.
The unit recognizes that the disc is blank
and enters the "Format" screen of the
"DISK UTILITY" menu in the MENU mode.
<Note>: With a CD-DA disc, the volume label setting is ineffective and
is not stored.
3)
Use the [MENU] dial to highlight "Vol.Label"
at the top and press the [ENTER/YES] key.
The rightmost digit of the current volume
label flashes and you can now edit the
label.
18
CD-R/RW MASTER RECORDER CR500 (Preparation before using the CR500)
7)
Use the [MENU] dial to select a desired
format type and press the [ENTER/YES] key.
8)
Use the [MENU] dial to highlight
"[EXECUTE]" and press the [ENTER/YES]
key. (To cancel formatting, select "[EXIT]".)
Formatting starts and the display shows
the formatting status.
flashing
The screen below shows an example when
the disc is formatted by "BWF (48/24)".
When formatting completes, "Completed"
is shown and the unit exits the MENU
mode. The display shows the Home screen.
4)
Use the numeric keys or [MENU] dial to edit
the volume label.
You can enter a desired alphanumeric
character at the flashing point.
You can move the flashing point by using
] keys. You can
the [SKIP/CURSOR
clear the character at the flashing point by
pressing the [CLEAR/+10] key.
5)
After completing editing, press the [ENTER/
YES] key to set the volume label.
6)
Use the [MENU] dial to highlight "Audio
format type" and press the [ENTER/YES] key.
The current format type flashes ("CD-DA"
flashes by default) and you can now
select the format type.
flashing
You can select a desired format type from
among "CD-DA" and various "BWF" types
(see the table below). To make an audio
CD, select "CD-DA". To record WAV files,
select any one of "BWF" types shown below.
On the Home screen immediately after the
disc has been formatted, track display is
blank while the Fs and Bit information of
the disc is shown.
After the CD-R/RW disc has been formatted, you can now make a recording with
the CR500. See "Chapter 5: Recording"
(from page 39) for details.
CD-DA: 44.1kHz/16Bit (Default)
<Note>: You can re-format a formatted disc by the "Format" menu item
of the "DISK UTILITY" menu in the
MENU mode (see "Formatting a disk
[Format]" on page 86).
BWF (44.1/16): 44.1kHz/16Bit
BWF (44.1/24): 44.1kHz/24Bit
BWF (48/16): 48kHz/16Bit
BWF (48/24): 48kHz/24Bit
BWF (88.2/24): 88.2kHz/24Bit
BWF (96/24): 96kHz/24Bit
19
CD-R/RW MASTER RECORDER CR500 (Preparation before using the CR500)
<Note>: Formatting by the "CD-DA" type
is executed immediately. After "Completed" is shown, the following Home
screen appears.
<Note>: If you eject a CD-DA formatted disc
without making recording or if you turn
off the power and then on, the display
shows "Blank Disc" again, followed by the
"Format" screen.
With a CD-DA formatted CD-R/RW disc,
you can make additional recordings until
you finalize the disc.
20
CD-R/RW MASTER RECORDER CR500 (Preparation before using the CR500)
The following table shows available Fs/Bit combinations for recording, as well as capabilities of additional recordings, reformatting, file name editing, file deletion, export to
PC and playback by normal CD players.
Format type
BWF
CD-DA
Disc type
CD-RW
CD-R
CD-R
CD-RW
Available Fs/Bit for recording
Selectable when
formatting
Selectable when
formatting
44.1kHz/16Bit or 24Bit
48kHz/16Bit or 24Bit
88.2kHz/24Bit
96kHz/24Bit
44.1kHz/16Bit or 24Bit
48kHz/16Bit or 24Bit
88.2kHz/24Bit
96kHz/24Bit
Fixed to 44.1kHz/16Bit
Fixed to 44.1kHz/16Bit
Additional recordings
Possible until a disc
is finalized.
Possible until a disc
is finalized.
Possible until a disc
is finalized.
Possible until a disc
is finalized.
Reformatting of a recorded disc
Possible
Impossible
Impossible
Possible
File name editing/file deletion/file restore
Possible until finalized
After editing, the file
system must be stored.
Possible until finalized
After editing, the file
system must be stored.
<Note>: Impossible when
there is no remaining recordable space on the
disc.
<Note>: Impossible when
there is no remaining recordable space on the
disc.
Impossible.
Impossible.
File export to a PC
Possible with a closed or
finalized disc.
Possible with a closed or
finalized disc.
* Only can be exported to a Windows machine.
Possible with a
finalized disc.
Possible with a
finalized disc.
* Can be exported to a Windows or Mac OS machine.
Playback by a normal CD player
Impossible.
Possible with a
finalized disc.
Impossible.
Impossible.
<Note for reformatting>
Do not use the CR500 for reformatting a CD-RW disc on which you have make recording using another machine such as a PC. If you reformat such a disc using the CR500,
data may not be completely erased. When you reformat a CD-RW disc using the "Format" menu item of the "DISK UTILITY" menu in the MENU mode, make sure that the
disc has been recorded by the CR500.
21
CD-R/RW MASTER RECORDER CR500 (Preparation before using the CR500)
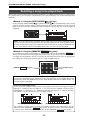
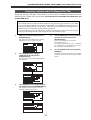
Adjusting display contrast
The display contrast of the unit is adjusted suitably when shipped. If you want to change
the contrast, follow the procedure described below.
[DISPLAY/
CONTRAST
] key
MEMORY
[SHIFT] key
MEMORY SET
DISPLAY
ACCESS
LOCATE
1
space
CONTRAST
PLAY MODE
2
DEF
EDIT TIME
4
5
GHI
DIR SEL
REPEAT
6
JKL
+10
MNO
SKIP/CURSOR
REC RDY
7
8
PQRS
OPEN/CLOSE
EXIT/NO
PUSH
MENU/ENTER/YES
CLEAR
FILE SEL
PROGRAM SET
SHIFT
3
ABC
9
TUV
0
WXYZ
symbol
REC END
ABS 0
RECORD
STOP/HOME
PLAY
REWIND
F FWD
[MENU] dial / [ENTER/YES] key
1)
Press the [SHIFT] key to turn on the [SHIFT] indicator, followed by the [DISPLAY/
key.
CONTRAST
]
The popup message as shown below appears on the display and you can now adjust the
display contrast.
2)
While the popup message above is shown, rotate the [MENU] dial to adjust the display
contrast.
Rotating the dial clockwise weakens the contrast, while rotating it counterclockwise
strengthens the contrast.
<Weak contrast>
3)
<Strong contrast>
After adjusting the contrast, press the [ENTER/YES] key to confirm your setting.
The adjusted display contrast is now effective and the popup message above is dismissed.
<Note>: The contrast setting remains even if you turn off the power.
If you initialize the system memories from the "Sys initial Memories>" or
<"Sys Default Set>" item of the "SYS SETUP" menu in the MENU mode, the contrast
is initialized to the factory preset.
22
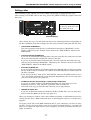
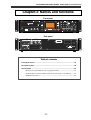
CD-R/RW MASTER RECORDER CR500 (Names and functions)
Chapter-3: Names and functions
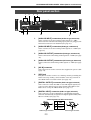
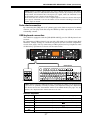
Front panel
MEMORY
LOCATE
1
PLAY MODE
FILE SEL
PROGRAM SET
DIR SEL
2
space
CONTRAST
REPEAT
5
GHI
(KYBD ONLY)
MIN
MAX
MAX
MIN
EXIT/NO
PUSH
MENU/ENTER/YES
+10
MNO
8
9
TUV
0
WXYZ
symbol
REC END
ABS 0
MAX
RECORD
INPUT LEVEL
PHONES
6
JKL
PQRS
OPEN/CLOSE
MIN
USB
EDIT TIME
SKIP/CURSOR
7
POWER
DEF
REC RDY
R
SHIFT
3
ABC
CLEAR
4
L
MEMORY SET
DISPLAY
ACCESS
STOP/HOME
REWIND
PLAY
F FWD
Rear panel
ANALOG INPUT
L
R
L
L
R
R
ANALOG OUTPUT
R
L
CAUTION
BALANCED [+4dBu]
UNBALANCED [-10dBV]
RISQUE DE CHOC ELECTRIQUE
AVIS: NE
PAS OUVRIR
WARNING:
TO REDUCE THE RISK OF FIRE OR ELECTRIC
SHOCK, DO NOT EXPOSE THIS EQUIPMENT
TO RAIN OR MOISTURE.
BALANCED [+4dBu]
AC IN
AC
IN
DIGITAL
INPUT
OUTPUT
GPI
1:GND 2:HOT 3:COLD
Table of contents
Front panel section .........................................................................................................24
Rear panel section ..........................................................................................................29
Screen details .................................................................................................................30
Home screen (available in stop or playback mode) ........................................30
Input monitor screen (available while in record ready or recording) .........32
MENU mode screen ..............................................................................................34
23
CD-R/RW MASTER RECORDER CR500 (Names and functions)
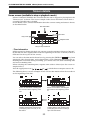
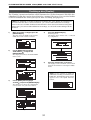
Front panel section
1
2
4
3
5
9
6 7 8
MEMORY
LOCATE
1
PLAY MODE
FILE SEL
PROGRAM SET
DIR SEL
2
space
CONTRAST
REPEAT
5
GHI
(KYBD ONLY)
22
PHONES
21
MAX
MIN
MAX
MIN
EXIT/NO
PUSH
MENU/ENTER/YES
+10
MNO
9
TUV
0
WXYZ
symbol
REC END
ABS 0
MAX
RECORD
INPUT LEVEL
20
6
JKL
8
PQRS
OPEN/CLOSE
MIN
EDIT TIME
SKIP/CURSOR
7
USB
DEF
REC RDY
R
SHIFT
3
ABC
CLEAR
4
POWER
MEMORY SET
DISPLAY
ACCESS
L
10 11 12 13
19 18
17
PLAY
STOP/HOME
16
15
REWIND
F FWD
14
About Non-shift mode and Shift mode
Some keys have the secondary function which is available
when the SHIFT indicator is lit (i.e. in the Shift mode), while
the primary function is available when the SHIFT indicator
is unlit (i.e. in the Non-shift mode).
In this manual, we sometimes say "when SHIFTed" and
"when unSHIFTed", instead of "when the SHIFT indicator is
lit" (or "in the Shift mode") and "when the SHIFT indicator
is unlit" (or "in the Non-shift mode") respectively.
Audio file and audio track
In this manual, each audio data file recorded on a BWF
formatted disc is called an "audio file", while each audio
data file recorded on a CD-DA formatted disc is called an
"audio track".
1.
[POWER] switch
Turns on or off the power of the unit.
2.
Disc tray
Loads a CD-R or CD-RW disc. Use the [OPEN/CLOSE] key to open
or close the tray.
You can also close the tray by pushing the front of the tray
lightly.
3.
[ACCESS] indicators
Indicates the condition of the CD-R/RW drive.
Depending on the drive condition, the indicator status changes
as below.
No disc is set in the tray.
Unlit
Lit in green
The disc is stopped.
Flashing in orange The unit is playing back the disc.
Flashing in red
24
The unit is recording to the disc.
CD-R/RW MASTER RECORDER CR500 (Names and functions)
4.
[PLAY MODE/ PROGRAM SET ] key
This key has primary (unSHIFTed) and secondary (SHIFTed)
functions.
While stopped, pressing this key switches the play
mode in the following order (see page 54).
When unSHIFTed:
“ALL PLAY” -> “SINGLE PLAY” -> “PROGRAM
PLAY” -> “MEMORY PLAY” -> “ALL PLAY”
<Note>: "PROGRAM PLAY" is shown only when
the play list is set.
When SHIFTed:
5.
Pressing this key brings up the screen for program
setting on which you can set or edit the play list
(page 57).
LCD display
This 132 x 64 dot LCD display shows file information, setting
status, etc (see page 30).
6.
[DISPLAY/ CONTRAST ] key
This key has primary (unSHIFTed) and secondary (SHIFTed)
functions.
When unSHIFTed:
While stopped or playing, pressing this key
switches the time display mode in the following
order (see page 30).
Total time -> Track time -> Total remaining time ->
Track remaining time -> Total time...
When SHIFTed:
7.
[FILE SEL/
Pressing this key brings up the screen for adjust
the display contrast. Adjust the display contrast
using the [MENU] dial and press the [ENTER/YES]
key to confirm (see page 22).
DIR SEL
] key
This key has primary (unSHIFTed) and secondary (SHIFTed)
functions.
When unSHIFTed:
Pressing this key brings up the screen for selecting an audio file (or audio track) (see page 51).
Pressing this key brings up the screen for selecting a directory (see page 67).
When SHIFTed:
<Note>: The Shifted function is available only
when a BWF formatted disc is loaded. It is not
available with a CD-DA formatted disc.
Pressing the [STOP/HOME] key (or the [EXIT/NO] key) dismisses
each selection screen and returns to the Home screen.
25
CD-R/RW MASTER RECORDER CR500 (Names and functions)
8.
[MEMORY/ MEMORY SET ] key
The keys in this key group have primary (unSHIFTed) and
secondary (SHIFTed) functions.
Depending on the current play mode, the function differs.
• In ALL PLAY, SINGLE PLAY or PROGRAM PLAY
mode:
Pressing a key in this key group directly locates the
When unSHIFTed: beginning of the audio file (or audio track) corresponding to the key number.
• In MEMORY PLAY mode:
Pressing a key in this key group starts playback of the
audio file (or audio track) set to the memory bank corresponding to the key number (Instant start function).
When SHIFTed:
Note that the SHIFTed functions of the keys in this
key group are effective only in the MEMORY PLAY
mode.
Pressing a key in this key group brings up the screen
for setting a desired audio file (or audio track) to the
corresponding memory bank (see page 62).
In the MENU mode, the keys in this key group are used for
entering alphanumeric characters.
9.
[LOCATE/
EDIT TIME
] key
This key has primary (unSHIFTed) and secondary (SHIFTed)
functions.
10.
When unSHIFTed:
Pressing this key locates the position previously located (see page 70).
When SHIFTed:
Pressing this key brings up the time edit screen and
you can edit the current time (see page 70). After
editing the time, pressing this key locates he edited
time position.
Pressing the [STOP/HOME] key (or the [EXIT/NO]
key) dismisses the time edit screen and returns to
the Home screen.
[CLEAR/+10] key
This key is used when you select an audio file (or audio track)
whose number is more than 9. For example, to select "15", press
this key, followed by the [5/JKL] key (see pages 50 and 68).
This key is also used to clear the highlighted character on the
screen of the "Edit File Name" item of the "DISK UTILITY" menu
in the MENU mode (see page 89).
11.
[SHIFT] key
Pressing this key turns the shift mode on or on. When on, the
indicator is lit and you can execute a SHIFTed (secondary)
function of a key which has dual functions.
The SHIFTed function of a key (if available) is labeled under
the key.
12.
[EXIT/NO] key
This key has opposite functions to the [ENTER/YES] key.
It is used to cancel editing or execution.
In the MENU mode, pressing this key goes up the menu level.
Pressing this key repeatedly exits the MENU mode.
26
CD-R/RW MASTER RECORDER CR500 (Names and functions)
13.
[MENU] dial/[ENTER/YES] key
This knob has dual functions; the [MENU] dial for selecting an
option and the [ENTER/YES] key for confirming the selection.
Pressing the [ENTER/YES] key enters the MENU mode. In the
MENU mode, you can use the [MENU] dial to make settings of
each menu item of the MENU mode. The [MENU] dial also can
be used for entering alphanumerical characters.
14.
[SKIP/CURSOR
] keys
Pressing the [
] or [
] key skips to the beginning of the
previous or next audio file (or audio track). You can skip to the
beginning of a desired file by pressing the key as many time as
required (see page 50 and 69).
When the display shows a screen for entering alphanumerical
characters in the MENU mode, these keys can be used for
moving the cursor position.
15.
Transport control keys
[
PLAY] key
•
Pressing this key plays back the current audio file (or audio
track).
Pressing this key while holding down the [STOP/HOME] key
enters the digital scrub mode.
•
[
STOP/HOME] key
•
During playback or recording, pressing this key stops the
drive.
Pressing the [PLAY] key while holding down this key enters
the digital scrub mode (see page 56).
Pressing this key exits any editing or setting mode and re
turns to show the Home screen.
Pressing the [F FWD] or [REWIND] key while holding down
this key locates a specific position as below.
•
•
•
[
•
•
•
[
•
•
•
[STOP/HOME]
+
[F FWD]
Locates the record end position (REC END) of
the currently loaded disc (LOCATE REC END
function).
[STOP/HOME]
+
[REWIND]
Locates the beginning (ABS 0) of the currently
loaded disc (LOCATE ABS 0 function).
F FWD] key
Pressing this key while stopped starts fast-forward at up to
30 times the normal playback speed.
Pressing this key during playback executes forward cueing
playback.
While stopped, pressing this key while holding down the
[STOP/HOME] key locates the last recording position of the
current audio file (or audio track) (LOCATE REC END).
REWIND] key
Pressing this key while stopped starts fast-rewind at up to
30 times the normal playback speed.
Pressing this key during playback executes reverse cueing
playback.
While stopped, pressing this key while holding down the
[STOP/HOME] key locates the beginning of the current
audio file (or audio track) (LOCATE ABS 0).
27
CD-R/RW MASTER RECORDER CR500 (Names and functions)
16.
[
RECORD] key
•
While the [REC RDY] indicator flashes, pressing this key
automatically creates a new audio file (or audio track) and
starts recording.
[REC RDY] key
Pressing this key switches the record ready mode on and off.
When it is on, you can monitor the input signal and adjust the
recording level (see pages 32, 42 and 47).
While the recorder is in the record ready mode, the [RED RDY]
indicator flashes. After recording starts, the indicator lights
solidly.
17.
Level meters
Show the recording/playback.
The nominal input level of the unit is set to "-12dB" by default.
You can change it to "-20dB" using the "Ref. Level" menu item
of the "SYS SETUP" menu in the MENU mode (see page 78).
18.
[REPEAT] key
Pressing this key switches the repeat mode on and off.
When the repeat mode is on, the [REPEAT] indicator lights and
the recorder repeats playback according to the current play
mode until the [STOP/HOME] key is pressed.
<Note>: When the play mode is set to "MEMORY PLAY", the
repeat playback function is disabled.
19.
[OPEN/CLOSE] key
Pressing this key opens or closes the disc tray.
<Note>: You can also close the tray by pushing the front of
the tray lightly.
20.
[INPUT LEVEL] control
This control adjusts the input level (L and R) when recording
analog audio signals (see page 42).
21.
[PHONES] level control/[PHONES] jack
The [PHONE] jack is used to connect headphones, while the
[PHONES] level control adjusts the headphone monitor level.
22.
[USB (KYBD ONLY)] port
By connecting a USB keyboard to this port, you can enter a file
name or control the transport, etc. form the keyboard (see page
37). You can also connect a numeric keyboard for entering
numeric values and transport controls.
When you connect a USB keyboard, set the "Keyboard type"
menu item of the "SYS SETUP" menu in the MENU mode
appropriately (see page 78) to match the keyboard.
You can select between "JAPAN" and "US" (by default, it is set
to "US").
28
CD-R/RW MASTER RECORDER CR500 (Names and functions)
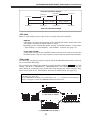
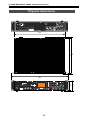
Rear panel section
1
2
ANALOG INPUT
L
R
3
L
L
R
R
4
ANALOG OUTPUT
R
L
CAUTION
BALANCED [+4dBu]
RISQUE DE CHOC ELECTRIQUE
AVIS: NE
PAS OUVRIR
WARNING:
UNBALANCED [-10dBV]
TO REDUCE THE RISK OF FIRE OR ELECTRIC
SHOCK, DO NOT EXPOSE THIS EQUIPMENT
TO RAIN OR MOISTURE.
BALANCED [+4dBu]
AC IN
AC
IN
DIGITAL
INPUT
OUTPUT
GPI
1:GND 2:HOT 3:COLD
8
7
6
1.
5
[ANALOG INPUT] connectors (XLR-3-31 type, balanced)
These connectors receive analog audio signals at +4dBu.
When the RCA unbalanced analog input jacks are plugged, the
balanced connectors are disabled (see page 36).
2.
[ANALOG INPUT] connectors (RCA type, unbalanced)
These connectors receive analog audio signals at -10dBV (see
page 36).
3.
[ANALOG OUTPUT] connectors (RCA type, unbalanced)
These connectors send analog audio signals at -10dBV (see page
36).
4.
[ANALOG OUTPUT] connectors (XLR-3-32 type, balanced)
These connectors send analog audio signals at +4dBu (see page
36).
5.
[AC IN] connector
This connector is used to connect the supplied AC power cable
(page 14).
6.
[GPI] jack
This jack is used to connect to a mixing console providing the
fader start/stop facility, which enables start/stop control of
the CR500 from a console's fader (see page 36).
7.
[DIGITAL OUTPUT] connector (XLR-3-32 type, balanced)
This connector sends AES/EBU or S/P DIF digital signals (see
page 36). The digital output signal format (AES/EBU or S/P
DIF) can be set by the MENU mode (see page 77).
8.
[DIGITAL INPUT] connector (XLR-3-31 type, balanced)
This connector receives AES/EBU or S/P DIF digital signals.
The unit automatically recognizes the digital signal format (AES/
EBU or S/P DIF) (see page 36).
<Pin assignment of XLR connectors>
1
2
3
XLR-3-31 type connector
29
1
GND
2
HOT
3
COLD
1
2
3
XLR-3-32 type connector
CD-R/RW MASTER RECORDER CR500 (Names and functions)
Screen details
Home screen (available in stop or playback mode)
When a formatted CD-R/RW disc is loaded and the unit is stopped or playing back, the
"Home screen" is shown. The screen example below shows the Home screen when a
recorded CD-R/RW disc is loaded.
On the Home screen, various information about the current setting and status is shown,
as described below.
Time information
File name
Play mode
Playback Fs/bit
File (or track) number list
• Time information
While stopped or during playback, the current recorder position is shown in "m:s:ms".
By default, the disc elapsed time from the beginning of the disc is shown (TOTAL is
indicated on the top left of the screen).
You can select the time mode shown here by pressing the [DISPLAY/ CONTRAST ] key from
among the disc elapsed time, track elapsed time, total remaining time and track remaining time. Note that during recording, you cannot select the total remaining time
and track remaining time.
When selecting the remaining time, negative time value is shown (see the screen examples below).
Also the appropriate icon (
,
,
,
or
) which shows transport status is lit.
The following shows a screen example of each of four time modes when the recorder is
at the beginning of the disc.
<Disc elapsed time>
<Track elapsed time>
Shows "0m 00s 000ms", indicating that
the recorder is at the beginning of the
disc.
Shows "0m 00s 000ms", indicating that
the recorder is at the beginning of track
01.
<Track remaining time>
<Total remaining time>
Indicates that the track remaining time
(=total playing time of track 01) is "3m
56s 000ms".
Indicates that the total remaining time
(=total playing time of tracks 01 through
06) is "23m 45s 670ms".
30
CD-R/RW MASTER RECORDER CR500 (Names and functions)
Track time indication example
0m00s000ms
0m00s000ms
1m00s000ms
1m00s000ms
File 1 (1 minute)
0m00s000ms
0m00s000ms
1m00s000ms
File 2 (1 minute)
1m00s000ms
File 3 (1 minute)
2m00s000ms
3m00s000ms
Total time indication example
• File name
Shows a track number and a name of the currently selected track (file).
• WAV file
A file name according to the setting of the "Default File Name" menu item of the
"SYS SETUP" menu in the MENU mode is shown.
Depending on the "Default File Name" setting, "DATE information", "Scene Name
+ Take number" or "Reel Number + File Number" is shown (see page 75).
• Audio track (CD-DA)
A track name written in the CD-TEXT format is shown. If no name is saved in the
CD-TEXT format, only the track number is shown (the file name field is blank).
• Play mode
The currently selected play mode is shown. When the MEMORY PLAY mode is selected,
the screen looks differently.
You can select the desired play mode by pressing the [PLAY MODE/ PROGRAM SET ] key from
among "ALL PLAY", "SINGLE PLAY", "PROGRAM PLAY" and "MEMORY PLAY" (by default, ALL PLAY is selected). You can also select the desired play mode using the "Play
Mode" menu item of the "PLAY SETUP" menu in the MENU mode (see page 83).
<Note>: If no file is set in the play list, you cannot select the PROGRAM PLAY mode
("No Play List" pops up).
In the MEMORY PLAY mode, if no audio data is set, "-----" is shown in each memory
bank (1 through 10) and the [MEMORY] indicator flashes fast.
ALL PLAY mode
("-> ALL PLAY" is shown.)
MEMORY PLAY mode
SINGLE PLAY mode
("-> SINGLE PLAY" is shown.)
PROGRAM PLAY mode
("-> PROGRAM PLAY" is shown.)
31
CD-R/RW MASTER RECORDER CR500 (Names and functions)
• Audio file (or audio track) information
Numbers of recorded audio files (or audio tracks) are shown. The file (or track) which
can be played back currently is highlighted. If no audio file (or audio track) is recorded to the disc, all boxes are blank.
When the ALL PLAY or SINGLE PLAY mode is selected, file (track) numbers are arranged from left top to right bottom in the order of recordings.
When the PROGRAM PLAY mode is selected, file (track) numbers are arranged from
left top to right bottom in the order of play list registration.
• Playback FS/Playback bit
The Fs and bit information of the playback file is shown.
CD-DA (FS44.1 and BIT CDDA are shown.) WAV file (FS and BIT information is shown as below.)
Input monitor screen (available while in record ready or recording)
The screen example below shows the screen which appears after pressing the [REC
RDY] key to enter the record ready mode when a blank or additionally-recordable
CD-R/RW disc is loaded and the Home screen is shown.
This screen is shown while in record ready or recording. While this screen is shown,
the input monitor mode is enabled, so you can adjust the input levels when recording
analog audio signals.
The input monitor screen shows the following information.
Time information
Current track
Next track
Channel status
of digital input
Remaining recordable
time/remaining number
of recordable tracks
Record mode
Input selection
• Time information
The current recorder position is shown in "m:s:ms". By default, the disc elapsed time is
shown ("TOTAL" is lit on the top left of the screen).
32
CD-R/RW MASTER RECORDER CR500 (Names and functions)
• Current track
Shows the track number of the currently selected file (or track). When recording a
WAV file, a file name is also shown (if the disc is blank, only the track number is
shown). When recording a CD-DA track, only the track number is shown.
• Next track
When recording a WAV file, a file name of the next audio file is shown. When recording
a CD-DA track, only the next track number is shown.
• Remaining recordable time/remaining number of recordable tracks
Shows the remaining recordable time on the disc by the current Fs/bit setting in minutes/seconds, as well as the remaining number of recordable tracks.
• Record mode
Shows the record mode (including recording Fs, bit and format) of the disc currently
loaded as below. The record mode is conformed to the format type you select when
formatting a disc.
CD-DA disc
BWF disc (FS and BIT information is shown as well as "WAV", as below.)
• Input selection
Shows the currently selected input source (analog or digital).
You can select the input using the "Select Input" menu item of the "SYS SETUP" in the
MENU mode (see page 76).
Shown when "Analog" is selected (default).
The recorder can record the analog audio signals fed to the [ANALOG INPUT]
connectors on the rear panel.
Shown when "Digital" is selected.
The recorder can record the digital audio signal fed to the [DIGITAL INPUT] connector on the rear panel. When the unit is not receiving a correct digital signal,
"DIGITAL" flashes and the recorder input is muted.
• Channel status of digital input
When "Select Input" is set to "Digital" and the unit is receiving a correct digital signal,
the channel status of the digital signal is shown.
Shows L channel data of bytes 1, 2, 3
and 4 from right in hexadecimal.
33
CD-R/RW MASTER RECORDER CR500 (Names and functions)
MENU mode screen
The following screen is the MENU list screen which appears when you enter the menu
mode by pressing the [ENTER/YES] key while the recorder is stopped (see page 72).
This screen is the first level screen of the MENU mode and you can select a menu from
6 menus listed on this screen.
To select a menu, use the [MENU] dial to highlight the desired menu and press the
[ENTER/YES] key. The display now shows the menu screen of the selected menu, as
below.
SYS SETUP menu screen
On this menu screen, you can select a desired menu item from among
those related to basic system setup (see page 73).
PLAY SETUP menu screen
On this menu screen, you can select a desired menu item from among
those related to playback (see page 82).
DISK UTILITY menu screen
On this menu screen, you can select a desired menu item from among
those related to disc management (see page 85).
FILE SEL screen
On this screen, you can select a desired file to be played back (see
page 51).
You can access to this screen by pressing the [FILE SEL/ DIR SEL ]
key while the Home screen is shown.
DIRECTORY SEL screen
On this screen, you can select a desired directory (see page 67).
You can access to this screen by pressing the [FILE SEL/ DIR SEL ]
key in the Shift mode while the Home screen is shown. This screen is
available only for a BWF formatted disc. When a CD-DA formatted
disc is loaded, you cannot bring up this screen.
PROGRAM SET screen
On this screen, you can set the play list for program playback (see
page 58).
You can access to this screen by pressing the [PLAY MODE/
PROGRAM SET ] key in the Shift mode while the Home screen is shown.
34
CD-R/RW MASTER RECORDER CR500 (Connection)
Chapter-4: Connection
This chapter describes details about connection of analog and digital audio devices, as
well as USB keyboard connection and functions.
35
CD-R/RW MASTER RECORDER CR500 (Connection)
Connecting to other devices
Analog audio device
ANALOG INPUT
L
R
Analog audio device
L
L
R
R
ANALOG OUTPUT
R
L
CAUTION
BALANCED [+4dBu]
UNBALANCED [-10dBV]
RISQUE DE CHOC ELECTRIQUE
AVIS: NE
PAS OUVRIR
WARNING:
TO REDUCE THE RISK OF FIRE OR ELECTRIC
SHOCK, DO NOT EXPOSE THIS EQUIPMENT
TO RAIN OR MOISTURE.
BALANCED [+4dBu]
AC IN
AC
IN
DIGITAL
INPUT
OUTPUT
GPI
1:GND 2:HOT 3:COLD
Digital audio device
Digital audio device
Fader start
Power cable
Analog audio connection (balanced/unbalanced)
The CR500 is equipped with both the balanced (XLR-3-31) and unbalanced (RCA)
[ANALOG INPUT] connectors, ensuring broad compatibility. You can connect
"+4dBu" signals to the balanced input connectors, while "-10dBV" signals to the
unbalanced input connectors.
To record analog signals fed to the balanced or unbalanced [ANALOG INPUT]
connectors, set the "Input Sel" menu item of the "SYS SETUP" in the MENU mode
to "Analog" (see page 76). By default, the "Input Sel" menu item is set to "Analog". If it is set to "Digital", however, you need to change the setting.
The CR500 is also equipped with both the balanced (XLR-3-32) and unbalanced
(RCA) [ANALOG OUTPUT] connectors, which feed +4dBu and -10dBV analog audio
signals respectively.
<Note>: When both the balanced (XLR) and unbalanced (RCA) input connectors
of [ANALOG INPUT] are plugged, the unbalanced input signal takes priority (the
balanced XLR connector is disabled).
Digital audio connection (AES/EBU, S/P DIF)
The CR500 is equipped with the [DIGITAL INPUT] (XLR-3-31) connector which
accepts digital audio signals of both IEC 60958 (AES/EBU) and IEC 60958 (S/P
DIF) format. It automatically detects the format (AES/EBU or S/P DIF) of the
digital input signal. Regardless of the Fs/bit information of the input signal, the
CR500 records the input signal at the Fs/bit which is set when a disc is formatted.
To record a digital signal fed to the [DIGITAL INPUT] connectors set the "Input
Sel" menu item of the "SYS SETUP" in the MENU mode to "Digital" (see page 76).
The CR500 is also equipped with the [DIGITAL OUTPUT] (XLR-3-32) connector
which accepts digital audio signals of both IEC 60958 (AES/EBU) and IEC 60958
(S/P DIF) format, like the [DIGITAL INPUT] connector.
You can set the digital output signal format (AES/EBU or S/P DIF) using the
"Digital Out" menu item of the "SYS SETUP" in the MENU mode (see page 77).
The default setting of the "Digital Out" menu item is "AES/EBU".
36
CD-R/RW MASTER RECORDER CR500 (Connection)
<Note>: When recording digital audio, if a correct digital signal is fed to the [DIGITAL INPUT] connector, PLL (Phased-locked loop) is active. By entering the record
ready mode, the CR500 locks to the input sync signal, while the "DIGITAL" icon
on the Home screen changes from flashing to lit.
If the unit does not receive a correct digital signal or does not lock to the input
sync signal, "DIGITAL" icon on the Home screen remains flashing and the recorder input is muted.
Fader start connection
By connecting the [GPI] jack (1/4" phone type) to the fader start port of a mixing
console, you can play back and stop the CR500 by fader operation of an external mixing console.
USB keyboard connection
The CR500 is equipped with the [USB (KYBD ONLY)] port for USB keyboard connection.
By connecting a USB keyboard, you can edit a file name or a volume name (Reel
Number), change setting, etc. from the keyboard (for the function assignment,
see the next page). Also by connecting a USB keyboard, its keys duplicate some
of CR500 key operations as shown on the table below.
MEMORY
LOCATE
2
1
space
CONTRAST
PLAY MODE
CLEAR
GHI
MAX
MIN
MIN
MAX
+10
MNO
8
PQRS
9
TUV
0
WXYZ
symbol
REC END
ABS 0
MAX
RECORD
INPUT LEVEL
PHONES
6
JKL
SKIP/CURSOR
R
OPEN/CLOSE
MIN
USB
(KYBD ONLY)
PUSH
MENU/ENTER/YES
EDIT TIME
REC RDY
7
POWER
DEF
5
4
DIR SEL
REPEAT
EXIT/NO
SHIFT
3
ABC
FILE SEL
PROGRAM SET
L
MEMORY SET
DISPLAY
ACCESS
STOP/HOME
REWIND
PLAY
F FWD
USB keyboard
F1
ESC
Num
Lock
/
*
BS
7
8
9
+
~
`
!
1
TAB
PgUp
Home
4
5
6
-
1
2
3
Enter
00
.
@
2
Q
Caps Lock
Ins
SHIFT
PgDn
End
00Ins
Ctrl
Del
F2
Help
F3
A
R
E
S
Z
%
5
$
4
#
3
W
D
X
F5
F4
^
6
T
F
C
Alt
&
7
Y
G
V
)
0
I
J
N
F8
(
9
*
8
U
H
B
F7
F6
O
K
M
F10 F11 F12
_
-
+
=
{
[
P
L
<
,
F9
J
>
.
Back Space
}
]
K
?
/
Alt
|
/
Print
Screen
SysReq
Scroll Pause
Lock Break
Insert
Home
Page
Up
Num
Lock
Delete
End
Page
Down
7
Home
8
4
5
6
1
End
2
3
ENTER
SHIFT
/
*
-
9
Pg Up
+
Pg Dn
Enter
Ctrl
0
Ins
.
Del
Numeric keyboard
<Note>: Before using the USB keyboard for controlling the CR500, set the keyboard
type ("US" or "JAPAN") correctly to match your keyboard using the "Keyboard
Sel" menu item of the "SYS SETUP" menu in the MENU mode (see page 78). By
default, the "Keyboard Sel" menu item is set to "US".
Numeric keyboard
0 through 9 keys Duplicates the function of the keys in the CR500 [MEMORY] key group.
, Del key
Duplicates the function of the [CLEAR/+10] key on the CR500 panel.
Enter key
Duplicates the function of the [STOP/HOME] key on the CR500 panel.
/ key
Duplicates the function of the [SKIP/CURSOR
] key on the CR500 panel.
* key
Duplicates the function of the [SKIP/CURSOR
] key on the CR500 panel.
+ key
Duplicates the function of the [PLAY] key on the CR500 panel.
- key
Duplicates the function of the [SHIFT] key on the CR500 panel.
37
CD-R/RW MASTER RECORDER CR500 (Connection)
USB keyboard
Function keys
F1 key
Brings up the screen of the "Edit File Name" menu item of the "DISK UTILITY"
menu in the MENU mode.
F3 key
Brings up the screen of the "Default File Name" menu item of the "DISK UTILITY"
menu in the MENU mode.
F5 key
Switches the play mode to "ALL PLAY".
SHIFT + F5 keys
F6 key
Switches the play mode to "SINGLE PLAY".
Switches the play mode to "MEMORY PLAY".
SHIFT + F6 keys
Switches the play mode to "PROGRAM PLAY".
F7 key
Turns on the record ready mode.
SHIFT + F7 keys
Turns off the record ready mode.
F8 key
Acts the same as the [RECORD] key on the CR500 panel.
F9 key
Acts the same as the [STOP/HOME] key on the CR500 panel.
F10 key
Acts the same as the [PLAY] key on the CR500 panel.
F11 key
Acts the same as the [REWIND] key on the CR500 panel.
F12 key
Acts the same as the [F FWD] key on the CR500 panel.
Shortcut keys
ALT + F keys
Enters the "FILE SEL" menu in the MENU mode.
ALT + D keys
Enters the "DIRECTORY SEL" menu in the MENU mode.
ALT + S keys
Enters the "SYS SETUP" menu in the MENU mode.
ALT + P keys
Enters the "PLAY SETUP" menu in the MENU mode.
ALT + L keys
Enters the "PROGRAM SET" menu in the MENU mode.
ALT + U keys
Enters the "DISK UTILITY" menu in the MENU mode.
Control keys
Ctrl + L keys
Acts the same as the [LOCATE/
EDIT TIME
] key on the CR500 panel.
Special keys
/ /
/
keys
Moves the cursor point or scrolls through a list in the MENU mode.
BS key
Back space function.
DEL key
Acts the same as the [CLEAR/+10] key on the CR500 panel.
Esc key
Acts the same as the [EXIT/NO] key on the CR500 panel.
Enter key
Acts the same as the [ENTER/YES] key on the CR500 panel.
HOME key
Acts the same as the [STOP/HOME] key on the CR500 panel.
Space key
Acts the same as the [STOP/HOME] key on the CR500 panel.
key
Skips forwards.
key
Skips backwards.
<Note>: Functions assigned to a USB keyboard and numeric keyboard may be enhanced in
the future.
38
CD-R/RW MASTER RECORDER CR500 (Recording)
Chapter-5: Recording
This chapter describes how to record audio data using the CR500.
The CR500 can record audio to a BWF formatted or CD-DA formatted disc. To a BWF
formatted disc, you can record WAV audio files. You can then export files to a Windows
computer after closing the disc. To a CD-DA formatted disc, you can record audio tracks.
After finalizing a CD-DA formatted disc, you can play it back by a normal CD player or
export tracks to a Windows or Mac OS computer.
<Note>: With a BWF formatted disc, each time you make recording, an "audio
file" is created. You can make up to 97 audio files on a disc as long as there is disc
remaining space (note that closing the disc affects the maximum number of
recordable audio files).
With a CD-DA formatted disc, each time you make recording, an "audio track" is
created. You can make up to 99 audio tracks on a disc as long as there is disc
remaining space.
Table of contents
Before starting recording ..............................................................................................40
Closing and finalizing ..........................................................................................40
Preparation for recording ..............................................................................................41
Connecting a sound source .................................................................................41
Selecting the input ...............................................................................................42
Adjusting recording levels ..................................................................................42
Recording a WAV file .......................................................................................................44
Starting recording ................................................................................................44
Stopping recording ..............................................................................................44
Checking the recorded audio file .......................................................................45
Playing back a recorded audio file .....................................................................45
Closing a disc .........................................................................................................46
Recording a CD-DA track (Creating an audio CD) ......................................................47
Starting recording ................................................................................................47
Stopping recording ..............................................................................................47
Checking the recorded audio track ...................................................................48
Playing back a recorded audio track .................................................................48
Finalizing a disc ....................................................................................................49
Selecting a song to be played back ..............................................................................50
<Method 1>: Using the [SKIP/CURSOR
] keys ......................................50
<Method 2>: Using the [MEMORY/ MEMORY SET ] key group ........................50
<Method 3>: Using the "FILE SEL" screen ..........................................................51
39
CD-R/RW MASTER RECORDER CR500 (Recording)
Before starting recording
<Closing and finalizing>
The CR500 can close or finalize a recorded disc. The following explains what are
closing and finalizing.
Closing
Closing is done to a BWF formatted disc. A closed disc can be read by a Windows
computer. You can close a disc when ejecting a recorded disc (see page 46).
If you use a recorded disc only with the CR500 and do not use it with your computer, you do not need to close it (see <Notes> below).
If you want to close an unclosed disc which is not currently loaded to the CR500,
load it to the CR500 and then attempt to eject it (i.e. press the [OPEN/CLOSE]
key). The display shows the screen for closing the disc (see page 46).
<Note>: Each time you close a BWF formatted disc, the number of remaining
recordable files decreases by one and the remaining disc space decreases.
Therefore, we recommend closing a disc only when it is necessary.
<Note>: You can also finalize a BWF formatted disc using the "Finalize" item
of the "DISK UTILITY" menu in the MENU mode (see page 92).
With a finalized formatted disc, you cannot make additional recordings, file
name editing, file deletion and file restoring.
Finalizing
Finalizing is done to a CD-DA formatted disc. A finalized disc can be read by a
Windows or Mac OS computer, as well as can be played back by a normal CD
player (only a CD-R disc can be played back by a normal CD player).
You can finalize a disc when ejecting a recorded disc (see page 49) or using the
"Finalize" item of the "DISK UTILITY" menu in the MENU mode (see page 92).
<Note>: Note that you cannot make additional recordings to a finalized disc.
40
CD-R/RW MASTER RECORDER CR500 (Recording)
Preparation for recording
Before making recording of analog or digital audio, you must make preparation for recording as
described below.
The following description assumes that the CR500 is turned on and a BWF formatted or CD-DA
formatted blank CD-R/RW disc is set to the disc tray. To record WAV files, use a BWF formatted
CD-R/RW disc. To record audio CD tracks, use a CD-DA formatted CD-R/RW disc.
<BWF formatted CD-R/RW disc>
<CD-DA formatted CD-R/RW disc>
MEMORY
ACCESS
LOCATE
2
1
PLAY MODE
space
REPEAT
MIN
USB
(KYBD ONLY)
MIN
MAX
5
GHI
DIR SEL
R
MIN
MAX
6
JKL
EXIT/NO
PUSH
MENU/ENTER/YES
+10
MNO
SKIP/CURSOR
8
PQRS
9
TUV
0
WXYZ
symbol
REC END
ABS 0
MAX
RECORD
INPUT LEVEL
PHONES
EDIT TIME
REC RDY
OPEN/CLOSE
POWER
DEF
CLEAR
7
L
SHIFT
3
ABC
FILE SEL
4
PROGRAM SET
MEMORY SET
DISPLAY
CONTRAST
STOP/HOME
REWIND
PLAY
F FWD
The following description is assumed that the Home screen as shown below appears on the
display. The Home screen looks slightly different depending on the format type. The screen
examples below show the Home screens for a BWF (48/24) formatted and CD-DA formatted
discs.
<Home screen of a BWF (48/24) formatted disc>
<Home screen of a CD-DA formatted disc>
Connecting a sound source
To record an analog audio signal, connect a sound source to the [ANALOG INPUT] (balanced or unbalanced) connectors. To record a digital audio signal, connect a sound source
to the [DIGITAL INPUT] connector.
<Note>: If you make connection to both the analog balanced (XLR) and unbalanced (RCA)
input connectors, the unbalanced input takes priority and the balanced input is disabled.
Analog audio device
ANALOG INPUT
L
R
L
L
R
R
ANALOG OUTPUT
R
L
CAUTION
BALANCED [+4dBu]
UNBALANCED [-10dBV]
RISQUE DE CHOC ELECTRIQUE
AVIS: NE
PAS OUVRIR
WARNING:
TO REDUCE THE RISK OF FIRE OR ELECTRIC
SHOCK, DO NOT EXPOSE THIS EQUIPMENT
TO RAIN OR MOISTURE.
BALANCED [+4dBu]
AC IN
AC
IN
DIGITAL
INPUT
OUTPUT
GPI
1:GND 2:HOT 3:COLD
Digital audio device
41
CD-R/RW MASTER RECORDER CR500 (Recording)
Selecting the input
According to the sound source, select the "Select Input" menu item of the "SYS SETUP"
menu in the MENU mode appropriately to "Analog" or "Digital". See page 76 for details
about the "Select Input" menu item.
If you record an analog audio source,
select "Analog".
If you record a digital audio source,
select "Digital".
<Note>: You must set the "Select Input" menu item appropriately. Otherwise, the connected audio source is not fed to the recorder.
Adjusting recording levels (for analog input only)
You can adjust recording levels only when you record analog audio.
When you record digital audio, recording is always made at the same level as the digital
source level.
[REC RDY] key
[PHONES] control
MEMORY
LOCATE
2
1
space
CONTRAST
PLAY MODE
5
4
GHI
R
USB
MIN
PHONES
MAX
MIN
MAX
MIN
EXIT/NO
PUSH
MENU/ENTER/YES
6
JKL
+10
MNO
SKIP/CURSOR
7
(KYBD ONLY)
EDIT TIME
REC RDY
8
PQRS
OPEN/CLOSE
POWER
DEF
CLEAR
DIR SEL
REPEAT
SHIFT
3
ABC
FILE SEL
PROGRAM SET
L
MEMORY SET
DISPLAY
ACCESS
9
TUV
0
WXYZ
symbol
REC END
ABS 0
MAX
RECORD
INPUT LEVEL
STOP/HOME
PLAY
REWIND
F FWD
[INPUT LEVEL] control
•
To adjust the input levels, press the [REC RDY] key to enter the record ready mode
([REC RDY] indicator flashes).
The display changes to the input monitor screen, which shows the format type, input
selection, etc. In the record ready mode, the L and R level meters show input levels and
you can now check and adjust the input levels.
The following shows input monitor screen examples for a BWF formatted disc and a CDDA formatted disc. In these examples, the analog input is selected.
Input monitor screen for a BWF formatted disc
42
Input monitor screen for a CD-DA formatted disc
CD-R/RW MASTER RECORDER CR500 (Recording)
<Note>: When the "Select Input" menu item is set to "Digital", the input monitor screens for a BWF formatted disc and a CD-DA formatted disc look like the
examples below ("
" is shown).
Input monitor screen for
a CD-DA formatted disc
Input monitor screen for
a BWF formatted disc
While the "Select Input" menu item is set to "Digital", if the unit receives a
correct digital input signal and locks to it, "DIGITAL" of "
" is lit.
Just below the "DISC-R" field, the channel status information of the digital
signal currently received is shown. If the unit does not receive a correct digital
input signal or does not lock to the digital input signal, "DIGITAL" flashes and
the input audio signal is muted. In such a case, check the digital output setting
of the source device and connection between the source device and the [DIGITAL INPUT] connector of the CR500.
<Note>: By default, the file name shown on the input monitor screen for a BWF
formatted disc is "<Scene Name> + <Take Number>" (with ".wav", the file extension). Using the "Default File Name" menu item of the "SYS SETUP" menu in
the MENU mode, you can select the file name mode from among "<Scene Name>
+ <Take Number>" (default), "<Reel Number> + <Take Number>" and "<Date>"
(see page 75). You can also edit the file name using the "Edit File Name" menu
item of the "SYS SETUP" menu in the MENU mode (see page 89).
<Note>: Normally, no file name is indicated on the input monitor screen for a
CD-DA formatted disc. However, if any file name is written by CD-TEXT, it is
indicated. Note that you cannot edit the file name of an audio track on the CDDA formatted disc.
•
Feed an analog audio source and adjust the input levels appropriately using the
[INPUT LEVEL] control (when feeding a digital audio source, you can only view
the levels but cannot control it).
When the analog audio signals are fed, turning the [INPUT LEVEL] control
clockwise raises the input level. Adjust the levels appropriately by checking the
meter indication and monitoring via headphones.
*
When the "Select Input" menu item is set to "Digital", you do not need to adjust the
input levels.
<Note>: You should set the input levels appropriately so that the indicators
near to "0"dB sometimes light but the "OL" indicators do not light.
The reference level is set to "-12dBFS" by default. On the level meter scale, "12"
(the -12dB point from the 24-bit full-scale level) is shown in red as the reference marker. You can change to set this level to "-20dB" via the "Ref.level" item
in the "SYS SETUP" menu of the MENU mode (see page 78 for details).
43
CD-R/RW MASTER RECORDER CR500 (Recording)
Recording a WAV file
You can record analog or digital audio in the WAV file format.
The following description assumes that a BWF formatted blank CD-R (or CD-RW) disc is loaded.
[REC RDY] key
MEMORY
LOCATE
1
PLAY MODE
2
space
CONTRAST
5
GHI
PHONES
MAX
MIN
MAX
MIN
EXIT/NO
PUSH
MENU/ENTER/YES
6
JKL
+10
MNO
SKIP/CURSOR
R
8
PQRS
OPEN/CLOSE
MIN
USB
(KYBD ONLY)
EDIT TIME
REC RDY
7
POWER
DEF
CLEAR
4
DIR SEL
REPEAT
SHIFT
3
ABC
FILE SEL
PROGRAM SET
L
MEMORY SET
DISPLAY
ACCESS
9
TUV
0
WXYZ
symbol
REC END
ABS 0
MAX
RECORD
INPUT LEVEL
[RECORD] key
[INPUT LEVEL] control
STOP/HOME
PLAY
REWIND
F FWD
[STOP/HOME] key
Starting recording
•
Press the [REC RDY] key to enter the record ready mode.
The display changes to show the input monitor screen, on which you can see the
remaining recordable time and the number of the tracks on the disc.
You can check the input level for recording. When the analog input is selected, you can
adjust the input levels for left and right channels using the [INPUT LEVEL] controls.
See "Adjusting recording levels" described earlier in this chapter for details about how
to adjust the input levels.
•
Press the [RECORD] key to start recording.
When you start recording, the input monitor screen changes as the screen example
below. While recording is in progress, the time indication is counted up, whereas the
remaining recordable time is counted down (during recording, " " is shown beside the
time indication).
<Note>: In order not to miss the beginning of the audio input source, we recommend
starting the recorder first.
On the input monitor screen, the "TRK-01" field shows the
name of the audio file currently recorded, while the "NEXT-R"
field shows the name of the next audio file to be recorded. The
file name depends on the setting of the "Default File Name"
menu item of the "SYS SETUP" menu in the MENU mode
(see page 75).
Stopping recording
•
To stop recording, press the [STOP/HOME] key.
After finishing post-processing of recording ("Please Wait..." is shown on the display),
the disc stops at the last recording position.
44
CD-R/RW MASTER RECORDER CR500 (Recording)
Checking the recorded audio file
•
Press the [REC RDY] key to disable the record ready mode.
The display returns to the Home screen. You can confirm that an audio file has been
created, as shown on the screen example below. The time indication shows the last
recording position.
The currently selected audio file
•
To make another recording in succession, repeat the operation above.
We recommend checking the recordable time and the number of the recordable files on
the disc when you make recording.
<Note>: Each time you make recording, the recorded file
number is added to the track list on the Home screen. The
screen example on the right shows the recorder condition
when the recorder has just finished recording of the sixth
audio file.
<Note>: With a BWF formatted CD-R or CD-RW disc, you can record additional WAV
files to the disc as long as there is remaining recordable space. You can also delete
unnecessary files (see page 90). After closing a recorded disc, you can export WAV
files to a Windows computer. Note that you cannot reformat a recorded CD-R disc.
Playing back a recorded audio file
The recorder stops at the last recording position when stopping recording. You can skip
back to the beginning of the audio file by either of the operations below.
The following assumes that a single audio file is recorded to a disc (see page 50 for file
selection when more than one audio file is recorded).
<Hint>: The CR500 has four play modes. By default, the play mode is set to "ALL PLAY".
Therefore, if there are more than one audio file is recorded, the recorder starts playback from the first (earliest) file continuously.
For details about the other play mode, see "Playback/locate" described later.
[1/space] key
MEMORY
ACCESS
LOCATE
1
PLAY MODE
FILE SEL
PROGRAM SET
DIR SEL
2
space
REPEAT
(KYBD ONLY)
MIN
PHONES
MAX
MIN
MAX
MIN
EXIT/NO
PUSH
MENU/ENTER/YES
EDIT TIME
6
JKL
+10
MNO
SKIP/CURSOR
REC RDY
R
8
PQRS
OPEN/CLOSE
USB
DEF
5
GHI
7
POWER
SHIFT
3
ABC
CLEAR
4
L
MEMORY SET
DISPLAY
CONTRAST
9
TUV
0
WXYZ
symbol
REC END
ABS 0
MAX
RECORD
INPUT LEVEL
STOP/HOME
[STOP/HOME] key
REWIND
PLAY
F FWD
[REWIND] key
[PLAY] key
•
Press the [REWIND] key while holding down the [STOP/HOME] key, or press the
[1/space] key in the [MEMORY] key group.
45
CD-R/RW MASTER RECORDER CR500 (Recording)
If you press the [REWIND] key while holding down the [STOP/HOME] key, the recorder
executes the "Locate ABS 0" function to go to the beginning of the disc and stops.
If you press the [1/space] key in the [MEMORY] key group, the recorder goes to the
beginning of the first audio file and automatically starts playback.
<Note>: Because the "Auto Play" menu item of the "PLAY SETUP" menu in the MENU
mode is set to "On" by default, when you press the [1/space] key in the [MEMORY]
key group, the recorder automatically starts playback after skipping to the beginning
of the file (see page 84).
<Note>: When more than one audio file is recorded on a disc, if you press the [REWIND] key while holding down the [STOP/HOME] key to execute the "Locate ABS 0"
function, the recorder goes the beginning of the first audio file. That is, the "Locate
ABS 0" function always locates the beginning of the disc (ABS 0), not the beginning
of each file. If you wish to select a desired audio file to be played back from among
more than one file, follow the instructions described on page 50.
•
After executing "Locate ABS 0", press the [PLAY] key to start playback.
Closing a disc
By closing a recorded BWF formatted disc, you can export WAV files to a Windows computer. You can close a disc when you eject the disc. Note that you can make additional
recordings to a closed disc by reloading the disc.
<Notes>
• You cannot make additional recordings to a disc which is finalized using the "Finalize"
item of the "DISK UTILITY" menu in the MENU mode (see page 92).
• Each time you close a disc, the number of remaining recordable files decreases by one
and the remaining disc space decreases approximately one or two seconds (the screen
shows the number of remaining recordable files calculated by "97 - (the number of
recorded files + the number of times you close the disc)"). We recommend not closing a
disc unless it is necessary if you do not like to waste tracks and the disc space.
•
While stopped, press the [OPEN/CLOSE] key.
"Un-closed track!" pops up, followed by the confirmation screen.
•
To close the disc, press the [ENTER/YES] key. To cancel closing, press the [EXIT/NO]
key.
If you press the [ENTER/YES] key, "Please Wait Closing track..." pops up.
After completing closing, the disc is ejected. Note that it takes some time for closing.
If you press the [EXIT/NO] key, the disc is ejected immediately.
46
CD-R/RW MASTER RECORDER CR500 (Recording)
Recording a CD-DA track (Creating an audio CD)
You can record analog or digital audio to a disc in the CD-DA format. By finalizing a CD-DA disc
on which one or more CD-DA tracks are recorded, an audio CD is created. You can export audio
tracks on a finalized CD-DA disc to a Windows computer or play them back by a normal CD
player. The following description assumes that a CD-DA formatted blank CD-R (or CD-RW) disc is
loaded (you can only make 44.1kHz Fs/16-bit recordings with a CD-DA disc). <Note>: An audio
track recorded on a CD-DA formatted CD-RW disc may not be played back by a normal CD player.
[REC RDY] key
MEMORY
LOCATE
2
1
space
CONTRAST
PLAY MODE
5
4
GHI
PHONES
MAX
MIN
MAX
MIN
6
JKL
EXIT/NO
PUSH
MENU/ENTER/YES
+10
MNO
SKIP/CURSOR
8
R
PQRS
OPEN/CLOSE
MIN
USB
(KYBD ONLY)
EDIT TIME
REC RDY
7
POWER
DEF
CLEAR
DIR SEL
REPEAT
SHIFT
3
ABC
FILE SEL
PROGRAM SET
L
MEMORY SET
DISPLAY
ACCESS
9
TUV
0
WXYZ
symbol
REC END
ABS 0
MAX
RECORD
INPUT LEVEL
[INPUT LEVEL] control
[RECORD] key
STOP/HOME
PLAY
REWIND
F FWD
[STOP/HOME] key
Starting recording
•
Press the [REC RDY] key to enter the record ready mode.
The display changes to show the input monitor screen, on which you can see the
remaining recordable time and the number of the tracks on the disc.
You can check the input level for recording. When the analog input is selected, you can
adjust the input levels for left and right channels using the [INPUT LEVEL] controls. See
"Adjusting recording levels" described earlier in this chapter for details about how to
adjust the input levels.
•
Press the [RECORD] key to start recording.
When you start recording, the input monitor screen changes as the screen example
below. While recording is in progress, the time indication is counted up, whereas the
remaining recordable time is counted down (during recording, " " is shown beside the
time indication).
<Note>: In order not to miss the beginning of the audio input source, we recommend
starting the recorder first.
On the input monitor screen, the "NEXT-R" field
shows the track number currently being recorded.
Stopping recording
•
To stop recording, press the [STOP/HOME] key.
After finishing post-processing of recording ("Please Wait..." is shown on the display),
the disc stops at the last recording position.
47
CD-R/RW MASTER RECORDER CR500 (Recording)
Checking the recorded audio track
•
Press the [REC RDY] key to disable the record ready mode.
The display returns to the Home screen. You can confirm that an audio track is created,
as shown on the screen example below. The time indication shows the last recording
position.
The currently selected audio track
•
To make another recording in succession, repeat the operation above.
Note that each time you make a recording, check the recordable time and the number of
the tracks on the disc.
<Note>: If you make recordings in succession, the track
numbers are shown in the track list on the Home screen.
In the screen example on the right, six audio tracks have
been recorded in succession and the last track is now
loaded.
<Note>: With a CD-DA formatted CD-R or CD-RW disc, you can record additional
tracks to the disc until it is finalized as long as there is remaining recordable space.
After finalizing a recorded disc, you can play back the disc by a normal CD player or
export audio tracks to a Windows or Mac OS computer. Note that you cannot reformat a recorded CD-R disc.
Playing back the recorded audio track
The recorder stops at the last recording position when stopping recording. You can locate
the beginning of the audio track by either of the operations below. The following assumes
that a single audio track is recorded to a disc.
<Hint>: The CR500 has four play modes. By default, the play mode is set to "ALL PLAY".
Therefore, if there are more than one audio track is recorded, the recorder starts playback from the first track continuously.
For details about the other play mode, see "Playback/locate" described later.
[1/space] key
MEMORY
LOCATE
1
PLAY MODE
2
space
CONTRAST
4
5
GHI
USB
(KYBD ONLY)
MIN
PHONES
MAX
MIN
MAX
MIN
6
JKL
+10
MNO
SKIP/CURSOR
7
R
EXIT/NO
PUSH
MENU/ENTER/YES
EDIT TIME
REC RDY
8
PQRS
OPEN/CLOSE
POWER
DEF
CLEAR
DIR SEL
REPEAT
SHIFT
3
ABC
FILE SEL
PROGRAM SET
L
MEMORY SET
DISPLAY
ACCESS
9
TUV
0
WXYZ
symbol
REC END
ABS 0
MAX
RECORD
INPUT LEVEL
STOP/HOME
[STOP/HOME] key
PLAY
REWIND
F FWD
[REWIND] key
[PLAY] key
•
Press the [REWIND] key while holding down the [STOP/HOME] key, or press the
[1/space] key in the [MEMORY] key group.
48
CD-R/RW MASTER RECORDER CR500 (Recording)
If you press the [REWIND] key while holding down the [STOP/HOME] key, the recorder
executes the "Locate ABS 0" function to skip to the beginning of the disc and stops. If
you press the [1/space] key in the [MEMORY] key group, the recorder goes to the beginning of the audio track and automatically starts playback.
<Note>: Because the "Auto Play" menu item of the "PLAY SETUP" menu in the MENU
mode is set to "On" by default, when you press the [1/space] key in the [MEMORY]
key group, the recorder automatically starts playback after skipping to the beginning of the track (see page 84).
<Note>: When more than one audio track is recorded on a disc, if you press the
[REWIND] key while holding down the [STOP/HOME] key to execute the "Locate ABS
0" function, the recorder goes to the beginning of track 1. That is, the "Locate ABS 0"
function always locates the beginning of the disc (ABS 0), not the beginning of each
track. If you wish to select a desired audio track to be played back from among more
than one track, follow the instructions described on page 50.
•
After executing "Locate ABS 0", press the [PLAY] key to start playback.
Finalizing a disc
After finalizing a recorded CD-DA formatted disc, you can play back tracks by a normal CD
player or export tracks to a Windows or Mac OS computer. You can finalize a disc when you
eject the disc. You can also finalize a disc using the "Finalize" menu item of the "DISK
UTILITY" menu in the MENU mode (see page 92).
<Note>: You cannot make additional recordings to a disc which has been finalized.
•
While stopped, press the [OPEN/CLOSE] key.
"Un-closed track!" pops up, followed by the confirmation screen.
•
To finalize the disc, press the [ENTER/YES] key. To cancel finalizing, press the [EXIT/
NO] key.
If you press the [ENTER/YES] key, "Please Wait Finalizing track..." pops up.
After completing finalizing, the disc is ejected. Note that it takes some time for
finalizing. If you press the [EXIT/NO] key, the disc is ejected immediately.
49
CD-R/RW MASTER RECORDER CR500 (Recording)
Selecting a song to be played back
When a disc contains more than one song ("audio file" on a BWF formatted disc or "audio track"
on a CD-DA disc), you can select a desired song to be played back by any of the following three
methods.
<Method 1>: Using the [SKIP/CURSOR
] keys
If you press the [SKIP/CURSOR
] or [SKIP/CURSOR
] key, the following popup screen
appears, and the recorder skips to the beginning of the current/previous or next song and
stops. You can locate the desired track by pressing the appropriate key as many times as
required.
SKIP/CURSOR
<Note>: You can execute the operation above while stopped or during playback. If you
execute the operation during playback, the recorder automatically starts playback after
locating the specified song. If you enable the repeat function (by using the [REPEAT] key
or the "PLAY SETUP" menu in the MENU mode), the recorder repeats playback.
<Method 2>: Using the [MEMORY/ MEMORY SET ] key group
By specifying the file (track) number of a song using a key in the [MEMORY/ MEMORY SET ] key
group, the recorder locates the beginning of the song. To specify a song whose number is
two-digit, use the [CLEAR/+10] key to specify the tens digit and then press an appropriate
key among the [0] through [9] keys (see the entry examples below).
MEMORY
MEMORY SET
2
1
space
3
ABC
DEF
CLEAR
[MEMORY/ MEMORY SET ] key group
5
4
GHI
7
6
JKL
8
PQRS
+10
9
TUV
[CLEAR/+10] key
MNO
0
WXYZ
symbol
<Note>: You can execute the operation above while stopped or during playback. The
recorder automatically starts playback of the specified song. If you enable the repeat
function (by using the [REPEAT] key or the "PLAY SETUP" menu in the MENU mode), the
recorder repeats playback.
How to use the [CLEAR/+10] key
If you press the [CLEAR/+10] key once, the popup screen below left appears. Highlighted "1-" indicates the tens digit is "1". If you press the [CLEAR/+10] key again,
highlighted "1-" changes to "2-", indicating that the tens digit is "2". That is, pressing
the [CLEAR/+10] key increments the tens digit number.
<When you press the [CLEAR/+10] key once>
<When you press the [CLEAR/+10] key twice>
For example, to select track 15, press the [CLEAR/+10] key once, followed by the [5/
JKL] key in the [MEMORY/ MEMORY SET ] key group. To select track 24, press the [CLEAR/
+10] key twice, followed by the [4/GHI] key in the [MEMORY/ MEMORY SET ] key group.
50
CD-R/RW MASTER RECORDER CR500 (Recording)
<Method 3>: Using the "FILE SEL" screen
You can bring up the "FILE SEL" screen by the following two methods.
<Note>: When you select a file from the "FILE SEL" screen, the recorder does not start
playback automatically.
• Press the [FILE SEL/
DIR SEL
] key to bring up the "FILE SEL" screen directly.
While stopped, pressing the [FILE SEL/ DIR SEL ] key brings up the "FILE SEL" screen,
on which the songs on the current disc are listed. The currently selected song is
highlighted.
(The screen example below shows the "FILE SEL" screen of a BWF formatted disc.
When a CD-DA disc is set, the "FILE SEL" screen shows the track number and recording time.)
FILE SEL
DIR SEL
While the "FILE SEL" screen is shown, use the [MENU] dial (or the [SKIP/CURSOR
] keys) to select a desired song and press the [ENTER/YES] key. The display changes
to show the Home screen of the selected song and you can now play back the song.
• Go down the menu to the "FILE SEL" menu.
(1)
While stopped, press the [ENTER/YES] key.
The unit enters the menu mode. The display shows the MENU list screen.
<MENU list screen>
(2)
Use the [MENU] dial to highlight "FILE SEL
key.
" and press the [ENTER/YES]
The display shows the "FILE SEL" screen, the same one which appears by
pressing the [FILE SEL/ DIR SEL ] key as described above.
(3)
Use the [MENU] dial (or the [SKIP/CURSOR
song and press the [ENTER/YES] key.
] keys) to select a desired
The display changes to show the Home screen of the selected song and you can
now play back the song.
51
CD-R/RW MASTER RECORDER CR500 (Recording)
52
CD-R/RW MASTER RECORDER CR500 (Playback/Locate)
Chapter-6: Playback/Locate
This chapter describes playback functions of the CR500, as well as locate functions.
The CR500 can play back commercially available audio CD discs, as well as CD-R/CD-RW
discs recorded by the CR500 or other devices.
Table of contents
About play mode .............................................................................................................54
Playback in the ALL PLAY mode ...................................................................................55
Playback in the SINGLE PLAY mode ............................................................................55
Cueing/digital scrub .......................................................................................................56
Cueing ....................................................................................................................56
Digital scrub ..........................................................................................................56
Playback in the PROGRAM PLAY mode ......................................................................57
Creating the play list ............................................................................................58
Deleting a song form the play list .......................................................................60
Deleting all songs in the play list ........................................................................60
Playback in the MEMORY PLAY mode .........................................................................61
Assigning audio data to a memory ....................................................................62
Replacing the audio file in a memory bank ......................................................63
Editing a memory name ......................................................................................64
Editing the start time/end time by entering time data ...................................64
Editing the start time/end time using the digital scrub function ..................65
Deleting memory play data ................................................................................66
Playing back an ISO9660 formatted disc .....................................................................67
Locate/skip functions .....................................................................................................68
Locating an audio file (or audio track) ..............................................................68
Skipping between audio files (or audio tracks) ...............................................69
Locating the specific ABS time ............................................................................69
Locating a point by entering a time ...................................................................70
53
CD-R/RW MASTER RECORDER CR500 (Playback/Locate)
About play mode
The CR500 has four play modes. Normally, the "ALL PLAY" or "SINGLE PLAY" mode is used when
playing back a disc regardless of whether it is commercially available audio CD disc or CD-R/CDRW discs recorded by the CR500 or other devices.
You can select the desired play mode from among the ALL PLAY, SINGLE PLAY, PROGRAM PLAY
and MEMORY PLAY modes by pressing the [PLAY MODE/ PROGRAM SET ] key while stopped. See the
Home screen examples of four play modes below. The Home screen example of the PROGRAM
PLAY mode assumes that there are entries in the play list. Similarly, the Home screen example of
the MEMORY PLAY assumes that some memory banks have entries.
<Note>: If you select "MEMORY PLAY" while no memory bank has an entry, the Home
screen looks like the one below and you cannot execute playback. See page 62 for
details about how to add an entry to a memory bank.
<Note>: If you select "PROGRAM PLAY" when the play list is not saved, the display
shows "No Play List!" and returns to the ALL PLAY" mode. See page 58 for details
about how to create a play list.
PLAY MODE
[PLAY MODE/ PROGRAM SET ] key
PROGRAM SET
MEMORY
LOCATE
2
1
space
CONTRAST
PLAY MODE
5
4
R
GHI
(KYBD ONLY)
MIN
PHONES
MAX
MIN
MAX
MIN
6
JKL
EXIT/NO
PUSH
MENU/ENTER/YES
+10
MNO
SKIP/CURSOR
8
PQRS
OPEN/CLOSE
USB
EDIT TIME
REC RDY
7
POWER
DEF
CLEAR
DIR SEL
REPEAT
SHIFT
3
ABC
FILE SEL
PROGRAM SET
L
MEMORY SET
DISPLAY
ACCESS
9
TUV
0
WXYZ
symbol
REC END
ABS 0
MAX
RECORD
INPUT LEVEL
<Home screen of the ALL PLAY mode>
<Home screen of the MEMORY PLAY mode>
STOP/HOME
PLAY
REWIND
F FWD
<Home screen of the SINGLE PLAY mode>
<Home screen of the PROGRAM PLAY mode>
<Hint>: You can also select the play mode using the "Play Mode" menu item of the "PLAY
SETUP" menu in the MENU mode (see page 83).
54
CD-R/RW MASTER RECORDER CR500 (Playback/Locate)
Playback in the ALL PLAY mode
In the ALL PLAY mode, while the Home screen is shown, pressing the [PLAY] key starts playback of
all songs on a disc continuously. When finishing playback of the last song, the CR500 stops at the
end of the last song. (If you wish to play back tracks in a desired order, use the "PROGRAM PLAY"
mode.)
<Home screen of the ALL PLAY mode>
<Hint 1>: By enabling the repeat function, you can repeat playback of all songs until you press the
[STOP/HOME] key. You can enable or disable the repeat function by pressing the [REPEAT] key or
by using the "Repeat" menu item of the "PLAY SETUP" menu in the MENU mode (see page 83).
<Hint 2>: You can select the song from which playback starts in either of the following methods.
(1)
(2)
(3)
Use the numeric keys in the [MEMORY/ MEMORY SET ] key group and the [CLEAE/+10] key to enter
the desired track number (see pages 50 and 68).
] keys (see pages 50 and 69).
Use the [SKIP/CURSOR
Select a desired song on the "FILE SEL" screen (see page 51).
<Note>: If you select a song other than the first one as the song from which playback starts,
the previous songs prior to the selected song are not played back. For example, if you
select "05" on the screen above, only tracks (files) 05 through 15 are played back. Regardless of which song you start from, the recorder stops at the end of the last song after
finishing playback of the last song. By default, the "Auto Play" menu item of the "PLAY
SETUP" menu in the MENU mode is set to "On", so if you select a song by using a key in the
[MEMORY/ MEMORY SET ] key group, the recorder automatically starts playback of the selected
song.
Playback in the SINGLE PLAY mode
In the SINGLE PLAY mode, while the Home screen is shown, pressing the [PLAY] key starts playback of the song currently selected.
<Home screen of the SINGLE PLAY mode>
<Hint 1>: By enabling the repeat function, you can repeat playback of the current song until you
press the [STOP/HOME] key. You can enable or disable the repeat function by pressing the [REPEAT] key or by using the "Repeat" menu item of the "PLAY SETUP" menu in the MENU mode (see
page 83).
<Hint 2>: You can select the song to be played back in either of the following methods.
(1)
(2)
(3)
Use the numeric keys in the [MEMORY/ MEMORY SET ] key group and the [CLEAE/+10] key to enter
the desired track number (see pages 50 and 68).
] keys (see pages 50 and 69).
Use the [SKIP/CURSOR
Select a desired song on the "FILE SEL" screen (see page 51).
By default, the "Auto Play" menu item of the "PLAY SETUP" menu in the MENU mode is set to "On",
so if you select a song by using a key in the [MEMORY/ MEMORY SET ] key group, the recorder automatically starts playback of the selected song.
55
CD-R/RW MASTER RECORDER CR500 (Playback/Locate)
Cueing/digital scrub
Cueing
In the cueing mode, you can cue forward or backward at up to three times the normal
speed.
<Note>: The maximum cueing speed depends on the recording Fs/bit of a playback disc.
During playback, you can cue forward or backward by pressing the [F FWD] or [REWIND] key.
To return to the normal playback, press the [PLAY] key.
<Forward cueing>
<Backward cueing>
<Note>: Cueing is possible in “ALL PLAY”, “SINGLE PLAY” and “PROGRAM PLAY”
mode.
Digital scrub
The digital scrub function allows you to scrub audio.
When the recorder is stopped, pressing the [PLAY] key while holding down the [STOP]
key enters the scrub mode, and the display changes to show the waveform screen as
below. In this mode, you can scrub forward or backward in 10 milliseconds step using
the [MENU] dial.
<Waveform screen in the scrub mode>
<Note>: To exit the scrub mode, press any one of the [STOP/HOME] key, [PLAY]
key, [EXIT/NO] key and [ENTER/YES] key. If you exit the scrub mode by pressing
on the
the [ENTER/YES] key, the time data at the scrub point (pointed by
waveform screen) is stored to the [LOCATE/ EDIT TIME ] key. Therefore, pressing the
[LOCATE/ EDIT TIME ] key locates the scrub point.
<Note>: Cueing is possible in “ALL PLAY”, “SINGLE PLAY” and “PROGRAM PLAY”
mode.
56
CD-R/RW MASTER RECORDER CR500 (Playback/Locate)
Playback in the PROGRAM PLAY mode
In the PROGRAM PLAY mode, while the Home screen is shown, pressing the [PLAY] key starts
playback of the songs in the order of the play list. You can select the play mode which is only
effective in the PROGRAM PLAY mode between "ALL PLAY" and "SINGLE PLAY" (see page 59).
To make playback possible in the PROGRAM PLAY mode, the play list must be set in advance
(see below).
<Home screen of the PROGRAM PLAY mode>
<Hint 1>: By enabling the repeat function, you can repeat playback until you press
the [STOP/HOME] key. You can enable or disable the repeat function by pressing
the [REPEAT] key or by using the "Repeat" menu item of the "PLAY SETUP" menu in
the MENU mode (see page 83).
<Hint 2>: You can select the song from which playback starts in either of the following methods.
(1)
(2)
(3)
Use the numeric keys in the [MEMORY/ MEMORY SET ] key group and the [CLEAE/+10]
key to enter the desired track number (see pages 50 and 68).
] keys (see pages 50 and 69).
Use the [SKIP/CURSOR
Select a desired song on the "FILE SEL" screen (see page 51).
<Note>: If you select a song other than the first step (program number 01) in the
play list as the song from which program playback starts, the songs in the play
list prior to the selected song are not played back. For example, if you select "05"
on the screen above, only songs in program numbers 05 through 15 are played
back. Songs in program numbers 01 through 04 are not played back. Regardless
of which program number you start from, the recorder stops at the end of the
last song when finishing playback of the last song.
By default, the "Auto Play" menu item of the "PLAY SETUP" menu in the MENU
mode is set to "On", so if you select a song by using a key in the [MEMORY/
MEMORY SET ] key group, the recorder automatically starts playback of the selected
song.
<Notes>
The following are notes on using method (1) above for selecting a song,
• If you attempt to select a non-existing track number, "Illegal No. xx" (xx is the
number you select) is shown and the operation is cancelled.
• If the same song is used in the play list more than once, selecting the song
selects the one assigned to the youngest program number in the list. For
example, let's assume that the play list has following five entries in program
number order: 02, 05, 08, 02, and 07. If you press the [2/ABC] key in the
[MEMORY/ MEMORY SET ] key group, 02 of program number 1 is selected.
Therefore, to select 02 of program number 4, use method (2) or (3).
<Note>: You can store the play lists for 100 discs to the CR500 system memory. If
you attempt to store a play list for a new disc when play lists for 100 discs are
already stored, the CR500 deletes the oldest play list and stores the new play list.
However, if you reload a disc whose play list has been deleted as in the case above,
its play list is automatically stored as the newest list.
<Note>: By executing the "Sys Initial Memory" item of the "SYS SETUP" menu in the
MENU mode, all play lists are reset (see page 80).
57
CD-R/RW MASTER RECORDER CR500 (Playback/Locate)
Creating the play list
The description below assumes that a BWF formatted disc on which more than one WAV file
is recorded is loaded. However, it is also applicable to a CD-DA formatted disc on which more
than one audio track is recorded.
<Note>: You can also access to the screen for setting the play list using the "PROGRAM SET" menu in the MENU mode. To do this, follow the procedure below.
1)
1)
While stopped, press the [ENTER/YES] key.
The unit enters the menu mode. The display shows the MENU list screen.
2)
Use the [MENU] dial to highlight "PROGRAM SET " and press the [ENTER/YES]
key.
The display shows the screen for setting the play list for program playback.
For the procedure afterwards, see the next page.
Press the [SHIFT] key to turn on the Shift
mode, and press the [PLAY MODE] key.
<Note>: To cancel setting, press the
[CLEAR/+10] key while the program
number of which you want to cancel
the setting is highlighted (see page
60).
The display shows the screen for setting the
play list.
4)
2)
The display changes to show the song list
screen, as step 2) above.
Press the [ENTER/YES] key.
The display changes to show the song list
screen.
3)
Use the [MENU] dial to move the cursor to
"02" and press the [ENTER/YES] key.
Use the [MENU] dial to select a desired song
and press the [ENTER/YES] key.
The selected song is set to program number
01. (In the screen example below, file 03 is
set.)
5)
Use the [MENU] dial to select a desired song
and press the [ENTER/YES] key, as with step
3) above.
The selected song is set to program
number 02. Repeat steps 4) and 5) until
all desired songs are set to the play list.
58
CD-R/RW MASTER RECORDER CR500 (Playback/Locate)
6)
To insert a song between songs in the
play list:
The currently selected play mode flashes and
you can now select the mode (the default is
ALL).
The play mode set here is only effective in
the PROGRAM PLAY mode. You can select
between ALL and SINGLE.
To insert a song between program numbers 01 and 02 in the play list, for example;
1)
Move the cursor to "<PLAY MODE>" and
press the [ENTER/YES] key.
Move the cursor to program
number 02 and press the
[ENTER/YES] key.
7)
ALL
Continuously plays back songs
in the play list in program number order.
SINGLE
Plays back only the selected
song.
Use the [MENU] dial to select the play mode
and press the [ENTER/YES] key.
The play mode is set and the display returns
to the previous screen.
2)
Select a desired song to be
inserted from the song list
screen and press the [ENTER/
YES] key.
8)
Use the [MENU] dial to move the cursor to
"<SAVE>" and press the [ENTER/YES] key.
The play list is created and the display
returns to the Home screen shown before
starting play list setting.
The selected song (example: 04
SCENE_004.wav) is inserted
between the songs previously set
to program numbers 01 and 02.
To check the play list created, press the
[PLAY MODE/ PROGRAM SET ] key until the PROGRAM PLAY mode is selected.
If you insert a song to the list which
has been saved, you need to save
the list again.
After setting all desired song to the play
list, select the play mode for PROGRAM
PLAY.
59
The play list created is saved to the CR500
memory. If you load the same disc later
and select the PROGRAM PLAY mode, the
play list previously created is effective.
CD-R/RW MASTER RECORDER CR500 (Playback/Locate)
Deleting a song form the play list
Deleting all songs in the play list
You can delete a song from the play list.
The following description assumes that some
songs are set to the play list and the Home
screen of the PROGRAM PLAY mode is shown.
You can delete a song from the play list.
The following description assumes that some
songs are set to the play list and the Home
screen of the PROGRAM PLAY mode is shown.
1)
1)
Press the [SHIFT] key to turn on the Shift mode,
and press the [PLAY MODE/ PROGRAM SET ] key.
The display shows the play list screen on
which some songs are set.
2)
Use the [MENU] dial to move the cursor to
the song you want to delete, and press the
[CLEAR/+10] key.
The display shows the play list screen on
which some songs are set.
2)
Use the [MENU] dial to move the cursor to
"<ALL CLEAR>", and press the [CLEAR/
+10] key.
All songs in the play list are deleted and the
display changes to shown the play list screen
with no entry, as shown below.
The example below shows how the screen
changes when track 05 which is set to program number (PN) 03 is deleted. You can
see that track 02 which is set after the deleted track moves up.
3)
3)
Press the [SHIFT] key to turn on the Shift mode,
and press the [PLAY MODE/ PROGRAM SET ] key.
Move the cursor to "<SAVE>" and press the
[ENTER/YES] key.
Move the cursor to "<SAVE>" and press the
[ENTER/YES] key.
The display changes to show the Home
screen of the PROGRAM PLAY mode. You can
see that the play list now has no entry as
shown in the screen example below.
The edited play list is saved and reflected to
the Home screen of the PROGRAM PLAY
mode. You can see that track 05 on program
number 03 has been deleted in the screen
example below.
<Note>: After you edit the play list, do not for<Note>: After you edit the play list, do not forget to execute the save operation (select
"<SAVE>" and press the [ENTER/YES] key). If you
exit the "PROGRAM SET" menu without executing the save operation, editing is not reflected
to the play list.
get to execute the save operation (select
"<SAVE>" and press the [ENTER/YES] key). If you
exit the "PROGRAM SET" menu without executing the save operation, editing is not reflected to
the play list.
60
CD-R/RW MASTER RECORDER CR500 (Playback/Locate)
Playback in the MEMORY PLAY mode
While the Home screen of the MEMORY PLAY mode is shown, pressing a numeric key in the
[MEMORY] key group instantly starts playback of audio data which is assigned to the corresponding memory bank (instant start function).
In the MEMORY PLAY mode, you can starts playback of the selected song from the desired start
time and ends playback at the desired end time. To execute playback in the MEMORY PLAY mode,
you need to assign a song to at least one memory bank (see below).
Executing MEMORY PLAY (instant start)
<Home screen of the MEMORY PLAY mode>
While the Home screen of the MEMORY PLAY mode as above is shown, pressing a
numeric key in the [MEMORY] key group instantly starts playback of audio data
which is set to the corresponding memory bank (instant start function). The following shows the example when the [3/DEF] key in the [MEMORY] key group is
pressed.
MEMORY
1
MEMORY SET
2
space
3
ABC
DEF
CLEAR
[MEMORY] key group
4
5
GHI
7
6
JKL
8
PQRS
+10
MNO
9
TUV
0
WXYZ
symbol
<Note>: In the MEMORY PLAY mode, unlike other modes, you cannot use the
repeat and auto play functions.
<Note>: You can store memory play data for 100 discs to the CR500 system memory.
If you attempt to store a memory play data for a new disc when memory play data
for 100 discs are already stored, the CR500 deletes the oldest memory play data
and stores the new memory play data. However, if you reload a disc whose memory
play data has been deleted as in the case above, its memory play data is automatically stored as the newest memory play data.
<Note>: By executing the "Sys Initial Memory" item of the "SYS SETUP" menu in the
MENU mode, all memory play data are reset (see page 80).
61
CD-R/RW MASTER RECORDER CR500 (Playback/Locate)
Assigning audio data to a memory
The description below assumes that a BWF formatted disc on which more than one WAV file is
recorded is loaded, however, it is basically also applicable to a CD-DA formatted disc.
1)
By default, the file name of the selected audio file is used as the “memory name”, while
the start time (00m00s000ms) and end time
of the audio file are set as the start time and
end time of the memory entry respectively.
Press the [PLAY MODE/ PROGRAM SET ] key
until the MEMORY PLAY mode is selected.
The display shows the Home screen of the
MEMORY PLAY mode. All memory banks (1
through 10) are empty by default.
You can also select the MEMORY PLAY mode
to bring up this screen using the "Play Mode"
item of the "PLAY SETUP" menu in the MENU
mode (see page 81).
2)
Press the [SHIFT] key to turn on the Shift
mode, and specify the memory bank to
which you want to assign audio data by
pressing the corresponding numeric key in
the [MEMORY] key group.
<Note>: Before executing the save operation, you can edit the memory name,
as well as playback start time and end
time. However, in the procedure example here, we leave them as default.
See the following pages for details about
how to edit a memory name and the
start/end time.
For example, if you press the [1/space] key,
the display changes to show the setting
screen for memory bank 1 (MEMORY 1).
5)
While "<SAVE>" is highlighted, press the
[ENTER/YES] key.
The setting completes and the display
returns to the Home screen on which you
can see the file is assigned to MEMORY 1.
3)
While "[TNO]" is highlighted, press the
[ENTER/YES] key.
The display changes to show the audio file
list screen for selecting an audio file.
4)
Repeat the procedure as many times as required until desired audio files are assigned
to memory banks. You can assign up to 10
audio files to memory banks.
In the following screen example, all memory
banks (1 through 9 and 0) have audio data.
With a CD-DA disc, a track number is shown
in the name field.
Use the [MENU] dial to select a desired
audio file and press the [ENTER/YES] key.
The display returns to the MEMORY 1
setting screen. The selected audio file is
assigned to MEMORY 1 and "<SAVE>" is
highlighted.
62
CD-R/RW MASTER RECORDER CR500 (Playback/Locate)
<Note>: Up to 10 memory play data can be set to the memory banks per disc. When you
reload a disc whose files have been assigned to the memory banks, its memory play
data is automatically recalled.
The flash memory of the CR500 can have memory play data for up to 100 discs. If you
attempt to store memory play data for a new disc when memory play data for 100 discs
are already stored, the CR500 deletes the oldest memory play data and stores the new
memory play data.
Replacing the audio file in a memory bank
You can replace the audio file in a memory bank with another file.
The following description assumes that one or more memory banks have audio data and the
display shows the Home screen of the MEMORY PLAY mode.
1)
Press the [SHIFT] key to turn on the Shift
mode, and specify the memory bank of
which you want to replace the audio file by
pressing the corresponding numeric key in
the [MEMORY] key group.
For example, if you press the [1/space] key,
the display changes to show the setting
screen for memory bank 1 (MEMORY 1).
2)
While "[TNO]" is highlighted, press the
[ENTER/YES] key.
The display changes to show the audio file
list screen for selecting an audio file.
3)
Use the [MENU] dial to select a desired
audio file and press the [ENTER/YES] key.
The audio file currently assigned to memory
bank 1 is replaced with the newly selected
audio file.
To replace the audio file of another memory
bank, repeat the same procedure.
63
4)
After you finish replacing the audio file(s),
use the [MENU] dial to move the cursor to
"<SAVE>" and press the [ENTER/YES] key.
The new memory play data is saved, and
the display returns to the Home screen of
the MEMORY PLAY mode.
<Note>: Do not forget to execute the
save operation. Otherwise, the editing is cancelled.
CD-R/RW MASTER RECORDER CR500 (Playback/Locate)
Editing a memory name
By default, the original file name is set as the memory name in a memory bank. You can edit this
name. The following description assumes that at lease one memory bank has audio data and the
display shows the Home screen of the MEMORY PLAY mode.
1)
Press the [SHIFT] key to turn on the Shift
mode, and specify the memory bank you
want to edit by pressing the corresponding
numeric key in the [MEMORY] key group.
For example, if you press the [1/space] key,
the display changes to show the setting
screen for memory bank 1 (MEMORY 1).
flashing
3)
Use the [SKIP/CURSOR
] keys to move
the cursor point (flashing point).
Use the numeric ([MEMORY]) keys or [MENU]
dial to select the desired character of the
flashing point.
Pressing the [CLEAR/+10] key deletes the
immediate right character of the flashing
point.
Therefore, by pressing the [CLEAR/+10] key
repeatedly when the leftmost character
flashes, you can delete the whole current
name.
4)
2)
Move the cursor to "[NAME]" and press the
[ENTER/YES] key.
The rightmost digit of the current memory
name starts flashing and you can now edit
the name.
Edit the memory name.
After entering the desired name, press the
[ENTER/YES] key.
The old name is replaced with the new name.
5)
After editing, move the cursor to "<SAVE>"
and press the [ENTER/YES] key.
The display returns to the Home screen of
the MEMORY PLAY mode.
<Note>: Do not forget to execute the
save operation above. Otherwise, the
editing is cancelled.
Editing the start time/end time by entering time data
By default, the selected song is played back from the beginning to the end of the file when
MEMORY PLAY is executed by pressing a numeric key.
You can, however, edit the playback start time and end time by entering desired time data (or
using digital scrub function, as described on the next page).
The following description assumes that one or more memory banks have audio data and the
display shows the Home screen of the MEMORY PLAY mode.
1)
Press the [SHIFT] key to turn on the Shift
mode, and specify the memory bank whose
data you want to edit by pressing the corre
sponding numeric key in the [MEMORY] key
group.
For example, if you press the [1/space] key,
the display changes to show the setting
screen for memory bank 1 (MEMORY 1).
2)
Move the cursor to "[START]" or "[END]"
and press the [ENTER/YES] key.
To edit the playback start time, select
"[START]".
To edit the playback end time, select "[END]".
64
CD-R/RW MASTER RECORDER CR500 (Playback/Locate)
<Example when you select "[START]">
3)
Use the numeric ([MEMORY]) keys or
[MENU] dial to enter the desired number.
Use the [SKIP/CURSOR
]] keys to
move the cursor point (flashing point).
Use the numeric ([MEMORY]) keys or [MENU]
dial to enter the desired value of the
flashing point.
By pressing the [CLEAR/+10] key repeatedly,
you can reset time to 00m00s000ms.
flashing
4)
After entering the desired time, press the
[ENTER/YES] key.
The start (or end) time is replaced with the
new value.
5)
<Example when you select "[END]">
After editing, move the cursor to "<SAVE>"
and press the [ENTER/YES] key.
The display returns to the Home screen of
the MEMORY PLAY mode.
<Note>: Do not forget to execute the
save operation above. Otherwise, the
editing is cancelled.
flashing
Editing the start time/end time using the digital scrub function
You can edit the playback start time and end time by using digital scrub function.
The following description assumes that one or more memory banks has audio data and the display shows the Home screen of the MEMORY PLAY mode.
1)
Press the [SHIFT] key to turn on the Shift mode,
and specify the memory bank whose data you
want to edit by pressing the corresponding
numeric key in the [MEMORY] key group.
To edit the playback start time, select
"<SCRUB-S>".
To edit the playback end time, select
"<SCRUB-E>".
For example, if you press the [1/space] key,
the display changes to show the setting
screen for memory bank 1 (MEMORY 1).
Pressing the [ENTER/YES] key brings up the
waveform screen of audio data.
While this screen is shown, you can scrub
audio for fine adjustment of time using the
[MENU] dial.
" " on the screen indicates the playback
start (or end) time.
<Example when you select "<SCRUB-S>">
2)
Move the cursor to "<SCRUB-S>" or
"<SCRUB-E>", and press the [ENTER/YES]
key.
65
CD-R/RW MASTER RECORDER CR500 (Playback/Locate)
<Example when you select "<SCRUB-E>">
3)
Use the [MENU] dial to scrub forward or
backward for adjusting the start (or end) point.
At a point where audio is recorded, You can
hear the scrubbing sound.
4)
After adjusting the start (or end) point, press
the [ENTER/YES] key.
The time of the point replaces the start (or
end) time and is shown in the "[START]" (or
"[END]") field.
5)
3)
After editing, move the cursor to "<SAVE>"
and press the [ENTER/YES] key.
The display returns to the Home screen of
the MEMORY PLAY mode.
Use the [MENU] dial to scrub forward or
backward for adjusting the start (or end) point.
<Note>: Do not forget to execute the
save operation above. Otherwise, the
editing is cancelled.
At a point where audio is recorded, You can
hear the scrubbing sound.
Deleting memory play data
You can delete data in a memory bank. The following description assumes that one or more
memory banks have audio data and the display shows the Home screen of the MEMORY PLAY
mode. <Note>: You cannot delete whole memory play data of a disc at once.
1)
Press the [SHIFT] key to turn on the Shift
mode, and specify the memory bank whose
data you want to edit by pressing the
corresponding numeric key in the [MEMORY]
key group.
3) After editing, move the cursor to "<SAVE>" and
press the [ENTER/YES] key.
The display returns to the Home screen of the
MEMORY PLAY mode. The memory bank whose data
has been deleted shows "-------".
For example, if you press the [1/space] key,
the display changes to show the setting
screen for memory bank 1 (MEMORY 1).
2)
<Note>: Do not forget to execute the
save operation above.
To assign new audio data to the
memory bank whose data has been deleted, follow the procedure described
above.
Use the [MENU] dial to move the cursor to
"<CLEAR>" and press the [ENTER/YES] key.
Data in MEMORY 1 is cleared.
The screen shows MEMORY 1 is now blank and
the cursor automatically moves to <SAVE>.
<Note>: If you attempt to execute
MEMORY PLAY (Instant start) of an
empty memory bank, "Memory 1 No
Entry" appears and the operation is
cancelled.
66
CD-R/RW MASTER RECORDER CR500 (Playback/Locate)
Playing back an ISO9660 formatted disc
You can play back an audio file (WAV file) on an ISO9660 formatted disc recorded by a computer
by selecting the root or a directory. The procedure example below assumes that an ISO9660
formatted disc which has the directory hierarchy as shown below is loaded.
Root
abwff
******
cbwff
******
bwf1
<Note>: The CR500 displays the directory
hierarchy from the root to the third level
folders (32 at maximum) and you can select a desired directory.
In the hierarchy example on the left, you
can select from among seven directories
(the root and six folders).
******
By selecting the root or a desired directory
and creating the audio file table, you can
play back a WAV file recorded on an
ISO9660 formatted disc.
#####001.wav
#####002.wav
#####003.wav
1)
Set an ISO9660 formatted disc to the disc
tray and close the tray.
The CR500 recognizes that an ISO9660
formatted disc is loaded and brings up the
directory select screen as below.
<Note>: To select another directory (or
root), carry out either of the following
operations.
•
While the display shows the Home screen
as shown on the left, press the [SHIFT] key
to turn on the Shift mode, and press the
[FILE SEL/ DIR SEL ] key.
The display changes to show the directory
select screen as shown on the left, on which
you can select the root or a directory.
2)
Use the [MENU] dial to select the root (or a
directory) and press the [ENTER/YES] key.
The audio file table of the root (or a
directory) is created and the display returns
to the Home screen.
•
While the display shows the Home screen
as shown on the left, press the [ENTER/
YES] key to enter the menu mode and use
the [MENU] dial to select "DIRECTORY SEL
", then press the [ENTER/YES] key.
The display changes to show the directory
select screen as shown on the left, on which
you can select the root or a directory.
3)
Pressing the [PLAY] key starts playback
from the first file on the audio file table.
You can use various playback functions as
with a disc recorded by the CR500.
67
CD-R/RW MASTER RECORDER CR500 (Playback/Locate)
Locate/skip functions
The CR500 provides versatile locate/skip functions.
Locating an audio file (or audio track)
When more than one song is recorded on a CD-R/RW disc, you can immediately locate
the beginning of a song.
While the recorder is stopped, pressing a numeric key of the [MEMORY/ MEMORY SET ] key
group locates the beginning of a corresponding numbered song. To specify a file (track)
numbered over 10, use also the [CLEAR/+10] key.
MEMORY
MEMORY SET
2
1
space
3
ABC
DEF
CLEAR
[MEMORY/ MEMORY SET ] key group
5
4
GHI
7
6
JKL
8
PQRS
+10
9
TUV
[CLEAR/+10] key
MNO
0
WXYZ
symbol
While track 01 is selected, pressing the [5/JKL] key in the [MEMORY/ MEMORY SET ] key
group locates the beginning of track 05 and starts playback.
To locate a track numbered over 10, press the [CLEAR/+10] key, followed by an
appropriate key in the [MEMORY/ MEMORY SET ] key group.
If you press the [CLEAR/+10] key once, the popup screen below left appears, highlighted "1-" indicates the tens digit is "1". If you press the [CLEAR/+10] key again,
highlighted "1-" changes to "2-", indicating that the tens digit is "2".
That is, pressing the [CLEAR/+10] key increments the tens digit number.
Press the [CLEAR/+10] key twice
Press the [CLEAR/+10] key once
For example, to select a track between 10 and 19, press the [CLEAR/+10] key once,
followed by the appropriate key in the [MEMORY/ MEMORY SET ] key group. To select a
track between 20 and 29, press the [CLEAR/+10] key twice, followed by the appropriate key in the [MEMORY/ MEMORY SET ] key group.
<Note>: The locate function above is available when the play mode is selected to
"ALL PLAY", "SINGLE PLAY" and "PROGRAM PLAY". In the "MEMORY PLAY" mode,
pressing a numeric key of the [MEMORY/ MEMORY SET ] key group executes the memory
play function.
<Note>: Because the "Auto Play" menu item of the "PLAY SETUP" menu in the
MENU mode is set to "On" by default, the recorder automatically starts playback
after locating the specified point. If you want to change "Auto Play" setting, see
page 84.
68
CD-R/RW MASTER RECORDER CR500 (Playback/Locate)
Skipping between audio files (or audio tracks)
When more than one song is recorded on a CD-R/RW disc, you can immediately skip to
the beginning of a desired song.
] or [SKIP/CURSOR
]
While the recorder is stopped, pressing the [SKIP/CURSOR
key skips to the beginning of the next or current/previous song. Therefore, you can skip
] key as many
to the desired song by pressing the appropriate [SKIP/CURSOR
times as required.
SKIP/CURSOR
[SKIP/CURSOR
] key
The following shows how the display changes by pressing the [SKIP/CURSOR
key once to skip to the second song while the first song is selected.
]
<Note>: The skip function above is always available regardless of the play mode.
<Note>: If you press the [SKIP/CURSOR
] or [
] key during playback, playback automatically starts from the beginning of the selected song.
Locating the specific ABS time (Locate ABS 0/Locate REC END)
Pressing the [REWIND] key while holding down the [STOP/HOME] key immediately locates the beginning of the current disc ("Locate ABS 0" function).
Pressing the [F FWD] key while holding down the [STOP/HOME] key immediately locates
the record end position of the current disc ("Locate REC END" function).
<Note>: With the "Locate ABS 0" and "Locate REC END" functions, you cannot select
an audio file (or audio track) individually. To select a file (or track) individually, use
the [SKIP/CURSOR
] key as described above or use other methods describes
in "Selecting a song to be played back" on page 51.
69
CD-R/RW MASTER RECORDER CR500 (Playback/Locate)
Locating a point by entering a time
By entering a time, you can immediately locate the corresponding point
Depending on the current time mode, you can specify the point by the disc elapsed time
or track elapsed time.
1,3 1
2
MEMORY
LOCATE
2
1
space
CONTRAST
PLAY MODE
FILE SEL
PROGRAM SET
DIR SEL
REPEAT
USB
(KYBD ONLY)
MIN
PHONES
MAX
MIN
MAX
MIN
EDIT TIME
PUSH
MENU/ENTER/YES
CLEAR
GHI
6
JKL
+10
MNO
SKIP/CURSOR
8
7
PQRS
OPEN/CLOSE
POWER
DEF
REC RDY
R
9
TUV
0
WXYZ
symbol
REC END
ABS 0
MAX
RECORD
INPUT LEVEL
PLAY
STOP/HOME
REWIND
2
1)
EXIT/NO
SHIFT
3
ABC
5
4
L
MEMORY SET
DISPLAY
ACCESS
2
F FWD
2
While the recorder is stopped or during playback, press the [SHIFT] key to turn on the Shift
mode, and press the [LOCATE/ EDIT TIME ] key.
The current time is captured and the popup screen for editing time is shown.
flashing
<Note>: The time information area on the screen shows the captured time in the
current time mode (the disc elapsed time or track elapsed time).
2)
Use the [MENU] dial (or the numeric keys) to enter the desired time.
You can use the cursor position by using the [SKIP/CURSOR
] keys.
You can reset the time on the screen to "000m 00s 000ms" by pressing the [CLEAR/+10]
key. You can enter a time within the range between "000m 00s 000ms" and "999m 59s
999ms".
<Note>: If you enter an illegal time and attempt to locate the corresponding
point, the display shows "Out of Zone!" and the operation is rejected. Enter a
legal value.
3)
After entering the time, press the [LOCATE/
EDIT TIME
] key.
The recorder immediately locates the corresponding point and stops.
<Note>: When you press the [LOCATE/ EDIT TIME ] key in step 3) above, the time is
stored to the [LOCATE/ EDIT TIME ] key. Therefore, next time you press the [LOCATE/ EDIT TIME ] key, you can locate the same point. The stored time is effective
until you edit the time by the steps above.
<Note>: If you have never executed the locate function using the [LOCATE/
EDIT TIME ] key, pressing the [LOCATE/ EDIT TIME ] key locates the beginning of the
disc.
70
CD-R/RW MASTER RECORDER CR500 (MENU mode: SYSTEM SETUP menu)
Chapter-7: MENU mode
Table of contents
About MENU mode .........................................................................................................72
SYS SETUP menu ...........................................................................................................73
Basic procedure for using the “SYS SETUP” menu ...........................................74
Default file name setting [Default File Name] ..................................................75
Input selections [Select Input] ............................................................................76
Digital output signal format selection [Digital In] ...........................................77
Peak hold time setting [Peak Hold] ....................................................................77
Reference level setting [Ref. Level] .....................................................................78
USB keyboard type setting [Keyboard Sel] .......................................................78
Saving SYS SETUP data [Sys User Save] ..............................................................79
Loading SYS SETUP data [Sys User Load] ...........................................................79
Initializing system memory data [Sys Default Set] ..........................................80
Initializing flash memory [Sys Initial Memory] ...............................................80
ROM version checking [Version] ........................................................................81
PLAY SETUP menu .........................................................................................................82
Basic procedure for using the “PLAY SETUP” menu ........................................82
Play mode selection [Play Mode] ........................................................................83
Repeat mode on/off [Repeat] .............................................................................83
Auto play mode on/off [Auto Play] ...................................................................84
Auto play on/off when powered on [Power On Play] ......................................84
DISK UTILITY menu ........................................................................................................85
Formatting a disc [Format] .................................................................................86
Rewriting the file system [Rewrite File Sys] ......................................................88
Editing a file name [Edit File Name] ...................................................................89
Deleting an unnecessary audio file [Delete File] ..............................................90
Restoring a deleted audio file [Restore Del. File] .............................................91
Finalizing a disc [Finalize] ...................................................................................92
71
CD-R/RW MASTER RECORDER CR500 (MENU mode: SYSTEM SETUP menu)
About MENU mode
In the MENU mode, various essential setting menus and execution menus are available.
While the recorder is stopped, pressing the [ENTER/YES] key enters the MENU mode and
the display shows the MENU list screen. There are six menus in the MENU list. You can
select a desired menu using the [MENU] dial.
This chapter describes "SYS SETUP", "PLAY SETUP" and "DISK UTILITY" menus. For
details of the other menus, see the appropriate pages indicated on the table below.
MEMORY
LOCATE
2
1
space
CONTRAST
PLAY MODE
FILE SEL
PROGRAM SET
DIR SEL
REPEAT
(KYBD ONLY)
MAX
PHONES
MIN
MAX
MIN
6
JKL
EXIT/NO
PUSH
MENU/ENTER/YES
+10
MNO
SKIP/CURSOR
8
PQRS
OPEN/CLOSE
MIN
USB
EDIT TIME
CLEAR
GHI
7
POWER
DEF
REC RDY
R
SHIFT
3
ABC
5
4
L
MEMORY SET
DISPLAY
ACCESS
9
TUV
0
WXYZ
symbol
REC END
ABS 0
MAX
RECORD
INPUT LEVEL
STOP/HOME
PLAY
REWIND
F FWD
[ENTER/YES] key
/[MENU] dial
Main menu name
Contents
SYS SETUP menu
This menu has 12 menu items for setting preferences (see the next and
following pages).
PLAY SETUP menu
This menu has four menu items regarding playback modes and functions. Among the four menu items, the "Play Mode" and "Repeat" menu
items can be also accessed from the [PLAY MODE] and [REPEAT] keys
respectively.
DISK UTILITY menu
This menu has six menu items regarding a disc (CD-R/RW disc) or files.
You can format a disc, store the file system, edit an audio file name,
delete an unnecessary audio file, and restore a deleted audio file. (Note
that you cannot edit, delete or restore a file with a CD-DA formatted
disc.)
FILE SEL menu
This menu allows you to select an audio file (or audio track). You can
directly enter this menu simply by pressing the [FILE SEL] key on the
panel (see page 51 for details).
DIRECTORY SEL menu
The menu shows the directory hierarchy screen from the root to the third
level, and you can select the desired directory. You can directly enter
this menu by pressing the [SHIFT] key to activate the Shift mode, followed by the [FILE SEL] key (see page 67 for details).
PROGRAM SET menu
The menu create the play list for executing program playback. You can
directly enter this menu by pressing the [SHIFT] key to activate the Shift
mode, followed by the [PLAY MODE] key (see page 58 for details).
72
CD-R/RW MASTER RECORDER CR500 (MENU mode: SYSTEM SETUP menu)
SYS SETUP menu
In the SYS SETUP menu, 12 menu items are available. The following table shows each
menu item name and available values (or action), as well as the default setting.
<Note>: This section explains all the menu items except "Adjust RTC". For the details
about "Adjust RTC" menu item, see "Setting the realtime clock" on page 14.
Available value or action
Menu item
Default file name
Default
File name mode
Date, Take, Reel
Take
Scene Name
Up to 19 characters can be entered.
SCENE
Take Number
001 to 999
001
Select input
Analog, Digital
Analog
Digital out
AES/EBU, S/P DIF
AES/EBU
Peak hold
0sec. to 9sec.
3sec.
Ref. level
-12dB, -20dB
-12dB
Keyboard Sel
US, JAPAN
US
Sys User Save
Saves the current system settings of the SYS SETUP and PLAY
SETUP menu items to the user system memory.
-
Sys User Load
Loads the user system memory.
-
Sys Default Set
Initializes the system settings of the SYS SETUP and PLAY SETUP
menu items.
-
Sys Initial Memory
Initializes the system settings of the SYS SETUP and PLAY SETUP
menu items, as well as clears the flash memory.
-
Adjust RTC
**Y **M **D **h **m **s
Adjusted to
the factory
local time.
Version
Displays the ROM version.
Shipped
version
73
CD-R/RW MASTER RECORDER CR500 (MENU mode: SYSTEM SETUP menu)
Basic procedure for using the "SYS SETUP" menu
The basic procedure for using the "SYS SETUP" menu is as described below, though the actual
procedure may differ depending on menu. It is assumed that a blank or recorded CD-R/RW disc
is set to the disc drive.
1)
While the recorder is stopped, press the [ENTER/YES] key.
The unit enters the MENU mode and the MENU list screen as below is shown.
Initially, "SYS SETUP " is highlighted.
2)
While "SYS SETUP
" is highlighted, press the [ENTER/YES] key.
The display now shows the SYS SETUP menu screen.
Initially, "Default file name " is highlighted.
3)
Use the [MENU] dial to select the desired menu item and press the [ENTER/YES]
key.
The display now shows the first level screen of the selected menu item.
Selecting a menu item with " " on the right goes down to the next level screen.
If you select a menu item without " ", the current setting flashes and you can
now make selection on the current level screen.
For details of each item, see the next and following pages.
• Example of a menu item which has the next level screen
(Selecting the item goes down to the next level screen.)
• Example of a menu item of which you can make setting on the first level screen
(When you select the item, the current setting flashes.)
Pressing the [EXIT/NO] key goes up the level one by one. Therefore, you can
finally exit the MENU mode by pressing the [EXIT/NO] key repeatedly. Also,
you can directly exit the MENU mode by pressing the [STOP/HOME] key.
74
CD-R/RW MASTER RECORDER CR500 (MENU mode: SYSTEM SETUP menu)
Default file name setting [Default File Name]
The "Default File Name" menu item selects the default name format of an audio file
which is created automatically when recording is made to a BWF formatted disc.
You can give a file name which has date information (according to the internal realtime
clock), a scene name with a take number or a reel number with a file number.
(Note that you cannot give a file name to a CD-DA formatted disc.)
• Selecting "File name mode"
By selecting "Default File Name " on the SYS SETUP menu screen and pressing the [ENTER/YES] key, the second level screen appears.
On this screen, "File name mode: xxx" is highlighted.
By pressing the [ENTER/YES] key again, the current setting (the default is "Take") starts
flashing and you can now make selection using the [MENU] dial. You can select from among
"Take" (default), "Date" and "Reel". After selecting the desired mode, press the [ENTER/
YES] key to confirm the setting.
If you select "Take", set "Default File Name" on the same screen (see below).
(When you select "Date" or "Reel", the "Default File Name" setting is not effective.
Date
The internal realtime clock data (with ".wav", the file extension) is set to the file name.
Example: B05h 05m 06s 10may 2006.wav
Take
"<SCENE NAME> + <TAKE NUMBER>" (with ".wav", the file extension) is set to the file
name. The TAKE NUMBER is incremented automatically each time recording is made.
Example: Scene_001.wav, Scene_002.wav, ...
Reel
The reel number (= Vol. Label) which is set when formatting a disc is set to the file name.
Example: 123_001.wav, 123_002.wav, ...
• Default file name (SCENE NAME/TAKE NUMBER) setting
When you set "File name mode" to "Take" and press the [ENTER/YES] key, you can set the
desired scene name and take number.
Use the [MENU] dial to highlight "SCENE NAME [SCENE]" and press the [ENTER/YES] key.
The rightmost character of the current scene name starts flashing and you can now start
entering a desired name.
] keys to move the cursor position and enter
To enter a name, use the [SKIP/CURSOR
a desired name using the [MENU] dial or numeric keys. After entering the desired scene
name, pressing the [ENTER/YES] key confirms the setting.
75
CD-R/RW MASTER RECORDER CR500 (MENU mode: SYSTEM SETUP menu)
SCENE Up to 19 ASCII characters can be entered. The first character must be alphabetical.
NAME The ".wav" extension is automatically added, therefore, you do not need to enter it.
After entering the scene name and pressing the [ENTER/YES] key, the cursor automatically moves to "001" in the take number field.
Enter the desired take number in the same manner as for the scene name, and press the
[ENTER/YES] key to confirm your setting.
TAKE
NUMBER
Any number between 001 and 999 can be entered.
<Note>: If you enter "000" in the TAKE NUMBER field, it is automatically set as "001".
* After making "Default File Name" setting, press the [STOP/HOME] key to exit the MENU
mode.
Input selection [Select Input]
The "Select Input" menu item selects the recording source between analog and digital.
The setting is stored to the Flash ROM of the unit.
Select the "Select Input" menu item on the SYS SETUP menu screen and press the [ENTER/
YES] key. The current setting starts flashing (the default is "Analog") and you can now
make selection. Use the [MENU] dial to select "Analog" or "Digital" and press the [ENTER/
YES] key to confirm the setting.
Analog
You can record the analog audio signals fed to the [ANALOG INPUT] connectors (balanced or
unbalanced). This is the default.
Digital
You can record the digital audio signal fed to the [DIGITAL INPUT] connector.
* To exit the MENU mode, press the [STOP/HOME] key.
The selected input source is shown at the bottom of the Input monitor screen, as
indicated by an arrow below.
<When "Analog" is selected>
<When "Digital" is selected>
76
CD-R/RW MASTER RECORDER CR500 (MENU mode: SYSTEM SETUP menu)
Digital output signal format selection [Digital Out]
The "Digital Out" menu item selects the format (AES/EBU or S/P DIF) of the digital signal
which is output from the [DIGITAL OUTPUT] connector.
Select the "Digital Out" menu item on the SYS SETUP menu screen and press the [ENTER/
YES] key. The current setting (the default is "AES/EBU") starts flashing and you can now
select the desired option. Use the [MENU] dial to select between "AES/EBU" and "S/P DIF",
and press the [ENTER/YES] key to confirm your setting.
AES/EBU
S/P DIF
IEC 60958 (AES/EBU) format digital signal is output.
IEC 60958 (S/P DIF) format digital signal is output.
* To exit the MENU mode, press the [STOP/HOME] key.
Peak hold time setting [Peak Hold]
The "Peak Hold" menu item sets the peak hold time of the peak level meters.
Select the "Peak Hold" menu item on the SYS SETUP menu screen and press the [ENTER/
YES] key. The current setting (the default is "3sec") starts flashing and you can now set the
peak hold time. Use the [MENU] dial to select the desired time and press the [ENTER/YES]
key to confirm your setting.
You can set the time between "0sec" and "9sec" in one second step.
* To exit the MENU mode, press the [STOP/HOME] key.
77
CD-R/RW MASTER RECORDER CR500 (MENU mode: SYSTEM SETUP menu)
Reference level setting [Ref. Level]
The "Ref. Level" menu item selects the reference input level. The reference level is set to
"-12dB" by default, but you can change it to "-20dB".
Select the "Ref. Level" menu item ob the SYS SETUP menu screen and press the [ENTER/YES]
key. The current setting starts flashing (the default is "-12dB") and you can now select the
desired option. Use the [MENU] dial to set the desired level and press the [ENTER/YES] key
to confirm your setting.
You can select from between "-12 dB" and "-20 dB" (the default is "-20dB").
* To exit the MENU mode, press the [STOP/HOME] key.
The reference level setting is reflected to the level meters on the front panel.
The associated level indicator is lit in red.
This indicator is lit in red when
"-12dB" is selected.
This indicator is lit in red when
"-20dB" is selected.
USB keyboard type setting [Keyboard Sel]
The "Keyboard Sel" menu item selects the type (between "US" or "JAPAN") of a USB
keyboard connected to the [USB (KYBD ONLY)] connector .
Select the "Keyboard Sel" menu item and press the [ENTER/YES] key.
The current setting (the default is "US") starts flashing and you can now select the type.
Use the [MENU] dial to select the desired option and press the [ENTER/YES] key to confirm
your setting.
US
JAPAN
A US keyboard can be connected. This is the default.
A Japanese keyboard can be connected.
* To exit the MENU mode, press the [STOP/HOME] key.
78
CD-R/RW MASTER RECORDER CR500 (MENU mode: SYSTEM SETUP menu)
Saving SYS SETUP data [Sys User Save]
Using the "Sys User Save " menu item, you can save the current setup data (including
SYS SETUP data, PLAY SETUP data and contrast level) to the user memory. The saved
setup data can be loaded using the "Sys User Load" menu item (see below for details) at
any time.
Select "Sys User Save " on the SYS SETUP menu screen and press the [ENTER/YES] key.
The display changes to show the confirmation screen (where "?" of "Are you sure?" flashes).
To save SYS SETUP/PLAY SETUP data, press the [ENTER/YES] key. To cancel the operation,
press the [EXIT/NO] key.
<Note>: The following setup data is saved to the user memory.
* SYS SETUP:
(1) File name mode
(4) Ref.level
(2) Select input
(5) Keyboard sel
(3) Peak hold time
(6) Digital out
* PLAY SETUP:
(1) Play mode
(4) Power on play
(2) Repeat
(3) Auto play
* Contrast level
* To exit the MENU mode, press the [STOP/HOME] key.
Loading SYS SETUP data [Sys User Load]
Using the "Sys User Load " menu item, you can load the setup data (including SYS
SETUP data, PLAY SETUP data and contrast level) from the user memory.
Select "Sys User Load " on the SYS SETUP menu screen and press the [ENTER/YES] key.
The display changes to show the confirmation screen (where "?" of "Are you sure?" flashes).
To load the setup data, press the [ENTER/YES] key. To cancel the operation, press the
[EXIT/NO] key.
<Note>: If you execute “Sys Default Set” (Initializing system memory data) or “Sys
Initial Memory” (Initializing flash memory), the setup data is initialized.
Therefore, even though you execute “Sys User Load”, you cannot load the setup data
you saved.
* To exit the MENU mode, press the [STOP/HOME] key.
79
CD-R/RW MASTER RECORDER CR500 (MENU mode: SYSTEM SETUP menu)
Initializing system memory data [Sys Default Set]
Using the "Sys Default Set " menu item, you can initialize the setup data (including SYS
SETUP data, PLAY SETUP data and contrast level) to the factory preset data.
Select "Sys Default Set " on the SYS SETUP menu screen and press the [ENTER/YES] key.
The display changes to show the confirmation screen (where "?" of "Are you sure?" flashes).
Pressing the [ENTER/YES] key initializes the setup data, and the display returns to the
previous screen. To cancel the initialization, press the [EXIT/NO] key.
<Note>: The following setup data is initialized.
* SYS SETUP:
(1) "File Name Mode" setting
(3) "Peak Hold Time" setting
(5) "Keyboard Sel" setting
(2) "Select Input" setting
(4) "Ref.Level" setting
(6) "Digital Out" setting
* PLAY SETUP:
(1) "Play Mode" setting
(3) "Auto Play" setting
(2) "Repeat" setting
(4) "Power On Play" setting
* Contrast level
* User memory data
* To exit the MENU mode, press the [STOP/HOME] key.
Initializing flash memory [Sys Initial Memory]
Using the "Sys Initial Memory " menu item, you can initialize the flash memory data
(including all system memory data, the play list for program play and the memory play
data) to the factory preset data.
Select "Sys Initial Memory " on the SYS SETUP menu screen and press the [ENTER/YES]
key. The display changes to show the confirmation screen (where "?" of "Are you sure?"
flashes).
Press the [ENTER/YES] key holding down the [RECORD] key, initializes the flash memory,
and the display returns to the previous screen. To cancel the initialization, press the [EXIT/
NO] key.
<Note>: The following setup data is initialized.
* SYS SETUP:
(1) "File Name Mode" setting
(3) "Peak Hold Time" setting
(5) "Keyboard Sel" setting
(2) "Select Input" setting
(4) "Ref.Level" setting
(6) "Digital Out" setting
* PLAY SETUP:
(1) "Play Mode" setting
(3) "Auto Play" setting
(2) "Repeat" setting
(4) "Power On Play" setting
* Memory play data
* Play list for program play
* Contrast level
* To exit the MENU mode, press the [STOP/HOME] key.
80
* User memory data
CD-R/RW MASTER RECORDER CR500 (MENU mode: SYSTEM SETUP menu)
ROM version checking [Version]
Using the "Version
" menu item, you can check the version of the unit.
Select "Version " on the "SYS SETUP" menu screen and press the [ENTER/YES] key.
The display changes to show the ROM version.
* To exit the MENU mode, press the [STOP/HOME] key.
81
CD-R/RW MASTER RECORDER CR500 (MENU mode: PLAY SETUP menu)
PLAY SETUP menu
In the PLAY SETUP menu, four menu items are available. The following table shows each
menu item name and its function, as well as the default setting.
Menu item
Play Mode
Default
Function
Selects the play mode. You can also use the [PLAY MODE/
PROGRAM SET ] key on the panel to select the play mode (see
page 54).
Repeat
Selects on/off of the repeat mode. You can also use the [REPEAT] key on the panel to select the play mode.
Auto Play
Selects whether the recorder automatically starts playback
after locating the song when you specify the desired song to
be played back using the numeric keys in the [MEMORY/
MEMORY SET ] key group and [CLEAR/+10] key.
Power On Play
Selects whether the recorder automatically starts playback
when turning on the unit.
ALL
Off
On
Off
Basic procedure for using the "PLAY SETUP" menu
The basic procedure for using the "PLAY SETUP" menu is as described below.
1)
While the recorder is stopped, press the [ENTER/YES] key.
The unit enters the MENU mode and the MENU list screen as below is shown.
2)
Use the [MENU] dial to highlight "PLAY SETUP
" and press the [ENTER/YES] key.
The display now shows the PLAY SETUP menu screen.
3)
Use the [MENU] dial to select the desired menu item and press the [ENTER/YES] key.
The display now shows the first level screen of the selected menu item.
The current setting flashes and you can now make selection on the current level screen.
4)
Use the [MENU] dial to select the desired option and press the [ENTER/YES] key to
confirm the selection.
82
CD-R/RW MASTER RECORDER CR500 (MENU mode: PLAY SETUP menu)
Play mode selection [Play Mode]
The "Play Mode" menu item selects the play mode.
<Note>: The play mode also can be selected using the [PLAY MODE/ PROGRAM SET ] key.
The selection using the [PLAY MODE/ PROGRAM SET ] key is reflected to the PLAY SETUP
menu screen.
Select the "Play Mode" menu item on the PLAY SETUP menu screen and press the [ENTER/
YES] key. The current setting starts flashing (the default is "ALL") and you can now make
selection. Use the [MENU] dial to select "ALL", "SINGLE", "PROGRAM" or "MEMORY" and
press the [ENTER/YES] key to confirm the setting.
ALL
Sets the play mode to "ALL PLAY".
SINGLE
PROGRAM
MEMORY
Set the play mode to "SINGLE PLAY".
Set the play mode to "SINGLE PLAY".
When the play list is not saved, you cannot select the PROGRAM PLAY mode. If you
select "PROGRAM" and press the [ENTER/YES] key, your selection is ignored and the
play mode is set to "ALL".
Set the play mode to "MEMORY PLAY".
* To exit the MENU mode, press the [STOP/HOME] key.
Repeat mode on/off [Repeat]
The "Repeat" menu item selects on/off of the repeat mode.
<Note>: You can also select on/off of the repeat mode using the [REPEAT] key.
The selection using the [REPEAT] key is reflected to the PLAY SETUP menu screen.
<Note>: You cannot repeat playback in the MEMORY PLAY mode.
Select the "Repeat" menu item on the PLAY SETUP menu screen and press the [ENTER/YES]
key. The current setting starts flashing (the default is "Off") and you can now make selection. Use the [MENU] dial to select "Off" or "On" and press the [ENTER/YES] key to confirm
the setting.
On
The recorder repeats playback of the song(s) according to the current play mode until you stop.
Off
The recorder stops playback after playing back the song(s) according to the current play mode.
* To exit the MENU mode, press the [STOP/HOME] key.
83
CD-R/RW MASTER RECORDER CR500 (MENU mode: PLAY SETUP menu)
Auto play mode on/off [Auto Play]
The "Auto Play" menu item selects whether or not the recorder automatically starts playback after carrying out either of the following operations.
(1) Selecting a song by using the numeric and [CLEAR/+10] keys while the recorder is
stopped or playing.
(2) Selecting a song by the [SKIP/CURSOR
] keys while the recorder is playing.
<Note>: By default, when you select a desired song using the [SKIP/CURSOR
]
keys or the "FILE SEL" screen while the recorder is stopped, the recorder locates the
beginning of the selected song and stops. However, when you do it while the recorder
is playing, the recorder starts playback after locating the beginning of the selected
song. Also note that the auto play function is not available when locating ABS 0.
Select the "Auto Play" menu item on the PLAY SETUP menu screen and press the [ENTER/
YES] key. The current setting starts flashing (the default is "On") and you can now make
selection. Use the [MENU] dial to select "Off" or "On" and press the [ENTER/YES] key to
confirm the setting.
On
The recorder starts playback after locating the beginning of the selected song (default).
Off
The recorder stops after locating the beginning of the selected song.
* To exit the MENU mode, press the [STOP/HOME] key.
Auto play on/off when powered on [Power On Play]
This menu item selects whether the recorder starts playback or not when you turn on the
power with a disc is set to the disc tray.
<Note>: If you turn on the power when this menu item is set to “On”, the recorder
automatically starts playback in the play mode previously selected when you turned
off the power last time. For example, if the play mode was set to “PROGRAM PLAY”
mode when you turned off the power last time, the recorder is starts playback in the
“PROGRAM PLAY” mode after you turn on the power.
<Note>: If the play mode was set to “MEMORY PLAY” when you turned off the power
last time, the recorder does not start playback after you turn on the power regardless
of “Power On Play” setting.
Select the "Power On Play" menu item on the PLAY SETUP menu screen and press the
[ENTER/YES] key. The current setting starts flashing (the default is "Off") and you can now
make selection. Use the [MENU] dial to select "Off" or "On" and press the [ENTER/YES] key
to confirm the setting.
On
The recorder automatically starts playback in the previously selected play mode when powered on.
Off
The recorder stops after starting up (default).
* To exit the MENU mode, press the [STOP/HOME] key.
84
CD-R/RW MASTER RECORDER CR500 (MENU mode: DISK UTILITY menu)
DISK UTILITY menu
In the DISK UTILITY menu, six menu items regarding a disc and file are available.
The following table shows each menu item name and its function.
Menu item
Format
Function
Executes the initial format or reformat of a CD-R/RW disc.
You cannot reformat a recorded CD-R disc.
Rewrite File Sys
Rewrites the file system after editing (name editing, file deletion, etc.) of a WAV
audio file recorded to a BWF formatted disc.
This item is not available with a CD-DA disc.
Edit File Name
Edits and saves a file name of a WAV audio file recorded to a BWF formatted
disc. This item is not available with a CD-DA disc.
Delete File
Deletes an unnecessary WAV audio file recorded to a BWF formatted disc.
This item is not available with a CD-DA disc.
Restore Del. File
Restores a WAV audio file which has been deleted from an unfinalized BWF
formatted disc. This item is not available with a CD-DA disc.
Finalize
Finalizes a BWF or CD-DA formatted CD-R/RW disc.
A finalized CD-DA disc can be played back by a normal CD player, however,
depending on a CD player, a CD-RW disc cannot be played back.
85
CD-R/RW MASTER RECORDER CR500 (MENU mode: DISK UTILITY menu)
Formatting a disc [Format]
This menu item is used to format an unformatted CD-R/RW disc or reformat a formatted CD-RW disc.
<Note>: When you load an unformatted CD-R/RW disc, the display automatically goes
down to the second level screen of the "Format" menu. For details, see "Preparation
before using the CR500" on page 18.
<Note>: You can reformat the following CD-R/RW discs.
(1)
(2)
1)
BWF formatted or CD-DA formatted blank CD-R/RW discs
BWF formatted or CD-DA formatted recorded CD-R/RW discs
You cannot reformat a recorded CD-R disc.
While the recorder is stopped, press the
[ENTER/YES] key.
The unit enters the MENU mode and the
MENU list screen as below is shown.
2)
Use the [MENU] dial to highlight
"DISK UTILITY " and press the [ENTER/YES]
key.
The display now shows the DISK UTILITY menu
screen. Initially, "Format " is highlighted.
4)
Use the [MENU] dial to highlight
"Vol. Label" and press the [ENTER/YES] key.
The rightmost character of the current
volume label flashes and you can now edit
the label.
3)
While "Format " is highlighted, press the
[ENTER/YES] key.
The display now shows "Format" screen.
You can edit a disc volume label (=reel
number) and select the format type (between
BWF and CD-DA).
A disc volume label can be used as the
default file name for audio files to be
recorded in a BWF formatted disc.
5)
You can move the cursor position by using
the [SKIP/CURSOR
] keys.
You can clear the character at the cursor
position by pressing the [CLEAR/+10] key
If you do not edit a volume label, skip steps
4) through 6) below.
<Note>: With a CD-DA disc, the volume
label setting is ineffective and is not
stored.
Use the numeric keys or the [MENU] dial to
enter a desired character at the cursor
position.
6)
86
After editing the volume label, press the
[ENTER/YES] key to confirm your setting.
CD-R/RW MASTER RECORDER CR500 (MENU mode: DISK UTILITY menu)
7)
Use the [MENU] dial to highlight "Audio
format type" and press the [ENTER/YES]
key.
The currently selected format type (the
default is "CD-DA") flashes and you can now
select the format type.
10)
Press the [ENTER/YES] key to start
formatting the disc.
When you select any of the BWF types in
step 8) above, the unit erases data before
formatting the disc as shown in the screens
below. When you select "CD-DA" in step 8)
above, the unit only erases data.
When formatting (or erasing) completes, the
display shows "Completed", while the unit
exits the MENU mode. The display returns
to the Home screen.
You can select a format type from among
"CD-DA" and the various "BWF" types (see
the table below).
CD-DA (default) : 44.1kHz/16Bit
BWF (44.1/16) : 44.1kHz/16Bit
BWF (44.1/24) : 44.1kHz/24Bit
BWF (48/16) : 48kHz/16Bit
BWF (48/24) : 48kHz/24Bit
BWF (88.2/24) : 88.2kHz/24Bit
BWF (96/24) : 96kHz/24Bit
8)
Use the [MENU] dial to select the desired
type and press the [ENTER/YES] key to
confirm your selection.
9)
Use the [MENU] dial to highlight
"[EXECUTE]" and press the [ENTER/YES]
key. (To cancel formatting, highlight "[EXIT]"
instead of "[EXECUTE]".)
The display shows the "CAUTION" screen as
below, on which "Are you sure?" flashes.
To cancel formatting, press the [EXIT/NO]
key.
flashing
87
<Note>: To reformat a formatted disc
with the different format type, execute
the same procedure as above.
CD-R/RW MASTER RECORDER CR500 (MENU mode: DISK UTILITY menu)
Rewriting the file system [Rewrite File Sys]
This menu item rewrites the file system. It is available only with a BWF formatted disc
(Note: This menu item is not available with CD-DA discs and finalized BWF discs). After you
edit a WAV file on the UDF file system (such as file name editing, file deletion and file
restoring), you have to rewrite the file system using this menu item.
<Note>: If you attempt to eject a disc after making editing on the file system without rewriting, the popup screen as below left appears. Pressing the [ENTER/YES] key starts rewriting
the file system (the popup screen as below right appears). After completing rewriting, the
disc is ejected.
If you press the [EXIT/NO] key instead of the [ENTER/YES] key when the popup screen above
left is shown, the disc is ejected without rewriting the file system. In this case, the editing
you made is cancelled and the system returns to the condition before editing.
<Note>: Each time you rewrite the system file using the "Rewrite File Sys" menu item, the
number of remaining recordable files decreases by one and the remaining disc space decreases. Therefore, we recommend rewriting the system file after you complete all file editing operations.
1)
While the recorder is stopped, press the
[ENTER/YES] key.
The unit enters the MENU mode and the
MENU list screen as below is shown.
2)
Use the [MENU] dial to highlight
"DISK UTILITY " and press the [ENTER/YES]
key.
flashing
The display now shows the DISK UTILITY menu
screen. Initially, "Format " is highlighted.
<Notes>
• If you carry out the operation of step
3) when you have not made any
editing after rewriting the file
system last time, the display shows
"No data changed!".
• If you carry out the operation of step
3) when a CD-DA disc is set, the
display shows "Void!".
4)
3)
Press the [ENTER/YES] key to rewrite the
system file.
The display shows the screen below while
executing. After rewriting completes, the
display shows the Home screen.
Use the [MENU] dial to highlight "Rewrite
File Sys " and press the [ENTER/YES] key.
The display changes to show the
confirmation screen as below, where "Are
you sure?" flashes Pressing the [ENTER/YES]
key rewrites the file system. Pressing the
[EXIT/NO] key cancels rewriting.
88
CD-R/RW MASTER RECORDER CR500 (MENU mode: DISK UTILITY menu)
Editing a file name [Edit file name]
The "Edit File Name" menu item edits the file name of a WAV file on an unfinalized BWF
disc. This menu item is not available with CD-DA discs and finalized BWF discs.
<Note>: After editing a file name, do not forget to rewrite the file system using the
"Rewrite File Sys" menu item described on the previous page. However, each time you
rewrite the system file, the number of remaining recordable files decreases by one and
the remaining disc space decreases. Therefore, we recommend rewriting the system file
after you complete all file editing operations.
If you attempt to eject an edited disc without rewriting the file system, the popup
screen for rewriting the file system appears (see the previous page).
1)
4)
While the recorder is stopped, press the
[ENTER/YES] key.
The unit enters the MENU mode and the
MENU list screen as below is shown.
2)
The display now shows the "EDIT FILE NAME"
screen. On this screen, you can edit the
current file name (the rightmost character
of the name flashes).
Use the [MENU] dial to highlight
"DISK UTILITY " and press the
[ENTER/YES] key.
5)
The display now shows the DISK UTILITY
menu screen.
3)
Use the [MENU] dial to select an audio file
you want to edit and press the [ENTER/YES]
key.
Edit the file name.
Use the [SKIP/CURSOR
] keys to move
the cursor point (flashing point).
Use the numeric ([MEMORY]) keys or [MENU]
dial to select the desired character of the
flashing point.
Pressing the [CLEAR/+10] key deletes the
immediate right character of the flashing
point.
Therefore, by pressing the [CLEAR/+10] key
repeatedly when the leftmost character
flashes, you can delete the whole current
name.
<Note>: Do not edit or delete ".wav",
the file extension of a file name. If you
attempt to save a file name which does
not have this file extension, the display shows "Void" and returns to the
previous screen.
Use the [MENU] dial to highlight "Edit File
Name " and press the [ENTER/YES] key.
The display now shows the screen for
selecting an audio file from the audio file
list.
5)
After entering the desired name, press the
[ENTER/YES] key.
The old name is replaced with the new name.
6)
To exit the MENU mode, press the [STOP/
HOME] key.
The display returns the Home screen which
has been shown before entering the MENU
mode.
89
CD-R/RW MASTER RECORDER CR500 (MENU mode: DISK UTILITY menu)
Deleting an unnecessary audio file [Delete File]
The [Delete File] menu item deletes an unnecessary WAV file on an unfinalized BWF
disc. This menu item is not available with CD-DA discs and finalized BWF discs.
<Note>: After deleting an audio file, do not forget to rewrite the file system using the
"Rewrite File Sys" menu item described on the previous page. However, each time you
rewrite the system file, the number of remaining recordable files decreases by one and
the remaining disc space decreases. Therefore, we recommend rewriting the system file
after you complete all file editing operations.
If you attempt to eject an edited disc without rewriting the file system, the popup
screen for rewriting the file system appears (see the previous page).
<Note>: A deleted file still exists as a "hidden file" on the disc. You can restore a hidden
file by the "Restore Del File" menu item described on the next page.
1)
While the recorder is stopped, press the
[ENTER/YES] key.
The unit enters the MENU mode and the
MENU list screen as below is shown.
4)
2)
Use the [MENU] dial to select an audio file
you want to delete and press the
[ENTER/YES] key.
The confirmation screen pops up.
To delete the file, press the [ENTER/YES] key.
To cancel deleting the file, press the [EXIT/
NO] key.
Use the [MENU] dial to highlight
"DISK UTILITY " and press the
[ENTER/YES] key.
The display now shows the DISK UTILITY
menu screen.
5)
Press the [ENTER/YES] key to delete the file.
The selected audio file is deleted and the
display returns to show the screen for
selecting an audio file from the audio file
list.
6)
3)
To exit the MENU mode, press the [STOP/
HOME] key.
The display returns the Home screen which
has been shown before entering the MENU
mode.
Use the [MENU] dial to highlight
"Delete File " and press the [ENTER/YES]
key.
<Note>: If you delete the audio file
The display now shows the screen for
selecting an audio file from the audio file
list.
which is selected before entering the
MENU mode, the display shows the
Home screen of the file next to the
deleted audio file.
90
CD-R/RW MASTER RECORDER CR500 (MENU mode: DISK UTILITY menu)
Restoring a deleted audio file [Restore Del. File]
Using the "Restore Del. File" menu item, you can restore a hidden file which has been
deleted by the "Delete File" menu item. This menu item is not available with CD-DA discs and
finalized BWF discs.
<Note>: After restoring a deleted audio file, do not forget to rewrite the file system using
the "Rewrite File Sys" menu item described on the previous page. However, each time
you rewrite the system file, the number of remaining recordable files decreases by one
and the remaining disc space decreases. Therefore, we recommend rewriting the system file after you complete all file editing operations.
If you attempt to eject an edited disc without rewriting the file system, the popup
screen for rewriting the file system appears (see the previous page).
1)
4)
While the recorder is stopped, press the
[ENTER/YES] key.
The unit enters the MENU mode and the
MENU list screen as below is shown.
The selected audio file is restored.
File restoring starts.
The display shows "Please wait....", followed
by "Completed", and returns to the screen
for selecting a deleted audio file.
5)
2)
To exit the MENU mode, press the [STOP/
HOME] key.
The display returns the Home screen which
has been shown before entering the MENU
mode.
Use the [MENU] dial to highlight
"DISK UTILITY " and press the
[ENTER/YES] key.
The display now shows the DISK UTILITY
menu screen.
3)
Use the [MENU] dial to select an audio file
you want to restore and press the
[ENTER/YES] key.
Use the [MENU] dial to highlight "Restore
Del. File " and press the [ENTER/YES] key.
The display now shows the screen for
selecting a deleted audio file.
91
CD-R/RW MASTER RECORDER CR500 (MENU mode: DISK UTILITY menu)
Finalizing a disc [Finalize]
The "Finalize" menu item finalizes a BWF formatted or CD-DA formatted CD-R/RW disc.
A finalized CD-DA disc can be played back by a normal CD player. You can also finalize
a CD-DA formatted disc when you eject it after recording (see page 49).
<Note>: By finalizing a CD-DA formatted CD-R/RW disc, TOC (Table Of Contents) is
recorded and the disc is closed. Therefore, you cannot make additional recordings.
Also in the case of a BWF formatted CD-R/RW disc which has been finalized using this
menu item, you cannot make additional recordings, as well as file name editing and file
deletion.
1)
While the recorder is stopped, press the
[ENTER/YES] key.
4)
Finalizing starts.
The display shows "Please wait....", followed
by "Completed".
The unit enters the MENU mode and the
MENU list screen as below is shown.
2)
Press the [ENTER/YES] key.
Use the [MENU] dial to highlight
"DISK UTILITY " and press the
[ENTER/YES] key.
The display now shows the DISK UTILITY
menu screen.
5)
Press any operation key on the panel.
The display returns the Home screen which
has been shown before entering the MENU
mode.
<Note>: If you attempt to make an
additional recording to a finalized CDR/RW disc, the following popup screen
appears over the input monitor
screen.
3)
Use the [MENU] dial to highlight
"Finalize " and press the [ENTER/YES] key.
The display now shows the confirmation
screen, where "Are you sure?" flashes.
flashing
92
CD-R/RW MASTER RECORDER CR500 (Specifications)
Chapter-8: Specifications
93
CD-R/RW MASTER RECORDER CR500 (Specifications)
CR500 main specifications
Inputs/Outputs
* 0dBu = 0.775Vrms, 0dBV = 1Vrms
Reference level: -12dBFS/-20dBFS (default: -12dBFS, selectable in the “Ref.Level” menu item of the SYS
SETUP menu)
ANALOG INPUT L, R (balanced)
Connector
Input impedance
:
:
XLR-3-31 type (balanced, pin-2: hot)
10kΩ or higher
Reference input level
Maximum input level
:
:
+4dBu
+24dBu (-20dBFS)
ANALOG INPUT L, R (unbalanced)
Connector
Input impedance
:
:
RCA pin jack
10kΩ or higher
Reference input level
Maximum input level
:
:
-10dBV
+10dBV (-20dBFS)
ANALOG OUTPUT L, R (balanced)
Connector
Output load impedance
:
:
XLR-3-32 type (balanced, pin-2: hot)
10kΩ or higher
Reference output level
Maximum output level
:
:
+4dBu
+24dBu (-20dBFS)
ANALOG OUTPUT L, R (unbalanced)
Connector
Output load impedance
:
:
RCA pin jack
10kΩ or higher
Reference output level
Maximum output level
:
:
-10dBV
+10dBV (-20dBFS)
Connector
Output load impedance
:
:
ø6mm Stereo Phone jack
8Ω or higher
Maximum output level
:
100mW (32Ω)
Connector
:
XLR-3-31 type (balanced, pin-2: hot)
Format
:
IEC 60958 (S/P DIF) or IEC 60958 (AES/EBU), auto
selection.
:
:
XLR-3-32 type (balanced, pin-2: hot)
IEC 60958 (S/P DIF) or IEC 60958 (AES/EBU),
PHONES
DIGITAL INPUT
DIGITAL OUTPUT
Connector
Format
The format of an output signal is selected in the “Digital
Out” menu item of the SYS SETUP menu.
USB (USB keyboard Only)
Connector
:
USB series “A” receptacle
The keyboard uses Default Scan Code 2.
:
ø6mm Phone jack
GPI (Fader Start)
Connector
94
CD-R/RW MASTER RECORDER CR500 (Specifications)
Recording/playback
Recording medium
:
ATAPI (E-IDE) CD-R/RW drive
:
fs 44.1kHz / 48kHz, 16bit
:
fs 44.1kHz / 48kHz / 88.2kHz / 96kHz, 24bit
Recording tracks
:
2 (STEREO)
Reference recording level
:
-12dBFS/-20dBFS (selectable in the MENU mode)
Shock loop function
:
20 seconds
Sampling frequency (fs)/
Quantization (bit)
Performance
* Analog input to ADC to DAC to analog output: (fs 48kHz 24bit, Ref: -12dBFS)
R/P Frequency response
:
20H - 20kHz +/-1dB (fs 44.1/48kHz)
:
20H - 40kHz +/-2dB (fs 88.2/96kHz)
Signal to noise ratio
:
100dB (Typical)
Dynamic range (1kHz, -60dBFS)
:
100dB (Typical)
T. H. D. (1kHz, -1dBFS)
:
0.01% or less
:
93.5 (H) x 482 (W) x 321 (D) mm (including the
General
External dimensions
projection parts)
Weight
:
Approx. 4.8 kg
Power requirements
:
120VAC 50/60Hz
230VAC 50/60Hz
240VAC 50/60Hz
Power consumption
:
Approx. 14W
*
Specifications and appearance are subject to change without notice for product improvement.
*
All company names and model names mentioned in this manual are trademarks or registered
trademarks of their respective holders.
95
CD-R/RW MASTER RECORDER CR500 (Specifications)
Physical dimensions
1:GND 2:HOT 3:COLD
GPI
INPUT
OUTPUT
DIGITAL
BALANCED [+4dBu]
UNBALANCED [-10dBV]
AC IN
AC
IN
BALANCED [+4dBu]
TO REDUCE THE RISK OF FIRE OR ELECTRIC
SHOCK, DO NOT EXPOSE THIS EQUIPMENT
TO RAIN OR MOISTURE.
RISQUE DE CHOC ELECTRIQUE
AVIS: NE
PAS OUVRIR
WARNING:
R
R
CAUTION
R
L
ANALOG INPUT
L
ANALOG OUTPUT
R
L
L
321
301
430
482
MEMORY
LOCATE
2
1
space
CONTRAST
R
MIN
PHONES
MAX
MIN
MAX
MIN
6
JKL
+10
MNO
SKIP/CURSOR
8
PQRS
OPEN/CLOSE
USB
EXIT/NO
PUSH
MENU/ENTER/YES
9
TUV
0
WXYZ
symbol
REC END
ABS 0
MAX
RECORD
INPUT LEVEL
96
STOP/HOME
PLAY
REWIND
F FWD
93.5
GHI
DIR SEL
REC RDY
7
(KYBD ONLY)
EDIT TIME
CLEAR
5
4
POWER
DEF
FILE SEL
REPEAT
SHIFT
3
ABC
88
PLAY MODE
PROGRAM SET
L
MEMORY SET
DISPLAY
ACCESS
Declaration of EC Directive
This equipment is compatible with the EMC Directive (89/336/EEC) - Directive on approximation of member
nation's ordinance concerning the electromagnetic compatibility and with the Low Voltage Directive (73/23/EEC)
- Directive on approximation of member nation's ordinance concerning electric equipment designed to be used
within the specified voltage range.
The Affect of Immunity on This Equipment
The affect of the European Specification EN61000-6-1 (coexistence of electromagnetic waves - common
immunity specification) on this equipment are as shown below.
In the electrical fast transient/burst requirements, surge, conducted disturbances by radio-frequency fields,
power frequency magnetic field, radiate electromagnetic field requirements and static electricity discharging
environment, this could be affected by generation of noise in some cases.
FOSTEX DISTRIBUTORS LIST IN EUROPE
* Including non-EU countries (as of January, 2005)
<AUSTRIA>
<ITALY>
NAME: ATEC Audio-u. Videogeraete VertriebsgesmbH.
ADD: Im Winkel 5, A-2325 Velm, Austria
TEL: (+43) 2234-74004, FAX: (+43) 2234-74074
NAME: Proel S. p. A.
ADD: Zona Via Alla Ruenia, 37/43 64027 - Sant'Omero
(Teramo), Italy
TEL: (+39) 0861-81241, FAX: (+39) 0861-887862
<BELGIUM>
NAME: General Audio
ADD: Raymond Pelgrimslaan 101, B-1702 GrootBijgaarden, Belgium
TEL: (+32) 2-4630650, FAX: (+32) 2-4661500
<THE NETHERLANDS>
NAME: IEMKE ROOS AUDIO B. V.
ADD: Kuiperbergweg 20, 1101 AG Amsterdam, The
Netherlands
TEL: (+31) 20-697-2121, FAX: (+31) 20-697-4201
<DENMARK>
NAME: SC Sound ApS
ADD: Malervej 2, DK-2630 Taastrup, Denmark
TEL: (+45) 4399-8877, FAX: (+45) 4399-8077
<NORWAY>
NAME: Siv. Ing. Benum AS
ADD: P.O. Box 145, Vinderen, 0319 Oslo, Norway
TEL: (+47) 2213 9900, FAX: (+47) 2214 8529
<FINLAND>
NAME: Noretron Oy Audio
ADD: P. O. Box 22, FIN-02631 Espoo, Finland
TEL: (+358) 9-5259330, FAX: (+358) 9-52593352
<FRANCE>
NAME: Sennheiser France
ADD: 128 bis, avenue Jean-Jaures, 94851 Ivry-sur-Seine
Cedex, France
TEL: (+33) 1 4987 0300, FAX: (+33) 1 4987 0324
<GERMANY>
NAME: Mega Audio GmbH
ADD: Stromberger Str. 32, D-55411 Bingen, Germany
TEL: (+49) 6721-94330, FAX: (+49) 6721-32046
<GREECE>
NAME: Bon Studio S. A.
ADD: 6 Zaimi Street, Exarchia, 106.83 Athens, Greece
TEL: (+30) 210-3809-605, 606, 607, 608
FAX: (+30) 210-3845-755, 210-3827-868
<ICELAND>
NAME: I. D. elrf. electronic Ltd.
ADD: ARMULA 38 108 REYKJAVIK, ICELAND
TEL: (+354) 588 5010, FAX: (+354) 588 5011
<PORTUGAL>
NAME: Caius - Tecnologias Audio e Musica, Lda.
ADD: Praca do Bom Sucesso, No 61 Bom Sucesso
Trade Center, Escritorio 701/702, 4150-1460 Porto,
Portugal
TEL: (+351) 22-608-06-10, FAX: (+351) 22-608-06-29
<SPAIN>
NAME: Letusa S. A.
ADD: C/Laguna 10, 28923 Alcorcon, Madrid, Spain
TEL: (+34) 91-4862800, 91-4470898
FAX: (+34) 91-6414597
<SWEDEN>
NAME: Sennheiser AB
ADD: John Ericssonsgatan 10, P.O. Box 22035, SE-104
22 Stockholm, Sweden
TEL: (+46) 8 566 16400, FAX: (+46) 8 566 16490
<SWITZERLAND>
NAME: Audio Bauer Pro AG
ADD: Bernerstrasse-Nord 182, CH-8064 Zurich,
Switzerland
TEL: (+41) 1-4323230, FAX: (+41) 1-4326558
<UK>
NAME: SCV London
ADD: 40 Chigwell Lane, Oakwood Hill Industrial Estate,
Loughton, Essex IG10 3NY U. K.
TEL: (+44) 20-8418-0778, FAX: (+44) 20-8418-0624
FOR THE US CUSTOMERS ONLY
FOSTEX AMERICA LIMITED WARRANTY
The following statement defines specific legal rights. You may also have additional rights depending on the state in which the Fostex product was purchased.
WARRANTY PROTECTION
All Fostex parts are warranted for one (1) year from the date of original purchase, except for
recording media, such as hard disc drives and compact flash cards, heads, lamps and fuses, which
are warranted, for one hundred-eighty (180) days. Fostex America will repair and / or replace
parts during the term of this warranty. Labor costs are also covered by Fostex America for one (1)
year from the date of original purchase. Except as specified below, this warranty covers all defects
in material and workmanship in this product.
The following are not covered by this warranty:
1.
Batteries.
2.
Damage to any product that has been altered.
3.
Damage to any product on which the original serial number has been defaced, modified
or removed.
4.
Damage to or deterioration of the external cabinet.
5.
Damage occurring during shipment of the product. (NOTE: Shipping claims must be
presented to the carrier.)
6.
Damage resulting from accident, misuse, abuse or neglect.
7.
Damage resulting from failure to perform routine maintenance and / or calibration
procedures.
8.
Damage resulting from failure to follow instruction in the owner's manual.
9.
Damage resulting from repair or attempted repair or by someone other than a Fostex
America Service technician or a technician at an authorized Fostex America service station.
10.
Damage resulting from causes other than product defects, including lack of technical skill,
competence or experience on the part of the user.
11.
External appearance items such as cosmetic parts, knobs, liquid crystal displays, buttons,
etc.
12.
Replacements or repairs necessitated by loss or damages resulting from any cause beyond
the control of Fostex America.
13.
Damage resulting from misuse or abuse on rental units.
NOTE:
FOSTEX AMERICA IS NOT RESPONSIBLE FOR DATA LOST OR DAMAGED DURING
OPERATION OF THIS PRODUCT.
CALIBRATION AND MAINTENANCE PROCEDURES ARE NOT COVERED BY THIS
WARRANTY.
Fostex America reserves the right to inspect all products submitted pursuant to this warranty.
If such an inspection shows reasonable cause to believe that any of the above exclusions to the
above warranty are applicable, then Fostex America or the authorized service station will charge
prevailing service rates and parts, costs for any repairs.
FOSTEX AMERICA LIMITED WARRANTY
To claim all warranty service, first access www.fostex.com to receive service authorization (RMA
number). Then present the authorization together with the bill of sale, which shows the date of
original purchase to Fostex America. This warranty is not transferable.
SHIPPING
If this product needs service, you must take it, or package it carefully, using ample packaging
materials to prevent damage during shipment and mail it to the distributor from whom you have
purchased this product, postage pre-paid and insured.
NOTE: Fostex America will not assume responsibility for damages or losses occurred in transit, but
will reasonably assist the sender in processing any claims whenever possible (such as submitting
statements to the carriers when applicable).
Any collect or C.O.D. shipments will be refused. In order to obtain warranty repairs, you must
include the following:
1.
Date proof of original purchase (copy pf bill of sale or charge slip).
2.
A note describing the problem with sufficient particularity to allow Fostex America to
inspect or adjust the problem.
3.
All accessory items appurtenant to that problem.
LIMITATIONS OF INPLIED WARRANTIES
AND EXCLUSIONS OF CERTAIN DAMAGES
Unless considered unenforceable or unlawful under applicable law:
A.
All implied warranties ? including warranties of merchantability and fitness for a particular
purpose ? are limited in duration to term of this warranty and to the express coverage of
this warranty;
B.
Fostex America's liability for any defect product is expressly limited to repair or
replacement of the product, at the sole discretion and / or option of Fostex America.
Fostex America shall not under any circumstances be liable for:
C.
1.
Damaged based on inconvenience, loss of use of the product, loss of time,
interrupted operation or commercial loss, OR;
2.
Any damages, whether incidental, consequential or otherwise, except damages
which may not be excluded by under applicable law.
Fostex America makes no other warranties, express or implied, above and / or beyond the
representations made herein.
WARRANTY APPLIES ONLY TO THOSE PRODUCTS SOLD AND
DISTRIBUTED BY FOSTEX AMERICA
Service Department
FOSTEX AMERICA
13701 Cimarron Avenue Gardena, CA 90249
TEL: (310)-329-2960 FAX: (310)-329-1230
www.fostex.com
FOSTEX CO.
3-2-35, Musashino, Akishima-shi, Tokyo, Japan, 196-0021
FOSTEX AMERICA
13701 Cimarron Avenue Gardena, CA 90249 U.S.A.
© PRINTED IN JAPAN MARCH 2006 8588 076 000 FX
438100