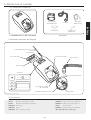
1
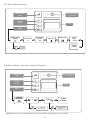
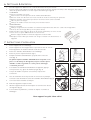
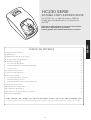
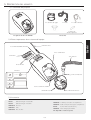
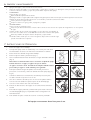
S
SERIE
HC230
Operating Manual
Manuel de l’utilisation
Manual del Usiario
SECTION
English . . . . . . . . . . . . . . . . . . . .
A
Francais . . . . . . . . . . . . . . . . . . .
B
Español . . . . . . . . . . . . . . . . . . .
C
HUMIDIFIED CPAP SYSTEMS
The HC230 series are a range of CPAP systems
designed for use in the home for the treatment
of OSA.
For further assistance, please contact your local
F&P office – see reverse for addresses. Please
keep this manual for future reference.
TABLE OF CONTENTS
1. Symbol Definitions . . . . . . . . . . . . . . . . . . . . . . . . . . . . . . . . . . . . . . . . . . . . . . . . . . . . . . . . . . . . . . . . . . . . . . . . . . . . . . . . 2
2. Warnings . . . . . . . . . . . . . . . . . . . . . . . . . . . . . . . . . . . . . . . . . . . . . . . . . . . . . . . . . . . . . . . . . . . . . . . . . . . . . . . . . . . . . . . 2
3. Oxygen Use Warnings . . . . . . . . . . . . . . . . . . . . . . . . . . . . . . . . . . . . . . . . . . . . . . . . . . . . . . . . . . . . . . . . . . . . . . . . . . . . . 2
4. Intended Use . . . . . . . . . . . . . . . . . . . . . . . . . . . . . . . . . . . . . . . . . . . . . . . . . . . . . . . . . . . . . . . . . . . . . . . . . . . . . . . . . . . . . 2
5. Description of the device . . . . . . . . . . . . . . . . . . . . . . . . . . . . . . . . . . . . . . . . . . . . . . . . . . . . . . . . . . . . . . . . . . . . . . . . . . . 3
5.1 Package Contents. . . . . . . . . . . . . . . . . . . . . . . . . . . . . . . . . . . . . . . . . . . . . . . . . . . . . . . . . . . . . . . . . . . . . . . . . . . . . . 3
5.2 Important Parts of Your Device . . . . . . . . . . . . . . . . . . . . . . . . . . . . . . . . . . . . . . . . . . . . . . . . . . . . . . . . . . . . . . . . . . . 3
5.3 Accessories . . . . . . . . . . . . . . . . . . . . . . . . . . . . . . . . . . . . . . . . . . . . . . . . . . . . . . . . . . . . . . . . . . . . . . . . . . . . . . . . . . 3
6. Cleaning & Maintenance . . . . . . . . . . . . . . . . . . . . . . . . . . . . . . . . . . . . . . . . . . . . . . . . . . . . . . . . . . . . . . . . . . . . . . . . . . . 4
7. Setup Instructions . . . . . . . . . . . . . . . . . . . . . . . . . . . . . . . . . . . . . . . . . . . . . . . . . . . . . . . . . . . . . . . . . . . . . . . . . . . . . . . . 4
8. Controls and Display . . . . . . . . . . . . . . . . . . . . . . . . . . . . . . . . . . . . . . . . . . . . . . . . . . . . . . . . . . . . . . . . . . . . . . . . . . . . . . 5
8.1 Display Descriptions and Functions . . . . . . . . . . . . . . . . . . . . . . . . . . . . . . . . . . . . . . . . . . . . . . . . . . . . . . . . . . . . . . . . 5
8.2 Patient Menu Summary . . . . . . . . . . . . . . . . . . . . . . . . . . . . . . . . . . . . . . . . . . . . . . . . . . . . . . . . . . . . . . . . . . . . . . . . . 6
8.3 Patient Menu - Additional Settings Summary . . . . . . . . . . . . . . . . . . . . . . . . . . . . . . . . . . . . . . . . . . . . . . . . . . . . . . . . . 6
9. Frequently Asked Questions . . . . . . . . . . . . . . . . . . . . . . . . . . . . . . . . . . . . . . . . . . . . . . . . . . . . . . . . . . . . . . . . . . . . . . . . . 7
10. Product Specifications . . . . . . . . . . . . . . . . . . . . . . . . . . . . . . . . . . . . . . . . . . . . . . . . . . . . . . . . . . . . . . . . . . . . . . . . . . . . . 7
11. Operating conditions . . . . . . . . . . . . . . . . . . . . . . . . . . . . . . . . . . . . . . . . . . . . . . . . . . . . . . . . . . . . . . . . . . . . . . . . . . . . . 8
12. Storage and Transport conditions . . . . . . . . . . . . . . . . . . . . . . . . . . . . . . . . . . . . . . . . . . . . . . . . . . . . . . . . . . . . . . . . . . . . 8
13. Troubleshooting . . . . . . . . . . . . . . . . . . . . . . . . . . . . . . . . . . . . . . . . . . . . . . . . . . . . . . . . . . . . . . . . . . . . . . . . . . . . . . . . . 8
PLEASE READ ALL INSTRUCTIONS BEFORE INITIAL USE
C a u t i o n : U S A F e d e r a l L a w re s t r i c t s t h i s d e v i c e f o r s a l e b y o r o n t h e o rd e r o f a p h y s i c i a n .
A-1
English
HC230 SERIES
1. SYMBOL DEFINITIONS
Type BF
Applied Part
ATTENTION
Consult
accompanying
documents
Drip Proof
Alternating
Current
Class ll
Double Insulated
Standby or
On/Off
93/42/EEC
Class IIb
2. WARNINGS
1.
2.
3.
4.
5.
6.
7.
8.
9.
PLEASE NOTE:- This manual refers to the HC230 Series CPAP unit
as "the device".
The device should only be used with masks, connectors and
delivery tubes recommended by Fisher & Paykel
Healthcare, or by your physician or respiratory therapist.
Never operate the device if:
a) it has a damaged power cord or plug, b) the tube has
been damaged with holes, tears or kinks, c) it has been
dropped or damaged, d) it has been dropped into water,
e) it is not working properly.
Return the device to an authorised service center for
examination and repair.
Do not use the device when the room temperature exceeds
35°C (95°F) as this may lead to an elevated airflow
temperature which may give rise to an irritation of the
airways.
Ensure an air filter is fitted when operating your unit.
Remove the humidification chamber before filling.
Do not fill the chamber with boiling water.
When handling the device with chamber and water avoid
tilting the machine to prevent any chance of water entering
the unit enclosure.
Place your device on a level surface lower than your head
height to prevent water entering the respiratory tubing
should the device be knocked over.
Do not store or use your device where it can fall or be
pulled into water. If water has entered the unit enclosure,
disconnect the power cord and discontinue use. Seek
advice from your homecare provider.
10. Never block the air openings of the device or place it on a
soft surface such as a bed or couch, where the filter area
may be blocked. Keep the air openings free of lint, hair or
the like.
11. Ensure that the unit is dry before plugging into the power
socket.
12. A mask should not be used unless the device is switched
on, and operating properly. The vent hole(s) associated with
the mask should never be blocked.
13. Due to the operating temperature of the heater plate,
avoid making contact to the exposed heater plate or
chamber base.
14. At low CPAP pressures, the flow through the mask may be
insufficient to clear all exhaled gas from the tubing, and
consequently some re-breathing may occur.
15. Adjusting the pressure control can result in ineffective
therapy. The pressure control must only be adjusted by a
healthcare professional.
16. Never drop or insert any object into any opening or tube.
17. Always switch off the device and unplug the power cord
from the power socket before cleaning.
18. Empty all the water from the chamber before transporting
your device.
19. Refer all maintenance to qualified service personnel except
as outlined in this manual.
3. OXYGEN USE WARNINGS
If supplemental oxygen is used with the device, the oxygen flow must be turned off when the device is not operating. This
ensures that oxygen will not flow through the tube and accumulate in the device enclosure.
•
•
•
•
The device should be located in a position where ventilation around the device is not restricted.
•
A spontaneous and violent ignition may occur if oil, grease or greasy substances come in contact with oxygen under pressure.
These substances must be kept away from oxygen regulators, cylinder valves, tubing and connections, and all other oxygen
equipment.
•
At a fixed flow rate of supplemental oxygen flow, the inhaled oxygen concentration will vary, depending on the pressure
settings, patient breathing pattern, mask selection and leak rate.
It is recommended that supplemental oxygen be administered at the mask.
Oxygen should not be used while smoking or in the presence of an open flame.
The use of oxygen in therapy requires that special care be taken to reduce the risk of fire. Any materials which will burn in air
and some that will not are easily ignited and burn rapidly in high concentrations of oxygen. Accordingly, for safety it is
necessary that all sources of ignition be kept away from the product and preferably out of the room in which it is being used.
4. INTENDED USE
The device is used to assist with patient breathing while sleeping, for the purpose of treating Obstructive Sleep Apnea (OSA).
This is done by the delivery of Continuous Positive Airway Pressure (CPAP) in order to prevent airway obstruction. The addition
of heated respiratory humidification to the device relieves the drying and irritating effects on the patient airways which usually
arises from use of a CPAP system. The CPAP device is for use on adult patients at home or in the sleep lab.
A-2
5. DESCRIPTION OF THE DEVICE
English
5.1 Package Contents
1 x tube
2 x Water Chamber
1 x Power Cord
1 x Spare Air Filter
1 x Funnel
Accessories
1 x HC230 series
5.2 Important Parts of Your Device
POWER CORD
ON/OFF BUTTON
HEATERPLATE
900HC221 TUBE
FILTER HOLDER
AIR FILTER
DISPLAY
900HC010 CONNECTOR
CHAMBER GUARD
WATER CHAMBER
WATER LEVEL LINE
5.3 Accessories
HC385
Water Chamber – disposable
900HC230
Compliance Maximizer Software
HC355*
Water Chamber – reusable
900HC232
Compliance Download Serial Cable
900HC010
Connector
HC225
Remote Control (Laboratory)
900HC221
Tube
900HC226
Lead Extension Kit for HC225
900HC240
Filter
*Not available in all countries
A-3
6. CLEANING & MAINTENANCE
1.
Switch off the device and unplug from the power socket.
2.
Wipe the exterior of the device with a clean, damp (not wet) cloth and mild dishwashing detergent.
Do not use harsh abrasives or solvents, or these may damage the device.
3.
DAILY
Clean chamber and tube.
Remove the breathing tube from the chamber.
Rinse the tube with soapy water. Hang – up hose with hose ends pointing to floor to dry.
Remove the chamber by pushing down the finger guard and pulling out the chamber.
Pour out & discard the remaining water.
Clean the chamber with soapy water, rinse and dry.
•
•
•
•
•
4.
WEEKLY
Thoroughly clean the chamber
Soak the inside of the chamber for 10 minutes in a solution of one part white vinegar
to five parts water.
•
5.
Replace the air filter when it becomes significantly discoloured, at least once
every 3 months or after 1000 hours machine running time.
Remove the filter holder from the back of the device and take out the filter.
Replace the old filter with a new filter: Ensure the vertical black line is
facing towards the device.
•
•
7. SETUP INSTRUCTIONS
HOW
TO SET UP YOUR SYSTEM
1.
Remove your device from its packaging.
2.
Place the device on a low shelf or on the floor beside your bed,
the unit needs to be placed below head height.
3.
Remove one water chamber from the packaging.
4.
Remove the blue caps and discard them (Fig.1).
5.
Fill the chamber up to the water filling line with distilled
water only (Fig.2).
Fig.1
Fig.2
Fig.3
Fig.4
Never fill the chamber while it is attached to the device.
When moving your device, ensure that the water chamber is
empty. Machine failure due to water damage is not covered by
warranty.
6.
To attach the water chamber to the device, press down the
finger guard and slide the chamber on (Fig.3) (Fig. 4).
7.
When the chamber is fitted correctly, the finger guard will
click into place.
8.
One end of the tube has a white plastic connector.
Push this onto the outlet on top of the chamber. (Fig.5)
9.
Connect the other end of the tube to the mask.
10.
Plug the device power cord into your household power socket and
rear of device.
11.
Fig.5
Switch on the device by pressing the on/off button (See Fig.6 ).
The current humidity setting is displayed.
12.
For changing the setting refer to section 8 “Controls and Display”.
Your device is now ready for use.
A-4
Fig.6
DISPLAY
AND
FUNCTIONS
English
8.1 DISPLAY DESCRIPTION
On/Off Button
Ramp button
Up button
Increase Setting
Down button
Decrease Setting
Mode button
Step through the options
KEY
FUNCTION & DESCRIPTION
ON/OFF
Switches the device ON & OFF
OPERATION
TO SWITCH “ON”
Press
button down briefly
The device will default to display the humidity setting.
TO SWITCH “OFF”
Remove your mask
Press button down briefly
RAMP
Reduces pressure to a lower
level to help you fall asleep.
The pressure will gradually return
to full operating pressure
over 20 minutes
TO SWITCH “OFF”
Press the ON/OFF button
INCREASE/DECREASE
Adjusts settings up or down
Press the
MODE
To step through options
Press sequentially to step through and view options available
and
button to raise or lower settings
OPERATION
<
TO VIEW ITEMS
Press the “ ” key to sequentially view:
Humidity setting (default display)
For adjusting humidity levels to minimize upper airway
side effects from CPAP use
Press the
and button to raise or lower settings
<
PATIENT MENU
DISPLAY
For viewing of CPAP settings, humidity,
compliance data, altitude and pressure settings
<
<
<
TO SWITCH “ON”
Press the RAMP button
NB: to reset ramp during a cycle the device must be switched off first
<
hr
Total run hours*
Displays the total number of hours the device has been
switched on (includes hours without mask use)
hr/
Average compliance hours per night*
Displays average number of hours the device has been
used at night with the mask on
Checksum*
Displays information for medical practitioner or dealer
use to check compliance
Altitude setting
Displays altitude setting
cmH2O
PATIENT MENU - ADDITIONAL SETTINGS
DISPLAY
To access additional settings:
OPERATION
Altitude
Select “m” for metres of “ft” for feet using
the
and keys
<
From the Default setting “HUMIDITY”
Press the “
Pressure setting
Displays pressure setting
” key for 3 seconds
3000
<
Altitude level
- Press
to change altitude level
- Set the altitude level by pressing the
- Press
to exit menu
and
keys
<
AND
<
8. CONTROLS
Warning: Failure to select correct altitude setting (for any given location) will have an adverse effect on set pressure delivery.
* only available on devices with compliance monitoring.
A-5
8.2 PATIENT MENU SUMMARY
Press once to switch
device on/off
Press to activate
Ramp
Increase
Decrease
Display
MODE
Humidity Setting
(default)
Average Hours
per night
hr/
Total Run Time
hr
Altitude Setting
Check sum
cmH2O
RETURN
TO DEFAULT
<
<
or
Pressure
Setting
0,1,2,3,4
+ 0.5 INCREMENT
-
8.3 PATIENT MENU - ADDITIONAL SETTINGS SUMMARY
Press once to switch
device on/off
Press to activate
Ramp
Increase
Decrease
Display
MODE
ADVANCED
PATIENT MENU
ft or
RETURN
TO DEFAULT
3000
m
Hold for 3 seconds
or
<
<
Select Units
for Altitude
<
<
or
Increase/Decrease
altitude Level
Warning: Failure to select correct altitude setting (for any given location) will have an adverse effect on set pressure delivery.
A-6
When I wake up in the morning, my nose and throat feel dry. What can I do?
Try increasing your humidity setting. If this does not help, please contact your clinician for advice.
How do I prevent condensation in the tubing?
The humidity setting enables adjustment of humidity, so that there should be fine misting in the six inches (183cm) of the breathing
tube closest to your face. If the humidity setting is too high for the conditions, condensation may occur in the breathing tube.
Note: Using greater than 6' (183 cm) of tubing will increase condensation.
There are several ways of reducing condensation in the tube:
1. Ensure the device is not positioned in a cool draft.
2. Decrease the humidity setting on your device slightly. Gradually decrease the setting until the condensation no longer occurs.
3. Warm the air in the room.
Do I have to use distilled water with my device?
The use of distilled water will maximize the life of the water chamber. Water from the faucet will often contain minerals which can
damage the chamber, causing pitting in the base, even if the water is passed through a filter.
Can I use my device in other countries?
Yes. Simply use the appropriate electrical socket adaptor and the device will automatically adapt to any voltage supply.
Note: When moving your device, ensure that the water chamber is empty. Machine failure due to water damage is not covered by
warranty.
Can I use supplemental oxygen with my device?
Yes, oxygen can be administered at the mask. Turn the device on before turning on the oxygen. Ensure that the oxygen source is
turned off before turning off the device to avoid oxygen accumulating in the machine.
When do I replace my water chamber?
Replace the chamber if the plastic walls of the chamber become cracked or cloudy or the chamber base becomes pitted. (Note: If
the chamber leaks at all, it should be replaced immediately).
10. SPECIFICATIONS
DIMENSIONS:
275mm x 170mm x 140mm
WEIGHT:
1.9kg (3.0kg packaged in bag
incl. accessories)
STANDARDS COMPLIANCE
Designed to conform to the
requirements of:
ELECTRICAL RATINGS
Supply Frequency:
Supply Voltage and Current:
50-60 Hz
100-115V~ (1.2A, 1.3A max),
220-240V~ (0.8A, 1.8A max)
Note: These values represent
average current
DC to AC Inverter requirements: 115V - 200W/300W surge
230V - 300W/500W surge
Heater Plate :
Heater Plate Temperature:
85W max
65°C (149°F) max
PERFORMANCE
Pressure Range
Altitude Range
4 to 20 cmH2O
0 to 3000m, or 0 to 9000 ft
EN / IEC 60601-1
UL2601-1
CSA C22.2/No.60601.1
AS3200.1.0
The device complies with the electromagnetic compatibility
requirements of IEC 60601-1-2. In certain circumstances, the
device may affect or be affected by nearby equipment due to
the effects of electromagnetic interference. If this should
happen, try moving your unit or the location of the device
causing interference, or alternatively consult your homecare
provider.
A -7
English
9. FREQUENTLY ASKED QUESTIONS
11. OPERATING CONDITIONS:
AMBIENT TEMPERATURE:
5° - 35°C
HUMIDITY:
10 - 95% RH
ALTITUDE:
0 - 3000m (9000ft)
Above 500m (1500 ft) the maximum operating pressure will be reduced.
12. STORAGE AND TRANSPORT CONDITIONS:
The device should be stored and transported in environmental conditions of: -10° to 60°C .
13. TROUBLESHOOTING:
If you feel that your device is not operating correctly, consult your homecare dealer.
Do not attempt to repair the device yourself.
Fisher & Paykel Healthcare have a policy of continued product improvement and
reserve the right to alter specifications without notice.
A- 8
HC230 SERIES
PPC AVEC SYSTÈME
D’HUMIDIFICATION INTÉGRÉ
Pour une assistance complémentaire, veuillez
contacter votre Bureau local F&P – voir adresse
au verso. Conserver ce manuel pour futures
références.
TABLE DES MATIÈRES
1. Définitions des symboles . . . . . . . . . . . . . . . . . . . . . . . . . . . . . . . . . . . . . . . . . . . . . . . . . . . . . . . . . . . . . . . . . . . . . . . . . . . 2
2. Avertissement . . . . . . . . . . . . . . . . . . . . . . . . . . . . . . . . . . . . . . . . . . . . . . . . . . . . . . . . . . . . . . . . . . . . . . . . . . . . . . . . . . . . 2
3. Avertissement contre l’utilisation d’oxygène . . . . . . . . . . . . . . . . . . . . . . . . . . . . . . . . . . . . . . . . . . . . . . . . . . . . . . . . . . . . . 2
4. Utilisation recommandée . . . . . . . . . . . . . . . . . . . . . . . . . . . . . . . . . . . . . . . . . . . . . . . . . . . . . . . . . . . . . . . . . . . . . . . . . . . . 2
5. Description de l’appareil . . . . . . . . . . . . . . . . . . . . . . . . . . . . . . . . . . . . . . . . . . . . . . . . . . . . . . . . . . . . . . . . . . . . . . . . . . . 3
5.1 Contenu de l’emballage . . . . . . . . . . . . . . . . . . . . . . . . . . . . . . . . . . . . . . . . . . . . . . . . . . . . . . . . . . . . . . . . . . . . . . . . . 3
5.2 Eléments importants de l’appareil
................................................................3
5.3 Accessoires . . . . . . . . . . . . . . . . . . . . . . . . . . . . . . . . . . . . . . . . . . . . . . . . . . . . . . . . . . . . . . . . . . . . . . . . . . . . . . . . . . 3
6. Nettoyage et Entretien . . . . . . . . . . . . . . . . . . . . . . . . . . . . . . . . . . . . . . . . . . . . . . . . . . . . . . . . . . . . . . . . . . . . . . . . . . . . . 4
7. Instructions d’installation . . . . . . . . . . . . . . . . . . . . . . . . . . . . . . . . . . . . . . . . . . . . . . . . . . . . . . . . . . . . . . . . . . . . . . . . . . . 4
8. Contrôles et Affichages . . . . . . . . . . . . . . . . . . . . . . . . . . . . . . . . . . . . . . . . . . . . . . . . . . . . . . . . . . . . . . . . . . . . . . . . . . . . 5
8.1 Affichages: Description et Fonction . . . . . . . . . . . . . . . . . . . . . . . . . . . . . . . . . . . . . . . . . . . . . . . . . . . . . . . . . . . . . . . . 5
8.2 Sommaire Menu Patient . . . . . . . . . . . . . . . . . . . . . . . . . . . . . . . . . . . . . . . . . . . . . . . . . . . . . . . . . . . . . . . . . . . . . . . . 6
8.3 Sommaire Menu Patient: Réglages Supplémentaires . . . . . . . . . . . . . . . . . . . . . . . . . . . . . . . . . . . . . . . . . . . . . . . . . . . 6
9. Questions fréquemment posées . . . . . . . . . . . . . . . . . . . . . . . . . . . . . . . . . . . . . . . . . . . . . . . . . . . . . . . . . . . . . . . . . . . . . . 7
10. Caractéristiques techniques. . . . . . . . . . . . . . . . . . . . . . . . . . . . . . . . . . . . . . . . . . . . . . . . . . . . . . . . . . . . . . . . . . . . . . . . . 7
11. Conditions de fonctionnement . . . . . . . . . . . . . . . . . . . . . . . . . . . . . . . . . . . . . . . . . . . . . . . . . . . . . . . . . . . . . . . . . . . . . . 8
12. Entreposage et transport. . . . . . . . . . . . . . . . . . . . . . . . . . . . . . . . . . . . . . . . . . . . . . . . . . . . . . . . . . . . . . . . . . . . . . . . . . . 8
13. Dépannage . . . . . . . . . . . . . . . . . . . . . . . . . . . . . . . . . . . . . . . . . . . . . . . . . . . . . . . . . . . . . . . . . . . . . . . . . . . . . . . . . . . . . 8
VEUILLEZ LIRE LES INSTRUCTIONS DANS LEUR TOTALITE AVANT D’UTILISER VOTRE APPAREIL POUR LA PREMIERE FOIS
B-1
Français
Les systèmes de PPC de série HC230 ont été
conçus pour le traitement à domicile du SAS.
1. DÉFINITION
Type BF
Pièce utilisée
DES SYMBOLES
ATTENTION
Consulter les
documents joints
Anti-écoulement
Courant
alternatif
Class ll
Double isolation
Veille
On/Off
93/42/EEC
Classe IIb
2. AVERTISSEMENT
1.
2.
3.
4.
5.
6.
7.
8.
9.
A noter: ce mode d'emploi se réfère à l'appareil de PPC HC230
comme l'appareil
L’appareil ne peut être utilisé qu’avec des masques,
connecteurs et circuit recommandés par Fisher & Paykel
Healthcare, votre médecin ou thérapeute.
Ne jamais utiliser l’appareil si:
a) son cordon d’alimentation ou sa prise est endommagé,
b) Le circuit est endommagé : trous, déchirures, pliures,
c) l’appareil est endommagé ou s’il est tombé par terre, d)
l’appareil est tombé dans l’eau,
e) l’appareil ne fonctionne pas correctement.
Retourner l’appareil à un centre de dépannage agrée pour
inspection et réparation.
Ne pas utiliser l’appareil lorsque la température extérieure
s’élève à plus de 35°C (95°F), cela pouvant accroître la
température du flux d’air, risquant d’entraîner une irritation
des voies respiratoires.
S’assurer que le filtre à air est présent lorsque vous vous
servez de l’appareil.
Retirer la chambre d’humification avant remplissage.
Ne pas remplir la chambre avec de l’eau bouillante
When handling the device with a chamber and water avoid
tilting the machine to prevent any chance of water entering
the unit enclosure.
Placer votre appareil à une hauteur inférieure à celle de
votre tête pour éviter tout risque de pénétration d’eau dans
le circuit chauffant au cas où l’appareil serait renversé.
Ne pas entreposer ou utiliser l'appareil dans un endroit où
il est susceptible de tomber par terre ou dans l’eau. Si de
3. AVERTISSEMENT
l’eau s’est infiltrée dans l’appareil, déconnecter le
cordon d’alimentation et ne plus l’utiliser. Solliciter le
conseil de votre prestataire de service.
10. Ne jamais boucher les ouvertures d’air du l'appareil ou le
placer sur une surface tel un lit ou un canapé, sur lesquels
le filtre risque de s’obstruer. S’assurer que les ouvertures
d’air ne comportent pas de matières telles que des
peluches ou cheveux.
11. S’assurer que l’appareil est sec avant de le rebrancher.
12. Ne pas utiliser de masque si l’appareil est éteint ou s’il ne
fonctionne pas correctement. Ne jamais boucher la fuite
expiratoire du masque.
13. En raison de la température de fonctionnement de la
plaque chauffante, éviter tous contacts avec la plaque
chauffante ou la base de la chambre d’humidification.
14. Si la pression PPC est basse, le flux circulant à travers le
masque peut s’avérer insuffisant pour évacuer tous les gaz
exhalés du circuit chauffant, ce qui peut entraîner une reinhalation.
15. Changer la pression peut rendre la thérapie inefficace. La
pression ne devrait être contrôlée que par un professionnel
du corps médical.
16. Ne jamais insérer ou faire tomber de corps étrangers dans
les ouvertures ou le tuyau.
17. Avant tout nettoyage, éteindre l’appareil et débrancher le
cordon d’alimentation de la prise murale.
18. Vider la totalité de l’eau avant transport.
19. Tout entretien autre que celui décrit dans ce manuel doit
être effectué par du personnel qualifié.
CONTRE L’UTILISATION D’OXYGÈNE
Si une quantité supérieure d’oxygène est utilisée avec l’appareil, couper le débit d’oxygène lorsque l’appareil n’est pas en service.
Cela empêche l’oxygène de passer par le tube et de s’accumuler à l’intérieur de l’appareil.
•
•
•
•
•
Le modè l’appareil doit être placé dans un endroit ventilé.
Une adjonction d’oxygène doit être administrée au niveau du masque.
L’oxygène ne doit pas être utilisée en présence de fumée de cigarette ou à proximité d’une flamme. La thérapie par oxygène
comporte des risques d’incendie et requiert par conséquent une attention particulière. Tout matériau inflammable à l’air et
certains matériaux non inflammables peuvent s’enflammer facilement en présence de hautes concentrations d’oxygène. C’est
pourquoi, pour des raisons de sécurité, il est recommandé de garder à distance et de préférence hors de la pièce où
l’appareil est utilisé toute source possible d’ignition.
Une inflammation spontanée et agressive peut se produire si de l’huile, de la graisse ou des substances graisseuses, entrent
en contact avec des régulateurs d’oxygène, soupapes, tubes et connecteurs, et tout autre équipement se rapportant à
l’oxygène.
A un taux fixe de débit d’oxygène, la concentration d’oxygène inhalée varie en fonction des paramètres de pression, le type
d’inhalation, le masque et le taux de fuite.
4. UTILISATION RECOMMANDÉE
L’appareil a pour objectif le traitement du syndrome des apnées du sommeil (SAS) et est particulièrement recommandé
comme aide respiratoire de patients endormis. La méthode consiste à délivrer une Pression Positive Continue (PPC) afin de
prévenir l’obstruction des voies respiratoires. L’adjonction d’un humidificateur respiratoire chauffant prévient les effets
desséchants et irritants des voies respiratoires couramment observés lors de l’utilisation d’appareils PPC. L'appareil convient à
domicile ainsi qu’une utilisation professionnelle dans les laboratoires du sommeil.
B-2
5. DESCRIPTION DE L’APPAREIL
5.1 Contenu de l’emballage
1 x Cordon
d’alimentation
1 x Circuit
1 x Filtre à air
additionnel
1 x Entonnoir
Accessoires
1 x humidificateur avec PPC Série HC230
5.2 Eléments importants de l’appareil
CORDON D’ALIMENTATION
INTERRUPTEUR
PLAQUE CHAUFFANTE
SUPPORT DE FILTRE
CIRCUIT 900HC221
FILTRE A AIR
AFFICHAGE
CONNECTEUR 900HC010
DISPOSITIF PROTECTEUR
DE LA CHAMBRE
CHAMBRE D’HUMIDIFCATION HC385
NIVEAU D’EAU
5.3 Accessoires
HC385
Chambre d’humidification jetable
900HC230
Logiciel d’observance Maximizer
HC355*
Chambre d’humidification réutilisable
900HC232
Câble série de téléchargement
900HC010
Connecteur
HC225
Télécommande
900HC221
Circuit
900HC226
Rallonge d’extension du HC225
900HC240
Filtre à poussières (2-Pack)
*Non disponible dans certains pays
B-3
Français
2 x Chambre
d'humidification
6. NETTOYAGE & ENTRETIEN
1.
2.
3.
4.
Eteindre l’appareil et débrancher le cordon d’alimentation de la prise murale.
Essuyer l’extérieur du l’appareil à l’aide d’un chiffon propre humecté d’eau (pas mouillé) et d’un détergent doux. Ne pas
utiliser de produits abrasifs ou solvants risquant d’endommager l’appareil.
JOURNALIER
Nettoyer la chambre et le circuit.
Déconnecter le circuit respiratoire de la chambre d’humidification.
Rinser le circuit avec dle l’eau savonneuse. Pendre le circuit à la verticale pour qu’il sèche.
Retirer la chambre en poussant la protection vers le bas et faire sortir la chambre.
Vider et jeter l’eau usagée
Nettoyer la chambre à l’eau savonneuse, rincer et laisser sécher
HEBDOMADAIRE
Nettoyer la chambre
Nettoyer soigneusement la chambre en la faisant tremper 10 minutes dans une solution de vinaigre blanc
et d’eau (1 dose de vinaigre blanc pour cinq doses d’eau).
Replacer le filtre à air lorsqu’il se décolore de manière significative, au moins une fois
tous les 3 mois ou après 1000 heures de fonctionnement.
Retirer le support du filtre à l’arrière de l’appareil et retirer le filtre.
Remplacer l’ancien filtre par un filtre neuf. La ligne verticale noire doit faire face à
l’appareil.
•
•
•
•
•
•
5.
•
•
7. INSTRUCTIONS D’INSTALLATION
1.
Retirer l’appareil de son emballage.
2.
Placer l’appareil sur une étagère basse ou par terre à côté de votre lit.
Placer l’appareil à une hauteur inférieure à celle de votre tête.
3.
Retirer une chambre d'humidification de l’emballage.
4.
Retirer et jeter les capuchons bleus (Fig.1).
5.
Remplir la chambre d’humidification jusqu’au trait noir avec de
l’eau.(Fig. 2)
Ne jamais remplir la chambre d’humidification lorsqu’elle est en
Fig.1
Fig.2
Fig.3
Fig.4
Fig.5
Fig.6
place. Lors du transport du l’appareil, toujours s’assurer que la
chambre est vide. La garantie ne couvre pas les dommages
occasionnés par l’eau.
6.
Pour attacher la chambre d'humidification au l’appareil, appuyer
sur la protection et y glisser la chambre. (Fig.3) (Fig. 4).
7.
Lorsque la chambre est placée correctement, la protection
s’enclenche
8.
Une des extrémités du circuit possède un connecteur en plastique.
Connecter cette extrémité à la sortie de la chambre d’humidification (Fig. 5).
9.
Connecter l’autre extrémité au masque.
10.
Brancher l’appareil à la prise murale.
11.
Allumer l’appareil à l’aide de l’interrupteur se trouvant sur le dessus
12.
Pour modifier les paramètres, consulter le chapitre “Contrôles et
de l’appareil. (Fig.6)
Affichages “
Votre appareil est prêt à être utilisé.
B-4
AFFICHAGE
8.1 AFFICHAGES: DESCRIPTION
FONCTION
ET
Interrupteur
ON/OFF
Bouton monté
en pression
progressive
Bouton Haut
Augmente le réglage
Bouton Bas
Bouton mode
Naviguer entre les options
BOUTON
DESCRIPTION ET FONCTION
FONCTIONNEMENT
MARCHE /ARRET
Mise en marche & arrêt
METTRE EN MARCHE
Appuyer sur le bouton
brièvement.
L’appareil affiche la valeur d’humidité par défaut .
ETEINDRE L’APPAREIL
Retirer le masque
Appuyer sur le bouton brièvement
MODE PROGRESSIF
Réduction de pression pour
favoriser l’endormissement.
Augmentation progressive de la
pression à la valeur prescrite
après 20 minutes.
AUGMENTER / DIMINUER
Ajuste le réglage
Utiliser le bouton
MODE
Naviguer entre les options
Press sequentially to step through and view options available
MENU PATIENT
<
<
<
METTRE EN MARCHE
Appuyer sur le bouton du mode progressif
A noter : pour réinitialiser le mode progressif lors d’un cycle, il est
nécessaire d’éteindre l’appareil préalablement.
ETEINDRE
Appuyer sur le bouton Marche/Arrêt.
et
AFFICHAGE
Visualisation des paramètres
PPC (humidité, observance,
données, altitude et pression)
pour augmenter ou réduire les réglages
FONCTIONNEMENT
VISUALISER LES VALEURS
hr
hr/
<
<
Appuyer sur le bouton “ ” pour visualiser séquentiellement:
Paramètres d’humidité (paramètres par défaut)
Pour ajuster le niveau d’humidité a