1
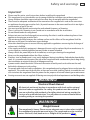
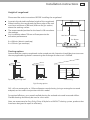
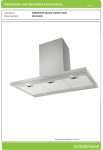
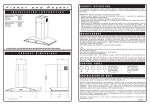
Installation instructions
and User guide
Slideout rangehood
HS60CSRX2, HS60CSRW2, HS90CSX2, HS60CSW2,
HS60CSX2, HS60CIW2, HS60CIX2 models
NZ AU
Contents
Safety and warnings
Installation instructions
Getting started quickly
Cleaning and maintenance
Manufacturer’s Warranty
Customer Care
Important!
SAVE THESE INSTRUCTIONS
The models shown in this User Guide may not be available in all markets and are
subject to change at any time. For current details about model and specification
availability in your country, please visit our local website listed on the back cover
or contact your local Fisher & Paykel dealer.
1
2
6
7
8
9
Safety and warnings
1
Important!
Please read the entire set of instructions before installing the rangehood.
This rangehood is not intended for use by young children or infirm persons without supervision.
Young children should be supervised to ensure that they do not play with the rangehood.
There must be adequate ventilation of the room when the rangehood is used at the same time
as appliances burning gas or other fuels. (A partial vacuum in the room could result in too high a
concentration of gas in the air).
You must read the details concerning the method and frequency of cleaning.
There is a fire risk if cleaning is not carried out in accordance with the instructions.
Do not flambé under the rangehood.
Exhaust air must not be discharged into an existing flue that is used for exhausting fumes from
appliances burning gas or other fuels.
The minimum distance between the cooktop surface and the filters of the rangehood shall be
600 mm, or 650 mm if installed over a gas cooktop.
Attention should be given to ensure that any applicable regulations concerning the discharge of
exhaust air is fulfilled.
If the supply cord of this equipment is damaged it must only be replaced by the manufacturer, its
service agent or similarly qualified person in order to avoid a hazard.
Always switch the power off prior to installation, servicing or cleaning the rangehood.
Never use the rangehood without the filters in place.
Stainless steel or powdercoat is very easily damaged during installation if abraded or knocked by
tools. It is recommended to protect the top of the rangehood with cardboard or plastic bag during
the installation to minimise the risk of damage occurring.
A power outlet should be within 750 mm of the motor assembly and can be either on the wall,
behind the chimney or in the ceiling.
To comply with electrical safety regulations, this rangehood must be plugged into a socket near the
appliance. The socket must be accessible, or have an accessible isolating switch, to enable the end
user to isolate the rangehood from the power for the purpose of internal cleaning or maintenance.
Ducting accessories are not supplied. All ducting must comply with local requirements and building codes.
WARNING!
Electrical Shock Hazard
All electrical work must be done in accordance with local and/or national
electrical codes as applicable. For safety, this product must be earthed. If
you are unfamiliar with methods of installing electrical wiring, employ the
services of a qualified electrician. Turn off power at service entrance before
installing wiring or servicing this product.
WARNING!
Weight Hazard
The rangehood is heavy. Please ensure adequate care is taken when installing
the rangehood to prevent personal injury. The rangehood must be installed
onto a solid wall, stud, beam or truss. Weight of the product is 6.5 kg.
2
Installation instructions
Thank you for purchasing a quality Fisher & Paykel rangehood. Each rangehood is tested and
approved before it leaves the factory, ensuring our high standard of quality control is met.
Contents of packaging
1 x rangehood
1 x installation instructions
1 x Installation kit - “SIDE FIXING”
1 x Installation kit - “TOP FIXING”
4 x Spacer Tube 25.4 mm
4 x Screw 8x1.5”
4 x Screw 8x1”
Typical equipment required:
Electric drill
Screwdriver
Duct tape (if ducting)
Jig saw (if ducting)
Ladder (if ducting)
Ducting
Tape measure
Drill bits
Spirit level
Fig.1 Slideout rangehood
Accessories
Accessory
Part Number
Replacement aluminium filter (HS60)
R103794
Replacement aluminium filter (HS90)
R103795
Charcoal filter (HS60)
R103794C
Charcoal filter (HS90)
R103795C
Light bulb
R111020
Installation instructions
3
Height of rangehood
Please read the entire instructions BEFORE installing the rangehood.
Ascertain the desired installation height of the rangehood.
When installing the rangehood, the lower edge of the unit
must be a minimum of 600 mm (650 mm for gas cooker)
above the cooking surface.
The recommended position for the hood is 650 mm above
the cooktop.
Any installation above 750 mm will compromise the
extraction performance.
Not less than 650 mm
Gas Burner
A = 600 min (electric cook top)
A = 650 min (gas cook top)
Fig.2 Positioning
Ducting options
Some authorities require rangehoods to be vented outside. Attention should be given to ensure
that any applicable regulations concerning the discharge of exhaust air is fulfilled.
Top ducting through roof
Rear ducted
Side ducting
Fig.3 Ducting options
285 x 85 mm rectangular, or 150 mm diameter round ducting (using a rectangular-to-round
adaptor) can be used in conjunction with this model.
For optimal efficiency, use smooth-walled ducting for reduced noise and increased airflow.
Flexible ducting should only be used as a last resort.
Note: we recommend an Easy Fit by Fisher & Paykel or a UNIDUCT ducting system, products that
have been designed to expel air efficiently.
4
Installation instructions
Preparing the rangehood for installation
Ensure the overhead cabinets are built according to Fig.5 (below).
Before drilling any holes, check that the area behind the surface to be drilled is clear of any
electrical cables or pipes etc.
1
2
3
4
Recirculated installation
Knockouts (remove for ducted only)
If the rangehood is to be installed as a recirculated hood,
first ensure the cabinets are built according to Fig. 5 below:
Do not remove the knockouts shown in Fig.4. These are
removed for ducted options only.
Remove Cover Tape “A”. See Fig.4.
Note: for recirculation, please purchase a charcoal
filter (refer to Accessories list on page 2).
If an 80 mm handle is not installed (depending on model
purchased), remove front fascia “B” by undoing the 3 screws
on the fascia (see Fig. 4).
Fig.4 Preparing for install
Replace front fascia “B” with a replacement front panel “C”,
constructed of same or similar material as the surrounding
cupboard doors. See Fig. 5 for height of panel.
Filtered air
1
2
Ducted installation
If the rangehood is to be installed as a ducted hood:
Remove the appropriate knockout to suit rear or top
venting, as shown in Fig.4
Do not remove Cover Tape “A”. See Fig.4. This is removed
for recirculating only.
Cooking fumes
Fig.5 Panel heights
Mounting the rangehood
The rangehood can be mounted in two ways, top or sides.
Before commencement, unpack the rangehood and check that it functions correctly.
Mounting to underside of cupboard
Fix the rangehood to a shelf mounted at the right height in your wall units, by drilling 4 holes,
5 mm in diameter, (see Fig.6) and fixing with the 4 screws supplied (found in the bag labelled
“TOP FIXING”).
For top ducting cut hole to suit size
Dimensions shown are for UNIDUCT
Drill 5 mm holes
Cupboard
Door
Wall
Fig.6 Mounting to
underside of cabinetry
Installation instructions
5
Mounting to cabinetry sides
See Installation sheet provided. When mounting to the cabinetry sides, please ensure the correct
dowels and screws are used. These can be found in the bag labelled “SIDE FIXING”.
Note: using the incorrect screws for the side-fixed mounting method may cause damage to
the product.
Fix rangehood to your wall units, with 2 screws in each side into the vertical panels. To do this:
1
2
3
Slide out the drawer and remove filter. You will see two mounting holes running through the
moulded sides (see Fig.7).
Remove the thin plastic skin (A) from each side fixing hole. An 8 mm diameter drill bit is
recommended.
Position slideout (ensuring unit is level) and fix in place using screws and hollow dowels through
each side fixing hole (see Fig.8). (Check screw length with thickness of cabinet panels).
The rangehood’s plug can be easily plugged into the nearest wall socket, or if connected directly
into the house wiring, a registered electrician is required.
Fig.7 Fixing holes
Hollow Dowel
Cupboard
Slideout Slide
Fig.8 Side mounting
6
Getting started quickly
Control panel features
Fig.9 Slider Controls
Light switch: the light can be operated independently from the fan.
Fan switch: the fan can be run at different speeds depending on the cooking requirements.
Cleaning and maintenance
7
Caution!
Never use abrasive or oil based liquid cleaners.
General maintenance
The manufacturer is not liable for any damage caused by not following these instructions.
The rangehood should be cleaned regularly using warm water with soap or mild liquid
detergents. This ensures that no build-up of grease occurs as these deposits are corrosive.
Do not use abrasives or harsh detergents/cleaning fluids.
Note: in areas of high humidity and coastal environments cleaning should be carried out
frequently.
Aluminium filter
The grease filter must be periodically cleaned (at least every two months).
Remove the grease filter and wash either by hand using hot soapy water or place in the
dishwasher using mild detergent. A badly smoked filter may be cleaned with “cookware cleaners”.
Note: some discolouration of the frame may occur.
When installing or replacing a filter, remove the protective plastic covering from the filter.
Charcoal filter
Charcoal filters are designed to remove grease and odours from cooking vapours, prior to the
cleansed air re-entering the kitchen (when the rangehood is in recirculating mode). Charcoal
filters are disposable items and it is recommended that these should be replaced every three to
six months depending on use.
Note:
Fully saturated charcoal filters can become a barrier to air movement, impeding the rangehood’s
performance.
In the event of fire, fully grease laden filters could be flammable and therefore regular
replacement is recommended.
In ducted installations, conventional aluminium filters are recommended.
For replacement charcoal filters, ducting accessories, spare parts and service, please contact your
local supplier or Fisher & Paykel Customer Care Centre.
1
2
3
4
Light bulb replacement
(230 Volt / 50 Watt light bulb)
To replace a light bulb, first disconnect rangehood from power supply.
Apply finger pressure to the face of the lamp cover and twist one quarter turn anti-clockwise, the
lamp cover will now be free to drop out.
Remove the faulty bulb and fit replacement bulb into the lamp holder.
Refit the lamp cover, applying finger pressure and twist one quarter turn clockwise.
8
Manufacturer’s Warranty
You automatically receive a 2 year Manufacturer’s Warranty with the purchase of this
Product covering parts and labour for servicing within the country of purchase.
Fisher & Paykel undertakes to:
Repair or, at its option, replace without cost to the owner either for material or labour any
part of the Product, the serial number of which appears on the Product, which is found to
be defective within TWO YEARS of the date of purchase.
This Warranty DOES NOT cover
A
Service calls which are not related to any defect in the Product. The cost of a service call will be
charged if the problem is not found to be a Product fault. For example:
1. Correcting the installation of the Product.
2. Instructing you how to use the Product.
3. Replacing house fuses or correcting house wiring or plumbing.
4. Correcting fault(s) caused by the user.
5. Noise or vibration that is considered normal, eg drain/fan sounds, refrigeration noises
or user warning beeps.
6. Correcting damage caused by pests, eg rats, cockroaches etc.
B
Defects caused by factors other than:
1. Normal domestic use or
2. Use in accordance with the Product’s User Guide.
C
Defects to the Product caused by accident, neglect, misuse or Act of God.
D
The cost of repairs carried out by non-authorised repairers or the cost of correcting such
unauthorised repairs.
E
Normal recommended maintenance as set out in the Product’s User Guide.
F
Repairs when the appliance has been dismantled, repaired or serviced by other than a
Fisher & Paykel Authorised Repairer or the selling dealer.
G
Pick-up and delivery.
H
Transportation or travelling costs involved in the repair when the Product is installed outside the
Fisher & Paykel Authorised Repairer’s normal service area.
This Product has been designed for use in a normal domestic (residential) environment. This
Product is not designed for commercial use (whatsoever). Any commercial use by a Customer will
affect this Product’s Warranty.
Service under this Manufacturer’s Warranty must be provided by a Fisher & Paykel Authorised
Repairer (refer to the ‘Customer care’ section at the back of this book). Such service shall be provided
during normal business hours. This Warranty certificate should be shown when making any claim.
Note
This Warranty is an extra benefit and does not affect your legal rights.
Please keep this User Guide in a safe place.
Customer Care
9
Before you call for service or assistance…
Check the things you can do yourself.
Refer to your User Guide and check:
1
2
Your appliance is correctly installed.
You are familiar with its normal operation.
If after checking these points you still need assistance, please refer to your nearest Fisher & Paykel
Authorised Repairer, or contact us through our local website listed on the back cover.
In New Zealand if you need assistance...*
Call your Fisher & Paykel retailer who is trained to provide information on your appliance, or if we
can be of any further help, please contact our Customer Care Centre,
Toll Free: 0800 FP CARE or 0800 37 2273 Fax: (09) 273 0656
Email: [email protected]
Postal address: PO Box 58732, Botany, Manukau 2163
If you need service...*
Fisher & Paykel has a network of independent Fisher & Paykel Authorised Repairers whose fully
trained technicians can carry out any service necessary on your appliance. Your dealer or our
Customer Care Centre can recommend a Fisher & Paykel Authorised Repairer in your area.
In Australia if you need assistance...*
Call the Fisher & Paykel Customer Care Centre and talk to one of our Customer Care Consultants.
Toll Free: 1 300 650 590
Fax: (07) 3826 9298
Email: [email protected]
Postal Address: PO Box 798, Cleveland QLD 4163
If you need service...*
Fisher & Paykel has a network of qualified Fisher & Paykel Authorised Repairers responsible for
servicing only Fisher & Paykel branded appliances. Our Customer Care Centre can recommend a
qualified Fisher & Paykel Authorised Repairer in your area.
*If you call, write or contact our website please provide: your name and address, model number,
serial number, date of purchase and a complete description of the problem. This information is
needed in order to better respond to your request for assistance.
Product details
Fisher & Paykel Appliances, Ltd
Model/Serial No.
Date of Purchase
Purchaser
Dealer
Suburb
Town
Country
Copyright © Fisher & Paykel 2009. All rights reserved.
The product specifications in this booklet apply to
the specific products and models described at the
date of issue. Under our policy of continuous product
improvement, these specifications may change at any
time. You should therefore check with your Customer
Care Centre to ensure this booklet correctly describes
the product currently available.
www.fisherpaykel.co.nz
www.fp.com.au
NZ AU
Slideout rangehood
Installation instructions and user guide
Published: 09/2009
Part No. 111024 I