1
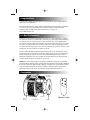
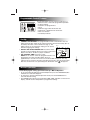
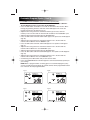
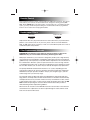
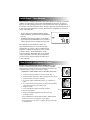
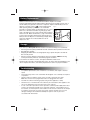
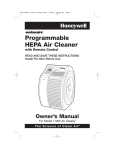
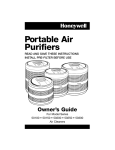
035-00438 17005 OM eng/fr/sp
8/3/01
12:44 PM
Page 1
®
Programmable
HEPA Air Cleaner
with Remote Control
READ AND SAVE THESE INSTRUCTIONS
Install Pre-filter Before Use.
hours
speed
program
filter
set
minutes
Distributed by:
TM
.c om
(888) 933-0100
M20123
Owner’s Manual
For Model 17005 Air Cleaner
The Science of Clean Air®
035-00438 17005 OM eng/fr/sp
8/3/01
12:44 PM
Page 2
IMPORTANT SAFETY
INSTRUCTIONS
READ AND SAVE THESE SAFETY
INSTRUCTIONS BEFORE USING THIS
AIR CLEANER
When using electrical appliances, basic precautions should
always be followed to reduce the risk of fire, electric shock,
and injury to persons, including the following:
1. Read all instructions before operating the air cleaner.
2. Place air cleaner where it is not easily knocked over by persons in the household.
3. Always turn the air cleaner to the OFF position and unplug from the wall outlet
when not in use.
4. To disconnect the air cleaner, first turn control to the OFF position, grip the plug
and pull it from the wall outlet. Never pull by the cord.
5. Do not use any product with a damaged cord or plug or if product malfunctions, is
dropped or damaged in any manner. Keep the cord away from heated surfaces.
6. Do not use air cleaner outdoors.
7. Never use air cleaner unless it is fully assembled.
8. Do not run power cord under carpets, and do not cover with throw rugs. Arrange
cord such that it will not be tripped over.
9. Do not use air cleaner where combustible gases or vapors are present.
10. Do not expose the air cleaner to rain, or use near water, in a bathroom, laundry
area or other damp location.
11. The air cleaner must be used in its upright position.
12. Do not allow foreign objects to enter ventilation or exhaust opening as this may
cause electric shock or damage to the air cleaner. Do not block air outlets or
intakes.
13. Locate air cleaner near the outlet and avoid using an extension cord.
14. This appliance has a polarized plug (one blade is wider than the other). To reduce
the risk of shock, this plug is intended to fit only one way in a polarized outlet. If
the plug does not fit fully in the outlet, reverse the plug. If it still does not fit,
contact a qualified electrician. DO NOT attempt to defeat this safety feature.
15. A loose fit between the AC outlet (receptacle) and plug may cause overheating
and a distortion of the plug. Contact a qualified electrician to replace loose or
worn outlet.
16. Do not sit, stand or place heavy objects on the air cleaner.
17. Disconnect power supply before servicing.
WARNING: To Reduce The Risk of Fire or Electric Shock, Do Not Use This Air
Cleaner With Any Solid-State Speed Control Device.
CAUTION: The battery used in this device may present a risk of fire or chemical
burn if mistreated. Do not recharge, disassemble, heat above 100˚ C (212˚F), or
incinerate. Replace battery with Panasonic CR 2032, 3V only. Use of another
battery may present a risk of fire or explosion.
035-00438 17005 OM eng/fr/sp
8/3/01
12:44 PM
Page 3
Congratulations
You now own a quality portable HEPA air cleaner that has been engineered and
crafted for your satisfaction.
Our Consumer Relations representatives will be pleased to help with any questions
or concerns you may have about your air cleaner. Please call our Consumer
Relations Dept. at (800) 332-1110 for assistance, or e-mail us at
[email protected].
For Best Performance
Indoor air can be quickly contaminated by activity in a room, infiltration of outside
air, and from sources of contamination. Therefore, it is generally recommended that
you operate your air cleaner 24 hours a day. However, this unit is equipped with
convenient, energy-saving programmable controls which will allow you to preset the
air cleaner to shut off when you are away and turn on when you generally use the
room, thus minimizing energy costs. For best performance, set the air cleaner to turn
on about an hour or so before you will use a room.
This air cleaner discharges filtered air upwards into the room, allowing the unit to
be placed on the floor in almost any location. While all the air in a room will not be
processed by the air cleaner, the more air circulated through the filter, the more
filtered air returned to the room. Portable air cleaners will be much more effective
in rooms where all doors and windows are closed.
NOTE: Due to the large volume of air drawn towards the air cleaner, surrounding
areas should be cleaned and/or vacuumed more frequently to prevent dust build-up.
If the unit is placed on light colored carpeting, a small mat or rug should be used to
ease cleaning and prevent permanent staining of carpeting. This is particularly
important in homes with heavy contamination from smoking or fireplaces.
Construction
Locking
Mechanism
hours
speed
program
filter
set
minutes
Pre-filter
Motor
Housing
M20124
Remote Control
HEPA Filter
Endcap
035-00438 17005 OM eng/fr/sp
8/3/01
12:44 PM
Page 4
Programmable Control Features
Fig. 1
Your programmable control features include (Fig. 1):
• Manual control or automatic programmed operation
• 3 Speed settings
• Customize set program times
• Clock
• Intelli-CheckTM Pre-filter life monitor bar
• Intelli-CheckTM HEPA filter life monitor bar
• Filter reset function
• Low battery indicator
Set-Up
• CONNECT THE BATTERY. The programmable controls and real time clock are
battery backed. Upon initial set-up, pull the protective film from the battery door so
the battery will make contact and function (Fig. 2). This
Fig. 2
battery allows you to temporarily unplug your air cleaner
without losing program settings.
• INSTALL PRE-FILTER BEFORE USE. Locate the initial
pre-filter in the packaging. Refer to the "How to Install and
Replace the Filters" section for proper installation.
• SET CURRENT TIME. Plug unit in outlet.
NOTE: The air cleaner cannot be programmed unless it is
plugged into the outlet. Hold SET button down for
approximately 3 seconds. The clock icon and word TIME will appear. You may
adjust the hours using the up button and adjust the minutes using the down button.
After the current time is set, repeatedly press SET button until (
) disappears.
speed
filter
minutes
Manual Operation
The default program setting upon initial start-up is Manual Operation.
• To go from Automatic Operation to Manual Operation press the PROGRAM button
until both PG1 and PG2 disappear.
• To change the speeds in Manual Operation mode press the SPEED button to
select the desired setting.
• The SPEED button will move through HIGH, MED, LOW, and OFF as noted on the
display, and will function independent of programmed settings.
035-00438 17005 OM eng/fr/sp
8/3/01
12:44 PM
Page 5
Pre-Set Program Cycle
To run one pre-set program cycle in a 24 hour period (PG1).
PG1 Pre-Setting to run Program One
P1-ON
4 PM HIGH SPEED
P1-OFF
8 AM
To activate pre-set PG1, Press the PROGRAM button once. PG1 will be displayed.
Your machine is now programmed to run from 4pm to 8am on HIGH (Fig. 3a, 3b).
Fig. 3a
Fig. 3b
Customize Program Cycles
NOTE: The air cleaner cannot be programmed unless it is plugged into the outlet.
To SET program points:
Press the SET button and hold for 3 seconds to activate time function. The SET
button will move through these programming functions:
Set (current) TIME.
Set PG1 cycle times P1-ON and P1-OFF.
Set PG2 cycle times P1-ON and P1-OFF, and P2-ON and P2-OFF.
Set EXIT mode and Run the clock.
To Customize the PG1 Program Settings to run ONE ON/OFF Cycle in a 24 hour
period:
NOTE: You are unable to set the OFF time to be the same as the ON time.
• Press the SET button and hold for 3 seconds to activate time function. Move
through programming functions by repeatedly pressing SET button until PG1 and
P1-ON appear. The clock and program speed icons will appear (Fig. 4a).
• Adjust the time using the hours and minutes button (up for hours, down for
minutes). This is the time that the machine will turn ON.
• Adjust the desired speed setting using the SPEED button.
• Press the SET button until PG1 and P1-OFF appear. The speed icon will disappear
(Fig. 4b).
• Adjust the time using the hours and minutes button. This is the time that the
machine will turn OFF.
• Repeatedly press SET button until (
) disappears.
• Press the PROGRAM button until PG1 appears. Unit will automatically operate per
your settings.
Fig. 4a
Fig. 4b
035-00438 17005 OM eng/fr/sp
8/3/01
12:44 PM
Page 6
Customize Program Cycles (Cont'd)
To run TWO customized ON/OFF cycles in a 24 hour period (PG2):
NOTE: You are unable to set the OFF time to be the same as the ON time.
The P2-ON time must be set for after the P1-OFF time.
• Press the SET Button and hold for 3 seconds to activate the time function. Move
through programming functions until PG2 and P1-ON appear. The clock and
program speed icons will appear (Fig. 5a).
• Adjust the time using the hours and minutes button (up for hours, down for
minutes). This is the time that the machine will turn ON for the first ON/OFF cycle.
• Adjust the desired speed setting using the SPEED button.
• Press the SET button until PG2 and P1-OFF appear. The speed icon will disappear
(Fig. 5b).
• Adjust the time using the hours and minutes button. This is the time that the
machine will turn OFF for the first ON/OFF cycle.
• Press the SET button until PG2 and P2-ON appear. The speed icon will appear.
(Fig. 5c).
• Adjust the time using the hours and minutes button. This is the time that the
machine will turn ON for the second ON/OFF cycle.
• Adjust the desired speed setting using the SPEED button.
• Press the SET button until PG2 and P2-OFF appear. The speed icon will disappear.
(Fig. 5d).
• Adjust the time using the hours and minutes button. This is the time that the
machine will turn OFF for the second ON/OFF cycle.
• Continuously press SET button until you exit set time mode.
• Press the PROGRAM button until PG2 appears. Unit will automatically operate per
your settings.
NOTE: When a program function is running (pre-set or customized program cycles),
you may override the speed setting; the unit will continue with its programmed function
once it reaches the next programmed time.
Fig. 5a
Fig. 5b
Fig. 5c
Fig. 5d
035-00438 17005 OM eng/fr/sp
8/3/01
12:44 PM
Page 7
Remote Control
This air cleaner features a remote control handset for additional convenience. The remote
control allows you to turn the air cleaner OFF and to change the running speed (LOW,
MED, HIGH). NOTE: When a program function is running (pre-set or customized program
cycles), you may override the speed setting; the unit will continue with its programmed
function once it reaches the next programmed time.
Replacement Filter s
HEPA Filter
Part Number
Carbon Pre-filter
Part Number
20500
38002
Replacement filters may be purchased from the retail outlet where you purchased the
product. If you cannot locate one in your area, please call our Consumer Relations
Dept. at (800) 332-1110 for assistance, e-mail us at [email protected] or visit us
at www.honeywell.com/yourhome.
Filter Replacement Intervals
CAUTION: Do not attempt to wash either the activated carbon pre-filter or the
HEPA filter. They are not washable and washing will damage the filters.
With proper maintenance, your air cleaner is designed to provide years of high efficiency
air cleaning. Our recommendations regarding filter replacement intervals are intended as
guidelines only, as life expectancy of any filter media is dependent on the concentration of
the contaminants to which the system is exposed. If there are sources of large amounts
of contaminant generation (such as dust from woodworking or heavy smoking) the useful
life of the filter media in your air cleaner may be reduced and require early replacement.
The primary HEPA filter should remain effective for 1 to 3 years, depending upon the
environment in which the air cleaner is operating. Honeywell recommends changing the
HEPA filter based upon operation conditions–every 3 years for light usage, 2 years for
normal usage and 1 year for heavy usage.
The activated carbon pre-filter helps protect the HEPA filter by capturing lint and other
large particles, and helps reduce normal household odors. It should be checked monthly
and replaced at least every 3 months. If there are heavy concentrations of odors, smoke,
or large particles in the home, you may need to change the pre-filter more often. We DO
NOT recommend operating the air cleaner without the activated carbon pre-filter or
without following the filter replacement guidelines.
Whenever the air resistance of the HEPA filter becomes excessive due to the amount of
contaminants it has captured, the air volume output will begin to reduce and the sound
level of the air cleaner will increase.
Intelli-CheckTM Filter Monitors
This air cleaner is equipped with Intelli-Check FilterTM Monitors to serve as a convenient
guideline for replacement of the pre-filter and HEPA filter based on the air cleaner’s
hours of use and operating speed. This is beneficial because a filter’s life depends on
the amount of air and contaminants drawn through it. Each filter bar will fill up from clean
to dirty as its expected filter life is used up. Once the bar is completely full, it is time to
check / replace the filter.
• To move between the PRE-FILTER bar and the
HEPA FILTER bar, quickly press the FILTER button
(Fig. 6a).
• To RESET a filter bar that appears on the display,
press and hold the FILTER button for 5 seconds, or
until the filter bar clears to CLEAN status (Fig. 6b).
The Intelli-Check™ Filter Monitors calculate the
expected filter life based on an assumed average
operating time of 12 hours a day on medium speed.
Therefore, it will indicate replacement of the Pre-filter
in about 3 months, and the HEPA filter in about 1
year and 9 months. Depending upon your individual
usage (environment, hours and speed of operation),
you may need to check and replace the filters more
or less frequently.
How to Install and Replace the Filters
INSTALL PRE-FILTER BEFORE INITIAL OPERATION. The initial
pre-filter is packaged separately to ensure its freshness. BEFORE
Fig. 7
initial operation, locate the pre-filter in the package and install per the
instructions (Refer to Page 2 “Construction” section).
DISCONNECT FROM POWER SUPPLY BEFORE SERVICING.
1. Unscrew locking mechanism counter-clockwise (Fig. 7).
2. Remove Endcap and remove filter assembly from unit (Fig. 8).
3. Undo fastener(s) and remove pre-filter.
Fig. 8
4. As needed, replace HEPA Filter (there is no orientation to
filter).
5. As needed, install new pre-filter by securing it around HEPA
filter with the fastener(s) provided (Fig. 9).
6. Replace endcap.
7. Insert and tighten locking mechanism clockwise.
8. Discard used filter(s).
9. Plug in and RESET appropriate filter monitor(s) per
instructions below.
• Press FILTER button until the PRE-FILTER or HEPA FILTER
monitor you wish to reset appears on the display.
• Press and hold for 5 seconds, or until the filter bar clears fully
to CLEAN status.
Fig. 9
;;;
;;;
;
;
;;;;;;;
;;;;;;;
;;;;;;;
;;;;;;;
;;;;;;;
;;;;;;;
;;;;;;;
;;;;;;;
;;;;;;;
;;;;;;;
;;;;;;;
;;;;;;;;
;;;;;;;;
;;;;;;;;
;;;;;;;;
;;;;;;;;
;;;;;;;;
;;;;;;;;
035-00438 17005 OM eng/fr/sp
8/3/01
12:44 PM
Page 9
Battery Replacement
Remote control handset: Two 1.5V AAA size batteries. Replace as needed.
Control Panel Battery backup: Replace battery with Panasonic CR 2032, 3V only. Use of
another battery may present a risk of fire or explosion. Replace when Battery Low icon
appears on viewing screen (
). Keep unit plugged in
Fig. 10
while replacing battery to prevent loss of customized
programs. To replace battery, locate battery door on control
panel. Use a flat head screwdriver to gently pry up both
ends of the battery door (Fig. 10). Carefully remove battery
holder from unit. Make sure that the (+) sign on the battery
is facing up in the battery holder before returning the new
battery to the unit. Dispose of used battery promptly. Keep
away from children. Do not disassemble and do not
dispose of in fire.
hours
speed
filter
program
set
minutes
Storage
If
•
•
•
you store your Honeywell HEPA air cleaner for more than 30 days, we recommend:
Removing both the primary HEPA filter and the activated carbon pre-filter from the unit.
Discarding the pre-filter.
Wrapping the HEPA filter in an air-tight plastic bag or plastic wrap. Be sure that the
filter is totally sealed.
• Remove and store batteries. Keep batteries away from children. NOTE: Removing
control panel battery will erase customized programs and times.
To restore the air cleaner to service, unwrap the HEPA filter, install a new
activated carbon pre-filter, reinstall both filters in the air cleaner and reinstall batteries. See
"How to Replace the Filters", and “Battery Replacement” section for proper installation.
Troubleshooting
•
•
•
•
•
•
For optimum performance, start on HIGH for a few minutes, then adjust to desired
speed.
This product may emit a “new” smell which will disappear over a relatively short period
of operation.
Check to make sure that the power cord is correctly connected to the outlet.
Note: The unit can not be programmed unless it is plugged into the outlet.
Test that the outlet is functioning properly using another appliance or lamp.
Check the fuse or circuit breaker. The outlet may be overloaded if other appliances are
also in use. Determine and correct the cause of the overload.
If none of the above procedures restore operation, call Honeywell at (800) 332-1110 or
e-mail us at [email protected] for technical assistance. If the problem can not
be resolved, see warranty terms and conditions in this owner’s manual. Do not attempt
to repair the unit yourself, as it may cause injury, and the warranty does not cover
damage resulting from unauthorized attempts to repair or from any use not in
accordance with this manual.
035-00438 17005 OM eng/fr/sp
8/3/01
12:44 PM
Page 10
5 Year Limited Warranty
Honeywell HEPA Air Cleaners
Model No. 17005
This product has been engineered and
crafted with great care for your
satisfaction. Be sure to fill out and return
the enclosed card within 10 days of
purchase.
A. This limited warranty applies to repair
or replacement of product found to be
defective in material or workmanship
within 5 years of the date of purchase.
This warranty does not apply to damage
resulting from commercial, abusive,
unreasonable use or supplemental
damage. Defects that are the result of
normal wear and tear will not be
considered manufacturing defects under
this warranty. HONEYWELL IS NOT
LIABLE FOR INCIDENTAL OR
CONSEQUENTIAL DAMAGES OF ANY
NATURE. ANY IMPLIED WARRANTY,
INCLUDING MERCHANTABILITY OR
FITNESS FOR A PARTICULAR
PURPOSE, ON THIS PRODUCT IS
LIMITED IN DURATION TO THE
DURATION OF THIS LIMITED
WARRANTY. Some regions do not allow
the exclusion or limitation of incidental or
consequential damages or limitations on
how long an implied warranty lasts, so
the above limitations or exclusions may
not apply to you. This warranty gives you
specific legal rights, and you also may
have other rights which vary from region
to region. This warranty applies only to
the original Purchaser of this product.
B. At its option, Honeywell will repair or
replace this product if it is found to be
defective in material or workmanship
within the limited warranty period.
Defective product should be returned to
the place of purchase in accordance
with store policy or to Honeywell.
C. This warranty does not cover
damage resulting from unauthorized
© 2000 Honeywell. All Rights Reserved.
AC7032.00
attempts to repair or from any use not
in accordance with this manual.
D. This warranty DOES NOT cover
the pre-filter or the HEPA filter except
for material or workmanship defects.
E. Return defective product to the
following address with a brief
description of the problem. Include
proof-of-purchase and a U.S. $10.00/
Canadian $15.00 check or money
order for handling, return packing and
shipping charges. Please include your
name, address and daytime phone
number. You must prepay shipping
charges. Mark carton "Attention
Returns Department"
Ship to:
In USA:
Honeywell
Returns Department
4755 Southpoint Drive
Memphis, TN 38118 U.S.A.
In Canada:
Honeywell
510 Bronte St. South
Milton, Ontario Canada L9T 2X6
If you experience a problem with your Air
Cleaner, please see owner’s guide for
instructions. Please do not attempt to
repair the air cleaner yourself. Doing so
may void the warranty and could cause
damage or personal injury. If
the problem still persists, please call:
Honeywell
Consumer Relations Dept.
[email protected]
Toll Free 1-800-332-1110.
Mail Questions or Comments to:
Honeywell
Consumer Relations Dept.
250 Turnpike Road
Southborough, MA 01772
U.S.A.
Visit our website at
www.honeywell.com/yourhome
P/N 035-00438-000