1
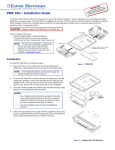
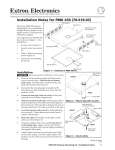
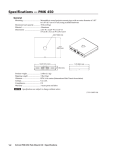
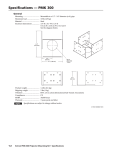
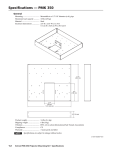
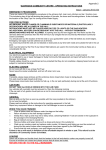
PMK 150 • Installation Guide
The Extron® PMK 150 Pole Mount Kit is a
simple solution for mounting Extron devices
and their external power supplies to a
projector pole.
Pipe Clamp
PMK 150
Mounting Plate
The PMK can be installed on a 1½ inch pipe
within a 4 inch space between the projector
(2) Hex Bolts
and the ceiling.
(2) Washers
Including the power supply, the
following devices can be mounted:
•
one three-inch deep half-rack device, or
•
two 3-inch deep quarter rack devices, or
•
an MPA 401
(2) Tie Wraps
Figure 1. PMK 150 Parts
Figure 1 shows the parts that are included in the kit.
CAUTION: The maximum load for the PMK 150 is 5 lbs (2.25 kg).
NOTE:The PMK 150 is to be used only with Extron UL listed products.
Installation
NOTE:Ensure the finished installation is in accordance with local and national
building codes, fire and safety codes, UL requirements, and local and
national electrical codes.
To install the PMK 150 (with a device) on a projector pole:
1.
Place the plate on the base of the device and align holes in the plate with
the mounting holes in the device (see figure 2).
2.
Secure the device to the plate with 4-40
screws (see note below).
CAUTION: Use only the screws supplied
with the device to avoid damaging it.
NOTE:When installing the MPA 401 onto
the PMK 150, install it with the rear
panel facing the projector pipe. Allow
enough space for the connectors on
the cables to fit without bending the
cables excessively. If the space for
this is inadequate, turn the MPA 401
around and place it on the PMK so the
front panel of the device is closest to
the pipe, and then connect the cables.
(2) 4-40 x 3/16"
Screws
PMK 150
Use 2 mounting
holes on opposite
corners.
Figure 2. Attaching the Device
Continued on side 2.
PMK 150 • Installation Guide, continued
3.
Attach the power supply to the underside of
the mounting plate by passing the supplied
tie wraps under the power supply, through
the raised slots in the plate, and back over
the power supply. Ensure the tie wraps sit in
the grooves on the power supply.
Tighten the ties until snug.
Power Supply
PMK 150
4.
With the installed device uppermost,
Figure 3. Attaching the Power Supply
lift the plate up to the installation
location on the projector pipe. Fit the pipe clamp around the pipe and hold
it against the flange on the mounting plate.
5.
Insert the two hex bolts through the clamp holes and into the flange.
6.
Level the plate and tighten the hex bolts firmly to secure it against the pipe.
Half Rack Device
MPA 401
INP
UT
S
PO
WE
R
12V
3A
L
R
MA
(MO
NO
)
®
LIST
US
AUD17TTED
APPIO/V
ARAIDEO
TUS
X
L (MO
NO
CLA
DO SS
NO 2 WIR
SPE OR T GR ING
AK SHOOU
ER RT ND
OU
TPU
10V
TS!
MPA
40
1-10
0V
VOL 50m
/MU A
TE
)
OU
R
TP
UT
RE
MO
TE
100
V
Power Supply
Figure 4. Half Rack Device (left) and an MPA 401 (right) Mounted on the PMK 150
7.
Attach input and output cables to the mounted device and thread them
through the access hole in the projector pipe to the inputs and the display
device. Use the remaining tie wraps for cable tidying.
CAUTION: DO NOT thread the power cable through the projector pipe.
Threading the power cable through the pipe violates national
electrical regulations.
8.
Connect the power supply to an electrical outlet and turn on the device.
For configuration and operation, see the user guide for the device.
Extron USA - West
Headquarters
+800.633.9876
Inside USA / Canada Only
+1.714.491.1500
+1.714.491.1517 FAX
Extron USA - East
Extron Europe
Extron Asia
Extron Japan
Extron China
Extron Middle East
+800.633.9876
+800.3987.6673
+800.7339.8766
+81.3.3511.7655
+81.3.3511.7656 FAX
+400.883.1568
+971.4.2991800
+971.4.2991880 FAX
+1.919.863.1794
+1.919.863.1797 FAX
+31.33.453.4040
+31.33.453.4050 FAX
+65.6383.4400
+65.6383.4664 FAX
Inside USA / Canada Only
Inside Europe Only
Inside Asia Only
©2010 Extron Electronics. All rights reserved. www.extron.com
Inside China Only
+86.21.3760.1568
+86.21.3760.1566 FAX
68-1842-01
Rev A
11 10