1
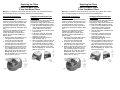
Canister Vacuum
Item # XDB520H
Canister Vacuum
Item # XDB520H
for Models CV520HR/HB/HY
for Models CV520HR/HB/HY
25 Paper Bags
25 Paper Bags
Warning: To reduce the risk of electric shock, the power cord
Warning: To reduce the risk of electric shock, the power cord
Changing the Dust Bag:
1. Unplug power cord from wall outlet.
2. Open the dust bag compartment, lift up the cover locking tab. (Fig. 1)
3. Pull dust bag retaining clip forward. Remove the dust bag from the dust
bag compartment by pulling up the cardboard section. Dispose of paper
bags. Never reuse paper bags.
4. Insert a new dust bag back into the dust bag support guide inside the
bottom of the dust bag compartment making sure that the dust bag rubber
seal is aligned correctly against the air intake hole on the unit. (Fig. 1)
When inserting the new dust bag, make sure that the arrow on the bag is
pointing down. (Fig. 2)
5. Release the dust bag retaining clip, ensuring that the dust bag is held in
place.
must be disconnected before changing the bag or
performing maintenance/trouble shooting checks.
Retaining
Clip
Fig. 1
Retaining
Clip
Fig. 2
Lift Up
Fig. 1
Fig. 2
Lift Up
Caution: Make sure that the cardboard section of the dust bag is firmly in
place inside the dust bag support.
Caution: The dust bag compartment will not close if the dust bag is not
inserted properly into the unit. Never use the vacuum without a
dust bag inserted into the unit. NEVER reuse the paper dust bags.
NEVER REUSE PAPER BAGS
EURO-PRO Operating LLC
94 Main Mill Street, Door 16
Plattsburgh, NY 12901
Tel.: 1 (800) 798-7398
must be disconnected before changing the bag or
performing maintenance/trouble shooting checks.
Rev. 03/05A
Printed in China
Caution: Make sure that the cardboard section of the dust bag is firmly in
place inside the dust bag support.
Caution: The dust bag compartment will not close if the dust bag is not
inserted properly into the unit. Never use the vacuum without a
dust bag inserted into the unit. NEVER reuse the paper dust bags.
NEVER REUSE PAPER BAGS
EURO-PRO Operating LLC
94 Main Mill Street, Door 16
Plattsburgh, NY 12901
Tel.: 1 (800) 798-7398
Rev. 03/05A
Printed in China
Replacing the Filters
2 Sets Pre-Motor Filters
2 Sets Post Motor Filters
Replacing the Filters
2 Sets Pre-Motor Filters
2 Sets Post Motor Filters
Warning: To reduce the risk of electric shock, the power cord must be disconnected
before changing the bag or performing maintenance/ troubleshooting.
Warning: To reduce the risk of electric shock, the power cord must be disconnected
before changing the bag or performing maintenance/ troubleshooting.
Changing & Cleaning the
Pre-Motor Filter
Changing & Cleaning the Post
Motor Filter
Changing & Cleaning the
Pre-Motor Filter
Changing & Cleaning the Post
Motor Filter
Your vacuum is equipped with a filtration
system to reduce dust and pollen in your
home as you clean. The pre-motor filter
is located inside the vacuum cleaner
body behind the dust bag. Check when
changing the dust bag and replace when
dirty.
This is a rinse-able filter but should be
replaced every three (3) to six (6)
months, depending on usage. Never
operate the vacuum without ALL the
filters in place
1. Push the Power On/Off button to the
"Off" position and disconnect the
power cord from the wall outlet.
2. To remove, open the dust bag
compartment cover and remove the
pre-motor filter out of the vacuum.
3. Rinse in lukewarm water and let it air
dry completely for 24 hours. Do not
use a washing machine to rinse the
filter. Do not use a hair dryer to dry it.
Air dry only. When the pre-motor
filter is completely dry, insert the filter
into the vacuum. (Fig. 1)
The post motor filter should be replaced
every three (3) to six (6) months
depending on usage. Never operate the
vacuum without ALL the filters in place.
1. Push the Power On/Off button to the
"Off" position and disconnect the
power cord from the wall outlet.
2. The post motor filter is located at the
rear of the unit.
3. Push down on the tab of the post
motor filter assembly and pull the
assembly out. (Fig. 2)
4. Remove the post-motor from the
filter assembly. (Fig. 3)
5. Rinse in lukewarm water and let it air
dry completely for 24 hours. Do not
use a washing machine to rinse the
filter. Do not use a hair dryer to dry it.
Air dry only. When the post-motor
filter is completely dry, insert it in the
filter into the vacuum.
Fig. 2
Fig. 1
Fig. 3
Fig. 2
Fig. 1
Fig. 3