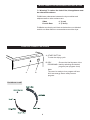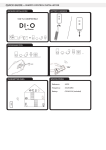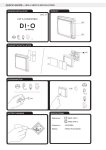
1
EQUATOR
Tumble Dryer
Model: CL 837 V
INTRODUCTION
UN@mˆˆšŒ”Š@sš„”‡„˜‡™
The dryer vents using a standard 4" duct that fits most dryer
exhaust vents.
Congratulations on your new EquatorVented Dryer. In addition
to its award winning design, this is a highly sophisticated
engineered product that will give you many years of satisfaction.
Please spend a few moments to read the Owners Manual. This
will show you ways to best utilize your valuable purchase.
VN@c•”œŒ”Œˆ”š@lŒ”š@c•”š˜•’
An easily accessible lint filter is available for cleaning after every
load.
Here are 10 of the best reasons for buying your Dryer -
WN@RRPv@•–ˆ˜„šŒ•”
The dryer power cord plugs into a standard 220V outlet - available
in most homes.
QN@ e”ˆ˜Š @ s„œŒ”Š™
This appliance is engineered to provide valuable energy savings
when compared to other washer-dryers.
XN@s„‰ˆš
The dryer has a built in safety switch that reset when air flow is
restricted. This lets the dryer electronics remain unharmed by
pausing the appliance till the conditions are corrected.
RN@ s–„†ˆ@ s„œŒ”Š™
The Dryer is designed to utilize horizontal and vertical space
effectively. By using the stacking kit (available separately,)
this unit can be mounted onto the Equator combo Washer-Dryer.
YN@e„™ @o–ˆ˜„šŒ•”
Just set the dryer clothing mode and press the start button.
Easy as 1-2-3.
SN@ sˆ”™Œ”Š@ tˆ†‹”•’•Š
Built-in moisture and weight sensing technology is designed to
stop drying at the appropriate time.
.
QPN@tŒ“ˆ‡@d˜ :
A one-button operation is available for an extra 60 minutes of
timed drying.
TN@tˆ“–ˆ˜„š›˜ˆ@sˆ’ˆ†šŒ•”#
Choose your drying temperature for the quantity and quality
of clothes you place in the dryer. High and low heat settings
are available for cottons/mixed thread clothing and for delicates.
IMPORTANT SAFETY INSTRUCTIONS
Your safety and that of your children
Your dr yer has been built in compliance with the str ictest inter national safety r egulations.
To protect you and all your family.
9. Do not add gasoline, dry-cleaning solvents, or other
WARNING -To reduce the risk of fire, electrical shock, flammable or explosive substances as drying agents.
or injury to persons when using your appliance, follow These substances give off vapors, that could ignite or
explode.
basic precautions, including the following:
10. Under certain conditions, Hydrogen gas may be
1. Read all instructions, before using the appliance.
produced in a hot water system that has not been used
for 2 weeks or more. HYDROGEN GAS IS EXPLOSIVE. If
2. Do not dry articles that have been previously
cleaned in, washed in, or spotted with gasoline, dry the hot water system has not been used for such a period,
cleaning solvents, other flammable or explosive before using a washing machine or combination washer
substances as they emit vapors that could ignite or washer-dryer, turn on all hot after faucets and let the water
flow from each for several minutes. This will release any
explode.
3. Do not allow children to play on or in the appliance. accumulated Hydrogen.
Close supervision of children is necessary, when the 11. Do not use heat to dry articles containing foam
rubber or similar textured rubber-like materials.
appliance is used near children.
4. Before the appliance is removed from service or 12. Clean lint filter before or after each load.
13. Keep the exhaust opening and surrounding areas
discarded, remove the door to the drying
compartment.
free from accumulation of lint, dust, and dirt.
5. Do not reach into the appliance if the tub, agitator, or 14. The interior of the machine should be cleaned
periodically by qualified service personnel.
drum is moving.
6. Do not install or store this appliance where it will be 15. Do not place items exposed to cooking oil in your
Dryer. Items contaminated with cooking oils may
exposed to the weather.
contribute to a chemical reaction that could cause a load
7. Do not tamper with controls.
to catch fire.
8. Do not repair or replace any part of the appliance or
attempt any servicing unless specifically recommended
in the user-maintenance instructions or in published userrepair instructions that you understand and have the skills
to carry out.
Save these instructions
1
Model CL 837 V Clothes Dryer
The model number of your dryer (CL 837 V) can also be
found on the serial plate, located inside the door.
The Dryer Stacking Kit and other Spare parts are available
for purchase or special order.
For service, contact
Equator Service at
1-800-776-3538
To request service and/or the location of the service agent
nearest you, call the toll free number listed to the left.
NOTE:
When requesting service or ordering parts, always provide
the following information:
• Product Type
• Model Number
• SERIAL# (Please Note)
2
INSTALLATION INSTRUCTIONS
Exhaust Materials
NOTE:To reduce the risk of fire, DO NOT use flexible
plastic pipe to exhaust the dryer. The following exhaust
materials are recommended and can be obtained from
any local hardware store:
4.1 4"(Diameter) Rigid metal duct.
4.2 4"(Diameter) Non-combustable semi-rigid
flexible metal duct.
4.3 IMPORTANT: For maximum efficiency, keep the
exhaust duct as short as possible.Make sure old exhaust
ducts are 'cleaned' before installing your new dryer.
4.4 To prevent "backdraft" when the dryer is not in use,the
outer end of the exhaust pipe must have a weather hood
with hinged dampers installed.(Available at local hardware
stores).
Note: Weather hood should be installed at least 12"
(30.5cm) above the ground. Higher clearances may be
necessary in areas where heavy snowfall can occur.
INSTALLATION
5.1 Before installation,we recommend a thorough visual
inspection of the dryer for damage.Do not install the dryer
if the appliance is damaged.
5.2 The dryer is equipped with an exhaust adapter which
will accept standard 4" (10.2 cm) diameter rigid or flexible
metal exhaust pipe.
5.3 Mount the adapter to the cabinet (Fig 2) using the
sheet metal screws provided.
5.4 The dryer must be installed on a solid floor and
adequate ventilation provided.
5.5 Warning! The dryer should not be exhausted into a
chimney, a wall, a ceiling, or a concealed part of the
building.
5.6 Warning! To reduce the risk of fire, this appliance
must be exhausted outdoors.
5.7 Try and place the dryer so the exhaust pipe is as
short as possible. (Fig 3)
5.8 Use as few 90º elbows as possible.
5.9 Use duct tape (not screws) to seal all joints.
5.10 Make sure that the air inlets at the back of the dryer
are not blocked and do not allow lint to accumulate
around the dryer.
5.11 To level the dryer, adjust the two (2) leveling legs front of the dryer
Never operate the dryer without
the lint filter in place.
5.12 Install the lint filter into position, as shown in Fig (4).
5.13 Plug the electrical power cord(supplied with the dryer) into an approved receptacle mounted on the wall
adjacent to the dryer.
3
WALL INSERT OR RECESSED INSTALLATION
7.1 Warning! To reduce the risk of fire, this appliance must
be exhausted outdoors.
7.2 Minimum clearances between the dryer cabinet and
adjacent walls or other surfaces are:
Sides
Front & Rear
0" (0 cm)
3" (7.6 cm)
7.3 Make sure that the air inlets at the back are not blocked
and do not allow fluff/lint to accumulate around the dryer
CONTROL PANEL FEATURES
A. START BUTTON
To start the drying cycle
Choose the final dryness of the
B. DRY
PROGRAMS: load by selecting the desired
program (see program chart)
A
Note:
The use of a ready-to-iron program will use
30% less energy than a ready-to-wear
program.
B
PROGRAM CHART
4
OPERATING INSTRUCTIONS
TROUBLESHOOTING
If the clothes are not dry after normal drying time:
• Open the door.
• Load clothes loosely into the drum.
• Load sheets first,starting with one corner.
• Close the door.
• Dry your hands.
• Plug in the machine.
• Select the final Dry Cycle (see program chart
on control panel for recommendations).
• Press Start. The drum begins rotating in a
counter-clockwise direction. (If the machine has no
load in the drum, it turns off automatically after
approximately 40 seconds.)
• The drum will now begin to rotate and will stop
automatically when your clothes are dry.The drum
pauses and rotates in the other direction every few
minutes.
• Make sure the lint filter is clean.
• Check that you have used the corrrect program
settings.
• Make sure the exhaust hose is not blocked.
If a load is checked mid-cycle, restart the appliance by
closing the door and pressing the start button. When
drying large items such as sheets, we suggest you
periodically stop the dryer to re-distribute the load.
When drying mixed loads, the dryer may stop when
the lighter items are dry. These should be removed and
the dryer restarted to allow the heavier items to
continue drying.
There is an automatic 12 minute cool down period at
the end of every cycle, during which the heater turns off.
The dryer then automatically performs an anticrease
cycle to minimize creasing. In this cycle, the dryer
tumbles every few minutes.
Important note: The dryer is fitted with a reset safety
switch. A "red push button" is located near the top
right at the back of the dryer (fig 6). To check if the
switch has tripped, remove switch cover, press the red
button lightly. If the switch has tripped, a sharp "click"
will be heard. This safety switch operates (trips) only
when the airflow is severely restricted,so it is
imperative that the filter be kept clean.
TECHNICAL DATA
• Electrical:
220/240 Volts - 15 Amps
• Heating element:
2,500 Watts
• Drum capacity:
11 lb (5kg)
• Overall dimensions
- Height:
33.5"(85cm)
- Width:
23.4"(59.5cm)
- Depth:
20.8"(53cm)
• Net weight:
68.1lb (31kg)
• Energy Factor:
2.93 lb/kWh (1.33 kg/kWh)
NOTE: A stacking kit is available for this dryer.
Tumble drying beneficial
Do not tumble dry
Dry flat
THINGS TO AVOID
- Do not overload the dryer
RED PUSH BUTTON
- Avoid drying large articles alone as they tend to
bundle up, increasing the drying time.
SWITCH
COVER
- Do not dry wollen or wool mixture articles unless
the article is labelled suitable.
- Do not allow exhaust hose or lint filter to become
clogged with lint.
- Do not allow lint to accumulate around the dryer.
5
FOR PR
ODUCT P
AR
TS & SER
VICE CALL
PRODUCT
PAR
ARTS
SERVICE
(800) 776-3538
Equator Corporation,
Equator Plaza,
2801 W Sam Houston Pkwy N, Houston, Texas 77043-1611
Phone (800) 935-1955 • Fax (713) 464-2151
Printed in England. All rights reserved.
Manual subject to change without notice