1
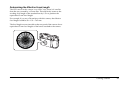
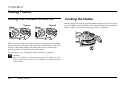
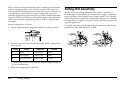
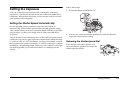
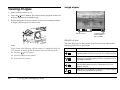
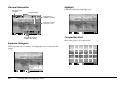
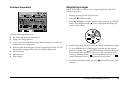
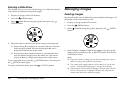
User’s Guide
1
No part of this publication may be reproduced, stored in a retrieval system, or transmitted in any form or by any means, electronic, mechanical,
photocopying, recording, or otherwise, without the prior written permission of Seiko Epson Corporation. The information contained herein is
designed only for use with this Epson product. Epson is not responsible for any use of this information as applied to other products.
Neither Seiko Epson Corporation nor its affiliates shall be liable to the purchaser of this product or third parties for damages, losses, costs, or
expenses incurred by the purchaser or third parties as a result of accident, misuse, or abuse of this product or unauthorized modifications, repairs,
or alterations to this product, or (excluding the U.S.) failure to strictly comply with Seiko Epson Corporation’s operating and maintenance
instructions.
Seiko Epson Corporation shall not be liable for any damages or problems arising from the use of any options or any consumable products other
than those designated as Original Epson Products or Epson Approved Products by Seiko Epson Corporation.
Seiko Epson Corporation shall not be held liable for any damage resulting from electromagnetic interference that occurs from the use of any
interface cables other than those designated as Epson Approved Products by Seiko Epson Corporation.
EPSON is a registered trademark of Seiko Epson Corporation.
Microsoft and Windows are registered trademarks of Microsoft Corporation.
Apple and Macintosh are registered trademarks of Apple Computer, Inc.
Adobe and Photoshop are registered trademarks of Adobe System Incorporated.
SD is a trademark.
General Notice: Other product names used herein are for identification purposes only and may be trademarks of their respective owners. Epson
disclaims any and all rights in those marks.
Copyright © 2006 Seiko Epson Corporation. All rights reserved.
2
Contents
Introduction
Warnings, Cautions, and Notes. . . . . . . . . . . . . . . . . . . 5
Chapter 1 Getting Started
Unpacking Your Camera. . . . . . . . . . . . . . . . . . . . . . . . . . . . . . 6
Camera Parts and Functions. . . . . . . . . . . . . . . . . . . . . . . . . . . 7
Attaching the Strap to the Camera . . . . . . . . . . . . . . . . . . . . 11
Using the Battery . . . . . . . . . . . . . . . . . . . . . . . . . . . . . . . . . . . 11
Charging the Battery . . . . . . . . . . . . . . . . . . . . . . . . . . . 11
Installing the Battery in the Camera . . . . . . . . . . . . . . 13
Using a Memory Card . . . . . . . . . . . . . . . . . . . . . . . . . . . . . . . 13
Inserting a Memory Card . . . . . . . . . . . . . . . . . . . . . . . 14
Removing the Memory Card . . . . . . . . . . . . . . . . . . . . 14
Mounting and Removing Lenses . . . . . . . . . . . . . . . . . . . . . . 15
Incompatible Lenses . . . . . . . . . . . . . . . . . . . . . . . . . . . 15
Mounting an M-mount Lens . . . . . . . . . . . . . . . . . . . . 15
Removing an M-mount Lens . . . . . . . . . . . . . . . . . . . . 16
Mounting and Removing an L-mount Lens . . . . . . . 16
Selecting the Focal Length . . . . . . . . . . . . . . . . . . . . . . 16
Chapter 2 Taking Photos
Turning the Camera On and Off. . . . . . . . . . . . . . . . . . . . . . . 18
Cocking the Shutter . . . . . . . . . . . . . . . . . . . . . . . . . . . . . . . . . 18
Setting White Balance. . . . . . . . . . . . . . . . . . . . . . . . . . . . . . . . 19
Setting Image Quality. . . . . . . . . . . . . . . . . . . . . . . . . . . . . . . . 19
Setting ISO Sensitivity . . . . . . . . . . . . . . . . . . . . . . . . . . . . . . . 20
Setting the Exposure. . . . . . . . . . . . . . . . . . . . . . . . . . . . . . . . . 21
Setting the Shutter Speed Automatically . . . . . . . . . . 21
Setting the Shutter Speed Manually . . . . . . . . . . . . . . 22
Setting the Aperture. . . . . . . . . . . . . . . . . . . . . . . . . . . . 22
Using the Light Meter . . . . . . . . . . . . . . . . . . . . . . . . . . 22
Focusing . . . . . . . . . . . . . . . . . . . . . . . . . . . . . . . . . . . . . . . . . . . 24
Releasing the Shutter . . . . . . . . . . . . . . . . . . . . . . . . . . . . . . . . 24
Chapter 3 Viewing and Managing Photos
Opening the LCD Monitor. . . . . . . . . . . . . . . . . . . . . . . . . . . . 25
Viewing Images. . . . . . . . . . . . . . . . . . . . . . . . . . . . . . . . . . . . . 26
Viewing Photo Information . . . . . . . . . . . . . . . . . . . . . 27
Magnifying Images . . . . . . . . . . . . . . . . . . . . . . . . . . . . 29
Running a Slide Show . . . . . . . . . . . . . . . . . . . . . . . . . . 30
Managing Images . . . . . . . . . . . . . . . . . . . . . . . . . . . . . . . . . . . 30
Deleting Images . . . . . . . . . . . . . . . . . . . . . . . . . . . . . . . 30
Locking/Unlocking Images . . . . . . . . . . . . . . . . . . . . . 31
Selecting Photos to be Printed
(DPOF Setting). . . . . . . . . . . . . . . . . . . . . . . . . . . . . . 31
3
Chapter 4 Customizing the Settings
Accessing the Settings Menu . . . . . . . . . . . . . . . . . . . . . . . . . .33
Setting Items . . . . . . . . . . . . . . . . . . . . . . . . . . . . . . . . . . . . . . . .33
Settings Menu. . . . . . . . . . . . . . . . . . . . . . . . . . . . . . . . . .33
Basic Setup Menu . . . . . . . . . . . . . . . . . . . . . . . . . . . . . .34
Chapter 5 Opening RAW Images on Your Computer
Software Overview . . . . . . . . . . . . . . . . . . . . . . . . . . . . . . . . . .36
System Requirements . . . . . . . . . . . . . . . . . . . . . . . . . . . . . . . .36
Installing the Software. . . . . . . . . . . . . . . . . . . . . . . . . . . . . . . .37
EPSON PhotoRAW . . . . . . . . . . . . . . . . . . . . . . . . . . . . .37
EPSON RAW Plug-In . . . . . . . . . . . . . . . . . . . . . . . . . . .37
Opening a RAW Image . . . . . . . . . . . . . . . . . . . . . . . . . . . . . . .38
Using EPSON PhotoRAW . . . . . . . . . . . . . . . . . . . . . . .38
Using EPSON RAW Plug-In . . . . . . . . . . . . . . . . . . . . .38
Finding More Information . . . . . . . . . . . . . . . . . . . . . . . . . . . .38
Chapter 6 Maintenance and Troubleshooting
Setting the Time and Date. . . . . . . . . . . . . . . . . . . . . . . . . . . . .39
Calibrating the Status Gauge . . . . . . . . . . . . . . . . . . . . . . . . . .40
Formatting the Memory Card . . . . . . . . . . . . . . . . . . . . . . . . .40
Cleaning the Camera Body . . . . . . . . . . . . . . . . . . . . . . . . . . . .41
Cleaning the CCD Sensor . . . . . . . . . . . . . . . . . . . . . . . . . . . . .41
Storing the Camera . . . . . . . . . . . . . . . . . . . . . . . . . . . . . . . . . .42
Troubleshooting . . . . . . . . . . . . . . . . . . . . . . . . . . . . . . . . . . . . .42
Contacting Customer Support . . . . . . . . . . . . . . . . . . . . . . . . .43
For Users in Europe. . . . . . . . . . . . . . . . . . . . . . . . . . . . .43
For Users in Singapore . . . . . . . . . . . . . . . . . . . . . . . . . .43
For Users in Hong Kong. . . . . . . . . . . . . . . . . . . . . . . . .43
4
For Users in Korea . . . . . . . . . . . . . . . . . . . . . . . . . . . . . 44
Appendix
Standards and Approvals . . . . . . . . . . . . . . . . . . . . . . . . . . . .
Camera. . . . . . . . . . . . . . . . . . . . . . . . . . . . . . . . . . . . . . .
Lithium-ion Battery . . . . . . . . . . . . . . . . . . . . . . . . . . . .
Battery Charger . . . . . . . . . . . . . . . . . . . . . . . . . . . . . . .
Specifications . . . . . . . . . . . . . . . . . . . . . . . . . . . . . . . . . . . . . . .
General. . . . . . . . . . . . . . . . . . . . . . . . . . . . . . . . . . . . . . .
Image Format . . . . . . . . . . . . . . . . . . . . . . . . . . . . . . . . .
Optical System . . . . . . . . . . . . . . . . . . . . . . . . . . . . . . . .
Display Functions. . . . . . . . . . . . . . . . . . . . . . . . . . . . . .
Viewfinder Indicators . . . . . . . . . . . . . . . . . . . . . . . . . .
Power Supply . . . . . . . . . . . . . . . . . . . . . . . . . . . . . . . . .
Battery Charger . . . . . . . . . . . . . . . . . . . . . . . . . . . . . . .
Optional Accessory. . . . . . . . . . . . . . . . . . . . . . . . . . . . . . . . . .
Index
45
45
45
45
45
45
45
46
46
46
46
47
47
Introduction
The Epson R-D1s offers the convenience of digital imaging technology
with the classic features of a traditional rangefinder camera to produce
high-quality photographs and an enjoyable shooting experience.
Traditional rangefinder design
If you are already familiar with rangefinder photography, you will be
up to speed in no time with the R-D1s. If you are new to this type of
camera, you will quickly discover the benefits of time-tested
rangefinder design, such as:
❏
Parallax-corrected bright-line frames within the finder view for
better composition
❏
Unobstructed and clear view of a subject during exposure
❏
Relatively silent and shock-free operations as compared to a single
lens reflex (SLR) camera
Wide variety of lenses available
The R-D1s is equipped with an EM mount, which accepts a wide variety
of M-type bayonet lenses originally introduced for film-based
rangefinder cameras. This opens up a world of possibilities with
hundreds of lenses to choose from, both vintage and contemporary.
The lenses you own and use on a film-based rangefinder camera may
produce unexpected results when used with R-D1s, which are yours to
experiment for years to come. With an adapter ring, L-mount lenses
can also be used with R-D1s, further enhancing its shooting potential.
Life-size magnification
The R-D1s comes with a viewfinder with 1.0x magnification, so what
you see through the viewfinder is at the same size as seen with a naked
eye. Using both eyes you can easily see what is happening outside the
viewfinder. With R-D1s you will focus more on what you are shooting,
not what you are shooting with.
Print optimized images
The pictures you take using R-D1s can be saved in unprocessed RAW
format, which can be postprocessed for printing using the bundled
software. We at Epson believe that photographic images, be them
film-based or digital, are best expressed on printed media. R-D1s
reflects this philosophy.
Warnings, Cautions, and Notes
Observe the following while you read this manual:
w
c
Warnings must be followed carefully to avoid bodily injury.
Cautions must be observed to avoid damage to your equipment.
Notes contain important information and useful tips on the operation of your
product.
Introduction
5
Chapter 1
Getting Started
Unpacking Your Camera
Make sure you have these items:
6
Camera body
Lens hole cover
Battery
Strap
Getting Started
Battery charger
Power cord
(for battery charger)
Quick Reference Guide
CD-ROM
Camera Parts and Functions
1
Front View
1
Rangefinder window
Images from this window are used to display the image
superimposing field in the center of the finder frame.
1
Bright-line frame illumination window
Receives light to illuminate bright-line frames in the
viewfinder.
1
Viewfinder window
Images from this window are displayed in the viewfinder.
1
X-sync contact
1
Used to connect an external flash unit. (See the flash’s
manual for details on how to attach the flash.)
1
1
1
Lens release button
Used to unmount the lens. (See“Mounting and Removing
Lenses” on page 15 for details on how to attach or remove
the lens.)
Getting Started
1
7
Top View
Power switch
Shutter charge lever
Switches the power on or off. (See “Turning
the Camera On and Off” on page 18 for
details.)
Used to cock the shutter before taking
each picture. (See “Cocking the Shutter”
on page 18 for details.)
Shutter speed/ISO sensitivity dial
Sets the shutter speed, exposure
compensation (in AE mode), and ISO
sensitivity (when pulled up). (See “Setting the
Exposure” on page 21 and “Setting ISO
Sensitivity” on page 20 for details.)
Shutter release button
Releases the shutter. If pressed halfway
(without releasing the shutter), the
metered and selected shutter speeds are
displayed at the bottom of the finder view.
Also used to recover from the power save
mode.
Accessory shoe
Used to mount optional equipment such as
a flash or external viewfinder. (See the flash
manual or viewfinder manual for details on
how to attach them.)
Dial-lock release button
Unlocks the shutter speed dial from the AE
position.
Jog dial
Scrolls through the menu items and pictures
displayed on the LCD monitor. (See “Viewing
and Managing Photos” on page 25 and
“Customizing the Settings” on page 33.)
Status gauge
Displays the current settings: white
balance, remaining battery power, the
number of remaining shots, and image
quality. (See “Status Gauge” on page 10
for details.)
Frame selector lever
Lower position
8
Upper position
Getting Started
Selects a bright-line frame for 28 mm, 35
mm, or 50 mm lens. (See “Selecting the
Focal Length” on page 16 for details.)
Back View
1
Rangefinder eyepiece
Used to compose your pictures and to focus on the subject.
1
AE-lock button
Locks the shutter speed at the metered value when using
automatic exposure. (See “Locking the Exposure Setting
(AE-lock)” on page 23 for details.)
1
Image quality/WB lever
Used when setting image quality or white balance. (See
“Setting White Balance” on page 19 and “Setting Image
Quality” on page 19 for details.)
1
Memory card access light
Lights when a picture is being saved in the memory card.
Flashes when there is an error or battery is low.
1
Memory card slot
1
Accepts an SD memory card of up to 2 GB capacity. (See
“Using a Memory Card” on page 13 for details.)
1
Memory card slot cover
Protects the memory card and memory card slot.
Focal length conversion table
1
Lists equivalent 35 mm focal lengths for the attached lenses.
(See “Determining the Effective Focal Length” on page 17
for details.)
1
1
Getting Started
9
LCD Monitor
(LCD) button
Switches between the shooting mode and the playback mode.
(MENU) button
Displays the Main menu on the LCD monitor when in the playback mode.
(ENTER) button
Sets the selected item or settings when in the playback mode. Also toggles between single and
tile display modes.
(CANCEL) button
Returns to the previous menu without making any settings.
(USER) button
Executes the preassigned function from the following: Delete, Lock, Magnify, Print, and Film.
Status Gauge
White balance
The number of remaining shots
Indicates the white balance setting. (See
“Setting White Balance” on page 19 for
details).
Indicates the number of remaining shots you can
take (up to 999). The needle points to ‘E’ if there
is no memory card or when an error occurs.
A
Note:
The actual number of shots you can take is not
limited to 999 and varies with the size of the
memory card used.
Auto
Sunny
Shade
Cloudy
Image quality
Incandescent
Indicates the image quality setting. (See “Setting
Image Quality” on page 19 for details)
Fluorescent
Remaining battery power
Indicates the remaining battery power.
The current battery level is indicated on the
scale from E (Empty) to F (Full).
10
Getting Started
Note:
Status gauge can be calibrated if
needed. See “Calibrating the Status
Gauge” on page 40 for details.
R
RAW/RAW+JPEG (High)
H
JPEG (High)
N
JPEG (Normal)
Attaching the Strap to the Camera
1.
4.
Lace the strap end through the two plastic fasteners.
1
Remove the protective pads and metal rings from the strap.
1
Metal ring
1
Protective pad
2.
Attach the protective pad and the metal ring to one side of the
camera.
5.
Repeat these steps to attach the other end of the strap to the other
side of the camera.
1
Using the Battery
c
3.
Lace the end of the strap through the holes in the protective pad
and the metal ring.
1
Caution:
Only use the Epson lithium-ion battery (EU-85). Do not use any other
make or model of battery under any circumstances.
1
1
Charging the Battery
The camera comes with a lithium-ion battery (model EU 85). Be sure to
charge it before using the camera for the first time, or if you have not
used it for a long time. It takes approximately 3.5 hours to fully charge
a new or empty battery.
1
1
1
Getting Started
11
1.
12
Connect the power cord to the battery charger, then plug it into an
electrical outlet.
Getting Started
2.
Insert the battery into the battery charger with the terminal end
first. The red indicator light on the charger lights up to indicate the
battery is being charged.
3.
When the indicator light turns off, the battery is fully charged.
Remove the battery from the charger.
4.
Disconnect the battery charger from the power outlet.
Installing the Battery in the Camera
1.
Make sure the camera’s power switch is in the Off position, then
open the battery cover.
Using a Memory Card
You cannot take pictures unless a memory card is installed in the
camera. The camera accepts SD memory cards of up to 2 GB capacity.
c
Caution:
❏ Make sure there is no dirt or dust on the memory card terminal. If
it is dirty, you may not be able to read from or write to the card.
❏
Never insert or remove a memory card while the memory card
access light is on. This may cause data in the card to be lost or
damaged, or render the memory card unusable.
❏
Keep the memory card slot cover closed except when you insert or
remove the memory card. This protects the memory card and the
slot from dust particles and static shock; otherwise data on the
memory card may be lost or damaged.
❏
Static shock to the memory card may cause the camera to
malfunction.
DUMMY
2.
Insert the battery into the camera as far as it will go, making sure
the orientation of the battery is correct.
DUMMY
Note:
❏ Be sure to read the documentation included with the card to make sure
you use it correctly.
❏
3.
Close the battery cover until it clicks.
If the memory card has been already formatted with a computer or another
digital camera, you may not be able to save images on the card. If this
happens, reformat the card using this camera. For instructions, see
“Formatting the Memory Card” on page 40.
Note:
You can check the amount of battery power remaining in the camera by
checking the status gauge. (See page 10.)
1
1
1
1
1
1
1
1
1
1
Getting Started
13
Inserting a Memory Card
Removing the Memory Card
1.
1.
Make sure that the memory card is not locked. Slide the write
protect switch to unlock the card if needed.
Make sure the memory card access light is off, then open the
memory card slot cover.
Write protect
switch
DUMMY
2.
Make sure that the memory card access light is off, then open the
memory card slot cover. Insert the memory card all the way into
the slot until it clicks.
2.
DUMMY
3.
DUMMY
Note:
If the memory card is not ejected, push it again.
Close the memory card cover.
3.
14
Getting Started
Push in the memory card until it clicks, then release your finger.
The memory card pops out.
Remove the card and close the memory card cover.
Mounting and Removing Lenses
Mounting an M-mount Lens
1.
Align the dot on the lens with the red dot on the lens release button.
The camera accepts a wide variety of M-type bayonet mount
(M-mount) lenses. You can also use L-type screw mount (L-mount)
lenses by attaching a third-party adapter ring.
1
Incompatible Lenses
1
Certain lenses are not compatible with the camera due to physical
constraints:
❏
Lenses that project more than 20.5 mm into the camera body.
These lenses cannot be used because they may touch the inner
parts of the camera. Some models known to be incompatible
include:
❏
❏
❏
❏
❏
Hologon 15 mm F8
Super Angulon 21 mm F3.4
Super Angulon 21 mm F4
Elmarit 28 mm F2.8 (earliest model)
Summicron 50 mm (Dual Range Summicron)
❏
Collapsible lenses.
However collapsible lenses such as the Hektor 50 mm F2.5 or the
Elmar 50 mm F3.5 can be used with the camera as long as the lens
barrel is not pushed into the camera body. Be very careful if using
these types of lenses.
❏
Lenses that have an auxiliary viewfinder lens.
These lenses cannot be used effectively because the baseline length
is different from the one used for this camera.
1
1
c
Caution:
❏ Do not touch the inner parts of the camera.
❏
2.
1
Beware of dust particles entering the camera body.
Insert the lens into the camera body, then turn the lens clockwise
until it clicks.
1
1
1
1
1
Getting Started
15
Removing an M-mount Lens
1.
Press the lens release button and turn the lens body
counterclockwise.
Mounting and Removing an L-mount Lens
For an L-mount lens, you need an optional M-bayonet adapter ring.
Attach the adapter ring to the lens, then install the lens on the camera
as you would an M-mount lens. When you want to remove the lens,
the procedure is the same as for an M-mount lens.
Selecting the Focal Length
You need to select the focal length of the lens mounted in order to
display the correct bright-line frame that indicates the field of view
covered by the lens. The automatic parallax correction feature allows
you to capture what you see in the selected bright-line frame. Turn the
frame selector lever to select 28 mm, 35 mm, or 50 mm to match the
focal length of the lens being used.
2.
16
Pull the lens straight out.
Getting Started
Determining the Effective Focal Length
1
The CCD sensor in this camera is an APS-C size, about 34% smaller
than the area covered by a 35 mm film. This effectively increases the
working focal length of the attached lens by 1.53x to produce the
equivalent 35 mm focal length.
1
For example, if you use a 50 mm lens with this camera, the effective
focal length would be 50 × 1.53 = 76.5 mm.
1
The focal length conversion table on the rear panel of the camera shows
equivalent 35 mm focal lengths of the lenses attached to the camera.
1
1
DUMMY
1
1
1
1
1
Getting Started
17
Chapter 2
Taking Photos
Turning the Camera On and Off
Turn on
Turn off
DUMMY
When you turn on the camera the first time, you need to set the current
date (month, day, and year) and time (hours and minutes) on the LCD
monitor. Once these settings are made, the camera automatically
records the date and time for each picture taken.
For instructions, see “Setting the Time and Date” on page 39.
c
18
Caution:
Never turn off the power while the memory card access light is on. This
may cause data in the card to be lost or damaged, or render the memory
card unusable.
Taking Photos
Cocking the Shutter
Before taking each picture, push the shutter charge lever as far as it will
go to the right to cook the shutter. The shutter charge lever can be left
in the “ready” position when shooting a series of pictures.
The selected setting is indicated on the status gauge:
Setting White Balance
Setting
The white balance feature adjusts the camera for different types of
ambient light. You can either set the white balance to be adjusted
automatically, or select the particular setting to suit the ambient light
type.
1.
A (Auto)
Pull down and hold the image quality/WB lever at the WB position.
3.
Automatically determined
(Sunny)
Outdoors on a sunny day
(Shade)
In the shade on a sunny day
(Cloudy)
Cloudy day without visible sun
(Incandescent)
Incandescent light
(Fluorescent)
2
Description
2
2
2
Fluorescent light
Release the image quality/WB lever.
2
Setting Image Quality
2.
Rotate the jog dial to select the desired white balance setting.
Image quality determines the format in which the image is saved, the
size of the image as it will be displayed on a computer screen, and the
file size of image stored in a memory card. Select the image quality
according to how you plan to use the image data.
2
2
Image Format
Images can be saved in either RAW or JPEG format. To open or process
RAW images, you need to install the software on the CD-ROM that
came with your camera. Because they are uncompressed, RAW images
take up a lot of storage space, but are also well suited for image
processing and printing on paper. For more information, see “Opening
RAW Images on Your Computer” on page 36.
2
2
2
Taking Photos
19
JPEG is a universal image format that can be viewed on most computers
without using proprietary software. Files saved in JPEG format are
compressed and smaller than those saved in RAW format. They do lose
varying degrees of picture quality when compressed, and are less
suited for postprocessing because resaving a JPEG file further degrades
its quality. JPEG format is fine for viewing on a regular computer screen
and can also produce good quality prints if saved in a high enough
resolution.
Set the image quality as follows:
1.
Pull up and hold the image quality/WB lever at the Q position.
2.
Rotate the jog dial to select the desired image quality setting on the
status gauge:
Setting
Format
Image Size
File Size
R
RAW
3,008 x 2,000
10 MB*
H
JPEG (High)
3,008 x 2,000
3 MB
N
JPEG (Normal)
2,240 x 1,488
1.5 MB
* 13 MB if RAW+JPEG is selected in the RAW Setting. See page 34
for more information.
3.
20
Release the image quality/WB lever.
Taking Photos
Setting ISO Sensitivity
The ISO sensitivity setting determines the camera’s sensitivity to
available light. As ISO sensitivity is increased, less light is required to
expose an image, which permits faster shutter speeds. This is helpful
for shooting fast moving subjects without blurring, but it also amplifies
any digital noises caught in an image, which can produce a picture with
a grainy appearance.
To set ISO sensitivity, pull up and rotate the outer ring of the shutter
speed dial to select 200, 400, 800, or 1600.
Setting the Exposure
Follow these steps:
1.
2
Rotate the shutter speed dial to AE.
You can set the exposure automatically or manually. Automatic
exposure is a convenient feature that works sufficiently under most
conditions. With manual exposure, you have more control over how
your pictures will be exposed.
2
2
Setting the Shutter Speed Automatically
Use the aperture priority automatic exposure (AE) feature to
automatically set the shutter speed for the selected aperture setting.
This is useful when you want to control the depth of field or to produce
special effects, or when you simply want to take point-and-shoot
snapshots.
The AE feature works sufficiently most of the time, but under certain
conditions you can also apply exposure compensation within the range
of +2 EV to -2 EV in 1/3 EV increments. You may, for example, increase
the compensation value by one notch (+1/3 EV) to overexpose a subject
standing in a bright background. Likewise, if your subject is too bright
for the background, you would lower the EV to underexpose the
subject.
2
2.
If necessary, rotate the shutter speed dial to select the desired
exposure compensation setting.
2
Releasing the Shutter Speed Dial
2
Press the dial-lock release button and
rotate the shutter speed dial to select the
shutter speed manually.
2
2
2
2
Taking Photos
21
Setting the Shutter Speed Manually
For more information, see the documentation included with your flash.
You can specify the shutter speed from 1 to 1/2000 sec., or B (Bulb).
To set the shutter speed, rotate the shutter speed dial to the desired
shutter speed value.
Note:
❏ To avoid blurring, set the shutter speed faster than "1/focal length (mm)."
If using a slower shutter speed, the use of a tripod is recommended.
❏
For brighter subjects, fast moving subjects or with a higher ISO
sensitivity, a higher shutter speed is recommended.
B (Bulb) Setting
The bulb setting is used for shooting night pictures or astronomical
objects. With this setting, the shutter stays open as long as the shutter
release button is depressed.
Using a Flash
You can use an optional flash unit when shooting pictures under low
light conditions. The syncro speed of the flash is 1/125 second. Set the
shutter speed dial to 125 when using a flash.
22
Taking Photos
Setting the Aperture
Rotate the lens aperture ring to the desired value.
For more information, see the documentation included with your lens.
Using the Light Meter
The camera has a built-in light meter that calculates the best shutter
speed for the amount of light available through the lens (TTL). Press
the shutter release button halfway to view the metered shutter speed
(in red) at the bottom of the viewfinder, then adjust the exposure
settings as needed.
The metered value is displayed in the range of 1 through 2000. For any
value higher than one second, 1 is displayed in the viewfinder.
Likewise, for values lower than 1/2000 second, 2000 is displayed in the
viewfinder.
With Manual Exposure
Locking the Exposure Setting (AE-lock)
When manual exposure is selected, the current shutter speed is lit, and
the metered speed flashes.
You can lock the exposure setting at the metered value using the
AE-lock button. This is useful, for example, when you create a single
panoramic picture from a series of images, to make sure they all have
the same level of exposure.
60
500
Flashes Lights
To lock the exposure setting, point to the subject when using the AE
mode and press the AE-lock button. The exposure setting remains
locked until the AE-lock button is released.
You can rotate the shutter speed dial and/or the aperture ring on the
lens to match the metered value, at which point only one shutter speed
will be displayed in the viewfinder. Or, you can disregard the meter
reading and do your own exposure adjustments.
2
2
2
2
2
With Automatic Exposure
When AE is selected, the metered shutter speed is lit. If you are using
exposure compensation, the shutter speed flashes to indicate that it is
a compensated value.
2
2
60
Lights or flashes
2
2
2
Taking Photos
23
Focusing
Releasing the Shutter
The camera’s viewfinder has a magnification of 1.0x, which allows you
to keep both eyes open when focusing on your subject.
When you are ready to shoot, gently press the shutter release button.
You should hear a clacking sound that indicates the shutter release.
When focusing, keep your eye in the center of the rangefinder eyepiece
for the best result.
To focus on a subject, rotate the lens focusing ring until the
double-image converges in the center of the bright-line frame.
DUMMY
If a subject has a distinct vertical line (i.e., a tree or a tower), rotate the
focus ring until the lines merge into a single continuous line. This
usually produces sharper images as straight lines are easier to focus on.
24
Taking Photos
Note:
If you set NR (Noise Reduction) to Hi (High) in the Film Setting screen and
set the exposure at more than 2 seconds, noise reduction is automatically
performed after taking a picture. Do not turn off the camera until the memory
card access light goes off. Otherwise, the image data may be lost or damaged,
or make the memory card unusable.
Chapter 3
3
Viewing and Managing Photos
Opening the LCD Monitor
1.
3.
3
Push the panel back into place.
3
Pull open the rear panel using the notch at the bottom.
3
DUMMY
DUMMY
c
Notch
2.
3
Caution:
❏ Do not pick up or handle the camera by the rear panel.
❏
3
Do not operate the camera while the rear panel is left open.
Gently rotate the panel clockwise until the LCD monitor faces
outward.
3
3
DUMMY
3
3
Viewing and Managing Photos
25
Viewing Images
1.
Make sure the camera is on.
2.
Press the
(LCD) button. The camera enters playback mode and
displays the newest recorded image.
3.
Rotate the jog dial (lower position) clockwise or counterclockwise
to display the image you want to view.
Image display
Monitor icons
Current image/
total images
(up to 9999)
Monitor Icons
The icons displayed at the bottom of the LCD monitor indicate the
following functions or operations.
Note:
If you do any of the following while the camera is in playback mode, the
LCD monitor is turned off and the camera returns to shooting mode:
❏
Press the
❏
Press the shutter release button
❏
Invert the LCD monitor
(LCD) button
Icon
Description
Indicates you can select the menu option by rotating the
jog dial (upper position) clockwise or counterclockwise.
Indicates you can scroll the image horizontally by
rotating the jog dial (upper position). Displayed only for
the Magnify feature.
Indicates you can scroll the image vertically by rotating
the jog dial (upper position). Displayed only for the
Magnify feature.
Indicates you can display the previous or next image by
rotating the jog dial (lower position).
26
Viewing and Managing Photos
Icon
Description
Indicates you can magnify or shrink the image by
rotating the jog dial (lower position). Displayed only for
the Magnify feature.
Appears when the
(ENTER) button is active.
Appears when the
(CANCEL) button is active.
Viewing Photo Information
3
Follow these steps to see more photo information:
1.
Display an image on the LCD monitor.
2.
Pull up the jog dial to the upper position, then rotate it to display
the desired set of information about the image.
3
Indicates single display mode.
Indicates tile display mode (thumbnails of four images).
Note:
❏ When the battery is running low, the
the jog dial icon.
3
(battery) icon appears above
❏
When the jog dial is in the upper position, the (upper) icon at the bottom
left corner turns green. Likewise, when the jog dial is in the lower position,
the (lower) icon turns green.
❏
Press the
(ENTER) button to toggle between the single and tile
display modes.
3
3
3
The following sets of information are available:
❏ General information
❏ Exposure histogram
❏ Highlight
❏ Composition grid
❏ Detailed information
3
3
3
3
Viewing and Managing Photos
27
Highlight
General Information
File sequence
number
Outlines and flashes highlight areas.
Image quality
Indicates this
image is locked
Number of prints
(if DPOF is set)
Date and time this
image was taken
Composition Grid
Shows the grid to aid composition.
Exposure Histogram
Shows the densities of shadow and highlight areas occupied in the
image.
28
Viewing and Managing Photos
Detailed Information
Magnifying Images
3
Follow these steps to zoom in on an image displayed on the LCD
monitor (up to 16x).
1.
Display an image on the LCD monitor.
2.
Press the
3.
Select
(Magnify) using the jog dial, then press the
(ENTER)
button. The Magnify mode ( ) icon is displayed at the top left
corner of the screen.
3
(MENU) button.
3
3
Lists the following information:
❏
File name (file number and format)
❏
Image size (image quality)
❏
Color (color/monochrome) setting. If monochrome is set, the color
of the filter is also displayed.
❏
Shutter speed. If the image was taken using the AE feature, AE and
the exposure compensation value (if used) are displayed.
❏
ISO sensitivity
❏
White balance
❏
Film setting
3
4.
Rotate the jog dial (lower position) to enlarge or reduce the image.
5.
To view different areas of the image, rotate the jog dial (upper
position) and press the
(ENTER) button to switch the direction
from vertical to horizontal, or vice versa. The current direction
setting is indicated by the
(horizontal direction) icon or
(vertical direction) icon at the bottom left of the screen.
6.
To return to the Main menu, press the
or twice.
(CANCEL) button once
3
3
3
3
3
Viewing and Managing Photos
29
Running a Slide Show
This feature allows you to view all the images in a slide show format,
with a three-second interval between images.
Managing Images
1.
Display an image on the LCD monitor.
Deleting Images
2.
Press the
In playback mode, you can delete the currently displayed image or all
the images saved on the memory card.
3.
Select
(Slide Show) using the jog dial, then press the
(ENTER) button.
4.
(MENU) button.
Display an image on the LCD monitor.
2.
Press the
3.
Select
button.
4.
Select Delete 1 image or Delete all images using the jog dial
(upper position), then press the
(ENTER) button. You see the
confirmation screen.
(MENU) button.
(Delete) using the jog dial, then press the
(ENTER)
Select the order in which you want the images to be displayed:
❏
❏
Rotate the jog dial clockwise to start the slide show from the
oldest image recorded. The forward playback (r) icon is
displayed at the bottom of the screen.
Rotate the jog dial counterclockwise to start the slide show
from the newest image back to the oldest one. The reverse
playback (l) icon is displayed at the bottom of the screen.
To pause the slide show, press the
the
(ENTER) button again.
(ENTER) button. To restart, press
To return to the Main menu, press the
30
1.
(CANCEL) button.
Viewing and Managing Photos
Note:
❏
If you select Delete 1 image, you can select an image you want to
delete by rotating the jog dial (lower position).
❏
You cannot delete images that have a lock ( ) icon. See the next
section, “Locking/Unlocking Images” on page 31 for details.
❏
If the memory card is locked, the message “Cannot delete. The SD
card is write-protected” is displayed. Remove the card from the
camera, then unlock the card and try again.
5.
In the confirmation screen, select OK using the jog dial, then press
the
(ENTER) button.
c
Caution:
This operation cannot be undone.
4.
Select Lock/Unlock 1 image, Lock all images, or Unlock all
images using the jog dial (upper position), then press the
(ENTER) button.
When the image is locked, the lock (
of the image.
3
) icon is displayed at the top right
Note:
This procedure does not securely delete the data from the memory card. To
securely "flush" the memory card so that no data can be recovered from the
card using third-party data recovery software, use Full Format to format the
card. For instructions, see “Formatting the Memory Card” on page 40.
If you select Lock/Unlock 1 image for a locked image, the image will
be unlocked.
Locking/Unlocking Images
c
If you select Lock/Unlock 1 image, you can select an image you want
to lock by rotating the jog dial (lower position).
Use this feature to protect images from accidental deletion.
Note:
Locked images are read-only and cannot be modified.
1.
Display an image on the LCD monitor.
2.
Press the
3.
Select
(Lock) using the jog dial, then press the
button. You see the Lock menu.
Caution:
If you format a memory card that contains images, all the data on the
card will be lost, including locked images.
(ENTER)
3
3
3
Selecting Photos to be Printed
(DPOF Setting)
(MENU) button.
3
This feature allows you to specify the number of prints for the images
you want to print from a printer, application, or photo lab that supports
Digital Print Order Format (DPOF).
3
Note:
This feature is not available for images saved in RAW format.
3
1.
Display an image on the LCD monitor.
2.
Press the
3
(MENU) button.
3
3
Viewing and Managing Photos
31
3.
Select
(Print Order) using the jog dial, then press the
(ENTER) button.
4.
Select Set DPOF for one for the displayed image, or Set DPOF for
all for all the images using the jog dial (upper position), then press
the
(ENTER) button.
Note:
5.
32
❏
To select another image, rotate the jog dial in the lower position.
❏
To view the current DPOF setting, select View current DPOF.
Specify the number of prints using the jog dial, then press the
(ENTER) button.
Viewing and Managing Photos
Chapter 4
4
Customizing the Settings
Accessing the Settings Menu
1.
Press
(LCD) then
LCD monitor.
4
Setting Items
(MENU) to display the Main menu on the
4
Settings Menu
Setting
2.
Select
(Settings) using the jog dial, then press the
button to display the Settings menu.
3.
Select the desired setting using the jog dial, then press the
(ENTER) button. The selected setting is displayed.
If you select
(Basic Setup), select the desired setting and press
the
(ENTER) button again.
4.
4
(Color Setting)
Selects whether to save images in Color or
Monochrome. For Monochrome, you can
select the Monochrome Filter by pressing the
(MENU) button.
(Basic Setup)
Displays the Basic Setup menu. See “Basic Setup
Menu” on page 34.
(Format SD Card)
Formats the memory card. You can select
Quick Format or Full Format. See “Formatting
the Memory Card” on page 40 for details.
(Initialize Settings)
Resets the current settings (except date and
time) to their default settings as shown below.
(ENTER)
Change the value or select the item using the jog dial, then press
the
(ENTER) button.
Description
Setting
Color
4
4
4
Default Value
4
Color
Film
Standard
Date
YYYY/MM/DD
Power Save Timer
5min
Sequential Numbering
On
LCD Brightness
5/8
Language
English
USER Button
Delete
Customizing the Settings
4
4
33
Setting
(Long Exp Noise
Reduction)
(Color Space)
Description
Reduces noise that appears on an image taken
with a long exposure. The shooting time may
become longer depending on shooting
conditions.
Selects the color space from sRGB or Adobe
RGB. Adobe RGB is a wider color space than
sRGB and encompasses the colors that can be
printed with CMYK inks. Select Adobe RGB if you
have a printer that supports it.
(RAW Setting)
Sets the image format recorded when shooting
in RAW mode. You can select RAW format only,
or both RAW and JPEG (high resolution) format
in a single file. RAW+JPEG provides the
convenience of viewing the JPEG image on
most computers while retaining the RAW data
for postprocessing, at an increase in image size
and memory card access time.
(Film Setting)
Allows you to quickly switch film profiles to best
suit the shooting subject or environment. For
each film profile (Film1, Film2, or Film3), you can
assign Edge Enhance, Saturation, Tint, Contrast,
and NR (Noise Reduction). By default, Film1 is
preset for portrait, Film2 for landscape, and
Film3 for night pictures. Use Standard if no
particular profile is required.
Basic Setup Menu
Setting
Time and Date
Description
Sets the current date and time
(year, month, day, hours and minutes).
See “Setting the Time and Date” on page 39.
Date Format
Selects date display format from the following:
YYYY/MM/DD (default setting),
MM/DD/YYYY,
DD/MM/YYYY
Power Save Timer
Selects the length of time before the camera
enters the power save mode, in which the LCD
monitor is turned off automatically to reduce
power consumption.
The available settings are 3min, 5min (default
setting), 10min, or 20min.
Press any button to exit the power save mode.
Sequential Numbering
Specifies whether to save images with a
sequential number (as part of the file name).
On (default): sequential numbers continue
even if the memory card is replaced.
Off: sequential numbers end and a new
sequence of numbers starts when the memory
card is replaced.
LCD Brightness
Changes brightness of the LCD monitor.
Also shows the firmware version.
Language
Selects the language for messages and menus
displayed on the LCD monitor from the
following: Japanese, English, French, German,
Italian, Spanish, Dutch, T (Traditional)-Chinese
Note:
The languages available may vary depending
on the country of purchase.
34
Customizing the Settings
Setting
Description
Calibrate Needles
Displays the Needle Calibration menu to adjust
the status gauge needles: E (number of
remaining shots), R (image quality), E
(remaining battery power), and A (white
balance).
Dead Pixel Correction
Corrects non-functional pixels so they are less
conspicuous on the LCD monitor. Repeat this
procedure every few months as necessary. For
the pixels that cannot be corrected with this
setting, try the Long Exp Noise Reduction
feature.
Setting
Assign USER Button
Description
You can assign one of the following functions
to the
(USER) button: Delete, Lock,
Magnify, Print, and Film. By default, Delete is
assigned to this button.
Note:
The
(USER) button does not function in the
tile display mode.
4
4
Quick view is canceled and the LCD monitor is
turned off if you do any of the following:
Press the
(LCD) button
❏
Press the
(MENU) button
❏
Press the
(USER) button
❏
Press the shutter release button
❏
Turn off the camera
4
4
Displays the image on the LCD monitor (i.e.,
enters the playback mode) automatically
when you release the shutter. You can select
the time period during which each image is
displayed on the LCD monitor: 3 sec or 10 sec.
❏
4
4
Note:
Be sure to attach the lens cap before executing
this feature. Otherwise, correct pixels may be
incorrectly calibrated. Also make sure the
battery has enough power left when using this
feature. You cannot execute this function with
a near-empty battery.
Quick View
4
4
4
4
Customizing the Settings
35
Chapter 5
Opening RAW Images on Your Computer
Software Overview
System Requirements
To open RAW format images, you need to install the Epson PhotoRAW
software included on the CD-ROM that came with your camera:
Windows: OS:
Microsoft Windows 98 Second Edition, Me,
2000 Professional, XP Home Edition, XP
Professional
❏
EPSON PhotoRAW is a standalone application that can process
multiple RAW images at one time using the batch feature.
Hardware:
❏
Pentium III 1 GHz or faster (Pentium 4 2 GHz
or faster is recommended)
EPSON RAW Plug-In lets you process your images using Adobe
Photoshop (versions 7, CS, CS2, and Elements 2 and 3).
Memory:
256 MB or more (1 GB or more is
recommended)
Hard Disk:
10 MB or more is required for installation
500 MB or more is required for operation
Display:
XGA (1024 × 768) or higher, 24-bit color or
higher
Macintosh: OS:
36
Opening RAW Images on Your Computer
Mac OS 10.2 or later
Hardware:
PowerPC G4 or higher (PowerPC G5 is
recommended)
Memory:
256 MB or more (1GB or more is
recommended)
Hard disk:
10 MB or more is required for installation
500 MB or more is required for operation
Display:
1024 × 768 or higher, 16-bit color or higher
(24-bit color is recommended)
Installing the Software
EPSON RAW Plug-In
1.
To install the software, you need administrator privileges.
EPSON PhotoRAW
1.
Insert the software CD-ROM into your CD-ROM drive.
Uninstalling PhotoRAW
If you need to uninstall PhotoRAW, do one of the following:
❏
Click Start, point to Settings, and select Control Panel,
Add/Remove Programs, and then click EPSON PhotoRAW.
❏
Click Start, point to Programs, and select EPSON PhotoRAW, and
then click Uninstall.
Windows:
The EPSON Installer Program dialog box appears automatically.
Note:
5
Macintosh:
Double-click Install EPSON RAW Plug-In icon inside the EPSON
folder.
If it does not appear, click the CD-ROM icon, and then select Open from
the File menu. Then double-click EPSETUP. EXE.
Follow the on-screen instructions until all the software is installed.
When you see a message that the installation is complete, click
Finish.
5
If it does not appear, click the CD-ROM icon, and then select Open from
the File menu. Then double-click EPSETUP. EXE.
The EPSON Installer Program dialog box appears automatically.
Note:
2.
Insert the software CD-ROM into the CD-ROM drive.
2.
Follow the on-screen instructions until the software is installed.
When you see a message that the installation is complete, click
Finish or Quit.
5
5
Note:
5
EPSON RAW Plug-In program is automatically installed in the plug-in
folder for Adobe Photoshop. If the plug-in folder for Adobe Photoshop is
not detected automatically, specify the folder manually.
5
Uninstalling RAW Plug-In
If you need to uninstall the RAW Plug-in, follow the instructions below.
Windows:
Click Start, point to Settings, and select Control Panel, Add/Remove
Programs, and then click EPSON RAW Plug-In.
Macintosh:
Delete the EPSON folder in the plug-in folder of Adobe Photoshop.
5
5
5
5
Opening RAW Images on Your Computer
37
Opening a RAW Image
Be sure to copy your RAW image files to your hard disk before trying
to open and process them. Working with them while they are still on
the memory card will take a very long time.
For Macintosh
Start Adobe Photoshop and open the RAW file you want to process.
The main window for EPSON RAW Plug-In is displayed.
Using EPSON PhotoRAW
Click Start, point to All programs (or Programs), and select EPSON
PhotoRAW, and then click EPSON PhotoRAW.
EPSON PhotoRAW starts and the main window is displayed.
Note:
❏ If the EPSON RAW Plug-In does not start automatically even if you select
a RAW file, select Open from the File menu, and select EPSON RAW
Plug-In from the Format drop-down list. Then select the RAW file.
❏
Using EPSON RAW Plug-In
For Windows
1.
Start Adobe Photoshop.
2.
Click File and point to Open. The Open dialog box is displayed.
3.
Select the desired RAW file, then click the Open button.
38
Opening RAW Images on Your Computer
You cannot select a RAW file from a sub folder.
Finding More Information
For more information about the bundled software, see the online help.
Chapter 6
6
Maintenance and Troubleshooting
Setting the Time and Date
1.
Press
(LCD), then
LCD monitor.
(MENU) to display the Main menu on the
3.
6
Use the following to set the time and/or date:
Jog dial
Changes the value.
6
(ENTER) button
Moves the cursor forward.
Pressing this button on the minutes slot
applies the change and returns to the
previous menu.
(CANCEL) button
Moves the cursor backward.
Pressing this button on the year slot returns
to the previous menu without setting time
or date.
Note:
If you remove the battery from the camera, the date and time settings will be
lost after approximately two days.
2.
Select
(Settings),
(Basic Setup), then Time and Date using
the jog dial, then press the
(ENTER) button.
6
6
6
6
6
6
6
Maintenance and Troubleshooting
39
Calibrating the Status Gauge
The gauge readings may deviate slightly from the set positions over
time. If this happens, follow the steps below to calibrate the gauge
needles.
1.
Press
(LCD) then
LCD monitor.
(MENU) to display the Main menu on the
5.
Select Finish using the jog dial, then press
6.
Repeat steps 2 through 4 if you want to calibrate the other needles.
7.
Select Finish using the jog dial, then press
(ENTER).
(ENTER).
Formatting the Memory Card
Format the memory card when you want to erase all the data on the
card, or if the memory card has been formatted with a computer or
another digital camera and you cannot save any images on the card.
Follow these steps:
1.
Press
(LCD) then
LCD monitor.
(MENU) to display the Main menu on the
2.
Select
(Settings) then
then press
(ENTER).
(Format SD Card) using the jog dial,
2.
Select
(Settings),
(Basic Setup), then Calibrate Needles
using the jog dial, then press
(ENTER).
3.
Select Quick Format or Full Format using the jog dial, then press
(ENTER). The confirmation screen is displayed.
3.
Select the needle you want to calibrate using the jog dial, then press
(ENTER).
4.
Select OK using the jog dial, then press
The formatting starts and the message “Formatting...” is displayed.
After the memory card is formatted, the screen returns to the
Settings menu.
Needle Calibration
Please calibrate
carefully.
Finish
Note:
❏ When you format the memory card, all the data on the card will be lost,
including the locked images.
❏
S e lect
4.
40
(ENTER).
Back
Select l or r using the jog dial, then press
(ENTER) repeatedly
to adjust the needle position on the status gauge.
Maintenance and Troubleshooting
If the memory card is locked, the message “Cannot format. The SD card
is write-protected” is displayed. Remove the card from the camera, then
unlock the card and try again.
c
Caution:
Do not remove the memory card from the camera while the card is being
formatted.
c
Note:
Quick Format does not securely delete the data from the memory card. To
securely “flush” the memory card so that no data can be recovered from the
card, use Full Format to format the card.
Cleaning the Camera Body
Clean your camera thoroughly several times a year to keep it in good
working condition. Before you perform any maintenance procedure on
the camera, be sure to read the Safety Instructions in the Quick Reference
Guide. Then follow these guidelines to clean the camera:
❏
Be sure to turn off the camera before cleaning.
❏
Use a clean, dry cloth to keep the camera free of dust.
❏
Do not use abrasive cleaners.
❏
If necessary, clean the battery contacts with a dry cloth.
Cleaning the CCD Sensor
Caution:
❏ Do not use blower cans that use compressed air.
❏
Do not touch the sensor with your finger or a cloth. Doing so may
damage the sensor and may affect image quality.
❏
Do not let the blower tip enter the camera body or touch the sensor
surface. The shutter or sensor may be damaged if the shutter is
accidentally released.
1.
Remove the memory card from the camera.
2.
Turn the shutter speed dial to B and attach the cable release.
3.
Insert a fully charged battery and turn on the camera.
c
6
6
6
Caution:
Do not use a low battery. If the battery dies and the shutter closes during
cleaning, the camera may be damaged.
4.
Cock the shutter, then remove the lens or lens hole cover.
5.
Lock the shutter open using the cable release.
6.
Blow off the dust carefully using the hand blower.
7.
After cleaning, unlock the cable release and close the shutter.
8.
Attach the lens or lens hole cover and remove the cable release.
6
6
6
If dark spots appear on the same place on all the pictures you take, there
may be dust particles on the CCD image sensor inside the camera. To
clean the CCD sensor, you need a hand blower and a cable shutter
release with a shutter lock feature.
6
6
6
6
Maintenance and Troubleshooting
41
Storing the Camera
If you are not planning to use the camera for a long period of time,
remove the battery and store it at room temperature in a dry location.
Store the camera in its case. Do not store the camera in following
conditions:
❏
Direct sunlight or bright light
❏
High humidity
❏
High heat
❏
Excessive dirt or dust
❏
Excessive vibrations
❏
Strong magnetic fields
Troubleshooting
Error Messages
Message
Remedy
Cannot delete. The image is
locked.
Unlock the image using the lock
function in the Main menu, then try
again.
Cannot delete. The SD card is
write-protected.
Remove the card from the camera,
release the write-protect switch from
the lock position, and try again.
Cannot lock. The SD card is
write-protected.
The memory card is write-protected.
Remove it from the camera, release
the write-protect switch from the lock
position, and try again.
Cannot unlock. The SD card is
write-protected.
Remove the card from the camera,
release the write-protect switch from
the lock position, and try again.
Other Problems
Problem
42
Maintenance and Troubleshooting
Remedy
Permanent white spots (dead
pixels) appear on the LCD
monitor.
Use the Dead Pixel Correction feature
to correct the dead pixels. See “Basic
Setup Menu” on page 34 for details.
Due to the nature of the CCD sensor,
dead pixels cannot be completely
eliminated.
The shutter cannot be released
and the memory card access
light flashes.
The battery power is too low. Charge
the battery and try again.
Contacting Customer Support
If your Epson product is not operating properly and you cannot solve
the problem using the troubleshooting information in your product
documentation, contact customer support for assistance. If customer
support for your area is not listed below, contact the dealer where you
purchased your product.
For Users in Singapore
Sources of information, support, and services available from Epson
Singapore are:
World Wide Web (http://www.epson.com.sg)
Information on product specifications, drivers for download,
Frequently Asked Questions (FAQ), Sales Enquiries, and Technical
Support via e-mail are available.
Customer support will be able to help you much more quickly if you
give them the following information:
Epson HelpDesk (Phone: (65) 6586 3111)
❏
Product serial number
Our HelpDesk team can help you with the following over the phone:
❏
Product model
❏
Sales enquiries and product information
❏
Product software version
(Click About, Version Info, or similar button in the product
software.)
❏
Product usage questions or problem
❏
Enquiries on repair service and warranty
❏
Brand and model of your computer
For Users in Hong Kong
❏
Your computer operating system and version number
❏
Names and version numbers of the software applications you
normally use with your product
To obtain technical support as well as other after-sales services, users
are welcome to contact Epson Hong Kong Limited.
For Users in Europe
Go to http://www.epson.com and select the Support section of your
local EPSON web site for the latest drivers, FAQs, manuals and other
downloadables.
Epson's Technical Support Web Site provides help with problems that
cannot be solved using the troubleshooting information in your printer
documentation.
Epson Hong Kong has established a local home page in both Chinese
and English on the Internet to provide users with the following
information:
Product information
❏
Answers to Frequently Asked Questions (FAQs)
❏
Latest versions of Epson product drivers
6
6
6
6
6
6
Users can access our World Wide Web home page at:
http://www.epson.com.hk
Maintenance and Troubleshooting
6
6
Internet Home Page
❏
6
6
43
Technical Support Hotline
You can also contact our technical staff at the following telephone and
fax numbers:
Phone: (852) 2827-8911
Fax: (852) 2827-4383
For Users in Korea
If you need help with your digital camera, contact the shop where you
purchased it.
44
Maintenance and Troubleshooting
Appendix
Standards and Approvals
Specifications
Camera
General
EMC Directive 89/336/EEC
EN55022 Class B
EN55024
Model type:
Lens-interchangeable rangefinder digital
camera
Dimensions:
Height:
Lithium-ion Battery
EMC Directive 89/336/EEC
EN55022 Class B
EN55024
Battery Charger
Low Voltage Directive 73/23/EEC
EN60950
EMC Directive 89/336/EEC
EN55022 Class B
88.5 mm (3.54 in.)
Width:
142 mm (5.68 in.)
Depth:
39.5 mm (1.58 in.)
Weight:
Approx. 560 g (1.2 lb)
Temperature:
Operating:
5 to 35°C
Storage:
–20 to 60°C
Humidity:
(without condensation)
Operating:
30 to 80%
Storage:
10 to 80%
External interfaces:
Memory card slot (for SD memory card up
to 2 GB)
X-sync contact (for external flash unit)
EN55024
Image Format
Recording format:
RAW, JPEG
File type:
Exif 2.21, DCF 2.0, DPOF 1.1 compliant
Image size/
typical file size:
JPEG: 2240 × 1488 pixels/1.5 MB
JPEG: 3008 × 2000 pixels/3 MB
RAW (12-bit)/10 MB
Appendix
45
JPEG compression ratio:
Locked at 1/4
PRINT image matching:
Supports PRINT Image Matching III
Optical System
Image sensor:
Primary-color filter CCD
(APS size: 23.7 × 15.6 mm)
Pixels:
6.1 M
Lens mount:
EM mount (M-type bayonet mount; L-type
screw mount with an optional adapter
ring)
Viewfinder:
Real image range finder type see-through
viewfinder
Viewfinder magnification: 1.0x
Rangefinder:
Rangefinder baseline
length:
Visual field frame:
Combined coincidence-type
(interlocking range: 0.7 m to infinity)
38.2 mm
28/35/50 mm bright frame switching, auto
parallax compensation
Frame coverage:
85% (at 3 m)
Shutter:
Electronically controlled vertically
traveling focal plane shutter
Shutter speed: 1/2000–1 sec, bulb
Flash:
Synchronous: 1/125 sec or slower
Supported only in synchronized shooting
Metering:
46
TTL screen surface direct actual-aperture
center-weighted averaged metering
Appendix
Exposure control:
Automatic exposure (AE) with aperture
priority and AE-lock/manual
Exposure compensation
range:
+/-2.0EV in 1/3EV steps (AE mode only)
ISO sensitivity:
200/400/800/1600
35 mm equivalent focal
length multiplier:
1.53x
Display Functions
LCD monitor:
Type 2 low-temperature polysilicon color
LCD
235 K pixels
Status gauge:
Analog needle indicators
Viewfinder Indicators
Shutter speed:
1/2000–1 sec. (flashing metered/lit: set on
dial)
Bright-line frames:
for 50/28/35 mm lenses
Power Supply
Battery type:
Lithium-ion
Model:
EU-85
Output voltage:
3.7 V
Capacity:
1500 mAh
Battery charge life-cycle:
Number of shots possible
Under shooting conditions 1*: Up to about
900 shots
Under shooting conditions 2**: Up to about
360 shots (compliant with the CIPA
standard)
Optional Accessory
The following option is available for the camera.
❏
Lithium-ion battery (Model: EU-85)
* Shooting conditions 1:
Shooting six pictures per minute at a
regular interval then turning the camera
off for one minute before turning it on
again and repeating this procedure, while
the flash is off, a shutter speed of 1/250,
ISO of 200, image quality of N (JPEG:
2240 × 1488 pixels) and WB on Sunny.
** Shooting conditions 2:
Turning on the camera and waiting 30
seconds before taking the first picture,
then taking nine more pictures at 30
second intervals before turning off the
camera and removing the battery for
10 minutes and repeating this procedure,
while using the flash - which is attached to
the accessory shoe - on full for every
second shot, with a shutter speed of 1/125,
ISO of 200, image quality of H (JPEG:
3008 × 2000 pixels) and WB on Auto.
Battery Charger
Model:
A281H
Input voltage:
100–240 VAC, 50/60Hz
Charging method:
Constant voltage, constant current
Appendix
47
Index
A
customer support, 43
accessory shoe, 8
adapter ring, 15
AE-lock, 23
AE-lock button, 9
aperture
setting, 22
D
dial-lock release button, 8
display icons, 26
M
E
B
EPSON PhotoRAW, 37
battery
charging, 11
installing, 13
lithium-ion battery, 11
bright-line frame
illumination window, 7
selecting, 16
bulb setting, 22
button
CANCEL button, 10
ENTER button, 10
LCD button, 10
MENU button, 10
USER button, 10
F
C
Jog dial, 8
calibrating status gauge, 40
cleaning
camera, 41
CCD sensor, 41
contacting Epson, 43
48
Index
mounting L-mount lens, 16
mounting M-mount lens, 15
release button, 7
removing M-mount lens, 16
flash, 22
focal length conversion scale, 9
focusing, 24
format memory card, 40
frame selector lever, 8
memory card
access light, 9
formatting, 40
inserting, 14
removing, 14
slot, 9
slot cover, 9
write protecting, 14, 40
O
I
icons, 26
image quality, 9, 10
installing software, 37
ISO sensitivity dial, 8
J
option, flash, 22
optional accessory, 47
P
power on/off, 18
power switch, 8
PRINT image matching, 46
LCD monitor, 10, 25
lens
incompatible lens, 15
SD memory card, formatting, 40
setting
aperture, 22
white balance, 19
shutter charge lever, 8, 18
shutter release button, 8
shutter speed, 8, 22
software, installing, 37
status gauge, 8, 10
storing camera, 42
T
technical support, 43
V
viewfinder window, 7
W
WB lever, 9
white balance, 10
X
X-sync contact, 7
R
L
S
rangefinder eyepiece, 9
rangefinder window, 7