1
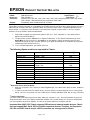
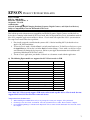
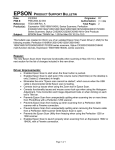
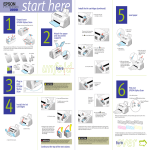
EPSON
Date:
PSB #:
Reference:
Product(s):
Subject:
PRODUCT SUPPORT BULLETIN
4/1/2002
PSB.2002.04.001
N/A
Stylus Scan 2000/2500
Product Installation on Windows XP
Originator:
Authorization:
Total Pages:
JD
3
This bulletin was created to provide installation instructions for the Stylus Scan 2000/2500 products on
Windows XP.
Issue:
Windows XP provides built-in scanner and printer driver support for these products. The drivers
provide scanning capability via Microsoft’s WIA (Windows Image Acquisition) user interface and
printing capability via Windows XP-compatible applications. As soon as you connect your Stylus Scan
product to the computer, Windows automatically detects the device and installs the drivers. However,
these drivers won’t work with Epson’s Smart Panel. In order to scan and print from Smart Panel, you
must install Epson drivers. Although Epson does not provide XP drivers for the Stylus Scan products,
you can use the Windows 2000 drivers. The next section provides instructions on how to install and
configure your Stylus Scan product on Windows XP.
Resolution:
If you have the Stylus Scan 2000, you will need to order the Epson Stylus Scan Drivers for Windows
2000 CD. The product code is CPD-10857. Call Epson’s Technical Support to order a copy. If you
have the Stylus Scan 2500/2500Pro, you will need the updated Printing and Scanning Software CD.
The product code for this CD is CPD-9146R1. Look for this code on the CD that came with your
product. The code is imprinted on the label. If the code says CPD-9146, you need to call Epson’s
Technical Support to order the newer CD.
Note: Smart Panel is not available as a downloadable file from our Web site. Therefore, do not
download the Stylus Scan Windows 2000 drivers. In order for Smart Panel to work, it must be installed
at the same time as the drivers. You must use the setup installer on the CD for installing Smart Panel
and the drivers.
Steps:
Important: Before you start, you must have sufficient access rights to install/uninstall and use the
Epson drivers and Smart Panel software. Therefore, when you start up Windows XP, always log in as
administrator or as a user with administrator rights.
1) Depending on the product you have, insert either the Stylus Scan Windows 2000 or Printing and
Scanning Software CD into the CD ROM drive.
2) Attach your Stylus Scan product to your computer with a USB cable and turn it on. Do not use a
parallel connection. If this is the first time that you are connecting the Stylus Scan to your computer,
Windows XP will detect the device, install drivers and automatically configure the port. This only takes
a few moments; so, do not interrupt the process. Once completed, go to the next step.
1
3) Open Windows Explorer and double-click the Windows folder. Click once on the INF folder and
press the F3 key. This brings up the Search utility. Set the search parameters to look within the
C:\Windows\INF folder.
4) Key in epsnmfp to find the following two file names:
epsnmfp.inf
epsnmfp.pnf
Rename the files to:
epsnmfp.ing
epsnmfp.png
If you don't find the files then go to the menu bar at the top of Windows Explorer and open Tools.
Select Folder Options. Click the View tab. If there is no bullet, then select the "Show hidden files and
folders" setting. Scroll down and uncheck "Hide file extensions for known file types".
Perform a refresh on the Windows Explorer screen and search again for the two files. When you find
them, change the names as described above.
5) Click the Start button. Right click on My Computer. Click Properties. Click the Hardware tab. Click
on the Device Manager button.
6) In Device Manager, double-click on Imaging Devices. Then double-click on the StylusScan product
name. This brings up the Property sheets. Click the Driver tab. Click the Update driver button.
Note: If you don't see your Stylus Scan product listed in Device Manager, then reboot the computer.
Windows should detect the device and launch the Found New Hardware Wizard. Now go to step 8 to
continue the installation.
7) Select "Install from list or specific location" and click Next.
8) On the next screen uncheck "Search removable media". Checkmark "Include this location in the
search". Click Browse.
9) In the Browse for folder dialog box, scroll to the CD ROM drive letter. If you have the Stylus Scan
2500, scroll to the Epson\Win2000 folder and double-click the Win2000 folder. Click OK. If you have
the Stylus Scan 2000, scroll to the ss2000 folder, double-click on it and click OK. Click Next.
10) A Hardware Installation dialog box should appear. It says the driver has not passed Windows Logo
testing. Click the Continue Anyway button.
11) Once the driver files have finished copying to the hard drive you will see either the Update or
Found New Hardware Wizard screen. Click Finish.
12) Open My Computer. If you have the Stylus Scan 2500, double-click on the Epson_ss2500 CD
icon. Double-click the ss2500 folder. Double-click on Cdsetup.exe. If you have the Stylus Scan 2000,
double-click on the Epson icon. Double-click on the ss2000 icon. Double-click on Cdsetup.exe. You
will see the Software Setup window.
13) Click once on the Add Software button. Make sure both Smart Panel and the drivers have a check
mark in front of them. Click OK.
2
14) When the printer driver installation is ready to begin you will see a Driver Installation Warning
dialog box. Click OK.
15) When the files have finished copying to your hard drive, you should see the StylusScan Utility
Setup dialog box. The message should say, "Driver installation and port configuration were completed
successfully." Click OK. Then click Restart.
Note: After you restart your computer, Windows may redetect the printer on your Stylus Scan product
and automatically install a driver. Do not try to interrupt this process. It will not affect the installed
Epson drivers.
16) Open the Printers window. You should see a printer icon labeled Epson Stylus Scan 2000 or
Epson Stylus Scan 2500. Verify it has a checkmark next to it and that it says Ready. Verify printer
communication by running a test page. If you want to test both the scanner and printer at the same
time, launch Smart Panel and use the Copy utility. For more information on how to use Smart Panel,
refer to your User’s Guide.
Note: If the Stylus Scan does not say Ready, then right-click on the icon and click on “Set as
Default”.
3
EPSON
Date:
PSB #:
Reference:
Product(s):
Subject:
PRODUCT SUPPORT BULLETIN
3/4/2002
Originator: JD
PSB.2002.03.001
Authorization:
TE01-320 Rev. A
Total Pages: 2
Perfection 610, 636, 640, 1200, 1240, 1250, 1640, 1650, 2450 & Expression 636, 800, 836XL,
1600, 1640XL, 1680 Series Scanners; StylusScan 2000, 2500
Compatibility Chart for Macintosh OS X Classic
This bulletin provides information on compatibility for EPSON scanners and Stylus Scan series products running in
Macintosh OS X Classic. Mac OS X provides Classic environment for Mac OS 9.x compatible applications and
device drivers. For purposes of this document, your Macintosh computer requires OS 9.2.1 and 10.1 system
software. To set up Classic, follow the steps below:
1.
First install or upgrade your Macintosh system to OS 9.2.1. Then, install OS 10.1 (for details refer to
Apple’s OS X documentation).
2. To start Classic, click the Classic icon in System Preferences. To find System Preferences go to the
Apple Menu or click on the icon in the Dock bar on the desktop. Classic can also be set up to start
automatically during the log in process. (Refer to your Apple documentation for installation and operation
of Macintosh OS X Classic and 9.2.1).
3. To run a Classic application, just double–click on it.
The following Epson models are supported in Classic.
Model
Perfection 610
Perfection 636U
Perfection 640U
Perfection 1200U
Perfection 1240U
Perfection 1250
Perfection 1640SU
Perfection 1650
Perfection 2450
Expression 1600
Expression 1640XL
Expression 1680
Stylus Scan 2000
Stylus Scan 2500
Driver Version
TWAIN L 1.00E
TWAIN 3.20A
TWAIN L 2.01A
TWAIN 4.01A
TWAIN 5.02A
TWAIN 5.53A
TWAIN 5.02A
TWAIN 5.53A
TWAIN 5.53A
TWAIN Pro 2.10A/Pro Network 2.00A *
TWAIN Pro 2.10A/Pro Network 2.00A *
TWAIN Pro 2.10A/Pro Network 2.00A *
TWAIN (v.1.10A); Printer (v.6.25E) **
TWAIN (v.1.10A); Printer (v.6.25E) **
Connector Type
USB
USB
USB
USB
USB
USB
USB
USB
USB
USB
USB
USB
USB
USB
* Expression Series Scanner Notes:
1.
2.
Start your computer in 9.2.1 before you install PageManager. If the Start button does not work, restart the
computer.
In order to use the Twain Pro network driver, you must have the scanner attached to a PC running Scan
Server. On a PC, the scanner can use a USB, SCSI or FireWire (Windows 2000, Me, XP only) connection.
** Stylus Scan Notes:
You must install Smart Panel from its own folder. Start your computer in 9.2.1. From the Software CD open the
Smart Panel folder. Click on the Epson Smart Panel Installer icon to install. Before you can launch Smart Panel
you must install the Stylus Scan Updater. The file can be downloaded from the Epson web site.
Important Note: MAC OS X Classic supports USB-native and network-capable devices. Classic
does not support MAC Serial, SCSI or FireWire connected devices. Therefore, the Expression
636, 800 and 836XL that all require a SCSI connection, are not supported in Classic.
Page 1 of 2
Twain Driver Installation:
1.
2.
3.
4.
5.
6.
Start your computer in 9.2.1.
Install the Twain driver.
Connect and power on the scanner.
Restart your computer in OS 10.1
Start Classic
Launch your scanning application
Page 2 of 2
EPSON PRODUCT SUPPORT BULLETIN
Date:
PSB #:
Reference:
Product(s):
Subject:
12/24/2001
PSB.2002.01.005
TE00-613 Rev.A
StylusScan 2500
Epson Scanner Monitor & Epson Printers
Originator:
Authorization:
Total Pages:
This bulletin was created to inform you of an issue that occurs when the StylusScan 2500 and
another Epson inkjet printer are installed on the same computer and both using a parallel port
connection.
Issue:
If you are running Windows 95 or 98 and you have an Epson inkjet printer installed via parallel
and then install a StylusScan 2500 as a parallel device, you will not be able to print again from
the other Epson printer. When you install the drivers for the Stylus Scan 2500 the program loads
a utility called Epson Scanner Monitor. The utility starts up by default when Windows is launched.
This program monitors the parallel port in the same way Epson Status Monitor 3 does for the
other Epson printer. Once the Scanner Monitor takes control of the port, the other printer stops
working.
Resolution:
An updated Twain driver that corrects this problem is now available on Epson’s web site. Go to
www.epson.com and navigate to the StylusScan 2500 support page to find the updated driver. To
install the driver follow these steps:
1) Follow the on-screen instructions to extract the driver files. Then double-click on
Setup.exe to start the installation.
2) In the Select Interface box, choose LPT1 (printer port). Click Next.
3) Once the installer has finished copying the files to your hard drive, the Screen Calibration
utility box appears. Click Next and follow the on-screen instructions. When finished click
OK.
4) The StylusScan 2500 Setup box appears when the installation has been completed. Click
OK.
5) Restart your computer to finish the update process.
1
JD
1
EPSON PRODUCT SUPPORT BULLETIN
Date:
PSB #:
12/24/2001
PSB.2002.01.004
Reference:
Product(s):
Subject:
TE00-684 Rev.A
StylusScan 2500
Epson Smart Panel Patch for Windows Me
Originator:
Authorization:
Total Pages:
This bulletin was created to inform you of an issue that occurs after installing Smart Panel for the
StylusScan 2500 on Windows Me.
Issue:
The Scanners and Cameras Events feature in Windows Me does not support the version of
Epson Smart Panel bundled with your product. Consequently, after you install Smart Panel, the
program does not show up under the Send to this Application list in the Events box. This prevents
the Scan button on your StylusScan product from working properly in Windows.
Resolution:
A patch for Smart Panel that corrects this problem is now available on Epson’s web site. Go to
www.epson.com and navigate to the StylusScan 2500 support page to find the updated patch.
Before installing the patch you must have Smart Panel 1.10A already installed on your computer.
To verify if you have this version on your computer, launch Smart Panel. On the main user
interface screen, click on the light bulb icon in the upper left corner. Click About to see the
version. If the version says 1.00A then you will need the updated software CD (CPD-9146R1).
Please call the Epson technical support line at 562 276-4382 (U.S.) or 905 709-2567 (Canada) to
obtain a copy. If you have Smart Panel 1.10A installed, then follow these steps to load the patch:
1) Follow the on-screen instructions to extract the patch files. Then double-click on
Setup.exe to start the installation.
2) Follow the on-screen instructions to complete the installation.
3) Once the installer has finished copying the files to your hard drive, you get an Information
dialog box on the screen that says Smart Panel has been successfully installed. Click
OK.
4) Open Control Panel and double-click Scanners and Cameras.
5) Double-click on the StylusScan 2500. Click on the Events tab. The Send to this
Application box should now list Epson Smart Panel. The program should have a
checkmark in front of it. If it does not then put a checkmark in the box. Then click Apply
and OK.
JD
1
EPSON PRODUCT SUPPORT BULLETIN
Date: 9/24/2001
PSB No.: PSB.2001.09.005
Reference: N/A
Originator: JD
Authorization:
Affected Product(s): Perfection 640, 1240, 1640, 1250, 1650 & Stylus Scan 2000/2500
Subject: Links to Smart Panel Patches
This bulletin provides information and links to patch updates for Epson Smart Panel software that is packaged with several of Epson
scanner and all-in-one products. The links provide instant access to the patch files for easy download and installation.
You can also access the patches by visiting NewSoft’s web site. For a complete list of all the fixes as well as download and installation
instructions for each patch, then point your browser to www.newsoftinc.com and refer to the instructions given below:
1.
2.
3.
4.
On the home page put (do not click) your pointer over the Support menu icon and click Patch from the drop-down menu.
From the Patch Search dialog box, select product (EPSON Smart Panel) and OS, then click search.
When you see the patch site, read the description and instructions.
Then click Download Now to copy the patch files to your computer.
Available Patch Links
To access the links from the Epson web site, set your browser to http://support.epson.com/filelibrary.html. From the Support page,
select your product. Click on the selected link. A Save As dialog box appears. Select your directory and click Save to copy the file to your
hard drive. For instructions on installing the patch, point your browser to www.newsoftinc.com. Then follow instructions 1-4 listed
above.
Perfection 640, 1240 and 1640
1.
For MFC42.dll errors when launching Smart Panel in Windows and 3rd party printer issues such as runtime errors when using
Smart Panel’s Copy utility in Windows 2000, please use this link to update your software.
http://www.newsoftinc.com/patch/download/english/esp-102p05a.exe
Perfection 640, 1240, 1640, 1250 & 1650
1.
For problems using 3rd party printers and Copy Utility with Smart Panel v.1.01A, 1.02A, 1.03A and 2.00A for Windows, please
use this link to update to the latest version (2.0A)
http://www.newsoftinc.com/patch/download/english/copy2.exe
2. For scanning or printing issues when using Photo Print bundled with Smart Panel v.1.01A, 1.02A, 1.03A and 2.00A for
Windows, please use this link to update your software.
http://www.newsoftinc.com/patch/download/english/epp131.exe
Perfection 1250 & 1650
1.
For image quality issues when using Smart Panel’s Scan to Web for Windows, please use this link to update your software.
http://www.newsoftinc.com/patch/download/english/scantoweb_e.exe
1
Stylus Scan 2000/2500
Windows
1.
For problems sending and receiving documents when using Smart Panel’s Scan to OCR with WinFax Basic, please use this link
to upgrade the fax engine.
http://www.newsoftinc.com/patch/download/english/esp-fax.exe
MAC
1.
For image quality problems or “Cannot scan to OCR” errors when using Smart Panel’s Scan to OCR, please use this link to
update your software.
http://www.newsoftinc.com/patch/download/english/ocr_01.hqx
2.
For problems launching Smart Panel or any of its applets in OS 9.1, please use this link to update your software.
http://www.newsoftinc.com/nai/atlantis/esp1.5mac/index.html
Note: This link will take you to a Software Agreement page. Read the Installation instructions before you click the “I agree…”
statement.
3.
For problems when using Smart Panel’s Scan to Fax with FaxSTF 6.0, please use this link for the latest fix.
http://www.newsoftinc.com/patch/download/english/esp patch-faxStf60.sit
4.
For problems running the Auto-Installer from the product’s Printing and Scanning Software Installation CD in OS 9.1, please use
this link to update the Epson Smart Panel preferences file.
Special note: To avoid the “In current MAC OS there are no applications that can be run normally” error, install Smart
Panel from its own folder (EPSON Smart Panel) and the printer/scanner drivers from their own folders (Epson Stylus Scan 2000
or 2500). Trash the original Epson Smart Panel preferences file. Then copy the updated Preferences file to the Preferences folder
on your hard disk. Launch Smart Panel. Visit NewSoft’s web site for additional download instructions.
http://www.newsoftinc.com/patch/download/english/esp-pref.sit
If you still require technical support for Smart Panel please contact NewSoft at (510) 445-8616 or visit their web site at
www.newsoftinc.com.
2
EPSON PRODUCT SUPPORT BULLETIN
Date: 9/24/2001
PSB No.: PSB.2001.09.003
Reference: TE00-683
Originator: JD
Authorization:
Affected Product(s): Stylus Scan 2000/2500
Subject: Smart Panel Updater for Macintosh OS 9.1
This bulletin provides Smart Panel updater information that addresses Stylus Scan 2000/2500 Smart Panel compatibility issues with Mac
OS 9.1.
Description:
When running the software setup installer from the Stylus Scan 2000/2500 product CD to install Smart Panel and the printer/scanner
drivers, the following error message appears when you click the Add Software button.
Solution:
To address this issue and properly run Smart Panel follow the instructions below.
1.
2.
3.
Install Smart Panel and the Stylus Scan drivers (printer & scanner) separately from their respective folders. Do not attempt to
launch Smart Panel at this point or you will get an error message that says: “Cannot find correct info for the multi-function
device”.
To enable Smart Panel to launch correctly, you must install the Smart Panel updater. This program automatically updates the
Smart Panel preferences file.
The updater can be downloaded from Epson’s web site. Please use one of the following links to access the updater. Follow the
on-screen instructions to download the file.
Stylus Scan 2000: http://support.epson.com/hardware/allinone/ss2k__/filelibrary.html
Stylus Scan 2500: http://support.epson.com/hardware/allinone/ss25__/filelibrary.html
Updater Installation Instructions:
1.
2.
3.
4.
5.
Double-click the Updater file to extract the Installer folder.
Double-click the appropriate Stylus Scan Update icon.
Click Install on the next screen.
When the installation has finished click Quit.
Launch Smart Panel; it should open and display the main user interface screen.
1
EPSON PRODUCT SUPPORT BULLETIN
Date: 8/15/2001
PSB No.: 2001.08.002
Reference: TE01-045 Rev. A
Originator: TC & JD
Authorization:
Affected Product(s): EPSON Imaging Products (Scanners, Digital Cameras, and Stylus Scan Devices)
Subject: Compatibility Chart for Macintosh OS X Classic
This bulletin provides information on compatibility for EPSON Scanners, Digital Cameras, and Stylus Scan
Series devices running in Macintosh OS X Classic mode. Mac OS X provides the Classic environment mode for
Mac OS 9 compatible applications and device drivers. Classic mode will require Mac OS 9.1 system software.
To setup Classic mode follow the steps below:
1. First install or upgrade your Macintosh system to OS 9.1 before installing OS X (for details refer to
Apple’s OS X documentation).
2. To start in Classic mode, click the Classic icon in System Preferences. To find System Preferences go to
the Apple Menu or click on the icon in the Dock bar on the desktop. Classic mode can also be set up to
start automatically during the log in process. (Refer to your Apple documentation for installation and
operation of Macintosh OS X Classic and 9.1).
3. To run a Classic application, just double–click on it or a document created with the application.
A) The following Epson models are supported in OS X Classic mode via USB.
Model
Perfection 610
Perfection 636U
Perfection 640U
Perfection 1200U
Perfection 1240U
Perfection 1640SU
Expression 1600
Expression 1640XL
Expression 1680
Stylus Scan 2000
Stylus Scan 2500
Photo PC 800/850Z/3000Z
Photo PC 3100Z
Driver Version
TWAIN L 1.00E
TWAIN 3.20A
TWAIN L 2.01A
TWAIN 4.01A
TWAIN 5.02A
TWAIN 5.02A
TWAIN Pro/Pro Network 2.00A *
TWAIN Pro/Pro Network 2.00A *
TWAIN Pro/Pro Network 2.00A *
TWAIN (v.1.10A); Printer (v.6.25E) **
TWAIN (v.1.10A); Printer (v.6.25E) **
EPSON Photo!3 (v.1.40E) ***
USB Storage Device
Connector Type
USB
USB
USB
USB
USB
USB
USB
USB
USB
USB
USB
USB
USB
Note: MAC OS X Classic mode supports USB-native and network-capable devices. Classic mode does not
support MAC Serial, SCSI or FireWire connected devices.
* Expression Series Scanner Notes:
1.
2.
3.
When installing the TWAIN driver and you are prompted to restart your computer, click Quit instead.
Click Stop to close the Classic environment. Close the System Preferences folder. Then restart the computer.
If you install PageManager v 2.40.05 for the Expression series scanners and the Start button does not work, restart
the computer.
1
** Stylus Scan Notes:
1.
You must install the Stylus Scan drivers in a true 9.1 environment. Do not install in OS X Classic, the installation
will hang. From the Printing and Scanning Software CD, open the Epson Stylus Scan 2xxx folder and click on the
icon to install the drivers. When prompted, restart the computer. Make sure the startup disk is set to OS X before
restarting. Start Classic and install Smart Panel.
2. You must install Smart Panel from its own folder. From the Software CD open the Smart Panel folder. Click on
the Epson Smart Panel Installer icon to install. Before you can launch Smart Panel you must install the Stylus Scan
Updater. The file can be downloaded from the Epson web site.
*** Digital Camera Notes:
1. EPSON Photo! 3 must be installed in a true Mac OS 9.1 environment. It cannot be installed in Mac OS X
Classic mode. After installation, restart the computer in OS X , start Classic, then launch Photo! 3.
2. Use the EPSON Camera Monitor Setup dialog box in Apple Menu Items to assign an application before
using the programmable Push (Shutter) Button Function.
3. You can use the Push Button Function in Classic mode.
B) The following models are not supported in OS X Classic when using the connector type(s) described
in the chart below.
Model
Perfection 636
Perfection 1200
Expression 636
Expression 800
Expression 1600
Expression 1640XL
Expression 1680
Expression 836XL
GT-10000 (PC platform only)
GT-10000+ (PC platform only)
GT-30000 (PC platform only)
Photo PC 500
Photo PC 600
Photo PC 650
Photo PC 700
Photo PC 750Z
Connector Type
SCSI
SCSI
SCSI
SCSI
SCSI/FireWire
SCSI/FireWire
SCSI/FireWire
SCSI
SCSI
SCSI
SCSI/FireWire
Serial
Serial
Serial
Serial
Serial
2