1
EPSON
Product Support Bulletin
Date:
PSB #:
Reference:
Product(s):
Originator:
09/25/2002
MS
Authorization:
PSB.2002.09.004
Total Pages:
N/A
EPSON Stylus Pro 9000, 9500, 9600, 7000, 7500, 7600, 10000, 10600, 5000,
5500 and Stylus Color 3000 Printers
Subject:
PostScript Printing Support for Mac OS X Native Mode
This bulletin provides instructions for installing and configuring a Mac OS X Client with your
existing EPSON hardware or software RIP. If your EPSON Professional Wide Format printer was
bundled with one of the RIP packages listed below, or if you had purchased the RIP as an option,
then you can configure a Mac OS X Client with OS Version 10.2 and above for PostScript printing
by simply installing the appropriate RIP PPD.
•
•
•
•
•
•
EFI RS 5000 LX Series – Stylus Pro 5000 printer
EFI RS 5100 X2 Series - Stylus Pro 9000, 7000, 9500 and 7500 printers
Fiery Spark Designer – Stylus Pro 5500 printer
Fiery Spark Professional 1.0 – Stylus Pro 5500 and Stylus Pro 10000ARC/DYE printers
Fiery Spark Professional 2.0 – Stylus Pro 9600UCM/7600UCM printers
EPSON StylusRIP - Stylus Color 3000 and Stylus Pro 5000 printers
Installation Instructions:
Setup your existing RIP Server as per the instructions provided in the User’s Guide that came
with your RIP. To setup a Mac OS X Version 10.2 Client follow the instructions below. There are
two ways you can add a PPD and configure your printer in OS X, AppleTalk or IP Printing.
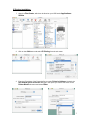
AppleTalk Installation:
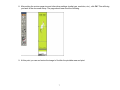
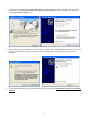
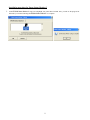
1. Open the Print Center, which can be found on your hard disk driver under
Applications - Utilities
1
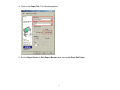
2. Click on the Add button. Then select AppleTalk from the top sub-menu and your
AppleTalk zone if applicable.
3. The Print Center should scan the network and find all your devices. Select your printer
from the list and click on the Printer Model sub-menu. Select Other to continue.
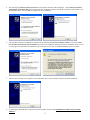
4. Navigate to the location of your PPD file. After selecting the PPD file it should reflect the
name of the printer under the Printer Model section. Click on the Add button.
5. Repeat the process to add your additional queues. Your Mac OS X Client should now be
ready to print.
2
IP Printing Installation:
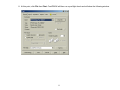
1. Open the Print Center, which can be found on your HDD under Applications Utilities
2. Click on the Add button and select IP Printing from the sub-menu.
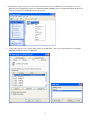
3. Enter the IP Address of the Postscript Server under Printer’s Address. Uncheck the
Use default queue on server and type in the queue you wish to add. Click on the
Printer Model sub-menu and select Other.
3
4. Navigate to the location of your PPD file. After selecting the PPD file it should reflect the
name of the printer under the Printer Model section. Click on the Add button.
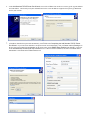
5. The Print Center should now show the Queue that you typed along with the IP address.
6. Repeat the process to add your additional queues. Your Mac OS X Client should now be
ready to print.
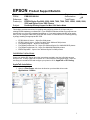
Note: The StylusRIP does not have a separate folder on the CD to select the printer’s PPD. In
order to select the PPD it must be copied from another client’s Printer Description folder as
shown below (HDD - System folder - Extensions folder - Printer Description folder).
4
EPSON
Date:
PSB #:
Reference:
Product(s):
Subject:
PRODUCT SUPPORT BULLETIN
8/8/02
Originator: RR
PSB.2002.01.001A
Authorization:
PSB.2002.01.001
Total Pages: 12
EPSON Stylus Color 3000, Stylus Pro 5000, 5500, 7000 Series, 7600 Series, 9000 Series, 9600 Series and
10000 Series
Maximum Printable Area Limits for the EPSON Professional Graphic Printer line.
This bulletin was created to inform you of the maximum custom page sizes allowable for EPSON Professional Graphic products.
The tables below show the maximum page sizes allowable for the EPSON Professional Graphics printer line (Desktop and Large
Format). Although this document is meant as a guideline for the maximum page size allowable for each printer, it does not include
printable area (margin) information. Please refer to your user guide for additional information regarding the printable area (margins)
for your particular printer. There are 3 aspects that effect how long of a page your printer can output. Those 3 items are:
1. Operating System.
2. Driver Specification.
3. Software application(s) being used.
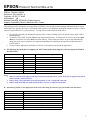
Maximum custom page size allowable per operating system (for Epson standard driver):
Macintosh
OS
Win 9x/Me
Win NT
4.0/2000/XP
Stylus
Color 3000
Stylus
Pro 5000
Stylus
Pro 5500
Stylus
Pro 7000
Stylus
Pro 7500
Stylus
Pro 7600
Stylus
Pro 9000
Stylus
Pro 9500
Stylus
Pro 9600
Stylus Pro
10000 Series
44 in.
44 in.
44 in.
90.5 in.
90.5 in.
90.5 in.
90.5 in.
90.5 in.
90.5 in.
90.5 in.
44 in.
44 in.
44 in.
44 in.
44 in.
44 in.
90.5 in.
590.5 in.
90.5 in.
590.5 in.
90.5 in.
590.5 in.
90.5 in.
90.5 in.
90.5 in.
590.5 in.
90.5 in.
590.5 in.
90.5 in.
590.5 in.
Print jobs being sent through the Epson standard print driver should be in the RGB format in order for color management to be
utilized properly.
1
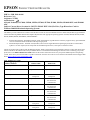
Maximum custom page size allowable for EPSON PostScript options (PPD):
EPSON Stylus RIP
EPSON Fiery RIP
Station
EPSON Fiery Spark
Designer (Mac)
EPSON Fiery Spark
Professional
Stylus
Color 3000
44 in.
N/A
Stylus
Pro 5000
44 in.
44 in.
Stylus
Pro 5500
N/A
N/A
Stylus
Pro 7000
N/A
See
NOTE 1
Stylus
Pro 7500
N/A
See
NOTE 1
Stylus
Pro 7600
N/A
N/A
Stylus
Pro 9000
N/A
See
NOTE 1
Stylus
Pro 9500
N/A
See
NOTE 1
Stylus
Pro 9600
N/A
N/A
Stylus Pro
10000 Series
N/A
N/A
N/A
N/A
44 in.
N/A
N/A
N/A
N/A
N/A
N/A
N/A
N/A
N/A
44 in.
N/A
N/A
See
NOTE1
N/A
N/A
See
NOTE1
See NOTE 1
Print jobs being sent through the Epson PostScript driver can be either RGB or CMYK format. Settings in the RIP will determine
how color management is used.
Maximum page size allowable from software applications:
Adobe Photoshop
5.x/6.x
*Adobe Illustrator
8.x/9.x
QuarkXPress 4.x
*CorelDRAW
8.x/9.x
Stylus
Color 3000
Stylus
Pro 5000
Stylus
Pro 5500
Stylus
Pro 7000
Stylus
Pro 7500
Stylus
Pro 7600
Stylus
Pro 9000
Stylus
Pro 9500
Stylus
Pro 9600
Stylus Pro 10000
Series
See NOTE
2
See
NOTE 2
See
NOTE 2
See
NOTE 2
See
NOTE 2
See
NOTE 2
See
NOTE 2
See
NOTE 2
See
NOTE 2
See NOTE 2
227 in.
227 in.
227 in.
227 in.
227 in.
227 in.
227 in.
227 in.
227 in.
227 in.
48 in.
1,800 in.
48 in.
1,800 in.
48 in.
1,800 in.
48 in.
1,800 in.
48 in.
1,800 in.
48 in.
1,800 in.
48 in.
1,800 in.
48 in.
1,800 in.
48 in.
1,800 in.
48 in.
1,800 in.
* - These applications allow for tiling of print pages, therefore allowing you to print beyond the printers maximum page length limit
and print to the applications limits. The printer driver must be set for Roll Paper (Banner) mode so that page breaks at the printer’s
maximum page length do not occur (in essence gives you a 0 margin for the bottom of the page). The Stylus Pro 5000/5500
however will give a slight page break at the 44 inch limit as these printers do not support banner mode. Also, printing certain
elements from these applications may not utilize color management correctly/properly and may produce output color that is not
expected.
2
NOTE 1:
a. Under Win 9x/Me, the PPD limit is 129 inches.
b. Under Windows NT, 2000 and XP, the PPD limit is 1771.6 inches (SP7000/9000 Series) and 1800 inches
(SP7600/9600/10000 Series).
c. Under Mac OS 8.x/9.x, the PPD limit is 273.06 inches.
NOTE 2:
Adobe Photoshop has a pixel limitation of 30,000 pixels, which means that a document created @ 300ppi can only
reach a maximum page size of 100 inches (H and V). When sending jobs to the printer via the standard nonPostScript print driver, Photoshop looks at the input resolution of the printer driver and adjusts the page size
accordingly. All Epson large format printers use 360dpi as the input resolution (this is the resolution data is rasterized
at), therefore when printing from Photoshop, the maximum page length you will be able to output to any Epson large
format printer using the standard Epson print driver would be 83.33 inches (30,000 pixels / 360dpi). As for the Epson
desktop products, they rasterize data at 720dpi, therefore the maximum page length obtainable with the standard
print driver would be 41.67 inches (30,000 pixels / 720dpi).
Also, under Photoshop 5.x/6.x for the Macintosh and Photoshop 6.x for the PC, the job will end up clipped if it is over
the 83.3inch printer page limit. If you are using Photoshop 5.x for the PC, the print job will actually be truncated to fit
within the printable area of the printer. Be advised that you may not get a page size error. It may be useful to enable
the “print preview’ function of your printer driver (if available) so that you do not waste unnecessary media.
The only options for printing beyond the limitations is to save the file and print via an application that does not have
the 30,000 pixel limit (may lose color management functions) or print the file through a PostScript RIP (which will
allow for longer pages).
The following examples show how to setup banner printing from Adobe Illustrator 8.01 and CorelDRAW 9 from the PC
platform. The Macintosh versions of these applications should be very similar in function. Please refer to your
software documentation for additional assistance.
3
Adobe Illustrator 8.01:
In this example, we are creating a banner, which is 227 inches (Illustrators max. page setup).
1. Launch Illustrator and open or place your file in the page layout.
2. Click on File, then Document Setup. The following screen appears.
3. Uncheck Use Print Setup, enable Tile Full Pages and create the page size (in our example we used 44x227
inches).
4. Click, Print Setup. This will bring up the print driver.
4
5. Click on the Paper Tab. The following appears.
6. Set the Paper Source to Roll Paper (Banner) and also enable Save Roll Paper.
5
7. When creating the custom page size, divide the banner size by a value that will make it less than the printer
maximum custom page size (not necessary for OS/Drivers that support 590.5 inches). In this example we take
(227/3 = 75.7), therefore the custom page size created would be 44x75.7 inches. The reason for this is to save
media.
6
8. After setting the custom page size and other driver settings (media type, resolution, etc.), click OK. This will bring
you back to the document setup. The page should now show the following.
9. At this point you can and resize the image to fit within the printable area and print.
7
CorelDRAW 9:
In this example, a banner is created at 227 inches.
1. Launch CorelDRAW and open or place an image in your page layout.
2. Adjust the page size and image for the document as shown in the following image.
3. Click on File and Print Setup.
8
4. Click on the Paper Tab. The following appears.
5. Set the Paper Source to Roll Paper (Banner) and also enable Save Roll Paper.
9
6. When creating the custom page size, divide the banner size by a value that will make it less than the printer
maximum custom page size (not necessary for OS/Drivers that support 590.5 inches, unless the document is
beyond that size). In this example we take (227/3 = 75.7), therefore the custom page size created would be
44x75.7 inches. The reason for this is to save media.
7. After setting the custom page size and other driver settings (media type, resolution, etc.), click OK. This will bring
you back to the document.
10
8. At this point, click File then Print. CorelDRAW will then run a pre-flight check and will show the following window.
11
9. Click on the Layout Tab and enable Print Tiled Pages and set any additional parameters as you see fit.
10. At this point you could check other tab settings (if necessary) and click Print Preview (recommended) if you want
to see how the file will be printed or Print to output the file to your printer.
For all other applications, please refer to your software documentation for information on maximum custom page sizes for
documents, banners or tiling prints.
12
EPSON
PRODUCT SUPPORT BULLETIN
Date: 11/21/2001
PSB No.: PSB.2001.11.002
Reference: N/A
Originator: RD/RR
Authorization:
Affected Product(s): Epson Stylus Pro 5000/5500/7000/7500/9000/9500/10000/10000CF
Subject: Windows XP Driver & Status Monitor 3 Installation Procedure
This bulletin describes Windows XP printer driver/Epson Status Monitor 3 installation procedures for the following Epson printer
models.
Model
Status Monitor 3
USB
IEEE 1394
Stylus Pro 5000
Stylus Pro 5500
Stylus Pro 7000
Stylus Pro 7500
Stylus Pro 9000
Stylus Pro 9500
Stylus Pro 10000
Stylus Pro 10000CF
N/A
Not available
Yes
Yes
N/A
Yes
Not available
Not available
N/A
Yes
Yes
Yes
N/A
N/A
Yes
Yes
Yes (optional)
Yes (optional)
Yes (optional)
Yes (optional)
Yes (optional)
Yes (optional)
Yes
Yes
Ethernet
(optional)
Yes
Yes
Yes
Yes
Yes
Yes
Yes
Yes
Parallel
Yes
Yes
Yes
Yes
Yes
Yes
Yes
Yes
The appropriate Windows XP driver/Status Monitor 3 can be downloaded from Epson America’s support website, at
http://support.epson.com/filelibrary.html. During the download process, choose “Save this program to disk” option to save the
files to your local hard disk drive. When you are ready to install your printer driver/ Status Monitor 3, Power OFF you printer and
restart you computer. Run the self-extracting executable file from the saved location on your hard disk drive and follow the
installation instruction on the screen for your specific connection type.
Note: The screen shots shown in this bulletin reflect the Stylus Pro 9500 printer, but the installation instruction are identical for all of the printer
models listed above.
Instructions for USB and Parallel Connection
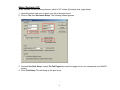
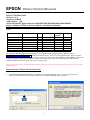
1. At the EPSON Printer Utility Setup screen highlight your printer then click OK. Next, you will see the progress bar
followed by the Windows Logo verification screen. Click on Continue Anyway option to continue.
1
2.
As instructed at following EPSON Printer Utility Setup screen Power ON your printer. Your printer will be detected
automatically. Select Install the software automatically (Recommended) option then click NEXT to continue at the
Found New Hardware Wizard screen.
3. Your will be prompted with Windows Logo verification screen again, Click on Continue Anyway option to proceed to the
next step. After the driver files have been copied to you local hard disk drive, click on Finish to compete the driver
installation.
4.
To install Epson Status Monitor 3 follow the instructions under section heading Installation Procedure for Epson Status
Monitor 3.
2
Instructions for IEEE 1394 Connection
1.
At the EPSON Printer Utility Setup screen highlight your printer then click OK. Next, you will see the progress bar
followed by the Windows Logo verification screen. Click on Continue Anyway option to continue.
2.
As instructed at the following EPSON Printer Utility Setup screen Power ON your printer. The IEEE 1394 card will be
detected automatically. At the Found New Hardware Wizard screen click on Install from a list or specific location
(Advanced) option then click on Next to start the installation of the IEEE 1394 device driver.
3.
On the screen shown below, uncheck Search removable media, click on Browse and navigate to the location of the
extracted driver files (usually under C:\Epson\) and point to the WIN2000 folder. Select the folder then click on Next to
continue and finish the IEEE 1394 driver installation.
3
5. The following Found New Hardware Wizard screen for IEEE 1394 status will be displayed. Select Install the software
automatically (Recommended) option selected and click on Next to continue. After the driver files have been copied to you
local hard disk drive, click on Finish to complete the driver installation.
6.
After the IEEE 1394 driver installation is completed on the following Found New Hardware Wizard screen select, Install
the software automatically (Recommended) option then click on Next to start the printer driver installation. Next, you will
see the progress bar followed by the Windows Logo verification screen. Click on Continue Anyway option to continue.
7. After the driver files have been copied to you local hard disk drive, click on Finish to compete the driver installation.
8.
To install Epson Status Monitor 3 follow the instructions under section heading Installation Procedure for Epson Status
Monitor 3.
4
Instructions for Ethernet Connection
1. At the EPSON Printer Utility Setup screen highlight your printer then click OK. Next, you will see the progress bar
followed by the Windows Logo verification screen. Click on Continue Anyway option to continue.
2.
At this point DO NOT POWER On your printer and at the EPSON Printer Utility Setup screen click on Stop searching
button to continue with the installation. Next, you will see the progress bar followed by the Windows Logo verification
screen. Select Continue Anyway option.
3.
On the next screen your will be notified that the printer has been set to LPT1, click on OK to finish the driver installation.
5
4.
Power ON your printer next, then you will need to redirect the port to the Type B Ethernet card’s IP address. Click on the
Start button, then Control Panel followed by Printers and Other Hardware then go to Printers and Faxes. Right click on
the printer icon and choose Properties from the pop-up menu.
5.
At the printer properties screen, click on Ports and then on the Add Port… button. On the Printer Ports screen, highlight
Standard TCP/IP Port and click on New Port.
6
6.
At the Add Standard TCP/IP Printer Port Wizard, screen click on Next. Then on the next screen type the Type B Ethernet
card’s IP address. Check with your System Administrator for the correct IP address assigned to the Epson Type B Ethernet
card on your network.
7. If Windows identifies the Epson card automatically, click Finish at the Completing the Add Standard TCP/IP Printer
Port Wizard. If your card is not identifies as an Epson network card automatically, click on Custom and then Settings. On
the next screen select LPR, type PASSTHRU as the Queue Name, check SNMP Status Enabled and click OK. Click Next
on the Add Standard TCP/IP Printer Port Wizard screen to continue with the installation, and then click Finish on the
next screen. Click Close at the Printer Ports screen.
7
8. On the next screen click on Apply and then on Close to finish the installation. Your printer driver installation has been
completed and the printer is ready to print.
9.
To install Epson Status Monitor 3 follow the instructions under section heading Installation Procedure for Epson Status
Monitor 3.
8
Installation procedure for Epson Status Monitor 3
1. At the EPSON Status Monitor 3 setup screen highlight your printer then click OK. Next, you will see the progress bar
followed by a window indicating that EPSON Status Monitor 3 is complete.
9
EPSON PRODUCT SUPPORT BULLETIN
Date: 09/06/2001
PSB No.: PSB.2001.09.002
Reference: N/A
Originator: RR
Authorization:
Affected Product(s): Stylus Pro 7000 Series, 9000 Series and 10000 Series Large Format Printers
Subject: Printer Connectivity Issue due to Incorrect Model Name Selection – Printer Reports Off-Line
Issue Description:
1.
MAC Connection: When connecting a Stylus Pro 7000 Series, 9000 Series or 10000 Series to an Apple Macintosh via
USB, Ethernet or FireWire, the Macintosh’s System Profiler sees the connection, but when going into the Chooser the
connection does not show up when the appropriate printer driver is selected.
2.
PC Connection: When connecting a Stylus Pro 7000 Series, 9000 Series or 10000 Series to a Windows PC via USB,
Ethernet or FireWire and while attempting to print, an error message (“Printer Off-Line” or “Communication Error” on PC
side) or ("Command Error" or "0002000B" on the LCD display of the printer) occurs.
Solution:
After verifying that all connections and port settings are good (on System and Printer) and that the printer is on-line, check that
the model name of the printer is set correctly. To do this, follow these steps:
1.
Shut printer off. Open the front cover.
2.
While holding down the [SelecType] + [Paper Feed +] buttons, power the unit on.
3.
The LCD display will then show the printer model name (it will show US and International model names). The following are
the names that will show for each model type. The model name should match the driver selection.
SP7000 Series Names:
SP9000 Series Names:
SP10000 Series Names:
Stylus Pro 7000 (US name)
Stylus Pro 9000 (US name)
Stylus Pro 10000 (US name)
Stylus Pro 7500 (US name)
Stylus Pro 9500 (US name)
Stylus Pro 10000CF (US name)
PM-7000 (International name)
PM-9000 (International name)
PM-10000 (International name)
MC-7000 (International name)
MC-9000 (International name)
MC-10000 (International name)
4.
If the incorrect model name selection appears, shut the unit off and repeat step 3 until the correct model name shows.
5.
Once the proper name shows up, power the unit off, wait 15 seconds, close the front cover and power the unit back on.
6.
Once the printer is in a ready state, make the appropriate driver selection on your computer system. At this point the printer
connection should work.
1
EPSON PRODUCT SUPPORT BULLETIN
Date:
PSB #:
Reference:
Product(s):
Subject:
05/29/01
Originator:
PSB.2001.08.006
Authorization:
TE00-117 Rev.C
Total Pages:
Stylus Pro 9000 / 7000, Stylus COLOR 900,
Expression 1640XL / 836XL / 1600, Stylus RIP
Incompatibility with FireWire 2.1 File and OS 9.0.1 or Later
LHD/DA
2
This bulletin was created to inform you of an incompatibility with the FireWire 2.1 extensions
and Mac OS 9.0.1 or later.
Problem:
!
When the FireWire extensions (FireWire Enabler ver. 2.1 and FireWire Support ver. 2.1)
are installed in a PowerPC based Mac (PCI-Bus model) without built in FireWire support
running OS 9.0.1 or later, the following system error occurs after restarting the system:
Sorry, a system error occurred.
Illegal instruction
To temporarily turn off extensions, restart and hold down the shift key
Effected Products:
Ink-Jet Printers:
Model Name
Stylus Pro 9000
Stylus Pro 7000
Stylus Color 900
Epson Stylus Driver Updater *1
Driver Version
Rev. 6.3aE
Rev. 6.3aE
Rev. 6.3aE
Rev. 1.0aE / 1.1aE
Scanner:
Model Name
Expression 1640XL
Expression 836XL
Expression 1600
Driver Version
Rev. 1.7aE
Rev. 1.7aE
Rev. 1.7aE
Stylus RIP:
Model Name
Stylus RIP
Action Required:
Driver Version
Vol. 1.4
Page 1 of 2
Please follow the procedure below in order to delete the FireWire files from the system:
1. Insert the Mac OS bootable CD in your CD ROM drive
2. Reboot the system while holding down the C key on the Keyboard
3. After the system is rebooted trash the FireWire Enabler and the FireWire Support files
from the Extensions Folder
4. Restart the system normally
NOTE:
The FireWire CD will contain the updated version of the extensions listed above by the end of
July 2000.
Page 2 of 2
EPSON PRODUCT SUPPORT BULLETIN
Date: 7/26/2001
PSB No.: PSB.2001.08.003
Reference: TE01-045 Rev. A
Originator: JD, RR, TC & MS
Authorization:
Affected Product(s): EPSON Pro Graphic Printers
Subject: Compatibility Chart for Macintosh OS X Classic
This bulletin provides information on compatibility for EPSON’s Pro Graphic printers running in Macintosh OS X Classic
mode. Mac OS X provides the Classic environment mode for Mac OS 9 compatible applications and device drivers. Classic
mode will require Mac OS 9.1 system software. To setup Classic mode follow the steps below:
1. First install or upgrade your Macintosh system to OS 9.1 before installing OS X (for details refer to Apple’s OS X
documentation).
2. To start in Classic mode, click the Classic icon in System Preferences. To find System Preferences go to the Apple
Menu or click on the icon in the Dock bar on the desktop. Classic mode can also be set up to start automatically
during the log in process. (Refer to your Apple documentation for installation and operation of Macintosh OS X
Classic and 9.1).
3. To run a Classic application, just double–click on it or a document created with the application.
A) The following Epson models are supported in OS X Classic mode when using the connector type(s) described in
the chart below.
Model
Stylus Color 3000
Stylus Pro 5000
Stylus Pro 5500
Stylus Pro 7000
Stylus Pro 7500
Stylus Pro 9000
Stylus Pro 9500
Stylus Pro 10000/10000CF
Driver Version
Connector Type
5.69E
5.69E
6.61E
6.63E
6.73E
6.30E
6.73E
6.63E
Ethernet I/F
Ethernet I/F
USB/Ethernet I/F
USB/Ethernet I/F
USB/Ethernet I/F
Ethernet I/F
Ethernet I/F
USB/Ethernet I/F
Note:
1.
MAC OS X Classic mode supports USB-native and network-capable devices. Classic mode does not support MAC Serial,
SCSI or FireWire connected devices.
2. Printers using a Fiery Rip Station for PostScript printing are not yet supported at this time.
3. Printers using Stylus Rip with Adobe PostScript drivers are not yet supported at this time.
B) The following models are not supported in OS X Classic when using the connector type(s) described in the chart below.
Model
Stylus Color 3000
Stylus Pro 5000
Stylus Pro 5500
Stylus Pro 7000
Stylus Pro 7500
Stylus Pro 9000
Stylus Pro 9500
Stylus Pro 10000/10000CF
Connector Type
Serial/Parallel-to-USB adapter/FireWire (IEEE 1394)
Serial/ Parallel-to-USB adapter/FireWire (IEEE 1394)
FireWire (IEEE 1394)
FireWire (IEEE-1394)
FireWire (IEEE-1394)
Serial/Parallel-to-USB adapter/FireWire (IEEE 1394)
Serial/Parallel-to-USB adapter/FireWire (IEEE 1394)
FireWire (IEEE-1394)
1
EPSON PRODUCT SUPPORT BULLETIN
Date: 6/26/01
PSB No.: PSB 2001.06.004
Reference: N/A
Originator: TC/RR
Authorization:
Affected Product(s): SC3000, SP5000, SP5500, SP7000, SP7500, SP9000, SP9500, SP10000 DYE, and SP10000
ARC
Subject: Current Driver Location for C823722 EPSON IEEE 1394 (FireWire) Type B Interface Card for
Windows 2000/Me/Macintosh Operating Systems
This bulletin provides information on where to find the most current driver for the EPSON C823722 - IEEE 1394 (FireWire) Type B Interface
Card for the following EPSON Professional Graphics Inkjet Printers with appropriate Operating Systems: SC3000, SP5000, SP5500, SP7000,
SP7500, SP9000, SP9500, SP10000DYE, and SP10000ARC.
1.
2.
Windows Requirements: The EPSON C823722 - IEEE 1394 (FireWire) Type B Interface Card only supports factory preinstalled full
versions of Windows 2000 and Windows Me Operating Systems
Macintosh Requirements: The IEEE 1394 (FireWire) drivers for the Apple Macintosh Operating System (OS 8.6 with FireWire
Update 2.1 or later required) are all ready built into the EPSON printer driver, and require no other driver files.
The driver CD that comes in the box with the EPSON C823722 - IEEE 1394 (FireWire) Type B Interface Card may contain older drivers than
what is available on the CD that came with your EPSON Printer or from EPSON Internet Support Web Site. Prior to installing your printer,
please refer to the IEEE 1394 Reference Table below for the location of the latest drivers for your specific EPSON printer and operating
system. If the driver your need is listed as “Update on the Web” the most current driver can be found on the EPSON Internet Support Web
Site at: http://support.epson.com/filelibrary.html
IEEE 1394 Reference Table:
Printer Models:
Windows 2000
Windows Me
EPSON Stylus COLOR 3000
Update on the Web
Update on the Web
EPSON Stylus PRO 5000
Update on the Web
Update on the Web
EPSON Stylus PRO 5500
Driver that came
Driver that came
EPSON Stylus PRO 7000
with printer
Update on the Web
EPSON Stylus PRO 7500
Update on the Web
EPSON Stylus PRO 9000
Update on the Web
EPSON Stylus PRO 9500
Update on the Web
EPSON Stylus PRO 10000
Driver that came
with printer
Driver on CD-ROM
that came with
C823722 card
Driver on CD-ROM
that came with
C823722 card
Driver on CD-ROM
that came with
C823722 card
Driver on CD-ROM
that came with
C823722 card
Driver that came
EPSON Stylus PRO 10000CF
with printer
Driver that came
with printer
Driver that came
with printer
with printer
1