1
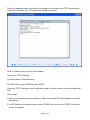
EPSON
Date:
PSB #:
Reference:
Product(s):
Subject:
PRODUCT SUPPORT BULLETIN
4/30/2003
PSB.2003.05.005
N/A
EpsonNet 802.11b Wireless Print Server
OS X Procedure for Updating the Firmware
Originator: DS
Authorization:
Total Pages: 6
This bulletin was created to inform you of the procedural steps used to update the EpsonNet
802.11b Wireless Print Server firmware using the OS X Terminal Utility.
Procedure:
1.) Configure the Macintosh and the EpsonNet 802.11b Wireless Print Server for TCP/IP.
2.) Download/copy the “WLEP399.bin” firmware file to the Desktop.
3.) Navigate to Macintosh HD>Applications>Utilities>Terminal, and launch the Terminal
Utility program.
4.) At the Terminal program screen do the following:
Type cd desktop, press RETURN
Page 1 of 6
TYPE: tftp <enter the IP address of the print server> then press RETURN
Example: tftp 139.63.2.150, then press the RETURN key.
Page 2 of 6
At the tftp> prompt type the word binary, then press RETURN
Example: tftp> binary, then press the RETURN key.
Page 3 of 6
At the tftp> prompt type put <WLEP399.bin file name> then press RETURN
Example: tftp> put WLEP399.bin, then press the RETURN key.
Page 4 of 6
During the update process, you will see a message on the screen at the TFTP prompt that a
number of bytes were sent. This means the update is complete.
Note: If a timeout error occurs do the following:
Check your TCP/IP settings
Cycle the power of the print server
Run WP-Admin, click CLEAR then click START
Check the TCP/IP settings in the Configuration page of the print server, save the settings then
Quit.
Rerun step 4.
5. Next, go to the print server and perform a reset, then launch WP-Admin again to setup the
print server.
6. At WP-Admin in the search screen, click on CLEAR first, then click on START for the print
server to reappear.
Page 5 of 6
7. Open the configuration page and confirm the settings are correct, change if necessary.
8. Print the Configuration page. Click on the WP-Admin drop down menu at the top of the page
and select TEST PAGE or PRINT.
9. Save, then Quit WP-Admin.
Page 6 of 6
EPSON
Date:
PSB #:
Reference:
Product(s):
Subject:
PRODUCT SUPPORT BULLETIN
Originator: JAM
11/1/2002
Authorization:
PSB.2003.01.006
Total Pages: 5
N/A
Epson Stylus C80WN
Enabling Wireless Encryption Protection (WEP) on Stylus C80WN and
Windows Me
This bulletin was created to inform you of a procedure to guide you through configuring
WEP on the Stylus C80WN Print Server system.
Windows Millennium Edition Instructions
Requirements:
You will need the “SSID” and “IP Settings” for your wireless network. The SSID
information is available in the properties of the wireless Ethernet interface on the
computer. The IP settings can be viewed by clicking on RUN in the Windows Start
menu, then type WINIPCFG in the RUN field and click OK. Refer to the Access
Point/Base Station’s documentation for the SSID if necessary.
Enabling WEP Encryption:
Note: To successfully enable WEP, the main item on the Print Server and Access
Point/Base station CONFIGURATION menu is the type of WEP key.
"Open" or "Shared" Key Type.
If The Epson Wireless Print Servers firmware is version 3.91 or earlier, the print server
defaults to "Open" and with no selection for "Shared" key type. Some Base Stations,
Proxim for example, default to "Shared" key type (other manufacturers may also) and
would need to be set to “OPEN” key type. Refer to the documentation for your Access
Point hardware to determine where the setting for the Key Type is found. If the Key
Types are not the same between the print server, computer and Access Point, the Host
and Print Server will not handshake properly. Even though all settings appear to be
correct, communication fails and a time-out occurs without any displaying any error
messages.
Additionally, after the Print Server, Access Point and wireless computer are configured
on the same IP address segment and communicating properly, the printer/print server's
TCP/IP address must be changed to a TCP/IP address within the same IP address
segment in order to communicate and print. The Subnet Mask and Gateway address
must match also.
To Begin:
Power-up the Printer, Print Server and Host Computer.
On the Host Computer, do the following:
1) Install, then Launch WP-Admin and click the "Start" button to begin the search.
On the EpsonNet 802.11b Print Server, do the following:
1) Push and hold in the RESET (Test/Factory) button for 10 -20 seconds. The print
server will reset to the 802.11 INFRASTRUCTURE mode settings of the host
computer running WP-Admin. This may take 2-3 minutes.
2) When the print server appears in the WP-Admin window, verify it is highlighted in the
search window and click the CONFIGURE button.
•
•
When the PASSWORD box shows on screen, click OK without entering a
password to continue.
When the CONFIGURATION screen appears, go to the “WEP KEY” section,
down-click and select “WEP 64BITs” or “128BITs” from the drop-down button
box.
3) Enter the encryption value in the “64Bit Key 1” box, for example 3132333435, or the
“128bit Key 1” box, for example 31323334350000000000000000.
*** Important Note *** If you forget to enter a value into the Key box and click OK to
save the settings, you will not have any communications with the print server. To
recover from this, go to the print server and repeat the restart procedure in step 1
above.
4) In the “Wireless Mode” box, verify the selection is set to INFRASTRUCTURE.
5) Next, go to the “SSID” field and type in the SSID name of the Access Point.
Example – Proxim
6) In the “Boot Method” drop-down button select STATIC (see Note), then go to the
TCP/IP address fields and enter the appropriate address, subnet mask and gateway.
Example IP Address: 192.168.0.8 >> 8 for the printer
Subnet Mask: 255.255.255.0
Gateway IP: 192.168.0.1 >> 1 for the Access Point
7) Click the OK button to save the new settings and the changes will be written to the
Print Server. This may take 2-3 minutes. Wait for the utility to finish.
8) Click QUIT to close the WIRELESS SERVER SEARCH box.
On the Host:
Note – If your Access Point is also a DHCP Server, skip step 1 and go to step 2.
1) Change the TCP/IP settings on the wireless notebook computer Adapter Card to the
address of the "Proxim" Base-Station. Example - 192.168.0.1
• Right click the NETWORK Icon
• Click PROPERTIES
• Down-click and highlight “TCP/IP -> WIRELESS LAN CARD”
• Click Properties button for the next screen
• In the TCP/IP PROPERTIES box, select the IP ADDRESS tab
• Click on… SPECIFY AN IP ADDRESS bullet
o Enter the appropriate IP ADDRESS values for your network
o Example - IP Address: 192.168.0.5 >> 5 for the computer (Tab between
periods)
o Subnet Mask: 255.255.255.0 >> (Tab between periods)
• Next, click on the GATEWAY tab in the TCP/IP PROPERTIES box
o In the NEW GATEWAY box, enter the appropriate IP ADDRESS for your
network gateway
o Example - Gateway: IP 192.168.0.1 >> 1 for the Access Point
• Click the ADD button
• Click OK button
• In the lower, right of the Taskbar, click the WIRELESS icon.
o Click Advanced Configuration from the menu that appears
o Click the Configuration tab
o In the Configuration screen, verify or enter the SSID name of the Access
Point
Example – Proxim
o Click the Apply button for any changes that have been made or click the
OK button to proceed to the next screen.
o Click the Apply button in the next screen that appears
o Click OK to close the Wireless configuration window
2) The system will prompt you to REBOOT “Do you want to restart your computer now?” Click the YES button.
3) After the system restarts proceed to the next step.
4) Use a WEB browser such as Internet Explorer to access the Access Point’s WEB
HOME configuration page and set the WEP encryption to match the Print Server
WEP encryption settings. NOTE: If you have a Proxy Server setting enabled in your
browser, you will need to disable it temporarily in order to access the Web HOME
page on the Access Point.
5) Type in the address of the Access Point on the address bar of the WEB browser and
hit enter. Example - HTTP://192.168.0.1
6) Find "Wireless" Configuration page for the Access Point and set as follows.
• Navigate to the CONFIGURE section for the “Wireless Setup” and match the
WEP Encryption type and value in the "WEP Data Privacy" section to the settings
of the print server.
•
64 Bit Encryption using a key table like this example - Key 1: 31 32 33 34 35
•
or 128 Bit Encryption using a key table like this example Key 1: 31 32 33 34 35 00 00 00 00 00 00 00 00
•
WEP Authentication: Open System << Choose this Shared Key
•
Click SAVE
•
On the next screen click FINISHED
7) Close the browser.
8) Go to the property settings of the Computer's Adapter Card.
• Right click NETWORK Icon
• Click PROPERTIES
• Highlight the WIRELESS ADAPTER setting
• Click PROPERTIES button
• Select ENCRYPTION Tab
o Encryption (WEP) - click on the drop-down button and select “64 bit” or
“128 bit”
o Click the CREATE KEYS MANUALLY bullet
o Type in 3132333435 or 31322234350000000000000000
o Click on APPLY button
o Click OK button - Next Screen
o Click OK button - to close the NETWORK box
9) Reboot the system and upon restart check the WIRELESS status monitor
10) If there are collision errors, re-enter the WEP KEY value and test WP-Admin.
Printer Driver Settings:
1) Change the Printer’s TCP/IP Settings.
•
Open the Printer properties and change the Port to "EPSON_LPR"
and set the printers address as follows:
- Click on Start
- Click on Settings
- Click on Printers
- Highlight “Epson Stylus C80 Series” - Right click Properties
o Click the DETAILS tab
o Click ADD PORT button – Next Screen
o On ADD PORT box, click NETWORK bullet, click BROWSE button –
Next Screen
o Double-click and expand the EPSON_LPR printer icon – Next Screen
o Browse and highlight the IP address PRINTER ICON symbol
o Click OK – Next Screen
o On ADD PORT box, click OK
• On EPSON STYLUS C80 SERIERS PROPERTIES BOX, click Apply
• Epson Stylus C80 Series box - Click GENERAL tab
o Click the PRINT TEST PAGE button – Next Screen
o If the test page printed, click Yes
• Click OK.
2) Verify the print out
3) Close the Epson Stylus C80 Series Properties box
4) Close the PRINTERS box
Go to the print server and push the test button in for one second to print a status sheet
of the print server to verify the settings.
EPSON
Date:
PSB #:
Reference:
Product(s):
Subject:
PRODUCT SUPPORT BULLETIN
Originator: JAM
11/1/2002
Authorization:
PSB.2003.01.005
Total Pages: 3
N/A
Epson Stylus C80WN
Enabling Wireless Encryption Protection (WEP) on the Stylus C80WN and
Macintosh OS X
This bulletin was created to inform you of a procedure to guide you through configuring
WEP on the Stylus C80WN Print Server system.
Test Configuration:
White iBook (500 MHz PowerPC G3 with 256MB memory)
Mac OS X Version 10.2
AirPort Admin Utility 2.1 (v2.1)
Epson “WP-Admin” 1.3-E
Epson Stylus C80WN
Important notes before starting:
Note #1: Under OS X, the WEP key fields do not appear wide enough to accept the
entire length of the key code. The box truncates and accepts the entire code in the
background, however, it will not appear on the computer screen that anything is being
input by the computer user.
Note #2: The status lights on the printer server will turn off during the entry of the WEP
code in step 7 and remain off until the AirPort Base Station is re-linked by the
“UPDATE” function in step 10 and 11 below.
Requirements:
You will need to have the Macintosh computer and the Epson C80WN printer
configured and operational in Infrastructure mode.
AirPort Utility:
Open the radio-signal icon for the “AirPort” and select the name of the AirPort Network
(i.e. MyAirport) to enable the wireless session.
WP-Admin Utility:
1. Start the “WP-Admin” utility.
2. In WP-Admin, verify the print server is highlighted in the search window and click the
CONFIGURE button when the print server appears.
• When prompted for a password in the PASSWORD box, click OK to continue.
A password is not necessary to continue.
• The “Reading Configuration” box will cycle 4 times for about 10 seconds.
•
When the CONFIGURATION screen appears, go to the “WEP KEY” section,
click the down arrow and select “WEP 64BITs” or “128BITs” from the dropPage 1 of 3
down button box.
(Refer to Note #1 from above)
3. Enter an encryption code in the “64Bit Key 1” box, for example - 3132333435
Or the “128bit Key 1” box, for example - 31323334350000000000000000
4. In the “Wireless Mode” box, verify the selection is set INFRASTRUCTURE.
5. Next, go to the “SSID” field and type in the SSID name of the Access Point.
For example – MyAirport.
6. In the “Boot Method” drop-down button, select STATIC.
7. Click the OK button to save the new settings and the changes will be written to the
Print Server; this may take 2-3 minutes, and then proceed.
*** Important Note ***
If you forget to enter a value into the Key box and click OK to save the settings,
you will not have any communications with the print server. To recover from this
do a hardware reset of the print server.
8. Click QUIT to close the WIRELESS SERVER SEARCH box.
Note #2 from above:
The communications status LEDs on the print server will turn off during the WEP
process making it appear the print server has stopped working. Go to the back of the
print server and press the reset switch for 2 seconds. From the status sheet, verify that
the settings just entered were retained.
If you try to do another server search, the unit will not be found because the WEP key
has been enabled and the server is now transparent. This is normal. The server will be
available and visible when the notebook has been setup with the same WEP key and
the AirPort session re-linked.
Airport Admin Utility:
9. Start the AirPort Admin Utility. The base station (i.e. MyAirport) should be found and
highlighted. Click the CONFIGURE tool icon. Enter the password you have setup
for the basestation and click OK. On the AIRPORT BASESTATION page, put a
check mark in the “Enable encryption (using WEP)” box. Click on the “CHANGE
PASSWORD”
button.
Please read steps 10 and 11 before continuing… the timing of performing
UPDATE and cycling power on the server is critical.
10. From the “WEP key length” drop-down button select 40-bit or 128-bit. In the “New
Password” and “Verify” boxes enter the WEP key used in the WP-Admin utility.
Note: the key must start with 0x (zero, lower case x) or a $ (dollar symbol) i.e.
0x3132333435 OR $3132323435. Click OK to continue. The system will cycle to
the previous page, click the UPDATE button.
11. Immediately remove AC power to the back of the Print Server and re-attach it while
Page 2 of 3
the UPDATE is sending the WEP key from the basestation to the server. The link
will be re-established and the communications lights will restart and update as
normal. The LEDs should no longer go out after this step.
AirPort Utility:
Open the radio-signal icon for the “AirPort” and select the name of the AirPort Network
(i.e. MyAirport) to enable the WEP session. You will be prompted for the password
(WEP). Enter the code with the correct prefix, i.e. 0x3132333435 OR $3132333435
Open WP-Admin and verify that you can access the configuration page of the print
server and check the settings. Do not change any settings. Click the CANCEL button.
The previous page will show again; click the QUIT button.
Text Editor:
Open the text-editor, enter some test text and then send a print request to the Stylus
C80WN printer. With a good WEP link, you will see a blue/white, horizontal barber-pole
status bar icon indicating an update. Allow a short period of time for the computer to
process the print request and send it to the print server over the wireless link. The
printer will print the test text once the print request has been received over the wireless
link.
Page 3 of 3
EPSON
Date:
PSB #:
Reference:
Product(s):
Subject:
PRODUCT SUPPORT BULLETIN
Originator: JAM
11/1/2002
Authorization: XX
PSB.2003.01.004
Total Pages: 5
N/A
Epson Stylus Color C80WN
Enabling Wireless Encryption Protection (WEP) for C80WN and Windows XP
This bulletin was created to inform you of a procedure to guide you through configuring
WEP on the C80WN Print Server system.
Windows XP Instructions
Requirements:
You will need the “SSID” and “IP Settings” for your wireless network. The SSID
information is available in the properties of the wireless Ethernet interface on the
computer. The IP settings can be viewed by typing IPCONFIG from the command
prompt on the computer. Refer to the Access Point/Base Station’s documentation for
the SSID if necessary.
Enabling WEP Encryption:
Note: To successfully enable WEP, the main item on the Print Server and Access
Point/Base station CONFIGURATION menu is the type of WEP key - "Open" or
"Shared" Key Type.
If The Epson Wireless Print Servers firmware is version 3.91 or earlier, the print server
defaults to Open with no selection for Shared key type. Some Access Points, Proxim for
example, default to Shared key type (other manufacturers may also) and would need to
be set to Open key type. Refer to the documentation for your Access Point hardware to
determine where the setting for the Key Type is found. If the Key Types are not the
same between the print server, computer and Access Point, the Host and Print Server
will not handshake properly.
Even though all settings appear to be correct,
communication fails and a time-out occurs without any displaying any error messages.
Additionally, after the Print Server, Access Point and wireless computer are configured
on the same IP address segment and communicating properly, the printer/print server's
TCP/IP address must be changed to a TCP/IP address within the same IP address
segment in order to communicate and print. The Subnet Mask and Gateway address
must match also.
Page 1 of 5
To Begin:
Power-up the Printer, Print Server, Access Point and Host Computer.
On the Host Computer do the following:
Note: The computer used for this example is an IBM ThinkPad A30p with a built-in
ActionTec 802.11b Interface and Windows XP Professional.
1) Disable WEP if it is on.
2) Install then Launch WP-Admin and click the "Start" button to begin the search.
On the EpsonNet 802.11b Print Server do the following:
1) Push and hold the RESET (Test/Factory) button for 10-20 seconds. The print server
will reset to the 802.11b INFRASTRUCTURE mode settings of the host computer
running WP-Admin. This may take 2-3 minutes.
2) When the print server appears In WP-Admin, verify it is highlighted in the search
window and click the CONFIGURE button. Leave the PASSWORD box blank and
click OK to continue when prompted for a password. When the CONFIGURATION
screen appears, go to the “WEP KEY” section, down-click and select “WEP 64BITs”
or “128BITs” from the drop-down button box.
1) Enter the encryption value in the “64Bit Key 1” box, for example 3132333435, or the
“128bit Key 1” box, for example 31323334350000000000000000.
*** Important Note ***
If you forget to enter a value into the Key box and click OK to save the settings, you
will not have any communications with the print server. To recover from this, go to
the print server and repeat the restart procedure in step 1 above.
3) In the “Wireless Mode” box, verify the selection is set to INFRASTRUCTURE.
4) Next, go to the “SSID” field and type in the SSID name or network name of the
Access Point. The SSID is also noted in the properties section of the wireless
interface on the computer.
5) In the “Boot Method” drop-down button select STATIC (see Note below), then go to
the TCP/IP address fields and enter the appropriate address, subnet mask and
gateway.
Example IP Address: 192.168.0.8
>> 8 for the printer
Subnet Mask: 255.255.255.0
Gateway IP: 192.168.0.1 >> 1 for the Access Point
Page 2 of 5
Note: If your Access Point is also a DHCP Server, leave the Boot Method on Auto and the Print
Server will be assigned TCP/IP address settings automatically when the configuration is saved.
6) Click the OK button to save the new settings and the changes will be written to the Print Server.
This may take 2-3 minutes. Wait for the utility to finish.
7) Click QUIT to close the WIRELESS SERVER SEARCH box.
On the Host:
Note – If your Access Point is also a DHCP Server, skip step 1 and go to step 2.
1) Change the TCP/IP settings for the wireless notebook computer Adapter Card to
match the address of the Base Station (in this case a Proxim Wireless Gateway was
used) for example - 192.168.0.1
• Right click NETWORK Icon
o Click PROPERTIES
o Highlight the Network Connection - WIRELESS LAN CONNECTION
o Right Click - click PROPERTIES
o Down-click and highlight INTERNET PROTOCOL (TCP/IP)
o Click PROPERTIES button, which opens a new window
o On TCP/IP PROPERTIES box, Click on USE THE FOLLOWING IP ADDRESS bullet:
o Enter the IP address
Example
IP Address:
192.168.0.5
>> 5 for the computer (Tab)
Subnet Mask: 255.255.255.0 >> Subnet was entered automatically (Tab)
Gateway IP:
192.168.0.1 >> 1 for the Access Point
• Click OK button to close the INTERNET PROTOCOL (TCP/IP) PROPERTIES box.
• Click on WIRELESS NETWORKS tab
• Remove check mark from USE WINDOWS TO CONFIGURE WIRELESS SETTINGS
• Click CLOSE button
• Close the NETWORKS CONNECTIONS box
2) Go the property settings of the Computer's Adapter Card.
• On lower right Taskbar right click WIRELESS Icon and click ADVANCED
CONFIGURATION
• On the CONFIGURATION tab verify or enter the SSID name >> i.e. Proxim
• Click on APPLY button if a change has been made or
• Click OK button to close the WIRELESS box
3) Use a WEB browser such as Microsoft Internet Explorer to access the HOME WEB
configuration page of the Access Point and set the WEP encryption to match the
Print Server WEP encryption settings.
NOTE: If you have a Proxy Server setting enabled in your browser, you will need to
disable it temporarily in order to access the HOME Web page on the base station.
Page 3 of 5
4) Type in the address of the Base-Station (i.e. 192.168.0.1) on the address bar of the
WEB browser and hit enter. Example… HTTP://192.168.0.1
5) Find "Wireless" Configuration page for the Access Point and set as follows.
6) Navigate to the CONFIGURE section for the “Wireless Setup” and set the WEP
Encryption type and value in the "WEP Data Privacy" section to match the settings
of the print server.
For Example –
64 Bit Encryption using this key table
Key 1: 31 32 33 34 35
Or 128 Bit Encryption using this key table
Key 1: 31 32 33 34 35 00 00 00 00 00 00 00 00
WEP Authentication: Open System << Choose this Shared Key
7) Click SAVE
8) On the next screen click FINISHED
9) Close the browser.
10) Go the property settings of the computer's wireless adapter card.
• On lower right Taskbar right click WIRELESS Icon
• Click ADVANCED CONFIGURATION
• Select ENCRYPTION Tab
o Encryption(WEP): - click on the drop-down button and select “64 bit” or “128 bit”
o Click CREATE KEYS MANUALLY bullet
o Type in 3132333435 or 31322234350000000000000000
• Click on APPLY button
• Click OK button - to close the WIRELESS box
11) Reboot the system and upon restart check the WIRELESS status monitor
12) If there are collision errors re-enter the WEP KEY value and test using WP-Admin.
Printer Driver Settings:
1) Changing the Printers Port to TCP/IP Settings.
2) Open the Printer properties and change the Port to "Standard TCP/IP Port" and set the TCP/IP
address to the address assigned to the Print Server follows:
• Click Start
• Go to Settings
• Click on Printers
• Highlight “Epson Stylus C80 Series” click with right mouse button
Page 4 of 5
•
In the Epson Stylus C80 Series Properties window:
o Click the PORTS tab
o In the PRINTER PORTS box, select STANDARD TCP/IP PORT
o Click the NEW PORT button
o In the “Add Standard TCP/IP Port Wizard” box, click the NEXT button
o For the Printer Name or IP Address:
- Enter the TCP/IP address
- Port Name: IP_xxx.xxx.xxx.xxx (The TCP/IP address is filled in automatically
when entering the TCP/IP address)
o Click the NEXT button
o The “Completing the Add Printer Port” box will appear
o Click the FINISH Button
o At the PRINTER PORTS box, click the CLOSE button
o Click Apply
o In the Epson Stylus C80 Series box, click the GENERAL tab
o Click the PRINT TEST PAGE button
o If the test page printed, click OK
3) Verify the print out
4) Close the Epson Stylus C80 Series Properties box
5) Close the PRINTERS box
Go to the print server and push the test button in for one second to print a status sheet of the print
server to verify the settings.
Page 5 of 5
EPSON
Date:
PSB #:
Reference:
Product(s):
Subject:
PRODUCT SUPPORT BULLETIN
11/1/2002
Originator: JAM
PSB.2003.01.003
Authorization:
N/A
Total Pages: 5
Epson Stylus Color C80WN
Enabling Wireless Encryption Protection (WEP) for C80WN and Windows 2000
This bulletin was created to inform you of a procedure to guide you through configuring
WEP on the C80WN Print Server system.
Windows 2000 Instructions
Requirements:
You will need the “SSID” and “IP Settings” for your wireless network. The SSID
information is available in the properties of the wireless Ethernet interface on the
computer. The IP settings can be viewed by typing IPCONFIG from the command
prompt on the computer. Refer to the Access Point/Base Station’s documentation for
the SSID if necessary.
Enabling WEP Encryption:
Note: To successfully enable WEP, the main item on the Print Server and Access
Point/Base station CONFIGURATION menu is the type of WEP key - "Open" or
"Shared" Key Type.
If The Epson Wireless Print Servers firmware is version 3.91 or earlier, the print server
defaults to Open with no selection for Shared key type. Some Access Points, Proxim for
example, default to Shared key type (other manufacturers may also) and would need to
be set to Open key type. Refer to the documentation for your Access Point hardware to
determine where the setting for the Key Type is found. If the Key Types are not the
same between the print server, computer and Access Point, the Host and Print Server
will not handshake properly.
Even though all settings appear to be correct,
communication fails and a time-out occurs without any displaying any error messages.
Additionally, after the Print Server, Access Point and wireless computer are configured
on the same IP address segment and communicating properly, the printer/print server's
TCP/IP address must be changed to a TCP/IP address within the same IP address
segment in order to communicate and print. The Subnet Mask and Gateway address
must match also.
Page 1 of 5
To Begin:
Power-up the Printer, Print Server, Access Point and Host Computer.
On the Host Computer do the following:
Note: The computer used for this example is an IBM ThinkPad A30p with built-in
ActionTec 802.11b Interface and Windows 2000 Professional.
1) Disable WEP if it is on.
2) Install, then Launch WP-Admin and click the "Start" button to begin the search.
On the EpsonNet 802.11b Print Server do the following:
1) Push and hold in the RESET (Test/Factory) button for 10-20 seconds. The print
server will reset to the 802.11 INFRASTRUCTURE mode settings of the host
computer running WP-Admin. This may take 2-3 minutes.
2) When the print server appears in the WP-Admin window, verify it is highlighted in the
search window and click the CONFIGURE button.
•
•
When the PASSWORD box shows on screen, click OK without entering a
password to continue.
When the CONFIGURATION screen appears, go to the “WEP KEY” section,
down-click and select “WEP 64BITs” or “128BITs” from the drop-down button
box.
1) Enter the encryption value in the “64Bit Key 1” box, for example 3132333435, or the
“128bit Key 1” box, for example 31323334350000000000000000.
*** Important Note *** If you forget to enter a value into the Key box and click OK to
save the settings, you will not have any communications with the print server. To
recover from this, go to the print server and repeat the restart procedure in step 1
above.
2) In the “Wireless Mode” box, verify the selection is set to INFRASTRUCTURE.
3) Next, go to the “SSID” field and type in the SSID name or network name of the
Access Point. The SSID is also noted in the properties section of the wireless
interface on the computer.
Page 2 of 5
4) In the “Boot Method” drop-down button select STATIC (see Note below), then go to
the TCP/IP address fields and enter the appropriate address, subnet mask and
gateway.
Example –
IP Address: 192.168.0.8 >> 8 for the printer
Subnet Mask: 255.255.255.0
Gateway IP: 192.168.0.1 >> 1 for the AP Base Station
Note: If your Access Point is also a DHCP Server, leave the Boot Method on Auto and the
Print Server will be assigned TCP/IP address settings automatically when the configuration is
saved.
5) Click the OK button to save the new settings and the changes will be written to the Print Server.
This may take 2-3 minutes. Wait for the utility to finish.
6) Click QUIT to close the WIRELESS SERVER SEARCH box.
On the Host:
Note: If your Access Point is also a DHCP Server, skip this step and go to step 2.
1) Change the TCP/IP settings on the wireless notebook computer Adapter Card, to the
address of the Access Point (for this test a Proxim Wireless Gateway was used)
Example - 192.168.0.1
• Right click the NETWORK Icon
o Click PROPERTIES
• Highlight the Network Connection - WIRELESS LAN CONNECTION
o Right Click WIRELESS LAN CONNECTION
o Click PROPERTIES
o Down-click and highlight “INTERNET PROTOCOL(TCP/IP)”
• Click the PROPERTIES button.
• On TCP/IP PROPERTIES box Click on “USE THE FOLLOWING IP ADDRESS” bullet.
Example IP Address:
Subnet Mask:
Gateway IP:
192.168.0.5
>> 5 for the computer
255.255.255.0 >> Subnet will be entered automatically
192.168.0.1
>> 1 for the Access Point
2) Click OK button to close the INTERNET PROTOCOL (TCP/IP) PROPERTIES box.
• Click on WIRELESS NETWORKS tab
• Remove the check mark from USE WINDOWS TO CONFIGURE WIRELESS
SETTINGS
• Click the CLOSE button
• Close the NETWORKS CONNECTIONS box
Page 3 of 5
3) Go the property settings of the Computer's Adapter Card.
• Right click the WIRELESS icon found in the System Tray by the lower right Taskbar.
• Click ADVANCED CONFIGURATION.
• On the CONFIGURATION tab, verify or enter the SSID name >> i.e. Proxim.
• Click on the APPLY button if a change has been made.
• Click the OK button to close the WIRELESS box.
4) Use a web browser such as Internet Explorer to access the Access Point HOME
WEB configuration page and set the WEP encryption to match the Print Server WEP
encryption settings.
NOTE: If you have a Proxy Server setting enabled in your browser, you will need to
disable it temporarily in order to access the HOME WEB page of the Access Point.
5) Type in the address of the Access Point (for example – HTTP://192.168.0.1) on the
address bar of the web browser and press the Enter key.
6) Find the "Wireless" Configuration page for the Access Point and set as follows:
•
Navigate to the CONFIGURE section for the “Wireless Setup” and set the
WEP Encryption type and value in the "WEP Data Privacy" section to
match the settings of the print server.
For Example 64 Bit Encryption using this key table for Key 1: 31 32 33 34 35
or 128 Bit Encryption using this key table for
Key 1: 31 32 33 34 35 00 00 00 00 00 00 00 00
•
•
•
WEP Authentication: Open System << Choose this Shared Key
Click SAVE
On the next screen click FINISHED
7) Close the browser.
8) Go the property settings of the Computer's Adapter Card.
•
•
•
•
•
•
•
•
Click the WIRELESS icon found in the right side of the Windows Taskbar.
Click on ADVANCED CONFIGURATION.
Select the ENCRYPTION Tab.
Encryption (WEP): - click on the drop-down button and select “64 bit” or “128 bit.”
Click the CREATE KEYS MANUALLY bullet.
Type in the WEP key you entered for Key 1 (3132333435 or
31322234350000000000000000 for this example).
Click on APPLY button.
Click the OK button to close the WIRELESS window.
Page 4 of 5
9) Reboot the system and upon restart check the WIRELESS status monitor.
10) If there are collision errors, re-enter the WEP KEY value and test with WP-Admin.
Printer Driver Settings:
Open the Printer properties and change the Port to "Standard TCP/IP Port" and set the TCP/IP
address to the address assigned to the Print Server:
1) Click the Windows “Start” button
• Click Settings.
• Click Printers.
• Right Click the “Epson Stylus C80 Series” icon.
• Click on Properties.
• Click the PORTS tab.
• In the PRINTER PORTS box:
o Select STANDARD TCP/IP PORT.
o Click the NEW PORT button.
o Click the NEXT button in the “Add Standard TCP/IP Port Wizard” box.
o Type the Printer Name or IP Address.
- Enter the TCP/IP address - Port Name: IP_xxx.xxx.xxx.xxx (The TCP/IP address
is filled in automatically when entering the TCP/IP address).
- Click the NEXT button.
- Click the FINISH button in the “Completing the Add Printer Port” box.
- Click the CLOSE button in the PRINTER PORTS box.
- Click the APPLY button.
- Click the GENERAL tab in the Epson Stylus C80 Series box.
- Click the PRINT TEST PAGE button.
- If the test page printed, click OK in the prompt window asking if the print was
successful.
- Click OK.
2) Verify the print out.
3) Close the Epson Stylus C80 Series Properties box.
4) Close the PRINTERS box.
Go to the print server and push the test button in for one second to print a status sheet of the print
server in order to verify the settings.
Page 5 of 5
EPSON
Date:
PSB #:
Reference:
Product(s):
Subject:
PRODUCT SUPPORT BULLETIN
11/1/2002
Originator: JAM
PSB.2003.01.002
Authorization:
N/A
Total Pages: 5
Epson Stylus Color C80WN
Enabling Wireless Encryption Protection (WEP) on C80WN and Windows 98
This bulletin was created to inform you of a procedure to guide you through configuring
WEP on the C80WN Print Server system.
Windows 98 Instructions
Requirements:
You will need the “SSID” and “IP Settings” for your wireless network. The SSID
information is available in the properties of the wireless Ethernet interface on the
computer. The IP settings can be viewed by clicking on RUN in the Windows Start
menu, then type WINIPCFG in the RUN field and click OK. Refer to the Access
Point/Base Station’s documentation for the SSID if necessary.
Enabling WEP Encryption:
Note: To successfully enable WEP, the main item on the Print Server and Access
Point/Base station CONFIGURATION menu is the type of WEP key.
"Open" or "Shared" Key Type.
If The Epson Wireless Print Servers firmware is version 3.91 or earlier, the print server
defaults to "Open" and with no selection for "Shared" key type. Some Base Stations,
Proxim for example, default to "Shared" key type (other manufacturers may also) and
would need to be set to “OPEN” key type. Refer to the documentation for your Access
Point hardware to determine where the setting for the Key Type is found. If the Key
Types are not the same between the print server, computer and Access Point, the Host
and Print Server will not handshake properly. Even though all settings appear to be
correct, communication fails and a time-out occurs without any displaying any error
messages.
Additionally, after the Print Server, Access Point and wireless computer are configured
on the same IP address segment and communicating properly, the printer/print server's
TCP/IP address must be changed to a TCP/IP address within the same IP address
segment in order to communicate and print. The Subnet Mask and Gateway address
must match also.
To Begin:
Power-up the Printer, Print Server and Host Computer.
On the Host Computer, do the following:
1) Disable WEP if it is on.
2) Install the Printer Driver and Epson Direct Print Utility (This will force you to reboot
the computer).
3) Install, then Launch WP-Admin and click the "Start" button to begin the search.
On the EpsonNet 802.11b Print Server, do the following:
1) Push and hold in the RESET (Test/Factory) button for 10-20 seconds. The print
server will reset to the 802.11 INFRASTRUCTURE mode settings of the host
computer running WP-Admin. This may take 2-3 minutes.
2) When the print server appears in the WP-Admin window, verify it is highlighted in the
search window and click the CONFIGURE button.
•
•
When the PASSWORD box shows on screen, click OK without entering a
password to continue.
When the CONFIGURATION screen appears, go to the “WEP KEY” section,
down-click and select “WEP 64BITs” or “128BITs” from the drop-down button
box.
3) Enter the encryption value in the “64Bit Key 1” box, for example 3132333435, or the
“128bit Key 1” box, for example 31323334350000000000000000.
*** Important Note *** If you forget to enter a value into the Key box and click OK to
save the settings, you will not have any communications with the print server. To
recover from this, go to the print server and repeat the restart procedure in step 1
above.
4) In the “Wireless Mode” box, verify the selection is set to INFRASTRUCTURE.
5) Next, go to the “SSID” field and type in the SSID name of the Access Point.
Example – Proxim
6) In the “Boot Method” drop-down button select STATIC (see Note), then go to the
TCP/IP address fields and enter the appropriate address, subnet mask and gateway.
Example IP Address: 192.168.0.8 >> 8 for the printer
Subnet Mask: 255.255.255.0
Gateway IP: 192.168.0.1 >> 1 for the Access Point
Note: If your Access Point is also a DHCP Server, leave the Boot Method on Auto and
the Print Server will be assigned TCP/IP address settings automatically when the
configuration is saved.
7) Click the OK button to save the new settings and the changes will be written to the
Print Server. This may take 2-3 minutes. Wait for the utility to finish.
8) Click QUIT to close the WIRELESS SERVER SEARCH box.
On the Host:
Note – If your Access Point is also a DHCP Server, skip step 1 and go to step 2.
1) Change the TCP/IP settings on the wireless notebook computer Adapter Card to the
address of the "Proxim" Base-Station. Example - 192.168.0.1
• Right click the NETWORK Icon
• Click PROPERTIES
• Down-click and highlight “TCP/IP -> WIRELESS LAN CARD”
• Click Properties button for the next screen
• In the TCP/IP PROPERTIES box, select the IP ADDRESS tab
• Click on… SPECIFY AN IP ADDRESS bullet
o Enter the appropriate IP ADDRESS values for your network
o Example - IP Address: 192.168.0.5 >> 5 for the computer (Tab between
periods)
o Subnet Mask: 255.255.255.0 >> (Tab between periods)
• Next, click on the GATEWAY tab in the TCP/IP PROPERTIES box
o In the NEW GATEWAY box, enter the appropriate IP ADDRESS for your
network gateway
o Example - Gateway: IP 192.168.0.1 >> 1 for the Access Point
• Click the ADD button
• Click OK button
• Highlight the WIRELESS LAN ADAPTER setting
• Click the PROPERTIES button
• On the CONFIGURATION tab verify or enter the SSID name
• Click on APPLY button if a change has been made or
• Click OK button – Next Screen
• Click OK button – to close the NETWORK box
2) The system will prompt you to REBOOT “Do you want to restart your computer now?” Click the YES button.
3) After the system restarts proceed to the next step.
4) Use a WEB browser such as Internet Explorer to access the Access Point’s WEB
HOME configuration page and set the WEP encryption to match the Print Server
WEP encryption settings. NOTE: If you have a Proxy Server setting enabled in your
browser, you will need to disable it temporarily in order to access the Web HOME
page on the Access Point.
5) Type in the address of the Access Point on the address bar of the WEB browser and
hit enter. Example - HTTP://192.168.0.1
6) Find "Wireless" Configuration page for the Access Point and set as follows.
• Navigate to the CONFIGURE section for the “Wireless Setup” and match the
WEP Encryption type and value in the "WEP Data Privacy" section to the settings
of the print server.
•
64 Bit Encryption using a key table like this example - Key 1: 31 32 33 34 35
•
or 128 Bit Encryption using a key table like this example Key 1: 31 32 33 34 35 00 00 00 00 00 00 00 00
•
WEP Authentication: Open System << Choose this Shared Key
•
Click SAVE
•
On the next screen click FINISHED
7) Close the browser.
8) Go to the property settings of the Computer's Adapter Card.
• Right click NETWORK Icon
• Click PROPERTIES
• Highlight the WIRELESS ADAPTER setting
• Click PROPERTIES button
• Select ENCRYPTION Tab
o Encryption (WEP) - click on the drop-down button and select “64 bit” or
“128 bit”
o Click the CREATE KEYS MANUALLY bullet
o Type in 3132333435 or 31322234350000000000000000
o Click on APPLY button
o Click OK button - Next Screen
o Click OK button - to close the NETWORK box
9) Reboot the system and upon restart check the WIRELESS status monitor
10) If there are collision errors, re-enter the WEP KEY value and test WP-Admin.
Printer Driver Settings:
1) Change the Printer’s TCP/IP Settings.
•
Open the Printer properties and change the Port to "EPSON_LPR"
and set the printers address as follows:
- Click on Start
- Click on Settings
- Click on Printers
- Highlight “Epson Stylus C80 Series” - Right click Properties
o DETAILS tab
o Click ADD PORT button – Next Screen
o On ADD PORT box, click NETWORK bullet, click BROWSE button –
Next Screen
o Double-click and expand the EPSON_LPR printer icon – Next Screen
o Browse and highlight the IP address PRINTER ICON symbol
o Click OK – Next Screen
o On ADD PORT box, click OK
• On EPSON STYLUS C80 SERIERS PROPERTIES BOX, click Apply
• Epson Stylus C80 Series box - Click GENERAL tab
o Click the PRINT TEST PAGE button – Next Screen
o If the test page printed, click Yes
• Click OK.
2) Verify the print out
3) Close the Epson Stylus C80 Series Properties box
4) Close the PRINTERS box
Go to the print server and push the test button in for one second to print a status sheet
of the print server to verify the settings.
EPSON
Date:
PSB #:
Reference:
Product(s):
Subject:
PRODUCT SUPPORT BULLETIN
03/27/2002
PSB.2002.03.003
N/A
Stylus C80WN
Using WEP Encryption
Originator: DS
Authorization:
Total Pages: 1
If you want to use WEP encryption or password protect your wireless network, and your
wireless adapter or access point normally uses a password or pass-phrase instead of WEP,
your software should allow you to enter a 0x followed by a ten digit (for 40-bit or 64-bit WEP)
or twenty-six digit (for 128-bit WEP) key in hexadecimal format.
If it only allows a password or pass-phrase, it will normally be 5 digits (for 40-bit or 64-bit WEP)
or thirteen digit (for 128-bit WEP). If this is the case, you can use the following table to
determine what WEP key to use for your wireless print server:
HEX
30
31
32
33
34
35
36
37
38
39
41
42
43
44
45
46
47
ASCII
0
1
2
3
4
5
6
7
8
9
A
B
C
D
E
F
G
HEX
48
49
4A
4B
4C
4D
4E
4F
50
51
52
53
54
55
56
57
58
ASCII
H
I
J
K
L
M
N
O
P
Q
R
S
T
U
V
W
X
HEX
59
60
61
62
63
64
65
66
67
68
69
6A
6B
6C
6D
6E
6F
Page 1 of 1
ASCII
Y
Z
a
b
c
d
e
f
g
h
i
j
k
l
m
n
o
HEX
70
71
72
73
74
75
76
77
78
79
7A
ASCII
p
q
r
s
t
u
v
w
x
y
z