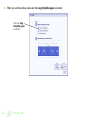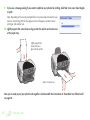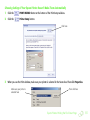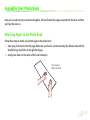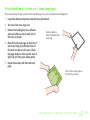
1
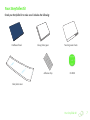
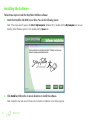
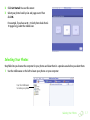
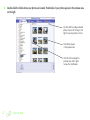
Creating a Photo Book
Copyright Notice
All rights reserved. No part of this publication may be reproduced, stored in a retrieval system, or transmitted in any form or by any
means, electronic, mechanical, photocopying, recording, or otherwise, without the prior written permission of Epson America, Inc.
Trademarks
Epson and Epson Stylus are registered trademarks of Seiko Epson Corporation.
Epson StoryTeller is a trademark, and Epson Store is a service mark of Epson America, Inc.
General Notice: Other product names used herein are for identification purposes only and may be trademarks of their respective
owners. Epson disclaims any and all rights in those marks.
© 2005 Epson America, Inc., 7/05
2
CPD-19341R1
Contents
Welcome! . . . . . . . . . . . . . . . . . . . . . . . . . . . . . . . . . . . . . . . . . . . . . . . . . . . . . . . . . . . . . . . . . . . . . . . . . . . .
System Requirements . . . . . . . . . . . . . . . . . . . . . . . . . . . . . . . . . . . . . . . . . . . . . . . . . . . . . . . . . . . . . . . . . .
Your StoryTeller Kit . . . . . . . . . . . . . . . . . . . . . . . . . . . . . . . . . . . . . . . . . . . . . . . . . . . . . . . . . . . . . . . . . . . .
Installing the Software . . . . . . . . . . . . . . . . . . . . . . . . . . . . . . . . . . . . . . . . . . . . . . . . . . . . . . . . . . . . . . . . .
6
6
7
8
Start Your Book . . . . . . . . . . . . . . . . . . . . . . . . . . . . . . . . . . . . . . . . . . . . . . . . . . . . . . . . . . . . . . . . . . . . . .
Starting StoryTeller Publisher . . . . . . . . . . . . . . . . . . . . . . . . . . . . . . . . . . . . . . . . . . . . . . . . . . . . . . . . . . .
Selecting Your Photos . . . . . . . . . . . . . . . . . . . . . . . . . . . . . . . . . . . . . . . . . . . . . . . . . . . . . . . . . . . . . . . . .
Fixing Your Photos . . . . . . . . . . . . . . . . . . . . . . . . . . . . . . . . . . . . . . . . . . . . . . . . . . . . . . . . . . . . . . . . . . . .
Saving Your Photo Changes . . . . . . . . . . . . . . . . . . . . . . . . . . . . . . . . . . . . . . . . . . . . . . . . . . . . . . . . . . . .
10
10
11
16
17
Create Your Photo Book Pages . . . . . . . . . . . . . . . . . . . . . . . . . . . . . . . . . . . . . . . . . . . . . . . . . . . . . . . . .
Adding Photos to Your Page Layouts . . . . . . . . . . . . . . . . . . . . . . . . . . . . . . . . . . . . . . . . . . . . . . . . . . . . .
Making Changes to Your Page Layouts . . . . . . . . . . . . . . . . . . . . . . . . . . . . . . . . . . . . . . . . . . . . . . . . . . .
Replacing One Photo with Another . . . . . . . . . . . . . . . . . . . . . . . . . . . . . . . . . . . . . . . . . . . . . . . . . .
Resizing, Repositioning, or Rotating a Photo . . . . . . . . . . . . . . . . . . . . . . . . . . . . . . . . . . . . . . . . . .
Adding, Deleting, and Locking Pages . . . . . . . . . . . . . . . . . . . . . . . . . . . . . . . . . . . . . . . . . . . . . . . . .
Adding Captions to Your Page Layouts . . . . . . . . . . . . . . . . . . . . . . . . . . . . . . . . . . . . . . . . . . . . . . . . . . .
Saving Your Photo Book to Your Computer . . . . . . . . . . . . . . . . . . . . . . . . . . . . . . . . . . . . . . . . . . . . . . .
18
18
22
22
23
24
25
26
3
4
Print Your Photo Book Pages . . . . . . . . . . . . . . . . . . . . . . . . . . . . . . . . . . . . . . . . . . . . . . . . . . . . . . . . . .
Printing a Draft of Your Photo Book . . . . . . . . . . . . . . . . . . . . . . . . . . . . . . . . . . . . . . . . . . . . . . . . . . . . .
Printing Your Final Photo Book Pages . . . . . . . . . . . . . . . . . . . . . . . . . . . . . . . . . . . . . . . . . . . . . . . . . . .
Epson Printers: Printing Your Final Pages . . . . . . . . . . . . . . . . . . . . . . . . . . . . . . . . . . . . . . . . . . . . .
HP Printers: Printing Your Final Pages . . . . . . . . . . . . . . . . . . . . . . . . . . . . . . . . . . . . . . . . . . . . . . .
Canon, Lexmark, or Other Printers: Printing Your Final Pages . . . . . . . . . . . . . . . . . . . . . . . . . . . .
27
27
28
29
33
36
Create Your Cover . . . . . . . . . . . . . . . . . . . . . . . . . . . . . . . . . . . . . . . . . . . . . . . . . . . . . . . . . . . . . . . . . . . .
Adding Photos to the Front and Back Covers . . . . . . . . . . . . . . . . . . . . . . . . . . . . . . . . . . . . . . . . . . . . .
Adding Photos and Text to the Flaps and Spine . . . . . . . . . . . . . . . . . . . . . . . . . . . . . . . . . . . . . . . . . . .
Saving Your Cover Pages to Your Computer . . . . . . . . . . . . . . . . . . . . . . . . . . . . . . . . . . . . . . . . . . . . . .
E-Mailing Your Front Cover Page . . . . . . . . . . . . . . . . . . . . . . . . . . . . . . . . . . . . . . . . . . . . . . . . . . . . . . . .
41
41
44
47
47
Print Your Cover . . . . . . . . . . . . . . . . . . . . . . . . . . . . . . . . . . . . . . . . . . . . . . . . . . . . . . . . . . . . . . . . . . . . .
Printing a Reduced Size Color Draft of Your Cover . . . . . . . . . . . . . . . . . . . . . . . . . . . . . . . . . . . . . . . . .
Printing Your Final Cover Page . . . . . . . . . . . . . . . . . . . . . . . . . . . . . . . . . . . . . . . . . . . . . . . . . . . . . . . . .
Epson Printers: Printing the Final Cover Page . . . . . . . . . . . . . . . . . . . . . . . . . . . . . . . . . . . . . . . . .
HP Printers: Printing Your Final Cover Page . . . . . . . . . . . . . . . . . . . . . . . . . . . . . . . . . . . . . . . . . . .
Canon, Lexmark, and Other Printers: Printing Your Final Cover Page . . . . . . . . . . . . . . . . . . . . . .
48
48
50
50
59
69
Contents
Assemble Your Photo Book . . . . . . . . . . . . . . . . . . . . . . . . . . . . . . . . . . . . . . . . . . . . . . . . . . . . . . . . . . . .
Attaching Pages to the Photo Book . . . . . . . . . . . . . . . . . . . . . . . . . . . . . . . . . . . . . . . . . . . . . . . . . . . . . .
Attaching the Cover to Your Photo Book . . . . . . . . . . . . . . . . . . . . . . . . . . . . . . . . . . . . . . . . . . . . . . . . .
If You Printed a Full-Length Cover Page . . . . . . . . . . . . . . . . . . . . . . . . . . . . . . . . . . . . . . . . . . . . . .
If You Printed Two 8 × 10-Inch or 5 × 7-Inch Cover Pages . . . . . . . . . . . . . . . . . . . . . . . . . . . . . . .
83
83
86
87
89
Problems? . . . . . . . . . . . . . . . . . . . . . . . . . . . . . . . . . . . . . . . . . . . . . . . . . . . . . . . . . . . . . . . . . . . . . . . . . . . 90
Uninstalling the StoryTeller Software . . . . . . . . . . . . . . . . . . . . . . . . . . . . . . . . . . . . . . . . . . . . . . . . . . . . . 92
Where To Get Help . . . . . . . . . . . . . . . . . . . . . . . . . . . . . . . . . . . . . . . . . . . . . . . . . . . . . . . . . . . . . . . . . . . 92
Index . . . . . . . . . . . . . . . . . . . . . . . . . . . . . . . . . . . . . . . . . . . . . . . . . . . . . . . . . . . . . . . . . . . . . . . . . . . . . . . 93
Contents
5
Welcome!
Ever wonder what to do with all those photos you took with your digital camera? Instead of storing them on your
computer or on a CD-ROM, you can create a personalized photo book that captures the family vacation, graduation
day, or a child’s birthday. And photo books make a great gift for everyone, for any occasion.
The Epson StoryTeller™ kit includes everything you need to make your own photo book. It comes with a hardbound
book, special glossy photo paper, panoramic sheets for your cover, and easy-to-use software. You can choose from
six different book styles (themes), each with up to 20 pre-designed page layouts that make arranging your photos a
breeze. And you can add your own captions and titles to make sure your photos tell your story.
This guide walks you through selecting and enhancing your photos, building and printing your photo book, and
creating and printing a cover page. Finally, it shows you how to put your book together.
System Requirements
To use the StoryTeller Publisher software, your system should have:
6
●
Microsoft Windows® 98SE, Me, 2000, or XP operating system
●
Pentium® III processor, 750 MHz or faster (Pentium IV processor, 1.3 GHz or faster recommended)
●
At least 2.3GB available hard disk space
●
256MB RAM (512MB RAM recommended)
●
16-bit color display, 800 × 600 pixels (higher resolution recommended)
Your StoryTeller Kit
Check your StoryTeller kit to make sure it includes the following:
Hardbound book
Glossy photo paper
Adhesive strips
Two long cover sheets
CD-ROM
Clear plastic cover
Your StoryTeller Kit
7
Installing the Software
Follow these steps to install the StoryTeller Publisher software:
1
Insert the StoryTeller CD-ROM in your drive. You see the following screen:
Note: If the screen doesn’t appear, click Start > My Computer (Windows XP) or double-click the My Computer icon on your
desktop (other Windows systems). Then double-click the Epson icon.
2
Click Install and follow the on-screen directions to install the software.
Note: Installation may take several minutes. Don’t cancel the installation or start other programs.
8
Welcome!
3
If you see a message asking if you want to restart your computer, click Restart Later.
4
When installation is complete, click Finish.
5
When you see the product registration screen, register your software as instructed. When you’re done, close
your browser.
6
Remove the CD-ROM and restart your computer.
Now you’re ready to begin creating your book. Go to “Start Your Book” on page 10.
Installing the Software
9
Start Your Book
This chapter explains how to start the StoryTeller Publisher software, choose your book format, and select the
photos you want to include in your photo book.
Starting StoryTeller Publisher
Follow these steps to start StoryTeller Publisher and choose your book style:
1
10
Double-click the
EPSON StoryTeller Publisher icon on your desktop. You see this screen:
2
Click Get Started. You see this screen:
3
Select your photo book by size and page count. Then
click OK.
For example, if you have an 8 × 10-inch photo book that is
10 pages long, select the middle icon.
Selecting Your Photos
StoryTeller lets you browse the computer for your photos and view them in a preview area before you select them.
1
Use the minibrowser on the left to locate your photos on your computer:
Use the minibrowser
to locate your photos
Selecting Your Photos
11
2
Double-click the folder where your photos are located. Thumbnails of your photos appear in the preview area
on the right.
Use this slider to enlarge selected
photos; move it all the way to the
right to view one photo at a time
Thumbnails appear
in the preview area
Click this tab to enlarge the
preview area; click it again
to view the minibrowser
12
Start Your Book
3
To select a photo, double-click its thumbnail or drag the thumbnail from the preview area to the photo bin at
the bottom of the screen. (A red border appears around selected thumbnails.)
If you want to select several photos, do one of the following:
●
Hold down the Shift key and click the first thumbnail in the group, then click the last thumbnail. Then drag
the entire group to the photo bin.
●
Drag your mouse over the images you want to select, then drag all the selected images to the photo bin.
●
To select images out of order, hold down the Ctrl key as you click the images you want, then drag the
selected images to the photo bin.
Drag and drop your
photos to the photo bin
Photo bin
Selecting Your Photos
13
4
If you decide you don’t want to use a photo, select its thumbnail in the photo bin and click the
icon.
Remove
To remove a series of photos from the photo bin, select the first thumbnail in the series. Hold down the Shift
key and select the last thumbnail in the series. Then click the
Remove icon.
Tip: You can also drag your mouse over several images to select them, or hold down the Ctrl key to select several images out of
Remove icon.
order. After you’ve selected the images, click the
To remove all photos from the photo bin, click the
Remove All icon.
To remove a photo
from the photo bin,
select it and click here
14
Start Your Book
5
Optionally, you can rearrange the thumbnails in the photo bin in the order you want them to appear in your
photo book. Just drag and drop each thumbnail to its new place in the line-up.
Note: A blue bar appears to indicate where the thumbnail will be placed.
Selecting Your Photos
15
Fixing Your Photos
You can fix red eye in your photos, apply special color effects like a sepia tone, sharpen the image, or enhance
brightness and contrast. Any modifications immediately appear in the preview image on the right side of the screen.
1
Click the Fix Pictures tab. The photo selected in the photo bin appears in the preview area.
Enhance brightness and
contrast automatically
Your first photo
appears in the
preview area
Or use these controls to
change these settings
manually
2
To automatically enhance the photo’s brightness and contrast, click the
To change these values manually, select a new setting in the Brightness or
Contrast controls:
16
Start Your Book
Auto Enhance button.
3
To automatically fix red eye, click Fix Red Eye.
4
To sharpen the image, click Sharpen. Then select a new setting in the Sharpen control.
5
To add a special color effect, click Color Effects. Then select one of the color effects
settings.
6
To rotate the image 90° to the right or left, click one of the
7
If you change your mind about any of the changes you made, click the
Click the
redo icon if you change your mind again!
rotation icons at the top of the screen.
undo icon at the top of the screen.
Now you’re ready to add photos to your photo book. Continue with the instructions in “Create Your Photo Book
Pages” on page 18, or go to the next section to save your photo changes.
Saving Your Photo Changes
Once you’ve fixed a photo, you can save it to your computer or a disk and use it at a later date. Just click the
icon
at the top of the screen. When you see the Save As dialog box, navigate to the location where you want to save it
and click Save.
Saving Your Photo Changes
17
Create Your Photo Book Pages
You can add your own distinctive touch by arranging the photos yourself in StoryTeller’s pre-designed layouts. If you
want to change the way your page looks, you can replace the photos, switch them, or reposition them to better fit
their frames. If you don’t like a particular page layout, you can replace it with a different one.
Tip: The official Epson StoryTeller Internet site has more information about StoryTeller, including special offers and links to
SM
troubleshooting information and the Epson Store , where you can buy additional StoryTeller paper. To go directly to the website,
icon to the right of the Book Style menu.
click the Create Book tab, then click the
Adding Photos to Your Page Layouts
1
Click the Create Book tab.
2
Click Customize Book.
18
Click Customize Book
3
Select your Book Style in the drop-down menu. The page layouts associated with this Book Style appear in the
Page Layout section. You’ll also see page layouts in the preview area.
Click here to
switch to single
page view in the
preview area
Select your
Book Style here
Preview area
shows page
layouts as they
will appear in
your book
Layouts for
your Book Style
appear here
Tip: If you want to view the page layouts in the preview area one at a time, click the
to viewing several page layouts at a time, click the
icon.
icon in the upper right corner. To return
Adding Photos to Your Page Layouts
19
4
Drag the page layouts you want to use from the Page Layout area over each of the 10 or 20 pages in the
preview area. Use the slider on the right of the preview area to move through all the pages in your book, and
the slider on the right of the Page Layout area to move through all the available layouts for your Book Style.
Tip: You can mix page layouts from different Book Styles. Once you’ve selected all the page layouts you want from one Book
Style, select a new Book Style in the drop-down menu. A new set of page layouts appears in the Page Layout area. You can
choose layouts from as many Book Styles as you want.
Drag the page
layout you want
over one of the
layouts in the
preview area
Use this slider to
scroll through
page layouts
20
Create Your Photo Book Pages
Use this slider
to scroll through
all the page
layouts in your
book
5
Drag your photos one at a time from the photo bin to their places on each page.
A checkmark appears on the image in the photo bin to indicate it has been used. Images can be used multiple
times.
Note: To automatically fill your page layouts with photos, click Auto Book at the top of the screen, then click the Auto Book
button at the bottom of the screen. StoryTeller places photos in the order they appear in the photo bin.
6
Use the slider on the right side of the screen to move to the next page layouts and drag photos from the photo
bins onto these pages. Repeat this step until you’ve filled all the pages in your book.
Adding Photos to Your Page Layouts
21
Making Changes to Your Page Layouts
You can replace one photo on a page layout with another, resize or reposition a photo in its frame, or add or delete
page layouts. You can even replace one page layout with another.
Replacing One Photo with Another
If you change your mind about where you placed a photo, do one of the following:
●
Select it on the page and click the
photo bin.
icon that appears. The photo is removed from the page but remains in the
Note: If the toolbar with the
icon doesn’t appear beside the page, make sure you’ve selected a photo. (A green border
appears around a selected photo.)
●
Drag a different photo from the photo bin over the one you want to replace.
●
Switch the positions of two photos on a page by dragging one over the other.
●
Switch the positions of two photos in two different page layouts by dragging one over the other.
22
Create Your Photo Book Pages
Resizing, Repositioning, or Rotating a Photo
You can double-click a photo on a page
to resize or reposition it in the frame.
You see this window:
●
Reposition the photo in the frame
by moving the pointer over it. When
the shape of the pointer turns into a
hand, drag the photo up, down, left
or right.
●
Click the
photo.
●
Click the
icon to reduce it.
●
Click the
the right.
icon to rotate it 90° to
icon to enlarge the
Indicates overlap of
another photo in the
page layout
Reposition the photo
When you’re done, click OK to close the
window.
Resizing, Repositioning, or Rotating a Photo
23
Adding, Deleting, and Locking Pages
You can add or delete a page, lock it to prevent changes, or replace it with a different page layout.
●
To delete a page, select it in the preview area; a red border appears to indicate the page is selected. Then click
the
icon beneath the preview area to delete it.
●
To add a page, select the page layout you want in the Page Layout section, then click the
icon beneath the
preview area. (The
icon is grayed out if you already have as many pages in the preview area as your book
allows.)
●
To lock a page, select it and click the
unlock it.)
Select a page
and click this icon
to lock it
icon that appears to the left of the page. (Click the
icon again to
Click this icon to
add a page in the
preview area
Click this icon to
delete a page
24
Create Your Photo Book Pages
Adding Captions to Your Page Layouts
1
Click the
2
Double-click the text you want to change in the preview area. A green border appears around the selected text,
and a text box appears.
icon above the preview area to view your pages one at a time.
Tip: If you’re having trouble selecting the text, make sure your pointer is positioned directly over the text before you double-click.
3
Enter your caption or title in the text box.
Note: If you don’t enter a caption or title, the page prints without text since the sample text is automatically deleted.
Use these tools
to modify your
text
Select the
text area
Enter your text
in the text box
Adding Captions to Your Page Layouts
25
4
Use the editing tools in the text box to make any modifications to the text, such as a different typeface, color, or
text alignment. Then click OK to close the text box.
5
Enter your own text on all the pages. Use the scrollbar to the right of the preview area to move through the
pages.
Now you’re ready to print your pages. Continue with the instructions in “Print Your Photo Book Pages” on page 27.
Or go to the next section to save your photo book to your computer.
Saving Your Photo Book to Your Computer
Once you’ve created your photo book, you can save it to your computer or a disk. Just click the
icon at the top of
the screen. When you see the Save As dialog box, navigate to the location where you want to save it and click Save.
26
Create Your Photo Book Pages
Print Your Photo Book Pages
The steps you use to print your photo book pages depend on the type of printer you have. Be sure to print a draft of
your photo book on plain letter-size paper to see how it looks before you print the final book.
Printing a Draft of Your Photo Book
Your draft prints in portrait mode, with one book page on each printed sheet. However, you can change the layout
to print two pages per sheet or four pages per sheet.
1
Click Print Book on the Create Book tab. You see this window:
Click Draft Color
You can select a different
page layout for your draft here
27
2
Click Draft Color.
3
If you don’t want to print one page per sheet, select either
2 pages/sheet or 4 pages/sheet in the Layout menu.
4
Click the
window:
5
Make sure your printer is selected in the Name box, then click
OK.
Print window
Printer Setup button. You see the Print
Note: If you decide to make any changes to the Print Settings, be sure to
select Portrait orientation when you print 2 pages/sheet or, Landscape
orientation when you print 4 pages/sheet.
6
Click the
Print button.
Printing Your Final Photo Book Pages
Those Epson® printers that support the Epson Easy Print interface automatically choose the right settings, which
makes printing fast and simple. Printers made by other manufacturers and some Epson printers require you to make
the settings yourself in your printer software.
This section includes the following:
●
“Epson Printers: Printing Your Final Pages” on page 29
●
“HP Printers: Printing Your Final Pages” on page 33
●
“Canon, Lexmark, or Other Printers: Printing Your Final Pages” on page 36
28
Print Your Photo Book Pages
Epson Printers: Printing Your Final Pages
1
Unwrap the 8 × 10-inch or 5 × 7-inch glossy photo paper that came with StoryTeller.
Note: Avoid touching the glossy surface of the StoryTeller paper as much as possible to avoid fingerprints.
2
Load the stack glossy side up against the right side of your printer’s feeder.
Load the paper against
the right side of your
feeder
Left edge guide
Lower the output tray
and slide out any
extensions
3
Slide the left edge guide up against the paper, but not too tightly.
4
Lower the output tray and pull out the output tray extensions, if your printer has them.
Epson Printers: Printing Your Final Pages
29
5
Click Print Book on the Create Book tab. You see this window:
6
Click Full Size Color Prints.
7
If you have one of the following Epson printers, click the
PRINT button. Your pages begin to print.
Note: Depending on the size of your digital files, it may take several minutes
for your book to start printing. Wait for the progress meter to disappear, and
don’t cancel printing or start another task.
Epson Stylus® C64
Epson Stylus Photo R800
Epson Stylus C84
Epson Stylus Photo RX500
Epson Stylus Photo 900
Epson Stylus Photo RX620
Epson Stylus Photo 1280
Epson Stylus Photo 2200
Epson Stylus Photo R200
Epson Stylus CX4600
Epson Stylus Photo R300
Epson Stylus CX6400
Epson Stylus Photo R320
Epson Stylus CX6600
If you have an Epson printer that is not listed above, continue with step 8.
30
Print Your Photo Book Pages
Click Full Size Color Prints
8
Click the
9
Make sure your printer is selected in the Name box, then click Properties.
Printer Setup button.
Make sure your printer is selected here
Then click here
Epson Printers: Printing Your Final Pages
31
10 Select these options:
●
For Quality Option, select Photo
●
For Paper Type, select Premium Glossy Photo Paper
Note: If Premium Glossy Photo Paper doesn’t appear in the Paper Type list, choose DuraBrite Ink Glossy Photo Paper, and
choose Best Photo as the Quality Option. If DuraBrite Ink Glossy Photo Paper doesn’t appear, choose Glossy Photo Paper,
and choose Best Photo as the Quality Option.
●
For Orientation, select Landscape
●
For Paper Size, select 8 × 10 in or
5 × 7 in, depending on your book
size
Note: For late-breaking news about
recommended print settings, visit the
StoryTeller website at
http://www.epson.com/storyteller.
11 Click OK, then click OK again at the
Print window.
Select Photo
Select Premium
Glossy Photo
Paper
Select 8 × 10 in
or 5 × 7 in
Select Landscape
32
Print Your Photo Book Pages
12 Click the
PRINT button. Your pages begin to print.
Note: Depending on the size of your digital files, it may take several minutes for your book
to start printing. Wait for the progress meter to disappear, and don’t cancel printing or start
another task.
Now you’re ready to create your cover page. Continue with the instructions in “Create Your Cover” on page 41.
HP Printers: Printing Your Final Pages
See your printer documentation for detailed paper loading and printing instructions. Your printer and software may
look different from those shown here.
Note: Avoid touching the glossy surface of the StoryTeller paper as much as possible to avoid fingerprints.
1
Unwrap the 8 × 10-inch or 5 × 7-inch glossy photo paper that came with StoryTeller.
2
Load the stack glossy side down in your printer’s
front feeder tray.
3
Adjust the edge guides if necessary.
Load your paper
glossy side down
from the front
HP Printers: Printing Your Final Pages
33
4
Click Print Book on the Create Book tab. You see this window:
Make sure Full
Size Color Prints
is selected
Then click here
5
Click Full Size Color Prints. Then click the
6
Make sure your printer is selected in the
Name box, then click Properties.
Printer Setup button.
Make sure your printer is selected here
Then click here
34
Print Your Photo Book Pages
7
Select these options:
●
For Print Quality, select Best
●
For Paper Type, select hp premium plus photo paper, glossy
●
For Paper Size, select Photo 8 × 10 in. or Photo 5 × 7 in., depending on your book size
Select your Paper Size
Select this Paper Type
Select Best
8
Click OK, then click OK again at the Print window.
9
Click the
PRINT button. Your pages begin to print.
Note: For late-breaking news about recommended print options, visit the StoryTeller website at http://www.epson.com/storyteller.
Now you’re ready to create your cover page. Continue with the instructions in “Create Your Cover” on page 41.
HP Printers: Printing Your Final Pages
35
Canon, Lexmark, or Other Printers: Printing Your Final Pages
Canon, Lexmark, and other printers usually load paper from the top, like Epson printers. See the illustration of an
Epson printer on page 29 to get an idea of how to load paper.
See your printer documentation for detailed paper loading and printing instructions. This section includes screens
for the Canon i560; your printer screens may look different and may include different options.
Note: Avoid touching the glossy surface of the StoryTeller paper as much as possible to avoid fingerprints.
1
Unwrap the 8 × 10-inch or 5 × 7-inch glossy photo paper from the StoryTeller kit.
2
Load the stack glossy side up against the right side of your printer’s feeder.
3
Lower the output tray and pull out the output tray extensions, if your printer has them.
36
Print Your Photo Book Pages
4
Click Print Book on the Create Book tab. You see this window:
Make sure Full
Size Color Prints
is selected
Then click here
5
Click Full Size Color Prints. Then click the
6
Make sure your printer is selected in
the Name box, then click Properties.
Printer Setup button.
Make sure your printer is selected here
Then click here
Canon, Lexmark, or Other Printers: Printing Your Final Pages
37
7
Select these options:
●
Select a high print quality; for Canon, select High
●
Select a high-grade glossy paper; for Canon, select Photo Paper Pro
Note: For late-breaking news about recommended print options, visit the StoryTeller website at
http://www.epson.com/storyteller.
38
Print Your Photo Book Pages
8
Select the correct paper size for your book; some printers will have the paper size option on the first screen, and
some will require you to click another tab. For Canon, click the Page Setup tab.
If your printer doesn’t have an 8 × 10-inch or 5 × 7-inch paper size option, select Custom or User Defined as
the paper size and type the correct paper size in the dialog box that appears.
If your printer doesn’t
have the correct paper
size, select Custom or
User Defined
Then enter the correct page
size in the dialog box that
appears
9
Click OK, then click OK again at the Print window.
Canon, Lexmark, or Other Printers: Printing Your Final Pages
39
10 Click the
PRINT button. Your pages begin to print.
Note: Depending on the size of your digital files, it may take several minutes for your
book to start printing. Wait for the progress meter to disappear, and don’t cancel
printing or start another task.
Now you’re ready to create your cover page. Continue with the instructions
in “Create Your Cover” on page 41.
40
Print Your Photo Book Pages
Create Your Cover
To create your cover, you’ll repeat some of the same steps you took when you created your photo book pages. You’ll
choose a Book Style from one of the pre-designed styles, then drag photos from the photo bin onto the layout in the
preview area. You’ll also use some of the same tools to modify your layout and add captions or titles.
Adding Photos to the Front and Back Covers
1
Click the Create Cover tab.
2
Select your Book Style in the drop-down menu. The layout for the front cover appears in the preview area.
Select a book
style here
The front or back
cover layout
appears here
Select which part
of the cover to
work on
41
3
Drag images from the photo bin to the preview area. If you want to select several images at once, do one of the
following:
●
Hold down the Shift key and click the first thumbnail in the series, then click the last thumbnail. Then drag
the entire group to the preview area.
●
Drag your mouse over the images you want to select, then drag all the selected images to the preview area.
●
To select images out of order, hold down the Ctrl key as you click the images you want, then drag the
selected images to the preview area.
Drag photos
from the photo
bin to the
preview area
42
Create Your Cover
4
Follow the instructions beginning on page 22 to replace, resize, reposition, or rotate photos on the front cover.
5
Click the text you want to change in the preview area. Follow the instructions beginning on page 25 to enter
your own text.
Note: If you don’t enter new text, the page prints without text since the default text is automatically deleted.
6
When you’re finished, select Back Cover in the diagram below the preview area and repeat steps 3 through 5.
7
Use the editing tools in the text box to make any modifications to the text, such as a different typeface, color, or
text alignment.
Now you’re ready to add photos and text to your cover’s spine and flaps. Continue with the instructions in “Adding
Photos and Text to the Flaps and Spine” on page 44.
Adding Photos to the Front and Back Covers
43
Adding Photos and Text to the Flaps and Spine
Some printers are not able to print a long cover page. If your printer cannot print a full-length cover page, you’re
ready to print your cover now. Go to “Print Your Cover” on page 48.
Note: All Epson printers can print a full-length cover page. If you’re not sure whether your non-Epson printer can print a full-length cover
page, see the instructions beginning on page 48.
1
In the diagram below the preview area, select the front flap. The layouts for both the front and back flaps and
the spine appear in the preview area.
Layouts for both flaps
and spine appear in
the preview area
Click the front flap
44
Create Your Cover
2
To add photos to the flaps, drag them from the photo bin.
Note: You may have to play with the photos and layouts a little to make sure you’ve filled all the photo areas on the flaps.
Drag photos from the
photo bin to the flaps
3
Click the text you want to change in the preview area.
A green border appears around the selected text, and the existing text appears in the text box on the left.
Tip: If you’re having trouble selecting the text, make sure your pointer is positioned directly over the text before you click it.
Adding Photos and Text to the Flaps and Spine
45
4
Type your text over the existing text in the text box.
Note: If you don’t enter new text, the page prints without text since the sample text is automatically deleted.
Select the text
area on the flap
Then type your
text here
5
Use the editing tools in the text box to make any modifications to the text, such as a different typeface, color, or
text alignment.
6
Click and edit all text areas on the flaps.
7
Click the text area on the spine and type your book’s title in the text box on the right.
Now you’re ready to print your cover page. Continue with the instructions in “Print Your Cover” on page 48. Or
continue with the next two sections to save your cover pages to your computer or e-mail your front cover page.
46
Create Your Cover
Saving Your Cover Pages to Your Computer
Once you’ve finished your cover pages, you can save them to your computer or a disk. Just click the
icon at the
top of the screen. When you see the Save As dialog box, navigate to the location where you want to save them and
click Save.
E-Mailing Your Front Cover Page
You can e-mail your front cover page directly from StoryTeller, without going to the trouble of saving it to your
computer and attaching it to a regular e-mail.
1
Make sure Front Cover is selected in the diagram below the preview area.
2
Click the
icon at the top of the StoryTeller screen.
You see this screen:
3
Select the size of the file for your front cover page.
Note: Smaller files are easier to deliver, but larger files are better
for printing.
4
Select your e-mail application in the Email Application
menu.
Note: If you are using Lotus® Notes,® make sure that Notes is
open before you send the e-mail.
5
Click the
SEND button.
A new memo with the file attachment opens in your e-mail
application. Complete the steps to send your e-mail.
Saving Your Cover Pages to Your Computer
47
Print Your Cover
The steps you use to print the cover depend on the type of printer you have and whether you’re printing an
8 × 10-inch book or 5 × 7-inch book. Many Epson printers automatically choose the right settings, which makes
printing fast and simple. Printers made by other manufacturers and some Epson printers require you to make the
settings yourself in your printer software.
In addition, some non-Epson printers may not be able to print a full-length cover page. If this is true of your printer,
you can print a front and back cover on your 8 × 10-inch or 5 × 7-inch StoryTeller paper.
Before you print the final cover page(s), follow the instructions in the next section to print a draft.
Printing a Reduced Size Color Draft of Your Cover
Follow the instructions in this section to print a color proof of your cover on plain letter-size paper. The front cover,
back cover, and flaps and spine will each print on a separate sheet of paper.
1
Load letter-size plain paper in your printer.
Note: See page 29 for instructions for your Epson printer, page 33 for instructions for your HP printer, and page 36 for
instructions for other printers.
48
2
Click the
PRINT icon on the StoryTeller window.
You see this window:
3
Click Draft (Plain Paper).
4
If your printer does not support banner or panoramic
printing, click the Spine and Flaps box to deselect it.
5
Click the
PRINT icon. You see a message asking if
you want to optimize your photos for better prints.
6
Click No. Your cover prints on several sheets.
Printing a Reduced Size Color Draft of Your Cover
49
Printing Your Final Cover Page
This section includes instructions for these printers:
●
“Epson Printers: Printing the Final Cover Page” in the next section
●
“HP Printers: Printing Your Final Cover Page” on page 59
●
“Canon, Lexmark, and Other Printers: Printing Your Final Cover Page” on page 69
Epson Printers: Printing the Final Cover Page
All Epson printers can print a full-length cover page for both the 8 × 10-inch and 5 × 7-inch books. In addition,
many Epson printers automatically choose the right print settings, so printing is easy.
Note: Avoid touching the glossy surface of the StoryTeller paper as much as possible to avoid fingerprints.
1
50
Before loading the StoryTeller cover sheet in your
printer, flatten it by gently bending it in the opposite
direction (for example, at the flaps and spine).
Print Your Cover
2
Load the sheet glossy side up against the right side of the feeder.
3
Slide the left edge guide up against the paper, but not too tightly.
4
Lower the output tray and pull out the output tray extensions, if your
printer has them.
5
Click the
Load the sheet in
your Epson printer
glossy side up
PRINT icon at the bottom of the StoryTeller screen.
Click here
Epson Printers: Printing the Final Cover Page
51
6
When you see this window, make sure that Long StoryTeller paper is selected.
Make sure Long
StoryTeller paper
is selected
52
Print Your Cover
7
If you have one of the following printers, your printer can print the cover sheet automatically. Continue with
step 8.
Epson Stylus C64
Epson Stylus Photo R800
Epson Stylus C84
Epson Stylus Photo RX500
Epson Stylus Photo 900
Epson Stylus Photo RX620
Epson Stylus Photo 1280
Epson Stylus Photo 2200
Epson Stylus Photo R200
Epson Stylus CX4600
Epson Stylus Photo R300
Epson Stylus CX6400
Epson Stylus Photo R320
Epson Stylus CX6600
If you have an Epson printer that is not listed, go to “Choosing Settings If Your Epson Printer Doesn’t Make Them
Automatically” on page 55.
8
Click the
PRINT icon at the bottom of the window.
Epson Printers: Printing the Final Cover Page
53
9
If you see a message asking if you want to optimize your photos for printing, click Yes. Your cover sheet begins
to print.
Note: Depending on the size of your digital files, it may take several minutes for your
cover to start printing. Wait for the progress meter to disappear, and don’t cancel
printing or start another task.
10 Lightly support the cover sheet as it goes into the printer and comes out
at the paper tray.
Lightly support the
cover sheet as it
goes into the printer
And as it comes out
Now you’re ready to put your photo book together. Continue with the instructions in “Assemble Your Photo Book”
on page 83.
54
Print Your Cover
Choosing Settings If Your Epson Printer Doesn’t Make Them Automatically
1
Click the
PRINT WIZARD button at the bottom of the Print Setup window.
2
Click the
Printer Setup button.
Click here
3
When you see the Print window, make sure your printer is selected in the Name box. Then click Properties.
.
Make sure your printer is
selected here
Then click here
Epson Printers: Printing the Final Cover Page
55
4
You see your printer’s Properties window. Select the following:
●
For Quality Option, select Photo
●
For Paper Type, select Premium Glossy Photo Paper
Note: If Premium Glossy Photo Paper doesn’t appear in the Paper Type list, choose DuraBrite Ink Glossy Photo Paper, and
choose Best Photo as the Quality Option. If DuraBrite Ink Glossy Photo Paper doesn’t appear, choose Glossy Photo Paper,
and choose Best Photo as the Quality Option.
●
For Paper Size, select User Defined. (If Borderless is checked, User Defined is unavailable.)
Click Photo
Select User Defined
Select Premium
Glossy Photo Paper
56
Print Your Cover
Note: For late-breaking news about recommended print options, visit the StoryTeller website at
http://www.epson.com/storyteller.
Make sure that Landscape is selected for the page orientation. Click the Help button in the printer sofware for
more information.
5
When you select User Defined for the Paper Size, you see the User Defined Paper Size window. Make sure
0.01 inch is selected as the unit of measurement.
6
Do one of the following:
7
●
If you have an 8 × 10-inch photo book, type
8×10cover in the Paper Size Name box, 850 in the
Paper Width box, and 2873 in the Paper Height box.
Then click Save.
●
If you have a 5 × 7-inch photo book, type 5×7cover in
the Paper Size Name box, 550 in the Paper Width box,
and 2087 in the Paper Height box. Then click Save.
Click OK to close the User Defined Paper Size window.
Note: You only need to create a user defined paper size once. The
next time you print a cover, choose the size you created—8x10cover
or 5x7cover—as your Paper Size in step 4.
8
Click OK, then click OK again at the Print window.
9
At the Print Wizard screen, click Next.
Make sure 0.01 inch is
selected as the unit of
measurement
Epson Printers: Printing the Final Cover Page
57
10 Click the
PRINT icon.
11 If you see a message asking if you want to optimize your photos for printing, click Yes. Your cover sheet begins
to print.
Note: Depending on the size of your digital files, it may take several minutes for your
cover to start printing. Wait for the progress meter to disappear, and don’t cancel
printing or start another task.
12 Lightly support the cover sheet as it goes into the printer and comes out
at the paper tray.
Lightly support the
cover sheet as it
goes into the printer
And as it comes out
Now you’re ready to put your photo book together. Continue with the instructions in “Assemble Your Photo Book”
on page 83.
58
Print Your Cover
HP Printers: Printing Your Final Cover Page
Most HP printers can print a full-length cover for an 8 × 10-inch book, but not for a 5 × 7-inch book. For the smaller
book, you’ll print a front and back cover on two sheets of your StoryTeller 5 × 7-inch paper.
Printing a Cover for Your 8 × 10-Inch Book on an HP Printer
See your printer documentation for detailed paper loading and printing instructions. Your printer and printer
software may look different.
Note: Avoid touching the glossy surface of the StoryTeller paper as much as possible to avoid fingerprints.
1
Before loading the StoryTeller cover sheet in your
printer, flatten it by gently bending it in the
opposite direction (for example, at the flaps and
spine).
HP Printers: Printing Your Final Cover Page
59
2
Carefully load the sheet glossy side down in your printer’s front
feeder tray.
3
Adjust the edge guides as necessary.
4
Click the
screen.
PRINT icon at the bottom of the StoryTeller
Load the sheet in
your HP printer
glossy side down
Click here
60
Print Your Cover
5
When you see this window, make sure that Long StoryTeller paper is selected. Then click the
WIZARD button.
PRINT
Make sure Long
StoryTeller paper
is selected
Then click here
HP Printers: Printing Your Final Cover Page
61
6
Click the
Printer Setup button.
Click here
Make sure
Landscape is
selected
7
When you see the Print window, make sure your printer is selected in the Name box. Then click Properties.
.
Make sure your printer is
selected here
62
Print Your Cover
Then click here
8
You see your printer’s Properties window. Select the following:
●
For Paper Size, select Banner [Letter (8.5 × 11 in.)]
●
For Paper Type, select hp banner paper
●
For Print Quality, select Best
Select Banner
Select hp banner
paper
Select Best
HP Printers: Printing Your Final Cover Page
63
Note: For late-breaking news about recommended print options, visit the StoryTeller website at
http://www.epson.com/storyteller.
Make sure that Landscape is selected for the page orientation. Click the Help button in the printer sofware for
more information.
9
Click OK, then click OK again at the Print window.
10 At the Print Wizard screen, click Next.
11 Click the
PRINT icon.
12 If you see a message asking if you want to optimize your photos for printing, click Yes. Your cover sheet begins
to print.
Note: Depending on the size of your digital files, it may take several minutes for your
cover to start printing. Wait for the progress meter to disappear, and don’t cancel
printing or start another task.
13 Lightly support the cover sheet as it feeds into the printer and as it ejects.
Lightly support
the cover sheet
as it feeds into
and ejects from
the printer
Now you’re ready to put your photo book together. Continue with the instructions in “Assemble Your Photo Book”
on page 83.
64
Print Your Cover
Printing Cover Pages for Your 5 × 7-Inch Book on an HP Printer
See your printer documentation for detailed paper loading and printing instructions. Your printer and printer
software may look different.
Note: Avoid touching the glossy surface of the StoryTeller paper as much as possible to avoid fingerprints.
1
Load two 5 × 7-inch StoryTeller sheets glossy side
down in your printer’s front feeder tray.
2
Adjust the edge guides as necessary.
3
Click the
PRINT icon at the bottom of the
StoryTeller screen.
Load two sheets
glossy side down
Click here
HP Printers: Printing Your Final Cover Page
65
4
When you see this window, select Short StoryTeller paper. Then click the
PRINT WIZARD button.
Make sure Short
StoryTeller paper
is selected
Then click here
66
Print Your Cover
5
Click the
Printer Setup button.
Click here
6
When you see the Print window, make sure your printer is selected in the Name box. Then click Properties.
HP Printers: Printing Your Final Cover Page
67
7
You see your printer’s Properties window. Select these options:
● For Paper Size, select Photo 5 × 7-in.
●
For Paper Type, select hp premium plus photo paper, glossy
●
For Print Quality, select Best
Note: For late-breaking news about recommended print options, visit the StoryTeller website at
http://www.epson.com/storyteller.
Make sure that Landscape is selected for the page orientation. Click the Help button in the printer sofware for
more information.
8
68
Click OK, then click OK again at the Print window.
Print Your Cover
9
At the Print Wizard screen, click Next.
10 Click the
PRINT icon.
11 If you see a message asking if you want to optimize your photos for printing, click Yes. Your cover sheets begin
to print.
Note: Depending on the size of your digital files, it may take several minutes for your
cover to start printing. Wait for the progress meter to disappear, and don’t cancel
printing or start another task.
Now you’re ready to put your photo book together. Continue with the
instructions in “Assemble Your Photo Book” on page 83.
Canon, Lexmark, and Other Printers: Printing Your Final Cover Page
The steps you follow to print your cover page depend on which printer you’re using and whether you’re printing a
cover for an 8 × 10-inch book or 5 ×7-inch book. For example, with a Canon printer you can print a full-length cover
for a 5 × 7-inch book, but not for an 8 ×10-inch book.
See your printer’s specifications for details. If your printer does not support 5.5 × 20.83-inch paper, you can use the
two extra StoryTeller 5 × 7-inch sheets to create separate back and front covers for your 5 × 7-inch book. If your
printer doesn’t support paper that is 28.73 inches long, you can use the extra 8 × 10-inch sheets to create back and
front covers for your 8 × 10-inch book.
Canon, Lexmark, and Other Printers: Printing Your Final Cover Page
69
Printing a Full-Length Cover
See your printer documentation for detailed paper loading and printing instructions. Your printer may not load from
the top, as described here, and your printer software may look different.
Note: Avoid touching the glossy surface of the StoryTeller paper as much as possible to avoid fingerprints.
1
Before loading the StoryTeller cover sheet in
your printer, flatten it by gently bending it in the
opposite direction (for example, at the flaps
and spine).
2
Load the sheet glossy side up against the right
side of the feeder.
Note: If your printer loads from the front like an HP
printer, load the paper glossy side down.
3
Slide the left edge guide up against the paper, but not too tightly.
4
Lower the output tray and pull out the output tray extensions, if your printer has them.
70
Print Your Cover
5
Click the
PRINT icon at the bottom of the StoryTeller screen.
Click here
Canon, Lexmark, and Other Printers: Printing Your Final Cover Page
71
6
When you see this window, make sure that Long StoryTeller paper is selected. Then click the
WIZARD button.
PRINT
Make sure Long
StoryTeller paper
is selected
Then click here
72
Print Your Cover
7
Click the
Printer Setup button.
Click here
8
When you see the Print window, make sure your printer is selected in the Name box. Then click Properties.
Canon, Lexmark, and Other Printers: Printing Your Final Cover Page
73
9
You see the printer’s Properties window. Select the following:
●
For paper type, select high-grade glossy paper; for Canon, select Photo Paper Pro
●
For print quality, select your printer’s highest setting; for Canon, select High
Note: For late-breaking news about recommended print options, visit the StoryTeller website at
http://www.epson.com/storyteller.
Make sure that Landscape is selected for the page orientation. Click the Help button in the printer sofware for
more information.
74
Print Your Cover
10 Select Banner or Panoramic for paper size; some printers will have the paper size option on the first screen,
and some will require you to click another tab. For Canon, click the Page Setup tab.
If your printer doesn’t have a Banner or Panoramic paper size
option, select Custom or User Defined for the paper size and
type the correct paper size for your book. For example:
●
If you have an 8 × 10-inch book, type 8.50 for the Paper
Height if your printer uses one inch as the unit of
measurement, and 850 if your printer uses 0.01 inch. Type
28.73 for the Paper Height if your printer uses one inch as
the unit of measurement, and 2873 if it uses 0.01 inch.
●
If you have a 5 × 7-inch photo book, type 5.50 for the Paper
Width if your printer uses one inch as the unit of measurement, and 550 if your printer uses 0.01 inch. Type
20.87 for the Paper Height if your printer uses one inch as the unit of measurement, and 2087 if it uses 0.01
inch.
Note: Canon printers cannot print a full-length cover page for an 8 × 10-inch book. See “Printing Individual Front and Back Cover
Pages” on page 76 for instructions on printing cover pages for your 8 ×10-inch book.
11 Click OK, then click OK again at the Print window.
12 At the Print Wizard screen, click Next.
13 Click the
PRINT icon.
Canon, Lexmark, and Other Printers: Printing Your Final Cover Page
75
14 If you see a message asking if you want to optimize your photos for printing, click Yes. Your cover sheet begins
to print.
Note: Depending on the size of your digital files, it may take several minutes for your
covers to start printing. Wait for the progress meter to disappear, and don’t cancel
printing or start another task.
Now you’re ready to put your book together. Continue with the instructions
in “Assemble Your Photo Book” on page 83.
Printing Individual Front and Back Cover Pages
See your printer documentation for detailed paper loading and printing instructions. Your printer may not load from
the top, as described here, and your printer software may look different.
Note: Avoid touching the glossy surface of the StoryTeller paper as much as possible to avoid fingerprints.
1
Load two StoryTeller sheets glossy side up against the right side of your paper feeder.
Note: If your printer loads from the front like an HP printer, load the paper glossy side down.
2
Slide the left edge guide up against the paper, but not too tightly.
3
Lower the output tray and pull out the output tray extensions, if your printer has them.
76
Print Your Cover
4
Click the
PRINT icon at the bottom of the StoryTeller screen.
Click here
Canon, Lexmark, and Other Printers: Printing Your Final Cover Page
77
5
When you see this window, select Short StoryTeller paper. Then click the
PRINT WIZARD button.
Make sure Short
StoryTeller paper
is selected
Then click here
78
Print Your Cover
6
Click the
Printer Setup button.
Click here
7
When you see the Print window, make sure your printer is selected in the Name box. Then click Properties.
Canon, Lexmark, and Other Printers: Printing Your Final Cover Page
79
8
You see the printer’s Properties window. Select the following:
●
For paper type, select high-grade glossy paper; for Canon, select Photo Paper Pro
●
For print quality, select your printer’s highest setting; for Canon, select High
Note: For late-breaking news about recommended print options, visit the StoryTeller website at
http://www.epson.com/storyteller.
80
Print Your Cover
9
Select the correct paper size for your book; some printers will have the paper size option on the first screen, and
some will require you to click another tab. For Canon, click the Page Setup tab.
If your printer doesn’t have an 8 × 10-inch or 5 × 7-inch paper size option, select Custom or User Defined as
the paper size and type the correct paper size in the dialog box that appears.
If your printer doesn’t
have the correct paper
size, select Custom or
User Defined
Make sure that Landscape is selected for the page orientation. Click the Help button in the printer sofware for
more information.
10 Click OK, then click OK again at the Print window.
11 At the Print Wizard screen, click Next.
Canon, Lexmark, and Other Printers: Printing Your Final Cover Page
81
12 Click the
PRINT icon.
13 If you see a message asking if you want to optimize your photos for printing, click Yes. Your cover sheet begins
to print.
Note: Depending on the size of your digital files, it may take several minutes for your
covers to start printing. Wait for the progress meter to disappear, and don’t cancel
printing or start another task.
Now you’re ready to put your book together. Continue with the instructions
in “Assemble Your Photo Book” on page 83.
82
Print Your Cover
Assemble Your Photo Book
Now you’re ready to put your photo book together. First you’ll attach the pages you printed to the book, and then
you’ll put the cover on.
Attaching Pages to the Photo Book
Follow these steps to attach your printed pages to the photo book:
1
Open your photo book to the first page. Make sure your book is oriented correctly; the adhesive strip with the
StoryTeller logo should be on the right-hand page.
2
Gently press down on the center of the book to flatten it.
Press down to
flatten the book
83
3
Line up your printed page with the edges of the backing sheet. (The backing sheet has the adhesive strip with
the StoryTeller logo on it.)
Note: Avoid touching the glossy surface of the StoryTeller paper as much as possible to avoid fingerprints.
Line up your printed page
with the edges of the
backing sheet
84
Assemble Your Photo Book
4
Hold your printed page in place with one hand as you peel off the liner for the adhesive strip.
Hold your page in
place as you peel off
the liner for the
adhesive strip
5
Press down on the inside edge of your printed page to
make sure it sticks to the backing sheet.
Press down to
make the page stick
Attaching Pages to the Photo Book
85
6
Optionally, turn the page over and carefully tear off the backing sheet.
7
Repeat steps 1 through 6 for each page in your photo book.
Attaching the Cover to Your Photo Book
This section describes how to put a full-length printed cover page on your book, or two separate 8 × 10-inch or
5 × 7-inch printed cover pages. If you want to protect your cover page, you can add the clear plastic cover that came
with your photo book.
86
Assemble Your Photo Book
If You Printed a Full-Length Cover Page
Note: Avoid touching the glossy surface of the StoryTeller paper as much as possible to avoid fingerprints.
1
Optionally, place the clear plastic cover over
your printed cover page:
●
Place your cover printed side down on
the clear plastic cover, inside the folds
that run the length of the plastic cover.
●
Fold one end of the plastic cover over the
right edge of the printed cover and secure
it with one of the adhesive strips that
came with your book.
●
Repeat this step with the other end of the
plastic cover and the left edge of the
printed cover.
Place your printed
cover inside the
folds along the
edges of the clear
plastic cover
Fold the ends of
the clear plastic
cover over the
printed cover and
secure with an
adhesive strip
If You Printed a Full-Length Cover Page
87
2
Position the photo book on the open cover page and fold the first flap over one side of the book.
Fold the flap over one
side of the book
3
Press down on the
flap’s crease so that it
stays in place
Press down on the flap’s crease so that it stays in place.
Note: Optionally, you can secure the flap to the book with one of the adhesive strips that came with the book.
4
88
Repeat these steps with the other flap.
Assemble Your Photo Book
If You Printed Two 8 × 10-Inch or 5 × 7-Inch Cover Pages
Note: Avoid touching the glossy surface of the StoryTeller paper as much as possible to avoid fingerprints.
1
Locate the adhesive strips that came with your photo book.
2
Turn your front cover page over.
3
Remove the backing from four adhesive
strips and adhere a strip to each side of
the cover, as shown.
4
Place the front cover page on the front of
your book, lining it up with two sides of
the book to make sure it’s even. (Check
the pages inside to make sure the cover is
right side up!) Then press down gently.
5
Repeat these steps with the back cover
page.
Place the adhesive
strips on the back of the
cover page
Place the front cover page on
the front of your book
If You Printed Two 8 × 10-Inch or 5 × 7-Inch Cover Pages
89
Problems?
Here are some troubleshooting tips if you have problems creating or printing your book pages and cover.
You can’t select the text you want to change.
●
Make sure you position the pointer directly over the text before you click. When the text is selected, a green
border appears around it in the preview area.
●
You can’t select or edit text in Auto Book mode. Click Customize Book to add captions to your pages. See
page 25 for instructions.
Your photos are turned or cut off incorrectly.
You can’t reposition or rotate your photos in Auto Book mode. Click Customize Book to resize, reposition, or rotate
a photo. See page 23 for instructions.
You can’t make changes to a page in your preview area.
Make sure the page isn’t locked. (A
icon appears in the lower right corner of the page layout.) If the page is
locked, click the
icon in the toolbar to the left of the page layout to unlock it.
You have too many page layouts in your preview area, and not enough photos to fill them.
●
You can delete a page by selecting it in the preview area and clicking the
page 24 for details.
●
Replace pages in the preview area with page layouts from the Page Layout area that hold fewer photos. If you
want, you can use page layouts from different Book Styles. See page 20 for details.
90
icon below the preview area. See
You don’t like one of the page layouts in the Customize Book window.
You can replace one page layout with another. Select the page layout you want in the Page Layout section and drag
it over the page you want to replace in the preview area.
Your printer doesn’t have the recommended print settings.
Visit the StoryTeller web site at http://www.epson.com/storyteller for updated information about print settings.
Some photo pages print without images or text.
Make sure you filled all your pages with photos and text. Use the scrollbar on the right side of the Customize Book
screen to move through all your page layouts. If you’re using Auto Book, click the
Play button to view a
slideshow of all the pages of your book.
You’ve made all the correct settings in your printer software, but the printout is the wrong size.
When you’re printing your book pages, make sure you use the StoryTeller
Printer Setup button to access
your printer software. When you’re printing your cover, make sure you use the StoryTeller Print Wizard to access the
software. If you try to access your software to change your printer settings by clicking File > Print Setup, StoryTeller
will overwrite the settings you make.
Your cover prints in reduced size on your cover page.
Look for an option like Reduce/Enlarge in your printer software. Make sure it’s not selected.
Problems?
91
The ink on your printed page is smeared.
Check your printer manual to make sure you’ve loaded the StoryTeller paper correctly. For Epson printers and other
printers that load from the top, load it glossy side up. For HP printers and printers that load from the front, load it
glossy side down.
Uninstalling the StoryTeller Software
1
Do one of the following:
Windows XP: Select Start > Control Panel > Add or Remove Programs.
Other Windows systems: Select Start > Settings > Control Panel. Then double-click the Change/Remove or
Add/Remove icon.
2
Select Epson StoryTeller Publisher and click Change/Remove (or Add/Remove).
3
Follow the on-screen directions to remove the software.
Where To Get Help
If you’re having trouble with your non-Epson printer, see the documentation or contact information for your printer.
Go to the Epson StoryTeller Internet site at http://www.epson.com/storyteller to learn more about StoryTeller and
view special offers. You’ll also find links to technical support and Epson Store, where you can purchase additional
StoryTeller paper and cover sheets. (For quick access to the StoryTeller site, click the
icon on the Create Book
tab.)
To purchase StoryTeller paper and cover sheets in Canada, please call 800-463-7766 for reseller referral.
92
Problems?
Index
A
C
Adding
color effects, 17
page layouts to book, 24
photos to cover, 41 to 43
photos to page layouts, 21
photos to photo bin, 11 to 13
text to cover, 43
text to pages, 25 to 26
Assembling photo book, 83 to 89
Attaching pages to photo book, 83 to 86
Auto Book, 21, 91
Auto Enhance button, 16
Automatic print settings, 30, 53
Canon printer
choosing print settings, 38 to 39, 74 to 75, 80 to 81
loading cover sheet, 70
loading glossy photo paper, 36
printing book pages, 36 to 40
printing cover, 69 to 82
Captions, see Text
Color effects, adding, 17
Contents of kit, 7
Contrast, adjusting, 16
Cover
adding photos, 41 to 43
adding text, 43
attaching to photo book, 86 to 89
creating flaps and spine, 44 to 46
draft, printing, 48 to 49
e-mailing, 47
loading cover sheet, 50 to 51, 59 to 60, 70
printing, 48 to 82
saving, 47
B
Banner setting, HP, 63
Book size, 11
Book Style, choosing, 19, 41
Brightness, adjusting, 16
93
Cropping photos, 23
Custom page size, 39, 57, 75, 81
D
Deleting
pages, 24
photo from page layout, 22
photos from photo bin, 14
Dell printer
loading cover sheet, 70
loading glossy photo paper, 36
printing book pages, 36 to 40
printing cover, 69 to 82
Draft, printing
cover, 48 to 49
photo book pages, 27 to 28
E
Editing text, 26, 43
E-mailing cover, 47
Epson help, 92
Epson printer
automatic print settings, 30, 53
choosing print settings, 32, 56 to 57
loading cover sheet, 50 to 51
loading glossy photo paper, 29
printing book pages, 29 to 33
printing cover, 50 to 58
F
Fixing photos, 16 to 17
Flaps, cover, adding photos and text, 44 to 46
H
Help, Epson, 92
HP printer
banner setting, 63
choosing print settings, 35, 63, 68
loading cover sheet, 59 to 60, 65
loading glossy photo paper, 33, 65
printing book pages, 33 to 35
printing cover, 59 to 69
I
Installing software, 8 to 9
94
Index
K
Kit, contents, 7
L
Layouts
adding photos, 21
making changes, 22 to 26
problems editing, 90
viewing, 19 to 21
Lexmark printer
loading cover sheet, 70
loading glossy photo paper, 36
printing book pages, 36 to 40
printing cover, 69 to 82
Loading
cover sheet, 50 to 51, 59 to 60, 70
glossy photo paper, 29, 36, 65
Locking pages, 24
P
Page layouts, see Layouts
Page size, choosing, 32, 35, 39, 57, 63, 68, 75, 81
Pages
adding photos, 21
adding text, 25 to 26
adding, deleting, and locking, 24
attaching to book, 83 to 86
problems editing, 90
viewing book pages, 21
Paper
loading cover sheet, 50 to 51, 59 to 60, 70
loading glossy photo paper, 29, 33, 36, 65
Photo bin
adding photos, 13
rearranging photos, 15
removing photos, 14
Photo book
attaching cover(s), 86 to 89
attaching pages, 83 to 86
printing draft, 27 to 28
printing pages, 28 to 40
saving to computer, 26
selecting size, 11
viewing pages, 19 to 21
Index
95
Photos
adding to book, 11 to 15, 21
adding to cover, 41 to 43, 44 to 46
adding to photo bin, 11 to 13
cropping, 23
enhancing, 16 to 17
problems, 90 to 91
removing from photo bin, 14
replacing on page, 22
saving adjustments, 17
viewing, 12
Play button, 91
Preview area, 12, 16, 19, 41, 42, 44
Print Wizard button, 55, 61, 66, 72, 78
Printer Setup button, 31, 55, 91
Printing
cover, 48 to 82
photo book pages, 28 to 40
problems, 91 to 92
Problems
adding text, 90
editing page layout, 90
ink smears, 92
printing, 91 to 92
too many photos for book, 90
96
Index
Proof, printing
cover, 48 to 49
photo book pages, 27 to 28
Q
Quality setting, 32, 35, 38, 56, 63, 68, 74, 80
R
Red eye, fixing, 17
Redo icon, 17
Removing photos from photo bin, 14
Replacing photos, 22
Requirements, system, 6
Resizing photos, 23
Resolution, see Quality setting
Rotating photos, 23
S
Saving
cover to computer, 47
edited photo, 17
photo book to computer, 26
Selecting
book size, 11
photos for book, 11 to 15
Sepia tone, adding, 17
Settings
for Epson printers, 30 to 33, 55 to 57
for HP printers, 35, 62 to 64
for other printers, 37 to 39, 73 to 75
problems making print settings, 91
Sharpness, adjusting, 17
Slideshow, viewing, 91
Smears, 92
Software
installing, 8 to 9
starting, 10 to 11
uninstalling, 92
Spine, adding text, 44 to 46
Starting software, 10 to 11
Support, 92
Switching photos, see Replacing photos
System requirements, 6
Text
adding to cover, 43, 46
adding to page layouts, 25 to 26
editing, 26, 43
problems, 90
Thumbnails
adding to photo bin, 13
rearranging in photo bin, 15
removing from photo bin, 14
Troubleshooting, see Problems
U
Undo icon, 17
Uninstalling software, 92
V
Viewing page layouts, 19 to 21
T
Technical support, 92
Index
97
98
Index