1
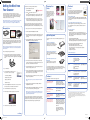
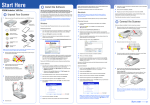
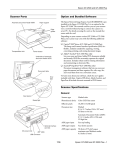
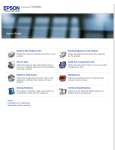
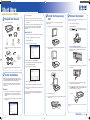
Start Here
Epson Expression 10000XL
®
1 Unpack Your Scanner
1
3
Click the Install button.
4When you see a message that installation is complete, click Exit.
5
Remove everything from the box.
Follow the on-screen instructions to register your scanner, then remove the CD-ROM.
If you want to use any of the bonus software included with your scanner,
insert the CD-ROM for the software you want to install, and follow the
on-screen instructions. Some software may not be compatible with
Windows Vista.
Scanner
User’s Guide
3 Install the Transparency
Unit
USB cable
1Connect the scanner to your computer.
1Fully open the scanner’s document cover, then lift it straight up.
If you’re using USB . . .
Plug the
square end of the USB cable into the scanner’s
USB port. Then plug the
flat end into any available USB port
on your computer or USB hub.
Macintosh OS X
2Double-click the
Note: If you are installing the optional Network Image Express card, see the
instructions in the User’s Guide.
If you have the Photo version of the scanner, you need to install the
transparency unit.
1Insert the Scanner Software CD-ROM in your CD-ROM or DVD drive.
Power cord
4 Connect the Scanner
Epson CD-ROM icon on the desktop.
3Double-click the Epson icon.
Scanner
Software
CD-ROM
MonacoEZcolor®
CD-ROM
Adobe®
Photoshop®
Elements
CD-ROM
4Read the license agreement and click Agree.
If you’re using IEEE 1394 (FireWire®) . . .
2Lower the transparency unit onto the scanner, so that the pins fit into
If you have the Photo version of the scanner, the following items are
also included.
Transparency
unit
the holes as shown.
Plug one end of the IEEE 1394 cable (not included) into the scanner’s
IEEE 1394 port. Then plug the other end into the IEEE 1394 port on
your computer.
Transparency
guide
LaserSoft Imaging™
SilverFast® Ai 6
CD-ROM
Film holders
(two of each type)
5When you see this screen, click the Install button.
6Enter your name and password, if required, then click OK. Read the
license agreement and click Accept.
2Remove all the tape and packing material inside and around the
product.
7
2Slide the transportation lock (the tab over the AC connector) up to the
When you see this screen, click Install.
Unlock position.
3Use a coin to turn the transportation lock to the Unlock position.
2 Install the Software
Wait! You must install your software before connecting the scanner to
your computer. The installation may take several minutes. Be sure to close
all open programs and turn off any virus protection programs.
EPSON Scan works with Windows® Vista,™ XP, and 2000, and Macintosh®
OS X 10.2.x, 10.3.9 to 10.4.x. Follow the steps in the section for your
operating system.
8When the installation is done, click Quit.
9
3Plug the scanner’s power cord into the AC connector. Then plug the
other end into a grounded electrical outlet.
When you see a message that installation is complete, click Exit.
4Press the
power button on the front of the scanner to turn it on. The
green Ready light blinks for about 30 seconds during initialization, and
then stays on when the scanner is ready to use.
10Follow the on-screen instructions to register your scanner, then remove
Windows
1Insert the Scanner Software CD-ROM in your CD-ROM or DVD drive.
With Windows Vista, if you see the AutoPlay window, click Run
Epsetup.exe. When you see the User Account Control screen, click
Continue.
2Read the license agreement and click Agree. The Software Installation
the CD-ROM.
If you want to use any of the bonus software included with your scanner,
insert the CD-ROM for the software you want to install, and follow the
on-screen instructions.
4Close the transparency unit.
Power button
5Connect the transparency unit cable to the scanner’s OPTION port, then
tighten its screws.
screen appears.
Caution: If you turn off the scanner, wait at least 10 seconds before turning
it back on.
Turn over
Ntmg_SH_E_CPD18060R1.indd 1
2/21/07 9:27:30 AM
Getting the Most from
Your Scanner
Your scanner includes various features that enable you to create
professional, high-quality scans. It also includes bonus software such as
Adobe Photoshop Elements and ABBYY FineReader Sprint (described in
your User’s Guide), MonacoEZcolor (see below), and LaserSoft Imaging
Silverfast (Photo version of the scanner only).
Note: For detailed instructions, see the electronic manual for each software
application. The SilverFast CD-ROM also contains useful QuickTime®
tutorials. Some software may not be compatible with Windows Vista.
Managing Color
Next, load the scanned image into MonacoEZcolor:
1Open MonacoEZcolor, then click
Create Input Profile.
2Click the
arrow button until you see the “Input the target” screen.
Then click the Load an Image button to import your scanned image.
Check it against the example images to verify that it looks correct.
3Continue with the instructions on the screen to select the correct
1
Place your photo on the scanner, then open Photoshop Elements.
2
Click File > Import > EPSON Expression 10000XL.
4Click the Configuration button, click the Color tab, and then click
5For the Source, select the name of the profile you created for your
scanner. For the Target, select a working space that has a wide color
gamut, such as Adobe RGB, and then click OK.
6Click the Preview button to prescan your image. Marquee-select just
the area of the image you want to scan.
7Click the
Auto Adjust button to apply your color profile. (The button
is located near the bottom of the main EPSON Scan screen; you may
have to scroll down to see it.) Then click Scan.
the screen. Then choose these settings:
8When scanning completes, close EPSON Scan to view your scanned
image in Photoshop Elements.
• Auto Exposure Type: Photo
• Resolution: 200 dpi
4Click the Configuration button at the bottom of the screen, click the
Color tab, select No color correction, and then click OK.
ote: The target profile you selected is embedded in the scanned
N
image.
9In Photoshop Elements, click Edit > Color Settings > Full color
10Click File > Print. Click the Show More Options box. Select Same as
6Draw a marquee around the target image so it looks like this.
ote: If you have ICC profiles for your printer (including the specific
N
print settings and type of paper you plan to use), you can select the
appropriate printer profile instead.
Now you are ready to print your scanned image. Make sure your printer’s
color management settings are turned off in your printer software before
you begin. If you’re using an ICC profile for the printer, be sure to select the
same printer settings and load the paper specified in the profile.
7Click Scan, then save your image as a TIFF file.
Epson Technical Support
•Internet Support
Visit Epson’s support website at epson.com/support and select your
product for solutions to common problems. You can download drivers and
documentation, get FAQs and troubleshooting advice, or e-mail Epson
with your questions.
Optional Equipment
Use these accessories to increase the versatility and productivity of your
scanner.
Network Image Express interface card
(B12B808393)
Connects the scanner to your network,
making it accessible to multiple users.
You can purchase supplies and accessories from an Epson authorized
reseller. To find the nearest reseller, call 1-800-GO-EPSON (1-800-463-7766).
Or you can purchase online at www.epsonstore.com (U.S. sales) or
www.epson.ca (Canadian sales).
Problems?
If your problem is listed here, try these suggestions.
The New Hardware Wizard
appears on your screen.
If you have not yet installed
the software, click Cancel and
disconnect the scanner. Follow the
steps on the other side of this sheet.
The bonus software
included with your
scanner doesn’t work with
Windows Vista
Contact the software vendors listed
on the right for Windows Vista
support information.
management, then click OK.
source to use Adobe RGB as your Print Space profile.
5Click the Preview button to prescan your image.
Before and after Dust Removal
Automatic document feeder (B813212)
Lets you scan multipage documents,
single- or double-sided. Useful for scanning
text for editing.
MonacoEZcolor face-down on the scanner glass. (Use the larger, 5 7
color chart as the target.) Put it in the upper-left corner of the glass, as
shown.
Electronic Reference Guide
To open the guide, double-click the Expression 10000XL Reference Guide
icon on your desktop. The guide contains additional information about using
your scanner.
On-screen Help for EPSON Scan and bonus software
Click the Help button or question mark that appears on the screen when
you’re using EPSON Scan or any of the bonus software that came with
your scanner.
Transparency unit (B12B813362)
Lets you scan slides, filmstrips, and
negatives in a variety of formats. Included
with the Photo version of the scanner.
1Turn on your scanner, then place the reflective target included with
• Image Type: 48-bit Color
Before and after Color Restoration
ICM (for Windows) or ColorSync (for Macintosh).
First, scan the target image using EPSON Scan:
• Document Type: Reflective
EPSON Scan includes various
filters to improve your photos,
including Color Restoration and
Dust Removal. For details on
using these features, see your
User’s Guide.
Original photo
Note: You can also use MonacoEZcolor to create profiles for your printer,
monitor, and digital camera. For details, see the on-screen guide included
with the software.
3Select Professional as the Mode at the top of
User’s Guide
See your User’s Guide to get more information about using
your scanner software, enhancing image quality, scanning
film, and installing optional equipment. You’ll also find
troubleshooting and maintenance instructions.
Now you are ready to scan a photo using your new color profile. In this
example, a photo is scanned into Adobe Photoshop Elements. (You can
install Photoshop Elements from the CD-ROM included with your scanner.)
support 48-bit color). Then select any other settings appropriate for
your image.
2Open EPSON Scan.
Questions?
reference file and give your profile a name—for example, “10000 refl”
to indicate that it’s for scanning reflective images with this scanner.
3Select 24-bit Color as the Image Type (Photoshop Elements does not
You can use MonacoEZcolor to calibrate your scanner and ensure that
printouts of scanned images closely match the originals. In this example, a
color profile is created for scanning reflective (paper) documents. If you are
planning to work with positive film or slides, you will also have to create a
profile for scanning transparencies.
Enhancing Your
Photos
•To Speak to a Support Representative
Dial (562) 276-4382 (U.S.) or (905) 709-3839 (Canada), 6 AM to 6 PM, Pacific
Time, Monday through Friday. Toll or long distance charges may apply.
Before you call, please have the following information ready:
•Product name (Epson Expression 10000XL)
•Product serial number (located on the back of scanner)
•Proof of purchase (such as a store receipt) and date of purchase
• Computer configuration
• Description of the problem
Software Technical Support
Software
Telephone and Fax*
Online and E-mail
EPSON Scan
U.S.: (562) 276-4382
Canada: (905) 709-3839
6:00 AM to 6:00 PM, Pacific
Time, Monday through
Friday
epson.com/support
(510) 226-6717
9:00 AM to 6:00 PM, Pacific
Time, Monday through
Friday
Fax: (510) 226-6069
www.abbyyusa.com
[email protected]
Adobe Photoshop
Elements
(206) 675-6126
6:00 AM to 5:00 PM, Pacific
Time, Monday through
Friday (pay support)
www.adobe.com/support
[email protected]
Monaco Systems
MonacoEZcolor
(978) 749-9944
9:00 AM to 5:00 PM, Eastern
Time, Monday through
Friday
www.monacosys.com/
support.html
[email protected]
LaserSoft Imaging
SilverFast (Photo
version of the
scanner only)
(941) 383-7496
9:00 AM to 5:30 PM, Eastern
Time, Monday through
Friday (pay support)
Fax: (941) 387-7574
www.SilverFast.com
[email protected]
ABBYY FineReader
Sprint
* Toll or long distance charges may apply.
Epson is a registered trademark and Exceed Your Vision is a trademark of Seiko Epson
Corporation. Expression is a registered trademark of Epson America, Inc.
You see a message about
a HI-SPEED USB device in
Windows XP.
Click the in the corner of the
message to close it. Your scanner will
work correctly.
You see an error message
when you try to scan, or
the scanner doesn’t scan.
Make sure the scanner is plugged
into your computer, connected to a
power source, and turned on. If you
just turned on the scanner, wait until
the Ready light stops blinking and
remains on.
General Notice: Other product names are for identification purposes only and may be
trademarks of their respective owners. Epson disclaims any and all rights in those marks.
© 2007 Epson America, Inc.
Printed in USA
2/07
If you’re using a USB hub, try
connecting the scanner directly
to one of the USB ports on your
computer.
continue
Ntmg_SH_E_CPD18060R1.indd 2
CPD-18060R1
2/21/07 9:27:42 AM