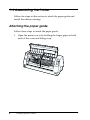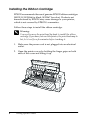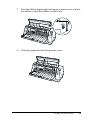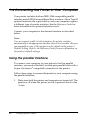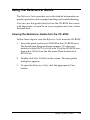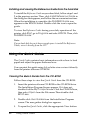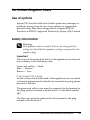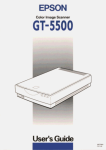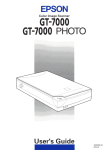
1
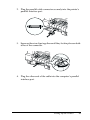
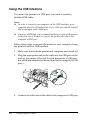
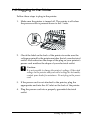
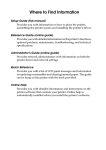
®
24-pin Dot Matrix Printer
Setup Guide
Read Before Using the Printer . . . . . . . . . . . 2
1 Setting Up the Printer . . . . . . . . . . . . . . . . . 3
2 Using Online Guides . . . . . . . . . . . . . . . . . 20
3 Safety and Environmental Information. . 23
4014326-00
XXX
Where to Find Information
Setup Guide (this manual)
Explains how to set up the printer and install the printer software.
Reference Guide (online guide)
Provides detailed information on the printer’s functions, optional
products, printer software, troubleshooting, and technical
specifications. You can view this guide directly from the CD, or
install it on your computer and view it from your hard disk.
Quick Guide (online guide)
Provides a summary of basic information on how to use the
printer.
Online Help
Provides detailed information and instructions on the printer
software that controls your printer. Online help is automatically
installed when you install the printer software.
All rights reserved. No part of this publication may be reproduced, stored in a retrieval
system, or transmitted in any form or by any means, electronic, mechanical, photocopying,
recording, or otherwise, without the prior written permission of SEIKO EPSON
CORPORATION. The information contained herein is designed only for use with this EPSON
printer. EPSON is not responsible for any use of this information as applied to other printers.
Neither SEIKO EPSON CORPORATION nor its affiliates shall be liable to the purchaser of
this product or third parties for damages, losses, costs, or expenses incurred by the purchaser
or third parties as a result of: accident, misuse, or abuse of this product or unauthorized
modifications, repairs, or alterations to this product, or (excluding the U.S.) failure to strictly
comply with SEIKO EPSON CORPORATION’s operating and maintenance instructions.
SEIKO EPSON CORPORATION shall not be liable for any damages or problems arising from
the use of any options or any consumable products other than those designated as Original
EPSON Products or EPSON Approved Products by SEIKO EPSON CORPORATION.
EPSON and EPSON ESC/P are registered trademarks and EPSON ESC/P2 is a trademark
of SEIKO EPSON CORPORATION.
Microsoft, Windows, and Windows NT are registered trademarks of Microsoft Corporation.
IBM is a registered trademark of International Business Machines Corporation.
General Notice: Other product names used herein are for identification purposes only and may be
trademarks of their respective owners. EPSON disclaims any and all rights in those marks.
Copyright © 2001 by SEIKO EPSON CORPORATION, Nagano, Japan.
1
Read Before Using the Printer
This guide consists of three chapters. The first and the second
chapters describe how to set up your printer and install the printer
software. The last chapter provides detailed safety and
environmental information. Be sure to follow the instructions
carefully to ensure safe and efficient use of your printer.
Warnings, Cautions, and Notes
w
c
Warnings must be followed carefully to avoid bodily injury.
Cautions must be observed to avoid damage to your equipment.
Notes contain important information and useful tips on the operation of
your printer.
2
Read Before Using the Printer
1
Setting Up the Printer
Follow the instructions in this chapter to unpack and set up your
printer.
1-1 Unpacking the Printer
Besides the items shown in the illustration below, the printer box
should include an EPSON printer software CD-ROM and a Notice
Sheet.
printer
black ribbon
color ribbon
paper guide
power cord
Note:
Depending on your printer model, the power cord may be permanently
attached to the printer. Also, the shape of the power cord plug varies
depending on the country of purchase; be sure the plug you have is the
right one for your location.
Setting Up the Printer
3
c
Caution:
There are several models of the printer designed for different
voltages, and it is not possible to adjust the printer for use with
another voltage. If the label on the back of the printer does not
show the correct voltage for your country, contact your dealer.
You must remove all protective materials packed around and
inside your printer before you set it up and turn on the power.
Follow the directions on the Notice Sheet (packed with the
printer) to remove these materials.
Save all packing and protective materials in case you need to ship
the printer in the future. It should always be transported in its
original packing materials.
1-2 Choosing a Place for the Printer
Follow these guidelines when selecting a location for your printer:
❏ Place the printer on a flat, stable surface. The printer will not
operate properly if it is tilted or placed at an angle.
❏ Place the printer where you can easily connect it to a network
interface cable, if necessary.
❏ Leave adequate room around the printer for easy operation
and maintenance.
❏ Avoid using or storing the printer in places subject to rapid
changes in temperature and humidity. Keep it away from
direct sunlight, strong light, heat sources, or excessive
moisture or dust.
❏ Avoid places subject to shocks and vibrations.
❏ Place the printer near a wall outlet where you can easily
unplug the power cord.
4
Setting Up the Printer
Note for French-speaking users:
Placez l’imprimante près d’une prise de courant où la fiche peut être
débranchée facilement.
❏ Avoid electrical outlets controlled by wall switches or
automatic timers. An interruption in power can erase
information in the memory of your printer or computer. Also
avoid outlets on the same circuit as large motors or other
appliances that can cause voltage fluctuations.
❏ Keep the entire computer system away from potential sources
of electromagnetic interference, such as loudspeakers or the
base units of cordless telephones.
❏ Use a grounded power outlet; do not use an adapter plug.
If you plan to use a printer stand, follow these guidelines:
❏ Use a stand that can support this printer at least 66kg (145.5
lb).
❏ Never use a stand that tilts the printer. The printer should
always be kept level.
❏ Position your printer’s power cord and interface cable so they
do not interfere with paper feeding. If possible, secure the
cables to a leg of the printer stand.
Setting Up the Printer
5
1-3 Assembling the Printer
Follow the steps in this section to attach the paper guide and
install the ribbon cartridge.
Attaching the paper guide
Follow these steps to attach the paper guide:
1. Open the printer cover by holding the finger grips on both
ends of the cover and lifting it up.
6
Setting Up the Printer
2. Slide the edge guide of the paper guide slightly to the center.
Hold the paper guide horizontally with both hands, and slide
the slots on both sides of it onto the mounting pegs in the
printer as shown below. Then lower the paper guide until it
locks into place.
3. Close the printer cover.
Setting Up the Printer
7
Installing the Ribbon Cartridge
EPSON recommends the use of genuine EPSON ribbon cartridges
(S015139/S015066 for black, S015067 for color). Products not
manufactured by EPSON may cause damage to your printer,
which is not covered by EPSON’s warranties.
Follow these steps to install the ribbon cartridge:
w
Warning:
You need to move the print head by hand to install the ribbon
cartridge. If you have just used the printer, the print head may be
hot; let it cool for a few minutes before touching it.
1. Make sure the power cord is not plugged into an electrical
outlet.
2. Open the printer cover by holding the finger grips on both
ends of the cover and lifting it up.
8
Setting Up the Printer
3. Open the paper bail.
4. Slide the print head to the position shown in the illustration
below.
w
Warning:
Never move the print head while the printer is turned on; this
can damage the printer.
Setting Up the Printer
9
5. Remove the new ribbon cartridge from the package and turn
the ribbon-tightening knob in the direction of the arrow to
remove any slack from the ribbon so it is easier to install.
6. Hold the ribbon cartridge with the part where the ribbon is
exposed facing down and the ribbon-tightening knob facing
the front of the printer.
As shown below, guide the ribbon under the print head, and
snap the cartridge into place from left to right so that the tabs
on both sides of the cartridge fit into the notches in the
cartridge holder.
10
Setting Up the Printer
7. Turn the ribbon-tightening knob again to remove any slack in
the ribbon so that the ribbon moves freely.
8. Close the paper bail and the printer cover.
Setting Up the Printer
11
1-4 Connecting the Printer to Your Computer
Your printer includes both an IEEE-1284-compatible parallel
interface and a USB (Universal Serial Bus) interface. Also a Type-B
optional interface slot is provided in case your computer requires
a different type of printer interface. See the Reference Guide for
more information on optional interface cards.
Connect your computer to the desired interface as described
below.
Note:
You can connect a cable to both interfaces; the printer switches
automatically to the appropriate interface when it receives data. Also you
can manually set one of the interfaces as the default in the printer’s
Default Setting. Refer to the Reference Guide for more information on
the printer’s default settings.
Using the parallel interface
To connect your computer to your printer’s built-in parallel
interface, you need a shielded, twisted-pair parallel cable with a
36-pin Centronics® compatible connector for the printer.
Follow these steps to connect the printer to your computer using
the parallel interface:
1. Make sure both the printer and computer are turned off. The
printer is off when the power switch is pressed down to the
❍ side.
12
Setting Up the Printer
2. Plug the parallel cable connector securely into the printer’s
parallel interface port.
3. Squeeze the wire clips together until they lock in place on both
sides of the connector.
4. Plug the other end of the cable into the computer’s parallel
interface port.
Setting Up the Printer
13
Using the USB interface
To connect the printer to a USB port, you need a standard,
shielded USB cable.
Note:
❏ In order to connect your computer via the USB interface, your
computer must be a Windows Me, 98, or 2000 pre-installed model
that is equipped with a USB port.
❏ If you use a USB hub, it is recommended that you connect the printer
to the first tier of the hub or connect the printer directly to the
computer’s USB port.
Follow these steps to connect the printer to your computer using
the printer’s built-in USB interface:
1. Make sure that both the printer and computer are turned off.
2. Plug the appropriate end of the cable into the USB port on the
back of the printer. (The end that fits the printer’s USB port
has a different shape from the end that fits the computer’s USB
port.)
3. Connect the other end of the cable to the computer’s USB port.
14
Setting Up the Printer
1-5 Plugging in the Printer
Follow these steps to plug in the printer:
1. Make sure the printer is turned off. The printer is off when
the power switch is pressed down to the ❍ side.
OFF
2. Check the label on the back of the printer to make sure the
voltage required by the printer matches that of your electrical
outlet. Also make sure the shape of the plug on your printer’s
power cord matches the shape of your electrical outlet.
c
Caution:
It is not possible to change the printer’s voltage. If the rated
voltage on the printer and your outlet voltage do not match,
contact your dealer for assistance. Do not plug in the power
cord.
3. If the power cord is not attached to the printer, plug the
appropriate end into the AC inlet on the back of the printer.
4. Plug the power cord into a properly grounded electrical
outlet.
Setting Up the Printer
15
1-6 Installing the Printer Software
After you connect the printer to your computer, you need to
install the software included in the EPSON printer software
CD-ROM shipped with your printer.
❏ Printer driver
The printer driver is the software that runs, or “drives,” your
printer. With it, you can make printer settings such as print
quality, resolution, and paper size.
❏ EPSON Status Monitor 3 utility (Windows Me, 98, 95, 2000 or
NT 4.0)
The EPSON Status Monitor 3 utility notifies you of printer
errors and displays printer status information. Refer to the
Reference Guide for more information on the Status Monitor 3
utility.
Installing the software in Windows Me, 98, 95,
2000, or NT 4.0
Follow these steps to install the printer software in Windows Me,
98, 95, 2000, or NT 4.0:
Note:
❏ Installing the printer software for Windows 2000 or NT 4.0 may
require administrator privileges. If you have problems, ask your
administrator for more information.
❏ If you wish to make a floppy disk version of the printer software on
your CD-ROM, insert the CD and run SETUP.exe. In the dialog
box that appears, double-click Create Floppy based printer
Driver/Utility disks and follow the on-screen instructions.
❏ If you are using the floppy disk version of the EPSON software, make
a backup copy of the EPSON printer software disk or disks before
you begin installation.
16
Setting Up the Printer
❏ If the New Hardware Found screen or any other wizard appears
when you turn on your computer, click Cancel.
❏ If the Digital Signature Not Found screen appears, click Yes. If you
click No, you must reinstall the printer driver as described below.
❏ Installation time varies depending on your computer.
1. Make sure Windows Me, 98, 95, 2000, or NT 4.0 is running
and the printer is turned off.
2. Insert the printer software CD-ROM into the CD-ROM drive.
The Install dialog box appears. If it does not, double-click the
My Computer icon. Click the CD-ROM icon, then select
Open from the File menu. Then double-click SETUP.exe. (If
you are using a floppy disk, insert the disk into the floppy
disk drive. Double-click the floppy disk drive icon and then
double-click the FD_Setup.exe icon.)
3. Double-click Install Printer Driver/Utility to start the printer
software installation, then follow the instructions on the
screen.
When you install the printer driver on Windows Me, 98, 95, 2000
or NT 4.0, the EPSON Status Monitor 3 utility will also be
installed.
For information on launching and using the software, see “Printer
Software” in the Reference Guide.
Setting Up the Printer
17
For DOS programs
To control the printer from DOS application programs, you need
to select the printer you are using or another available printer
from the printer list of your application.
Choose the EPSON printer at the appropriate step in the
installation or setup procedure. If the list in your application does
not include your printer, choose the first available printer from
this list:
DLQ-3000/3000+
LQ-2080
LQ-2180
LQ-2070
LQ-2170
LQ-1170
LQ-1070/1070+
DLQ-2000
LQ-1060
LQ-1050
LQ-2550
LQ-2500
If none of these printers is listed, choose the first one available
from the following:
LQ
EX
FX
LX
RX
MX
EPSON printer
Standard printer
Draft printer
Note:
If your application does not list a suitable alternative, contact the
software manufacturer to see if an update is available.
18
Setting Up the Printer
1-7 Options
By adding options, such as a cut-sheet feeder or automatic sheet
alignment unit, you can further expand your printer’s versatility.
Optional interface cards are also available to supplement your
printer’s built-in interfaces. If you purchase options, see “Options
and Consumables” in the Reference Guide for more information.
1-8 Start Using the Printer
Once the printer software has been successfully installed onto
your computer and paper is loaded in the printer, you can start
using the printer.
Your printer can print on a variety of paper types such as
continuous paper, multipart forms, labels, envelopes, and
postcards. See “Paper Handling” in the Reference Guide for
information on paper types and paper loading procedures.
Setting Up the Printer
19
2
Using Online Guides
This chapter describes how to use the two online guides: the
Reference Guide and the Quick Guide.
System Requirements
Your system must meet the following requirements necessary for
you to use the online guides.
System Requirements
System
Windows Me/98/95, or Windows 2000/NT 4.0
CPU
i486/25 MHz (for Windows 95, NT 4.0)
(Pentium or better recommended)
i486/66 MHz (for Windows 98)
(Pentium or better recommended)
Pentium 133 MHz (for Windows 2000)
Pentium 150 MHz (for Windows Me)
Memory
16 MB RAM for Windows 98/95, NT 4.0
(32 MB RAM or more recommended)
32 MB RAM for Windows Me and 2000
Hard disk space
3 MB to install the Reference Guide
CD-ROM drive
Double-speed (Quad-speed or faster
recommended)
Display
640 × 480 pixel or 800 × 600 pixel resolution, with High
Color (16 bit) or True Color (32 bit) setting
Browser
Web browser
(Microsoft Internet Explorer 4.0 or later recommended
for the Reference Guide)
Adobe Acrobat or Acrobat Reader 4.0 for the Quick
Guide
20
Using Online Guides
Using the Reference Guide
The Reference Guide provides you with detailed information on
printer operation such as paper handling and troubleshooting.
You can view this guide directly from the CD-ROM that comes
with the printer, or install it on your computer and view it from
the hard disk.
Viewing the Reference Guide from the CD-ROM
Follow these steps to view the Reference Guide from the CD-ROM:
1. Insert the printer software CD-ROM in the CD-ROM drive.
The Installation Program Screen appears. If it does not,
double-click the My Computer icon. Click the CD-ROM icon,
then select Open from the File menu.Then double-click
SETUP.exe.
2. Double-click User Guides on the screen. The user guides
dialog box appears.
3. To open the Reference Guide, click the appropriate View
button.
Using Online Guides
21
Installing and viewing the Reference Guide from the hard disk
To install the Reference Guide on your hard disk, follow steps 1 and
2 in the previous section. Then, click Install Reference Guide in
the dialog box that appears, and follow the on-screen instructions.
When the installation is complete, the DLQ3500 Guide icon
appears in the EPSON folder. Double-click the icon to open the
guide.
To view the Reference Guide during your daily operation of the
printer, click Start, go to Programs and select EPSON. Then, click
DLQ3500 Guide.
Note:
If your hard disk does not have enough space to install the Reference
Guide, view it directly from the CD.
Using the Quick Guide
The Quick Guide contains basic information such as how to load
paper and adjust the paper-thickness lever.
You can print this guide using A4- or letter-size or view it directly
from the printer software CD-ROM.
Viewing the Quick Guide from the CD-ROM
Follow these steps to view the Quick Guide from the CD-ROM:
1. Insert the printer software CD-ROM in the CD-ROM drive.
The Installation Program Screen appears. If it does not,
double-click the My Computer icon. Click the CD-ROM icon,
then select Open from the File menu.Then double-click
SETUP.exe.
2. Double-click User Guides from the Installation Program
screen. The user guides dialog box appears.
3. To open the Quick Guide, click the appropriate View button.
22
Using Online Guides
3
Safety and Environmental
Information
This chapter contains the safety and environmental information
about your printer.
Hot Parts Caution Symbol
K
This symbol is placed on the print head and other
parts to indicate that they may be hot. Never touch
those parts just after the printer has been used. Let
them cool for a few minutes before touching them.
Important Safety Instructions
Read all of these safety instructions before using the printer. In
addition, follow all warnings and instructions marked on the
printer itself.
❏ Do not place the printer on an unstable surface or near a
radiator or heat source.
❏ Do not block or cover the slots and openings in the printer’s
cabinet, and do not insert objects through the slots.
❏ Use only the type of power source indicated on the printer’s
label.
❏ Connect all equipment to properly grounded power outlets.
❏ Do not use a damaged or frayed power cord.
Safety and Environmental Information
23
❏ If you use an extension cord with the printer, make sure the
total ampere rating of all devices plugged into the extension
cord does not exceed the cord’s ampere rating. Also, make
sure the total ampere of all devices plugged into the wall
outlet does not exceed the wall outlet’s ampere rating.
❏ Unplug the printer before cleaning it, and always clean it with
a piece of damp cloth only.
❏ Replace fuses only with a fuse of the correct size and rating.
❏ Do not spill liquid onto the printer.
❏ Except as specifically explained in this guide, do not attempt
to service the printer yourself.
❏ Unplug the printer and refer servicing to qualified service
personnel under the following conditions:
i. If the power cord or plug is damaged.
ii. If liquid has entered the printer.
iii. If the printer has been dropped or the cabinet damaged.
iv. If the printer does not operate normally or exhibits a
distinct change in performance.
❏ If you plan to use the printer in Germany, observe the
following:
To provide adequate short-circuit protection and
over-current protection for this printer, the building
installation must be protected by a 10- or 16-amp circuit
breaker.
Note for German-speaking users:
Bei Anschluss des Druckers an die Stromversorgung muss
sichergestellt werden, dass die Gebaudeinstallation mit einer 10 Aoder 16 A-Sicherung abgesichert ist.
24
Safety and Environmental Information
For United Kingdom Users
Use of options
Epson (UK) Limited shall not be liable against any damages or
problems arising from the use of any options or consumable
products other than those designated as Original EPSON
Products or EPSON Approved Products by Epson (UK) Limited.
Safety information
w
Warning:
This appliance must be earthed. Refer to the rating plate for
voltage and check that the appliance voltage corresponds to the
supply voltage.
Important:
The wires in the mains lead fitted to this appliance are coloured
in accordance to the following code:
Green and yellow — Earth
Blue — Neutral
Brown — Live
If you have to fit a plug:
As the colours of the mains lead of this appliance may not match
coloured markings used to identify the terminals in a plug, please
proceed as follows:
The green and yellow wire must be connected to the terminal in
the plug which is marked with the letter E or the Earth symbol
(G).
The blue wire must be connected to the terminal in the plug
marked with the letter N.
Safety and Environmental Information
25
The brown wire must be connected to the terminal in the plug
marked with the letter L.
If damage occurs to the plug, replace the cord set or consult a
qualified electrician.
26
Safety and Environmental Information
EPSON OVERSEAS MARKETING LOCATIONS
Epson America, Inc.
EPSON UK LTD.
3840 Kilroy Airport Way
Long Beach, CA 90806
Phone: (562) 981-3840
Fax: (562) 290-5220
Campus 100, Maylands Avenue,
Hemel Hempstead, Herts,
HP2 7TJ, U.K.
Phone: (+44) 01442 261144
Fax: (+44) 01442 227227
EPSON DEUTSCHLAND GmbH
EPSON FRANCE S.A.
Zülpicher Straße 6,
40549 Düsseldorf Germany
Phone: (0211) 56030
Fax: (0211) 5047787
68 bis, rue Marjolin
92300, Levallois-Perret, France
Phone: 33.1.41.86.26.56
Telex: 610657
EPSON AUSTRALIA PTY. LTD.
EPSON SINGAPORE PTE. LTD.
70 GIBBES STREET,
CHATSWOOD 2067 NSW.
Phone: 2-9903-9000
Fax: 2-9903-9177
No. 1 Temasek Avenue #36-00
Millenia Tower, Singapore 039192
Phone: (065) 33 77 911
Fax: (065) 33 41 185
EPSON HONG KONG LTD.
EPSON TAIWAN TECHNOLOGY &
TRADING LTD.
Rooms 4706-10, 47/F,
China Resources Bldg.,
26 Harbour Road, Wanchai, Hong Kong
Phone: 2585-4300
Fax: 2827-7083
10F, No. 287 Nanking E. Road, Sec. 3,
Taipei, Taiwan, R.O.C.
Phone: (02) 717-7360
Fax: (02) 712-9164
EPSON ITALIA S.p.A.
EPSON IBERICA S.A.
V.le F.lli Casiraghi 427
20099 Sesto S.Giovanni
MI, Italy
Phone: +3902262331
Fax: +39022440750
Av. de Roma, 18-26
08290 Cerdanyola del Valles
Barcelona, Spain
Phone: 582. 15.00
Fax: 582. 15.55
SEIKO EPSON CORPORATION
(Hirooka Office)
EPSON PORTUGAL, S.A.
80 Harashinden, Hirooka
Shiojiri-shi, Nagano-ken
399-0785 Japan
R. do Progresso, 471, 1° Perafita
4460 Matosinhos, Portugal
Phone: (02) 996 14 02
Fax: (02) 996 14 11
2001 January
Printed in Japan 01.XX-XX