1
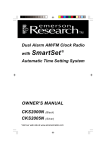
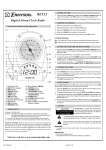
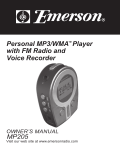
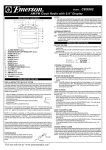
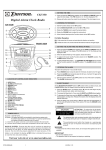
MODEL:
HR2001
AM/FM PLL STEREO RADIO
Thank you......................
for purchasing this Emerson Digital Tuning Personal Stereo Radio with Lightweight In-Ear Type Stereo Phones. This ultra compact
stereo receiver lets you enjoy your favorite radio stations while keeping your hands free for other activities. And you can enter up to 20
of your favorite stations (10 FM and 10 AM) in the tuner memory for easy recall at the touch of a button. Switch on the BBS (Bass Boost)
Control and you won't believe you're listening to a system that fits in the palm of your hand. For the fashion conscious we've included two
additional color snap-on front panels so you can coordinate your radio with your mood, or whatever you're wearing. Please read this
instruction sheet carefully and completely to make sure you understand the operation of your personal stereo receiver, and save this
sheet for future reference. If you encounter any problems with the set up or operation of this radio, please call the Emerson Radio Corp.
Customer Service Hotline, toll free, at 1-800-898-9020.
A Word Of Caution
Use good common sense when using this or any other headphone system. Adjust the volume to a comfortable level. Continuous
listening to music through headphones at high volume levels can be detrimental to your hearing. Also, do not set the volume to such a
high level that it prevents you from hearing other sounds, such as approaching cars, etc.
LOCATION OF CONTROLS
4
3
2
5
6
7
1
8
1. BAND (AM/FM) Switch.
2. Headphone Jack.
3. TUNING DOWN Button.
4. TUNING UP Button.
5. MEM.CH and Buttons.
6. MEM (Memory) Button.
7. LOCK Button.
8. LCD Display.
9. Battery Compartment.
10. VOLUME Control.
11. POWER ON/OFF Switch.
12. BBS (Bass Boost) ON/OFF Switch.
13. Belt Clip.
10
11
12
13
9
Battery Installation
1. Hold the radio upside down and slide the battery compartment door in the
direction of the arrow until the door pops open.
2. Insert two ‘AAA’ size batteries (not included), following the polarity diagram
shown at right. We recommend using alkaline batteries for longest life.
3. Push the battery compartment door closed and slide it back opposite the
direction of the arrow.
Memory backup
In order to maintain the memories when installing new batteries, the unit must
be turned off and new batteries installed within 10 minutes.
NOTE: If the batteries are changed while the POWER switch is 'ON', the display may not reappear immediately. If this occurs, slide
the POWER switch to the 'OFF' position, and then back to the 'ON' position to restore the display.
Removing The Belt Clip
Changing The Front Panel
To remove the belt clip, slide it
downward in the direction of the arrows.
• To remove the front panel gently pry it up from the bottom edge as shown.
• To replace the front panel, place it on the front of the radio and press down on the panel
at (1) Right side first and then (2) Left side until it snaps into place.
Listening to the Radio
1. Insert the headphone plug into the headphone jack. The headphone wire serves as the FM antenna.
2. Set the VOLUME control to a low setting.
3. Set the BAND selector switch to either the AM or FM position, as desired.
Visit our web site at www.emersonradio.com
4. Slide the POWER switch to the ‘ON’ position. The display will come on and show either an AM or FM radio frequency, depending
upon the setting of the BAND selector switch. Tune to your desired frequency by pressing either the TUNING ‘UP’ or ‘DOWN’ button
repeatedly until the frequency of your station appears on the display. If either the TUNING ‘UP’ or ‘DOWN’ button is held for approximately
two seconds, the tuner automatically scans up or down to the next strong station and stops on that station.
NOTE: If the tuner does not stop on the exact frequency of the station, press either the TUNING ‘UP’ or ‘DOWN’ button again until the
exact frequency of the desired station appears in the display. If you are listening to a FM station and that station is broadcasting
in stereo, the ‘ST’ indicator will appear in the display.
5. Adjust the VOLUME and the BBS (Bass Boost) controls, as desired.
6. If you are carrying the radio in a backpack, handbag etc. while you are listening, you may press the LOCK button to disable all of the
front panel controls. This will prevent the station from changing accidentally if something in your handbag or backpack accidentally
presses against the TUNING ‘UP’ or ‘DOWN’ button. When the lock feature is engaged, the LOCK indicator appears in the display.
Press the LOCK button again to cancel the lock feature and resume normal operation.
7. When you are finished listening, slide the POWER switch to the ‘OFF’ position to turn the radio off. Remember that just removing the
headphones does not turn the radio off. If you do not set the POWER switch to the ‘OFF’ position, the radio remains ‘ON’ even if the
headphones are not connected, and the batteries will continue to drain.
To Store a Station in the Tuner Memory
Up to 20 stations (10 AM and 10 FM) can be stored in the Tuner Memory.
1. Tune to the first station you wish to memorize as described in the previous section.
2. Press the MEM button. The MEMO indicator will blink in the display.
3. While the MEMO indicator is blinking, press either the MEM.CH or button to select one of the ten Preset Memory locations, then
press the MEM button again to enter your desired station into that preset memory location number.
4. Repeat Steps 1 through 3, above, to continue entering up to 10 stations in each band.
5. After you have finished storing stations in the Memory, you can recall any of the stored stations by simply pressing the MEM.CH or
button until the desired preset number and radio frequency appears in the display.
NOTE: To change any of the stations stored in memory simply enter a new station in the desired memory location. The previously
stored station will be replaced by the new station.
Using Bass Boost switch
To increase the bass response, slide the BBS (Bass Boost) switch to the ‘ON’ position.
Antennas
The AM band has a built-in ferrite bar antenna which provides adequate reception in most areas.
The FM antenna is built into the headphone cord. Be sure to extend it for best reception.
CAUTION :
Never use chemicals such as benzene or paint thinner for cleaning, otherwise the case may be deformed or discolored.
FCC INFORMATION
This device complies with Part 15 of the FCC Rules. Operation is subject to the following two conditions:
(1) This device may not cause harmful interference, and
(2) This device must accept any interference received, including interference that may cause undesired operation.
EMERSON RADIO CORP.
LIMITED WARRANTY
What does this warranty cover ? Any manufacturing defects in original material,
including original parts and workmanship, under normal use and conditions.
For how long? For a period of ninety (90) days from the date of original purchase in
the U.S.
What will we do ? If you need service under this Warranty, and you provide us with
the dated proof of purchase, we will provide repair service at no charge for labor and
parts at an authorized Depot Repair Facility, or replace the product in our discretion.
How do you make your warranty claim ? If it becomes necessary to repair your
unit, you can obtain the name and mailing location of a Depot Repair Facility by dialing
1-800-695-0098. You should pack your unit in a well-padded heavy corrugated box,
enclose your check or money order payable to the Depot Repair Facility in the amount
of $9.00 to cover the return shipping and handling costs, and enclose a copy of your
proof of purchase (warranty service will not be provided without a dated proof of
purchase). Finally, you should ship the unit prepaid via UPS or parcel post (insured).
What does your warranty not cover ? Your warranty does not cover the following:
• Damage from negligence, misuse, abuse, accident, or failure to follow operating
instructions.
• Use of product in a commercial application or rentals.
• Changes or repairs by anyone other than an authorized Depot Repair Facility.
• Damage because your unit is improperly connected to the equipment of other
manufacturers.
• Unit on which the serial number has been defaced, modified or removed.
• Damage to equipment not properly connected to the product.
• Cost incurred in shipping your unit to and from an authorized Depot Repair Facility.
• Ordinary adjustments which you can perform as outlined in the owner’s manual.
• Signal reception problems caused by external antenna or cable systems.
• Products purchased, used, serviced, or damaged outside of the United States.
• Damage to compact discs or cassettes.
What other limitations apply to your warranty ?
THIS WARRANTY IS NON-TRANSFERABLE AND APPLIES ONLY TO THE
ORIGINAL PURCHASER AND DOES NOT EXTEND TO SUBSEQUENT
OWNERS OF THE PRODUCT. THIS WARRANTY IS VALID ONLY IN THE
UNITED STATES OF AMERICA. ANY APPLICABLE IMPLIED WARRANTIES,
INCLUDING THE WARRANTY OF MERCHANTABILITY, ARE LIMITED IN
DURATION TO A PERIOD OF THE EXPRESSED WARRANTY AS PROVIDED
ABOVE BEGINNING WITH THE DATE OF ORIGINAL PURCHASE AT RETAIL
AND NO WARRANTIES, WHETHER EXPRESSED OR IMPLIED, SHALL
APPLY TO THE PRODUCT THEREAFTER. WE MAKE NO WARRANTY AS
TO THE FITNESS OF THE PRODUCT FOR ANY PARTICULAR PURPOSE OR
USE.
THE EXTENT OF OUR LIABILITY UNDER THIS LIMITED WARRANTY IS
THE REPAIR OR REPLACEMENT PROVIDED ABOVE AND IN NO EVENT
WILL OUR LIABILITY EXCEED THE PURCHASE PRICE PAID BY THE
PURCHASER OF THE PRODUCT. UNDER NO CIRCUMSTANCES WILL WE
BE LIABLE FOR ANY LOSS, DIRECT, INDIRECT, INCIDENTAL, SPECIAL,
OR CONSEQUENTIAL DAMAGE ARISING OUT OF OR IN CONNECTION
WITH THE USE OF THIS PRODUCT.
How does state law apply to your warranty ?
THIS WARRANTY GIVES YOU SPECIFIC LEGAL RIGHTS, BUT YOU MAY
ALSO HAVE OTHER RIGHTS WHICH VARY FROM STATE TO STATE. SOME
STATES DO NOT ALLOW LIMITATIONS ON IMPLIED WARRANTIES OR
EXCLUSION OR LIMITATION OF INCIDENTAL OR CONSEQUENTIAL
DAMAGE, SO THESE RESTRICTIONS MAY NOT APPLY TO YOU.
AU898F
Part No.: 16-2805
012-01
Emerson Radio Corp.
Consumer Affairs Dept.
1901 Diplomat Drive
Farmers Branch, TX75234.
1-800-898-9020
Printed in China