1
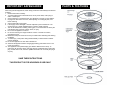
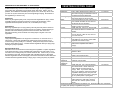
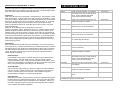
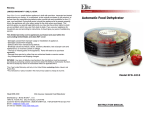
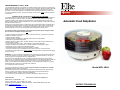
LIMITED WARRANTY* ONE (1) YEAR:
Your small kitchen appliance is warranted to the original purchaser to be free from any manufacturing
defects under normal use and conditions for one (1) year, cord excluded. During that period, should the
appliance fail to operate properly, return the appliance with your sales receipt to the store where
purchased. If you use your appliance for household use and according to instructions, it should give
you years of satisfactory service. This product warranty covers only the original consumer purchaser
of the product.
WARRANTY IS ONLY VALID WITH A DATED PROOF OF PURCHASE.
To guarantee repair or replacement without charge, a dated sales receipt showing purchase within the
limited warranty period* must accompany the appliance. Without a sales receipt, warranty will be
estimated according to the appliance's manufactured date. A comparable appliance should arrive
within 2-3 weeks. However, in case an appliance is not covered by warranty, correspondence offering
alternatives will be mailed to you.
During the one-year warranty period, a product with a defect will be either repaired or replaced with a
reconditioned comparable model (at our option) when the product is returned to our Service Center.
(See the “Returns” section below). The repaired or replacement product will be in warranty for the
remaining balance of the one-year warranty period and an additional one-month period.
Automatic Food Dehydrator
This limited warranty covers appliances purchased and used within the 50 contiguous states
plus the District of Columbia and does NOT cover:
- Damages caused by unreasonable use, neglect, normal wear and tear, commercial use, improper
assembly or installation of product.
- Damages caused in shipping.
- Damages caused by replacement or resetting of house fuses or circuit breakers.
- Defects other than manufacturing defects.
- Breakage caused by misuse, abuse, accident, alteration, lack of proper care and maintenance, or
incorrect current or voltage.
- Lost or missing parts of the product. Parts will need to be purchased separately.
- Damages of parts that are not electrical; for example: cracked or broken plastic or glass.
- Damage from service or repair by unauthorized personnel.
- Extended warranties purchased via a separate company or reseller.
- Consumer’s remorse is not an acceptable reason to return a product to our Service Center.
*The consumer is responsible for any delivery charges for all replacement units provided for exchange
under the warranty.
RETURNS: Any return of defective merchandise to the manufacturer must be processed accordingly
by contacting customer service first to obtain an RA # (Return Authorization Number). We will not
accept any returns of merchandise without an applicable RA #.
We cannot assume responsibility for loss or damages to products returned to us during incoming
shipment. For your protection, always carefully package the product for shipment and insure it with the
carrier. Be sure to enclose the following items with your return: any accessories related to the
problem, your full address and daytime phone number, a note describing the problem, a copy of the
dated sales receipt or other proof of purchase and a valid RA#.
C.O.D shipments cannot be accepted.
*One Year Limited Warranty valid only in the 50 contiguous states plus the District of Columbia,
excluding Puerto Rico and the Virgin Islands.
This warranty is effective only if the product is purchased and operated in the USA; product usage
which is in violation of the written instructions provided with the unit will void this warranty.
For international warranty, please contact the local distributor.
**Any instruction or policy included in this manual may be subject to change at any time.
Model EFD-1010
Model EFD-1010
Elite Gourmet Automatic Food Dehydrator
Distributed by: MAXI-MATIC , USA
18401 E. Arenth Ave. City of Industry, CA 91748
Customer Service Department: (626) 912-9877 Ext. 116/120 MON-FRI 9am-5pm PCT
Email: [email protected]
Or visit our website: www.maxi-matic.com
®
INSTRUCTION MANUAL
IMPORTANT SAFEGUARDS..
When using electrical appliances, basic safety precautions should always be followed
as below:
1. Read all instructions carefully.
2. To protect against risk of electrical shock, do not put the base, cord & plug in
water or other liquid.
3. Close supervision is necessary when any appliance is used by or near children.
4. Unplug from outlet when not in use, before putting on or taking off parts, and
before cleaning.
5. Avoid contact with moving parts.
6. If the supply cord is damaged, it must be replaced by the manufacturer or its
service agent or a similar qualified person in order to avoid a hazard.
7. The use of attachments, including canning jars, not recommended or sold by the
manufacturer may cause fire, electric shock, or injury.
8. Do not use the appliance out doors.
9. Do not let cord hang over edge of table or counter or contact hot surface,
including the stove.
10. Blades are sharp. Be careful not to hurt your hands when detaching and cleaning
the blades.
11. To avoid injury, never place cutting blade assembly on base without container
properly attached.
12. Do not use appliance for other than intended use.
13. Switch off the appliance before changing approaching parts which move in use
(such as container).
14. This appliance has a polarized plug (one blade is wider than the other). To
reduce the risk of electric shock, this plug will fit in a polarized outlet, reverse the
plug. If it still does not fit, contact a qualified electrician. Do not modify the plug in
any way.
SAVE THESE INTRUCTIONS
THIS PRODUCT IS FOR HOUSEHOLD USE ONLY!
PARTS & FEATURES..
POLARIZE PLUG & SHORT CORD SAFETY..
Polarized Plug:
This appliance is for Household Use Only. Place it on a level surface, and insert plug
into any 120-volt AC electrical outlet. Do not use any other type of outlet.
This appliance has a polarized plug (one blade is wider than the other). As a safety
feature, this plug fits in a polarized outlet only one way. If the plug does not fit into the
outlet, reverse the plug and try again. Do not force the plug into the socket. If it still
does not fit, contact a qualified electrician. Do not attempt to defeat this safety
feature.
Short Cord:
A short power-supply cord is provided to reduce the risk resulting from becoming
entangled in or tripping over a longer cord. Longer detachable power-supply cords or
extension cords are available and may be used if care is exercised in their use.
If a longer detachable power-supply cord or extension cord is used, 1) the marked
electrical rating of the extension cord should be at least as great as the electrical
rating of the appliance, and 2) the longer cord should be arranged so that it will not
drape over the counter top or table where it can be pulled on by children or tripped
over accidentally.
FIRST USE & OPERATION..
BEFORE USING:
1) Carefully unpack the food dehydrator.
2) Wash the five dehydrator trays and lid in warm, soapy water. Rinse well and
dry thoroughly.
3) Wipe the dehydrator base with a clean, soft cloth or sponge. NEVER
IMMERSE BASE, CORD OR PLUG IN WATER OR ANY OTHER LIQUID.
HOW TO USE:
1) Make sure unit is switched OFF and unplugged before using.
2) Always wash the dehydrator trays and lid before each use to avoid any food
contamination.
3) Place base on a flat, smooth countertop surface where it will not fall or be
pulled by the plug.
4) Prepare food to be dehydrated as instructed in this manual; preparation
depends on the type of food. Do not overlap food or overload trays.
5) Arrange food on trays, but do not place trays on the base; stack up the trays
first and set them aside.
6) Trays may be adjusted to accommodate a variety of food sizes.
7) Plug unit into electrical wall outlet, switch to ON and preheat for
approximately 5 minutes.
8) Place stacked trays onto the base, cover the top tray with the lid, and allow
food to dry for the recommended length of time; drying time may vary
depending on the type of food.
9) Begin to check on food before the dehydration period is completed; check
food for desired dryness. Remove individual pieces and store in containers
or food bags. If some pieces are not yet done, leave them on the dehydrator
and check frequently until all food dehydration is completed.
10) Food that is not going to be eaten within a day or two should be store in the
refrigerator. If store food in the freezer, be sure to use containers or bags
designed for freezer storage.
11) Switch the unit OFF and plug after using.
12) Always wash the dehydrator trays and lid after each use. Wipe the base
with a soft damp cloth or sponge; do not allow water or any other liquid to
get into the base. Make sure the trays and lid are completely dry before
replacing them on the base.
CLOSING AND OPENING VENTS IN LID:
During the first initial hours of dehydrating, leave the vent open to allow moisture
to escape.
Once the moisture has evaporated from the food that is being dehydrated, you
can close the vent and allow the dehydrating process to continue.
SELECTING THE TYPE OF FOOD TO DEHYDRATE:
Food to be dried should be in good condition. Select fruits that are just ripe; they
have the highest natural form of sugar and are best for drying. Fruits that are not ripe
may have a flat, bitter taste. Vegetables should be fresh and tender. Check fruits
and vegetables for marks or bruises and cut away these portions before preparing for
dehydration. Avoid using overripe fruits and vegetables with spoiled portions. Meat,
poultry and fish should be fresh and lean. Preparation, dehydration time and storage
of foods also influence their quality and taste. Follow the preparation, dehydration
and storage instructions in this manual to ensure the best-quality dried foods.
WARNING: If you suspect food is contaminated, freeze at 0° for 48 hours to prevent
bacteria growth, or heat at 175°F for 15 minutes to pasteurize it. Some nutrition may
be lost, but it will stop the contamination process.
** ROLL-UP SHEET
The roll-up sheet is for use to dehydrate food that may have drippings that may drip
through the holes on the trays.
However, it is primarily used to make FRUIT ROLL UPS. Simply mix a mixture of
fruits until the consistency is thick and smooth. Pour the mixture over the roll-up
sheet to dehydrate for approximately 12 hours.
PREPARATION & PRETREATMENT OF VEGETABLES:
Vegetables dried at home require a little more effort in processing and storage than
do fruits because they are low in acid and have little sugar. Some vegetables have a
poor quality when dehydrated, and are better frozen than dried. Others, such as
potatoes, are available at reasonable prices all year round, and it may not be worth
your time to dry them unless they are used for lightweight camping. Be selective in
the vegetables you choose to dry.
VEGETABLE DRYING CHART..
VEGETABLE
Asparagus
Beans (green)
Preparation:
Select only the highest quality, fresh, crisp and tender vegetables for drying. Wash
vegetables carefully just before processing to remove dirt and bacteria. Most
vegetables should be peeled, trimmed, cut, or shredded prior to drying.
Beets
Broccoli
Pretreatment:
Blanching vegetables prior to drying destroys the enzymes that produce off flavors
during storage, resulting in poor texture and poor re-hydration. Steam blanching is
preferred over water blanching because there is less flavor and vitamin loss.
Microwave blanching is also excellent and usually keeps a brighter color in the
vegetables.
Steam Blanching:
Layer prepared vegetables in the top portion of a steamer, no more than 2 to 2 ½
inches deep. Steam until vegetables are heated all the way through but are not
cooked enough to eat (usually 2 to 3 minutes). Small pieces may need occasional
stirring to steam blanch evenly. Transfer steamed vegetables directly to drying trays,
working as quickly as possible.
Microwave Blanching:
Microwave ovens are convenient for blanching fresh vegetables. Prepare vegetables
as for steam blanching. Place vegetables with small amount of water (refer to your
microwave oven cooking chart) in a covered casserole dish. Cook for only ¼ to ⅓the
time specified in the chart, stirring well after half of the blanching time. Microwave
blanched vegetables will be more brightly colored than those that are steam blanched.
Transfer blanched vegetables directly to drying trays, working as quickly as possible.
Carrots
Corn
Celery (Stalks)
Celery (Leaves)
Chives
Cucumber
Garlic
Mushrooms
Onions
Peppers
(pimentos)
Peppers
(jalapeños)
Potatoes
PREPARATION & PRETREATMENT
Cut in half to divide tips from stems. Tip
are best for drying, but dried stems can be
crushed and used for seasoning.
Snip off ends and cut as desired. Blanch,
then quick freeze for 30-45 minutes.
Trim, leaving about an inch of the top and
root. Blanch and allow to cool, then cut
off the top and root, and slice.
Trim and cut as usual.
Steam for about 4-5 minutes.
Wash and peel. Cut into ½” thick chunks
and steam for about 4-5 minutes until
tender.
Remove husk, wash and steam blanch
corn on the cob. Allow to cool, then cut
corn from the cob.
Wash and separate leaves from stalks.
Cut stalks into 1/2” chunks. Place stalks
separate from leaves in trays.
Break leaves apart from their stems.
Place leaves separate from stalks in
tray(s).
Wash and mince.
Wash, trim and slice about ¼” thick.
Separate and peel cloves. Cut cloves in
halves or slice.
Brush clean and remove stem. Leave
whole, cut in halves or slice.
Trim ends and peel. Cut in rings or dice.
Wash and remove core. Cut in halves,
quarters, rings or strips.
Wash and dry whole.
ESTIMATED TIME
17-19 hours
17-19 hours
22-24 hours
17-19 hours
11-13 hours
8-10 hours
12-14 hours
6-8 hours
5-7 hours
11-13 hours
16-18 hours
11-13 hours
13-15 hours
13-15 hours
11-13 hours
Wash and peel. Cut or slice as desired
14-16 hours
and steam blanch. Rinse under cold
water and pat dry before placing on
tray(s). Note: If you wish to leave the
skin on the potatoes, wash and scrub with
vegetable cleaning brush, then prick and
remove all “sprouts” and “scars,” using the
tip of a potato peeler or paring knife.
Tomatoes
Wash and remove stems. Dip in boiling
18-20 hours
water and then in cold water. Remove
skin and cut in halves, quarters or thick
slices.
*Approximate times are offered as guidelines only. Drying time may vary, depending
on quality and quantity of vegetables being dried.
PREPARATION & PRETREATMENT OF FRUITS:
Almost all fruits are suitable for drying at home, but some fruits will require more
drying time than others; the guidelines offered in this manual will help you get started.
Some fruits might not be suitable for drying all year round, so it will be helpful to learn
which fruits are in season and experiment with those first.
Preparation:
Wash fruits well and remove any bruised or overripe portions. Peel if desired. Larger
fruits may be halved. If pieces of fruit vary in size, they may be sliced 3/8” to ½” thick
for more even drying. Smaller fruits such as grapes and cherries may be dried whole.
Remove pits or stones from fruits such as prunes, cherries, apricots, etc. Fruits that
have been artificially waxed to prevent moisture loss should always be peeled.
Peeling is optional with other fruits. Dried pear skins tend to be grainy, and peach
peels are a little fuzzy.
Most fruits can be placed directly on the drying rays as they are
prepared…pineapples, grapes, strawberries, prunes, etc. However, apples apricots,
peaches and pears turn brown when the cut surface are exposed to the air, due to
oxidation and the continuous reaction of enzymes, these fruits may be pretreated to
slow this browning and to prevent loss of vitamins A an C, but your attention is called
to the cautions set forth below, which are for your protection. If you are drying these
fruits, and you intend to pre-treat them, cut pieces can be prevented from browning
while they are being prepared by keeping them in a holding solution until you have
sufficient fruit to pre-treat.
Pretreatment:
Below are listed several optional methods of pretreatment. You need not pre-treat
food in order to dry it. However, pretreatment often makes food look better, increases
the shelf life and can even enhance the nutritional value of some foods. Experiment
with both treated and untreated food in your storage to see which will best suit your
needs. Remember, proper storage is critical to the quality of the stored product,
whether treated or untreated.
Natural Pre-Dips:
Use pineapple or lemon juice as a natural alternative to other pretreatments to
reduce browning. Slice fruit directly into juice. Remove promptly (about 2
minutes) and place on trays. Fruits may also be dipped in honey, spices, lime or
orange juice, jello powders or sprinkled with coconut to give them a snappy dried
flavor. Use your imagination and make your own flavorful dip.
Sodium Bisulfite:
Ask for food-safe, (USP) grade only. Dissolve 1 teaspoon of sodium bisulfite in
one quart of water. Prepare small amounts of fruit and dip for 2 minutes in the
solution. This helps prevent loss of vitamin C and maintains a bright color.
Sodium bisulfite is available in most pharmacy/drug stores.
Popping Backs:
When drying fruit halves, especially apricots, it has been suggested that popping
the back (“inside out”) will speed the drying time. This is true, but it also results
in the loss of the nutritional juices to the bottom of the dehydrator. Instead, cut
each half in half again to give the end product more nutritional value, a brighter
color, and faster reconstitution capabilities.
FRUIT DRYING CHART..
FRUIT
Apples
PREPARATION & PRETREATMENT
Wash, and peel if desired. Cut in halves
and remove core, then cut into chunks or
slice. Can be pretreated with a little
lemon juice to prevent browning.
ESTIMATE TIME
22-24 hours
Apricots
Wash, cut in halves and remove pit. Cut
further into quarters, if desired.
30-35 hours
Bananas
Peel and slice. Can be pretreated with a
little lemon juice to prevent browning.
22-24 hours
Cherries
Wash and remove pit
22-24 hours
Coconut
Drain milk, crack and remove coconut.
Pat dry and cut into ¼” thick chunks.
24-30 hours
Figs
Wash and remove stems. Cut into halves
or quarters (dry skin side up)
22-24 hours
Grapes
Wash and remove stems. Leave whole.
23-25 hours
Papaya
Wash and peel. Cut into large or small
chunks, as desired.
30-35 hours
Peaches
Wash, cut in halves and remove pit. Cut
further into quarters, if desired.
35-42 hours
Pears
Wash, and peel if desired. Cut in halves
and remove core, then cut into chunks or
slices. Can be pretreated with a little
lemon juice to prevent browning.
28-32 hours
Pineapple
Remove core and cut into chunks, or slice
into wedges.
22-25 hours
Prunes
Wash, cut in halves and remove pit. Cut
further into quarters, if desired.
30-35 hours
Strawberries
Wash and leave whole, cut in halves or
slice.
12-15 hours
*Approximate times are offered as guidelines only. Drying time may vary, depending
on quality and quantity of fruits be dried.
MEAT DRYING PREPERATION..
Normally raw meat is used for making jerky. However, cooked meat as well as raw
meat can be dehydrated.
Make sure to always cut meat down to bite size before dehydration. It is much easier
to work with beforehand.
Be extra careful when making jerky from raw chicken or turkey because salmonella
bacteria may be present in poultry when it is purchased. It is extremely important to
cut raw chicken or turkey into portions that do not exceed 1/4" thickness. Any
marinade must thoroughly penetrate and soak into the meat, up to 10 minutes or
more.
It is not recommended to remove any excess marinade sauce.
Never consume food that tastes, smells or looks improper.
RAW MEAT FOR BEEF JERKY: Any kind of beef is good for making beef jerky.
Make sure to trim off all the fat before slicing into bite-size portions. It is
recommended to slice meat about 1/8" - 1/4" thickness.
Marinating beef has many different combination recipes. Please see some recipe
samples below for your preference:
TRADITIONAL JERKY: (Good for approximately 3-5 lbs of beef, fish, or poultry)
½ lb brown sugar
3 cups soy sauce
*Spices of your choosing
½ cup liquid smoke (optional)
Mix all ingredients together. Make sure the brown sugar is dissolved. Let mixture sit
for approximately 15 minutes. Place cut up meat into the marinade and cover. Let
stand for 10 minutes refrigerated. Make sure to turn meats periodically to coat
thoroughly. Drain any excess liquid.
Place meats onto trays and dehydrate. Drying time for a full 5-tray set up will take
approximately 24-36 hours.
OTHER DRYABLE ITEMS..
NUTS:
Remove shells to the nuts and rinse nuts with warm water. Pat dry and spread on
trays. Most nuts will take approximately 20-30 hours to dehydrate; they should be
allowed to dehydrate until brittle.
After dehydrating, allow to cool. Nuts that will not be consumed within a day or two
should be frozen to ensure freshness. Remove nuts from the freezer and allow them
to defrost before using.
HERBS:
Rinse and pat dry. Remove any dead, mushy or discolored portions, but leave the
stem and do not break apart until drying. Spread herbs or flowers on tray and allow
to dehydrate for about 2-7 hours, depending on their type. When drying is complete,
remove from tray and allow to cool.
Remove from stem and break leaves or buds apart, or crush if desired.
If dehydrating seeds, choose when pods have changed in color.
FLOWERS:
For best results, pick flowers after the morning dew rises and before the evening mist
sets in. Do not use flowers that have been sprayed with insecticides or other harmful
chemicals. If dehydrating at the same time as herbs intended for consumption, place
flowers on the bottom trays and herbs on the top trays; this is to prevent any
“drippings” from the flowers to fall onto the herbs.
HELPFUL HINTS..
-
-
Always preheat the dehydrator for at least 5 minutes before using.
If the dehydrator has been stored away for some time, wash and clean before
using.
Fresh vegetables and fruits are best for dehydrating. Canned goods to not
dehydrate as well.
Vegetables and fruits should always be cleaned before preparation and
pretreatment.
For best results, always prepare and pre-treat fruits and vegetables as outlined in
this manual.
It is relatively safe to leave the dehydrator on when dehydrating foods take a long
time, but make sure to set the dehydrator in a safe place. Read the “Important
Safeguards” on page 1 of this manual, and exercise safety when using this
product.
Exact dehydrating time varies greatly depending on several factors: Type, size
and quality of food, quantity placed on trays and personal preference. It will help
to keep a personal notepad where you can write down your own notes. Keep
notes on the type of food, weight before and after drying, total drying time and
final results
FOOD STORAGE..
Packaging:
DRIED FOODS MUST BE PROPERLY PACKAGED IN ORDER TO KEEP WELL.
Package your dried foods in freezer plastic bags, squeezing out as much air as
possible. Heat-sealable bags may also be used. Store the plastic bags inside of
airtight metal, plastic or glass containers. Storing foods in rigid containers without first
putting them into the freezer bags exposes the dried foods to air. Vacuum packaging
equipment for home use is available in some stores around the country. Vacuum
packaging will greatly extend shelf life.
Storage Conditions:
Store properly packaged dried foods in a cool, dark place. The cooler the food is kept,
the longer the optimal quality will be maintained. For every 18°F drop in temperature,
the shelf life increases 2 to 3 times. If you have room in a refrigerator or freezer, keep
your dried foods there. Otherwise, find the coolest place in your home to store dried
foods. Light also causes the quality and nutritive value to deteriorate. Keep dried
foods in the dark or in opaque containers.
Shelf Life:
Fruits have a naturally high sugar and acid content, which allows them to dry well and
store for longer periods of time than vegetables. When properly packaged and stored
at room temperature or below (70°F or less), most fruits will maintain a high quality
and nutritional value up to a year. Most vegetables are best when eaten within six
months.
FRUITS AND VEGETABLES KEPT BEYOND THE RECOMMENDED TIME MAY
NOT BE AS NUTRITIOUS OR TASTE AS GOOD BUT WILL NOT SPOIL UNLESS
THE PACKAGING IS NO LONGER INTACT.
MAINTENANCE..
This appliance requires little maintenance. It contains no user serviceable parts. Do
not try to repair it yourself. Refer it to qualified personnel if servicing is needed.
Always unplug the dehydrator from electrical outlet when not in use and before
cleaning.
TO CLEAN: NEVER IMMERSE BASE (MOTOR HOUSING) IN WATER. First, be
sure unit is switched “OFF” and unplugged. Separate trays from the base. Wash
trays and lid with warm, soapy water, using a soft cloth or sponge. Rinse well and dry
thoroughly. Wipe base (motor housing) with a slightly damp cloth or sponge.
DO NOT use scouring pads or any type of harsh cleanser to clean the
Dehydrator, as this may damage the finish.
TO STORE: Unplug unit; store in its box in a clean, dry place. Never store it while it
is hot or still plugged in. Never wrap cord tightly around the appliance. Do not put
any stress on the cord where it enters the unit, as it could cause the cord to fray and
break.