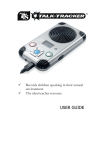
1
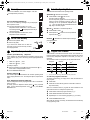
400-132-028-A (CJ Electric Elements TH132 F_AF 15-min eStat 761_762) ENG.fm Page 1 Monday, June 11, 2007 4:26 PM
eStat 761/762
User Guide
Programmable Thermostat
n
Description
1.
p
Configure the Switches
2.
The elements eStat 761/762 programmable thermostats can be used
to control the ambient (room) temperature or the floor temperature,
depending on the models. The following models are available:
The eStat thermostat has two switches, located on the upper-left part
on the rear of the control module, which are used to set the following
options:
eStat 761
Early Start
This model is designed to control the floor temperature. The temperature sensor must be installed in the floor.
When the Early Start function is enabled (disabled by default), the
eStat thermostat calculates the optimum system start time to obtain
the desired temperature by the set time. To enable this function:
eStat 762
This model has two temperature sensors:
•
One sensor is integrated in the thermostat to control the ambient
temperature.
•
The other sensor must be installed in the floor to limit the floor
temperature.
Position switch #1 down.
Note: When this function is enabled, the system can
be activated before the program’s start time.
Temperature Display
By default, the eStat thermostat displays the temperature in °C. If you
wish to change to °F:
Position switch #2 up.
Note: When you switch from °C to °F or vice versa, the
and
setpoints must be redefined.
q
n
o
p
n
o
p
q
r
s
t
u
v
w
DAY/HOUR/MIN—Set the day and clock settings.
,
Installation
3.
Refer to the installation guide of the power base.
Insert the tabs at the top of the control module in the slots at the
top of the power base.
Secure the control module using the captive screw underneath
the base.
Control module
PGM—Program the schedule (programs).
MODE—Select the operating mode.
RETURN—To exit a function.
To configure temperature setpoints:
Comfort, Economy and
Vacation.
Adjust the floor temperature limit (eStat 762 only).
—Increase and decrease temperature.
—Indicates the number of the current program
when Automatic mode is enabled.
Current operating mode (auto / manual ). In Auto mode, the
program’s associated setpoint icon is also displayed (
).
Indicates the room OR floor temperature.
Power base
% of heating time.
The thermostat displays the percentage of heating time required
to maintain the desired temperature. For example, is
displayed when heating is activated 40 percent of the time.
Display
% of heating time
eStat 761/762
1 to 24% 25 to 49% 50 to 74% 75 to 99%
100%
400-132-028-A
11/6/07
1/3
400-132-028-A (CJ Electric Elements TH132 F_AF 15-min eStat 761_762) ENG.fm Page 2 Monday, June 11, 2007 4:26 PM
r
Power Up
4.
On the first installation, the screen displays: 0:00, MO,
and temperature (room/floor).
u
Automatic
For Floor Heating Installations:
One of the two following messages may be displayed
when a problem occurs:
LO: The floor temperature is below 0°C, or the
temperature sensor is defective, or not connected.
The heating indicator
is displayed and the relay is
closed (energized).
HI: The floor temperature is above 60°C, or the
temperature sensor is defective.
n
o
n
o
Set the Time and Day
6.
These setpoints are associated with the schedule’s programs (prog.
1 & 3 = Comfort, prog. 2 & 4 = Economy) and are preprogrammed as
follows:
eStat 761—
28°C,
20°C
eStat 762—
20°C,
18°C
Set temperature
setpoint buttons (
.
or select one of the pre-defined
).
—Maintains the Vacation setpoint during a
prolonged absence.
Setpoints
Press MODE to select
Vacation
Adjust the Temperature Setpoints
and Economy
—Maintains a constant temperature.
5.
Set the day (DAY).
If you remove the module from its base for
more than 2 hours, the time and day will have
to be reprogrammed.
Comfort
—Executes the schedule.
Press MODE to select
. The current
program number is displayed.
You can temporarily bypass the current program by
setting a specific temperature setpoint
or by
selecting one of the pre-defined setpoint buttons
(
). The new setpoint will be maintained until the
beginning of the next program.
Manual
Set the time (HOUR - MIN).
t
Press
v
.
Program Your Schedule
Set the temperature using
and press and hold the
button until it is displayed on the screen.
o
Press MODE/RETURN to exit.
8.
The schedule is used with the Automatic mode. The schedule controls the heating system to automatically switch between the Comfort
and Economy temperature setpoints at the times you have programmed.
The schedule consists of 4 programs per day defined as follows:
Programs
Setpoint
Time a
Wake-up
To modify a setpoint:
n
7.
The eStat thermostat offers three operating modes:
n
s
Select the Operating Mode
Leave home
or
Back home
Night
Vacation Setpoint
The vacation setpoint is associated to the Vacation operating mode
and is preprogrammed to 10°C. To modify this setpoint, repeat above
steps.
Floor Temperature Setpoint (eStat 762)
The floor temperature limit is preprogrammed to 28°C to avoid damage to your floor.
To modify, press the adjustment button (below ) using a pointed
object, set the desired temperature using
and press MODE/
RETURN to exit.
a.
The programs’ start time can be different for each day of the week.
To enter the programs’ start time
To shorten programming, you simply have to enter the start time for
each program.
n
o
Press PGM.
Press DAY to select the day (hold for 3 seconds to select all
days of the week).
Note: It is sometimes faster to program the same schedule for the
entire week and then to modify the exception days.
p
q
r
s
Press PGM to select the program number (e.g. 1).
Press HOUR and MIN to set the start time.
Repeat steps 3 to 4 for remaining programs (e.g. 2, 3 and 4).
Press MODE/RETURN to exit.
Note: After 60 seconds of inactivity, the thermostat will automatically
exit programming mode.
eStat 761/762
400-132-028-A
11/6/07
2/3
400-132-028-A (CJ Electric Elements TH132 F_AF 15-min eStat 761_762) ENG.fm Page 3 Monday, June 11, 2007 4:26 PM
To clear a program time:
When you clear a program time entry, eStat 761/762 will maintain the
temperature setpoint of the last executed program until the beginning
of the next program.
n
o
Repeat steps 1 to 3 above.
p
Press MODE/RETURN to exit.
Press CLEAR to erase the time entry. The time portion of the
LCD indicates --:-- when the program is inactive.
Programming Example
Programs
MO
TU
WE
TH
FR
SA
SU
6:00
6:00
6:00
6:00
6:00
6:00
6:00
8:30
8:30
8:30
8:30
8:30
--:--
--:--
16:00 16:00 16:00 16:00 16:00
--:--
--:--
23:00 23:00 23:00 23:00 23:00 23:00 23:00
Comfort :
• Monday to Friday, between 6:00 and 8:30 and between 16:00
and 23:00.
• Saturday and Sunday, between 6:00 and 23:00.
Economy :
• Monday to Friday, between 8:30 and 16:00 and between
23:00 and 6:00.
• Saturday and Sunday, between 23:00 and 6:00.
To program this schedule
n
o
p
Press PGM.
q
Press PGM to select program 2.
Set the time (8:30) using the HOUR and MIN buttons.
r
Repeat step 4 for remaining programs:
program 3 (16:00) and program 4 (23:00).
s
When all programs are configured, press MODE/RETURN to
exit.
Press and hold DAY for 3 seconds to select all days of the week.
Press PGM to select program 1.
Set the time (6:00) using the HOUR and MIN buttons.
To erase programs 2 and 3 for Saturday and Sunday
n
o
p
q
r
s
t
u
v
Press PGM.
Press PGM to select program 2.
Press DAY to select SAturday (SA).
Press CLEAR to erase the time (--:--).
Press DAY to select SUnday (SU).
w
Technical Specifications
9.
Display range: 0°C to 60°C
Setting range (ambient): 5°C to 30°C
Setting range (floor): 5°C to 40°C
Pre-programmed temperature setpoints:
•
Comfort: AF: 20°C and F: 28°C
•
Economy: AF: 18°C and F: 20°C
•
Vacation: AF/F: 10°C
•
Floor limit: AF: 28°C
Temperature resolution display scale: 0.1°
Storage: -20°C to 50°C
Software: Class A
Controller: Electronic
Heating cycle length: 15 minutes
Programming protection: Protected memory
Clock protection: 2 hours
Size (H/W/D): 83 x 79 x 13 mm
;
Warranty
10.
elements warrants this product, excluding battery, to be free from defects in the
workmanship or materials, under normal use and service, for a period of three (3)
years from the date of purchase by the consumer. If at any time during the warranty
period the product is determined to be defective or malfunctions, elements shall
repair or replace it (at elements's option).
If the product is defective,
(i)
return it, with a bill of sale or other dated proof of purchase, to the place from
which you purchased it, or
(ii) contact elements. elements will make the determination whether the product
should be returned, or whether a replacement product can be sent to you.
This warranty does not cover removal or reinstallation costs. This warranty shall
not apply if it is shown by elements that the defect or malfunction was caused by
damage which occurred while the product was in the possession of a consumer.
elements's sole responsibility shall be to repair or replace the product within the
terms stated above. ELEMENTS SHALL NOT BE LIABLE FOR ANY LOSS OR
DAMAGE OF ANY KIND, INCLUDING ANY INCIDENTAL OR CONSEQUENTIAL
DAMAGES RESULTING, DIRECTLY OR INDIRECTLY, FROM ANY BREACH OF
ANY WARRANTY, EXPRESS OR IMPLIED, OR ANY OTHER FAILURE OF THIS
PRODUCT. Some regions do not allow the exclusion or limitation of incidental or
consequential damages, so this limitation may not apply to you.
THIS WARRANTY IS THE ONLY EXPRESS WARRANTY ELEMENTS MAKES
ON THIS PRODUCT. THE DURATION OF ANY IMPLIED WARRANTIES,
INCLUDING THE WARRANTIES OF MERCHANTABILITY AND FITNESS FOR A
PARTICULAR PURPOSE, IS HEREBY LIMITED TO THE THREE-YEAR
DURATION OF THIS WARRANTY. Some regions do not allow limitations on how
long an implied warranty lasts, so the above limitation may not apply to you.
This warranty gives you specific legal rights, and you may have other rights which
vary from region to region.
Customer Assistance
11.
If you have any questions about the product installation or operation, or
concerning the warranty, contact us at:
Press CLEAR to erase the time (--:--).
Press PGM to select program 3.
Repeat steps 3 to 6.
Press MODE/RETURN to exit.
Edison House
Unit 7 Edison Close
Ransomes Europark
Ipswich, Suffolk
IP30 9GU
Tel.: 0845 11 88 888
Fax: 0845 11 88 889
Email: [email protected]
Website: www.elementshop.co.uk
WEEE Directive:
•
Do not dispose along with
normal household waste.
•
Do not burn.
The product and its packaging must be
disposed of at a suitable recycling centre.
eStat 761/762
400-132-028-A
11/6/07
3/3