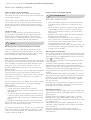
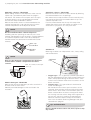
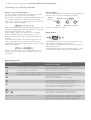
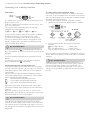
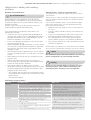
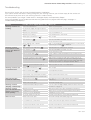
1
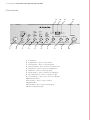
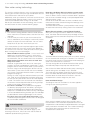
user manual mWj[hW_ZmWi^_d]cWY^_d[ (EWT806 and EWT606) [b[YjhebknmWj[hW_ZmWi^_d]cWY^_d[contents i Congratulations Congratulations and thank you for choosing our washing machine. We are sure you will find your new washing machine a pleasure to use. Before you use the washing machine, we recommend that you read through the entire user manual, which provides the description of the washing machine and its functions. To avoid the risks that are always present when you use an electric appliance, it is important that the washing machine is installed correctly and that you read the safety instructions carefully to avoid misuse and hazards. We recommend that you keep this instruction booklet for future reference and pass it on to any future owners. After unpacking the washing machine please check it is not damaged. If in doubt, do not use the appliance but contact your local Electrolux Customer Care Centre. Contents 9edjhebfWd[b MWj[h7_Zh[Y_hYkbWj_edioij[c MWj[hYedikcfj_edYecfWh_i_ed ?cfehjWdjiW\[jo_dijhkYj_edi CW_difh[iikh[mWj[h ?d\ehcWj_ededZ_ifeiWb\ehki[hi D[mmWj[hiWl_d]j[Y^debe]o – How does the Water Aid recirculation system work? – Water Aid recirculation system – Inner washbowl design – Draining wash and deep rinse water – The rinse options – How does Eco Rinse work? 7XekjoekhmWi^_d]cWY^_d[ – Detergent recommendation – Detergent and fabric softener dispensers – Fabric softener recommendation – Lid lock feature – Auto sensing water level feature – Button response and digital display – Out of balance interruption – Washing instructions Fh[fWh_d]\ehoekhmWi^ – Sort your washing into separate loads – Load the washing machine – Detergent and fabric softener use – Adding detergent and fabric softener – Add bleach Ef[hWj_d]oekhmWi^_d]cWY^_d[ – Starting your washing machine – Choosing your own wash program settings – Program button & Wash program guide – Water Aid recirculation system active programs – Dirt Level button – Water Level button – Auto sensing water level – Checking the water level – Temp. button – Spin speed – Drip dry – Selecting spin only – Rinse Option button – Start/Pause button – Lid Locked – Progress of your wash program – Advance button – Digital display – Favourite button – Delay start option – Soak option – Customising the auto sensing water level – To switch off the end of program ‘beep’ 9Wh_d]\ehoekhmWi^_d]cWY^_d[ – What to do after you have finished your washing – Cleaning the dispenser and lint filter – Cleaning your washing machine – Cleaning stains in the washbowl – Avoiding build-up of undissolved detergents – Clearing build-up – Removing your washing machine lid >[bf\kb^_dji_dZ[Wb_d]m_j^mWi^_d]fheXb[ci – Residues on washed items – Yellowing or greying clothes – Stained clothes - Hints for removing stains 7]k_Z[jeijW_dh[celWb JhekXb[i^eej_d] JhekXb[i^eej_d]\WkbjZ_ifbWoi MWhhWdjo __ ___ ___ 1 1 ' 2 2 2 2 3 3 3 3 3 3 4 4 4 4 4 4 5 5 5 5 5 6 7 7 7 7 7 8 8 8 8 8 9 9 9 9 9 9 10 10 10 11 11 12 12 12 '3 13 13 14 14 14 14 14 '5 15 15 15 '6 '7 '9 (0 ii control panel [b[YjhebknmWj[hW_ZmWi^_d]cWY^_d[ Control panel 11 1 2 3 4 5 6 7 12 8 ' Power button 2 Program button – press to select options 3 Dirt level button – press to select wash time * Water level button – press to select water level or auto + Temp. button – press to select wash temperature 6 Spin button – press to select spin speed 7 Advance button – press to advance wash program . Rinse Option button – press to change rinse type / F avourite button – allows you to save a wash program '& S tart/Pause button '' S oak button – press to select soak time '( D igital display ') D elay button – press to delay wash program '* L id Locked indicator light 9 13 14 10 [b[YjhebknmWj[hW_ZmWi^_d]cWY^_d[ recirculation system/water consumption comparison iii Water Aid recirculation system 2 1 ' Washbowl 2 Outer washbowl 3 Recirculation pump * Drive system 5 3 4 Pump to drain 5 Patent Pending Water consumption comparison – Water Aid versus traditional MWj[h7_Zh[Y_hYkbWj_edioij[cWYj_l[ your new washer with these rinse options JhWZ_j_edWbjefbeWZmWi^[h No recirculation or Eco rinse ;YeH_di[ :[[fH_di[ :[[fH_di[ Wash water (litres) 60 60 90 Eco Rinse (litres) 21 - - - 52 86 JejWbmWj[hki[Z (litres) 81 112 176 Approx. litres of water per kilogram of clothes 10 14 22 Deep Rinse (litres) (Litres/kg at kilogram rated capacity as tested to AS2040) electrolux water aid washing machine important safety instructions/mains water pressure 1 Important safety instructions Please read the user manual carefully and store in a handy place for later reference. Pass the user manual on to possible new owners of the washing machine. The symbols you will see in this booklet have these meanings: warning This symbol indicates information concerning your personal safety Mains pressure water warning If you have mains pressure hot water service and it has not been used for two or three weeks: så å"EFOREåUSINGåTHEåWASHINGåMACHINEåITåISåRECOMMENDEDå that a hot water tap close to the washing machine be turned on and the water allowed to flow for a couple of minutes. This will allow any gas pressure that has built up over the period of non-use to be discharged. For further details, please refer to your hot water service installation instruction and owners guide. caution This symbol indicates information on how to avoid damaging the washing machine Information on disposal for users tips and information This symbol indicates tips and information about use of the washing machine environmental tip This symbol indicates tips and information about economical and ecological use of the washing machine Meanings of symbols used in this manual are shown below: This symbol indicates never to do this This symbol indicates always do this warning It is important to use your washing machine safely. Check these safety points before using your washing machine. This appliance is not intended for use by persons (including children) with reduced physical, sensory or mental capabilities, or lack of experience and knowledge, unless they have been given supervision or instruction concerning use of the appliance by a person responsible for their safety. Children should be supervised to ensure that they do not play with the appliance. If this appliance is supplied from an extension cord or portable electrical outlet device, the extension cord or portable electrical outlet device shall be positioned so that it is not subject to splashing or entry of moisture. If the electrical cord of this appliance is damaged, it must be replaced by the Manufacturer, Authorised Service Agent or similarly qualified persons in order to avoid a hazard. environmental tip såå-OSTåOFåTHEåPACKINGåMATERIALSåAREåRECYCLABLEå0LEASEå dispose of those materials through your local recycling depot or by placing them in appropriate collection containers. såå)FåYOUåWISHåTOåDISCARDåTHISåPRODUCT åPLEASEåCONTACTåYOURå local authorities and ask for the correct method of disposal. såå7HENåDISCARDINGåTHISåPRODUCT åREMOVEåTHEåLIDåANDåDISPOSEå of it separately from the washer to avoid the risk of a child being locked inside the machine. 2 new water saving technology electrolux water aid washing machine New water saving technology This washing machine features many wash program options allowing you to select exactly the right combination for each wash load to clean and care for your clothes. Additionally, when you choose to use Eco rinse with the new TECHNOLOGYå7ATERå!IDåRECIRCULATIONåSYSTEMåINåTHISåWASHINGå machine, considerable water savings can be made. 7EåTELLåYOUåMOREåABOUTåTHEåNEWåTECHNOLOGY åHOWåITåWORKSå and the amount of water saved on following pages. How does the Water Aid recirculation system work? 7HENåPROGRAMåSETTINGSåACTIVATEåTHEåRECIRCULATIONåSYSTEM åITå works as follows. Excess water in the outer bowl is pumped INTOåTHEåINNERåWASHBOWLåTHROUGHåAåNEWLYåDEVELOPEDå7ATERå Aid recirculation system. Control of the water flow from the inner washbowl to the outer bowl has been achieved through the redesign of the washbowl drain holes. 4HEå7ATERå!IDåRECIRCULATIONåSYSTEMåPROVIDESåWATERåSAVINGSå whatever the load size by utilising water in the outer bowl. environmental tip så 4 å HISåWASHERåISåENERGYåEFlCIENTåANDåMOSTåWATERåEFlCIENTå when used with a full load of clothes and with Eco rinse selected. så å4HEålRSTåTIMEåYOUåSWITCHåONåYOURåNEWåMACHINE å%COå rinse is selected for you to help you save money and to reduce the impact on the environment. You can select Deep Rinse for your first wash load if you wish. If you have previously used a top load agitator type washer, you need to know that your new washer works differently. This washer uses much less water per load of washing and does it through two new technologies. 1. Water Aid Recirculation system – In most wash and deep rinses the recirculation system is active and a recirculation pump runs to keep water at a low level in the outer bowl, and at a correct level in the washbowl. Water Aid recirculation saves 33% of wash and deep rinse water. However, to give better wash results for some types of loads, soil levels and detergent combinations, some programs do not have the recirculation system active in the wash stage, and some programs do not have the recirculation system active in both the wash and deep RINSEåSTAGESåSEEå7ATERå!IDåRECIRCULATIONåSYSTEMåACTIVEå programs on page 7.) Savings in water usage are realised whatever your load SIZEå,OADåSENSINGåCOUPLEDåWITHåTHEå7ATERå!IDå3YSTEMå ensures that only the correct amount of water required is used. The machine senses the load size and adjusts the amount of water required while continuing to keep water at a low level in the outer bowl. 2. Eco rinse is available as the preferred rinsing option. It is done by spraying water on the clothes, spinning the water out and repeating this sequence four more times. Deep rinse is available but the clothes are fully submerged in rinse water before draining and final spin. Eco and deep are both effective at removing detergent. In this washer, Eco rinse saves 75% of the deep rinse water used in a traditional top load agitator machine and is not designed for use with fabric conditioner. environmental tip #HOOSINGåPROGRAMåSETTINGSåINåWHICHåTHEå7ATERå!IDå recirculation system is active (see table on page 7), and choosing an Eco rinse, will use less than half the water of traditional top load washing machines. Water Aid recirculation system (Patent Pending) After your washing machine has filled with water for your WASH åTHEå7ATERå!IDåRECIRCULATIONåPUMPåWILLåBEGINåTOåDRAWå down water from the outer bowl and pump it into the inner washbowl. 4HEå7ATERå!IDåRECIRCULATIONåPUMPåCYCLESåONåANDåOFF åWORKINGå for 100 seconds then resting for 5 seconds. This maintains the correct level of water in the washbowl while keeping the water in the outer bowl to a minimum. 4HEåSTOPåANDåGOåmOWåOFåTHEå7ATERå!IDåRECIRCULATIONåPUMPå also effectively keeps the pump free and clear of lint. å OUåWILLåHEARåTHEå7ATERå!IDåRECIRCULATIONåPUMPåSWITCHINGåONå 9 and off during wash and deep rinse, if selected. The water level may appear to be too low for your wash, BUTåASåTHEå7ATERå!IDåRECIRCULATIONåPUMPåDRAWSåWATERåFROMå the outer bowl the water level will increase in the inner washbowl to the correct height for your wash. Inner washbowl design The design of the inner washbowl is the most apparent change to your washing machine. slot-shaped drain hole Gone are the hundreds of drain holes normally seen in the washbowl. These have been replaced with a few slot shaped holes inside teardrop shaped indentations arranged evenly around the washbowl wall. The number and design of the drain holes control the flow of water from the washbowl to the outer bowl. electrolux water aid washing machine about your washing machine 3 About your washing machine Draining wash and deep rinse water At the end of the wash stage and deep rinse stage, if deep RINSEåISåSELECTED åTHEå7ATERå!IDåRECIRCULATIONåPUMPåWILLåSTOPå There will be a delay to allow water to flow through washbowl drain holes into the outer bowl. After the delay, the drain pump will start pumping water out through the drain hose and then the pump will stop. The drain pump will cycle ‘ON’ and ‘OFF’ in this manner several times, waiting each time for water to move from the washbowl to the outer bowl before starting again. You will hear the drain pump switching on and off during draining stages of the wash program. The rinse options There are two rinses to choose from… Eco rinse and Deep rinse. Rinse option Eco Eco rinse Eco rinse is a spray rinse giving you maximum water saving Deep deep rinse Deep rinse uses much more water How does Eco Rinse work? 7HENå%COå2INSEåISåUSED åRINSEåWATERåISåSPRAYEDåINTOåTHEå washbowl in pulses. After each pulse the washbowl will spin to remove detergent laden water from the clothes. The machine will go through a series of five pulse spray and short spin cycles in this manner, followed by a final long spin that removes the water from the clothes to complete the full wash program. Compare this with deep rinse where much more water is used. For deep rinse, water enters the machine filling up to the wash water level selected. The washer agitates and finally empties the rinse water through the drain hose. If the recirculation system is active during a deep rinse, the water SAVINGåISåSIMILARåTOåTHEåWASHå)NåTHEåh7ATERå#ONSUMPTIONå Comparison” table on page iii you can see the water savings made from using Eco Rinse combined with water savings due to recirculation. tips and information )FåYOUåAREåSELECTINGåTHEå7OOLåWASHåPROGRAMåORåYOUåINTENDå to use fabric softener, you need to read “Rinse Option” on page 9, “Operating your washing machine”. 7EåRECOMMENDåYOUåREADåTHEåINSTRUCTIONSåFORåADDINGå detergent, fabric softener or bleach before you do your first wash load. See pages 5 and 6. Detergent recommendation Using water saving technologies of this machine, it is similar to a front load washing machine and its revolutionary design is optimised for low sudsing detergents. caution Use only low sudsing detergent designed for use in front load washing machines or high efficiency washers - for example, Cold Power for Front Loaders and High Efficiency Top Loaders or detergents labelled “Matic”. så & å AILUREåTOåUSEåTHEåRECOMMENDEDåDETERGENT åORåUSINGåTOOå much detergent is likely to create over-sudsing and give poor rinse and spin performance. så å)FåYOUåAREåUSINGåCONCENTRATEDåDETERGENTåITåISåVERYåEASYåTOå accidentally overdose. Take care. så å$ETERGENTåINåTABLETåFORMåORåSACHETSåSHOULDåBEåDROPPEDå directly into the washbowl i.e. do NOT put them in the dispenser drawer if one is fitted. Detergent and fabric softener dispensers Model 806 has a dispenser drawer that will automatically add detergent and fabric softener to your wash load, dispensing them at the correct time in the wash program you have selected. You will find the dispenser drawer in the top panel of your washing machine, above the washbowl. The dispenser can be used with powder or liquid detergents by following the instructions on pages 5 and 6. If you prefer not to use the dispenser to add detergent, mix the detergent in one litre of hot or warm water and add pre-mixed detergent to your wash load in the washbowl. tips and information You must use the dispenser drawer if you select the Delay start option. Model 606 does not have a dispenser drawer. You add detergent mixed with water directly to the washbowl. It does have a dispenser for fabric softener in the filter column at the top of the agitator. The fabric softener will be automatically dispensed at the correct time in the wash program. For instructions, refer page 6. 4 about your washing machine electrolux water aid washing machine About your washing machine Fabric softener recommendation If you use fabric softener, you need to select the Deep rinse option and not use Eco rinse for your wash load. (See “Rinse Option” page 9) Button response and digital display tips and information Always press the buttons gently. Fabric softener makes clothes softer and reduces static so that clothes do not cling to you when worn. However, you do not have to use softener, your machine will wash perfectly well without it. (For more information, refer pages 5 and 6) Lid lock feature Lid lock is a safety feature in your washing machine to ensure the lid is not opened during a stage in the wash program when it would be hazardous for you to do so. The lid will lock in the closed position when the machine is spinning. The “Lid Locked” indicator light will be on. caution Do not try to force open the lid when it is locked. så 7 å ATCHåTHEåINDICATORåLIGHTSåONåTHEåCONTROLåPANELåTOåSEEå what effect pressing a button has and listen for the ‘beeps’. så å7HENåYOUåPRESSåAåBUTTONåYOUåWILLåGETåAåSHORTå@BEEPåTOå acknowledge the entry. If you press a button and the option is not available at the time, a long ‘error beep’ will be heard. så å3OMETIMESåYOUåWILLåGETåAåDELAYåAFTERåPRESSINGåAåBUTTONå before the machine responds. så å4HEåDIGITALåDISPLAYåWILLåSHOWåTHEåTIMEåINåMINUTESåORå hours and minutes) to complete the wash program. This time does not include the time that the washing machine will take to fill with water. så å4HEåDIGITALåDISPLAYåWILLåALSOåSHOWåINFORMATIONåCODESå&ORå more information see page 10 for digital display codes or page 19 for fault codes. At all other times, you will be able to easily open the lid when it is unlocked and the indicator light is off. This gives you the flexibility of a traditional top load washing machine. (See Lid Locked on page 9 for more information). Out of balance interruption The washing machine can stop during rinse and spin stages of a wash program because of an out of balance condition. You will know this has happened because the machine will show Auto sensing water level feature in the digital display. Auto sensing is a feature where the washer fills automatically Out of balance is caused by uneven distribution of clothes with water to just the right level for your clothes load. You do in the washbowl. To correct the out of balance condition, open the lid and have the option to manually set the water level if you wish. redistribute the clothes evenly in the space between the 7HENåYOUåTURNåONåYOURåMACHINE åANDåAFTERåAåWASHåHASå agitator and the wall of the washbowl. You may have to wait finished in preparation for the next wash, the water level a moment for the lid to unlock before opening the lid. defaults to auto. 7EåRECOMMENDåYOUåUSEåTHEåAUTOåSENSINGåWATERåLEVELåOPTIONå Closing the lid will start the machine and resume the wash program. to ensure there is just the right amount of water for the wash load in the machine. In other words, it will usually give If you have frequent out of balance interruptions, it may be due to your washing machine not standing firm and level on you the best wash while also being the most efficient in the floor. This can be corrected by adjusting the machine terms of water usage. legs as described in the Installation instructions supplied with your machine. At times during a wash it may appear your machine is either Using too high a water level for small loads can also cause doing nothing or intermittently it is only gently vibrating/ out of balance interruption. Select auto sensing or lower jiggling/agitating. water levels when washing small loads. This is because your machine could be: så å)NåAUTOåSENSINGåTESTåMODEåANDåTHEåMACHINEåISå Washing instructions determining the correct amount of water for your wash. The washing instructions beginning on the next page are of (See page 8). a general nature and you should get good wash results by så å!TåAåDRAINåSTAGEåOFåTHEåWASHåPROGRAMåANDåTHEåMACHINEå following them. is allowing time for water to flow from the washbowl to However, due to the variables of fabric types, soil levels, the outer bowl (See ‘Draining wash & deep rinse water’ detergent types and available program settings you may page 3). find some combinations of these which do not always result så %NGAGINGåORåDISENGAGINGåTHEåDRIVEåCLUTCHåMECHANISM in the perfect wash. 7AITåAåSHORTåTIME åYOURåWASHINGåMACHINEåWILLåCOMPLETEåTHEå If for example you see residuals of detergent or soils on above tasks and continue with the wash. some items, please read the section Residues on washed The amount of water for auto is factory set at an optimised level. You can adjust the Auto level up or down by a small amount. For more information see ‘Customising the auto sensing water level’ page 12. items on page 15. Over time you will learn what is the best set-up of programs, detergent and load sorting for different load types and soils. electrolux water aid washing machine preparing for your wash 5 Preparing for your wash Sort your washing into separate wash loads Each load of washing should contain clothing which needs the same washing conditions. For example, you should not wash delicate clothes with very dirty work clothes. Colour fast and non-colourfast fabrics should be separated. Knowing the type of fabrics you have and how dirty they are will help when you make selections from the wash program options. Some fabrics are lint collectors and can pick up lint, dirt and colour from other fabrics which are lint producers. Some examples are listed below: Lint collectors Lint producers Corduroy Towels Synthetics Nappies Permanent press fabrics Chenille/Candlewick tips and information Make sure that you wash lint collectors separately from lint producers. Check your clothes to avoid damage så å%MPTYåALLåPOCKETSå#LOSEåALLåHOOKSåANDåZIPPERSåTOåAVOIDå snagging clothes. så å7ASHåBRAS åPANTYHOSEåANDåOTHERåDELICATESåINåAåMESHå laundry bag, which you can purchase from your supermarket. såå $ å ONTåUSEåTOOåMUCHåDETERGENTå4HISåWILLåGIVEåYOUåTOOå many suds causing low spin speeds, poor rinsing and overloading the motor during spin stages of the wash program. så å$ONTåUSEåTOOåLITTLEåDETERGENTåBECAUSEåYOUåWILLåGETåAåPOORå wash. If you think you need more, increase dosages by only small amounts to avoid excessive suds. så 3EEå!DDINGåDETERGENTåFORåAå$ELAYåSTARTåONåPAGEå caution Do not spill fabric softener on the clothes as it may stain them. Add the detergent – Model 806 7HENåUSINGåTHEåWASHINGåMACHINEåFORåTHEålRSTåTIME åCHECKå that the dispenser is set for the type of detergent you will use. To do this, proceed as follows: 1. Pull the dispenser drawer forward until it stops. 2. Lift the front of the drawer up and forward to remove it from the runners. 3. Check the position of the flap at the rear of the detergent compartment in the dispenser drawer. (Factory setting is flap up for powder.) clip flap up for powder caution 4. Clip the flap down if you are going to use liquid detergent. Pre-treatment sprays and stain removers Fh[#jh[Wjc[djifhWoiWdZijW_dh[cel[hiYWdZWcW][ plastic components on your washing machine. clip flap down for liquid ?\oekki[fh[#jh[Wjc[djifhWoiehijW_dh[cel[hi" 5. Refit the dispenser back into its runners. apply them to the clothing well away from your Remember: If you change the type of detergent washing machine. you use, the position of the flap will need changing. See above. Load the washing machine 7HENåLOADINGåTHEåCLOTHESåINTOåYOURåWASHINGåMACHINE åTHEREå 6. You are now ready to add detergent. You are now ready to add detergent. Measure the amount you will use and are four things to remember: pour it into the detergent compartment of the dispenser så å#LOTHESåMUSTåBEåLOADEDåEVENLYåAROUNDåTHEåAGITATORå&ORå drawer. best results load small items first, followed by large items. så å#LOTHESåMUSTåNOTåBEåWRAPPEDåAROUNDåTHEåAGITATOR så å4HEåWASHINGåMACHINEåMUSTåNOTåBEåOVERLOADEDå#LOTHESå add detergent must be able to move around during washing. så å4HEåLOADåSHOULDåCONTAINåONLYåTHREEåORåFOURåLARGEåITEMS å for example, sheets. The rest of the load should be small items. A mixed load of large and small items will wash cleaner than a load of all large items. 7HENåUSINGåLIQUIDåDETERGENT åSOMEåMAYåLEAKåOUTåOFåTHEå dispenser into the wash load earlier than expected through Detergent and fabric softener use small openings in the back of the dispenser. These så D å on’t use the wrong type of detergent. You must openings are to help the flushing out of detergent. use a low sudsing detergent designed for front load washing machines or high efficiency top loaders, 7. If you want to use fabric softener, see ‘Add fabric softener’. such as Cold Power for Front Loaders and High Efficiency Top Loaders or detergents labelled “Matic”. 8. Close the drawer by pushing it backwards into the top panel of the washing machine when you have finished så å$ONTåUSEåSOAP BASEDåPRODUCTSåINåYOURåWASHINGåMACHINE adding detergent and softener. EF U FS HF OU TP GU F OF S 6 preparing for your wash electrolux water aid washing machine Add fabric softener – Model 806 "EFOREåADDINGåSOFTENERåTOåTHEåDISPENSER åMAKEåSUREåTHEå siphon cap is pushed firmly down onto the spigot in the drawer. The softener will not siphon out if the cap is incorrectly fitted, is missing or blocked with residue. You are now ready to add fabric softener. Measure the correct amount as recommended on the softener package into a cup and then pour it into the softener compartment of the dispenser drawer. Add fabric softener – Model 606 Measure the correct amount of fabric softener by following the recommendations on the package. Mix softener with an equal amount of warm water but only mix enough to fill to the line marked inside the cup. The softener cup holds 75ml. Pour the mixed softener into the cup in the top of the AGITATORå"EåCAREFULåNOTåTOåSPILLåSOFTENERåONåCLOTHESåINåTHEå wash bowl as you pour it, as it may stain them. caution Do not overfill the fabric softener dispenser. Overfilling and then siphoning out too early can cause softener and detergent to mix resulting in staining problems. The softener dispenser holds 100ml when filled up to the MAX marker. Any level lower than MAX will function correctly. siphon cap pushed down EF U FS HF OU TP GU F OF S add fabric softener Add bleach "LEACHINGåOFåCLOTHESåCANåHELPåREMOVEåSTAINS åHEAVYåSOILINGå and to kill bacteria. caution Only use the detergent compartment for detergent and the fabric softener compartment for fabric softener. add bleach here MAX - Do not fill above this height siphon cap Add the detergent – Model 606 Measure the amount of detergent you will use and mix in one litre of hot or warm water. Add the pre-mixed detergent to the wash load in the washbowl. E no][djof[ÅThis is generally a powder type bleach. Mix the required quantity with water and pour down the hole in the top panel during the fill when there is some water in the washbowl. Refer to the instructions on the bleach container. så Chlorine type – This type of bleach should not be mixed with detergent. Mix the bleach with water as per instructions on the container. Start to fill the washing machine with water. 7HENåTHEREåISåSOMEåWATERåINåTHEåWASHBOWL åPOURåTHEå bleach solution down the hole in the top panel. Allow the washing machine to finish filling and to agitate for a few minutes, then let it stand for the required time. Advance machine to Spin to empty the washbowl, then wash the clothes load using detergent and your selected wash program. tips and information Bleach should not be used on silk, wool, rayon or drip dry clothes. electrolux water aid washing machine operating your washing machine 7 Operating your washing machine Starting your washing machine 1. Turn on the taps 2. Close the lid 3. Press the Power button Program button Press the Program button until the light indicates the program you want to use. Each press of the Program button changes the wash program to the next program. 7HENåYOUåCHOOSEåTHEå7OOLåPROGRAM åTHEå Deep rinse option is automatically selected for you. You cannot select Eco rinse with THEå7OOLåWASHåPROGRAM Power button The machine will ‘beep” twice, briefly display a number in the digital display and then it is ready for you to select the wash program settings. Please wait for this to happen before attempting to operate the machine. If the displayed settings are what you want to use then press Start/Pause to start the wash program. To select a different program or change other settings, read the following instructions. Water Aid recirculation system active programs Your machine is programmed with the recirculation system active in most wash and deep rinse stages of the various wash programs. The following table shows when the recirculation is active during wash and deep rinse, for the DIFFERENTåSETTINGSåOFå7ASHå0ROGRAMåANDå$IRTå,EVEL Is the recirculation system active? Dirt Level Medium Heavy 7ASH Deep Rinse 7ASH Deep Rinse 7ASH Deep Rinse Intensive No No No No No No Normal / Heavy Yes Yes Yes Yes No No Normal Yes Yes Yes Yes No Yes 7OOL Yes Yes Yes Yes No Yes Delicate Yes Yes Yes Yes No Yes Wash Program NOTE: On powering up the machine, and also after a wash has finished in preparation for the next wash, the water level defaults to auto sensing and rinse defaults to Eco. (If your last wash was a Drip dry / Deep rinse program, then rinse will stay at deep). Choosing your own wash program settings så å3ETTINGSåCANåBEåCHANGEDåATåANYåTIME åEVENåWHENåAå wash is in progress or when the machine is paused. 7HENåRUNNINGåTHEREåWILLåBEåAåSHORTåDELAYåOFååSECONDSå before a change to settings takes effect. This is to allow you time to complete your desired changes. så å)FåYOUåMAKEåAåCHANGEåTOåSETTINGSåDURINGåAåWASH åTHEå progress of the wash may not continue exactly from where it was in the program before the change. så å7HENåYOUåTRYåTOåMAKEåAåCHANGEåTOåSETTINGSåANDåTHEå selection you make is unavailable at the time, you will hear a long ‘error beep’. Light NOTE: Eco Rinse With most programs you have an option of selecting an Eco Rinse, in which case the Deep Rinse column of the table above is not relevant. Recirculation is not active during Eco Rinse. Wash program guide Wash program (Program button) Recommended dirt level Recommended temp. wash water Using the program Intensive *(includes 6 minute soak) Heavy (OTåORå7ARM Select this program for a heavily soiled cotton wash load. Normal/Heavy Medium (OTåORå7ARM Select this program for a full load of normally soiled cottons. Normal Medium (OT å7ARMåORå#OLD Select this program for an average domestic load of mixed fabrics. Wool Medium or Light 7ARM Select this program for woollen clothes. Only wash woollens labelled ‘machine washable’. Delicate Light 7ARM Select this program for lingerie, lace trimmed and embroidered items. * Intensive has a built-in 6 minute soak period at the start of the wash program. Any soak period you have selected will be added to the 6 minutes. (See information at “Soak option” on page 12) 8 operating your washing machine electrolux water aid washing machine Operating your washing machine Dirt Level button There are 3 dirt levels to choose from: såHeavy for heavily soiled clothes eg. very dirty work clothes and overalls såMedium for everyday soiled items eg family clothes, sheets etc såLight for lightly soiled clothes, just to freshen them up The Dirt Level lets you have an influence on the wash time of the selected program. Press the Dirt Level button if you want to increase or decrease the wash time. For the same wash program, Heavy will have a longer wash time than Medium, and Medium a longer wash time than Light. Water Level button 0RESSINGåTHEå7ATERå,EVELåBUTTONåALLOWSåYOUå to choose the water level to be used for your wash. You can select: Wkje sensing or a manual water level så(IGH så-EDIUM så,OW Auto sensing is the default selection for each wash to help you save water. tips and information Do not overfill the washing machine. 7HENåCHOOSINGåAåMANUALåWATERåLEVEL åUSEåONLYåTHEåAMOUNTå of water you need for the wash load. If you are unsure what level to choose, select auto sensing and the machine will automatically fill with water to the correct level for you. Auto sensing water level Selecting the auto sensing water level option ensures you will use just the right amount of water for the wash load. 7HENåYOUåSTARTåYOURåWASHåPROGRAM åTHEåMACHINEåWILLå conduct a series of water fill and short agitations to determine the amount of water needed. will show in the digital display. Digital display shows followed by then program time is shown. eg. sequence repeats until end of sensing will disappear and automatically normal wash agitation will commence when there is sufficient water in the bowl. If you add more clothes to the washbowl after an auto sensing water level wash program has started, the machine will auto sense the new load and add extra water if needed. For auto water level, the amount of water the machine determines for a load is an optimised level. You can adjust the auto level to be a small amount above or below the optimised level if you consider the amount of water you normally get using the auto option is too high or too low. To do this, see ‘Customising the auto sensing water level’ on page 12. Checking the water level 7HENåTHEå7ATERå!IDåRECIRCULATIONåSYSTEMåISåACTIVEåANDåTHEå agitation of washing has started, you can open the lid to check the working water level in the washbowl. !FTERåOPENINGåTHEåLID åTHEå7ATERå!IDåRECIRCULATIONåPUMPåWILLå continue to run for 10 seconds. Check the water level being used for your wash during the time the pump is running. If you do not close the lid after 10 seconds, the pump will stop and the water level in the washbowl will begin to drop. If the lid is left open, the water level can drop a maximum 100mm as water drains from the inner to the outer bowl. The level of water may then appear too low for your wash load, but closing the lid will start the recirculation pump and the water level will return to the working level, ie. rise by a maximum 100mm. 100mm Recirculation pump on Recirculation pump off If you are using program settings where the recirculation system is not active, the water level will not change when you open the lid. Temp. button Press the Temp. button to set the wash water temperature. There are 5 temperatures to choose from: så(OT så 4EMPERATUREåBETWEENåHOTåANDåWARM så7ARM så 4EMPERATUREåBETWEENåWARMåANDåCOLD så#OLD Press the Temp. button repeatedly until the temperature you want is highlighted with an indicator light. A sensor in the machine measures incoming water temperatures and controls the entry of water to achieve the selected wash temperature. The hot and cold water valves may open together or independantly. tips and information så 9 å OUåMAYåBEåLIMITEDåINåYOURåWASHåTEMPERATUREåCHOICEå by the wash program selection made. For example, you will not be able to select hot water when the wool program is selected. så å)FåYOUåHAVEåAåCOLDåWATERåCONNECTIONåONLYåANDåTHEåHOTå valve is capped off, you must select cold washes only, or the machine will sense the unavailability of hot for washes other than cold and shutdown. (Refer Installations instructions). så å!LLåRINSEåWATERåTEMPERATURESåAREåCOLDåEXCEPTåFORåTHEå WOOLåWASHåPROGRAMå7OOLåHASåAåWARMåWASHåANDåAå warm rinse. så å#OMPONENTSåINåTHEåWASHINGåMACHINEåAREåDESIGNEDåTOå be used with water no hotter than 70°C. You should have a temperature limiting valve fitted by a qualified plumber if your water supply is too hot. electrolux water aid washing machine operating your washing machine 9 Spin speed Press the Spin button to change the spin speed. The indicator lights will show the speed that has been selected at each press of the button. Recommended spin speeds are: så(IGHåå nåFORåCOTTONSååNON DELICATES så-EDIUMåå nåFORåDELICATES så,OWåå nåFORåDELICATESååWOOLLENS så$RIPåDRYåå nåFORåDRIPåDRYåCLOTHESåNOåSPIN Drip dry Drip dry clothes, that need to be taken out of the washing machine dripping wet, do not require a spin cycle after deep rinse. To select Drip Dry: så åENSUREåTHEåRINSEåOPTIONå$EEPåRINSEåISåSELECTEDå (See “Rinse Option button” below) så PRESSåTHEå3PINåBUTTONåUNTILåTHEå$RIPå$RYåLIGHTåISå@/. At the end of deep rinse in your wash program, the washing machine will stop and will be shown in the digital display. Open the lid and remove the drip dry clothes from the machine. To drain the remaining water from the washing machine, simply close the lid and allow the cycle to complete. If you have other non drip dry items remaining in the bowl, de-select drip dry and select a spin speed to spin those items dry. Selecting spin only You may want to only spin clothes eg. clothes you have washed and rinsed by hand in a wash tub, or for very wet clothes to remove water. Press the Advance button until only the ‘Spin’ progress indicator light is ‘ON’ (blinking). Press the Start/Pause button. The washing machine will pump any water out first and then start a spin cycle. Rinse Option button Pressing the Rinse Option button allows you to change the rinse type. For most washes the machine automatically selects Eco rinse for you, but it will select deep rinse if you have already selected the wool wash program or drip dry, or your last wash was a drip dry with deep rinse. Eco rinse Press the Rinse Option pad until Eco rinse is illuminated in the progress indicator. The washing machine will go through a series of five pulse spray/spin cycles to remove the detergent laden water from the clothes. Deep rinse Press the Rinse Option button until Deep rinse is illuminated in the progress indicator. For deep rinse, the washer fills with water to the level selected for the wash water level. tips and information så 7 å EåSTRONGLYåRECOMMENDåYOUåUSEå%COåRINSEåFORåYOURå washes whenever you can. There is considerable saving of water when Eco is used instead of Deep to rinse CLOTHES åASåCANåBEåSEENåINåTHEå@7ATERå#ONSUMPTIONå Comparison’ table shown on page iii. så å9OUåCANNOTåSELECTå%COåRINSEåWITHåTHEå7OOLåWASHå program or Drip dry spin option. A long ‘error beep’ will tell you this if you try to select Eco rinse for them. så å%COåRINSEåISåNOTåDESIGNEDåTOåBEåUSEDåWITHåFABRICå softener. Select Deep rinse if you are going to use fabric softener. Deep rinse ensures the fabric softener is correctly dispensed and thoroughly removed from your clothes during rinsing. så å)FåYOURåCOLDåWATERåSUPPLYåPRESSUREåISåLOW å%COåRINSEå might not be fully effective in rinsing suds from your clothes. If this is the case then use Deep rinse. Note that you can save this option under your Favourite button if you wish. (Refer page 11.) Start/Pause button The Start/Pause button is used to start, stop or continue the wash program. If you have started a wash program and wish to stop it for some reason, then press Start/ Pause. If you press Start/Pause during a spin stage and you want to open the lid, you must wait until the Lid Locked light is ‘OFF’. Lid Locked The ‘Lid Locked’ indicator light will be ‘ON’ to advise you when the lid of the washing machine is locked in the closed position. The lid will be automatically locked when the washbowl is spinning during a wash program. To fill and agitate the lid must be closed, but will not be automatically locked. If the lid is open and the machine is waiting for it to be in closed for the wash program to continue, you will see the digital display accompanied by ‘beeping’. Should you need to access the washbowl during spin, press Start/Pause. You will have to wait a short time for the bowl to stop spinning before the lid unlocks and the ‘Lid Locked’ indicator light turns ‘OFF’. If then you open and close the lid, and the machine is still in a spin stage of the wash program, the lid will lock and the machine will continue to complete the spin stage. warning så D å O NOT insert anything into the lid lock slot in the top panel of the washing machine. :EDEJ_dj[h\[h[m_j^j^[b_ZbeYac[Y^Wd_icje try and disable it or otherwise change the way it works. :EDEJjhoje\ehY[ef[dj^[b_Zm^[d_j_ibeYa[Z$ 10 operating your washing machine electrolux water aid washing machine Operating your washing machine Progress of your wash program The wash progress indicator gives you information about the progress and status of your wash program. During a wash, the program stage will be highlighted in the wash progress indicator as it takes place. For example, when you start your wash by pressing Start/Pause, the first STAGEå@7ASHåWILLåBEåHIGHLIGHTED Advance button Press the Advance button to advance the wash program to the next stage as shown in the progress indicator. 7HENåTHEåPROGRAMåMOVESåONTOåTHEåRINSEåSTAGE å@7ASHåWILLå no longer be highlighted, and either Deep rinse or Eco rinse will be highlighted, whichever is selected. 7HENåYOUåPRESSå3TART0AUSEåDURINGåAåWASH åAåmASHINGå progress indicator tells you where the wash is in the program and remaining stages will be highlighted but not flashing. In the following illustration, the machine is paused in the @7ASHåSTAGEåLIGHTåmASHING å@%COåRINSEåANDå@3PINåAREå highlighted to show these stages will follow the wash stage when it is completed. EGå7ASHå %COåRINSEå 3PIN NOTE: A flashing progress indicator light indicates your machine is paused. When ‘End’ is highlighted your wash has finished. Advance button Digital display The digital display will show the time in minutes (or hours and minutes) to complete a wash program. This time does not include time the washing machine will take to fill with water. The digital display also shows information codes, in some CASESåACCOMPANIEDåBYå@"EEPINGå3EEåTABLEåBELOW Digital display codes Displayed code Beeping Information the display is giving you and what to do to continue 15 very fast ‘beeps’ every 4 minutes. Indicates the machine has gone out of balance during spin. Open lid, redistribute load and close lid. 5 very fast ‘beeps’ every 4 minutes. Lid is in the open position. Close the lid. 3 slow ‘beeps’ every 4 minutes. (No ‘beeps’ if end of program beep is switched off, see page 12). The machine has reached the end of the Drip Dry program. Open lid, remove clothes and close lid. Your machine is Soaking. 7HEREåSOAKåISåINCLUDEDåINåTHEåWASHåPROGRAM The machine has paused to allow motor controller to cool. 7AIT åANDåAFTERåAåSHORTåDELAYåTHEåWASHåWILLåCONTINUE You are in the Favourite wash programming mode. Press Favourite to save displayed settings as a favourite wash or press Start/Pause to exit and not save settings. The machine is set for Delay start. The machine is in auto sensing water level test mode 7AIT åANDåAFTERåAåSHORTåDELAYåTHEåWASHåWILLåCONTINUE then Other codes Accompanied by many ‘beeps’. The machine is informing you of a fault with the washing machine which you need to address. Refer to pages 17-19 for further information and what you should do before calling Service. electrolux water aid washing machine operating your washing machine 11 Favourite button The Favourite button allows you to store your favourite wash program in the washing machines memory and then run it. To program your favourite wash: 1. Hold the Favourite button depressed for 3 seconds. The digital display will show indicating you are in the favourite wash programming mode. The options highlighted on the control panel display are the currently stored favourite program. 2. Press the appropriate buttons as listed in the table below to make your selection at each one for your favourite wash program. 3. Press the Favourite button to store the wash program OR Press the Start/Pause button to cancel the new settings and not save them. 7EåRECOMMENDåYOUåWORKåFROMåLEFTåTOåRIGHTåACROSSåTHEå control panel, and that you read the information elsewhere in this book to see selections available at each. Press button to select Program wash program Dirt Level wash time 7ATERå,EVEL wash water level required Temp. wash water temperature Spin spin speed Soak a soak period Rinse Option the rinse to be used described on pages 5 and 6. å 7 å ITHåTHEåMACHINEåINåPAUSEåMODE åPRESSå$ELAY4HEå and digital display will show the alternating symbols indicating a delay start of 1 hour. 4. Press the Delay button repeatedly until the required delay time is shown in the display eg. . The washing machine will start the wash cycle in 4 hours time. DO NOT PRESS Start/Pause 5. Select your wash program and other options if required. To use Delay start with a favourite wash program 1. Ensure you have selected and stored your favourite wash program. (See “Favourite button” section on the left of this page) 2. Press the Delay button repeatedly until the required delay time is shown in the digital display eg. ETC Delay button 3. Press the Favourite button, your favourite wash program will start after the delay time has expired. DO NOT PRESS Start/Pause. Favourite button Cancelling a Delay start Cancel a Delay start by pressing Start/Pause eg. you may have set your washer for a delayed start and changed your mind. tips and information Delay start cannot be stored in your favourite wash program. To use delay start with a favourite wash program see instructions on the right of this page. To run the favourite wash program, Press the Favourite button to set the washer to the currently stored favourite program. You can make changes to settings if you wish. Press Start/Pause to begin the wash. Delay button You can start a wash program after a certain number of hours have elapsed, ranging from 1 hour to 12 hours. For example, if you want to start a wash cycle 4 hours from the current time then proceed as follows: 1. Load clothes into the washing machine. 2. Put detergent and softener in dispenser drawer as R T DE EN W RG POETE D Delay start option Adding detergent for a Delay start Model 806 7HENåUSINGåPOWDERåDETERGENT åWIPEåTHEåINSIDEåOFåTHEå dispenser drawer dry before you put the detergent in, otherwise it may harden and not dissolve correctly. Model 606 Remove the filter column and pour the detergent down the centre of the agitator. Then refit the filter column to the agitator. 12 operating your machine electrolux water aid washing machine Operating your washing machine Soak option Soak button This option allows you to soak heavily soiled clothes at the beginning of the wash. To do this, select the wash program you want to use, then press the Soak button. Pressing this button repeatedly gives you the soak selections in the digital display, eg. mins-- mins-mins-mins-- hour. The lid must be closed to allow Soak functions to operate, including the Intensive wash program 6 min. soak. At various times during a soak, the recirculation pump will turn on and off and the machine will agitate for short periods. At other times, the clothes are soaking and the machine will be doing nothing. tips and information During the soak period will be displayed and there will be a short agitation at intervals to maximise the effect of the detergent. The wash will begin automatically at the end of the soak period. To cancel the soak period at any time, press the Soak button repeatedly until is displayed. Customising the auto sensing water level If you are not happy with the water level when using auto sensing water level selection, you can adjust the auto level to be either higher or lower when you are in the program setting mode. 7ITHåTHEåAUTOåSENSINGåLEVELåSELECTED åHOLDINGåTHEå7ATERå Level button depressed for 3 seconds will show the Auto Adjust setting on the digital display: optimised auto water level (factory set) 20mm higher than optimised water level 20mm lower than optimised water level %ACHåPRESSåOFåTHEå7ATERå,EVELåBUTTONåAFTERåTHEålRSTåPRESSå will change the Auto Adjust setting to the next water level selection. 7HENåTHEåSETTINGåISåTHEåONEåYOUåWANT åASåSHOWNåINåTHEå digital display, save it by pressing Start/Pause. The washer will then be ready to start a wash program. tips and information )FåYOUåDOåNOTåPRESSå7ATERå,EVELåORå3TART0AUSEåWITHINåå seconds of the last button press or press any other button, the machine will exit the auto adjusting mode. In this case the setting will not have been changed and the machine will be paused. To switch off the end of program ‘beep’ The washing machine is factory set to ‘beep’ at the end of your wash. It will also ‘beep’ when the machine has paused after the Drip dry Deep rinse, to alert you to remove the drip dry clothes from the washbowl. To change the ‘beeping’ selection, proceed as follows: 1. Hold the Start/Pause button depressed for 3 seconds Press and hold for 3 seconds 2. Press the Temp. button to change the selection if required. in the digital display = ‘beep’ (ON) in the digital display = ‘beep’ (OFF) 3. Press the Start/Pause button to store the selection. 7HENåNOå@BEEPåATåENDåOFåPROGRAMåISåSELECTED åTHEåMACHINEå will still ‘beep’ when buttons are pressed and for unavailable selections. tips and information If you do not press Temp. or Start/Pause within 5 seconds of the last button press or press any other button, the machine will exit the programming mode. In this case the setting will not have been changed and the machine will be paused. electrolux water aid washing machine caring for your washing machine 13 Caring for your washing machine What to do after you have finished your washing. så å0RESSåTHEå0OWERåBUTTONåTOåSWITCHåOFFåTHEåMACHINE så 3WITCHåOFFåTHEåELECTRICITYåATåTHEåPOWERåPOINT så 4URNåOFFåTHEåWATERåTAPS så å,EAVEåLIDåOPENåFORåAåWHILEå4HISåALLOWSåTIMEåFORåMOISTUREå inside the washing machine to evaporate and for any odours to disperse. Cleaning the lint filter Lint is a collection of threads and fluff which comes off your clothes during washing. Your washing machine collects this lint in the lint filter. It is important to clean out this lint filter, preferably after each wash. How to clean the lint filter så å2EMOVEåTHEålLTERåCOLUMNåFROMåTHEåCENTREåOFåTHEåAGITATOR Cleaning the dispenser The dispenser needs to be cleaned regularly, preferably after each wash. Inspect the dispenser after each wash to see if there is any residue of detergent or fabric softener. To do this proceed as follows: så å0ULLåTHEåDISPENSERåDRAWERåFORWARDåUNTILåITåSTOPS så å,IFTåTHEåFRONTåOFåTHEåDRAWERåUPåANDåFORWARDåTOåREMOVEåITå from the runners. så å2EMOVEåTHEåSIPHONåCAPåFROMåTHEåDRAWERåSPIGOTåASå shown below. så å5NCLIPåTHEålLTERåBAGåFROMåTHEåCOLUMN QPXEFS MJRVJE så # å LEANåTHEåDISPENSERåDRAWER åSIPHONåCAPåANDåSPIGOTåWITHå hot water and a brush, eg. an old toothbrush. så å$RYåTHEåDRAWERåANDåCAP så å0UTåSIPHONåCAPåBACKåONTOåTHEåSPIGOT åENSURINGåTHEåCAPå is fully pressed down. så å"EFOREåREPLACINGåTHEåDISPENSERåBACKåINåITSåRECESS åCLEANå the inside of the drawer with an old toothbrush. så 4 å URNåTHEåBAGåINSIDEåOUTåANDåREMOVEåTHEåLINT så å7ASHåTHEålLTERåBAGåINåHOTåWATERå#LEANåTHEålLTERåBAGåWITHå an old brush, making sure water can flow through the bag mesh. så å#LEANåOUTåANYåRESIDUEåINåTHEåSOFTENERåDISPENSERåCUPåIFå one is fitted in the top of the filter column. så 0 å UTåTHEåDISPENSERåBACKåINTOåITSåRUNNERSåANDåCLOSEåTHEå drawer. så 2 å EASSEMBLEåTHEålLTERåTOåTHEåCOLUMNåANDåPLACEåITåBACKåINå the centre of the agitator. 14 caring for your washing machine electrolux water aid washing machine Caring for your washing machine Cleaning your washing machine To clean the inside and outside of your washing machine you should: så å7IPEåTHEåSURFACEåWITHåAåMILDåDISHWASHINGåDETERGENTåANDå warm water. så 7IPEåDRYåWITHåAåSOFTåCLOTH warning Never use solvents, aerosol cleaners, spray pack cleaners, glass cleaners, metal polishes, caustic materials, scourers or general household cleaners on or near the top panel and lid, control panel or other parts of your washing machine. Cleaning stains in the washbowl Stains and residue in the washbowl can be caused by: så å-ETALåOBJECTSåSUCHåASåBOBBYåPINS åDRESSåMAKINGåPINSå and nails så 3ALT så å"ODYåOILSåANDåGREASEåFROMåVERYåDIRTYåORåSWEATYåCLOTHESå being deposited around the top of the washbowl så å%XCESSIVEåFOAMåDURINGåWASHåIFåINCORRECTåORåTOOåMUCHå detergent is used. tips and information så # å HECKåALLåPOCKETSåBEFOREåLOADINGåCLOTHESåINTOåYOURå washing machine. så å$ONTåLEAVEåWETåCLOTHINGåESPECIALLYåSWIMWEAR åINåTHEå bowl for too long before you wash it. How to clean the washbowl så å7IPEåWITHåAåCLEANINGåPRODUCTåWHICHåISåSUITABLEåFORå stainless steel. så å/ILYåDEPOSITSåCANåBEåREMOVEDåBYåWIPINGåSURFACESåWITHåAå mild dishwashing detergent and warm water. caution Never use bleach cleaners or steel wool to clean the stainless steel washbowl. Avoiding build-up of undissolved detergents If you only wash with cold water, undissolved detergent and body oils will build up in the washing machine. This build-up can cause spotting on your clothes. To avoid this build-up: så å$OåNOTåUSEåTOOåMUCHåFABRICåSOFTENERåWITHåCOLDåWATER så 3ELECTåAåHOTåWATERåWASHåATåLEASTåONCEåAåMONTH Clearing build-up in the washing machine if there is spotting on your clothes Select the following to set up a machine cleansing program: Program Delicate Dirt Level Light å 7ATERå,EVELå -EDIUMå å 7ATERå4EMPå (OT Spin speed Low Rinse Option Deep rinse Soak 1 hour Put 250 grams of Epsom Salts into the washbowl. Press Start/Pause to begin the program and allow it to run to completion. Removing your washing machine lid You can remove the lid of your washing machine for easy cleaning. 7HENåCLEANINGåTHEåLID åUSEåONLYåMILDåDISHWASHINGåDETERGENTå and warm water. See the section on this page “Cleaning your washing machine”. How to remove the lid så /PENåTHEåLIDåTOåAåVERTICALåPOSITION så å,OOKåFORåTHEåHINGEåCLIPSåONåTHEåINSIDEåOFåTHEåLIDåATåTHEå bottom left and right hand corners. så å0RESSåDOWNåONåEACHåHINGEåCLIP åSLIDINGåTHEåCLIPSåTOWARDSå the centre of lid until they reach the stop. Up!sfmfbtf!ijohf Qsftt!epxo!!ifsf Tmjef!uijt!xbz Tupq så , å IFTåTHEåLIDåSTRAIGHTåUPåTOåREMOVEåITåFROMåTHEåWASHINGå machine How to replace the lid så å-AKEåSUREåTHEåHINGEåCLIPSåAREåATåTHEåSTOPåPOSITIONå3EEå below. så å(OLDåLIDåVERTICALåANDåLOWERåITåINTOåTHEåLIDåRECESSåONåTHEå top panel. så å3LIDEåTHEåHINGEåCLIPSåTOWARDSåTHEåEDGEåOFåTHEåLIDåUNTILå they clip into position. Up!tfdvsf!ijohf Tmjef!uijt!xbz så #LOSEåTHEåLID electrolux water aid washing machine helpful hints in dealing with washing problems 15 Helpful hints in dealing with washing problems Residues on washed items tips and information Some detergents have ingredients which do not fully dissolve and as a consequence, may leave white residue or particles evident on the surface of darker clothes in the finished wash load. Similarly, some soils may not dissolve fully, resulting in residue evident on lighter coloured clothes. If you are experiencing residue on some clothes, the following tips will help: så å#HECKåTHATåYOUåAREåUSINGåFRONTåLOADåTYPEåDETERGENTåTOå minimise over-sudsing. You may find different brands of detergent give better results. Liquid detergent may be better than powder in your situation. så å0RE MIXåTHEåDETERGENTåTHOROUGHLYåINåWARMåORåHOTåWATERå to improve the dissol ving. så å2EDUCEåDETERGENTåDOSAGEåTOåBETWEENåAååANDå§b¨åOFåTHEå manufacturer’s standard recommendation to avoid over concentration (the lower water usage requires lower detergent usage.) så å3OMEåRESIDUEåMAYåBEåRE DEPOSITEDåLINT åSOåBEåCAREFULåTOå not have lint producing items in a load which has darker clothes. så å3ELECTåDEEPåRINSEåANDåNOTåECOåRINSEåTOåHELPåmUSHåMOREå particles away. så å2EDUCEåTHEåCLOTHESåLOADåSIZEåPERåWASHåANDåUSEåAå manual water level setting to give more freedom for the clothes to move around in the bowl. så å5SEåANOTHERå0ROGRAMåASåBELOW åWHICHåHASåBEENå designed to minimise residual particles (they are in order of increasing benefit and will help you choose the best program for your wash load.) – Any Program, plus the Heavy Dirt Level option setting – The Normal/Heavy Program, plus the Heavy Dirt Level option setting – The Intensive Program Stained clothes – Hints for removing stains The guide to stain removal on page 16 may assist you in stain removal. Treat all stains as soon as possible. The longer you leave a stain the harder it will be to remove. Try soakers and stain removers first. If you use pre-treatment sprays or stain removers, apply them to the clothes items in a well ventilated area away from your washing machine. så å!VOIDåTHEåUSEåOFåHOTåWATERåONåSTAINSåASåHOTåWATERåWILLå set stains. så å5SEåLIGHTåSTROKESåANDåDONTåRUBåTHEåSTAINåREMOVERåINTOå the fabric. så å)FåYOUåUSEåAåCHLORINEåBLEACH åFOLLOWåTHEåINSTRUCTIONSåONå the bottle and dilute it before putting it on clothing. så å4ESTåCOLOUREDåFABRICSåONåANåINSIDEåSEAMåFORåCOLOURå fastness before using any stain removers or bleaches. så å4ESTåSYNTHETICåFABRICåONåANåINSIDEåSEAMåBEFOREåUSINGåANYåå chemicals or bleaches. NOTE: Chemicals referred to for stain removal are available from your local supermarket, hardware store or the chemist. caution Pre-treatment sprays and stain removers can damage plastic components on your washing machine. warning Do no use dry cleaning fluids or solvents near your washing machine. These fluids will damage your washing machine and may cause an explosion. Yellowing or greying clothes Problem Possible causes What to do Greyness Incorrect wash times and using insufficient detergent which can cause redepositing of detergent on clothes. Using incorrect type or too much detergent can cause poor rinsing and poor spin performance. Mixing whites with very dirty clothes, eg work clothes. 1. ONLY use low sudsing, front load washer or HE detergent in this machine, such as Cold Power for Front Loaders and High Efficiency Top Loaders or detergent labelled “Matic”. 2. Re-sort load, then re-wash using program selections suitable for the fabric and hot or warm water. 3. If the water is very dirty or very sudsy, repeat 2 above reducing the amount of detergent you use. Using soap flakes instead of laundry detergent. Yellowing A build-up of oils in clothes that come into close contact with the skin, eg underwear, T-shirts. Ageing of clothes. Iron deposits in the wash water. Use of chlorine bleaches on fabrics with resin finishes. Incorrect drying. Incorrect water temperatures ie. too hot or too cold. 1. Re-sort load, then re-wash using wash program selections suitable for the fabric and hot or warm water. 2. If the water is very dirty or very sudsy, repeat 1 above reducing the amount of detergent you use. NOTE: Synthetics which have been washed in very hot water will not respond to any treatment. 16 a guide to stain removal electrolux water aid washing machine A guide to stain removal White cottons and linens Washable coloured fabrics Ball point pen ink 3PONGEåWITHåMETHYLATEDåSPIRITå"LEACHåIFåREQUIRED Same as for whites - use oxygen type bleach. Beetroot Rinse as soon as possible under cold water. "LEACHåIFåNECESSARY Same as for whites - use oxygen type bleach. Blood, meat juice, Cover area with meat tenderiser (msg). Apply warm water egg (dry stain) TOåMAKEåAåPASTEå7AITå åMINUTESå3PONGEåWITHåCOOLå water or with diluted bleach. Same as for whites but select water temperature suitable to fabric - use oxygen type bleach. Blood, meat juice, Rinse in cold water. If stain remains, sprinkle with meat egg (fresh stain) tenderiser (msg). Let stand for 15-20 minutes. If stain still REMAINS åTHENåSPONGEåWITHåDILUTEDåBLEACHå7ASHåUSINGåHOTå water. Same as for whites but select water temperature suitable to fabric - use oxygen type bleach. Candle wax Scrape off excess, place stain between clean white blotter or several layers of facial tissue. Sponge with dry cleaning fluid. If spot remains, bleach. Same as for whites - use oxygen type bleach. Chewing gum Rub with ice to harden. Scrape off excess with blunt knife. Sponge with dry cleaning fluid. Same as for whites. Chocolate Soak in warm water with pre-soak product, and wash in lukewarm water. Use dry cleaning fluid (white spirits) to remove any grease spots. Soak in warm water with pre-soak or detergent solution. Treat any remaining stain with oxygen bleach. Coffee/tea (milk or cream) 2INSEåORåSOAKåINåCOLDåWATERå7ORKåDETERGENTåINTOåSTAINå Thoroughly rinse and dry. If a stain remains, sponge with dry cleaning fluid. If stain remains, bleach. Same as for whites - use oxygen type bleach. Coffee/tea Pour boiling water through stain. (black), fruit juice, "LEACHåIFåNECESSARY white wine Soak or rinse in cold water or sponge with warm water and detergent. Use oxygen type bleach. Correcting fluid Scrape off as much as possible. Rub clean with paint thinner or white spirits. Same as for whites. Cosmetics Sponge with prewash stain remover, liquid detergent or rub with soap. If greasy stain persists, soak in enzyme product then wash. Same as for whites. Curries Soak/rinse in lukewarm water until a majority of the colour is removed. Sponge with solvent to break down any remaining fats and oils then wash. Same as for whites. Check for colour fastness before applying solvent. Fat/grease/oil Sponge with dry cleaning fluid (white spirits). Same as for whites. Fruit Sponge with warm water and wash. "LEACHåREMAININGåSTAINåWITHåOXYGENåBLEACH Pour boiling water through stain. "LEACHåREMAININGåSTAIN Grass, green vegetables Sponge with methylated spirit. 7ASHåUSINGåWARMåWATER Same as for whites. Check colourfastness before applying methylated spirit. For acetate, sponge with dry cleaning fluid. Ice cream, cream milk Rinse or soak in cold water then wash. If ice cream contains fruit or chocolate treat as such. Same as for whites. Iodine 7ASHåUSINGåHOTåWATER 7ASHåUSINGåWARMåWATER Iron rust Apply oxalic acid and place in sun. Apply lemon juice and place in sun. Lipstick Rub with lard and wash using hot water. "LEACHåIFåNECESSARY Rub with lard and wash using warm water. Mildew 7ASHåUSINGåHOTåWATERå-OISTENåWITHåLEMONåJUICEåANDåLETå dry in sun. If stain persists, bleach. Old stains are hard to remove. Same as for whites but select water temperature to suit fabric. Mustard 7ASHåUSINGåHOTåWATERåANDåBLEACH 7ASHåUSINGåWARMåWATERåANDåUSEåOXYGENåBLEACH Nail polish Sponge with dry cleaning fluid or nail polish remover. "LEACHåTOåREMOVEåDYE Sponge with dry cleaning fluid. Paint (oil based) Scrape off fresh paint. Soften dry paint with lard or oil, then Same as for whites. sponge with turpentine (turps). Red wine Rub salt into the stain. Pour boiling water through stain. "LEACHåIFåNECESSARY Same as for whites. Scorch -OISTENåANDåPLACEåINåSUNLIGHTå"LEACHåIFåNECESSARY Usually a permanent stain. "RUSHåWOOLSåLIGHTLYåWITHåSANDPAPER Tomato sauce Soak in cool water for 10 minutes. Rub in liquid detergent then wash. If stain persists, try dry cleaning fluid or bleach. Same as for whites - use oxygen type bleach. electrolux water aid washing machine troubleshooting 17 Troubleshooting Do not call for service until you have checked the points listed below. If you call for service and there is nothing wrong with your washing machine, you will have to pay for the service call. You will have to pay even when your washing machine is under warranty. &ORåSOMEåPROBLEMSåYOUåWILLåGETåAåCODEåSHOWNåINåTHEåDIGITALåDISPLAYåACCOMPANIEDåBYå@"EEPS If you have a problem you are unable to resolve from the guidance on this page and the next page, see page 19 “Troubleshooting fault displays”. Problem Possible causes (digital display code) What to do Washing machine not working. Power not switched on. Switch on power point. No electricity supply through the power point. Check power point with another appliance. Machine not switched on. Press Power button on. Machine not washing. Press Start/Pause to start wash. 7ATERåTAPSåNOTåTURNEDåONåå Out of balance. ( Turn on taps. ) Open lid, redistribute load and close lid. ) Ensure machine is level. 7AITåORåCANCELå$ELAYåBYåPRESSINGå3TART0AUSEåORåCANCELå3OAKå by pressing Soak until is displayed. Set on DELAY start or SOAK. or ) ( Washing machine has washed load but will not spin. Water in washbowl. Spin speed set to DRIP DRY. ( Out of balance. ( Open lid, redistribute load and close lid. ) Ensure machine is level. Drain hose blocked. ( Check outlet is not blocked and there are no kinks in the hose. ) Too much, and/or incorrect type of detergent giving excessive suds. ( Washing machine will not fill with water. ) 7AITååMINS åMACHINEåSHOULDåSTARTå)NåFUTUREåUSEåLESSåå ONLY use low sudsing, front load washer detergent in this machine, such as Cold Power for Front Loaders and High Efficiency Top Loaders or detergent labelled “Matic”. Lid is not closed & locked for spin to start. ( ) Make sure lid is closed, or closed properly. 7ATERåTAPSåNOTåTURNEDåONåå Turn on taps. ) ) Inlet hoses blocked. ( Water flowing into washbowl indefinitely. Open lid, removes clothes, then close lid. ) Clean tap filters/washers. COLD water only connected to machine & you have selected a hot or warm wash Select COLD water washes only Drain hose too low. ( Raise drain hose or fit a syphon break. (See Installation instructions). ) 7ATERåVALVEåSTUCKåOPEN Turn both wall taps OFF Washing machine ‘beeping’ continuously. Problem/fault detected by machine. Look at code in the digital display and then refer to the Fault information on page 19. Washing machine goes out of balance or vibrates excessively when spinning. Machine not level. Make the machine level. (See Installation instructions). Water on floor. Levelling feet not adjusted. Adjust feet to touch floor. (See Installation instructions). Clothes not evenly distributed. Redistribute clothes evenly. Too much water for load size. Use Auto water level or a lower manual water level. 7ATERåVALVEåSTUCKåOPEN Turn both wall taps OFF (Refer page 19). Loose inlet hose connections. Check connections at taps and rear of machine. Incorrect water level for size of load. Use Auto water level or a lower manual water level. Condensation from hot water. Reduce water temperature. cont. over 18 troubleshooting electrolux water aid washing machine Troubleshooting Problem Possible causes (digital display code) What to do Clothes still dirty after wash program. Not enough or no detergent. Check detergent use and rewash clothes. Too many clothes in load. Remove some clothes and rewash. Incorrect selections for Program, Dirt Level or water Temp. Reselect settings. Incorrect water level selected. Use auto sensing water level and rewash clothes. Clothes still wet or sudsy after wash program Poor rinsing and spin due to excessive ) suds. ( In future use less detergent & ONLY use a low sudsing, front load washer detergent in this machine, such as Cold Power for Front Loaders and High Efficiency Top Loaders or detergent labelled “Matic”. Scraping noise on spin. "RAåWIREåORåOTHERåTHINåITEMåCAUGHTå between inner and outer washbowls. If item is visible, remove with pliers. Use wash bag in future. Humming, clicking and other intermittent noises. "OWLåROTATIONåATåSTARTåOFåWASH Normal noise. 7ATERåmOWCASCADEåNOISEåFROMå recirculated water entering washbowl Normal noise that may be heard during water recirculation when pump is ON. Machine is at a spin stage and ‘Lid Locked’ light is ON If you want to access the bowl, wait until stage is complete and light is OFF. Then you can open the lid. At end of wash. Machine is finishing final spin & the lid lock release stage. 7AITåAåSHORTåWHILEåUNTILå@,IDå,OCKEDåLIGHTåISå/&& Lid may be stuck in the locked position. If ‘Lid Locked’ light is OFF, press Power to turn off machine, then press Power again. If lid still will not open you should call Service. Lid will not open electrolux water aid washing machine troubleshooting fault displays 19 Troubleshooting fault displays Fault information and a guide for when you should call for service If you have a problem with your washing machine and before you call service, make sure you have followed ALL of the instructions that may remedy the problem. You will find instructions in the ‘Troubleshooting’ section on pages 17 and 18 and in the table below. 7HENåTHEåWASHINGåMACHINEåDETECTSåAåPROBLEMåTHATåREQUIRESåYOURåATTENTION åYOUåWILLåBEåALERTEDå4HEåMACHINEåWILLåWARNåYOUå OFåTHISåPROBLEMåBYåDISPLAYINGåAåFAULTåCODEåINåTHEåDIGITALåDISPLAY åACCOMPANIEDåBYå@"EEPING Fault information and the action you should take are described in the following table. Digital display fault code Problem Action to take Not filling with water Make sure both wall taps are on, and hose filters not blocked. Raise drain hose if water flowing out of drain hose. Press Start/Pause to re-start wash. If problem remains, call Service. 7ATERåISåNOTåTURNINGåOFF )FåWATERåISåPOURINGåONTOåTHEåmOOR åTURNåBOTHåWALLåTAPSå/&&å7AITåAåFEWåMINUTESåTOåSEEåIFå fault is corrected - if not, call Service. Recirculation pump fault Press Start/Pause to start the pump. After 30 seconds the machine will commence agitation. If problem repeats, advance to rinse or spin to drain machine. Call Service. 7ATERåNOTåDRAININGå correctly. The drain pump will switch off and on repeatedly to clear any blockage. 7AITåAåFEWåMINUTESåTOåSEEåIFåTHEåFAULTåISåCORRECTED If not, press Start/Pause then check the drain hose for blockage. Press Start/Pause to continue wash. If problem remains, call Service. 7ATERåLEVELåSENSORåNOTå operating correctly. The machine will only permit draining. If not draining, press Advance to select spin stage, then press Start/Pause to start pump. If this problem is repeatedly experienced, call Service. Control panel not functioning properly. Press Power button to turn machine off. Restart the machine. Motor fault 7AIT åTHEåPROBLEMåMAYåSELFåCLEAR If problem still exists, call Service. If not, select Spin to drain water from bowl. You may have to press Start/Pause to commence draining. If this problem is repeatedly experienced, call Service. Should you require further instructions in the care and use of your washing machine please contact Customer Care on the numbers shown on the back page. 20 warranty electrolux water aid washing machine å7ARRANTY &/2å3!,%3å).å!5342!,)!å!.$å.%7å:%!,!.$å !00,)!.#%å%,%#42/,58å7!3().'å-!#().% This document sets out the terms and conditions of product warranties for Electrolux branded appliances. It is an important document. Please keep it with your proof of purchase documents in a safe place for future reference should you require service for your Electrolux appliance. General Terms and Conditions 1. In this warranty å A å @å%LECTROLUXåMEANSå%LECTROLUXå(OMEå0RODUCTSå0TYå,TDå!".åå 004 762 341 in respect of Appliances purchased in Australia and Electrolux (NZ) Limited in respect of Appliances purchased in New Zealand; (b) ‘Appliance’ means any Electrolux product purchased by you accompanied by this document; å C å @å7ARRANTYå0ERIODåMEANSå (i) where you use the Appliance for personal, domestic or household purposes in Australia the period of ‘24’ months and in New Zealand the period of ‘24’ months; (ii) where you use the Appliance for commercial purposes, in Australia the period of ‘3’ months and in New Zealand the period of ‘3’ months, (if the period stated is 0 months you are not covered by this product warranty) following the date of original purchase of the Appliance; (d) ‘you’ means the purchaser of the Appliance not having purchased the appliance for re-sale, and ‘your’ has a corresponding meaning. 2. This warranty only applies to Appliances purchased and used in Australia or New Zealand and is in addition to (and does not exclude, restrict, or modify in any way) any non-excludable statutory warranties in Australia or New Zealand. 3. Electrolux warrants that, when dispatched from an Electrolux warehouse, the Appliance is free from defects in materials and WORKMANSHIPåFORåTHEå7ARRANTYå0ERIOD å $ å URINGåTHEå7ARRANTYå0ERIODå%LECTROLUXåORåITSå!UTHORISEDå3ERVICEå#ENTREå will, at no extra charge if your appliance is readily accessible without special equipment, and subject to these terms and conditions, repair or replace any parts which it considers to be defective. Electrolux or its ASC may use reconditioned parts to repair your appliance. You agree that any replaced Appliances or parts become the property of Electrolux. This warranty does not apply to light globes, batteries, filters or similar perishable parts. 5. Parts and Appliances not supplied by Electrolux are not covered by this warranty. å 7 å HEREåYOUåAREåWITHINåANå%LECTROLUXåSERVICEåAREA åTHISåWARRANTYåCOVERSå the cost of transport of the Appliance to and from Authorised Service Centres of Electrolux and travelling costs for representatives of the Authorised Service Centre to and from your home or business. If you are outside an Electrolux service area, you will bear these costs. For information about whether you are within an Electrolux service area, please phone 13 13 49 in Australia, or 0800 10 66 10 in New Zealand. 7. Proof of purchase is required before you can make a claim under this warranty. 8. You may not make a claim under this warranty unless the defect claimed is due to faulty or defective parts or workmanship. Electrolux is not liable in the following situations (which are not exhaustive): (a) The Appliance is damaged by: (i) accident (ii) misuse or abuse, including failure to properly maintain or service (iii)normal wear and tear (iv) power surges, electrical storm damage or incorrect power supply (v) incomplete or improper installation (vi) incorrect, improper or inappropriate operation (vii) insect or vermin infestation. (b) The Appliance is modified without authority from Electrolux in writing. (c) The Appliance’s serial number or warranty seal has been removed or defaced. (d) The Appliance was serviced or repaired by anyone other than Electrolux or its Authorised Service Centres. 9. This warranty, the contract to which it relates and the relationship between you and Electrolux are governed by the law applicable in the Australian State where the Appliance was purchased or the law applicable in New :EALANDåIFåTHEå!PPLIANCEåWASåPURCHASEDåINå.EWå:EALANDå7HEREåTHEå Appliance was purchased in New Zealand for business purposes the Consumer Guarantee Act does not apply. Limitation of Liability 10.To the extent permitted by law: (a) Electrolux excludes all warranties other than as contained in this document; (b) Electrolux shall not be liable for any loss or damage whether direct or indirect or consequential arising from your purchase, use or nonuse of the Appliance. 11.Provisions of the Trade Practices Act and State consumer legislation in Australia, and the Consumer Guarantees Act, the Sale of Goods Act and the Fair Trading Act in New Zealand, imply warranties or conditions, or impose obligations, upon Electrolux which cannot be excluded, restricted or modified. To the extent permitted by law, the liability of Electrolux (if any) arising out of or in relation to the Appliance or any services supplied by Electrolux shall be limited (where it is fair and reasonable to do so),: (a) in the case of Appliances, at its option, to the replacement or repair of the Appliances or the supply of equivalent products or the payment of the cost of replacing the Appliances or having the Appliances repaired or of acquiring equivalent Appliances. Upon being replaced, parts and Appliances become the property of Electrolux; or (b) in the case of services, at its option, to the supply of the services again or the payment of the cost of having the services re-supplied; and in the case of Appliances or services supplied in New Zealand, loss or damage whether direct or indirect or consequential that is reasonably foreseeable. Privacy You acknowledge that in the event that you make a warranty claim it will be necessary for Electrolux and its Authorised Service Centres to exchange information in relation to you to enable Electrolux to meet its obligations under this warranty. Important Notice "EFOREå#ALLINGåAå3ERVICEå4ECHNICIANåPLEASEåCHECKåCAREFULLYåTHEåOPERATINGåINSTRUCTIONS åSERVICEåBOOKLETåANDåTHEåWARRANTYåTERMSåANDåCONDITIONS FOR SERVICE or to find the address of your nearest state service centre in Australia PLEASE CALL 13 13 49 For the cost of a local call (Australia only) FOR SERVICE or to find the address of your nearest authorised service centre in New Zealand FREE CALL 0800 10 66 10 (New Zealand only) SERVICE AUSTRALIA ELECTROLUX HOME PRODUCTS www.electrolux.com.au SERVICE NEW ZEALAND ELECTROLUX HOME PRODUCTS www.electrolux.co.nz FOR SPARE PARTS or to find the address of your nearest state spare parts centre in Australia PLEASE CALL 13 13 50 For the cost of a local call (Australia only) FOR SPARE PARTS or to find the address of your nearest state spare parts centre in New Zealand FREE CALL 0800 10 66 20 (New Zealand only) ;b[Yjhebkn>ec[FheZkYji7kijhWb_W telephone: 1300 363 640 fax: 1800 350 067 email: [email protected] web: www.electrolux.com.au ;b[Yjhebkn>ec[FheZkYjiD[mP[WbWdZ phone: 09 573 2384 fax: 09 573 2221 email: [email protected] web: www.electrolux.co.nz J^[J^ek]^j\kb:[i_]d?ddelWjeh$ Do you remember the last time you opened a gift that made you say “Oh! How did you know? That’s exactly what I wanted!” That’s the kind of feeling that the designers at Electrolux seek to evoke in everyone who chooses or uses one of our products. We devote time, knowledge, and a great deal of thought to anticipating and creating the kind of appliances that our customers really need and want. This kind of thoughtful care means innovating with insight. Not design for design’s sake, but design for the user’s sake. For us, thoughtful design means making appliances easier to use and tasks more enjoyable to perform, freeing our customers to experience that ultimate 21st century luxury, ease of mind. Our aim is to make this ease of mind more available to more people in more parts of their everyday lives, all over the world. So when we say we’re thinking of you, you know we mean just that. ;b[Yjhebkn$J^_da_d]e\oek$ Share more of our thinking at www.electrolux.com.au F%De$,',#(&&#+)'''/)-'+&& © Copyright 2008 Electrolux Home Products Pty Ltd ABN 51 004 762 341 Print code: EWATERAID806+606UM_Feb 08