1
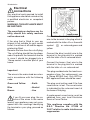
User manual
ERW23900X
ERW23910X
Wine refrigerator
Welcome to the world of Electrolux
You’ve chosen a first class product from Electrolux, which hopefully
will provide you with lots of pleasure in the future. Electrolux ambition is to offer a wide variety of quality products that would make
your life even more comfortable. You can look at some examples on
the cover in this manual. But now it’s time to study this manual and
start using and enjoying the benefits from your new machine. We
promise that it’ll make your life a little easier. Good luck!
4 electrolux
The following symbols are used in this manual:
Important information concerning your personal safety and information on
how to avoid damaging the appliance.
General information and tips
Environmental information
The symbol
on the product or on its packaging indicates that this product
may not be treated as household waste. Instead it shall be handed over to the
applicable collection point for the recycling of electrical and electronic equipment.
By ensuring this product is disposed of correctly, you will help prevent potential
negative consequences for the environment and human health, which could
otherwise be caused by inappropriate waste handling of this product. For more
detailed information about recycling of this product, please contact your local city
office, your household waste disposal service or the shop where you purchased
the product.
CONTENTS
Safety information
Genaral Safety
Service/Repair
Use
Installation
Environment Protection
Use
Cleaning the interior
Control panel
Display
Operation
Wine arrangement
Switching off
Acoustic alarm with door open
Button and light indicator
Inside accessories
Maintenance
6
6
6
7
7
8
9
9
9
10
11
11
12
12
12
13
electrolux 5
14
Defrosting
14
Cleaning
14
Lamp replacement safety instructions
15
Lighting lamps
15
Something not
working
Technical
Specifications
Customer Service and
Spare parts
Electrical
Connections
Installation
16
17
17
18
19
Assembly of the handle 21
EUROPEAN GUARANTEE 22
www.electrolux.com
23
6 electrolux
SAFETYINFORMATION
It is most important that this instruction book should be retained
with the appliance for future reference.
Should the appliance be sold or
transferred to another owner, or
should you move house and leave
the appliance, always ensure that
the book is supplied with the appliance in order that the new owner
can be acquainted with the functioning of the appliance and the relevant warnings.
If this appliance featuring magnetic
door seals is to replace an older appliance having a spring lock (latch)
on the door or lid, be sure to make
that spring lock unusable before
you discard the old appliance. This
will prevent it from becoming a
death-trap for a child.
These warnings are provided in the
interest of safety. You must read
them carefully before installing or
using the appliance.
General Safety
•
•
•
•
This appliance is designed to be
operated by adults. Children
should not be allowed to tamper
with the controls or play with the
product.
It is dangerous to alter the specifications or modify this product in
any way.
Before any cleaning or maintenance work is carried out, be sure
to switch off and unplug the appliance.
This appliance is heavy. Care
should be taken when moving it.
•
•
•
•
•
•
•
Ice lollies can cause frost burns if
consumed straight from the appliance.
Take utmost care when handling
your appliance so as not to cause
any damages to the cooling unit
with consequent possible fluid leakages.
The appliance must not be located
close to radiators or gas cookers.
Avoid prolonged exposure of the
appliance to direct sunlight.
There must be adequate ventilation round the back of the appliance and any damage to the
refrigerant circuit must be avoided.
For freezers only (except built-in
models): an ideal location is the
cellar or basement.
Do not use other electrical appliances (such as ice cream makers) inside of refrigerating appliances.
Service/Repair
•
•
•
Any electrical work required to install this appliance should be carried out by a qualified electrician or
competent person
This product should be serviced by
an authorized Service Centre, and
only genuine spare parts should
be used.
Under no circumstances should
you attempt to repair the appliance
yourself. Repairs carried out by
inexperienced persons may cause
injury or more serious malfunctioning. Refer to your local Service
Centre, and always insist on genuine spare parts.
•
This appliance contains hydrocarbons in its cooling unit; maintenance and recharging must
therefore only be carried out by
authorized technicians.
•
Use
•
•
•
•
The domestic refrigerators and
freezers are designed to be used
specifically for the storage of edible foodstuffs only.
Best performance is obtained with
ambient temperature between
+18°C and +43°C (class T); +18°C
and +38°C (class ST); +16°C and
+32°C (class N); +10°C and +32°C
(class SN). The class of your appliance is shown on its rating plate.
Warning: when the ambient temperature is not included within the
range indicated for the class of this
appliance, the following instructions must be observed: when the
ambient temperature drops below
the minimum level, the storage
temperature in the freezer compartment cannot be guaranteed; therefore it is advisable to use the
food stored as soon as possible.
Frozen food must not be re-frozen
once it has been thawed out.
Manufacturers’ storage recommendations should be strictly
adhered to. Refer to relevant instructions.
•
electrolux 7
The inner lining of the appliance
consists of channels through
which the refrigerant passes. If
these should be punctured this
would damage the appliance beyond repair and cause food loss.
DO NOT USE SHARP INSTRUMENTS to scrape off frost or ice.
Frost may be removed by using
the scraper provided. Under no circumstances should solid ice be
forced off the liner. Solid ice should
be allowed to thaw when defrosting the appliance.
Do not place carbonated or fizzy
drinks in the freezer as it creates
pressure on the container, which
may cause it to explode, resulting
in damage to the appliance.Do not
use a mechanical device or any artificial means to speed up the thawing process other than those
recommended by the manufacturer. Never use metal objects for
cleaning your appliance as it may
get damaged.
Installation
•
•
During normal operation, the condenser and compressor at the
back of the appliance heat up considerably. For safety reasons, minimum ventilation must be as
shown in the instructions.
Attention: keep ventilation openings clear of obstruction.
Care must be taken to ensure that
the appliance does not stand on
the electrical supply cable.
8 electrolux
Important: if the supply cord is damaged, it must be replaced by a special
cord or assembly availa-ble from the
manufacturer or its service agent.
•
•
•
If the appliance is transported horizontally, it is possible that the oil
contained in the compressor flows
in the refrigerant circuit. It is advisable to wait at least two hours before connecting the appliance to
allow the oil to flow back in the
compressor.
There are working parts in this product which heat up. Always ensure
that there is adequate ventilation
as a failure to do this will result in
component failure and possible
food loss. See installation instructions.
Parts which heat up should not be
exposed. Wherever possible the
back of the product should be
against a wall.
Environment
Protection
This appliance does not contain
gasses which could damage the
ozone layer, in either its refrigerant
circuit or insulation materials. The
appliance shall not be discarded together with the urban refuse and
rubbish. Avoid damaging the cooling unit, especially at the rear near
the heat exchanger. Information on
your local disposal sites may be
obtained from municipal authorities.The materials used on this appliance marked by the symbol
are recyclable.
USE
Cleaning the interior
Before using the appliance for the first
time, wash the interior and all internal
accessories with luke-warm water and
some neutral soap so as to remove
the typical smell of a brand-new product, then dry thoroughly.
electrolux 9
Do not use detergents or
abrasive powders, as these
will damage the finish.
Control panel
A - Appliance On/Off key
B - Bottom compartment temperature
adjustment knob
C - Compartment selection key
D - Temperature display
E - Door open alarm reset and light
switching on key (symbols if provided for)
F - Top compartment temperature adjustment knob
10 electrolux
Display
1. Selected compartment indicator
2. Positive temperature indicator
3. Temperature indicator
Operation
After inserting the plug in the socket,
if the display is not lit press the appliance On key (A).
Top compartement
Bottom compartement
Use
The wine refrigerator is divided into
two compartments with differentiated
temperatures.
Wine arrangement
electrolux 11
Top Compartment:
the temperature can be adjusted between +6 and + 12°C. This compartment is ideal for wines, especially
new reds and whites, to be consumed
immediately.
Bottom Compartment:
the temperature can be adjusted between + 12 and + 18°C. This compartment is ideal for storing and refining
red or white wines for long periods.
The temperatures of this compartment
are suitable for storing aged and fullbodied wines.
Lay the bottles down in such a way
that the corks do not dry.
Keep the wine in the dark. The oven
door is in anti-UV darkened double
glass to protect the wine from the light
in case the refrigerator is located in a
well-lit place.
Avoid switching the appliance light
on too often or for too long. Wine
keeps better in the dark.
Handle the bottles with care, to
avoid agitating the wine.
Follow the recommendations and
advice received at the time of purchase or given in the technical documentation regarding the quality,
duration and optimum storage temperature of the wine.
12 electrolux
Storage advice
The storage time for wine depends on
ageing, the type of grapes, alcoholic
content and level of fructose and tannin contained in it. At the time of purchase, check if the wine is already
aged or if it will improve over time.
Recommended storage temperatures:
- for champagne and sparkling wines,
between 6 and 8°C
- for white wines, between 10 and
12°C
- for rose’ and light red wines, between
12 and 16°C
- aged red wines, 14 -1 6°C
When placing various bottles on top of
each other, make sure they do not
touch the refrigerator cooling plate.
Temperature regulation
Select the compartment by pressing
the key (C)
Set the temperature by turning the
knob (B or F depending on the compartment to be adjusted).
The correct position must in any case
be determined bearing in mind that the
inside temperature depends on these
factors:
• Room temperature
• How often the doors are opened
• The quantity of bottles stored
• The position of the appliance
Switching off
Press the key (A) for more than 1 second to switch the appliance off. A
temperature countdown of -3 -2 -1 will
then be signalled.
When the appliance is switched off,
also the display (D) goes off.
Acoustic alarm with
door open
An acoustic alarm sounds when the
door remains open for about 5 minutes.
Door open alarm status is indicated
by:
- the symbol (1) flashing;
- the display lighting up red;
- the buzzer sounding.
To stop the acoustic alarm, press the
key (E).
The acoustic signal goes off - when
normal conditions are restored (door
closed).
Button “Light On” and
light indicator
In the case you want to maintain the
light on with the door closed, it is
sufficient to open and close the door
and the light will remain ON
automatically for 10 minutes.
If you want to switch off the light before
the automatic turn off time, open the
door and push the switch button (E).
The light has no negative effect on the
quality on the wine.
Inside accessories
Shelves
The shelves can be removed for cleaning.
electrolux 13
The shelf can be arranged between
guides 100 m apart to favour display
of the bottles.
The bottom compartment is arranged
with a sliding drawer to be used for
placing the bottles upright.
The drawer has two dividers that
adapt to bottles of different diameters.
Bottle holder
Remove the shelf and insert it between the two guides
The maximum possible weight on the
bottle shelves is 30 kg.
14 electrolux
Air circulation
The refrigerator compartment has a
special AIRLIGHT fan which is automatically activated in function of the
appliance thermostat setting and ambient conditions.
Defrosting
Defrosting in the refrigerator compartment occurs automatically. The defrost water is run into a bowl located at
the back of the appliance, above the
compressor, where it evaporates.
Make sure to periodically clean the defrost water drain hole, using the special “cleaner”.
Cleaning
MAINTENANCE
Important:
Unplug the appliance before
carrying out any operation.
Important
This appliance contains hydrocarbons in the refrigerant circuit; therefore maintenance and
recharging must only be carried out by
personnel authorised by the manufacturer.
Clean the inside, removing the shelves and bottle holders, with lukewarm
water and a mild detergent. Periodically clean the defrost water drain
hole, using the special “cleaner”. Periodically clean the condenser and
motor compressor with a brush or vacuum cleaner. This operation will improve operation, with consequent
energy saving.During periods when
the appliance is not being used, take
the following precautions:
• unplug the appliance;
• defrost and clean the inside and
all the accessories;
• leave the door ajar to prevent the
formation of unpleasant odours.
Important:
Never use metal objects to
clean the appliance.
Lamp replacement safety
instructions
For safety reasons this appliance is
provided with special lamps specifically tested and certified for the foreseen use.
They can only be replaced with lamps
of the same type and having the same
characteristics.
Replacement lamps must be requested only from the manufacturer or its
authorised customer service.
Do not use non-certified normal
lamps.
Lighting lamps
electrolux 15
To replace the top lamp, remove the
transparent cover by pressing it inwards with a tool (e.g. screwdriver) to
free the rear side hookings. At the
same time, free the middle hook and
slide off the cover in the direction of
the arrows.
To replace the bottom lamp, remove
the transparent cover by pressing the
front hooking with a tool (e.g. screwdriver) and at the same time pull in the
direction of the arrow.
16 electrolux
SOMETHING NOT WORKING
Important: If you call out an engineer to a fault listed below, or to repair a fault
caused by incorrect use or installation a charge will be made, even if the appliance is under guarantee.
Before contacting your local Service Force Centre, check the following points:
Symptom
No power to the appliance
The light does not come on
The temperature in the fridge
The compressor runs continously
Solution
Check there is power at the socket.
Check there is not a power cut by checking the household lights.
Check the fuse has not blown.
Ensure that the bulb is correctly fitted.
Replace the bulb if it has blown.
Check the door light switch is not jammed.
Check the electronic control in the fridge
is in the correct setting relative to ambient conditions.
Check the ambient temperature is within
the appliance s operating limits, please
refer to the installation section in this instruction book.Relocate the appliance if
necessary.
Check if the electronic control knob gives
the correct temperature control. See “Setting the temperature”.
Check that the door is closed.
Large quantities of food have recently
been placed in the cabinet and/or door is
frequently opened.
Noise
Water under the salad crispers
Check that air ventilation is not obstructed.
Refer to normal operating sounds.
Check the drain hole is not blocked. (see
Maintenance and Cleaning).
If, after the above checks, there is still a fault, call your local Service Force Centre. In guarantee customers should ensure that the above checks have been
made as the engineer will make a charge if the fault is not a mechanical or electrical breakdown. Please note that proof of purchase is required for any inguarantee service calls.
TECHNICAL SPECIFICATIONS
Net Fridge Capacity lt.
electrolux 17
218
64
Bottle capacity
Energy Consumption kWh/24h
0,619
Energy Consumption kWh/year
226
Power supply voltage and frequency
230-240 V / 50 Hz
1225
High (mm)
560
Width (mm)
Depth (mm)
550
The technical infomation are situated in the rating plate on the internal left side
of the appliance.
CUSTOMER SERVICE
AND SPARE PARTS
If the appliance is not functioning properly, check that:
• the plug is firmly in the wall socket
and the mains power switch is on;
• there is an electricity supply (find
out by plugging in another appliance);
• If there are water drops on the bottom of the cabinet, check that the
defrost water drain opening is not
obstructed (see “Defrosting”section).
•
•
If your appliance is still not working
properly after making the above
checks, contact the nearest service centre.
If the power cable is damaged, it
must be replaced with a special
cable or assembly available from
the manufacturer or the technical
assistance service.
To obtain fast service, it is essential that when you apply for
it you specify the model and serial number of your appliance
which can be found on the guarantee certificate or on the rating plate located inside the
appliance, on the bottom lefthand side.
18 electrolux
Electrical
connections
Any electrical work required to install
this appliance should be carried out by
a qualified electrician or competent
person.
WARNING: THIS APPLIANCE MUST
BE EARTHED.
The manufacturer declines any liability should this safety measure
not be observed.
If the plug that is fitted to your appliance is not suitable for your socket
outlet, it must be cut off and the appropriate plug fitted.
Remove the fuse from the cut off plug.
The cut off plug should then be disposed of to prevent the hazard of shocks
in case it should be plugged into a
13amp socket in another part of your
home.
Important
The wires in the mains lead are coloured in accordance with the following
code:
Green and Yellow
- Earth
Brown
- Live
Blue
- Neutral
If you fit your own plug, the colours of the wires in the mains
lead of your appliance may not correspond with the markings identifying
the terminals n your plug, proceed as
follows:
Connect the Green and Yellow (earth)
wire to the terminal in the plug which is
marked with the letter «E» or the earth
symbol
or coloured green and
yellow.
Connect the blue (neutral) wire to the
terminal in the plug which is marked
with the letter «N» or coloured black.
Connect the brown (live) wire to the
terminal in the plug which is marked
with the letter «L» or coloured red.
The plug moulded onto the lead incorporates a fuse. For replacement, use
a 13amp BSI362 fuse. Only ASTA or
BSI approved fuses should be used.
The plug must not be used if the fuse
cover/carrier is lost. The cover/carrier
is indicated by the coloured insert at
the base of the plug.
A replacement cover/carrier must be
obtained from your local Electrolux
Service Force Centre.
This appliance complies with the
E.E.C. Directive No. 87/308 of
2.6.87 relative to radio interference
suppression.
This appliance complies with the
following E.E.C. Directives:
- 73/23 EEC of 19.2.73 (Low VoltageDirective) and subsequent modifications;
- 89/336 EEC of 3.5.89
(Electromagnetic Compatibility Directive) and subsequent modifications.
Installation
electrolux 19
Dimensions of the recess
Height of housing
Depth of housing
Width of housing
mm 1225
mm 550
mm 560
Please ensure that when the appliance is installed it is easily accessible for the engineer in the
event of a breakdown.
It is necessary that the cabinet has a
ventilation recess with the following
dimensions:
Depth
Width
50 mm
540 mm
20 electrolux
Press in the joint covers as indicated
in the figure
Fix the appliance with the screw
Appliance insert
Fix the covers on the screws
Assembly of the handle
electrolux 21
22 electrolux
EUROPEAN GUARANTEE
This appliance is guaranteed by Electrolux in each of the countries listed at the
back of this user manual, for the period specified in the appliance guarantee or
otherwise by law. If you move from one of these countries to another of the countries listed, the appliance guarantee will move with you subject to the
following qualifications:
•
•
•
•
•
The appliance guarantee starts from the date you first purchased the appliance which will be evidenced by production of a valid purchase document
issued by the seller of the appliance.
The appliance guarantee is for the same period and to the same extent for
labour and parts as exists in your new country of residence for this particular
model or range of appliances.
The appliance guarantee is personal to the original purchaser of the appliance and cannot be transferred to another user.
The appliance is installed and used in accordance with instructions issued by
Electrolux and is only used within the home, i.e. is not used for commercial
purposes.
The appliance is installed in accordance with all relevant regulations in force
within your new country of residence. The provisions of this European Guarantee do not affect any of the rights granted to you by law.
www.electrolux.com
www.electrolux.com
2222782-11