1
Operating instructions
A 75108 GA3
Freezer
A/AE/14. (06.)
200380666
PERFEKT IN FORM AND FUNKTION
GB
Before installing and using the appliance read this user's instruction book carefully. It contains safety precautions, hints,
information and ideas. If the refrigerator is used in compliance with the instructions written, it will operate properly and
provide you with greatest satisfaction.
The symbols below help you to find things more easily:
Safety precautions
Warnings and information at this symbol serve safety for you and your appliance.
Hints, useful information
Environmental information
Symbol for ideas
At this symbol ideas can be found according to food and its storing.
The symbol on the product or on its packaging indicates that this product may not be treated as household waste.
Instead it shall be handed over to the applicable collection point for the recycling of electrical and electronic
equipment. By ensuring this product is disposed of correctly, you will help prevent potential negative consequences
for the environment and human health, which could otherwise be caused by inappropriate waste handling of this
product. For more detailed information about recycling of this product, please contact your local city office, your
household waste disposal service or the shop where you purchased the product.
Contents
Important safety information..............................................3
General safety precautions .................................................3
Precautions for child safety................................................3
Safety precautions for installation...................................3
Safety precautions for isobutane .....................................3
Instruction for the User .........................................................4
General information..............................................................4
General safety precautions .................................................4
Switch and indicators.....................................................5
Handling the appliance........................................................5
Installation .........................................................................5
Adjusting the temperature............................................5
Freezing ...............................................................................5
Storing .................................................................................6
How to make ice cubes ..................................................6
Some useful information and advice ........................6
Freezing and storage of frozen foods ...............................6
Hints and ideas .......................................................................6
How to save energy .........................................................6
The appliance and environment..................................6
Maintenance............................................................................6
Automatic defrosting......................................................6
No-Frost technology .......................................................6
Regular cleaning...............................................................7
Long-term absence..........................................................7
Trouble shooting.....................................................................7
Instructions for the Installer................................................8
Technical data..........................................................................8
Installing the appliance .......................................................8
Transportation, unpacking.............................................8
Cleaning ..............................................................................8
Placement...........................................................................8
Change of door opening direction .............................9
Electrical Connection......................................................9
Electrical Requirements..................................................9
Noises During Operation................................................10
Regulations, Standards, Guidelines.............................10
Technical Terminology.....................................................10
Electrical Connection......................................................11
Storage time chart ..................................................................11
Service and spare parts........................................................12
Guarantee conditions ...........................................................13
From the Electrolux Group. The world’s No.1 choice.
The Electrolux Group is the world's largest producer of powered appliances for kitchen, cleaning and outdoor use. More than 55 million Electrolux
Group products (such as refrigerators, cookers, washing machines, vacuum cleaners, chain saws and lawn mowers) are sold each year to a value
of approx. USD 14 billion in more than 150 countries around the world.
2
GB
Important safety information
General safety precautions
This appliance is heavy. Care should be taken when
moving it.
Keep these instructions. They should remain with the
appliance when moving away or changing owner.
This appliance is designed for storing and freezing
food, domestic use according to these instructions
only.
Only specialised companies that are qualified to do
so by the manufacturer must carry out service and
repairs including repairing and changing the power
cord. Accessory parts supplied by them should be used
only for repairing. Alterations or changes are not
permitted for reasons of safety.
The appliance is out of circuit only in that case if the
plug is removed from the socket. Before cleaning and
maintenance always switch off and unplug the
appliance (do not get it by the cable). If the socket is
difficult to reach, switch off the appliance by cutting
off the current.
Power cord must not be lengthened.
Make sure that the power plug is not squashed or
damaged by the back of the fridge/freezer.
- A damaged power plug may overheat and cause a
fire.
Do not place heavy articles or the fridge/freezer
itself on the power cord.
- There is a risk of a short circuit and fire.
Do not remove the power cord by pulling on its lead,
particularly when the fridge/freezer is being pulled
out of its niche.
- Damage to the cord may cause a short-circuit, fire
and/or electric shock.
- If the power cord is damaged, it must be replaced by
a certified service agent or qualified service
personnel.
If the power plug socket is loose, do not insert the
power plug.
- There is a risk of electric shock or fire.
When cleaning, defrosting, taking out frozen food or
ice tray do not use sharp, pointed or hard devices, as
they can cause damage to the appliance.
Ice and ice-cream can cause hurt if they are eaten
immediately after removal from the frozen food
compartment.
After defrosting frozen food it must not be refrozen, it
must be consumed up as soon as possible.
Store pre-packed frozen food in accordance with the
frozen food manufacturer's instructions.
You must not make defrosting faster with any electric
heating appliance or chemicals.
Warning: if you place frozen foods on top of the
product, the interaction of cold and vapor may
produce water condensate in the space below the top.
If such water condensate drips on the electric
components placed in that space, a short-circuit may
occur and damage the product. Therefore it is
forbidden to place frozen foods on top of the product.
Do not store flammable gas and liquid in the
appliance because they may explode.
Do not put carbonated drinks, bottled drinks and
bottled fruits into the freezer.
Precautions for child safety
Do not allow children to play with the packaging of
the appliance. Plastic foil can cause suffocation.
This appliance is designed to be operated by adults.
Children should not be allowed to tamper with the
controls or play with the product.
When the appliance is to be scrapped, cut off the
electrical supply cable and destroy the plug with
remaining cable. Disable the door catch in order to
prevent children from becoming trapped inside.
Safety precautions for installation
Place the appliance against the wall to avoid touching
or catching warm parts (compressor, condenser) to
prevent possible burn.
When moving the appliance take care to remove the
plug in the socket.
When placing the appliance take care not to stand it
on the power cord.
Adequate air circulation should be around the
appliance as lack of this will lead to overheating. To
achieve sufficient ventilation follow the instructions
relevant to installation.
Safety precautions for isobutane
Warning
The refrigerant of the appliance is isobutane (R600a)
that is inflammable and explosive to a greater extent.
Keep ventilation openings, in the appliance enclosure
or in the built-in structure, clear of obstruction.
Do not use mechanical devices or other means to
accelerate the defrosting process, other than those
recommended by the manufacturer.
Do not damage the refrigerant circuit.
Do not use electrical appliances inside the food
storage compartments of the appliance, unless they
are of the type recommended by the manufacturer.
For the safety of life and property keep the
precautions of these user's instructions as the
manufacturer is not responsible for damages caused by
omission.
3
GB
Instructions for the User
General information
The official designation of the appliance is home freezing.
According to this the appliance is suitable for storing
frozen and deep-frozen food, freezing products in quantity
given in the user's instructions at home and making ice.
The appliance can meet the requirements of standards
between different temperature limits according to the
climate class. The letter symbol for climate class can be
found on the rating plate.
General safety precautions
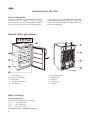
1. Freezer (baskets)
6. Door sealing gasket
2. Freezing compartment
7. Ventilation grid
3. Rating plate
8. Condenser
4. Switches and indicators
5. Adjustable feet
Waste handling
Packing materials
The materials marked with are reusable.
>PE<
PE= polyethylene
>PS<
PS= polystyrene
>PP<
PP= polypropylene
The packing consists of reusable materials only.
4
9. Airflow direction
10. Compressor
GB
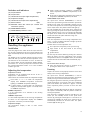
Switches and indicators
Insert the plug into the socket. Press the on/off switch of
the freezing compartment. The green on/off indicator will
light continuously and the current temperature value will
flash.
The flashing of the red alarm indicator and the acoustic
alarm will warn you that the internal temperature is not
yet sufficient for the conservation of food. To switch off
the acoustic alarm and the temperature display flashing,
press button "G". Do not put any food in the freezer until
the internal temperature reaches -18 C or the red alarm
indicator goes out.
Under normal operating conditions it displays the
actual temperature (CURRENT temperature) of the
freezer.
At the time of setting the temperature, the freshly set
temperature (DESIRED temperature) will flash.
QUICK FREEZE on/off switch
The quick freeze function ("FROSTMATIC") is used to
achieve the quick freezing of fresh food and to prevent the
already frozen goods from undesirable warming up. You
can turn on the quick freeze function by pressing the quick
freeze on/off switch. The yellow indicator will light up.
You can manually turn off the quick freeze function any
time by pressing the quick freeze on/off switch again. The
yellow indicator will go out. If not switched off manually,
the quick freeze function will be automatically switched
off 48 hours later. The yellow indicator will go out.
Temperature problem
Once the temperature of the freezing compartment rises
above -12 C the red alarm indicator will light up and an
acoustic alarm will be heard.
Possible causes of such temperature rise:
door opened too frequently or left open too long
large volume of hot food stored in the freezing
compartment
product defect
You can stop the acoustic alarm by pressing the "Acoustic
alarm off switch". Once the temperature of the freezing
compartment reduces to a displayable value, the red alarm
indicator and the acoustic alarm will automatically stop.
Note:
The acoustic alarm will stop:
when the quick freeze function is switched on (by
pressing the "Quick freeze on/off switch")
Adjusting the temperature
Freezing
Temperature controls
Temperature can be regulated with the use of the "+"
(higher) and "-" (lower) buttons.
These buttons are interlinked with the temperature display.
Press either "+" or "-" to switch the temperature
display from CURRENT temperature (continuous
lighting ) to DESIRED temperature (flashing).
If neither button is pressed again, the temperature
display will shortly (within approx. 5 seconds) return
to CURRENT temperature.
DESIRED temperature:
It is the temperature to be achieved in the freezing
compartment.
CURRENT temperature:
It is the actual temperature of the freezing compartment
as shown on the temperature display. The CURRENT
temperature is shown by a continuous light.
Temperature display
The temperature display is able to show various
information:
Prepare the various foods properly and then freeze them
always in the freezing compartment.
The quick freeze function ("FROSTMATIC") is used to
achieve the quick freezing of fresh food and to prevent the
already frozen goods from undesirable warming up.
For using the quick freeze function, press the quick freeze
on/off switch (J) for 2-3 seconds; in the case of small and
great food volumes you should do it approx. 4 and 24
hours, respectively, before you want to freeze the fresh
food.
The yellow indicator (H) will light up and the compressor
will operate continuously until the product reaches the
freezing temperature.
Once the food is completely frozen (it may take up to 24
hours) you can manually switch off the quick freeze
function by pressing the switch (J) for 2-3 seconds. If not
switched off manually, the quick freeze function will be
automatically switched off 48 hours later. The yellow
indicator (H) will also go out.
(
(
(
(
(
(
(
A ) On/off indicator
(green)
B ) On/off switch
C ) Thermostat button (for higher temperatures)
D ) Temperature display
E ) Thermostat button (for lower temperatures)
F ) Alarm indicator
(red)
G ) ACOUSTIC alarm OFF switch (see "Control and
information system")
( H ) QUICK FREEZE indicator
(yellow)
( J ) QUICK FREEZE pushbutton switch
Handling the appliance
Installation
5
GB
Storing
It is practical to replace frozen products into the storing
compartments (baskets) after freezing has finished so that
to make room in the freezing compartment for another
freezing.
Intermediate freezing does not deteriorate foods already
stored.
How to make ice cubes
To make ice cubes fill the enclosed ice cube tray with water
and place it to the frozen food compartment. Wetting the
bottom of the tray and setting thermostatic control knob
to maximum stage can shorten preparing time. After
finishing do not forget to reset the thermostatic control to
the suitable setting.
To release the ice cubes hold the tray under running water
then twist the tray.
Some useful information and
advice
After opening and closing the door of the freezer,
vacuum will rise inside the appliance because of the
low temperature. So wait 2-3 minutes after closing the
door while inner pressure equalises.
Take care of operating the freezer at a position of
thermostatic control so that the inside temperature
can never go beyond -18 °C, since temperature higher
than this can deteriorate frozen foods.
It is practical to make sure of faultless operation of the
appliance daily so as to notice possible failure in time
and prevent deterioration of frozen foods.
After a power failure the product will restart and the
quick freeze function will be switched on. If not
switched off manually, the quick freeze function will
be automatically switched off 5 hours later. When the
quick freeze function is switched off, the yellow
indicator (C) will go out.
The time of transportation from the seller to the
consumer must be as short as possible.
Hints and ideas
In this chapter practical hints and ideas are given about
how to use the appliance to reach maximum energy saving
and there is environmental information about the
appliance as well.
How to save energy
Avoid putting the appliance in a sunny place and near
anything that gives off heat.
Be sure that the condenser and the compressor are
well ventilated. Do not cover the sections where the
ventilation is.
Wrap products in tightly closing dishes or cling film to
avoid building up unnecessary frost.
Avoid products put in the freezer compartment
touching foods already frozen.
Do not leave the door open longer than necessary and
avoid unnecessary openings.
Put warm foods into the appliance only when they are
at room temperature.
The condenser must be kept clean.
The appliance and environment
This appliance does not contain gasses which could
damage the ozone layer, in either its refrigerant circuit or
insulation materials. The appliance shall not be discarded
together with the urban refuse and rubbish. Avoid
damaging the cooling unit, especially at the rear near the
heat exchanger. Information on your local disposal sites
may be obtained from your municipal authorities.
The materials used on this appliance marked with the
sympol
are recyclable.
Freezing and storage of frozen foods
As freezing with "No-Frost" technology is quicker, the
foods frozen this way will preserve their original form,
nutritional value and taste even after thawing.
Place the foods to be frozen in the lower part of the
product.
For the perfect operation of the product, make sure
that the frozen foods will not touch the ventilator
cover or the ventilator mounted on the backside of the
product.
For the best results it is recommended to distribute
the frozen foods evenly in the boxes.
If you make small portions of the foods, the freezing
process will take less time and subsequent thawing
will be possible in small portions also.
In order to avoid freezing burns, do not touch icecreams immediately after they have been taken out
from the freezer.
It is recommended to state the freezing date on the
package in order to check the storage duration.
6
Maintenance
Automatic defrosting
This product is designed to avoid the formation of ice in
the freezer. Accordingly, there is no need for manual
defrosting. The product will automatically perform any
defrosting once it becomes necessary.
No-Frost technology
In order to facilitate the removal of the ice layer, the
evaporator is assisted by electric heating during the
defrosting procedure. The ventilator is in OFF position. The
defrost water will drip in the tray placed at the compressor
and will evaporate. In the course of the defrosting
procedure (approx. 30 minutes) the evaporator becomes
warm but it has no influence on the internal temperature.
The foods should be kept well-packed in order to avoid any
moisture loss as a result of air circulation.
Do not obstruct the vent holes because otherwise the
operability of the product may be compromised.
GB
For such purpose it is recommended to put all foods in the
drawers in the freezer compartment.
Regular cleaning
Never use soap or abrasives for cleaning.
Once is it disconnected from the mains, wash the product
with lukewarm water and then wipe it dry.
Use clean water to clean the door sealing gasket.
After the cleaning operations, reconnect the product to
the mains.
Once or twice a year it is recommended to remove the dust
and dirt from the condenser mounted on the back panel.
Long-term absence
If you do not use the product for longer periods, make sure
to perform the following:
Switch off the product by pressing the on/off switch until
the on/off indicator goes out.
Disconnect the product from the mains.
Remove all foods from the product.
Problem
Cooling is too weak.
Cooling is too strong.
Perform defrosting and cleaning operations as described
above.
Leave the doors ajar to avoid the build-up of unpleasant
odors.
Trouble shooting
A malfunction may be caused by only a minor fault that
you can rectify yourself using the following instructions.
Do not perform any other work on the appliance if the
following information does not provide assistance in your
specific case.
We draw your attention that operation of appliance goes
with certain sounds (compressor- and circulating sound).
This normal operation.
We draw it to your attention that the appliance
operates discontinuously, so the stopping of
compressor does not mean being no-current. That is why
you must not touch the electrical parts of the appliance
before removing it from the mains socket.
Possible causes
Thermostat is set too low.
No sufficient pre-cooling done before freezing started.
Too large quantity of food inserted:
Remedial action
Set to higher position.
Provide for sufficient pre-cooling time.
Cut food into pieces.
Too much food inserted for freezing at the same time.
Food inserted while still hot.
Door not fully closed.
Thermostat is set too high.
Insert less food.
Insert food of room temperature only.
Check if door is fully closed.
Set to lower position.
No cooling at all.
Check plug-socket connection.
Plug is not properly inserted into socket.
No current in socket.
According to the indicator, the on/off switch (B) is not Check presence of current.
switched on.
Press the on/off switch (B) for more than a second.
Noisy operation
Product support is not correct.
Check stability of product support (all four feet
should stand on floor).
In as much as the advice does not lead to result, call your nearest Service Force Centre.
Power or operation failure:
In case of power failure during the storage of frozen foods, make sure not to open the freezer door. Once the power failure is
over, the yellow indicator (3) of the quick freeze function will light up and then, 5 hours after restart, it will automatically go
out.
If a short power failure occurs (max. 13 hours) and the appliance is full, the stored foods will not deteriorate. Otherwise you
must use the stored food as soon as possible (if the temperature of the frozen foods rises, their storability will be shorter).
When the electronic system fails to detect the ACTUAL temperature, the alarm indicator will start to flash. The product will
continue to operate with the use of a reserve system until the problem is eliminated by the local service personnel.
7
GB
Instructions for the Installer
Technical data
Model
Gross capacity (l)
Net capacity (l)
Width (mm)
Height (mm)
Depth (mm)
Energy consumption
(kWh/day)
(kWh/year)
Energy class, according to EU Standards
Freezing capacity (kg/24h)
Rising time (h)
Rated current (A)
Weight (kg)
A 75108 GA3
100
80
595
850
635
0,575
210
A
9
13
0.5
40
Installing the appliance
Transportation, unpacking
It is recommended to deliver the appliance in its
original packaging, in a vertical position.
After each transportation the appliance must not be
switched on for approx. 2 hours.
Unpack the appliance and check if there are damages on
it. Report possible damages immediately to the place of
purchase. In which case retain packaging.
Cleaning
Remove any adhesive tape, which ensure the parts do not
move in the appliance.
Wash the inside of the appliance using lukewarm water and
mild detergent. Use soft cloth.
After cleaning wipe out the inside of the appliance.
Placement
The ambient temperature has an effect on the energy
consumption and proper operation of the appliance. When
placing, take into consideration that it is practical to
operate the appliance between ambient temperature limits
according to the climate class that is given in the chart
below and can be found in the rating plate.
Class of climate
SN
N
ST
Ambient temperature
+10 ... +32 °C
+16 ... +32 °C
+18 ... + 38 °C
If the ambient temperature goes below the lower data the
temperature of the cooling compartment can go beyond
the prescribed temperature.
If the ambient temperature goes beyond the upper data
this means longer operating time of the compressor,
increasing temperature in the freezer or increasing energy
consumption.
8
When placing the appliance ensure that it stands level. This
can be achieved by the two adjustable feet (1) bottom
front two. 1-1 piece of distance washers (2) are accessories
2
1
of the adjustable feet. When levelling the appliance if
necessary, these washers can be removed.
Do not stand the appliance on a sunny place or close to a
radiator or cooker.
The refrigerator is designed to operate when it is totally
pushed to the wall.
When placing the refrigerator keep minimal
distances recommended in figure.
A: placing it under a wall-cupboard
B: placing it freely
GB
Change of door opening direction
Should the setting-up place or handling demand it, dooropening direction can be refitted from the right hand side
to the left hand side.
Following operations are to be done on the basis of figures
and explanations:
Pull out the plug from the mains socket.
Tilt back the appliance carefully so that the
compressor can not touch the floor. It is
recommended to ask another person for help, who can
keep the appliance at this position safely.
Unscrew the adjustable feet situated on both sides (2
pieces), in addition the screws fixing the lower door
holders (3 pieces) respectively the screw on the other
side.
Then screw in the one screw in the place set free on
the other side as well as the adjustable feet (2
pieces) and stand upright again.
Place over the handles on the other side and put the
plastic covering pins supplied in the plastic bag of this
instruction book into the vacant holes.
Place the appliance back into its location, set it level
and plug it into the mains socket.
In case you do not want to perform the procedures above,
call your nearest Service Force Centre. Technicians will
accomplish the refitting expertly for a charge.
Electrical Connection
Take off the freezer door by pulling it slightly
downwards.
Unscrew the top door hinge pin of the refrigerator
then screw it back on the other side.
Fit the freezer door on the upper door hinge pin.
Insert over the pin in the lower door holding plate in
the direction of the arrow.
Any
electrical
work
required to install this
appliance should be carried out
by a qualified electrician or
competent person. This appliance
must be earthed.
The manufacturer declines any
liability should these safety
measures not be observed.
Electrical Requirements
Before switching on, make sure the electricity supply
voltage is the same as that indicated on the appliance
rating plate.
The appliance is supplied with a 13 amp plug fitted. In the
event of having to change the fuse in the plug supplied, a
13 amp ASTA approved (BS 1362) fuse must be used.
Should the plug need to be replaced for any reason. The
wires in the mains lead are coloured in accordance with
the following code:
Fix the plate on the other side leaving the position of
the door unchanged.
Green and Yellow:
Earth
Blue:
Neutral
Brown:
Live
The wire coloured green and yellow must be connected to
the terminal marked with the letter “E“ or by the earth
symbol
or coloured green and yellow.
The wire coloured blue must be connected to the terminal
“N“ or coloured black. The wire coloured brown must be
connected to the terminal marked “L“ or coloured red.
9
GB
Upon completion there must be no cut, or stray strands
of wire present and the cord clamp must be secure over
the outer sheath.
Important! The plug must still be accessible after
the appliance has been installed. The appliance
should not be connected to the electrical supply by
means of an extension cable. In case that the electrical
cable has to be replaced, please contact your local Service
Force Centre.
Warning! A cut off plug inserted into a 13 amp
socket is a serious safety (shock) hazard. Ensure
that it is disposed of safely.
Noises During Operation
The following noises are characteristic of refrigeration
appliances:
Clicks
Whenever the compressor switches on or off, a click can
be heard.
Humming
As soon as the compressor is in operation, you can hear
it humming.
Bubbling/Splashing
When refrigerant flows into thin tubes, you can hear
bubbling or splashing noises. Even after the compressor
has been switched off, this noise can be heard for a
short time.
Regulations, Standards, Guidelines
This appliance was designed for household use and was
manufactured in accordance with the appropriate
standards. The necessary measures in accordance with
appliance safety legislation regulations (GSG), accident
prevention regulations for refrigeration appliances (VBG 20)
and the regulations of the German Society of Electrical
Engineers (VDE) were observed in the manufacture of this
appliance. The refrigerant circuit has been checked for leaks.
This appliance is in accordance with the following
EUguidelines:
– 73/23/EWG dated 19 February 1973 - low voltage
guidelines.
– 89/336/EWG dated 3 May 1989
(including guideline change notice 92/31/EWG) - EMV
guideline
10
Technical Terminology
Refrigerant
Liquids that can be used to a generate a cooling
effect are known as refrigerants. They have a
relatively low boiling-point, indeed so low, that the
warmth from the food stored in the fridge or freezer
can cause the refrigerant to boil and vaporise.
Refrigerant Circuit
Closed circulation system that contains the
refrigerant. The refrigerant circuit comprises
primarily of an evaporator, a compressor, a
condenser and pipe work.
Evaporator
The refrigerant is evaporated in the evaporator.
Similar to all other liquids, refrigerant requires heat
to evaporate. This heat is removed from the interior
of the appliance, as a result the interior is cooled.
The evaporator is therefore located inside the
appliance or placed in foam immediately behind the
inner wall and thus not visible.
Compressor
The compressor looks like a small drum. It is driven
by a built-in electric motor and is mounted on the
base of the appliance at the rear. The task of the
compressor is to draw in vaporised refrigerant from
the evaporator, to compress it, and to pass it on to
the condenser.
Condenser
The condenser normally has the form of a grid. The
refrigerant com-pressed in the compressor is
liquefied in the condenser. During this process, heat
is released to the surrounding air at the surface of
the condenser. The condenser is mounted on the
base of the appliance.
GB
Electrical connection
This refrigerator is designed to operate on a
220-240 V AC (~) 50 Hz supply.
The plug must be put into a socket with protective
contact. If there is no such, it is recommended to get an
electrician to fit an earthed socket in compliance with
standards near the refrigerator.
-
This appliance complies with the following E.E.C.
Directives:
73/23 EEC of 19.02.73 (Low Voltage Directive) and
subsequent modifications,
89/336 EEC of 03.05.89 (Electromagnetic Compatibility
Directive) and subsequent modifications.
Storage time chart
Storage time of deep-frozen and frozen products
Foods
-18°C
Vegetables:
green beans, green peas, mixed vegetables, marrow, corn, etc.
Ready-cooked foods:
vegetable dish, trimmings, with meat, etc.
Ready-cooked foods:
sirloin steaks, stew from knuckle of ham, etc.
Foods from potatoes, pasta:
mashed potato, gnocchi, dumpling, chips
Soups:
meat-broth, vegetable soup etc.
Fruits:
sour cherry, cherry, gooseberry, fruit cream
Meat:
chicken, duck, goose
fillets, tuna fish
Ice lollies, ice-cream
12 months
12 months
6 months
12 months
6 months
12 months
5 months
6 months
3 weeks
11
Service and Spare Parts
In the event of your appliance requiring service, or if you wish to purchase spare parts, please contact your local
Service Force Centre by telephoning:
0870 5 929929
Your telephone call will be automatically routed to the Service Force Centre
covering your post code area.
For address of your local Service Force Centre and further information about Service Force, please visit the website
at www.serviceforce.co.uk.
Before calling out an engineer, please ensure you have read details under the heading “Something Not Working”.
When you contact the Service Force Centre you will need to give following details:
1.Your name, address and post code
2.Your telephone number
3. Clear and concise details of the fault
4. The model and serial number of the apliance. (found on the rating plate).
5.The purchase date
Please note that a valid purchase receipt or guarantee documentation is required for in-guarantee service calls.
Customer Care Department
For general enquiries concerning your AEG appliance or for futher information on AEG products, please contact our
Customer Care Department by letter or telephone at the address below or visit our website at www.aeg.co.uk.
Customer Care Department
AEG Domestic Appliances
Addington Way,
Luton,
Bedfordshire
LU4 9QQ
Tel: 08705 350 350*
*calls to this number may be recorded for training purposes
12
GUARANTEE CONDITIONS
Standard guarantee conditions
We, AEG, undertake that if within 12 months of the date of the purchase this AEG appliance or any part thereof is
proved to be defective by reason only of faulty workmanship or materials, we will, at our discretion repair or replace
the same FREE OF CHARGE for labour, materials or carriage on condition that:
The appliance has been correctly installed and used only on the electricity or gas supply stated on the rating
plate.
The appliance has been used for normal domestic purposes only, and in accordance with the manufacturer's
operating and maintenance instructions.
The appliance has not been serviced, maintained, repaired, taken apart or tampered with by any person not
authorised by us.
All service work under this guarantee must be undertaken by a Service Force Centre. Any appliance or defective
part replaced shall become the Company's property.
This guarantee is in addition to your statutory and other legal rights.
Home visits are made between 8.30am and 5.30pm Monday to Friday. Visits may be available outside these hours
in which case a premium will be charged.
Exclusions
This guarantee does not cover:
Damage or calls resulting from transportation, improper use or neglect, the replacement of any light bulbs or
removable parts of glass or plastic.
Costs incurred for calls to put right an appliance which is improperly installed or calls to appliances outside the
United Kingdom.
Appliances found to be in use within a commercial environment, plus those which are subject to rental
agreements.
Products of AEG manufacture which are not marketed by AEG.
European Guarantee
If you should move to another country within Europe then your guarantee moves with you to your new home subject
to the following qualifications:
The guarantee starts from the date you first purchased your product.
The guarantee is for the same period and to the same extent for labour and parts as exists in the new country
of use for this brand or range of products.
This guarantee relates to you and cannot be transferred to another user.
Your new home is within the European Community (EC) or European Free Trade Area.
The product is installed and used in accordance with our instructions and is only used domestically, i.e. a normal
household.
The product is installed taking into account regulations in your new country.
Before you move please contact your nearest Customer Care centre, listed below, to give them details of your new
home. They will then ensure that the local Service Organisation is aware of your move and able to look after you and
your appliances.
France
Germany
Italy
Sweden
UK
Senlis
Nürnberg
Pordenone
Stockholm
Luton
+33 (0)3 44 62 29 29
+49 (0)800 234 7378
+39 (0)800 117511
+46 (0)8 672 53 60
+44 (0) 8705 350 350
13
14
A/AE/14. (06.)
15
From the Electrolux Group. The world’s No.1 choice.
AEG Hausgeräte GmbH
Postfach 1036
D-90327 Nürnberg
Sie können Ersatzteile, Zubehör und Pflegemittel on-line bestellen bei
http://www.aeg-electrolux.de
www.electrolux.com
www.aeg-electrolux.co.uk
© Copyright by AEG
Subject to change without notice
200380666- 00 - 0806
2006. 08. 15.
The Electrolux Group is the world's largest producer of powered appliances for kitchen, cleaning and
outdoor use. More than 55 million Electrolux Group products (such as refrigerators, cookers, washing
machines, vacuum cleaners, chain saws and lawn mowers) are sold each year to a value of approx. USD
14 billion in more than 150 countries around the world.