1
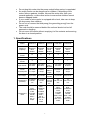
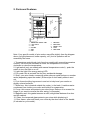
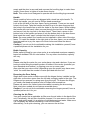
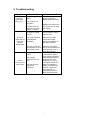
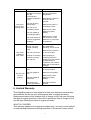
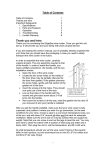
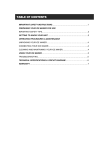
Table of Contents
Table of Contents
Important Safeguards
1. Specifications
2. Parts and Features
3. Installation
4. Operation
5. Troubleshooting
6. Limited Warranty
1
2
3
4
5
5
8
9
1
IMPORTANT SAFEGUARDS
When using an electrical appliance, basic precautions should always be
followed, including the following:
BEFORE USE, PLEASE READ AND FOLLOW ALL INSTRUCTIONS FOR
THIS WINE COOLER
•
•
•
•
•
•
•
•
•
•
•
•
•
•
•
•
•
•
•
•
Do not use if the power supply cord is damaged. If damaged, it must be
replaced by the manufacturer or a similarly qualified person.
This wine cooler is not intended for use by young children or infirm
persons without supervision. Young children must be supervised to
ensure they do not play with the appliance.
Ensure the cooler is unplugged before cleaning or if not in use.
To clean the cooler use only mild detergents or glass cleaning
products. Never use harsh detergents or solvents.
It is not recommended to use this wine cooler with an extension cord or
power strip. Please ensure that the appliance is plugged directly into
the electrical outlet.
When positioning the wine cooler, ensure that there is at least a 2”
clearance at the sides and a 4” clearance at the back of the cooler.
This will allow for adequate ventilation of heat from the back of the
cooler.
This cooler is designed to store wine bottles. If food is placed inside,
ensure that there is sufficient airflow between items. Also note that the
temperature range for this cooler is optimized for wine and beverage
storage. Perishable food items may require a different storage
environment.
Do not place hot food or drinks into the wine cooler before they cool
down to room temperature.
Close the cooler door immediately after putting in any items so the
inside temperature will not rise dramatically.
Avoid subjecting the cooler to external heat sources or direct sunlight.
For a stable installation, make sure the cooler is placed on a flat, level,
and solid surface.
Make sure that the surface on which the wine cooler is placed is strong
enough to hold the wine cooler once it is fully loaded with wine bottles.
Do not place any other appliances on top of the wine cooler.
The wine cooler is an electrical appliance. To avoid injury or death from
electrical shock, do not operate the wine cooler with wet hands, while
standing on a wet surface, or while standing in water.
Do not use outdoors or in wet or moist conditions.
Do not turn the cooler upside down, on its side, or 45° or more off level.
Never pull the power cord to disconnect it from the outlet. Grasp the
plug and pull it from the outlet.
Never lift or carry the wine cooler by the power cord..
Keep the power cord away from heated surfaces.
This wine cooler is designed for household, non-commercial use only.
2
•
•
•
•
•
•
Do not plug this cooler into the power socket before set up is completed.
An empty cooler can be dangerous for children. If disposing of the
cooler remove gaskets, latches, lids and the entire door from your
unused appliance, or take other action to ensure that children cannot
become trapped inside.
If your model of wine cooler is equipped with a lock, take care to keep
the keys away from children.
Do not cut or remove the third prong (the grounding prong) from the
power cord.
The cord should be secured behind the unit and should not be left
exposed or dangling.
Do not move this cooler without emptying it of its contents and securing
the door in a closed position.
1. Specifications
Specifications
Model:
TWR481S
TWR281S
TWR280
TWR180S
TWR120S
Maximum
Capacity:
48
Standard
Wine
Bottles
28
Standard
Wine
Bottles
28
Standard
Wine
Bottles
18
Standard
Wine
Bottles
12
Standard
Wine
Bottles
Number of
Racks
14
6
6
5
3
Controls
Digital
Manual
Manual
Manual
Manual
Temperature
Zones
2
1
1
1
1
Input Power:
115 Volts /
60 Hertz
115 Volts /
60 Hertz
115 Volts /
60 Hertz
115 Volts /
60 Hertz
Power
Consumption
150 Watts,
1.1 Amps
70 Watts,
1 Amps
70 Watts, 1
Amps
70 Watts, 1
Amps
Net Weight:
89 pounds
48 pounds
48
pounds
36 pounds
28 pounds
Dimensions
(HxWxD):
33 3/8"x27
5/8"x20
1/4"
29 1/4"x18
1/4"x20
3/4"
29
1/4"x18
1/4"x20
3/4"
25
3/8"x14"x19
3/4"
18
7/8"x14"x19
1/2"
Dimensions
Note:
Note:
Installation
of the
included
handle
adds 1
3/4" in
depth
Note:
Installation
of the
included
handle
adds 1
5/8" in
depth and
1/4" in
width
Note:
Installation
of the
included
handle
adds 1 5/8"
in depth
and 1/4" in
width
Note:
Installation
of the
included
handle
adds 1 5/8"
in depth
and 1/4" in
width
3
115
Volts /
60 Hertz
70
Watts, 1
Amps
2. Parts and Features
1
8
2
9
3
10
4
11
5
6
7
1.
2.
3.
4.
5.
6.
TEMPERATURE CONTROL KNOB
LI GHT SWI TCH
LI GHT
FAN MASK
SHELF
FOOT
7.
8.
WATER BOX
REAM COVER
9. MAGNETI C SEAL
10. GLASS
11. DOOR FRAME
Note: Your specific model of wine cooler may differ slightly from the diagram
above (in light placement, bottle capacity, etc,) but its operation will be
essentially the same.
1. Temperature control knob (only found on models with manual temperature
control)- turn the knob clockwise to lower the temperature or counter
clockwise to raise the temperature.
2. Light switch (only on models with manual temperature control) - push the
switch to turn the light on or off.
3. Light- the light is an energy-saving LED.
4. Fan mask- this is protects the fan from accidental damage.
5. Shelf- your wine cooler comes with either chrome metal shelves or wooden
racks (depending upon the model.) Either style of shelf easily slides in and
out.
6. Foot- these levelling legs screw in and out to help level your cooler on
slightly unlevel surfaces.
7. Water box- this is located outside the cooler, in the back. It catches water
condensed from inside your cooler and holds it for evaporation.
8. Cover- this covers and protects your door hinge. Remove it to access the
hinge (if you want to reverse the door swing, for example).
9. Magnetic seal- this gasket ensures a solid, airtight seal between the door
and the cabinet.
10. Glass- the tempered glass protects your wine while displaying it.
11. Door frame- open and close your cooler by the door frame or the handle
(if included on your model).
4
3. Installation
1.
2.
3.
4.
5.
6.
Remove all interior and exterior packaging.
Set up your wine cooler on a level surface. Make sure you have at
least 2” clearance on both sides and 4” clearance in the back for
ventilation.
Clean the interior surface with a little bit of lukewarm water and a
soft cloth.
If you desire, install the handle as outlined below (if your cooler
comes with a handle.)
Insert the power cord into the power socket. Make sure the power
socket is a grounded 115V~AC / 60Hz socket.
Fill the wine cooler with your choice of wine bottles. Allow up to 24
hours of operation for the bottles to reach the desired temperature.
4. Operation
The Temperature Control
Your wine cooler uses one of two systems for adjusting the thermostat:
Digital controlAdjust the temperature using the up and down arrows located on the door of
the wine cooler. While you are using the arrows, the temperature you are
setting appears on the digital display. After you finish setting the temperature,
the digital display will show the current temperature within the cooler.
Manual controlUse the temperature adjustment knob located inside the wine cooler to
change the temperature. Turn the knob clockwise to lower the temperature or
counter clockwise to raise the temperature.
Interior Light
Your wine cooler has an interior light with an on/off switch. Turn the light on or
off by pressing the switch. On digital control units the light switch will be
located on the temperature control, on the outside of the door. On manual
control units, the light switch will be located on the temperature control, inside
the unit.
Door Lock
Some models of wine cooler have a factory installed lock with keys. The lock
is inset into the door. To lock your cooler, insert the key into the lock and turn
the key counter clockwise until the metal tab is fully extended.
To unlock your cooler, insert the key into the lock and turn clockwise until the
metal tab is fully retracted back into the door.
Caution: Make sure to keep the key in a safe place and out of reach of
children- to prevent child entrapment.
Levelling Legs
Your wine cooler is shipped with four levelling legs installed. To adjust these
levelling legs, carefully lean the cooler to one side (make sure the cooler is
5
empty and the door is secured) and unscrew the levelling legs to make them
longer. Screw them in tighter to make them shorter.
Note: This cooler is not designed to operate with the levelling legs removed.
Handle
Some models of wine cooler are shipped with a towel bar-style handle. To
install the handle, you will need a Phillips head screwdriver.
Look at the left side of the door frame, facing outwards. There are two small
holes in the frame. Take the handle and hold it up to the door frame so that
the holes in the handle line up with the holes in the door frame. While holding
the handle with one hand, insert a screw through the top hole in the handle
and screw it into the top hole in the door frame. Then insert a screw in the
bottom hole in the handle and screw it into the bottom hole in the door frame.
Now insert the small “caps” included into the holes in the handle.
Note: On some models, the handle can be installed in either side of the door
frame. To install the handle in the right side of the door frame, use a small flat
head screwdriver to pry the caps out of their holes and follow the above
directions.
Caution: If you do not feel comfortable making this installation yourself, have
a qualified person do the installation for you.
Bottle Capacity
Bottle capacity listed for your wine cooler is an estimated maximum capacity
based on standard 750 mL wine bottles. For any other size bottles, capacity
will vary.
Racks
Please note that the racks for your cooler have a top and a bottom. If you are
having trouble fitting the stated number of bottles in the cooler (provided you
have standard wine bottles), try flipping over one or more racks.
Also note that your wine cooler (depending upon the model) may have more
“slots” for racks than the number of racks provided with the unit.
Reversing the Door Swing
Single door wine cooler models come with the hinges factory installed on the
right side, so the door opens from the left side, swinging open to the right. The
hinges can be reversed, to swing open from the right. To reverse the hinges,
you need a flat head screwdriver and a Phillips head screwdriver.
Please call service for further instructions about reversing the door swing.
Note: dual door models do not feature reversible doors.
Caution: If you do not feel comfortable reversing the hinges yourself, have a
qualified person do it for you.
Cleaning the Air Filter
Your wine cooler has a washable air filter over the air intake in the back of the
unit. Periodically, this air filter should be cleaned. You can remove it from the
cooler and gently wash it in a solution of mild detergent and water. Make sure
it is completely dry before reinstalling it over the air intake.
Alternatively, for a quick cleaning, you can vacuum the air filter.
6
Cleaning the Cooler
• Turn the temperature control to “off” and unplug your cooler. Remove
all items from it (wine bottles, shelves, etc.)
• Wash the inside surfaces with a mild cleaner. We suggest you use
either warm water alone, or a baking soda solution (try mixing 2
tablespoons of baking soda into a quart of water.)
• Wash the wire shelves/trays (if you have them) with a mild detergent
solution.
• Clean the wooden shelves/trays (if you have them) with a soft cloth and
some wood cleaner.
• Wash the outside of the cooler with a mild detergent solution.
• Dry any wet parts with a soft cloth.
Caution: make sure to minimize the exposure of water to any electronic or
control parts.
Extended Periods of Disuse
Your cooler can operate safely for three weeks or longer without any
adjustments. However, if the cooler is going to be left alone for several
months, you should unplug it and clean it according to the instructions above.
Pay special attention to drying the interior.
Now set the unit aside somewhere safe. You may want to crack the door
slightly to prevent mold growth or odor.
Transporting the Cooler
The ideal packaging for you cooler is its original packaging. If possible, keep
this packaging handy and repack the cooler as it was initially packed if you
need to transport it.
If you do not have the original packaging:
• Make sure the cooler is turned off and unplugged.
• Remove all items.
• Tape down the shelves and any other loose items within the cooler.
• Shut the door and tape it closed.
• Transport the cooler in a secure, upright position.
• Protect the outside of the cooler with Styrofoam, cardboard, a blanket,
etc.
Energy Efficiency Tips
Locate your cooler in the coolest area of the room.
Locate your cooler away from direct sunlight or any heat-producing sources.
Let any hot foods or drinks cool before placing them inside the cooler.
7
5. Troubleshooting
Symptoms
The wine
cooler does
not turn on.
Possible causes
There is a power
failure.
Replace the broken fuse
in your fuse box or reset
the breaker.
Keep the cooler away
from sunshine or other
heat sources.
The cooler does not
have sufficient
ventilation.
Make sure the wine
cooler has several
inches of ventilation on
the sides and back.
The door is opened
too frequently or for a
long period of time.
Close the door tightly
and do not open the door
too frequently or for a
long period of time.
Though the unit uses an
“auto-defrost” system,
under certain conditions,
manual defrosting may
be required. If frost
builds up, you can try
running the cooler on a
warmer temperature
setting, minimizing the
number of times you
open the door, or
unplugging the unit to
allow the frost to melt.
The environment is
humid.
Frost is
forming in the
wine cooler
Ensure the cooler is
plugged in and the
power outlet has power.
The cooler is not
plugged in.
A house fuse has
blown or the circuit
breaker is tripped.
The cooler is placed
too close to a heat
source.
The wine
cooler will not
reach the
desired
temperature
Solutions
The ambient
temperature is too
low.
The door is being
opened too
frequently.
8
Symptoms
Possible causes
The room
temperature is higher
than the
recommended
ambient temperature
(77°F).
The cooler
turns on and
off frequently.
The door is being
opened often.
The door is not
completely closed.
The door gasket is
not sealing properly.
The cooler does not
have the suggested
ventilation.
If the noise is from
the fan, it may be
normal operating
noise.
The cooler
makes too
much noise.
The unit is not level.
Popping or crackling
noises are coming
from the unit.
Your cooler is not
level.
The door will
not shut
properly.
The door gasket is
dirty.
Solutions
Run the cooler in the
appropriate ambient
temperature.
Minimize the number of
times the door is
opened.
Make sure the door is
completely closed.
Make sure the door
gasket is properly
sealing.
Make sure the cooler
has at least 2” on the
sides and 4” in the back
for clearance.
The fan makes normal
fan noises when
operating- this is normal.
Make sure the cooler is
on a level surface.
Some popping or
crackling noises are
normal. They are caused
by expansion and
contraction of the inside
walls due to temperature
changes.
Make sure the cooler is
on a level surface.
Clean the door gasket.
The door gasket is
malformed.
Make sure the door
gasket is properly
sealing.
The shelves are
incorrectly installed.
Correctly install the
shelves.
6. Limited Warranty
This EdgeStar product is warranted to be free from defective workmanship
and materials for the first year following the date of original purchase.
Replacement parts will be supplied free of charge for the first year following
the date of original purchase. Labor will be performed free of charge for the
first 90 days following the date of original purchase.
WHAT IS COVERED:
This warranty applies to the original purchaser only, and only covers defects
in workmanship experienced during operation of the product under normal
9
service, maintenance, and usage conditions. This warranty applies to the
purchase and use of this product in residential settings within the United
States of America.
WHAT IS NOT COVERED:
The following limitations apply to the coverage of this warranty:
Optional accessories, attachments, and appearance items are excluded from
warranty coverage, as is shipping damage, and any damage caused by
improper voltage or any other misuse, including abnormal service, handling,
or usage.
This warranty does not cover normal wear and tear on parts or replacement of
parts designed to be replaced, e.g. filters, etc.
This warranty does not cover service trips to deliver, pick-up, repair, or install
the product, or to instruct in proper usage of the product.
Damages or operating problems resulting from abuse, operation outside
environmental specifications, uses contrary to instructions provided in the
owner’s manual, accidents, vermin, fire, flood, improper installation,
unauthorized service, acts of God, unauthorized installation or modification, or
commercial use are excluded from warranty coverage.
This warranty does not cover labor incurred 91 days or more after the date of
original purchase.
This warranty does not cover use of EdgeStar products in commercial
settings.
DESCRIPTION OF WARRANTY SERVICE:
All defective product components covered by this warranty will be repaired or
replaced, at EdgeStar’s option, free of charge on a mail-in basis to EdgeStar’s
authorized repair facility during the first 90 days from the date of original
purchase.
All defective product components covered by this warranty will be repaired or
replaced, at EdgeStar’s option, on a mail-in basis to EdgeStar’s authorized
repair facility during the time period beginning on the 91st day from the date of
original purchase and ending one year from the date of original purchase.
During this time period, parts will be supplied free of charge, but labor charges
will apply.
All replacement parts and units will be new, remanufacturered, or refurbished.
All products and components replaced by EdgeStar under warranty service
become the property of EdgeStar.
OBTAINING WARRANTY SERVICE:
Contact EdgeStar for troubleshooting assistance and warranty service
authorization at 1-866-319-5473. Please have your order receipt available to
confirm the date of purchase.
Once an EdgeStar authorized representative has confirmed that your product
is eligible for warranty service, the product must be returned to an EdgeStar
authorized repair facility.
The purchaser is solely responsible for prepaying all shipping related costs to
and from the repair facility.
EdgeStar is not responsible for damage resulting from shipper mishandling or
improper packaging.
10
Do not return defective product to the place of purchase.
THIS WARRANTY IS IN LIEU OF ANY OTHER WARRANTY, EXPRESS OR
IMPLIED, INCLUDING WITHOUT LIMITATION, ANY WARRANTY OF
MERCHANTABILITY OR FITNESS FOR A PARTICULAR PURPOSE. TO
THE EXTENT ANY IMPLIED WARRANTY IS REQUIRED BY LAW, IT IS
LIMITED IN DURATION TO THE EXPRESS WARRANTY PERIOD ABOVE.
NEITHER THE MANUFACTURER NOR ITS DISTRIBUTORS SHALL BE
LIABLE FOR ANY INCIDENTAL, CONSEQUENTIAL, INDIRECT, SPECIAL,
OR PUNITIVE DAMAGES OF ANY NATURE, INCLUDING WITHOUT
LIMITATION, LOST REVENUES OR PROFITS, OR ANY OTHER DAMAGE
WHETHER BASED IN CONTRACT, TORT, OR OTHERWISE. SOME
STATES DO NOT ALLOW THE EXCLUSION OF INCIDENTAL OR
CONSEQUENTIAL DAMAGES, SO THE ABOVE EXCLUSION MAY NOT
APPLY TO YOU. THIS WARRANTY GIVES YOU SPECIFIC LEGAL
RIGHTS. YOU MAY HAVE OTHER RIGHTS THAT VARY FROM STATE TO
STATE.
11