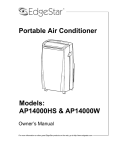
1
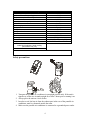
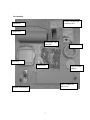
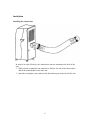
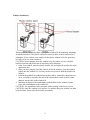
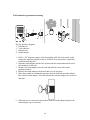
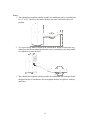
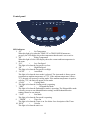
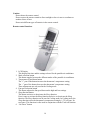
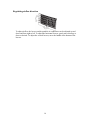
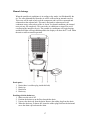
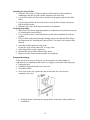
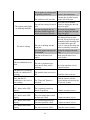
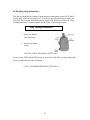
1
Table of contents
Table of contents
Thank you
Energy saving tips
Notes
Specifications
Safety precautions
Parts
Front view
Rear view
Accessories
Installation
Installing the exhaust hose
Window installation
Wall installation
Notes
Control panel
LED indicators
Buttons
Remote control
Setting up the remote control
Notes
Caution
Remote control functions
Regulating airflow direction
Manual drainage
Drain parts
Draining with the drain tray
Direct drainage
Maintenance
Notes
Cleaning the Exterior
Cleaning the condenser coils
Prefilter and charcoal filter
Notes
Installing the charcoal filter
Cleaning the prefilter
Long term storage
Troubleshooting
Limited warranty
1
2
2
2
3
3
5
5
5
6
7
7
8
9
10
11
11
12
12
12
12
13
13
15
16
16
16
17
17
17
17
17
17
17
18
18
18
19
22
2
Thank you
Thank you for purchasing an EdgeStar portable air conditioner. Rest assured that all
EdgeStar products are designed and manufactured to the highest standards. We would
like you to be able to fully utilize all features of this portable air conditioner, so
please take the time to read this owner’s manual in full prior to using the unit.
Energy saving tips:
1. Use the portable air conditioner for the recommended room size. Rooms that are
too small can cause the unit to short cycle and work inefficiently. Rooms that are
too large will never cool completely.
2. Be careful not to obstruct the air flow coming out of the portable air conditioner.
A powerful, unobstructed airflow is crucial for optimum cooling.
3. Keep blinds and curtains closed during the sunniest part of the day.
4. Clean the pre-filter often, and replace the activated carbon filter as needed (it
should be replaced twice a year under normal conditions).
5. Close your fireplace damper, floor grills, and wall grills to prevent cool air from
escaping.
6. Avoid opening doors frequently
7. Note that each additional person in room adds between 100-150 BTU of heat, so
the more people in a room, the more cooling capacity is required
8. Set the portable air conditioner to maximum cooling and high speed airflow when
you first start it up, and then adjust the unit to a comfortable setting.
Notes:
The portable air conditioner must be plugged into an appropriate power outlet. Refer
to the rating label on the back of the unit for more information.
The portable air conditioner is a compressor-driven cooling system. The air
conditioner has an anti-overheating safety feature that can delay the compressor from
starting for three minutes after the air conditioner turns on or when a mode change is
made. If the compressor does not immediately start, it is likely because of this feature.
To protect the compressor from overheating or freezing, it will only operate when the
ambient temperature is between 61° and 97°F.
Always unwind the power cord completely before use.
Please note that in Cooling, Auto, and Dry modes, the exhaust hose must be used.
When switching into the Cooling mode, cooling may be temporarily delayed as the
unit cools down.
3
Specifications
Model
Maximum Room Size (cooling)*
Power consumption for cooling mode
Air flow
Humidity removal capacity
Noise level
Power supply
Compressor
Refrigerant
Refrigerant Load
Timer
Thermostat
Net weight
Dimensions
Box dimensions
*Please note that maximum room sizes are
under ideal conditions. Actual cooling
performance may vary
AP410W
400 ft²
1000W
212 ft³/m
2.11 p/h
<54 dbA
115V/ 60Hz
Rotary
R-22
15.2 oz
1-12 hours
61°-88°F
70.5 pounds
29 1/4"h x 15"w x 14 3/4"d
29 15/16"h x 21"w x 17 3/8"d
Safety precautions:
1. Transport the portable air conditioner in an upright position only. If the unit is
tipped over, make sure it stands upright for at least 3 hours prior to turning it on.
2. Always place the unit on a level surface.
3. In order to cool, the hot air from the exhaust port in the rear of the portable air
conditioner must be exhausted outside the room.
4. Make sure the portable air conditioner is connected to a grounded power outlet.
4
5. This portable air conditioner is designed to operate in an ambient temperature of
61°-97° F.
6. This portable air conditioner has been designed for residential use.
7. Always turn the portable air conditioner off before unplugging it.
8. Do not damage the power cord.
9. Do not use this portable air conditioner for functions other than those described in
this owner’s manual.
10. Do not tilt the portable air conditioner.
11. Do not cover or obstruct the intake or outlet grills.
12. Do not use the portable air conditioner in a wet room- such as a bathroom or
laundry room- to avoid the possibility of shock.
13. Do not bend or crush the exhaust hose while in use.
14. Do not sit on, or place articles on, the portable air conditioner.
15. Do not touch the portable air conditioner with wet or damp hands
16. Do not let chemical substances come into contact with the portable air
conditioner.
17. Do not use the portable air conditioner in the presence of flammable substances or
vapors such as alcohol, insecticides, gas, etc.
18. Do not use the plug to start or stop the unit.
19. Do not yank on the electric cord or place it near a source of heat. If the electric
cord is damaged, it must be replaced by an authorized service agent.
20. Always use the control panel to start or stop the portable air conditioner.
21. Always allow for air flow around the portable air conditioner of at least 20”.
22. Always turn off the portable air conditioner when not in use.
23. Always turn the portable air conditioner off and unplug it after use, before
cleaning, before carrying out maintenance, and before moving it.
24. It the electrical socket is different from the plug, have a professionally qualified
electrician replace the socket with a suitable one. Do not use adapter plugs,
multiple sockets, or extension cords.
25. The filter must be used at all times. When removing the filter for cleaning, turn
off the unit and unplug it.
26. Make sure all children are properly supervised around this portable air
conditioner.
5
Parts
Front view
1. Control panel
2. Adjustable louvers
3. Carry handles
4. Caster wheels
Rear view
1. Air inlet
2. Exhaust port
3. Power cord hooks
4. Caster wheels
5. Drain plug (a plastic drain cap covers a rubber stopper)
6
Accessories
Owner’s manual and
warranty card
Drain hose
Exhaust hose
Rectangular vent
connector
Round adapter
Drain tray
Carbon filter
Cap for round
adapter
Plastic window kit
and screws
Remote and batteries
7
Installation
Installing the exhaust hose
In order to be used effectively, the exhaust hose must be mounted to the back of the
unit.
1. Make sure the rectangular vent connector is fitted to one end of the exhaust hose
and fit the round adapter to the other end.
2. Insert the rectangular vent connector into the exhaust port on the back of the unit.
8
Window installation
This portable air conditioner ships with a plastic window kit for temporary mounting
in standard windows. The plastic window kit comes in three sections, and its size is
adjustable. If you window is too small to fit the plastic window kit in, the parts may
be easily cut to size with a hacksaw.
CAUTION: Do not attempt to cut the window kit to size unless you are a skilled
hacksaw operator and please take all necessary safety measures.
1. Open your window, insert the plastic window kit, and adjust the window kit to the
appropriate size.
2. Once you have properly sized the window kit for the window, close the window
tightly onto the window kit. You may need to use screws to hold the window kit
in place.
3. Position the portable air conditioner near the window, extend the exhaust hose as
far as you need to, and place the end of the exhaust hose (which is in the round
adapter) into the hole in the window kit.
4. Match up the holes in the round adapter with the holes in the window kit and
screw the round adapter to the window kit.
CAUTION: Use appropriate safety measures while working with screws or tools.
CAUTION: Once the window kit is in place, it is unlikely that your window can then
be locked shut. Please take all necessary precautions.
9
Wall installation (permanent mounting)
Key for the above diagram:
1. Exhaust port
2. Vent connector
3. Exhaust hose
4. Round adapter
1. Drill a 5 1/8” diameter (approx.) hole through the wall. For safety and to avoid
cutting into structural support beams or electrical wires, please have a qualified
technician drill this hole.
2. Insert the round adapter into the hole (from inside the room) and mark the screw
hole positions on the wall
3. Remove the round adapter from the wall and drill four screw holes in the
positions marked.
4. Replace the round adapter into the wall and screw it into place.
5. Move the portable air conditioner into place near the wall and insert the exhaust
hose into the round adapter. Twist the exhaust hose into the adapter in a clockwise
direction.
6. When not in use, remove the exhaust hose from the round adapter and place the
round adapter cap over the hole.
10
Notes:
1. The exhaust hose supplied with the portable air conditioner can be extended from
14 1/2” to 59”. However, the shorter the hose, the more efficient the unit will
perform.
2. Try to prevent any kinks or bends in the exhaust hose. Kinks or bends may trap
exhaust air which can radiate heat into the room or potentially cause the portable
air conditioner to shut itself off.
3. The exhaust hose supplied with the portable air conditioner has been specifically
designed for this air conditioner. Do not lengthen the hose or replace it with any
other hose.
11
Control panel
LED indicators
1. “ST”
=
Set Temperature
When this light is lit (when the TEMP. UP or TEMP. DOWN buttons are
pressed), the LED display shows the temperature that the unit is set to cool to.
2. “RT”
=
Room Temperature
When this light is lit the LED display shows the current ambient temperature in
the room.
3. “LO”
=
Low Fan Speed
This light is lit when the fan speed is on Low.
4. “HI”
=
High Fan Speed
This light is lit when the fan speed is on High.
5. “AUTO”
=
Auto Mode
This light is lit when the Auto mode is selected. The Auto mode is factory preset
to maintain an ambient temperature of 73°F. If the ambient temperature is above
73°F, the unit will operate in cooling mode. If the ambient temperature is equal to
or below 73°F, the unit will operate in Fan mode.
6. “COOL”
=
Cooling Mode
This light is lit when the Cooling mode is operating.
7. “DRY”
=
Dehumidifier Mode
This light is lit when the Dehumidifier mode is operating. The Dehumidifier mode
is factory pre-set to one dehumidification setting- and the dehumidification
settings cannot be user-altered.
8. “FAN”
=
Fan Mode
This light is lit when the Fan mode is operating.
9. “TIMER”
=
Timer On
This light is lit when the Timer is on. See below for a description of the Timer.
10. “RUN”
=
Unit On
This light is lit when the unit is on.
12
If this light is flashing, the internal condensate tank is full and the unit has shut
itself off. Empty the tank to restart the unit. See the Drainage section for more
information on performing this operation.
Buttons
1. “TEMP. UP”
=
Adjusts Temperature Up
This button raises the thermostat temperature setting. It only affects the operation
of the unit in Cooling mode.
2. “TEMP. DOWN”
=
Adjusts Temperature Down
This button lowers the thermostat temperature setting. It only affects the operation
of the unit in Cooling mode.
3. “SPEED”
=
Adjusts Fan Speed
Press this button to adjust the fan speed between High and Low settings.
4. “MODE”
=
Toggles Modes
Press this button to switch between modes- Auto, Cooling, or Fan.
5. “TIMER”
=
Turns Timer On/Off
Press this button to activate the timer. Each time you press this button, a time will
appear in the LED display (from 1 to 12 hours). The timer can be used to turn the
unit on or off.
To turn the unit on using the timer, make sure the unit is off. Press the “TIMER”
button until the desired number of hours appears in the LED display. After the
number of hours you selected elapses, the unit will turn on.
To turn the unit off using the timer, make sure the unit is on and operating as you
want it to. Press the “TIMER” button until the desired number of hours appears in
the LED display. After the number of hours you selected elapses, the unit will
turn off.
6. “ON/OFF”
=
Turns Unit On/Off
Press this button to turn the unit on and off.
Remote Control
Setting up the remote control
1. Remove the cover from the back of the remote control.
2. Insert 2 AAA batteries.
3. Point the remote control at the portable air conditioner (make sure the air
conditioner is plugged in) and press the button for the operation that you want.
Notes:
Point the remote control at the portable air conditioner when you are using the
remote. The remote control sensor is located under the little red square on the top of
the portable air conditioner.
When the remote control is used to change most settings on the portable air
conditioner, the portable air conditioner will emit a beep.
The maximum range for the remote control is 13 feet.
Remove the batteries from the remote control if you are not going to use it for several
weeks or more.
13
Caution:
Do not abuse the remote control.
Do not expose the remote control to direct sunlight or leave it next to a radiator or
another source of heat.
Do not mix different types of batteries in the remote control.
Remote control functions
1. LCD Display
This displays the time and the settings selected for the portable air conditioner
2. Mode selection button
This button toggles between the different modes of the portable air conditioner
3. Temperature up and down button
The “+” part of the button increases the thermostat’s temperature setting.
The “-” part of the button decreases the thermostat’s temperature setting.
These adjustments are only used in the Cooling mode.
4. Fan speed selection button
This button adjusts the fan speed between the high and low settings.
5. Sleep function button
This button activates or deactivates the Sleep function.
Press it once to activate the Sleep function and twice to deactivate the Sleep
function. The Sleep function can be used in Cooling mode. In Cooling mode, the
Sleep function raises the thermostat’s temperature setting by 1.5°F per hour, for
two hours. This function is often used in conjunction with the Timer off function.
6. “On Timer” button
14
This button activates or deactivates the “On timer.” As noted in more detail
above, the On timer turns the portable air conditioner on after a number of hours
(you select the number of hours) elapses. To set the On timer using the remote
control, the portable air conditioner must be off. Press the On timer button once.
Press the Hour button several times until your desired number of hours appears in
the remote control. Press the On timer button again to set the portable air
conditioner to turn on in that number of hours.
7. “Off Timer” button
This button activates or deactivates the “Off timer.” As noted in more detail
above, the Off timer turns the portable air conditioner off after a number of hours
(you select the number of hours) elapses. To set the Off timer using the remote
control, the portable air conditioner must be on. Press the Off timer button once.
Press the Hour button several times until your desired number of hours appears in
the remote control. Press the Off timer button again to set the portable air
conditioner to turn on in that number of hours.
8. Power button
This button turns the air conditioner on or off.
9. Hour button (for on/off timer)
As noted above, this button adjusts the number of hours to delay the On or Off
timer. Additionally, this button is used to adjust the clock function of the remote
control.
10. Minute button
This button is used to adjust the time on the clock function of the remote control.
To set the clock, make sure the remote control is off.
a. Press and hold the On timer and Off timer buttons
b. After about 2 seconds, the clock icon in the LCD display will start
blinking. When it starts blinking, release the buttons.
c. Adjust the time with the hour and minute buttons. Each time you press the
hour button, the hour portion on the time will increase by 1. Each time you
press the minute button, the minute portion on the time will increase by 1.
d. When you have reached the correct time, press and hold the On timer and
Off timer buttons until the clock stops flashing. Release the buttons- the
time is now set.
15
Regulating airflow direction
To adjust airflow, the louvers on this portable air conditioner can be adjusted up and
down and from right to left. To adjust the horizontal louvers, gently move them up or
down as desired. To adjust the vertical louvers, move the handle at the bottom of the
louvers.
16
Manual drainage
When the portable air conditioner is in cooling or dry mode, it will dehumidify the
air. The water dehumidified from the air will be collected in an internal reservoir.
This water will be used to help cool the compressor and it will be evaporated and
exhausted out the exhaust hose. This unit is designed to exhaust most or all
condensate water collected out of the air, but in very humid conditions, the internal
reservoir may fill completely. This causes the air conditioner to turn off to avoid
overflowing the internal reservoir. The portable air conditioner will begin beeping
and the Run light will begin blinking and/or the display will show the E7 code. Drain
the unit to return to normal operation.
Drain parts:
1. Drain (there is a rubber plug inside this hole)
2. Drain cap
3. Drain hose
4. Drain tray
Draining with the drain tray
1. Make sure the unit is off.
2. Position the drain tray on the floor beneath the drain.
3. Unscrew the drain cap from the drain. Remove the rubber plug from the drain.
4. When the drain tray is almost full, insert the rubber plug back into the drain and
screw the drain cap back onto the drain.
17
5. Empty the drain tray.
6. Repeat steps 1-5 as necessary.
Direct drainage
1. Remove the drain cap and rubber plug from the drain.
2. Connect the drain hose to the drain. The drain hose can be extended if needed.
The portable air conditioner will now drain through the drain hose. Please note that
this unit has no drain pump; all water will drain with gravity only, i.e., only
“downhill.”
Maintenance
Notes:
Always unplug the portable air conditioner before performing cleaning or
maintenance.
Never hose this air conditioner down or attempt to clean it with a dripping wet sponge
or cloth.
Cleaning the exterior
• Use a soft damp cloth to wipe the body clean
• Never use harsh chemicals, gasoline, etc. to clean the portable air conditionerthey may cause permanent damage to the surface.
Cleaning the condenser coils
• From time to time, run the hose attachment from a vacuum cleaner over the air
intake on the side of the unit. This will help clean household dust out of the
condenser coils and allow the unit to run as efficiently as possible.
Prefilter and charcoal filter
Notes:
To keep dust from clogging the unit, never use the portable air conditioner
without the filter.
The prefilter on the back of the unit collects dust contained in the air. It must be
cleaned periodically to keep the portable air conditioner operating at maximum
efficiency.
We suggest that you clean the prefilter once every two weeks- or more often if it
operates in a dusty environment.
Do not bend the prefilter.
This portable air conditioner comes with an activated charcoal filter. This filter fits
into the filter frame between the air conditioner and the prefilter. The prefilter faces
the exterior of the unit and serves as the first filter for airborne irritants. The prefilter
is washable and can be reused indefinitely. The charcoal filter absorbs odors, smoke
and gases into itself; it will lose its effectiveness over time. We suggest you replace
the charcoal filter twice a year.
18
Installing the charcoal filter
1. Grasp the filter frame (it slides in and out of the top back of the portable air
conditioner) and pull up until it slides completely out of the unit.
2. Lay the filter frame on a flat surface, and remove the plastic grid from the filter
frame.
3. Lay the charcoal filter on the inside surface of the prefilter. Replace the plastic
grid in the filter frame.
4. Insert the filter frame back into the portable air conditioner.
Cleaning the prefilter
1. Remove the filter frame from the portable air conditioner (as described in step one
of “Installing the charcoal filter”).
2. Use a vacuum cleaner’s brush attachment to suck the accumulated dust off the
prefilter.
3. If the prefilter needs more thorough cleaning, remove the charcoal filter (follow
the instructions for “Installing the charcoal filter”, but remove the charcoal filter
instead).
4. Scrub the prefilter gently in warm water.
Do not use water warmer than 104° or soapy water.
5. Allow the prefilter to dry completely.
6. Reinstall the charcoal filter into the filter frame.
7. Replace the filter frame into the portable air conditioner.
Long term storage
At the end of the season, or whenever you do not plan to use the portable air
conditioner for an extended period of time, we suggest you take the following steps:
• Unplug the unit.
• Completely drain the internal water reservoir.
• Clean the prefilter.
• On a warm, sunny day, operate the unit on fan mode for a few hours to
completely dry it out.
•
Wind the power cord about the storage hooks on the back of the portable air
conditioner.
19
Troubleshooting
If the portable air conditioner is not working properly, it is usually due to a minor
problem that the user can handle. Before calling customer service, refer to the
following chart for troubleshooting:
Problem
Possible Causes
The plug is not properly
installed into a power outlet
The air conditioner will
not function at all
Plug the unit in properly.
The exhaust hose is kinked or
corkscrewed
Check your fuses (refer to the
rating label on the back of the
unit for Amp draw)
Drain the water reservoir.
Press the reset button on the
plug
Make sure the exhaust hose is
straight and as short as
possible
The unit is too close to a wall
or some other obstacle.
The unit should be at least 20"
away from walls and other
obstacles. Move the unit.
The unit is covered.
The unit will overheat if the
air intake or exhaust ports are
obstructed. Remove the
obstruction.
The "Timer off" function was
activated.
Press the power button to turn
the unit back on.
The room temperature is
outside the operational range
of 61° - 97°F
Room is too large
Use the unit within the
operational range of 61° 97°F
Use the unit in a smaller
room.
There is direct sunlight into
the room.
Windows or doors are open.
Close curtains or pull down
blinds; minimize the direct
sunlight into the room.
Close the windows or doors.
There are additional heat
sources in the room, e.g.,
servers, computer equipment,
etc.
Remove the additional heat
sources.
The filter is dusty or
otherwise blocked.
Clean the filter
There is insufficient amperage
in the power circuit to start
the unit.
The water reservoir is full.
The LCDI plug is tripped
The air conditioner starts
and then cuts out.
The air conditioner does
not seem to cool
effectively.
Solutions
20
The air intake or exhaust ports
are partially obstructed.
Remove the obstruction.
The condenser coils are dirty
The control panel lights
are blinking randomly
The unit is leaking
Vacuum the air inlet located
on the side of the unit
Move the unit to another
The unit has a minor electrical circuit or unplug the unit and
plug it in again.
fault
The unit is plugged into an
outlet that cannot supply the
correct electricity to the unit
Move the unit to another
circuit or unplug the unit and
plug it in again.
The unit is draining into the
drain pan
The drain pan has no auto
shut-off- do not leave the unit
unattended while draining into
an external drain pan- the
level of water in this drain pan
must be manually monitored
The drain stopple and plug are Install the stopple and drain
not installed
plug
The unit is not on a level
surface
Make sure the unit is on a
level surface
The unit is positioned on a
hard, uneven floor, and is
vibrating.
Move the unit onto a level,
carpeted surface.
The internal water reservoir is
full.
Drain the water reservoir.
The "Timer on" feature is
activated.
Turn the unit on with the
power button to deactivate the
"Timer on" feature.
"E1" shows in the LED
display.
The evaporator sensor has
detected a problem.
Contact customer service.
"E2" shows in the LED
display.
The room temperature sensor
has detected a fault.
Contact customer service.
"E5" shows in the LED
display.
The overheating protection
sensor has detected a fault.
Contact customer service.
"E7" shows in the LED
display.
The water reservoir is full.
Drain the water reservoir.
The air conditioner is too
loud.
The Run LED is blinking
and the air conditioner is
beeping.
The LED display seems to
show that the air
conditioner is on, but it is
not working.
21
LCDI plug wring instruction :
This unit is provided with Leakage Current detection interruption circuit (LCDI )built
into the plug of the power supply cord . This device provides protection to reduce the
risk of fire due to arcing faults in the power–supply cord. Before use, follow the “Plug
Testing Instructions” to ensure that the LCDI circuit is functioning properly:
Plug Testing Instructions:
1. Press Test Button.
Unit should trip.
2. Press Reset Button
firmly
DO NOT USE IF THE ABOVE TEST FAILS
Do not use the TEST and RESET buttons as an on/off switch. They are only meant to be
used to periodically check the LCDI plug
CALL CUSTOMER SERVICE IF TEST FALLS
22
Limited warranty:
This EdgeStar product is warranted to be free from defective workmanship and materials
for the first year following the date of original purchase. Replacement parts will be
supplied free of charge for the first year following the date of original purchase. Labor
will be performed free of charge for the first 90 days following the date of original
purchase.
WHAT IS COVERED:
This warranty applies to the original purchaser only, and only covers defects in
workmanship experienced during operation of the product under normal service,
maintenance, and usage conditions. This warranty applies to the purchase and use of this
product in residential settings within the United States of America.
WHAT IS NOT COVERED:
The following limitations apply to the coverage of this warranty:
Optional accessories, attachments, and appearance items are excluded from warranty
coverage, as is shipping damage, and any damage caused by improper voltage or any
other misuse, including abnormal service, handling, or usage.
This warranty does not cover normal wear and tear on parts or replacement of parts
designed to be replaced, e.g. filters, etc.
This warranty does not cover service trips to deliver, pick-up, repair, or install the
product, or to instruct in proper usage of the product.
Damages or operating problems resulting from abuse, operation outside environmental
specifications, uses contrary to instructions provided in the owner’s manual, accidents,
vermin, fire, flood, improper installation, unauthorized service, acts of God, unauthorized
installation or modification, or commercial use are excluded from warranty coverage.
This warranty does not cover labor incurred 91 days or more after the date of original
purchase.
This warranty does not cover use of EdgeStar products in commercial settings.
DESCRIPTION OF WARRANTY SERVICE:
All defective product components covered by this warranty will be repaired or replaced,
at EdgeStar’s option, free of charge on a mail-in basis to EdgeStar’s authorized repair
facility during the first 90 days from the date of original purchase.
All defective product components covered by this warranty will be provided on a mailout basis from EdgeStar during the time period beginning on the 91st day from the date of
original purchase and ending one year from the date of original purchase. During this
time period, parts will be supplied free of charge, but no labor charges will be covered by
EdgeStar.
All replacement parts and units will be new, remanufacturered, or refurbished.
All products and components replaced by EdgeStar under warranty service become the
property of EdgeStar.
OBTAINING WARRANTY SERVICE:
23
Contact EdgeStar for troubleshooting assistance and warranty service authorization at 1866-319-5473. Please have your order receipt available to confirm the date of purchase.
Once an EdgeStar authorized representative has confirmed that your product is eligible
for warranty service, the product must be returned to an EdgeStar authorized repair
facility.
The purchaser is solely responsible for prepaying all shipping related costs to and from
the repair facility.
EdgeStar is not responsible for damage resulting from shipper mishandling or improper
packaging.
Do not return defective product to the place of purchase.
THIS WARRANTY IS IN LIEU OF ANY OTHER WARRANTY, EXPRESS OR
IMPLIED, INCLUDING WITHOUT LIMITATION, ANY WARRANTY OF
MERCHANTABILITY OR FITNESS FOR A PARTICULAR PURPOSE. TO THE
EXTENT ANY IMPLIED WARRANTY IS REQUIRED BY LAW, IT IS LIMITED IN
DURATION TO THE EXPRESS WARRANTY PERIOD ABOVE. NEITHER THE
MANUFACTURER NOR ITS DISTRIBUTORS SHALL BE LIABLE FOR ANY
INCIDENTAL, CONSEQUENTIAL, INDIRECT, SPECIAL, OR PUNITIVE
DAMAGES OF ANY NATURE, INCLUDING WITHOUT LIMITATION, LOST
REVENUES OR PROFITS, OR ANY OTHER DAMAGE WHETHER BASED IN
CONTRACT, TORT, OR OTHERWISE. SOME STATES DO NOT ALLOW THE
EXCLUSION OF INCIDENTAL OR CONSEQUENTIAL DAMAGES, SO THE
ABOVE EXCLUSION MAY NOT APPLY TO YOU. THIS WARRANTY GIVES
YOU SPECIFIC LEGAL RIGHTS. YOU MAY HAVE OTHER RIGHTS THAT VARY
FROM STATE TO STATE.
24
25