1
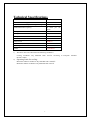
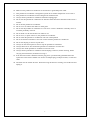
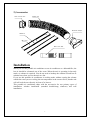
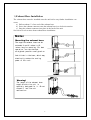
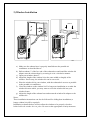
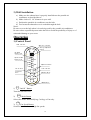
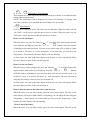
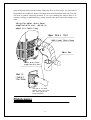
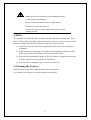
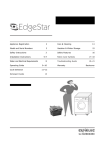
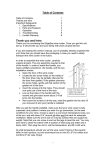
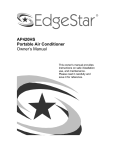
Table of Contents
Table of Contents -------------------------------------------------------- -----1
Thank You----------------------------------------------------------------- -----2
Energy Saving Tips------------------------------------------------------ -----2
Notes------------------------------------------------------------------------ -----2
Technical Specifications------------------------------------------------------3
Safety Precautions-------------------------------------------------------------4
Parts and Accessories---------------------------------------------------------6
-Parts-----------------------------------------------------------------------------------------6
-Accessories---------------------------------------------------------------------------------7
Installation----------------------------------------------------------------------7
-Exhaust Hose Installation----------------------------------------------------------------8
-Window Installation----------------------------------------------------------------------9
-Wall Installation---------------------------------------------------------------------------10
Operation -----------------------------------------------------------------------10
-Control Panel------------------------------------------------------------------------------10
-Remote Control----------------------------------------------------------------------------12
-Modes---------------------------------------------------------------------------------------12
-Water Drainage-----------------------------------------------------------------------------13
Maintenance--------------------------------------------------------------------14
- Filter----------------------------------------------------------------------------------------15
-Cleaning the Exterior----------------------------------------------------------------------15
-Long Term Storage------------------------------------------------------------------------16
Troubleshooting----------------------------------------------------------------17
Circuit Diagram----------------------------------------------------------------19
Limited Warranty-------------------------------------------------------------20
1
Thank You
Thank you for purchasing an EdgeStar portable air conditioner. It should provide you with years of
reliable cooling. Among other features, this versatile unit exhausts all the condensate that it extracts
from your air. Additionally, this portable air conditioner features auto restart. If power to the unit is
interrupted, the unit “remembers” its previous settings when power is restored.
In order to properly use all features of this portable air conditioner, please read this owner’s manual
prior to use and store the owner’s manual for future reference. It is also a good idea to save the box
and packaging for this portable air conditioner for off-season storage.
Energy Saving Tips
1. Use the portable air conditioner for the recommended room size. Rooms that are too small can
cause the unit to short cycle and work inefficiently. Rooms that are too large will never cool
completely.
2. Be careful not to obstruct the air flow coming out of the portable air conditioner. A powerful,
unobstructed airflow is crucial for optimum cooling.
3. Keep blinds and curtains closed during the sunniest part of the day.
4. Clean the pre-filter often.
5. Close your fireplace damper, floor grills, and wall grills to prevent cool air from escaping.
6. Avoid opening doors frequently.
7. Note that each additional person in room adds between 100-150 BTU of heat, so the more
people in a room, the more cooling capacity is required.
8. Set the portable air conditioner to maximum cooling and high speed airflow when you first
start it up, and then adjust the unit to a comfortable setting.
9. To provide cooling to a room, this portable air conditioner must always be used with its exhaust
hose attached.
Notes
The portable air conditioner must be plugged into an appropriate power outlet. Refer to the rating
label on the back of the unit for more information.
The portable air conditioner is a compressor-driven cooling system. The air conditioner has an
anti-overheating safety feature that delays the compressor from starting for three minutes after the
air conditioner turns on or when a mode change is made. If the compressor does not immediately
start, it is likely because of this feature.
To protect the compressor from overheating or freezing, it will only operate when the ambient
temperature is between 64° and 100°F.
In the Cooling or Dehumidifying modes the exhaust hose must be used.
When switching into the Cooling mode, cooling may be temporarily delayed as the unit cools
down.
2
Technical Specifications
Model
AP310SS
Electrical Power Supply
115 Volts / 60 Hertz
Rated Power Consumption During Cooling
See Label on Unit
Dehumidification Capacity
38 Pints
Hours
Refrigerant
R22
Refrigerant Load
500g
Fan Speeds
3
Airflow (H/M/L)
200/170/150 cfm
Noise Level
52dB(A)
Dimensions (HxWxD)
31"x14"x13.82"
Net Weight
55 Pounds
Timer
0.5-24 hours
per
24
Notes:
1)
The above data were obtained in the following conditions:
Cooling conditions: Dry bulb/Wet bulb: 95/75°F according to European standard
EN14511-2004
2)
Operating limits for cooling:
Maximum ambient conditions: Dry bulb/Wet bulb: 100/80°F
Minimum ambient conditions: Dry bulb/Wet bulb: 64/57°F
3
Safety Precautions
C
A
B
1.
2.
3.
4.
5.
6.
7.
8.
9.
Do not insert anything into the grill (Fig. A.)
Make sure all children are properly supervised around this portable air conditioner (Fig. B.)
Do not use an excessively wet cloth or industrial solvents to clean this unit (Fig. C.)
Do not damage the power cord (Fig. D.)
Do not use the portable air conditioner in the presence of flammable substances or vapors such
as alcohol, insecticides, gas, etc (Fig. D.)
Do not yank on the power cord or place it near a source of heat. If the electric cord is damaged,
it must be replaced by an authorized service agent (Fig. D.)
Transport the portable air conditioner in an upright position only. If the unit is tipped over,
make sure it stands upright for at least 3 hours prior to turning it on.
Always place the unit on a level surface.
In order to cool, the hot air from the exhaust port in the rear of the portable air conditioner must
be exhausted outside the room.
4
10.
11.
12.
13.
14.
15.
16.
17.
18.
19.
20.
21.
22.
23.
24.
25.
26.
27.
28.
Make sure the portable air conditioner is connected to a grounded power outlet.
This portable air conditioner is designed to operate in an ambient temperature of 64°-100° F.
This portable air conditioner has been designed for residential use.
Always turn the portable air conditioner off before unplugging it.
Do not use this portable air conditioner for functions other than those described in this owner’s
manual.
Do not tilt the portable air conditioner.
Do not cover or obstruct the intake or outlet grills.
Do not use the portable air conditioner in a wet room- such as a bathroom or laundry room- to
avoid the possibility of shock.
Do not bend or crush the exhaust hose while in use.
Do not sit on, or place articles on, the portable air conditioner.
Do not touch the portable air conditioner with wet or damp hands.
Do not let chemical substances come into contact with the portable air conditioner.
Do not use the plug to start or stop the unit.
Always use the control panel to start or stop the portable air conditioner.
Always allow for air flow around the portable air conditioner of at least 20”.
Always turn off the portable air conditioner when not in use.
Always turn the portable air conditioner off and unplug it after use, before cleaning, before
carrying out maintenance, and before moving it.
It the electrical socket is different from the plug, have a professionally qualified electrician
replace the socket with a suitable one. Do not use adapter plugs, multiple sockets, or extension
cords.
The filter must be used at all times. When removing the filter for cleaning, turn off the unit and
unplug it.
5
Parts and Accessories
1) Parts
Oper at i on Panel
Handl e
Ai r I nl et
Ai r Fi l t er
Ai r Out l et
Cont r ol
Si gnal Recept or
Hot Ai r Di schar gi ng Por t
Use t o connect
ai r hose.
Upper Dr ai n Por t
Ai r I nl et f or
condenser si de
Down Dr ai n Por t
Cast er
6
2) Accessories
I ndoor Ter mi nal End
Exhaust Duct
Wi ndow Ki t Adapt er
Wi ndow Ki t
Mai n pi ece
Wat er Dr ai n Hose
Installation
When you use this portable air conditioner as an air conditioner or a dehumidifier, the
hot air should be exhausted out of the room. When the unit is operating in fan-only
mode, no exhaust is required. You do not need to hookup the window kit and hot air
exhaust hose when you use the unit as a fan.
If you use this portable air conditioner in cooling mode without venting the exhaust
outside the room you are cooling, the net temperature in the room will rise, but the unit
will still cool the area directly in from of its louvers.
This portable air conditioner ships with the accessories for two primary types of
installation: window installation (standard double-hung windows) and wall
installation.
7
1) Exhaust Hose Installation
The exhaust hose must be installed onto the unit before any further installation can
occur.
a) Pull out about 6” of one end of the exhaust hose.
b) Screw the exhaust connector onto the exhaust hose in a clockwise motion.
c) Snap the exhaust connector into place in the back of the unit.
See below for a few notes about exhaust hose installation:
Note:
Mounting the exhaust hose
The suppl i ed exhaust hose can be
ext ended f r om 16 i nches t o 63
i nches l ong f or mount i ng. For best
oper at i on, use t he shor t est ,
st r ai ght est possi bl e conf i gur at i on.
Avoi d ki nks i n t he hose, whi ch may
dr ast i cal l y r educe t he cool i ng
power of t hi s uni t .
Warning!
The l engt h of t he exhaust hose
suppl i ed wi t h t hi s uni t i s
speci al l y desi gned f or i t . Do not
ext end i t l est t he uni t
mal f unct i on.
8
2) Window Installation
Wi ndows
Wi ndows
Wi ndow Ki t s
Wi ndow Ki t s
a) Make sure the exhaust hose is properly installed onto the portable air
conditioner as described above.
b) Pull out about 6” of the free end of the exhaust hose and install the window kit
adapter onto the exhaust hose by screwing it on in a clockwise manner.
c) Open your window about 5”.
d) Adjust the length of the window kit to the same width (or length) of the
window. If necessary, the window kit can be cut to size.
e) Place the window kit in your window, with the exhaust hole as near as possible
to the portable air conditioner.
f) Close the window on the window kit. For long-term installation or to make the
window kit more stable, you may want to screw the window kit into your
window frame.
g) Adjust the length of the exhaust hose and mount the window kit adapter to the
window kit.
Notes:
These installation instructions can also be followed for sliding door installation (a
longer window kit will be required).
Installation as detailed above will not allow the window to be properly closed or
locked while the window kit is in place. Be sure to take appropriate security measures.
9
3) Wall Installation
a) Make sure the exhaust hose is properly installed onto the portable air
conditioner as described above.
b) Make a hole of 5 1/8” diameter in your wall.
c) Position the portable air conditioner near the hole.
d) Feed as much exhaust hose as is needed through the hole.
Notes:
Be sure to cover the hole when it is not being used by the portable air conditioner.
Be sure to have a qualified person make the hole to avoid the possibility of injury or of
unintended damage to your room.
Operation
1) Control Panel
Power I ndi cat or
Wat er Ful l I ndi cat or
POWER
WATER FULL
Set t i ng Temper at ur e
Di spl ay
Fan Speed
Di spl ay Li ght
Oper at i on Mode
Di spl ay Li ght
HI GH
FAN
MED
LOW
COOL
DRY
MODE
Temper at ur e But t on
FAN
Ti mer Set But t on
Ti mer I ndi cat or
UP
Fan Speed Set
But t on
DOWN
TIMER
FAN
Mode Set But t on
MODE
ON/OFF
ON/ OFF But t on
ON/OFF
1)
: On/Off Button
Turns the unit on or off.
2)
MODE
:Mode Button
Selects the mode: Dehumidifying, Cooling, or Fan-only.
FAN
:Fan Speed Button
3)
Switches between low and high fan speeds.
10
DOWN
UP
4)
or
:Temperature / Time Buttons
These buttons are used to adjust the thermostat setting up or down, or to adjust the time
setting when using the timer.
NOTE: The temperature can be displayed in Celsius or Fahrenheit. To change from
one scale to another, press and hold the On/Off button for 20 seconds.
5)
TIMER
:Timer Button
Used to set or cancel the timer. The timer has two functions. When the unit is off, the
“On Timer” can be used to turn the unit on after a set time. When the unit is on, the
“Off Timer” can be used to turn the unit off after a set time.
How to set the Off Timer:
When the unit is on, press the Timer button. “3” will flash in the timer display and the
timer indicator will light up. Press the “
UP
” or
“
DOWN
” buttons while the number
is flashing to select the time delay. You may set the unit to turn off in as little as 1 hour
or as much as 24 hours, in 1 hour increments. 10 seconds after you last press the
Temperature / Time buttons, the timer display will stop flashing.
As time passes, the time in the timer display will decrease in 1 hour increments. When
the timer display reaches 0, the unit will turn off.
How to set the On Timer:
When the unit is off (but plugged in), press the Timer button. “3” will flash in the timer
display and the timer indicator will light up. Press the “
UP
” or “
DOWN
”
buttons
while the number is flashing to select the time delay. You may set the unit to turn on in
as little as 1 hour or as much as 24 hours, in 1 hour increments. The unit will start up
using the last settings it was on when it was turned off.
As time passes, the time in the timer display will decrease in 1 hour increments. When
the timer display reaches 0, the unit will turn on.
How to alter the time on the timer after it has been set:
When the timer is set (in either mode), press the timer button again. The time in the
timer display will begin to blink. While it is blinking, you can adjust the time using the
Temperature / Time buttons. 10 seconds after you last press the Temperature / Time
buttons, the timer display will stop flashing.
How to cancel the timer:
When the timer is set (in either mode), press the timer button again. The time in the
11
timer display will begin to blink. While it is blinking, press the timer button again. The
time will disappear from the Timer Display and an “F” will be displayed. The timer has
now been cancelled.
2) Remote Control
FAN SPEED
ON/ OFF
TEMP/ TI ME
MODE
TI MER
The six buttons on the remote control are same as the six buttons on the control panel
of the main unit. See the control panel section above for an explanation of how to use
the buttons.
The remote control uses a lithium battery model CR2025. The battery must be installed
prior to using the remote control.
3) Modes
Dehumidifying
1) Plug the power cord into a power outlet.
2) Turn on the unit.
3) Press the Mode button until the LED next to “Dry” lights up.
During the Dehumidifying mode, the unit will condense water out of the air and
exhaust it through the exhaust hose. The ambient temperature in the room will
probably drop by a few degrees while using the Dehumidifying mode.
Notes:
The fan always runs on low speed while in the Dehumidifying mode.
If you do not use the exhaust hose in Dehumidifying mode, you must manually drain
the water from the unit. Additionally, the ambient temperature in the room will
12
probably rise by a few degrees (if you do not use the exhaust hose.)
The Dehumidifying mode will not work in temperatures below 64°F.
Cooling
1)
2)
3)
4)
5)
Plug the power cord into a power outlet.
Turn on the unit.
Press the Mode button until the icon LED next to “Cool” lights up.
Select the fan speed by using the Fan button.
Set the thermostat using the Temperature / Time buttons. The thermostat is
adjustable between 64°F and 90°F in one degree increments.
Cooling mode cools and dehumidifies your air. If the ambient temperature drops below
the temperature you selected, the compressor turns off and the unit functions with the
fan only. When the temperature rises above the temperature you selected, the
compressor turns on again.
Note:
The exhaust hose must be used in Cooling mode in order to cool a room.
Fan-only
1) Plug the power cord into a power outlet.
2) Turn on the unit.
3) Press the Mode button until the LED next to “Fan” lights up.
4) Select the fan speed by using the Fan button.
Fan-only mode is used to circulate the air in your room. No temperature setting is
needed.
Note:
Fan-only mode does not require that the exhaust hose be attached.
4) Water Drainage
All air conditioners dehumidify the air as they cool. This portable air conditioner is
designed to evaporate and exhaust this condensed water (sometimes called condensate).
When using the Cooling or Dehumidifying modes under extremely humid conditions,
the internal water tray may fill completely. If this happens, the Water Level indicator
on the control panel will light and the compressor will shut off (so that no water is
spilled on the floor.) The unit will continue operating and exhausting water until the
water level lowers. Then the compressor will turn back on and the unit will begin
cooling as normal.
If you want to begin cooling or dehumidifying right away without waiting for the unit
to dispose of the excess condensate itself, you may manually drain the unit.
Manual Drainage
Turn the unit off. Unscrew the cap from the upper drain port. Connect a drain hose to
the upper drain port (one is included with this unit, or you may use a garden hose.) Put
the other end of the drain hose in a bucket. Turn the unit back on. The internal drain
13
pump will pump water into the bucket. When the flow of water stops, you can turn off
the portable air conditioner. Remove the drain hose and reinstall the drain cap. The unit
will now be almost completely drained. If you were draining the unit to allow it to
continue cooling or dehumidifying, simply turn the unit back on to the settings you
want.
Usi ng t he wat er dr ai n hose
suppl i ed wi t h uni t , whi ch i s
about si x f eet s l ong.
Upper Dr ai n Por t
Addi t i onal Dr ai n Hose
Wat er Box
Wat er dr ai n hose
suppl i ed wi t h uni t
How t o
i nst al l
t he hose
The end of t he hose
shoul d cover t he i nner
por t and i nsi de t he
scr ew connect or .
Maintenance
14
Make sure the unit is turned off and unplugged before
performing any maintenance.
Do not immerse the unit in water or other liquids.
Do not pour liquids into the unit.
Some parts may have sharp edges. Be careful to avoid
cutting yourself.
1) Filter
This portable air conditioner has a washable pre-filter that filters contaminants out of
the air. This pre-filter should be cleaned about once every two weeks or as needed. If it
becomes clogged with dust, the efficiency of the unit will be lowered.
1) Remove the filter from the filter compartment in the front of the portable air
conditioner.
2) Wash the filter by immersing it in warm water and lightly scrubbing it with a
gentle soap. Do not put the filter in water warmer than 104°F.
3) Rinse the filter thoroughly and dry it. The filter must be completely dry before
it can be put back into the portable air conditioner.
4) Once the filter is completely dry, reinsert it into the unit.
2) Cleaning the Exterior
Wipe the plastic parts with a slightly damp cloth to clean them.
Use stainless steel cleaner to clean the stainless steel panels.
15
3) Long Term Storage
Down Dr ai n
Por t
1) On a warm day, run the unit in Fan-only mode for a few hours to
exhaust all condensate and to completely dry out the interior.
2) Turn off the unit and unplug it.
3) Empty any residual condensate water by unplugging the lower
drain port and allowing any water accumulated there to drain
out. Reinstall the rubber stopper after doing this.
4) Detach the exhaust hose and collapse it to its smallest size.
5) Take out the filter. Clean and dry it (see the instructions above),
and reinstall it.
6) Cover the portable air conditioner to protect it from dust. It is
generally a good idea to store the unit in its original box and
packaging.
7) Store the unit in a cool, dry place. Do not stack heavy things on
top of it.
16
Troubleshooting
Problem
Possible Cause
Solution
There was a power failure
Restore the power supply
The plug is not correctly inserted
into the socket
Insert the plug correctly into the
socket
The automatic switch, line fuse,
or breaker has been tripped
Flip the switch, change the fuse,
or turn the breaker back on. Also
note that you may have too many
appliances drawing power on one
circuit, so you may need to move
some onto another circuit
The power supply voltage is too
low
Move the unit onto another
circuit with the correct voltage
The power cord is damaged
Call for service. Only authorized
service man should replace
damaged plugs
The LCDI plug for the unit is
tripped
Press the Reset button on the
portable air conditioner's plug
The room temperature is outside
of the operational tolerances of
the unit
This unit is designed to work in
ambient temperatures of 64°F to
100°F
The Cooling mode is not on
Press the Mode button until the
Cooling icon is shown on the
control panel
The compressor has not turned
on yet because of its time delay
Give the compressor 3 minutes to
turn on after the Cooling mode
has been selected
The set temperature is too high
Reset the temperature lower
The internal water reservoir is
full
Check the water level indicator
on the control panel. If it is lit,
either manually drain the water
or allow the unit to exhaust the
water itself. Then cooling will
resume
The filter is dirty or obstructed
Clean the filter
The air intake is obstructed
Make sure there is at least 20" of
clearance from the air intake (on
the front of the unit)
The exhaust duct is too long
Make the exhaust duct as short as
possible
The portable air conditioner does
not turn on
The unit turns on, but the
compressor does not turn on- the
fan runs, but there is no cooling
The air coming out of the unit is
not very cold, or the airflow
volume is weak
17
The exhaust is obstructed
Check the exhaust duct. Remove
any obstructions
The unit is set in dehumidifying
mode
Set the unit in cooling mode
The unit is set to low fan speed
Set the unit to high fan speed
Windows or doors are open
Close all windows and doors into
the room when the unit is cooling
There are too many people in the
room
You may need additional cooling
or another air conditioner
There is direct sunshine into the
room
Close curtains and blinds. Try to
minimize the amount of direct
sunlight into the room
The room is a kitchen, with many
heat-producing appliances
You may need additional cooling
or another air conditioner
There is a server in the room
You may need additional cooling
or another air conditioner
The room is too large
You may need additional cooling
or another air conditioner
There are many electrical
appliances in the room
You may need additional cooling
or another air conditioner
The room is not well insulated
You may need additional cooling
or another air conditioner, or you
may need to add insulation
The unit is not level
Make sure the unit is level
The compressor is bad
Call for service
The floor underneath the unit is
uneven
Move the unit to a location with a
level, even floor
The rubber drain stoppers are not
installed
Install the rubber drain stoppers
The unit was tilted, or is not level
Make use the unit remains level
The unit is unable to work as
efficiently as it needs to
Make sure the exhaust hose is not
over-extended or kinked, that the
filter is clean, and that nothing is
obstructing any of the air inlets
The ambient temperature is too
cold
Use the unit only when the
ambient temperature warms up
The unit shows an error code
beginning with "E"
Various factors
Call for service
Other issues
Various factors
Call for service
The unit has worked for a long
time, but the room is not cold
enough
The unit is very noisy
The unit is leaking water onto the
floor
The evaporator coils freeze up
18
Circuit Diagram
9C
Recei ver PCB
3C
Room
Temp
Sensor
Wat er Level
Det ect or
Condenser Si de
Fan Mot or
C1
Oper at i on
Panel PCB
Mi cr ocomput er
Mai n Cont r ol
PCB
HO
LO
Bump
HI
Cut - of f
Wat er
Pump
C3
MI
COM
LI
NO
AC- N
AC- N0 AC- N1
Cut - of f
Evapor at or
Si de Fan Mot or
C
Pr ot ect or
Tr ansf or mer
POWER
SUPPLY
L
N
G
S
R
C2
C1: Runni ng Capaci t or For Fan Mot or of Condenser Si de
C2: Runni ng Capaci t or For Compr essor
C3: Runni ng Capaci t or For Fan Mot or of Evapor at or Si de
19
Compr essor
Limited Warranty
This EdgeStar product is warranted to be free from defective workmanship and materials for the
first year following the date of original purchase. Replacement parts will be supplied free of charge
for the first year following the date of original purchase. Labor will be performed free of charge for
the first 90 days following the date of original purchase.
WHAT IS COVERED:
This warranty applies to the original purchaser only, and only covers defects in workmanship
experienced during operation of the product under normal service, maintenance, and usage
conditions. This warranty applies to the purchase and use of this product in residential settings
within the United States of America.
WHAT IS NOT COVERED:
The following limitations apply to the coverage of this warranty:
Optional accessories, attachments, and appearance items are excluded from warranty coverage, as
is shipping damage, and any damage caused by improper voltage or any other misuse, including
abnormal service, handling, or usage.
This warranty does not cover normal wear and tear on parts or replacement of parts designed to be
replaced, e.g. filters, etc.
This warranty does not cover service trips to deliver, pick-up, repair, or install the product, or to
instruct in proper usage of the product.
Damages or operating problems resulting from abuse, operation outside environmental
specifications, uses contrary to instructions provided in the owner’s manual, accidents, vermin, fire,
flood, improper installation, unauthorized service, acts of God, unauthorized installation or
modification, or commercial use are excluded from warranty coverage.
This warranty does not cover labor incurred 91 days or more after the date of original purchase.
This warranty does not cover use of EdgeStar products in commercial settings.
DESCRIPTION OF WARRANTY SERVICE:
All defective product components covered by this warranty will be repaired or replaced, at
EdgeStar’s option, free of charge on a mail-in basis to EdgeStar’s authorized repair facility during
the first 90 days from the date of original purchase.
All defective product components covered by this warranty will be repaired or replaced, at
EdgeStar’s option, on a mail-in basis to EdgeStar’s authorized repair facility during the time period
beginning on the 91st day from the date of original purchase and ending one year from the date of
original purchase. During this time period, parts will be supplied free of charge, but labor charges
will apply.
All replacement parts and units will be new, remanufacturered, or refurbished.
All products and components replaced by EdgeStar under warranty service become the property of
EdgeStar.
OBTAINING WARRANTY SERVICE:
20
Contact EdgeStar for troubleshooting assistance and warranty service authorization at
1-866-319-5473. Please have your order receipt available to confirm the date of purchase.
Once an EdgeStar authorized representative has confirmed that your product is eligible for
warranty service, the product must be returned to an EdgeStar authorized repair facility.
The purchaser is solely responsible for prepaying all shipping related costs to and from the repair
facility.
EdgeStar is not responsible for damage resulting from shipper mishandling or improper packaging.
Do not return defective product to the place of purchase.
THIS WARRANTY IS IN LIEU OF ANY OTHER WARRANTY, EXPRESS OR IMPLIED,
INCLUDING WITHOUT LIMITATION, ANY WARRANTY OF MERCHANTABILITY OR
FITNESS FOR A PARTICULAR PURPOSE. TO THE EXTENT ANY IMPLIED WARRANTY IS
REQUIRED BY LAW, IT IS LIMITED IN DURATION TO THE EXPRESS WARRANTY
PERIOD ABOVE. NEITHER THE MANUFACTURER NOR ITS DISTRIBUTORS SHALL BE
LIABLE FOR ANY INCIDENTAL, CONSEQUENTIAL, INDIRECT, SPECIAL, OR PUNITIVE
DAMAGES OF ANY NATURE, INCLUDING WITHOUT LIMITATION, LOST REVENUES
OR PROFITS, OR ANY OTHER DAMAGE WHETHER BASED IN CONTRACT, TORT, OR
OTHERWISE. SOME STATES DO NOT ALLOW THE EXCLUSION OF INCIDENTAL OR
CONSEQUENTIAL DAMAGES, SO THE ABOVE EXCLUSION MAY NOT APPLY TO YOU.
THIS WARRANTY GIVES YOU SPECIFIC LEGAL RIGHTS. YOU MAY HAVE OTHER
RIGHTS THAT VARY FROM STATE TO STATE.
21