1
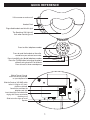
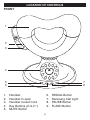
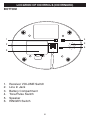
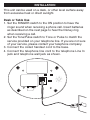
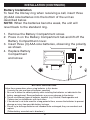
QUICK REFERENCE
Lift to answer or make a call
Handset Cord
Plug coiled handset cord into this jack
The Receiving Call Light will
flash when receiving a call
Press to dial a telephone number
Press to mute the handset so the caller
cannot hear you; release to un-mute.
Press to redial the last dialed telephone number
Press the FLASH button to hang up the phone
without having to return it to the base
Press to insert a three second pause
Slide to Tone or Pulse to
match the service provided
on your telephone line
Slide the Receiver VOLUME switch
to the HI (High) or LO (Low)
position as desired.
Connect the cord from the
telephone wall jack
Insert three AAA size batteries for
ringing with Disney sound when
receiving a call
Slide to turn the ringer on or off
Speaker
1
QUICK REFERENCE (CONTINUED)
1.
Set the RINGER switch to the ON position to have the ringer sound
when receiving a phone call.
2. Set the Tone/Pulse switch to Tone or Pulse to match the service
provided on your telephone line.
3. Connect the coiled handset cord to the base.
4. Connect the straight cord to the telephone base jack and telephone
wall jack.
5. When the phone rings, lift the handset and speak into the
mouthpiece. Hang up when call is completed.
6. Lift the handset and listen for a dial tone. Press the key buttons (0-9)
for the specified number you wish to call.
7. Slide the Receiver VOLUME switch to the HI (High) or NOR (Normal)
position as desired.
8. Press the REDIAL button to automatically redial the last number
dialed.
9. Press the FLASH button to hang up the phone without having to
return it to the base. This is useful for using the phone with the Call
Waiting feature.
10. Press and hold the MUTE button and you will be able to hear the
person on the other end of the telephone, but they cannot hear you.
Release the MUTE button to restore normal sound.
11. Press the PAUSE button to insert a three second pause. This is
useful in some cases, such as a PBX or long distance service when a
pause may be needed in the dialing sequence
2
PACKAGE LIST
The package should include the following items:
1. Base Unit
2. Handset with Handset Cord
3. Telephone Line Cord
4. User's Guide
IMPORTANT SAFETY INSTRUCTIONS
Warning: Changes or modifications to this unit not expressly approved by
the party responsible for compliance could void the user’s authority to
operate the equipment.
If your local telephone exchange only accepts Pulse dialing, you may
have to switch the Tone/Pulse switch to Tone to access certain services
that require Tone signalling (such as home banking). After the initial line is
connected to the number you are calling, switch the Tone/Pulse switch to
Tone to access Tone signalling. When you have completed your call,
please switch the Tone/Pulse switch back to Pulse.
3
IMPORTANT SAFETY INSTRUCTIONS (CONTINUED)
When using your telephone equipment, basic safety precautions should always be followed to
reduce the risk of fire, electric shock and injury to persons, including the following:
1. Read and understand all instructions.
2. Follow all warnings and instructions marked on this product.
3. Do not use this product near water–for example: near a bathtub, wash bowl, kitchen sink
or laundry tub; in a wet basement; or near a swimming pool.
4. Do not place this product on an unstable cart, stand or table. The product may fall, causing
serious injury and serious damage to the product.
5. Slots and openings in the cabinet and in the back or bottom are provided for ventilation, to
ensure reliable operation of the product and to protect it from overheating. These
openings must not be blocked or covered. The openings should never be blocked by
placing the product on a bed, sofa, rug or other similar surface. This product should never
be placed near or over a radiator or heat source. This product should not be placed in a
built-in installation unless proper ventilation is provided.
6. Never push objects of any kind into this product through cabinet slots as they may touch
dangerous voltage points or short out parts that could result in a risk of fire or electric
shock. Never spill or spray any type of liquid on the product.
7. To reduce the risk of electric shock, do not disassemble this product, but take it to a
qualified service personnel under the following conditions:
A. If liquid has been spilled into the product.
B. If the product has been exposed to rain or water.
C. If the product does not operate normally by following the
operating instructions. Adjust only those controls that are
covered by the operating instructions, as an adjustment of
other controls may result in damage and will often require
extensive work by a qualified technician to restore the
product to its normal operation.
D. If the product has been dropped or the cabinet has been
damaged.
E. If the product exhibits a distinct change in performance.
8. Avoid using a telephone (other than a cordless type) during an electrical storm. There may be
a remote risk of electric shock from lightning.
9. Do not use the telephone to report a gas leak in the vicinity of the leak.
10. Do not allow anything to rest on the telephone cord. Do not locate this product where the cord
will be abused by persons walking on it.
11. Never install telephone wire during a lightning storm.
12. Never install telephone jacks in wet locations unless the jack is specifically designed for wet
locations.
13. Never touch uninsulated telephone wires or terminals unless the telephone line has been
disconnected at the network interface.
14. Use caution when installing or modifying telephone lines.
15. Use only the supplied cord and batteries indicated in this manual. Do not dispose of batteries
in a fire. They may explode. Check with local codes for possible special disposal instructions.
SAVE THESE INSTRUCTIONS
4
LOCATION OF CONTROLS
FRONT
1
2
3
4
5
6
1.
2.
3.
4.
5.
7
8
Handset
Handset In Jack
Handset Coiled Cord
Key Buttons (0–9,#,*)
MUTE Button
6.
7.
8.
9.
5
REDIAL Button
Receiving Call Light
PAUSE Button
FLASH Button
LOCATION OF CONTROLS (CONTINUED)
BOTTOM
1
4
2
5
6
3
1.
2.
3.
4.
5.
6.
Receiver VOLUME Switch
Line In Jack
Battery Compartment
Tone/Pulse Switch
Speaker
RINGER Switch
6
INSTALLATION
This unit can be used on a desk, or other level surface away
from excessive heat or direct sunlight.
Desk or Table Use
1. Set the RINGER switch to the ON position to have the
ringer sound when receiving a phone call. Insert batteries
as described on the next page to hear the Disney ring
when receiving a call.
2. Set the Tone/Pulse switch to Tone or Pulse to match the
service provided on your telephone line. If you are not sure
of your service, please contact your telephone company.
3. Connect the coiled handset cord to the base.
4. Connect the telephone line cord to the telephone Line In
jack and telephone wall jack as shown.
7
INSTALLATION (CONTINUED)
Battery Installation
To hear the Disney ring when receiving a call, insert three
(3) AAA size batteries into the bottom of the unit as
described below.
NOTE: When the batteries become weak, the unit will
revert back to the standard ring.
1. Remove the Battery Compartment screw.
2. Press in on the Battery Compartment tab and lift off the
Battery Compartment cover.
3. Insert three (3) AAA size batteries, observing the polarity
as shown.
4. Replace Battery
–
+
Compartment
+
–
and screw.
–
+
BATTERY PRECAUTIONS
Follow these precautions when using batteries in this device:
1. Use only the size and type of batteries specified.
2. Be sure to follow the correct polarity when installing the batteries as indicated in the
battery compartment. Reversed batteries may cause damage to the device.
3. Do not mix different types of batteries together (e.g. Alkaline, Rechargeable and
Carbon-zinc) or old batteries with fresh ones.
4. If the device is not to be used for a long period of time, remove the batteries to prevent
damage or injury from possible battery leakage.
5. Do not try to recharge batteries not intended to be recharged; they can overheat and
rupture.
(Follow battery manufacturer’s directions.)
8
TELEPHONE OPERATION
RECEIVING CALLS
MAKING CALLS
1
1
Make sure the RINGER switch is in the
ON position. When the phone rings
and the Receiving Call Light flashes,
lift the handset and speak into the
mouthpiece. Hang up when the call is
1
completed.
Lift the handset and listen for a dial
tone. Press the 1key buttons (0-9) for
the specific number that you wish to
call.
RINGER SWITCH
1
2
Slide the RINGER switch to the ON
position to turn the ringer on.
Slide the RINGER switch to the OFF
position to turn the ringer off.
RECEIVER VOLUME SWITCH
1
1
1
Slide the Receiver VOLUME switch to
the HI (High) or NOR (Normal)
position as desired.
9
TELEPHONE OPERATION
T/P (TONE/PULSE) SWITCH
REDIAL BUTTON
1
1
Slide the T/P switch to Tone (T) or
Pulse (P) to match the service
provided on your telephone line. If you
are not sure of your service, please
contact your telephone company.
Press the REDIAL button to
1
automatically redial
the last number
dialed.
NOTE: Please note that only the last
number you called can be stored in the
Redial memory.
1
FLASH BUTTON
MUTE BUTTON
1
1
Press the FLASH button to hang up
1 having to return it to
the phone without
the base. This is useful for using the
phone with the Call Waiting feature.
Press and hold the MUTE button and
1 hear the person on
you will be able to
the other end of the telephone, but
they cannot hear you. Release the
MUTE button to restore normal sound.
PAUSE BUTTON
1
In some cases, such as a PBX or long
distance service, a pause may be
needed in the dialing sequence.
Pressing the PAUSE button will insert a
three second delay between dialed
numbers.
10
1
TROUBLESHOOTING GUIDE
Before requesting service, please refer to the following chart and check for the
symptom you are experiencing.
PROBLEM: No Dial Tone
SOLUTION 1: Handset cord is not connected properly; securely connect
to the base.
SOLUTION 2: Line cord is not connected properly; securely connect to
wall telephone outlet and Line In jack on the bottom of the unit.
SOLUTION 3: Your phone line is having problems; call the phone
company.
PROBLEM: Ringer not working or not working properly.
SOLUTION 1: RINGER switch is in the OFF position; slide to the ON
position.
SOLUTION 2: Batteries are weak or dead, so the Disney ring will not
sound; replace batteries.
11
For additional set-up or operating assistance,
please visit our website at www.disneyelectronics.com
or contact customer service at (954) 660-7026.
Please keep all packaging material for at least 90 days in case you
need to return this product to your place of purchase or Memcorp.
For parts and accessories, contact Fox International at 1-800-321-6993.
Distributed by Memcorp Inc., Weston, FL, Disney Elements © Disney 2004.
Para informacion adicional sobre la configuracion o si necesita asistencia con
la operacion del equipo, por favor visitenos en nuestra pagina web
www.disneyelectronics.com o si requiere asistencia directa, comuniquese con
nuestro departamento de servicio al cliente al numero (954) 660-7026.
Por favor mantenga todo el material de empaque por lo menos por 90 dias,
en caso que usted necesite devolver el producto donde lo compro a
directamente a Memcorp Inc.
Para Accesorios o Partes en general, por favor comuniquese con Fox
International al numero 1-800-321-6993.
Distribuido por Memcorp inc. Weston, FL, Disney Elements © Disney 2004.
Pour obtenir des informations supplémentaires sur l’installation ou une assistance
concernant l’emploi de votre produit, veuillez visiter notre site Web sur
www.disneyelectronics.com ou contacter notre service clientèle au (954) 660-7026.
Veuillez conserver tout matériel d’emballage pendant au moins 90 jours au cas où
vous devriez renvoyer votre produit à votre revendeur ou directement à
Memorex.
Pour les pieces et les accessoires, contactez Fox International
at au 1-800-321-6993
Distribué par Memcorp inc . Weston, FL, Disney Elements © Disney 2004.