1
User’s Guide
AM/FM Clock Radio
Manual del Usuario
AM/FM Radio Reloj
Guide d'utilisation
Radio-réveil AM/FM
DCR4500-P
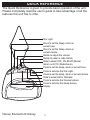
QUICK REFERENCE
The Quick Reference is given to provide basic operation of the unit.
Please completely read the user’s guide to take advantage of all the
features this unit has to offer.
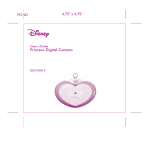
Star Light.
Press to set the Sleep, Alarm or
current hour.
Press to set the Sleep, Alarm or
current minute.
Rotate to adjust the volume.
Rotate to select a radio station.
Slide to select OFF, ON, BUZZ (Buzzer
Alarm) or AUTO (Radio Alarm).
Press to set the sleep, alarm or current hour.
Press to activate the Star Light.
Press to set the sleep, alarm or current minute.
Slide to select AM or FM band.
Press to activate the Snooze feature.
Press to activate the Sleep feature.
Display.
Disney Elements © Disney
1
QUICK REFERENCE (CONTINUED)
TO LISTEN TO THE RADIO:
1. Slide the Function switch to the ON position to turn the unit on; the AM or FM indicator will
light.
2. Slide the Band switch to select AM or FM.
3. Tune a station by rotating the Tuning control until the desired frequency is shown at the top of
the dial.
4. Adjust the volume using the Volume control .
5. Slide the Function switch to the OFF position to turn the unit off.
TO TURN THE STAR LIGHT ON/OFF:
1. To turn the star light on, press the Star Light button; the star light will then light from dim to
bright repeatedly on the castle top.
2. To turn the Star light off, press the Star Light button again.
TO SET OR RESET THE ACTUAL TIME:
1. Press and hold the TIME SET button; the Time indicator ( ) and the display will blink.
2. While holding the TIME SET button, press the HOUR button to set the hour and/or MIN button
to set the minute of the time. Make sure the appropriate AM/PM indicator is lit.
3. Release the TIME SET button and the time will be set.
TO SET OR RESET THE ALARM TIME:
1. With the Function switch in the ON, AUTO or BUZZ position, press and hold the ALARM SET
button; the display will blink.
2. While holding the ALARM SET button, press the HOUR button to set the hour and/or MIN
button to set the minute of the alarm time. Make sure the appropriate AM/PM indicator is lit.
3. Release the ALARM SET button. After 4 seconds, the display will show the actual time and the
alarm time will be set.
TO SET THE ALARM TO WAKE TO RADIO:
1. Set the alarm time as instructed above. Select a radio station and make sure the Volume
control is set as desired.
2. Slide the Function switch to the AUTO position and the Radio Alarm indicator (
) will light.
When the actual time matches the selected preset alarm time, the radio will automatically turn
on for nearly one hour then turn off again.
3. Press the ALARM SET button to turn off the alarm and set it again for the next day. Slide the
Function switch to the OFF position to turn off the alarm and not set for the next day.
TO SET THE ALARM TO WAKE TO DISNEY ALARM:
1. Set the alarm time as instructed above.
2. Slide the Function switch to the BUZZ position and the Buzzer Alarm indicator ( ) will light.
When the actual time matches the selected preset alarm time, the buzzer will automatically
turn on for nearly one hour then turn off again.
3. Press the ALARM SET button to turn off the alarm and set it again for the next day. Slide the
Function switch to the OFF position to turn off the alarm and not set for the next day.
Disney Elements © Disney
2
SAFETY PRECAUTIONS
DANGEROUS VOLTAGE:
The lightning flash with arrowhead symbol within an equilateral
triangle is intended to alert the user to the presence of uninsulated
dangerous voltage within the product’s enclosure that may be of
sufficient magnitude to constitute a risk of electric shock to persons.
ATTENTION:
The exclamation point within an equilateral triangle is intended to
alert the user to the presence of important operating and
maintenance (servicing) instructions in the literature accompanying
the appliance.
CAUTION
RISK OF ELECTRIC SHOCK
DO NOT OPEN
CAUTION: TO REDUCE THE RISK OF ELECTRIC SHOCK, DO NOT
REMOVE COVER (OR BACK). NO USER-SERVICEABLE PARTS INSIDE.
REFER SERVICING TO QUALIFIED SERVICE PERSONNEL.
• Place the unit on a stable surface.
• Avoid installing the unit in locations described below:
• Places exposed to direct sunlight or close to heat radiating
appliances such as electric heaters.
• On top of other stereo equipment that radiates too much heat.
• Places lacking ventilation or dusty places.
• Places subject to constant vibration.
• Humid or moist places.
SURGE PROTECTORS:
It is recommended to use a surge protector for AC connection. Lightning
and power surges ARE NOT covered under warranty for this product.
3
IMPORTANT SAFETY INSTRUCTIONS
Before using the unit, be sure to read all
operating instructions carefully. Please note
that these are general precautions and may
not pertain to your unit. For example, this unit
may not have the capability to be connected
to an outdoor antenna.
1. READ INSTRUCTIONS
All the safety and operating instructions
should be read before the product is
operated.
2. RETAIN INSTRUCTIONS
The safety and operating instructions should
be retained for future reference.
3. HEED WARNINGS
All warnings on the product and in the
operating instructions should be adhered to.
4. FOLLOW INSTRUCTIONS
All operating and use instructions should be
followed.
5. CLEANING
Unplug this product from the wall outlet
before cleaning. Do not use liquid cleaners
or aerosol cleaners. Use a dry cloth for
cleaning.
6. ATTACHMENTS
Do not use attachments not recommended
by the product's manufacturer as they may
cause hazards.
7. WATER AND MOISTURE
Do not use this product near water-for
example: near a bathtub, washbowl, kitchen
sink or laundry tub; in a wet basement; or
near a swimming pool.
8. ACCESSORIES
Do not place this product on an unstable
cart, stand, tripod, bracket or table. The
product may fall, causing serious injury and
serious damage to the product. Use only
with a cart, stand, tripod, bracket or table
recommended by the manufacturer or sold
with the product. Any mounting of the
product should follow the manufacturer’s
instructions, and should use a mounting
accessory recommended by the
manufacturer.
8A. An appliance and cart combination should
be moved with care. Quick
stops, excessive force and
uneven surfaces may cause
the appliance and cart
combination to overturn.
9. VENTILATION
Slots and openings in the cabinet and in the
back or bottom are provided for ventilation,
to ensure reliable operation of the product
and to protect it from overheating. These
openings must not be blocked or covered.
The openings should never be blocked by
placing the product on a bed, sofa, rug or
other similar surface. This product should
never be placed near or over a radiator or
heat source. This product should not be
placed in a built-in installation such as a
bookcase or rack unless proper ventilation is
provided or the manufacturer's instructions
have been adhered to.
10. POWER SOURCES
This product should be operated only from
the type of power source indicated on the
marking label. If you are not sure of the type
of power supply to your home, consult your
appliance dealer or local power company.
For products intended to operate from
battery power, or other sources, refer to the
operating instructions.
11. GROUNDING OR POLARIZATION
This product is equipped with a polarized
alternating-current line plug (a plug having
one blade wider than the other). This plug
will fit into the power outlet only one way.
This is a safety feature. If you are unable to
insert the plug fully into the outlet, try
reversing the plug. If the plug should still fail
to fit, contact your electrician to replace your
obsolete outlet. Do not defeat the safety
purpose of the polarized plug.
12. POWER-CORD PROTECTION
Power-supply cords should be routed so
that they are not likely to be walked on or
pinched by items placed upon or against
them, paying particular attention to cords at
plugs, convenience receptacles, and the
PORTABLE CART WARNING
(symbol provided by RETAC)
4
IMPORTANT SAFETY INSTRUCTIONS
13.
14.
15.
16.
17.
18.
19.
point where they exit from the appliance.
LIGHTNING
To protect your product from a lightning
storm, or when it is left unattended and
unused for long periods of time, unplug it
from the wall outlet and disconnect the
antenna or cable system. This will prevent
damage to the product due to lightning and
power-line surges.
POWER LINES
An outside antenna system should not be
located in the vicinity of overhead power
lines or other electric light or power circuits,
or where it can fall into such power lines or
circuits. When installing an outside antenna
system, extreme care should be taken to
keep from touching such power lines or
circuits as contact with them might be fatal.
OVERLOADING
Do not overload wall outlets and extension
cords as this can result in a risk of fire or
electric shock.
OBJECT AND LIQUID ENTRY
Never push objects of any kind into this
product through openings as they may
touch dangerous voltage points or short out
parts that could result in fire or electric
shock. Never spill or spray any type of liquid
on the product.
SERVICING
Do not attempt to service this product
yourself as opening or removing covers may
expose you to dangerous voltage or other
hazards. Refer all servicing to qualified
service personnel.
REPLACEMENT PARTS
When replacement parts are required, be
sure the service technician uses
replacement parts specified by the
manufacturer or those that have the same
characteristics as the original part.
Unauthorized substitutions may result in fire,
electric shock or other hazards.
SAFETY CHECK
Upon completion of any service or repairs to
this product, ask the service technician to
20.
21.
a.
b.
c.
d.
e.
f.
22.
23.
24.
5
perform safety checks to determine that the
product is in proper operating condition.
WALL OR CEILING MOUNTING
The product should be mounted to a wall or
ceiling only as recommended by the
manufacturer.
DAMAGE REQUIRING SERVICE
Unplug the product from the wall outlet and
refer servicing to qualified service personnel
under the following conditions:
When the power-supply cord or plug is
damaged.
If liquid has been spilled or objects have
fallen into the product.
If the product has been exposed to rain or
water.
If the product does not operate normally by
following the operating instructions. Adjust
only those controls that are covered by the
operating instructions, as an adjustment of
other controls may result in damage and will
often require extensive work by a qualified
technician to restore the product to its
normal operation.
If the product has been dropped or the
cabinet has been damaged.
When the product exhibits a distinct change
in performance–this indicates a need for
service.
HEAT
The product should be situated away from
heat sources such as radiators, heat
registers, stoves or other products (including
amplifiers) that produce heat.
NOTE TO CATV SYSTEM INSTALLER
This reminder is provided to call the CATV
system installer's attention to Article 820-40
of the NEC that provides guidelines for
proper grounding and, in particular, specifies
that the cable ground shall be connected to
the grounding system of the building, as
close to the point of cable entry as practical.
NONUSE PERIODS
The power cord of the appliance should be
unplugged from the outlet when left unused
for a long period of time.
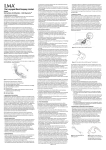
LOCATION OF CONTROLS
FRONT
1.
2.
3.
4.
5.
6.
7.
8.
1
9.
10
11
12
13
14
15
2
3
4
5
6
16
8
9
DISPLAY
B
C D E
AM
FM
F
11.
12.
13.
14.
15.
16.
7
A
10.
Star Light
Tuning Control
ALARM SET
Button
TIME SET Button
Sleep Button
VOLUME Control
Display
AC Cord (Rear of
Unit)
Battery
Compartment
(Bottom of Unit)
Function
(OFF/ON/BUZZ/
AUTO) Switch
Band (AM/FM)
Switch
HOUR Button
MIN Button
Star Light Button
Snooze Button
FM Antenna Wire
(Rear of Unit)
G
H
AM
PM
I
A. Sleep
B. Snooze
C. Radio Alarm
D. Time
E. Buzzer Alarm
F. AM/FM
6
G. Clock Setting
H. Radio
I. AM/PM
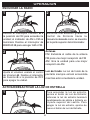
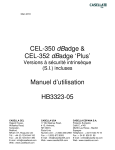
INSTALLATION
Ð
+
Unravel the AC cord and connect it to a
conveniently located AC outlet having 120V
and 60Hz only. The Clock Display will
AC Outlet
illuminate and “12:00” will blink in the
display and the backlight will light.
NOTE: If the AC plug does not fit into a
AC Plug
nonpolarized outlet, do not file or cut the
wide blade. It is the user’s responsibility to have an electrician replace the
obsolete outlet.
If the AC cord is disconnected or if there is a power failure, this electronic
clock is designed to continue operating internally (without showing the time
on the Clock Display) with two (2) AAA size batteries (not included).
To install the batteries:
• Remove the battery compartment door by inserting a
small screwdriver, paper clip or similar item into the tab
while gently pushing to remove.
• Insert two (2) AAA size batteries into the battery
compartment. Be sure to observe the polarity markings
which are engraved inside the battery compartment. If the
batteries are inserted incorrectly, the unit will not operate.
• Replace the battery compartment door.
Be sure to check the condition of the batteries periodically by disconnecting
the AC cord and connecting it again two or three minutes later. The preset
times should continue operating. If the present time does not appear, it
indicates the batteries are dead or not connected properly.
Ð
+
BATTERY PRECAUTIONS
Follow these precautions when using batteries in this device:
1. Use only the size and type of batteries specified.
2. Be sure to follow the correct polarity when installing the batteries as indicated next
to the battery compartment. Reversed batteries may cause damage to the device.
3. Do not mix different types of batteries together (e.g. Alkaline, Rechargeable and
Carbon-zinc) or old batteries with fresh ones.
4. If the device is not to be used for a long period of time, remove the batteries to
prevent damage or injury from possible battery leakage.
5. Do not try to recharge batteries not intended to be recharged; they can overheat
and rupture. (Follow battery manufacturer’s directions.)
7
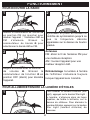
OPERATION
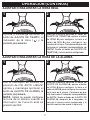
TO LISTEN TO THE RADIO
1
2
1
2
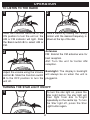
Slide the Function switch 1 to the
ON position to turn the unit on; the
AM or FM indicator will light. Slide
the Band switch 2 to select AM or
FM.
3
1
2
Tune a station by rotating the Tuning
control until the desired frequency is
shown at the top of the dial.
1
1
Antennas
FM: Extend the FM antenna wire for
best reception.
AM: Turn the unit for better AM
reception.
Adjust the volume using the Volume Backlight: The display’s backlight
control 1. Slide the Function switch will always be on when the unit is
2 to the OFF position to turn the plugged in.
unit off.
TURNING THE STAR LIGHT ON/OFF
1
1
1
To turn the star light on, press the
Star Light button; the star light will
then light from dim to bright
repeatedly on the castle top. To turn
the Star light off, press the Star
Light button again.
8
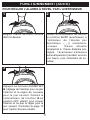
OPERATION (CONTINUED)
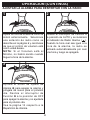
TO SET OR RESET THE ACTUAL TIME
1
2
2
3
1
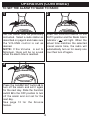
Press and hold the TIME SET
button; the Time indicator ( ) and
the display will blink.
While holding the TIME SET button
1, press the HOUR button 2 to set
the hour and/or MIN button 3 to set
the minute of the time. Make sure
the appropriate AM/PM indicator is
lit. Release the TIME 1SET button 1
and the time will be set.
1
TO SET OR RESET THE ALARM TIME
1
2
1
With the Function switch in the ON,
AUTO or BUZZ position, press and
hold the ALARM SET button; the
display will blink.
NOTE: You cannot set the alarm
time when the Function switch is set
to the OFF position.
2
3
While holding the ALARM SET
button 1, press the HOUR button 2
to set the hour and/or MIN button 3
to set the minute of the alarm time.
Make sure the appropriate AM/PM
indicator is lit. Release the ALARM
1
SET button 1; after 4 seconds, the
alarm time will be set and the display
will show the actual time again
9
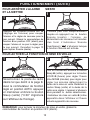
OPERATION (CONTINUED)
TO SET THE ALARM TO WAKE TO RADIO
1
2
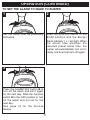
Set the alarm time as previously
instructed. Select a radio station as
described on page 8 and make sure
the VOLUME control is set as
desired.
NOTE: If the Volume is set to
Minimum, there will be no sound
when the alarm time is reached.
Slide the Function switch to the
AUTO position and the Radio Alarm
indicator ( ) will light. When the
actual time matches the 2
selected
preset alarm time, the radio will
automatically turn on1for nearly1 one
hour then turn off again.
3
1
2
Press the ALARM SET button 1 to
turn off the alarm and set it again
for the next day. Slide the Function
switch 2 to the OFF position to turn
off the alarm and not set for the
next day.
See page 12 for the Snooze
feature.
1
10
OPERATION (CONTINUED)
TO SET THE ALARM TO WAKE TO BUZZER
1
2
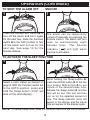
Set the alarm time as previously
instructed.
Slide the Function switch to the
BUZZ position and the Buzzer
Alarm indicator ( ) will light. When
2 the
the actual time matches
selected preset alarm time, the
1 for
buzzer will automatically
1 turn on
nearly one hour then turn off again.
3
1
2
Press the ALARM SET button 1 to
turn off the alarm and set it again
for the next day. Slide the Function
switch 2 to the OFF position to turn
off the alarm and not set for the
next day.
See page 12 for the Snooze
feature.
1
11
OPERATION (CONTINUED)
TO SHUT THE ALARM OFF
1
1
SNOOZE
1
2
Press the ALARM SET button 1 to
turn off the alarm and set it again
for the next day. Slide the Function
switch 2 to the OFF position to turn
off the alarm and not set for the
next day. See page 12 for the
Snooze feature.
The alarm can be temporarily
turned off manually by pressing the
Snooze button; the alarm will turn
back on automatically eight
1
minutes later. The Snooze
indicator (
) will light when
Snooze is activated.
TO ACTIVATE THE SLEEP FUNCTION
1
2
1
2
3
While holding the Sleep button 1,
press the HOUR button 2 to set the
hour and/or MIN button 3 to set
minute of the desired sleep time.
Release the Sleep button 1 and the
time will be set. The unit will then
turn on for the selected
1 amount of
time. The Sleep indicator (icon) will
appear in the display and the
1 actual
time will appear in the display again.
Select a radio station as desired on
page 8. With the Function switch set
to the AUTO position, press and
hold the Sleep button (“0:00” will
blink on the clock display).
NOTE: To cancel sleep timer, slide the Function switch to the OFF position.
12
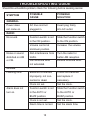
TROUBLESHOOTING GUIDE
Should this unit exhibit a problem, check the following before seeking service:
POSSIBLE
CAUSE
POSSIBLE
SOLUTION
Power does
AC line cord not
Insert plug firmly
not come on.
plugged in.
into AC outlet.
SYMPTOM
GENERAL
RADIO
No sound.
Function switch is not
Slide the Function switch
in the ON position.
to the ON position.
Volume control at
Increase the volume.
minimum position.
Noise or sound
AM–Interference from
Turn the radio for
distorted on AM
traffic.
better AM reception.
FM–Antenna Wire
Extend Antenna Wire.
or FM.
not extended.
CLOCK
Flashing time.
Batteries connected
Check the batteries
improperly, not con-
and replace if
nected or dead.
necessary.
Clock not set.
Set the clock.
Alarm does not
Function switch is not
Slide the Function switch
turn on.
in the AUTO or
to the AUTO or
BUZZ position.
BUZZ position.
Clock is not set.
Set the clock.
Alarm time is not set.
Set the alarm time.
13
FONCTIONNEMENT
POUR ÉCOUTER LA RADIO
1
2
1
2
Glissez le commutateur de fonction 1
en position ON (en marche) pour
allumer l'appareil ; l'indicateur AM ou
FM
s'allumera.
Glissez
le
commutateur de bande 2 pour
sélectionner la bande AM ou FM.
3
1
2
Syntonisez un poste en tournant le
contrôle de syntonisation jusqu'à ce
que la fréquence désirée
1
apparaisse sur le dessus du bouton
gradué.
1
Antennes
FM: étirez le fil de l'antenne FM pour
une meilleure réception.
AM : tournez l'appareil pour une
meilleur réception AM.
Réglez le volume avec le contrôle
de volume 1. Glissez le Rétroéclairage :la lumière à l'arrière
commutateur de fonction 2 en de l'afficheur s'allumera toujours
position OFF (éteint) pour éteindre lorsque l'appareil sera branché.
l'appareil.
POUR ALLUMER/ÉTEINDRE LA LUMIÈRE D'ÉTOILES
1
1
1
Pour allumer la lumière d'étoiles (star
light), appuyez sur le bouton Star Light ;
la lumière s'allumera alors de façon
répétée, de faible à brillante, sur le
dessus du château. Pour éteindre la
lumière d'étoiles, appuyez sur le bouton
Star Light (lumière d'étoiles) de
nouveau.
8
FONCTIONNEMENT (SUITE)
POUR INITIALISER OU RÉINITIALISER L'HEURE ACTUELLE
1
2
1
2
3
Tout en maintenant enfoncé le bouton
TIME SET 1 (réglage de l'heure),
appuyez sur le bouton HOUR 2
(heure) pour régler l'heure et/ou MIN 3
(minutes) pour régler pour régler les
minutes. Assurez-vous que l'indicateur
AM/PM approprié
est allumé.
Relâchez le bouton TIME SET 1
(réglage de l'heure) et
1 l'heure sera
réglée.
Appuyez et maintenez enfoncé le
bouton TIME SET (réglage de
l'heure) ; l'indicateur d'heure ( ) et
l'afficheur clignoteront.
POUR INITIALISER OU RÉINITIALISER L'HEURE DE
1 RÉVEIL
1
2
1
2
3
Tout en maintenant enfoncé le
bouton ALARM SET 1 (réglage de
l'alarme), appuyez sur le bouton
HOUR 2 (heure) pour régler l'heure
et/ou MIN 3 (minutes) pour pour
régler les minutes de l'alarme.
Assurez-vous que l'indicateur AM/PM
1 Relâchez le
approprié est allumé.
bouton ALARM SET 1 (réglage de
l'alarme) ; après 4 secondes, l'heure
de l'alarme sera réglée et l'afficheur
montrera l'heure actuelle.
Lorsque le commutateur de fonction
est en position ON (en marche),
AUTO ou BUZZ (avertisseur),
appuyez et maintenez enfoncé le
bouton ALARM SET (réglage de
l'alarme) ; l'afficheur clignotera.
REMARQUE : vous ne pouvez pas
régler l'heure de l'alarme lorsque le
commutateur de fonction est en
position OFF (éteint).
9
FONCTIONNEMENT (SUITE)
POUR RÉGLER L'ALARME À RADIO RÉVEIL
1
2
Réglez l'heure de réveil comme
décrit ci-dessus. Sélectionnez un
poste de radio tel que décrit à la
page 8 et assurez-vous que le
contrôle VOLUME est réglé comme
désiré.
REMARQUE : si le volume est
réglé à minimum, aucun son ne se
fera entendre lorsque l'alarme se
déclenchera.
Glissez le commutateur de fonction
en position AUTO et l'indicateur de
l'alarme radio (
) s'allumera.
2
Lorsque l'heure actuelle correspond
à l'heure d'alarme pré-réglée,
1 le
1
radio s'allumera automatiquement
pendant environ une heure puis
s'éteindra.
3
1
2
Appuyez sur le bouton ALARM SET
1 (réglage de l'alarme) pour couper
l'alarme et la régler de nouveau
pour le jour suivant. Glissez le
commutateur de fonction 2 en
position OFF (éteint) pour couper
l'alarme et ne pas la régler pour le
jour suivant. Consultez la page 12
pour l'option Snooze (sieste).
1
10
FONCTIONNEMENT (SUITE)
POUR RÉGLER L'ALARME À RÉVEIL PAR L'AVERTISSEUR
1
2
Réglez l'heure de réveil comme
décrit ci-dessus.
Glissez le commutateur de fonction
en position BUZZ (avertisseur) e
l'indicateur de l'alarme par
2
avertisseur (
)) s'allumera.
Lorsque
l'heure actuelle
correspond à l'heure
1 d'alarme1 préréglée, l'avertisseur s'allumera
automatiquement pendant environ
une heure, puis s'éteindra de luimême.
3
1
2
Appuyez sur le bouton ALARM SET
1 (réglage de l'alarme) pour couper
l'alarme et la régler de nouveau
pour le jour suivant. Glissez le
commutateur de fonction 2 en
position OFF (éteint) pour couper
l'alarme et ne pas la régler pour le
jour suivant. Consultez la page 12
pour l'option Snooze (sieste).
1
11
FONCTIONNEMENT (SUITE)
POUR ARRÊTER L'ALARME
ET LA METTRE
1
1
SIESTE
1
2
Appuyez sur le bouton ALARM SET 1
(réglage de l'alarme) pour couper
l'alarme et la régler de nouveau pour le
jour suivant. Glissez le commutateur de
fonction 2 en position OFF (éteint) pour
couper l'alarme et ne pas la régler pour
le jour suivant. Consultez la page 12
pour l'option Snooze (sieste).
L'alarme peut être temporairement
coupée en appuyant sur le bouton
Snooze (sieste) ; l'alarme se
déclenchera de nouveau huit minutes
plus tard. L'indicateur Snooze
(avertisseur) (
) s'allumera lorsque
la fonction Snooze est 1
activée.
POUR ACTIVER LA FONCTION DE MISE EN VEILLE
1
2
1
2
3
Tout en maintenant enfoncé le bouton
Sleep 1 (veille), appuyez sur le bouton
HOUR 2 (heure) pour régler l'heure
et/ou MIN 3 (minutes) pour régler pour
régler les minutes déterminant la
durée de la mise en veille. Relâchez le
bouton Sleep (veille) et la durée de la
veille sera réglée. L'appareil s'allumera
alors pendant la durée1 sélectionnée.
L'indicateur de mise en veille 1 (icône
apparaîtra dans l'afficheur et l'heure
1
actuelle apparaîtra de nouveau.
Sélectionnez le poste de radio
désiré tel que décrit à la page 8.
Avec le commutateur de fonction
réglé en position AUTO, appuyez
et maintenez enfoncé le bouton
Sleep (veille) ("0:00" clignotera
sur l'afficheur de l'horloge).
REMARQUE: pour annuler le minuteur de mise en veille, glissez le
commutateur de fonction en position OFF (éteint).
12
GUIDE DE RÉSOLUTION DES PROBLÈMES
Si vous avez un problème avec cet appareil, vérifiez le tableau cidessous avant de
consulter un technicien.
SYMPTÔME
CAUSE
POSSIBLE
SOLUTION
POSSIBLE
GÉNÉRAL
La mise sous tension
Le cordon d’alimentation Insérez la fiche dans la
ne se fait pas.
CA n’est pas branché.
prise CA.
RADIO
La radio n’émet
aucun son.
Sélecteur de Function Mettez l’Function à la
n’est pas à la position ON. position ON.
Le VOLUME est au
Augmentez le
niveau minimal.
VOLUME.
On entend des parasites AM - Interférence causée
Faites pivoter l’appareil pour
ou de la distorsion sur par la circulation.
une meilleure réception AM.
la bande AM ou FM. FM - Antenne non
Déployez l’antenne.
déployée.
HORLOGE
L’heure clignote.
La pile est mal connectée, Vérifiez l’état de la pile.
n’est pas connectée ou
est à plat.
L'horloge n'est pas réglée. Réglez l'horloge.
La fonction de réveil
ne s’enclenche pas.
Sélecteur de Function
n’est pas à la position
Mettez l’Function à la
la position AUTO.
AUTO.
L'horloge n'est pas réglée. Réglez l'horloge.
L’heure de réveil n’est
pas réglée.
13
Réglez l’heure de réveil.
OPERACIÓN
ESCUCHAR LA RADIO
1
2
1
2
Deslice el interruptor Función 1 a
la posición de ON para encender la
unidad; el indicador de AM o FM se
iluminará. Deslice el interruptor de
BANDAS 2 para escoger AM o FM.
3
1
2
Sintonice una estación girando el
control de Sintonía hacia la
frecuencia deseada como se muestra
1
en la parte superior del sintonizador.
1
Antenas
FM: Extienda el cable de la antena
FM para una mejor recepción de FM
AM: Gire la unidad para una mejor
recepción de AM.
Ajuste el volumen usando el control Luz de fondo: La luz de fondo de la
de Volumen 1. Deslice el interruptor pantalla siempre estará encendida
de Función 2 a la posición de OFF mientras esté conectada la unidad.
para apagar la unidad.
ACTIVAR/DESACTIVAR LA LUZ DE ESTRELLA
1
1
1
Para encender la luz de estrella,
oprima el botón de Luz de Estrella;
entonces la luz de estrella iluminará
repetidamente de pálida a brillante en
la parte superior del castillo. Para
apagar la luz de estrella, oprima de
nuevo el botón de Luz de Estrella.
6
OPERACIÓN (CONTINÚA)
AJUSTAR O REAJUSTAR LA HORA REAL
1
2
2
3
1
Mientras mantiene oprimido el botón de
AJUSTE DE TIEMPO 1, oprima el botón
de HORA 2 para configurar la hora o el
botón de MIN 3 para configurar los
minutos de la hora. Cerciórese de que esté
iluminado el indicador correspondiente de
AM/PM. Suelte el botón de AJUSTE DE
TIEMPO 1 y la hora estará configurada.
Oprima y mantenga oprimido el
botón de AJUSTE DE TIEMPO; el
indicador de la Hora ( ) y la
pantalla parpadearán.
1
AJUSTAR O REAJUSTAR LA HORA DE LA ALARMA
1
1
2
2
3
1
Mientras mantiene oprimido el botón de
AJUSTE DE ALARMA 1, oprima el botón
de HORA 2 para configurar la hora o el
botón de MIN 3 para configurar los minutos
de la hora de la alarma. Cerciórese de que
esté iluminado el indicador correspondiente
de AM/PM. Suelte el botón de AJUSTE DE
ALARMA 1; después de 4 segundos, la
hora de la alarma estará configurada y la
pantalla mostrará de nuevo la hora real.
Con el interruptor de Función en
posición de ON, AUTO o BUZZ,
oprima y mantenga oprimido el
botón de AJUSTE DE ALARMA; la
pantalla parpadeará.
NOTA: Usted no puede configurar
la hora de la alarma cuando el
interruptor de Función está en
posición de OFF.
1
7
OPERACIÓN (CONTINÚA)
AJUSTAR LA ALARMA PARA DESPERTAR CON LA RADIO
1
2
Ajuste la hora de la alarma como se
indicó anteriormente. Seleccione
una estación de radio como se
describe en la página 6 y cerciórese
de que el control de volumen esté
como usted desea.
NOTA: Si el Volumen está al
Mínimo, no habrá sonido cuando
llegue la hora de la alarma.
Deslice el interruptor de Función a
la posición de AUTO y se iluminará
el indicador de Radio Alarma ( ).
2 a la
Cuando la hora real sea igual
hora de la alarma, la radio se
activará automáticamente
por1casi
1
una hora y luego se apagará.
3
1
2
Oprima el botón de Ajuste de
Alarma 1 para apagar la alarma y
póngala de nuevo para el próximo
día. Deslice el interruptor de
Función 2 a la posición de OFF
para apagar la alarma y no ajustarla
para el próximo día.
Vea la página 10 respecto a la
Repetición de Alarma.
1
8
OPERACIÓN (CONTINÚA)
AJUSTAR LA ALARMA PARA DESPERTAR CON ZUMBADOR
1
2
Ajuste la hora de la alarma como se
indicó anteriormente.
Deslice el interruptor de Función a
la posición de BUZZ y se iluminará
el indicador de Alarma Zumbador
( ). Cuando la hora real 2
sea igual
a la hora de la alarma, el zumbador
1 por
se activará automáticamente
1
casi una hora y luego se apagará.
3
1
2
Oprima el botón de Ajuste de Alarma
1 para apagar la alarma y póngala de
nuevo para el próximo día. Deslice el
interruptor de Función 2 a la posición
de OFF para apagar la alarma y no
ajustarla para el próximo día.
Vea la página 12 respecto a la
Repetición de Alarma.
1
9
OPERACIÓN (CONTINÚA)
APAGAR LA ALARMA
1
1
REPETICIÓN DE ALARMA
1
2
Oprima el botón de Ajuste de Alarma 1
para apagar la alarma y póngala de
nuevo para el próximo día. Deslice el
interruptor de Función 2 a la posición
de OFF para apagar la alarma y no
ajustarla para el próximo día. Vea la
página 12 respecto a la Repetición de
Alarma.
La alarma puede apagarse temporalmente a mano al oprimir el botón de
Repetición de Alarma; la alarma se
volverá a activará automáticamente
después de ocho minutos. El indicador
de Repetición de Alarma (
) se
iluminará cuando se active la repetición
de alarma.
1
ACTIVAR LA FUNCIÓN DE DORMIR
1
2
2
3
1
Mientras mantiene oprimido el botón de
Dormir 1, oprima el botón de HORA 2 para
configurar la hora o el botón de MIN 3 para
configurar los minutos de la hora de dormir.
Suelte el botón de Dormir 1 y la hora estará
configurada. Entonces la unidad se
encenderá por la cantidad seleccionada de
tiempo. El indicador de Dormir (icono)
aparecerá en la pantalla y aparecerá de
nuevo la hora real en la pantalla.
Seleccione una estación de radio
como desee en la página 8. Con el
interruptor de Función en posición
de AUTO, oprima y mantenga
oprimido el botón de Dormir ("0:00"
parpadeará en la pantalla del reloj).
1
1
NOTA: Para cancelar el cronometrador de dormir, deslice el interruptor de
Función a la posición de OFF.
10
For additional set-up or operating assistance,
please visit our website at www.disneyelectronics.com
or contact customer service at 1-877-DISNYCE (1-877-347-6923).
Please keep all packaging material for at least 90 days in case you
need to return this product to your place of purchase or Memcorp.
For parts and accessories, contact Fox International at 1-800-321-6993.
Distributed by Memcorp Inc., Weston Fl
Disney Elements © Disney 2004.
Para informacion adicional sobre la configuracion o si necesita asistencia
con la operacion del equipo, por favor visitenos en nuestra pagina web
www.disneyelectronics.com o si requiere asistencia directa, comuniquese con
nuestro departamento de servicio al cliente al numero 1-877-DISNYCE
(1-877-347-6923).
Por favor mantenga todo el material de empaque por lo menos por 90 dias,
en caso que usted necesite devolver el producto donde lo compro a
directamente a Memcorp Inc.
Para Accesorios o Partes en general, por favor comuniquese con Fox
International al numero 1-800-321-6993.
Distribuido por Memcorp inc. Weston, FL, Disney Elements@Disney 2004
Pour obtenir des informations supplémentaires sur l’installation ou une
assistance concernant l’emploi de votre produit, veuillez visiter notre site
Web sur www.disneyelectronics.com ou contacter notre service clientèle
au 1-800-919-3647.
Veuillez conserver tout matériel d’emballage pendant au moins 90 jours
au cas où vous devriez renvoyer votre produit à votre revendeur ou
directement à Memorex.
Pour les pieces et les accessoires, contactez Fox International at au
1-800-321-6993