1
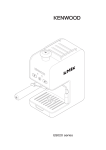
IMPORTANT SAFEGUARDS en
When using electrical appliances, basic safety precautions should always be followed, including the following:
• Read all instructions.
• Do not touch hot surfaces. Use handles and knobs.
• To protect against fire, electrical shock and personal injury, do not immerse cord, plug or appliance in water or other
liquid.
• Never allow the appliance to be used by children.
• Unplug from the outlet when not in use and before cleaning. Allow to cool before fitting or taking off parts, and
before cleaning the appliance.
• Do not operate with a damaged cord or plug, or after the appliance malfunctions, or has been damaged in any
manner. Return the appliance to the nearest authorized service facility for examination, repair or adjustment.
• The use of accessory attachments or spare parts not recommended by the appliance manufacturer may result in
fire, electrical shock or personal injury.
• Do not use outdoors.
• Do not let the cord hang over the edge of the table or counter, or touch hot surfaces.
• Do not place on or near a hot gas or electrical burner, or in a heated oven.
• Plug cord into the wall outlet. To disconnect, turn any control to “off”, then remove plug from wall outlet.
• Do not use the appliance for other than the intended use. This appliance is to be utilized for domestic use only. Any
other use is to be considered improper and, therefore, dangerous.
WARNING: To reduce the risk of fire or electric shock, do not remove the cover. Don’t attempt to repair or
modify the machine, doing so will void the warranty. Repair should be done by authorized service personnel only!
SAVE THESE INSTRUCTIONS
This product is for household use only
short cord instructions
- A short power cord is provided to reduce risks resulting from becoming entangled in or tripping over a longer
cord.
- Longer, detachable power supply cords or extension cords are available and may be used if care is exercised in
their use.
- If an extension cord is used, the marked electrical rating should be at least as great as the electrical rating of the
appliance. If the appliance is provided with 3- wire, grounding type cord, the extension should be a GROUNDING
TYPE 3 - WIRE CORD. The longer cord should be arranged so that it will not drape over the counter-top or table top
where it can be pulled on by children or tripped over.
- Your product is equipped with a polarized alternating current line plug (a plug having one blade wider than the
other). This plug will fit into the power outlet only one way. This is a safety feature. If you are unable to insert the
plug fully into the outlet, try reversing the plug. If the plug should still fail to fit, contact your electrician to replace
your obsolete outlet. Do not defeat the safety purpose of the polarized plug.
4
Description · Safety Warnings · Installation
en
Safety Warnings
• This appliance is designed to “make espresso coffee” and
“hot drinks”. Use with care to avoid scalds from the water
and steam jets or through incorrect use.
• Never touch hot parts.
• After removing the packaging, make sure the product is
complete. If in doubt, do not use the appliance and contact a De’Longhi customer service representative.
• The packing elements (plastic bags, polystyrene foam,
etc.) should be kept out of reach of children as they are a
safety hazard.
• This appliance is intended for domestic use only. Any
other use is considered improper and thus dangerous.
• The manufacturer cannot be held responsible for any
damage caused through incorrect, wrong or unreasonable use.
• Never touch the appliance with wet or damp hands.
• Never let children use the appliance without supervision.
• Never allow children to play with the appliance.
• Should the appliance break or not function correctly, turn
it off and do not tamper with it. For all repairs, contact
authorized service centers only and insist on the use of
original spare parts.
Failure to respect the above could reduce the safety of the
appliance.
• The power cord for this appliance must not be replaced by
the user as this operation requires the use of special tools.
In the event of damage, contact an authorized service
center only to avoid all risks.
Read this instruction booklet carefully before installing
and using the appliance. This is the only way to ensure
the best results and maximum safety for the user.
Description (see page 3)
The terminology below will be used repeatedly on the following pages.
a removable water tank
b lid
C finger grip for steam nozzle
d steam tube
e steam nozzle
f coffee outlet
g variable steam knob
h small filter for 1 cup dispensing or coffee pod
i tab
j large filter for 2 cup dispensing only
k coffee button
l coffee ready indicator light
m on/off button
n steam ready indicator light
o steam button
p drip tray
q float
r cup stand
s measuring spoon/coffee tamper
t filter holder
filter emptying lever
cup storage tray
Installation
• Place the appliance on a work surface away from water
faucets and sinks.
• Check that the voltage of the outlet corresponds to the
value indicated on the appliance rating plate. Connect
the appliance to an efficiently grounded electrical socket
with a minimum rating of 10A only. The manufacturer
declines all liability for any accidents caused by the absence of an efficient ground system.
• If the plug fitted to the appliance does not match the
electrical socket, have the outlet replaced with a suitable
type by a qualified electrician.
• Never install the appliance in environments where the
temperature may reach 0°C (32°F) or lower (the appliance may be damaged if the water freezes).
Attention: Before using the machine for the first time
all accessories and internal circuits must be washed
by making at least five cups of coffee without using
ground coffee.
5
How to make Espresso coffee
Before making coffee for the first time
1 Make sure the variable steam knob is closed by turning
clockwise (don’t overtighten).
2 Lift the lid, then lift out the tank and fill with cold water.
Never fill above the “max” level marked. Alternatively lift
the lid and fill the tank while in position.
We recommend using filtered water as it produces better
coffee and reduces limescale. Never use carbonated water
or any other liquid.
3 Refit the tank. Make sure that it is correctly located and
apply light pressure if necessary to ensure the valve at
the bottom of the tank connects with the bottom of the
machine.
Important
Never operate the machine without water in the tank. Refill
as soon as the level gets low.
4 Close the lid.
5 Hold the finger grip and swing out the steam nozzle and
put a jug underneath.
6 Fit a filter into the filter holder (without coffee and making sure that the tab on the filter fits into the slot on the
filter holder). Attach to the machine by positioning it under the coffee outlet and turning to the right 1. Place a
suitably sized container underneath.
7 Connect to the power supply then press the on/off button and it will glow orange. At the same time the green
coffee ready indicator light will flash. Wait until the green
light stops flashing.
8 Open the variable steam knob by turning anti-clockwise
and press the coffee button and allow 4 large cups of
water to flow out of the steam nozzle. Close the variable
steam knob and allow 4 large cups of water to flow out of
the coffee outlet into the container. Refill the water tank
as necessary.
9 Press the coffee button to stop the flow, then press the
on/off button to switch off the machine.
10 Repeat these steps if you haven’t used the coffee maker
for a few days.
3
4
5
6
en
ing it under the coffee outlet and turning to the right 1.
Ensure it is firmly positioned.
Position a cup under the filter holder. Using the same cup
that the coffee will be served in will ensure it is preheated.
Press the on/off button and it will glow orange. At the
same time the green coffee ready indicator light will
flash. Wait until the green light stops flashing.
Press the coffee button and it will glow orange, and hot
water will dispense into the cup. When the green coffee
ready light starts flashing again, press the coffee button
to stop the flow.
Remove the filter holder and proceed to make coffee using either ground coffee or coffee pods.
How to prepare Espresso coffee using ground coffee
1 Preheat the appliance as described in the previous section.
2 Check that there is water in the tank.
3 Select the desired filter.
Use the smaller filter for making one cup of coffee (or when
using coffee pods) and the larger filter for 2 cups.
4 Add the coffee using the measuring spoon provided one
level spoon per cup, level the surface then lightly press
with the coffee tamper. Wipe off any coffee around the
rim.
When buying ground coffee make sure it is suitable for
espresso machines.
Never press the coffee too firmly as it will block the filter
and the coffee will come out very slowly and the crema will
be of a dark color. However, if it is pressed too lightly, the
coffee will come out too fast and the crema will be a light
color and the coffee will taste watery.
5 Fit the filter holder. Make sure that the tab on the filter
fits into the slot on the filter holder.
6 Fit the filter holder into the coffee outlet. Turn it to the
right to lock into position 1.
Put one or two cups underneath 2. If making one cup of
coffee, center your cup in the middle.
7 Press the on/off button and wait until the green coffee
ready indicator light stops flashing, then press the coffee
button.
8 When you’ve enough coffee – not too much otherwise
it will be too weak, press the coffee button. If you’re not
making more coffee press the on/off button to switch off
the machine. The chart below gives a guide on how long
to operate the coffee button to produce drinks of different
volumes.
Preheating the coffee machine
To ensure your espresso coffee is dispensed at the right temperature it is necessary to pre-heat the coffee unit.
1 Check that the variable steam knob is firmly closed (turn
clockwise) and that there is sufficient water to heat 1 or 2
cups as required.
2 Fit the desired filter into the filter holder (without coffee
and making sure that the tab on the filter fits into the slot
on the filter holder). Attach to the machine by position-
6
How to make Cappuccino · Hot water production · Cleaning and maintenance
Quantity
Always follow the instructions on the package
of the pods for the correct positioning of the
pods in the filter.
Filter size Approximate
time to dispense
1 Espresso (1.35fl.oz/ 1 cup
40ml)
12 sec
2 Espresso (1.35fl.oz/
40ml each)
2 cup
25 sec
1 large coffee (4.25 fl.oz/ 1 cup
125ml)
32 sec
2 large coffees (4.25 2 cup
fl.oz/ 125ml each)
65 sec
en
How to make Cappuccino
Prepare the espresso as previously described.
Hint - to prepare more than one cappuccino, first make all the
coffees then at the end prepare the frothed milk for all the cappuccinos.
1 Make sure there is water in the tank.
2 Ensure that the variable steam control is closed.
3 Press the on/off button and it will glow orange. 4 Press the steam button and the red steam indicator light
will flash.
5 Wait until the red light glows continuously indicating
that the unit has reached the correct temperature.
It is recommeded to clear the steam tube of water before
beginning to froth milk. To do this, place a jug under the
steam nozzle and slightly open the variable steam knob by
turning anti clockwise until steam is produced.
DO NOT OPEN THE VALVE FULLY.
6 Part fill a jug with milk – the milk may increase up to
three times in volume so select a suitably sized jug. As a
guide use 1.4-2.0 oz. (40-60 ml) milk per cappuccino.
Cold reduced fat or skim milk gives the best results.
7 Hold the jug in one hand and place the nozzle in the
milk, ensure that the milk does not go above the steam
nozzle.
8 Open the variable steam knob by turning in an anti clockwise direction. The milk will begin to increase in volume
and become frothy 6. Adjust the height of the jug ensuring that the tip of the nozzle remains below the surface
of the milk. After 20-25 seconds the milk will be steamed
and frothy.
9 Stop the steam by turning the varialble steam knob in a
clockwise direction.
Never allow the milk to boil as this will spoil the flavor of
the coffee.
10 Press the steam button.
11 Pour the frothed milk into the cups containing the espresso coffee. For coffee latte hold back the froth and just add
the steamed milk.
Important – Never operate the steam nozzle for
longer than 2 minutes at one time, and always
clean the nozzle after use.
12 Press the on/off button to switch off.
9
Wait for 30 seconds then remove the filter holder by turning to the left.
There may be water on the filter when you remove it: this is
normal
10 To remove the used coffee from the filter holder, flip the
lever on the handle so that the end locates over the filter
3. Hold the lever in position then tip the unit upside down
and tap out the grounds 4.
Important
Never remove the filter holder while the coffee or
steam function is selected – steam could shoot out
and burn you.
How to prepare Espresso coffee using pods
Important
If the filter for one cup is used after ground coffee has been
used, it is necessary to clear any ground coffee from around the
coffee outlet. This is necessary to avoid water leakages from
the filter holder and to ensure optimum performance. Take
care as the area may be hot.
1 Preheat the machine as described in the previous section,
fitting the small filter in the filter holder.
2 After pre-heating remove the filter holder and place the
coffee pod into the filter making sure the pod is facing the
correct way 5.
3 Press the pod towards the lower part of the filter, making
sure that the paper flaps adhere to the inner part of the
filter.
4 The pod needs to be well centered and placed firmly in
the filter.
5 Fit the filter holder into the coffee outlet and turn to the
right until it locks into position 1.
6 Follow the points ‘to make espresso’.
Note – use pods that conform to the ESE standard.
7
Descaling
To make espresso after frothing milk
Important - Never remove the filter holder from its
housing immediately after using the steam fuction.
If you’re making espresso after frothing milk, you need to
get rid of any over-hot water that could burn your coffee.
Here’s how:1 Switch off the steam button.
2 Ensure there is water in the tank and place a jug beneath
the steam nozzle.
3 Open the variable steam knob by turning anti-clockwise
and press the coffee button (water/steam will come out
of the steam nozzle). Wait until the green light flashes
then close the variable steam knob and switch off the
coffee button.
4 Wait for additional time until the green light glows continuously. When this happens the machine is ready to
make coffee.
en
After approximately every 100 uses dismantle and clean more
thoroughly as described below.
Remove the cap located on the underside of the filter by turning in the direction indicated 6. Remove the crema device by
pushing up from the underside 7. Separate the components of
the crema device by pulling the gasket to the side and removing the plastic disc and metal filter. Rinse parts thoroughly.
Clean the metal filter in hot water using a brush 8. Make sure
the holes in the metal filter are not blocked. If necessary clean
with a pin 8. Dry the parts then reassemble, making sure the
parts are correctly assembled.
Cup stand, drip tray
Empty the drip tray regularly. You’ll know when it is full, the
red float in the middle of the drip tray will rise and become
visible in the hole on the cup stand.
1 Wash then dry. Alternatively wash in the dishwasher, first
removing the float from the drip tray and placing in the
cutlery basket.
Cleaning
Steam nozzle
Prior to cleaning the steam nozzle allow some hot water to
flow out of the nozzle to assist with the cleaning operation.
This should be carried out immediately after having dispensed
steam. Here’s how:1 Ensure there is water in the tank and that there is a jug
under the steam nozzle.
2 Switch off the steam button.
3 Open the steam knob by turning in an anti-clockwise
direction.
4 Press the coffee button and operate for approximately 10
seconds to allow hot water to pass through the nozzle.
5 Switch off the coffee button then close the variable steam
knob by turning clockwise.
6 Press the on/off button to switch off the machine.
Before further cleaning, unplug and let everything cool.
Never immerse the appliance in water.
Don’t wash parts in the dishwasher unless recommended.
Coffee outlet
After every use check that this area is clean and free from any
coffee grounds. Wipe clean and if necessary carry out the following procedure to clean more thoroughly. Failure to keep
this area clean will affect the quality of the coffee produced
and may damage the unit.
1 Using a screwdriver 10, unscrew the screw that holds the
coffee outlet in place (do not remove the inner cover).
2 Clean the area with a damp cloth.
3 Clean the removed outlet thoroughly in hot soapy water
using a brush. Rinse thoroughly. Make sure the holes are
not blocked, if necessary use a pin to clean.
4 Reverse the above procedure to re fit to the outlet.
Failure to clean the coffee outlet and the filters as described invalidates the guarantee.
Failure to clean the coffee outlet and the filters as described
invalidates the guarantee.
Descaling
It is advisable to discale the coffee maker after 200 cups of coffee have been made.
1 We recommend purchasing a product specifically for descaling espresso coffee machines. Use the quantities recommended by the proprietary descaler but do not exceed
the 1 litre tank capacity.
2 Make sure the filter holder is not attached and position a
bowl under the coffee outlet and a jug under the steam
nozzle.
3 Press the on/off button then press the coffee button and
open the variable steam knob by turning anti-clockwise
Steam nozzle
1 Unscrew the nozzle by turning clockwise, then wash thoroughly. Check that the 3 holes indicated are not blocked.
If necessary unblock them with a pin.
2 Clean the steam tube. Make sure the end is not blocked.
3 Screw the nozzle back onto the delivery tube.
Tank, lid, filter holder
Wash, rinse and allow to dry.
Filter (one and two cup version)
Wash and dry after every use.
8
Descaling
en
Troubleshooting
en
and allow 1 cup of water to flow out of the steam nozzle.
Close the variable steam knob and allow 1 cup of water
to flow out of the coffee outlet. Do not wait for the green
light to stop flashing. 4 Switch off and unplug the coffee maker and leave the
machine to stand for 15 minutes.
5 Repeat step 3 and allow all the descaler to flow out of the
machine. Switch off.
6 Thoroughly rinse the tank and fill with fresh water.
7 Follow step 3 allowing the water to flush out of the hot
water nozzle and also the coffee outlet. Repeat with a
fresh tank of water. This will remove all traces of the descaler.
Repairs caused by malfunctioning due to a build up of limescale in the product are not covered by the guarantee if the
descaling process is not carried out regularly.
Any other servicing should be performed by an authorized
service representative.
Problem
Possible causes
Solution
Espresso coffee doesn’t come out of the The coffee is damp and/or pressed too Check that you are using ground coffee
machine
firmly into the filter
suitable for espresso makers. Press the
coffee more lightly in the filter and change the grind if necessary.
The holes in the filter holder are blocked
Clean the holes in the spouts
The coffee outlet is blocked
Clean as indicated in the cleaning section.
The tank is incorrectly fitted and the val- Press the tank lightly so as to open the
ve at the bottom is not open.
valve at the bottom
The holes in the crema device are blo- Dismantle the crema device 8 and clean
cked.
parts thoroughly. See Cleaning (filter)
section.
Espresso coffee drips from the edges The filter holder is incorrectly attached to
of the filter holder, instead of from the the machine.
holes.
The gasket of the espresso boiler has lost
its elasticity.
Refit the filter holder, making sure it is
located correctly and turn to the right.
Get the gasket replaced. Refer to Service
and Customer Care.
The holes in the filter holder spouts are Clean the holes in the spouts.
blocked
Too much coffee has been placed in the Decrease the quantity of coffee.
coffee filter
9
Troubleshooting
en
Problem
Possible causes
Solution
The espresso coffee is cold
Pre heating the machine was not carried Follow instructions on pre heating the
out.
coffee machine.
The green coffee ready indicator light Wait until the green coffee indicator light
was not glowing when the coffee button stops flashing before pressing the coffee
was pressed.
button.
The pump is too noisy
The water tank is empty
Fill the tank with water.
The tank is incorrectly fitted and the val- Press the tank lightly so as to open the
ve in the bottom is not open.
valve at the bottom.
The coffee cream is light in colour and is The ground coffee has not been pressed Press the coffee more firmly.
dispensed too quickly.
enough.
Insufficient ground coffee has been used. Increase the quantity of coffee in the
filter.
Too much coffee has been dispensed.
Decrease the quantity of coffee dispensed into the cup(s).
The coffee used is unsuitable.
Change the type of coffee used.
The coffee cream is dark in colour and is The ground coffee has been pressed too Press the coffee less.
dispensed too slowly.
firmly.
The coffee has an acidic taste
The coffee outlet is blocked.
Clean as indicated in the cleaning section.
Too much coffee has been used.
Decrease the quantity.
The coffee is too finely ground.
Change the coffee and buy one suitable
for espresso machines.
The coffee used is unsuitable.
Change the type of coffee used
The machine was not rinsed thoroughly Flush the machine with several changes
after descaling
of clean water and rinse all components,
see cleaning
The milk does not froth when making a The milk is not cold enough.
cappuccino
The cappuccino maker is dirty.
10
Always use milk from the refrigerator.
Try milk with a different fat content.
Clean the steam delivery tube as well as
the nozzle. See Cleaning.
Limited warranty
en
This warranty applies to all products with De’Longhi or Kenwood brand names.
What does the warranty cover?
We warrant each appliance to be free from defects in material and workmanship. Our obligation under this warranty is limited to repair at our factory or authorized service center of any defective parts or part thereof, other than parts damaged in transit. In the event
of a products replacement or return, the unit must be returned transportation prepaid. The repaired or new model will be returned
at the company expense.
This warranty shall apply only if the appliance is used in accordance with the factory directions, which accompany it, and on an
Alternating current ( AC ) circuit.
How long does the coverage last?
This warranty runs for one year (1) from the purchase date found on your receipt and applies only to the original purchaser for use.
What is not covered by the warranty?
The warranty does not cover defects or damage of the appliance, which result from repairs or alterations to the appliance outside
our factory or authorized service centers, nor shall it apply to any appliance, which has been subject to abuse, misuse, negligence or
accidents. Also, consequential and incidental damage resulting from the use of this product or arising out of any breach of contract or
breach of this warranty are not recoverable under this warranty. Some states do not allow the exclusion or limitation of incidental or
consequential damage, so the above limitation may not apply to you.
How do you get service?
If repairs become necessary, see contact information below:
U.S. Residents: Please contact our toll free hotline at 1-800-322-3848 or log onto our website at www.delonghi.com
Residents of Canada: Please contact our toll free hotline at 1-888-335-6644 or log onto our website at www.delonghi.com
Residents of Mexico: Please contact our toll free number 01-800-711-8805 for assistance or log onto our website at www.delonghi.com
The above warranty is in lieu of all other express warranties and representations. All implied warranties are limited to the applicable
warranty period set forth above. This limitation does not apply if you enter into an extended warranty with De’Longhi. Some states/
countries do not allow limitations on how long an implied warranty lasts, so the above exclusions may not apply to you. De’Longhi
does not authorize any other person or company to assume for it any liability in connection with the sale or use of its appliance.
How does country law apply?
This warranty gives you specific legal rights, and you may also have other rights, which vary from state to state/country to country.
11