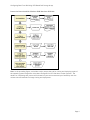
1
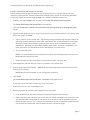
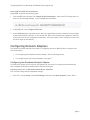
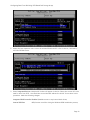
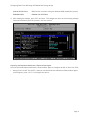
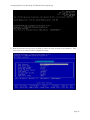
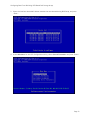
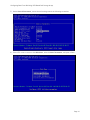
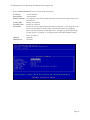
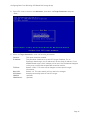
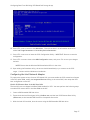
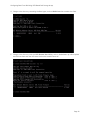
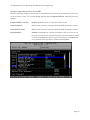
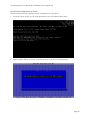
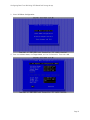
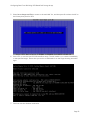
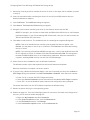
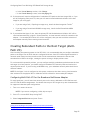
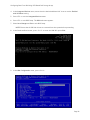
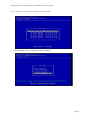
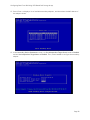
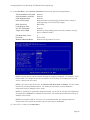
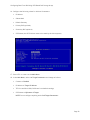
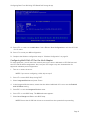
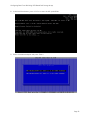
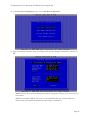
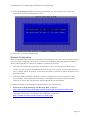
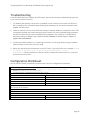
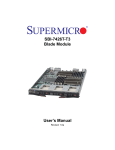
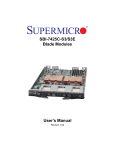
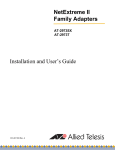
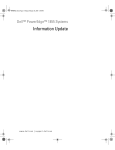
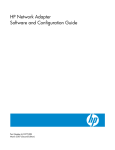
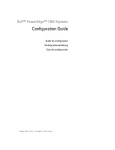
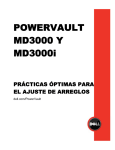
Configuring DELL PowerEdge
11G Servers Running
Windows Server 2008 for
iSCSI SAN Boot
A Dell Technical White Paper
Dell │ Product Group
Storage Interoperability Engineering Team
Configuring Boot From SAN Using iSCSI-Based Dell Storage Arrays
THIS WHITE PAPER IS FOR INFORMATIONAL PURPOSES ONLY, AND MAY CONTAIN TYPOGRAPHICAL
ERRORS AND TECHNICAL INACCURACIES. THE CONTENT IS PROVIDED AS IS, WITHOUT EXPRESS OR
IMPLIED WARRANTIES OF ANY KIND.
© 2010 Dell Inc. All rights reserved. Reproduction of this material in any manner whatsoever without
the express written permission of Dell Inc. is strictly forbidden. For more information, contact Dell.
Dell, the DELL logo, and the DELL badge, PowerEdge, PowerVault, and EqualLogic are trademarks of
Dell Inc. Broadcom is a registered trademark and NetXtreme is a trademark of Broadcom Corporation
or its affiliates in the US and other countries. Microsoft, Windows, and Windows Server are registered
trademarks and Hyper-V is a trademark of Microsoft Corporation in the United States and/or other
countries. Intel is a registered trademark of Intel Corporation in the United States and/or other
countries. Other trademarks and trade names may be used in this document to refer to either the
entities claiming the marks and names or their products. Dell Inc. disclaims any proprietary interest in
trademarks and trade names other than its own.
March 2010
Page ii
Configuring Boot From SAN Using iSCSI-Based Dell Storage Arrays
Table of Contents
Introduction.............................................................................................................. 2
Scope ................................................................................................................... 2
Process Overview..................................................................................................... 3
Additional Considerations ........................................................................................... 5
Before You Begin ........................................................................................................ 5
Configuring the Storage Array......................................................................................... 6
Configuring the Dell EqualLogic Storage System ................................................................ 6
Configuring the PowerVault MD3000i Storage Array ............................................................ 7
Manually Register a Host ......................................................................................... 7
Create a Virtual Disk and Assign It to the Host ............................................................... 8
Record IQN and iSCSI Host IP Addresses........................................................................ 9
Configuring Network Adapters ........................................................................................ 9
Configuring the Broadcom Network Adapter..................................................................... 9
Preparing the Server To Use the Broadcom NIC for iSCSI Boot ............................................. 9
Preparing the Broadcom NetXtreme II Ethernet Boot Agent............................................... 11
Configuring the Intel Network Adapter .......................................................................... 17
Enable iSCSI Remote Boot in the NIC Boot ROM ............................................................. 17
Configure Integrated Devices in Server BIOS ................................................................. 19
Set iSCSI Boot Configuration on the NIC ...................................................................... 20
Installing Windows Server 2008 or 2008 R2 ........................................................................ 23
Extract NIC Drivers for Later Use If Necessary.................................................................. 23
Install the Operating System Directly Onto the iSCSI LUN .................................................... 23
Creating Redundant Paths to the Boot Target (Multi-Path I/O) ................................................ 25
Configuring Multi-Path I/O for the Broadcom NetXtreme Adapter .......................................... 25
Configuring Multi-Path I/O for the Intel Adapter............................................................... 31
Windows Configuration ............................................................................................. 34
Troubleshooting ........................................................................................................ 35
Configuration Worksheet.............................................................................................. 35
Page iii
Configuring Boot From SAN Using iSCSI-Based Dell Storage Arrays
Introduction
This document provides instructions for configuring Dell™ PowerEdge™ 11G family of servers to boot the
Microsoft® Windows Server® 2008 SP2 or the Windows Server 2008 R2 from iSCSI SAN-based boot
images.
The evolution of server and storage virtualization as well as the adoption of Storage Area Networks
(SANs) by SMB, Departmental, and Enterprise markets has created the demand to boot servers directly
from SAN-based volumes (Logical Unit Numbers or LUNs). Beyond the obvious flexibility and power
efficiency benefits of not needing Direct-Attached Storage (DAS) Boot Disks in servers, Boot from SAN
allows for quick reconfiguration and deployment of multiple operating system- and application-specific
images.
Dell’s iSCSI solution offerings provide an extremely flexible and scalable platform to meet many
demanding customer environments. Dell iSCSI Array products ranging from Network-Attached Storage
(NAS) Appliances, MD3000i, EqualLogic™, and the full EMC iSCSI portfolio can all be configured to
support Boot from iSCSI.
Scope
The process for configuration boot from iSCSI can vary considerably based on which server-based NICs
are being used, which operating systems you are booting, what type of iSCSI SAN arrays you are using
for storing the boot volumes, and how your SAN architecture is designed to support varying levels of
I/O throughput performance and high availability by adding redundant systems and multi-path I/O
(MPIO).
In this document, we limit our focus to the steps required to configure the iSCSI SAN boot paths as
shown in the following table.
Boot Paths Covered By This Document
Operating Systems
Windows Server 2008 SP2
Windows Server 2008 R2
Server
Dell PowerEdge 11G Family
• Process validated on PowerEdge R710, system BIOS 1.3.6
Network Interface
Controllers
Broadcom NetXtreme II 5709c Gigabit Ethernet NIC
• Process validated using Broadcom NetExtreme II Ethernet
Boot Agent 5.0.5 and iSCSI Configuration Utility 4.1.1
Intel 10 GbE AT Server Adapter 1
• Process validated using Intel Boot Agent Utility (IBAUtil)
4.17.00.00 and flash firmware iSCSI Boot 2.4.06
1
The procedure in this document should work with other 1GbE and 10GbE Intel NICs provided by Dell that use the same Intel option ROM. Page 2
Configuring Boot From SAN Using iSCSI-Based Dell Storage Arrays
Storage Array
Dell EqualLogic PS Series
• Process validated using array controller firmware 4.1.4
Dell PowerVault MD3000i
• Process validated using array controller firmware
07.35.31.60
Process Overview
The process for booting from SAN over iSCSI described in this document involves completion of the
following key configuration processes:
•
Configure storage arrays to host the operating system boot volumes
•
Configure the network interface(s) on the server to support boot from iSCSI targets
•
Install the operating system onto the target iSCSI SAN-based volume
•
Configure redundant boot paths (multi-path I/O) to the boot volumes (optional)
The overall process is illustrated in the following figure. We do not create a local installation image
and then deploy that image to an iSCSI LUN as was possible with Windows Server 2003. For Windows
Server 2008, you must prepare an image for iSCSI boot by first performing a direct operating system
installation on a system that has the iSCSI network driver and is connected to an available iSCSI-based
LUN. 2 After you verify that the system boots properly from the iSCSI LUN, you can then collect the
boot image for deployment to other systems.
2
See Microsoft Support document KB2002298, http://support.microsoft.com/kb/2002298 Page 3
Configuring Boot From SAN Using iSCSI-Based Dell Storage Arrays
Process for Direct Install for Windows 2008 Boot from iSCSI SAN
Note: In the preceding figure, we include a major step at the end for cloning and deploying copies of
the operating system image after it has been configured for iSCSI SAN boot to other systems. The
details for completing that process will be based on your environment and your familiarity with the
various tools and methods for image cloning and deployment.
Page 4
Configuring Boot From SAN Using iSCSI-Based Dell Storage Arrays
Additional Considerations
The iSCSI boot scenario we describe in this document corresponds to Scenario 2, “Server network
adapter creates iBFT for connection to iSCSI target without requiring external devices,” as described in
the Microsoft TechNet article, “About iSCSI Boot,” available at http://technet.microsoft.com/enus/library/ee619722%28WS.10%29.aspx. We recommend that you review the sections titled
“Requirements for iSCSI Boot deployment” and “Differences in Windows functionality when using iSCSI
Boot” in that article before continuing with this process. Please consider the following additional
considerations:
•
It is not recommended to configure a gateway for an iSCSI boot adapter if the iSCSI target is in
the same subnet as the initiator. For more details, see the Microsoft Knowledge Base article
KB960104 on support.microsoft.com.
•
NIC teaming is not supported for iSCSI boot.
•
iSCSI boot is not supported with IPv6 networks and Broadcom 5722/5708 NetXtreme or the Dell
supported Intel family of adapters.
•
If you are using two NICs, one as the primary and the other as the secondary boot NIC, ensure
that they are configured to use separate subnets. (This consideration applies only to the
PowerVault MD3000i boot from iSCSI scenario.)
•
For a server with Microsoft Hyper-V™ enabled, you can boot the parent partition from SAN.
Hyper-V does not support boot from SAN for virtual machines.
Before You Begin
Before you start the configuration process, you should do the following:
1. Use a configuration tracking worksheet similar to the example provided in “Configuration
Worksheet” on page 35.
2. See the following documents:
Intel PRO Family of Adapters User’s Guide located on the Intel NIC media documentation
website or under Network documentation on the Dell Support website at
support.dell.com/manuals
Broadcom NetXtreme Family of Adapters User’s Guide located on the Broadcom NIC media
website or under Network documentation on the Dell Support website at
support.dell.com/manuals
3. Update your Dell Storage Array to the latest drivers and firmware versions referring to the
following matrices or support sites:
Dell PowerVault MD3000i Support Matrix located on the Dell Support website at
support.dell.com/manuals
Dell EqualLogic Support Downloads located on the Dell EqualLogic website at
www.equallogic.com/support
Page 5
Configuring Boot From SAN Using iSCSI-Based Dell Storage Arrays
4. Download the latest Intel PRO or Broadcom NetXtreme drivers and firmware from the Drivers and
Downloads section on the Dell Support website at support.dell.com.
Configuring the Storage Array
The following sections describe the process of configuring the storage arrays with the LUNs necessary
to host the iSCSI Boot. In this document, we limit our boot path configuration examples to two target
array types: Dell EqualLogic PS Series or Dell PowerVault MD3000i.
Configuring the Dell EqualLogic Storage System
Perform the following steps to make a target volume available:
1. Log in to Dell EqualLogic PS Series Group Manager.
2. Under Activities, select Create Volume. Name the volume and enter a description. Select a
storage pool and click Next.
3. Create either of the following volume sizes for the boot volume according to your requirement:
•
Thin Provision
•
Snapshot reserved (defaults to 100% of the volume)
NOTE: Microsoft recommends a minimum system partition size of 40 GB for Windows Server
2008 installations, depending on system RAM, possible power states, and other considerations.
For more information, see the Microsoft website at microsoft.com/windowsserver2008.
4. Select the iSCSI access mode for the server you are going to present the Array Disk to:
•
Authenticate using the CHAP user name
•
Limit access by IP Address
•
Limit access to the iSCSI Initiator Name
NOTE: If you limit access based on the iSCSI initiator name, then the name entered here must
match the name on the host server that will be booting from this volume.
NOTE: Do not enable shared storage. Clustering on boot from iSCSI is not a supported
configuration.
The Summary screen is displayed.
5. Verify the settings on the Summary screen.
6. Click the Volume option. Then, right-click the volume you just created and view the iSCSI settings.
In the iSCSI Target box is the iSCSI Qualified Name (IQN), which is the Target Name that will be
used for the Initiator Target Device.
Page 6
Configuring Boot From SAN Using iSCSI-Based Dell Storage Arrays
Configuring the PowerVault MD3000i Storage Array
Perform the following steps to register a host and create a virtual disk to be used as the boot volume.
Manually Register a Host
1. Launch the Dell PowerVault Modular Disk Storage Manager (MDSM), and connect to the PowerVault
MD3000i storage array to be used by the host for booting.
2. Click Configure, and select Configure Host Access (Manual).
3. Type a host name in the Enter host name text box. The host name can be an informal name; it
does not have to be a name used to identify the host to the network.
The Select host type drop-down menu appears.
4. Select the operating system of your host in the Select host type drop-down menu, and then click
Next. Select Windows Server 2003/Server 2008 Non-Clustered since we are creating this LUN for
dedicated boot image storage.
5. In the Configure Host Access (Manual) - Specify iSCSI Initiators screen, click New.... Enter the
iSCSI initiator name and the iSCSI initiator label in the Enter new iSCSI initiator dialog box, and
then click Add.
NOTE: The initiator name entered here must match the name of the host server that will be
booting from this array.
6. Enter the IQN of the host initiator in the iSCSI initiator name field. Record this information in the
Configuration Worksheet provided on page 35.
NOTE: Leave the iSCSI Initiator label setting at Default. The fully-qualified IQN format is:
<iqn><yyyy-mm>.com<company name>:<server name>
as shown in the following example.
7. Click Add and then click Next.
8. Accept the default, No: This host will NOT share access to the same virtual disks with other
hosts, since we are configuring this target to contain an operating system boot image. Then, click
Next. The Confirm Host Definition page appears. Your host definition should then appear as
shown in the following example.
9. Click Finish, and then click No when asked if you want to define another host.
Page 7
Configuring Boot From SAN Using iSCSI-Based Dell Storage Arrays
Create a Virtual Disk and Assign It to the Host
A fully-configured Disk Group is required for the following section. If a Disk Group has not been
configured, please see the "Creating Virtual Disks and Disk Groups" section of the PowerVault MDSM
Online Help manual (accessible using the Help link in MDSM) for detailed instructions.
1. In MDSM, click the Configure tab, and then click Create Disk Groups and Virtual Disks.
The Create Disk Groups and Virtual Disks screen appears.
2. Click the Virtual Disk: Create a new virtual disk using free capacity on an existing disk group
button.
3. Expand the disk group you will be using to host the new virtual disk and select a free capacity node
within that group. Click Next.
•
Set the capacity for the virtual disk. The capacity setting should be large enough to host a full
operating system installation and any other applications that will be installed into that image.
Microsoft recommends a minimum system partition size of 40 GB for Windows Server 2008
installations, depending on system RAM, possible power states, and other considerations. For
more information, see the Windows Server 2008 website at microsoft.com.
•
Set a Virtual Disk Name
NOTE: It is recommended that you use the service tag of the PowerEdge system and the term
boot-LUN in the description field.
•
Select File system in the Virtual Disk I/O characteristics field, and click Next.
4. Select Map now: and then select the host you created in the previous step.
5. Select 0 as the logical unit number. IMPORTANT: Most operating systems will need to have their
boot partition on LUN 0.
NOTE: Record the LUN Number in your configuration worksheet.
6. Click Finish.
The Create Disk Groups and Virtual Disks - Complete screen appears next.
At this point we do not need to create any more virtual disks.
7. Select No to return to the main MDSM screen.
8. Record the preferred controller path assigned to the virtual disk:
•
Click the Modify tab, and select Change Virtual Disk Ownership/Preferred Path.
•
Expand the disk group containing the virtual disk you created, and select the virtual disk. Note
the preferred path setting shown at the bottom of the screen. It will be the RAID Controller
Module in either slot 0 or slot 1. Record this information in your configuration worksheet since
you will need it to determine which IP address is used to access the target.
Page 8
Configuring Boot From SAN Using iSCSI-Based Dell Storage Arrays
Record IQN and iSCSI Host IP Addresses
Using MDSM, complete the following steps:
1. Click the iSCSI tab, and then click Change Target Identification. Record the iSCSI target name, as
shown in the following example, in your configuration worksheet.
2. In the iSCSI tab, click Configure iSCSI Ports.
3. At the iSCSI host port: drop-down menu, select the same RAID controller module that was assigned
as the preferred path controller for the virtual disk. Record the IP address(es) assigned to the ports
on this controller in your configuration worksheet. Your host system will be configured to boot from
the iSCSI target at this address.
Configuring Network Adapters
The following sections describe the process for configuring the server BIOS and NICs to support boot
from iSCSI targets.
•
For configuring the Broadcom network adapter, see the following section.
•
For configuring the Intel network adapter, see page 17.
Configuring the Broadcom Network Adapter
To prepare the system to boot from an iSCSI-based LUN, you must first modify the system BIOS and
then configure the Broadcom NetExtreme II Ethernet Boot Agent.
Preparing the Server To Use the Broadcom NIC for iSCSI Boot
First we must change the boot sequence settings.
1. Press <F2> to enter Setup, select Boot Settings, and then select Boot Sequence. Press <Enter>.
Page 9
Configuring Boot From SAN Using iSCSI-Based Dell Storage Arrays
2. Adjust the boot sequence order so that the onboard Broadcom NIC is first in the list, followed by
the DVD/CD-ROM device.
3. Select Integrated Devices. Multiple NIC choices will appear in the list. Select the correct NIC to be
used for boot from iSCSI. You should also record the MAC address for this NIC for use later in this
procedure. Make the following changes:
Integrated RAID Controller Disabled (Disables access to any internal hard drives)
Internal USB Port
Off (Prevents a conflict during the Windows 2008 installation process)
Page 10
Configuring Boot From SAN Using iSCSI-Based Dell Storage Arrays
Internal SD Card Port
Off (Prevents a conflict during the Windows 2008 installation process)
Embedded NICx
Enabled with iSCSI Boot
4. After making the changes, press <ESC> and save. The changes are shown in the following example.
Continue immediately with the process in the next section.
Preparing the Broadcom NetXtreme II Ethernet Boot Agent
You must use the Broadcom NetXtreme II Ethernet Boot Agent to configure the NIC for boot from iSCSI.
1. During Power-On Self-Test (POST), when you see the NetXtreme II Broadcom Ethernet Boot Agent
version appear, press <Ctrl-S> to configure the device.
Page 11
Configuring Boot From SAN Using iSCSI-Based Dell Storage Arrays
2. Make sure the Boot Protocol is set to iSCSI, and leave all other settings at their defaults. Then
press <Ctrl-K> to enter the iSCSI Configuration Utility.
Page 12
Configuring Boot From SAN Using iSCSI-Based Dell Storage Arrays
3. Select the interface whose MAC address matches the one selected during BIOS Setup, and press
<Enter>.
4. At the Main Menu for the iSCSI Configuration Utility, select General Parameters and press <Enter>.
Page 13
Configuring Boot From SAN Using iSCSI-Based Dell Storage Arrays
5. Under General Parameters, ensure that all settings match the following screenshot.
6. Press <ESC> once to return to the Main Menu, select Initiator Parameters, and press <Enter>.
Page 14
Configuring Boot From SAN Using iSCSI-Based Dell Storage Arrays
7. Under Initiator Parameters, enter the following information:
IP Address:
<host IP Address>
Subnet Mask:
<host netmask>
Default Gateway: Not required, if the iSCSI initiator (this host) and the iSCSI target reside on the
same subnet
Primary DNS:
Usually not required
Secondary DNS:
Usually not required
iSCSI Name:
The server will auto-generate an IQN name for this host. If the target is set to
control access based on an IQN name, then this name must be changed to
match the IQN configured on the target (see “Configuring the Dell EqualLogic
Storage System” on page 6 or ”Configuring the PowerVault MD3000i Storage
Array” on page 7).
CHAP ID:
(optional)
CHAP Secret:
(optional)
Page 15
Configuring Boot From SAN Using iSCSI-Based Dell Storage Arrays
8. Press <ESC> once to return to the Main Menu; then select 1st Target Parameters and press
<Enter>.
9. Under 1st Target Parameters, enter the following information:
Connect:
IP Address:
TCP Port:
Boot LUN:
iSCSI Name:
CHAP ID:
CHAP Secret:
This option should be enabled.
This parameter should be set to the iSCSI target IP address. For an
EqualLogic-based target, this IP address will be the Group IP address. For an
MD3000i-based target, this IP address will be one of the IP addresses assigned
to the ports on the preferred path RAID controller module.
Default is 3260. This value can be changed to match specific target
information.
Default is 0. This value usually will not need to be changed.
Manually entered IQN name of the iSCSI target.
(optional)
(optional)
Page 16
Configuring Boot From SAN Using iSCSI-Based Dell Storage Arrays
10. Press <ESC> once to return to the Main Menu. Ensure that there is no information entered for
either 2nd Target Parameters or Secondary Device Parameters.
11. Press <ESC> once more to leave the iSCSI Configuration Utility. IMPORTANT: Be sure to save the
configuration.
12. Press <ESC> one more time to the MBA Configuration menu, and press <F4> to save your changes
and exit.
NOTE: Ensure that the Windows 2008 installation DVD is in the drive.
13. Upon exiting the Broadcom utility, the server should immediately try to connect to the iSCSI
target. Continue with the Windows® installation.
Configuring the Intel Network Adapter
To prepare the system to boot from an iSCSI-based LUN, you must enable the iSCSI remote boot feature
in the NIC option ROM, modify the Integrated Devices setting in the server BIOS, then setup the iSCSI
boot configuration on the NIC.
Enable iSCSI Remote Boot in the NIC Boot ROM
The Intel NICs are not shipped with Boot ROMs enabled for iSCSI. You must perform the following steps
to enable iSCSI remote boot in the Boot ROM on the NIC.
1. Create a DOS-bootable USB flash drive.
2. Extract both the Intel Boot Agent Utility (ProBoot.exe) and the Intel iSCSI Remote Boot Utility
(ISBoot.exe) to the bootable USB flash drive in separate directories.
3. With the Intel NIC installed, boot the server using the DOS-bootable USB flash drive.
Page 17
Configuring Boot From SAN Using iSCSI-Based Dell Storage Arrays
4. Change to the directory containing the Boot Agent, and run IBAUtil.exe -fe to enable the flash.
5. Change to the directory with the iSCSI Remote Boot Utility, and run iscsiutl.exe -up -all to replace
the PXE boot flash with the iSCSI boot flash on the installed Intel NIC.
Page 18
Configuring Boot From SAN Using iSCSI-Based Dell Storage Arrays
Configure Integrated Devices in Server BIOS
Make the following changes to ensure that no embedded NICs on the server are enabled for iSCSI boot.
On server restart, press <F2> to enter Setup, and then select Integrated Devices. Make the following
changes:
Integrated RAID Controller
Disabled (Disables access to any internal hard drives)
Internal USB Port
Off (Prevents a conflict during the Windows 2008 installation process)
Internal SD Card Port
Off (Prevents a conflict during the Windows 2008 installation process)
Embedded NICx
Enabled (all) Multiple NIC choices will appear in the list. Since we will
be using the Intel NIC for the iSCSI boot path, you must make sure that
all of the embedded NIC choices in this screen are set to Enabled and
not to Enabled with iSCSI Boot or Enabled with PXE Boot.
Page 19
Configuring Boot From SAN Using iSCSI-Based Dell Storage Arrays
Set iSCSI Boot Configuration on the NIC
The following process will complete the NIC configuration for iSCSI boot.
1. On server restart, press <Ctrl-D> when prompted for the iSCSI Remote Boot setup:
2. Select the MAC address of the NIC on which you want to perform iSCSI Remote boot:
Page 20
Configuring Boot From SAN Using iSCSI-Based Dell Storage Arrays
3. Select iSCSI Boot Configuration:
4. Enter the Initiator Name, the Target Name, and the IP information. Then select OK:
Page 21
Configuring Boot From SAN Using iSCSI-Based Dell Storage Arrays
5. Select Save changes and Exit to return to the main MAC list, and then press P to select the NIC as
the Primary boot path for iSCSI:
6. Press <ESC> to exit the Intel iSCSI Remote Boot setup. The NIC should try to connect immediately
to the specified target. Ensure that you receive a LUN header from the target showing successful
login.
7. Continue with the Windows installation.
Page 22
Configuring Boot From SAN Using iSCSI-Based Dell Storage Arrays
Installing Windows Server 2008 or 2008 R2
In this section, we provide steps to complete a basic installation of Windows Server 2008 onto a
bootable iSCSI SAN-based target LUN.
Extract NIC Drivers for Later Use If Necessary
You will first need to extract the Broadcom NetXtreme Virtual Bus Driver (VBD) and the Network Driver
Interface Specification (NDIS) drivers or the Intel PRO plug and play drivers, in case you need them
later in this process.
1. Use the setup.exe /a command for Broadcom or the setup.exe -a command for Intel on a
workstation to extract the drivers from the setup executable file, specifying a target directory for
the extracted files.
NOTE: Make note of the directory structure to which the files are extracted. For example, the
Broadcom drivers for Windows Server 2008 x64 are extracted to the following locations:
For VBD: /Program Files 64/Broadcom/BDrv5706/VBD
For NDIS: /Program Files 64/Broadcom/BDrv5706/W2k8
2. Copy the driver files to removable media suitable for use during operating system installation,
preferably a USB flash drive.
Install the Operating System Directly Onto the iSCSI LUN
Perform the following steps to install the operating system on iSCSI LUN:
1. Turn on or restart the server.
2. Insert the Windows Server 2008 or 2008 R2 DVD in the DVD drive.
3. Press any key when prompted to boot from the DVD.
The Install Windows dialog box appears.
4. Select the appropriate Language, Time, and Keyboard options.
5. Click Next, and then click Install Now to continue the installation.
The Operating System Selection page appears.
6. Select Full Installation and click Next to continue.
The License Agreement screen appears.
7. Read the license agreement and select I accept the license terms to continue with the
installation. Click Next.
The Installation Type page appears.
8. Select Custom.
Page 23
Configuring Boot From SAN Using iSCSI-Based Dell Storage Arrays
9. Determine if the target LUN is available in the list of drives. If the target LUN is available, proceed
to step 15.
10. Insert the removable media containing the drivers for the NIC (Intel PRO Network device or
Broadcom NetXtreme adapter).
11. Click Load Driver. The Load Driver dialog box appears.
12. Click Browse. The Browse for Folder dialog box appears.
13. Navigate to the location containing the driver for the Network device and click OK.
NOTE: For example, you will need to install both the VBD and the NDIS driver for the Broadcom
NetXtreme adapter. If you will be enabling HBA offload mode, then you will need to install the
VBD and the Offload iSCSI (OIS) driver.
14. Click Next to load the driver. The available drives list containing the targeted LUN appears.
NOTE: If the list of available drives containing the targeted LUN does not appear, click
Refresh. You may have to wait for up to a minute or click Refresh a few times before seeing
the list of drives.
NOTE: If you are using a PowerVault MD3000i storage array, a LUN of size 20 MB and with LUN
ID of 31 appears in the list of available iSCSI LUNs. Do not select this LUN. This LUN appears
because the MD3000i MPIO driver is not loaded during installation. When the installation is
complete, installing MDSM will filter out this LUN from Disk Manager.
15. Select the drive and click Next to start the Windows installation.
The Windows installer copies and expands files and installs features and updates.
When the installation is complete, the server restarts.
16. If you are using a Broadcom NetXtreme adapter, then we recommend you verify that the Boot to
iSCSI Target setting has switched from One Time Disabled to Enabled. After the server restarts:
a. Press <Ctrl-K> to access the iSCSI Configuration Utility.
b. Select the General Parameters option and make sure that Boot to iSCSI Target is enabled.
c. Press <ESC> to exit the Broadcom menus and save the configuration when prompted.
The system then boots from the iSCSI LUN and completes the Windows setup.
17. Restart the system and log in to the operating system.
18. Disable the page file. Since the PowerEdge system will not have a local hard drive configured on
the host, you will need to disable the page file:
a. Right-click My Computer and select Properties.
b. In the System Properties screen, click the Advanced tab.
c. In the Performance section, click Settings.
d. In the Performance Options screen, click the Advanced tab.
Page 24
Configuring Boot From SAN Using iSCSI-Based Dell Storage Arrays
e. In the Virtual Memory section, click Change.
f. In the Virtual Memory screen, select No paging file.
19. If the system will require configuration of redundant iSCSI paths to the boot image LUN, or if you
will be configuring multi-path I/O, then you will need to install additional software in the host
image for your array type:
•
If you are using a Dell | EqualLogic storage array, install the Host Integration Toolkit. 3
•
If you are using a PowerVault MD3000i storage array, install the Dell PowerVault MDSM
software 4 .
20. If you enabled the Hyper-V role, then the primary BFi LAN On Motherboard (LOM) or NIC will be
restricted automatically in Hyper-V Virtual Networks. A virtual network cannot be created on this
adapter. If a secondary BFi LOM or NIC will be configured, then you must avoid the selection of
that adapter manually when creating virtual networks.
Creating Redundant Paths to the Boot Target (MultiPath I/O)
After installing the operating system to the iSCSI LUN, it is recommended that you configure redundant
paths to the target from all hosts that are configured with boot from iSCSI. Misconfigured networks or
networks under heavy load may interfere with critical communication between the host and the
associated boot LUN on the target, causing the system to hang or display a blue screen.
To work around this potential problem, you can configure multiple (redundant) paths between the host
and target. As a best practice, you should configure redundant iSCSI network paths and monitor the
network performance. If you are using an MD3000i array, your redundant network paths should be on
different subnets.
NOTE: If the Hyper-V role is configured on this system, make sure that there are no virtual networks
that are bound to the physical NICs or LOMs that will be utilized for the secondary BFi adapter.
Configuring Multi-Path I/O for the Broadcom NetXtreme Adapter
For multi-path boot, you will need two network ports on the server dedicated to iSCSI SAN boot and
two iSCSI SAN IP address assignments. You should also see your iSCSI target array user documentation
for supported redundant path configurations.
1. Turn on or restart the server.
NOTE: If you are not configuring a LOM, skip to step 8.
2. Press <F2> to enter BIOS Setup during POST.
3. Select Integrated Devices and press <Enter>.
3
4
http://www.equallogic.com/resourcecenter/assetview.aspx?id=8933 http://support.dell.com/support/edocs/systems/md3000i/en/index.htm Page 25
Configuring Boot From SAN Using iSCSI-Based Dell Storage Arrays
4. In the Integrated Devices menu, ensure that the desired additional NIC is set to use the Enabled
with iSCSI Boot setting.
5. Press <ESC> to exit the Integrated Devices menu.
6. Press <ESC> to exit BIOS Setup. The BIOS exit menu appears.
7. Select Save Changes and Exit to exit BIOS Setup.
NOTE: Ensure that all USB flash drives are removed from the system before proceeding.
8. In the Broadcom Boot banner, press <Ctrl-S> to enter the LOM/NIC option ROM:
9. In the MBA Configuration menu, press <Ctrl-K>:
Page 26
Configuring Boot From SAN Using iSCSI-Based Dell Storage Arrays
10. 10. Select the current primary adapter and press <Enter>:
11. In the Main Menu, select Secondary Device Parameters.
Page 27
Configuring Boot From SAN Using iSCSI-Based Dell Storage Arrays
12. Press <Enter> to display a list of available secondary adapters, and then select the MAC address of
the adapter chosen.
13. In the Secondary Device Parameters screen, set Use Independent Target Portal mode as Enabled
and set Use Independent Target Name as Enabled. Then, select Invoke to configure the secondary
adapter.
Page 28
Configuring Boot From SAN Using iSCSI-Based Dell Storage Arrays
14. In the Main Menu, select General Parameters and then set the following parameters:
TCP/IP parameters via DHCP
iSCSI parameters via DHCP
CHAP Authentication
Boot to iSCSI target
DHCP Vendor ID
Link Up Delay Time
Use TCP Timestamp
Target as First HDD
LUN Busy Retry Count
IP Version
Windows HBA Boot Mode
Disabled
Disabled
Disabled
Disabled (when installing image), Enabled (after cloning or
installing image to boot from iSCSI target)
BRCM ISAN
0
Disabled
Disabled (if using Imaging with Local Disk), Enabled (if using
Direct or Remote Install)
0
IPV4 or IPV6
Disabled (not applicable for Linux)
NOTE: You must ensure that all network settings are properly configured. For example, if you
enable CHAP in the target but you do not enable it in the Primary or Secondary path (or vice
versa), a blue screen will result.
NOTE: If you wish to use OIS to boot, set Windows HBA Boot Mode to Enabled. You will need a
license key to enable offload features. For additional information, see the Broadcom
NetXtreme Family of Adapters User's Guide.
NOTE: To use DHCP for dynamically-assigned settings, set the TCP/IP and the iSCSI parameters
through DHCP to Enabled. For additional information, see the Broadcom NetXtreme Family of
Adapters User's Guide.
NOTE: Do not enable CHAP at this time. It is recommended that you configure advanced
features after the connection between the host and target is established.
15. Press <ESC> to return to the Main Menu.
Page 29
Configuring Boot From SAN Using iSCSI-Based Dell Storage Arrays
16. Configure the following values for Initiator Parameters:
•
IP Address
•
Subnet Mask
•
Default Gateway
•
Primary DNS (optional)
•
Secondary DNS (optional)
•
iSCSI Name (the iSCSI initiator name to be used by the client system)
17. Press <ESC> to return to the Main Menu.
18. In the Main Menu, select 1st Target Parameters and change as follows:
•
Connect to Enabled
•
IP Address to Target IP Address
•
TCP Port and Boot LUN (if different from default settings)
•
iSCSI Name to IQN name of Target
NOTE: Do not configure anything under 2nd Target Parameters.
Page 30
Configuring Boot From SAN Using iSCSI-Based Dell Storage Arrays
19. Press <ESC> to return to the Main Menu. Select Exit and Save Configuration to exit the NIC/LOM
<Ctrl-S> menu.
20. Press <F4> to save your MBA configuration.
21. Complete the Windows configuration steps in ”Windows Configuration” on page 34.
Configuring Multi-Path I/O for the Intel Adapter
For multi-path boot, you will need two network ports on the server dedicated to iSCSI SAN boot and
two iSCSI SAN IP address assignments. Also, see your iSCSI target array user documentation for
supported redundant path configurations.
1. Turn on or restart the server.
NOTE: If you are not configuring a LOM, skip to step 8.
2. Press <F2> to enter BIOS Setup during POST.
3. Select Integrated Devices and press <Enter>.
4. In the Integrated Devices menu, ensure that the desired additional NIC is set to use the Enabled
with iSCSI Boot setting.
5. Press<ESC> to exit the Integrated Devices menu.
6. Press <ESC> to exit BIOS Setup. The BIOS exit menu appears.
7. Select Save Changes and Exit to exit BIOS Setup.
NOTE: Ensure that all USB flash drives are removed from the system before proceeding.
Page 31
Configuring Boot From SAN Using iSCSI-Based Dell Storage Arrays
8. In the Intel Boot banner, press <Ctrl-D> to enter the NIC option ROM:
9. Select the disabled adapter and press <Enter>:
Page 32
Configuring Boot From SAN Using iSCSI-Based Dell Storage Arrays
10. In the iSCSI Port Configuration menu, select iSCSI Boot Configuration:
11. Enter the Secondary Initiator name, the Target name, and the Target IP information, then select
OK:
NOTE: Ensure that all network settings are properly configured—failing to do so could result in
boot failure.
NOTE: Do not enable CHAP at this time. It is recommended that you configure advanced
features after the connection between host and target is established.
Page 33
Configuring Boot From SAN Using iSCSI-Based Dell Storage Arrays
12. Select Save changes and Exit to return to the main MAC list, and then press S to select the
Alternate NIC as the Secondary path for iSCSI:
13. Press <ESC> to exit the adapter setup.
Windows Configuration
When the redundant boot paths are created using the preceding process, the server will boot as long as
one of the paths is available at boot time. To ensure path redundancy after the operating system is
running, MPIO software will need to be enabled or installed on the server.
•
Open the iSCSI Initiator in the Windows Control Panel. If this is the first time you have run the
Initiator, you will receive a message that the iSCSI Service is not running, and you are prompted to
start it. Answer Yes to the prompt, as well as to the follow-on question to add an exception to the
Windows Firewall.
•
In Windows 2008 and 2008 R2, the MPIO software is considered an optional component. Using
Server Manager, add the Multi-path I/O feature. This addition will require a system restart to
complete, at which time the EqualLogic Host Integration Kit can be installed.
For more information on running MPIO in Windows Server, see the following:
•
Windows Server High Availability with Microsoft MPIO, available at:
http://www.microsoft.com/WindowsServer2003/technologies/storage/mpio/default.mspx
”Multipath I/O Overview” (for Windows Server 2008 R2), available at:
http://technet.microsoft.com/en-us/library/cc725907.aspx
Page 34
Configuring Boot From SAN Using iSCSI-Based Dell Storage Arrays
Troubleshooting
If the iSCSI Boot BIOS fails to detect the iSCSI target, perform the following troubleshooting steps and
try to boot the system from iSCSI:
1. Try disabling the spanning tree protocol (if enabled) on the switch ports on which the iSCSI boot
NIC is configured. For information about disabling the spanning tree, see the documentation that
shipped with the switch.
2. Check for data entry errors in the iSCSI boot settings in Network adapter's configuration menu. The
configuration options must match the instructions provided. For more troubleshooting procedures,
see the iSCSI boot section in the Intel PRO Family of Adapters User's Guide or in the Broadcom
NetXtreme Family of Adapters User's Guide and under Network on the Dell Support website at
support.dell.com/manuals.
3. To eliminate switch problems, try connecting the initiator to the target directly using a standard
Ethernet cable. Do not use a cross-over cable.
4. During the operating system installation to the iSCSI LUN, if you receive the error message: Failed
to create a new partition on the selected unused space. [Error:
0x80042453], then the indication is that the initiator connection has been made to a controller
that does not own the LUN.
Configuration Worksheet
You can use the following worksheet to capture boot from iSCSI configuration information.
Dell PowerEdge Server (Host/Initiator)
NOTE: use fully-qualified IQN format: <iqn><yyyy-mm>.com.<company name>:<server name>.
Example: iqn.1984-04.com.dell:server-name.
For more information, see RFC3720 and RFC3721 at http://rfc.net/.
IQN:
Primary Boot NIC
IP Address:
Subnet Mask:
Gateway:
Slot Location:
Secondary Boot NIC (optional)
IP Address:
Subnet Mask:
Gateway:
Slot Location:
Dell Storage Array (Target)
IQN:
iSCSI Port:
LUN Number:
Primary iSCSI port:
IP Address:
Secondary iSCSI port: (optional)
IP Address:
Page 35