1
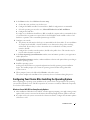
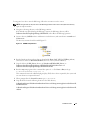
Microsoft® Windows® Compute
Cluster Server 2003
Installation Guide
w w w. d e l l . c o m | s u p p o r t . d e l l . c o m
Notes, Notices, and Cautions
NOTE: A NOTE indicates important information that helps you make better use of your computer.
NOTICE: A NOTICE indicates either potential damage to hardware or loss of data and tells you how to avoid the problem.
CAUTION: A CAUTION indicates a potential for property damage, personal injury, or death.
____________________
Information in this document is subject to change without notice.
© 2006 Dell Inc. All rights reserved.
Reproduction in any manner whatsoever without the written permission of Dell Inc. is strictly forbidden.
Trademarks used in this text: Dell, the DELL logo, PowerEdge, PowerVault, and OpenManage are trademarks of Dell Inc.; Active Directory,
Microsoft, Windows, and Windows Server are registered trademarks of Microsoft Corporation.
Other trademarks and trade names may be used in this document to refer to either the entities claiming the marks and names or their products.
Dell Inc. disclaims any proprietary interest in trademarks and trade names other than its own.
August 2006
Rev. A00
Contents
Setting Up Your Hardware .
. . . . . . . . . . . . . . . . . . . . . . . . . . . .
Installing the Operating System With Dell OpenManage
Server Assistant . . . . . . . . . . . . . . . . . . . . . .
. . . . . . . . . . . .
Before You Install CCP .
. . . . . . . . .
7
7
8
9
9
. . . . . . . . . . .
. . . . . . . . . . .
. . . . . . . . . . .
. . . . . . . . . . . . . . . . . . . . . . . . . . . . .
10
. . . . . . . . . . . . .
10
. . . . . . . . . . . . . . . . . . . . . . . . . . . . . . . . . .
10
Preparing a Partition for the RIS Server Images .
Installing CCP
6
. . . . . . . . . . .
Configuring Your Cluster After Installing the Operating System
Windows Server 2003 R2 Post-Setup Security Updates
Promote System to Domain Controller and Install DNS
Install DHCP Server . . . . . . . . . . . . . . . . . . .
Authorize the DHCP Server . . . . . . . . . . . . . . .
5
Configuring CCP
. . . . . . . . . . . . . . . . . . . . . . . . . . . . . . . . .
Networking . . . . . . . . . . . . . . . . . . . . . . . . . .
Remote Installation Service . . . . . . . . . . . . . . . . .
Adding PowerEdge 1950-Specific Drivers to the RIS Image .
. . . . . . .
. . . . . . .
. . . . . . .
11
11
11
12
Contents
3
4
Contents
This document provides information about installing Microsoft® Windows® Compute Cluster
Server 2003 on your Dell™ PowerEdge™ Cluster. It is intended for experienced IT professionals who
need to configure the cluster solution, and for trained service technicians who perform upgrade and
maintenance procedures. This document also addresses readers who are new to clustering and covers
the following topics:
•
Setting up your hardware
•
Installing the operating system with Dell OpenManage™ Server Assistant
•
Configuring your system after installing the operating system
•
Before you install Compute Cluster Pack (CCP)
•
CCP Installation
•
CCP Configuration
Setting Up Your Hardware
Compute Cluster Server 2003 is supported on PowerEdge 1950 systems and embedded Broadcom network
devices (as both the public interface and the cluster interconnect). The supported external storage is
Dell PowerVault™ MD1000 attached to a PowerEdge Expandable RAID Controller (PERC) 5/e.
A cluster running Compute Cluster Server 2003 comprises of a single head node and one or more
compute nodes. The head node controls the access to the cluster. Figure 1-1 gives an example of the
topology through which the head node and the compute nodes are connected in a network. For more
information about network configuration using Compute Cluster Server 2003, see the Microsoft Support
website at support.microsoft.com.
The recommended configurations for the head node and compute nodes are:
•
•
Head node
–
Disable hyperthreading in BIOS.
–
Disable Pre-boot eXecution Environment (PXE) on both network interfaces.
–
Connect the primary network interface to the cluster switch.
–
Connect the secondary network interface to the public or intranet network.
Compute nodes
–
Disable hyperthreading in BIOS.
–
Ensure that PXE is enabled on the primary network interface (NIC 1).
–
Ensure that the boot order has the primary network interface before the local hard drive.
Installation Guide
5
Figure 1-1.
Example of a Topology With Nodes Running Compute Cluster Server 2003
public network
head node
private network
compute nodes
NOTE: If you purchased the head node with preinstalled operating system from Dell, Windows Server® 2003 R2
Enterprise 64-bit Edition is preinstalled on your head node.
Installing the Operating System With Dell OpenManage
Server Assistant
NOTE: If you purchased a PowerEdge system with a preinstalled image of Compute Cluster Server 2003, see
"Configuring Your Cluster After Installing the Operating System" to complete your operating system configuration.
Dell recommends installing the Windows Server 2003 R2 operating system on the head node using the
Dell PowerEdge Installation and Server Management CD. This CD prepares the hard drives and completes
the installation of the operating system. The Dell OpenManage Server Assistant creates an unattended
installation by requesting various system resources such as host name, IP numbers, disk, and redundant
array of independent disk (RAID) configurations.
1 Boot the system from the Dell PowerEdge Installation and Server Management CD.
2 Select your language at the first graphical user interface (GUI) screen.
3 The Dell Server Assistant End User License Agreement appears. Read the agreement, choose Accept,
and click Next if you agree to the terms and conditions.
6
Installation Guide
4 In the Home window, select Click here for server setup.
a
Set the date, time, and time zone for the server.
b
Configure the RAID controller. For internal drives, RAID 1 configuration is recommended.
c
Select the operating system, in this case, Microsoft Windows Server 2003 x64 Edition.
d
Configure the hard drive.
If you plan to use the Remote Install Server (RIS) to install the compute nodes (recommended), then
a second hard drive or partition is required. At least 10 GB should be made available on the second
hard drive or partition. The recommended partition type is NTFS.
5 Configure your network.
a
The primary network interface (Link A) is recommended for the cluster fabric. To ease installation
of compute nodes with RIS, a static IP should be set on this interface along with a matching
subnet mask. Ensure that you select a subnet that does not include the secondary network
interface (Link B).
b
Configure the secondary network interface (Link B) as the public device. This interface may be
used as either a dynamic or static IP.
6 In the Enter Operating System Information window, enter information specific to your organization
and/or deployment.
7 In the Installation Summary window, confirm installation selections and options before proceeding to
install the operating system.
8 Install the operating system.
At this point, the hard drives are prepared and partitioned, and the operating system installation
begins. The installer prompts you to insert the operating system CD after it has gathered the
system resources.
9 When prompted, remove the CD and click Finish to reboot the system.
The system completes the installation. Your system may reboot several times during this process.
Configuring Your Cluster After Installing the Operating System
After completing the operating system installation, the system reboots and prompts for the operating
system CD for Windows Server 2003 R2 components. If you want to install any additional components,
do so before CCP installation.
Windows Server 2003 R2 Post-Setup Security Updates
1 After installation of Windows Server 2003 R2, a window appears prompting you to apply existing security
updates. If the system is connected to the Internet, download and apply the latest updates at this time.
2 If you plan to have the system connected to the Internet at all times, configure the automatic updates
at this time as well.
Installation Guide
7
Promote System to Domain Controller and Install DNS
NOTE: If you are using your system running Compute Cluster Server 2003 as a stand-alone device, or if a domain
network is already installed, see "Install DHCP Server" for more information.
1 Click Start→ Programs→ Administrative Tools→ Manage Your Server.
2 In the Manage Your Server Roles window, click Add or remove a role and click Next.
The system detects your network settings and connections, and displays the Configuration Options
window.
3 In the Configuration Options window, select Custom Configuration and click Next.
The Server Role window appears.
4 In the Server Role window, select Domain Controller (Active Directory) and click Next.
5 In the Summary window, click Next.
6 In the Active Directory Installation window, click Next to open the Operating System
Compatibility wizard.
7 In the Operating System Compatibility wizard, click Next and follow the steps below to set the
operating system parameters that are required:
a
In the Domain Controller Type screen, select Domain controller for a new domain and
click Next.
b
In the Create New Domain screen, select Domain in a new forest and click Next.
c
In the Install or Configure DNS screen, select No, just install and configure DNS on this
computer and click Next.
d
In the New Domain Name screen, enter a DNS name for the new domain (for example,
cluster.com) and click Next.
e
In the NetBIOS Domain Name screen, enter a NetBIOS domain name and click Next.
f
In the Database and Log Folders screen, select folders for the database and logs, and click Next.
g
In the Shared System Volume screen, select a folder for the Shared System Volume and click Next.
h
In the Permissions screen, select the permissions compatibility depending on your environment
and click Next.
i
In the Directory Services Restore Mode Administrator Password screen, enter a Directory
Services Restore Mode Administrator Password and click Next.
j
In the Summary screen, review the contents and click Next if they are correct.
Microsoft Active Directory® installation occurs at this point and the system prompts you to insert the
operating system CD. This installation may take several minutes.
8 Click Finish and then click Restart Now.
9 After the system reboots, log in and click Finish.
8
Installation Guide
Install DHCP Server
If you are using RIS, you must install and configure a DHCP server. The DHCP server is required for
network installation of compute nodes. To install and configure the DHCP server:
1 Click Start→ Programs→ Administrative Tools→ Manage Your Server.
2 In the Manage Your Server Roles window, click Add or remove a role and click Next.
3 Select DHCP server and click Next.
4 In the Summary window, click Next.
The installer runs and you may be prompted to insert the operating system CD.
5 In the New Scope wizard, click Next. Complete the following steps to set the scope parameters and to
activate the scope:
a
In the Scope Name screen, select a name and description for the scope and click Next.
b
In the IP Address Range screen, enter a scope on the same subnet as your primary network
interface (NIC 1) that is large enough to cover all of the compute nodes and click Next.
c
In the Add Exclusions screen, enter any exclusion ranges or IP addresses as requied and click Next.
d
In the Lease Duration screen, enter a lease duration and click Next.
e
In the Configure DHCP Options screen, select Configure additional DHCP options and
click Next.
f
In the Router (Default Gateway) screen, configure a router if required and click Next.
g
In the Domain Name and DNS Servers screen, configure a domain name and DNS server and
click Next.
h
In the WINS Server screen, configure a WINS server if required and click Next.
i
In the Activate Scope screen, select To activate the scope now and click Next.
j
Click Finish to exit the wizard.
6 Click Finish again.
Authorize the DHCP Server
1 Click Start→ Programs→ Administrative Tools→ Manage Your Server.
2 In the DHCP Server entry, click Manage this DHCP server.
3 In the DHCP Control window, right-click the server name and select Authorize.
4 Close the DHCP Server window.
Installation Guide
9
Before You Install CCP
Before you begin installation of CCP, download and install the following Quick Fix Executables (QFEs)
from Microsoft:
•
ICS QFE from http://go.microsoft.com/fwlink/?linkid=55166
•
RIS QFE from http://go.microsoft.com/fwlink/?linkid=55167
•
MMC 3.0 x64 version from http://go.microsoft.com/fwlink/?linkid=62400
Ensure that you reboot the system after installing these updates.
Preparing a Partition for the RIS Server Images
1 Click Start→ My Computer (right-click)→ Manage.
2 Select Disk Management.
3 Right-click the unallocated disk space (either additional space on the primary disk or another disk)
and select New Partition.
4 When the New Partition wizard appears, click Next and perform the following steps:
a
In the Select Partition Type screen, select Primary Partition and click Next.
b
In the Select Partition Size screen, select the partition size and click Next.
c
In the Assign Drive Letter or Path screen, assign a drive letter to the partition and click Next.
d
Format the partition with the NTFS file system and name the partition (optional). Click Next.
e
Allow the partition to finish formatting. When the formatting is completed, close the
Computer Management screen.
Installing CCP
To install CCP:
1 Run setup.exe and click Next.
2 The End User License Agreement window appears. Read the agreement, choose Accept, and
click Next if you agree to the terms and conditions.
3 In the Select Installation Type screen, determine if the head node will also function as a compute node
and select the Create a new compute cluster with this server as the head node.
4 In the Select Installation Location screen, select a destination for the software installation
(default recommended) and click Next.
5 Click Install to install Microsoft SQL Server 2000 Desktop Engine.
6 Click Install to install Microsoft .NET Framework 2.0.
7 Click Install to begin Microsoft Compute Cluster Pack.
8 Click Finish.
10
Installation Guide
Configuring CCP
After installing CCP on your cluster, a To Do list appears. This section describes the steps to follow for
completing the CCP configuration through the To Do list.
Networking
To complete the tasks in the Networking section:
1 Click Configure Cluster Network Topology and click Next.
2 From the drop down menu, select the Network Topology and click Next.
3 Select Compute Nodes Isolated on a Private Network for this installation.
4 Select Local Area Connection 2 as the public network adapter and click Next.
5 Select Local Area Connection as the private network adapter and click Next.
6 Select Disable Internet Connection Sharing and click Next.
NOTE: On selecting this option, this cluster will not have Internet connectivity to the compute nodes.
7 In the Summary window, verify the contents and click Finish.
8 In the Configuration Succeeded window, click Close.
9 Click Manage Windows Firewall Settings and click Next.
10 In the Configure Firewall window, select Enable Windows Firewall and click Next. The firewall is
enabled on the public network interface but is disabled on the private network interface.
11 In the Summary window, click Finish.
12 In the Configuration Succeeded window, click Close.
Remote Installation Service
RIS allows automated deployment of compute nodes. RIS installs the operating system and the compute
cluster package. When the compute nodes are installed, RIS also adds them to the domain.
Dell recommends that you install the operating system using RIS because installing the operating system,
adding nodes to the domain, and installing CCP take lesser time when done using RIS as compared to
when they are done manually.
1 Click Install RIS (wizard) and click Next.
2 In the Install RIS screen, click Finish.
If you have not inserted the operating system CD already, you will be prompted to insert the CD now.
3 In the Configuration Succeeded screen, click Close.
Installation Guide
11
4 Click Manage Images (wizard) and click Next. Perform the following steps to add a new image.
a
Select Add New Image and click Finish.
b
When the wizard starts, click Next.
c
Select a destination for the remote installation folder and click Next. This destination should be
on the partition that was previously prepared for RIS.
d
Select the drive or path that contains the Compute Cluster Server 2003 operating system CD or
image and click Next.
e
Select a folder name for the image and click Next. The default folder name is WINDOWS and is
appropriate for the first image.
f
Select a description for the image and click Next.
g
Review the settings and click Finish.
The image will now be copied from the operating system CD and installed. The installation may
take a few minutes to complete.
h
When the image is installed, click Done.
i
In the Succeeded screen, click Close.
5 Click Manage Images (wizard) and click Next. Perform the following steps to add the product key for
the image you have created.
a
Select Modify Image Configuration and click Next.
b
Select the image that was just created and click Next.
c
In the Product Key section, select the Search for product key option.
d
Click Search and select the drive with the Compute Cluster Server 2003 media. Click OK.
A message indicating that the key was found should appear next to the search button.
e
Click Next and then click Finish.
6 In the Summary screen, click Close.
Adding PowerEdge 1950-Specific Drivers to the RIS Image
To complete the configuration of Compute Cluster Server 2003 on PowerEdge 1950, you must install
additional drivers. Download the latest drivers for PERC 5/i, SCSI/RAID, and Broadcom NetExtreme II
drivers from the Dell Support website at support.dell.com. Search for R120962 and download the
appropriate drivers for your system.
12
Installation Guide
To integrate these drivers into the RIS image, follow the instructions in this section.
NOTE: Throughout this section, D:\ refers to the RIS image partition and C:\ refers to the system boot directory.
1 Open an explorer window.
2 Navigate to the image directory on the RIS image partition.
If the defaults were picked during the RIS image creation, the RIS image directory will be
D:\RemoteInstall\Setup\English\Images\WINDOWS, where D:\ is the RIS image partition.
3 Create a directory $OEM$ and two subdirectories in this directory and name them as textmode and
$1\drivers\nic.
The directory structure should resemble Figure 1-2:
Figure 1-2. OEM Directory Structure
4 Run the Broadcom driver package that you downloaded (Bcom_LAN_NX2_26_W2K364_A01.exe)
and extract its files to C:\Broadcom\W2K364, where C:\ is the system boot directory.
5 Copy the files in the RIS_Drivers directory (C:\Broadcom\W2K364\RIS_Drivers) to
D:\RemoteInstall\Setup\English\Images\WINDOWS\$OEM$\$1\drivers\nic and
D:\RemoteInstall\Setup\English\Images\WINDOWS\amd64.
6 Run the setup.exe program with a command line option of -a. Click Start→ Run, and type
C:\Broadcom\W2K364\setup.exe -a.
This command extracts the additional plug and play (PNP) device drivers required by the system and
are stores them in a compressed format.
7 When prompted for the Network Location, type C:\Broadcom.
8 Copy all the files from the following locations to the NIC directory:
C:\Broadcom\Program Files\Broadcom\Broadcom Driver and Management Applications\NetXtremeII\
Win2K3SNP\x64
C:\Broadcom\Program Files\Broadcom\Broadcom Driver and Management Applications\NetXtremeII\
vbd\x64
Installation Guide
13
9 Copy the .inf and .sys files from the NIC driver directory,
D:\RemoteInstall\Setup\English\Images\WINDOWS\$OEM$\$1\drivers\nic to
D:\RemoteInstall\Setup\English\Images\WINDOWS\amd64.
10 Extract the PERC 5/i drivers into the textmode directory. This may require running an executable
installer and then accessing the location at which the files are installed (for example, C:\Dell\PERC5).
NOTE: Copy the text in the SCSI section from the file txtsetup.oem (for example, DELL PERC 5 RAID Controller
Driver [Windows Server 2003 x64]) exactly into another file. Using copy and paste is highly recommended for
this. This text can change between driver revisions.
11 Edit the ristndrd.sif file at D:\RemoteInstall\Setup\English\Images\WINDOWS\amd64\templates.
a
Add a section MassStorageDrivers and add the text from the SCSI section mentioned above
(use copy and paste):
[MassStorageDrivers]
"DELL PERC 5 RAID Controller Driver (Windows Server 2003 x64)"="OEM"
b
Add another section OEMBootFiles and list each file from the text mode directory
excluding .txt files
[OEMBootFiles]
nodev.inf
oemsetup.inf
percsas.cat
percsas.pdb
percsas.sys
txtsetup.oem
c
Add the following line to the Unattended section
OemPnpDriversPath="\Drivers\Nic"
d
Save and close the file.
12 Restart the RIS by opening a command prompt and typing net stop binlsvc and
net start binlsvc.
14
Installation Guide
13 In the Node Management section, click Add Nodes (wizard) and then click Next. In the wizard,
perform the following procedure:
a
Select Automated Deployment and click Next.
b
In the Select Image screen, enter the administrator (or a user with permission to add nodes to
a domain) user name and password, and click Next.
c
Enter a node series name and click Next. This name will be used to name the compute nodes when
they are installed. The name is followed by a numerical progression of numbers starting with 001.
d
The End User License Agreement screen appears. Read the agreement, choose Accept, and
click Next if you agree to the terms and conditions.
e
In the Start RIS screen, click Next.
f
In the Image Nodes screen, click Start RIS.
g
When RIS starts, the compute nodes can be booted through PXE.
h
After all the compute nodes are installed, click Stop RIS and then click Next.
i
In the Summary screen, ensure that all the compute nodes are listed and click Close.
j
Click the Node Management tab.
k
Select all the compute nodes in the list and click the Approve button located on the right side of
the window.
l
Click Resume, which is also located on the right side of the screen.
Installation Guide
15
16
Installation Guide