1
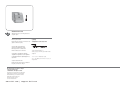
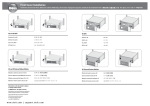
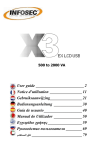
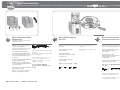
Front Cover Installation
Installation du Couvercle Avant | Einbau der vorderen Abdeckung | Установка передней крышки | Instalación de la Cubierta Frontal | 前盖安装 | 前蓋安裝 | 앞면 커버 설치 | フロントカバーの取り付け
1
Remove the UPS or External Battery
Module front cover
2
UPS only: Remove the LCD panel
(four screws)
3
UPS only: Attach the LCD panel to
the new front cover (four screws)
Push the two cover latches to release the
front cover and pull up
Retirez le couvercle avant de l’onduleur ou
du Module de Batterie Externe
Poussez les deux loquets du couvercle pour
libérer le couvercle avant et levez
Vordere Abdeckung der USV bzw. des
externen Batteriemoduls (EBM) entfernen
取下 UPS 或外部電池模組前蓋
推動兩個外蓋閂鎖以鬆開前蓋,然後將
其拉起
UPS 또는 외장 배터리 모듈 앞면 커버를
분리합니다
두 개의 커버 걸쇠를 밀어서 앞면 커버를
Auf die beiden Abdeckungslaschen drücken, 풀고 당겨 올립니다
um die vordere Abdeckung zu lösen und
hochzuziehen
UPS、または外付けバッテリーモジュール
のフロントカバーを取り外します
Снимите переднюю крышку ИБП или
2個のカバー止めを押し、
フロントカバー
модуля внешней батареи
を開放し、引き上げます
Нажмите на две защелки крышки,
чтобы освободить переднюю крышку,
取下 UPS 或外部电池模块前盖
и потяните вверх
推动两个外盖闩锁,以松开前盖,并将
Cómo Extraer la Cubierta Frontal del Módulo 其拉起
de Batería Externa o el UPS
Empuje las dos pestillas de la cubierta para
liberar la cubierta frontal y levantarla
Onduleur seulement : Retirez le panneau LCD UPS 전용: LCD 패널 분리합니다
(quatre vis)
(네 개의 나사)
Onduleur seulement : Fixez le panneau LCD
sur le couvercle avant neuf (quatre vis)
Nur USV: LCD-Display entfernen
(vier Schrauben)
Nur USV: Das LCD-Display an der neuen
vorderen Abdeckung anbringen
(vier Schrauben)
Только ИБП: Снимите
жидкокристаллическую панель
(четыре винта)
Sólo UPS: Extraiga el panel LCD
(cuatro tornillos)
UPS のみ:LCDパネルを取り外します
(ネジ4個)
Только ИБП: Установите
жидкокристаллическую панель на
новую переднюю крышку
(четыре винта)
Sólo UPS: Sujete el panel LCD a la nueva
cubierta frontal (cuatro tornillos)
仅限 UPS: 取下 LCD 面板(4 个螺钉)
仅限 UPS:将 LCD 面板连接到新的前盖
(4 个螺钉)
僅限 UPS: 取下 LCD 面板(4 個螺釘)
僅限 UPS: 將 LCD 面板連接到新的前蓋
(4 個螺釘)
UPS 전용: LCD 패널을 새로운 앞면
커버에 부착합니다(네 개의 나사)
UPS のみ:LCD パネルを新しいフロントカ
バーに取り付けます(ネジ4個)
www.dell.com | support.dell.com
4
1
Attach the front cover
Slide the top of the cover into guides and
snap into place
Fixez le panneau LCD
连接前盖
Faites glisser le haut du couvercle dans les
guides et fixez-le en place
将前盖顶部滑入导轨并咬合到位
連接前蓋
Vordere Abdeckung anbringen
將前蓋頂部滑入導軌並咬合到位
Oberseite der Abdeckung in die
Führungsschienen schieben und
hineinschieben, bis sie einrastet
앞면 커버를 부착합니다
Установите переднюю крышку
커버 상단을 가이드로 밀어서 제자리에
맞춥니다
Задвиньте верхнюю часть крышки
в направляющие и зафиксируйте со
щелчком
Sujete la cubierta frontal
フロントカバーの取り付け方法
カバーの上部をガイドにスライドさせ、は
め込みます
Deslice la parte superior de la cubierta en
las guías y ranuras en el lugar
Information in this document is subject
to change without notice.
© 2009 Dell Inc. All rights reserved.
Reproduction in any manner whatsoever without the
written permission of Dell Inc. is strictly forbidden.
Dell and the DELL logo are trademarks of Dell Inc.
Dell disclaims proprietary interest in
the marks and names of others.
June 2009 • 164950230 Rev 1
www.dell.com | support.dell.com