1
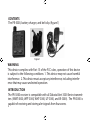
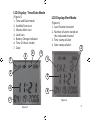
Dakota Alert™
PR-3000
Portable
Receiver
Owner’s Manual
CONTENTS
The PR-3000, battery charger, and belt clip. (figure 1)
Figure 1
WARNING
This device complies with Part 15 of the FCC rules, operation of this device
is subject to the following conditions: 1. This device may not cause harmful
interference. 2. This device must accept any interference, including interference that may cause undesired operation.
INTRODUCTION
The PR-3000 receiver is compatible with all Dakota Alert 3000 Series transmitters (WMT-3000, WPT-3000, WHT-3000, UT-3000, and IR-3000). The PR-3000 is
capable of receiving and storing alert signals from four zones.
2.
When a signal is received, the zone will be displayed on the LCD screen and
the receiver can be set to give an audible tone or a silent vibrate alert. Each
zone can store up to 400 events with a time and date stamp or up to 999 events
without a time and date stamp. The PR-3000 is powered by a rechargeable LiIon battery which will hold a charge for up to 10 days.
CHARGING THE PR-3000
To charge the PR-3000 plug the battery charger into an outlet and insert the
jack into the charger plug (#5 on figure 2). The unit should be charged for
8-10 hours when the battery is low.
OPERATION
Push and hold the side button for two seconds to turn on the PR-3000. The
unit will beep and the time display will come on. Push and hold the side
button to turn the unit off again. The unit also has a backlight for viewing
the display in low light situations. Pushing and releasing any button will
turn on the backlight for a few seconds. The backlight will also come on for
a few seconds when the PR-3000 receives an alert signal.
3.
Figure 2
1
THE PR-3000
(figure 2)
1. LCD display
2. (Side button)
ON/OFF
and Mode button
3. Left Button
4. Right Button
5. Charger plug
6. Reset button
6
4.
5
2
3
4
LCD Display - Time/Date Mode
(Figure 3)
1. Time and Date mode
2. Audible Tone icon
3. Vibrate Alert icon
4. Lock icon
5. Battery Charge Indicator
6. Time (24 hour mode)
7. Date
1
3
2
4
LCD Display Alert Mode
(Figure 4)
1. Last Channel received
2. Number of alerts stored on
the indicated channel
3. Time stamp of alert
4. Date stamp of alert
2
5
1
3
6
4
7
Figure 4
Figure 3
5.
Alert Mode
When the PR-3000 receives an alert, the LCD display changes to alert mode.
The display will remain in alert mode, showing the most recent alert received
until manually reseting to time/date mode. Push the right button to change
from the alert mode to the time/date mode.
Programming the Receiver
Push the side and right buttons at the same time to enter the programming
mode. There are four different programming screens. Pushing the side button will scroll through the programming screens. The different programming
screens are:
1. Time and Date setting
2. Audible tone ON/OFF
3. Vibrate alert ON/OFF
4. Frequency setting
Pushing the side button again after the frequency setting screen will return
you to the time/date mode. If no button is pushed in programming mode for
8 seconds the display will automatically return to the time/date mode.
NOTE: The display must be in the time/date mode to access the programming screens.
6.
Setting the Time and Date
1. Push the side and right button to enter the time/date setting screen in
the programming mode. The hour digits will be flashing.
2. Push the right button to change the hour to
the correct setting. (holding the right button
down will scroll through the numbers quickly.)
3. Push the left button and the minutes will
start flashing.
4. Push the right button to change the minutes
to the correct setting
Figure 5
5. Repeat this process to set the month, day,
and year.
Programming the audible tone
From the time/date setting screen push the side
button to access the audible tone programming
screen. The audible tone icon (see figure 2.)
will flash and there will be “ON” or “OFF” in the
upper right section of the display. Use the right
button to toggle between on and off. (figure 5)
Figure 6
7.
Programming the vibrate alert
From the audible tone setting screen, push the side button to access the
vibrate alert programming screen. The vibrate alert icon will flash and there
will be “ON” or “OFF” in the upper right section of the display. Use the right
button to toggle between on and off. (figure 6)
Programming the Frequency
From the vibrate alert programming screen, push the
Figure 7
side button to access the frequency programming
screen. There will be eight symbols at the bottom of
the display, each of which will be a 1 or a 0. (figure
7) These eight symbols correspond to the eight dip
switches used to set the frequency on the transmitter (see transmitter owner’s manual.) with 1 representing “ON” and 0 representing “OFF.” Push the left
button to scroll through the symbols and push the
right button to toggle the symbol between 1 and 0. Make sure the
frequency setting of the transmitter and receiver match.
8.
Locking the display
Pushing the left and right buttons at the same time will lock the display
in the time/date mode. The top of the display (figure 3) and no other
screens can be viewed. Pushing the left and right buttons again will
unlock the display.
Viewing Alert log
Push the side and left buttons at the same time to acess the alert log. The
display will show the channel and the total number of alerts stored for
that channel.(figure 4) Pushing the left button will scroll through the four
channels and then return to the time/date mode. To view the time and
date stamps for a channel, push the left button until the desired channel
is shown on the display, then push the right button. The date stamp for
the most recent alert on the given channel will be shown. Pushing the
right button again will show the date stamp for the next alert. Continue
to push the right button to see the date stamp for all alerts stored for the
channel. If no buttons are pushed for about 8 seconds the display will
revert to the time/date mode.
9.
Clearing the alert log
The alerts stored for a channel can be cleared through the alert log screen.
Access the alert log, display the channel to be
cleared, and push the side button. The text CLrECOrd (clear record) will appear on the bottom of
the display (figure 8). Push the side button again
and all stored alerts for the chosen channel will be
cleared.
Figure 8
Reset button
If the PR-3000 stops responding correctly, the reset button should be
pushed. The reset button is located inside the small hole directly below
the side button (figure 2). Insert a pin in the hole and push the button. The
unit will beep and dEFAULt will appear on the bottom of the display (figure
9). Push the side button and the display will show PASS and then enter the
programming mode. The time and date will have been reset to the default,
and will need to be reprogrammed.
10.
TECHNICAL SUPPORT
If you encounter any difficulty in the operation of this product after reading
the manual, please contact us. You can reach us by phone at 605-356-2772
from 8:30 AM to 5:00 PM Monday through Friday (Central Standard Time).
We will be happy to answer your questions and help you in any way we
can.
WARRANTY
Dakota Alert warrants this product to be free of defects in material and workmanship for a period of one year from the date of purchase. This warranty
does not cover damage resulting from accident, abuse, act of God or improper operation. If this product does become defective, simply return it to
Dakota Alert. Please include a note describing the troubles along with your
name and return address as well as the original sales receipt. If the product
is covered under warranty it will be repaired or replaced at no charge. If it is
not covered by warranty, you will be notified of any charges before work is
done.
11.
Dakota Alert, Inc.
109 W. Main St.
P0 Box 130
Elk Point, SD 57025
Phone: (605) 356-2772
Fax: (605) 356-2584
Web: www.dakotaalert.com