Transcript
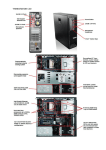
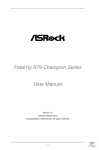
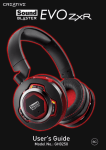
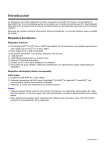
Model No.: SB1506
Install Your Hardware
Thank you for choosing the Sound Blaster Zx audio card. Welcome to a world of sound never before experienced.
a
SB1506
Install Your Software
To take full advantage of your Sound Blaster audio card, you need to install device
drivers and applications.
b
Audio Control Module
TAD
AU
X_I
N
(i) PCI slot
(ii) PCIe slot
(a) Headphone Volume
Control Knob
Remove the power cable.
Remove the computer cover.
(b) Built-in Beamforming
Microphones (Stereo)
(a) Line In / Mic In
(b) Headphone
(c) Front (L/R)
(d) Rear (L/R)
(c) Microphone In jack
(6.3mm)
(e) Center / Subwoofer
(e) Microphone In jack
(3.5mm)
c
Remove the existing sound card.
Remove the metal casing of a PCIe slot.
For Windows 7:
1. Insert the Installation CD into your CD or
DVD drive.
Your CD should start automatically. If it
does not, follow the steps below:
i. Click Start > Computer.
ii. Right-click the CD or DVD drive icon, and
then click Open AutoPlay.
2. To complete the installation, follow the
instructions on the screen.
If you encounter the following message,
click Install.
d
(f) Optical Out
Quick Start
Sound Blaster Zx
1 Prepare it
Jacks & Connectors
(g) Optical In
(d) Headphone jack
(6.3mm)
(h) Front Panel
Header
(f) Headphone jack
(3.5mm)
For Windows 8:
1. Insert the Installation CD into your CD or
DVD drive.
2. In a short while, a drive icon will be
displayed. Click on the icon, and then
choose Run setup.exe.
If you do not see the drive icon, follow the
steps below:
i. Right-click on the background of the
Windows' start screen, and then click
All apps.
ii. Click Computer
iii. Right-click the CD or DVD drive icon,
and then click Open AutoPlay.
3. To complete the installation, follow the
instructions on the screen.
If you encounter the following message,
click Install.
3. When prompted, restart your computer.
PN 03SB150600000 Rev.A
Product Registration
Registering your product ensures you receive the most appropriate service and product support
available. You can register your product during installation or at www.creative.com/register.
Please note that your warranty rights are not dependent on registration.
Technical & Customer Support Services
Go to www.creative.com/support to resolve and troubleshoot technical queries at Creative’s
24-hour self-help Knowledge Base. You can also find customer support services and other helpful
information here.
Other Information
You can find the following information on the Installation CD.
Warranty
d:\warranty\<region>\warranty.pdf
Please keep your Proof of Purchase for the duration of the Warranty period.
Safety
d:\notices\<language>\Safety_Regulatory.pdf
Regulatory
d:\fcc\<model>\FCC-DoC.pdf
User’s Guide
d:\manual\<language>\manual.pdf
(replace d:\ with the drive letter of your CD-ROM/DVD-ROM drive, <region> with the region you
are in, and <language> with the language that the document is in.)
Keep this document for future reference.
Information in this document is subject to change without notice and does not represent a commitment on the part of Creative
Technology Ltd. No part of this manual may be reproduced or transmitted in any form or by any means, electronic or mechanical,
including photocopying and recording, for any purpose without the written permission of Creative Technology Ltd.
Copyright © 2012 Creative Technology Ltd. All rights reserved. Creative, the Creative logo, Sound Blaster, the Sound Blaster logo,
the SBX logo and CrystalVoice are trademarks or registered trademarks of Creative Technology Ltd. in the United States and/or
other countries. All other trademarks are properties of their respective owners. All specifications are subject to change without prior
notice. Use of this product is subject to a limited hardware warranty. Actual contents may differ slightly from those pictured. The
software that is downloadable from the website may not be used separately from the hardware. Before using the software, your
must agree to be bound by the terms and conditions of the end user license agreement.
Note: The ACM Volume Control Knob allows you to adjust headphone levels conveniently based on
the maximum level set by your computer's master volume control. We recommend that you
determine the desired maximum volume on your computer before using the ACM.
FR
Jack & Connectors
Thank you for choosing the Sound Blaster Zx
audio card. Welcome to a world of sound never
before experienced.
SB1506
(e) Center / Subwoofer
(a) Line In / Mic In
(f) Optical Out
(b) Headphone
(g) Optical In
(c) Front (L/R)
(h) Front Panel Header
(d) Rear (L/R)
Audio Control Module
(a) Headphone Volume Control Knob
(b) Built-in Beamforming Microphones (Stereo)
(c) Microphone In jack (6.3mm)
(d) Headphone jack (6.3mm)
(e) Microphone In jack (3.5mm)
(f) Headphone jack (3.5mm)
NOTE: The ACM Volume Control Knob allows you to
adjust headphone levels conveniently based on
the maximum level set by your computer's
master volume control. We recommend that you
determine the desired maximum volume on your
computer before using the ACM.
1. Prepare it
Install Your Hardware
(a) Remove the power cable.
Remove the computer cover.
(b) Remove the existing sound card.
Remove the metal casing of a PCIe slot.
(i) PCI slot
(ii) PCIe slot
(c) Gently but firmly slot the Sound Blaster Zx
sound card into the PCIe slot.
(d) Replace the outer casing.
Reconnect the power cable.
Gently but firmly slot the Sound Blaster Zx
sound card into the PCIe slot
Replace the outer casing.
Reconnect the power cable.
ES
Install Your Software
To take full advantage of your Sound Blaster audio
card, you need to install device drivers and
applications.
For Windows 7:
1. Insert the Installation CD into your CD or DVD
drive.Your CD should start automatically. If it
does not, follow the steps below:
i. Click Start > Computer.
ii. Right-click the CD or DVD drive icon, and then
click Open AutoPlay.
2. To complete the installation, follow the
instructions on the screen.
If you encounter the following message, click
Install.
3. When prompted, restart your computer.
For Windows 8:
1. Insert the Installation CD into your CD or DVD
drive.
2. In a short while, a drive icon will be displayed.
Click on the icon, and then choose Run
setup.exe.
If you do not see the drive icon, follow the steps
below:
i. Right-click on the background of the Windows'
start screen, and then click All apps.
ii. Click Computer
iii. Right-click the CD or DVD drive icon, and then
click Open AutoPlay.
3. To complete the installation, follow the
instructions on the screen.
If you encounter the following message, click
Install.
4. When prompted, restart your computer.
Jack & Connectors
Thank you for choosing the Sound Blaster Zx
audio card. Welcome to a world of sound never
before experienced.
SB1506
(e) Center / Subwoofer
(a) Line In / Mic In
(f) Optical Out
(b) Headphone
(g) Optical In
(c) Front (L/R)
(h) Front Panel Header
(d) Rear (L/R)
Audio Control Module
(a) Headphone Volume Control Knob
(b) Built-in Beamforming Microphones (Stereo)
(c) Microphone In jack (6.3mm)
(d) Headphone jack (6.3mm)
(e) Microphone In jack (3.5mm)
(f) Headphone jack (3.5mm)
NOTE: The ACM Volume Control Knob allows you to
adjust headphone levels conveniently based on
the maximum level set by your computer's
master volume control. We recommend that you
determine the desired maximum volume on your
computer before using the ACM.
1. Prepare it
Install Your Hardware
(a) Remove the power cable.
Remove the computer cover.
(b) Remove the existing sound card.
Remove the metal casing of a PCIe slot.
(i) PCI slot
(ii) PCIe slot
(c) Gently but firmly slot the Sound Blaster Zx
sound card into the PCIe slot.
(d) Replace the outer casing.
Reconnect the power cable.
4. When prompted, restart your computer.
BP
Install Your Software
To take full advantage of your Sound Blaster audio
card, you need to install device drivers and
applications.
For Windows 7:
1. Insert the Installation CD into your CD or DVD
drive.Your CD should start automatically. If it
does not, follow the steps below:
i. Click Start > Computer.
ii. Right-click the CD or DVD drive icon, and then
click Open AutoPlay.
2. To complete the installation, follow the
instructions on the screen.
If you encounter the following message, click
Install.
3. When prompted, restart your computer.
For Windows 8:
1. Insert the Installation CD into your CD or DVD
drive.
2. In a short while, a drive icon will be displayed.
Click on the icon, and then choose Run
setup.exe.
If you do not see the drive icon, follow the steps
below:
i. Right-click on the background of the Windows'
start screen, and then click All apps.
ii. Click Computer
iii. Right-click the CD or DVD drive icon, and then
click Open AutoPlay.
3. To complete the installation, follow the
instructions on the screen.
If you encounter the following message, click
Install.
4. When prompted, restart your computer.
Jack & Connectors
Thank you for choosing the Sound Blaster Zx
audio card. Welcome to a world of sound never
before experienced.
SB1506
(e) Center / Subwoofer
(a) Line In / Mic In
(f) Optical Out
(b) Headphone
(g) Optical In
(c) Front (L/R)
(h) Front Panel Header
(d) Rear (L/R)
Audio Control Module
(a) Headphone Volume Control Knob
(b) Built-in Beamforming Microphones (Stereo)
(c) Microphone In jack (6.3mm)
(d) Headphone jack (6.3mm)
(e) Microphone In jack (3.5mm)
(f) Headphone jack (3.5mm)
NOTE: The ACM Volume Control Knob allows you to
adjust headphone levels conveniently based on
the maximum level set by your computer's
master volume control. We recommend that you
determine the desired maximum volume on your
computer before using the ACM.
1. Prepare it
Install Your Hardware
(a) Remove the power cable.
Remove the computer cover.
(b) Remove the existing sound card.
Remove the metal casing of a PCIe slot.
(i) PCI slot
(ii) PCIe slot
(c) Gently but firmly slot the Sound Blaster Zx
sound card into the PCIe slot.
(d) Replace the outer casing.
Reconnect the power cable.
Install Your Software
To take full advantage of your Sound Blaster audio
card, you need to install device drivers and
applications.
For Windows 7:
1. Insert the Installation CD into your CD or DVD
drive.Your CD should start automatically. If it
does not, follow the steps below:
i. Click Start > Computer.
ii. Right-click the CD or DVD drive icon, and then
click Open AutoPlay.
2. To complete the installation, follow the
instructions on the screen.
If you encounter the following message, click
Install.
3. When prompted, restart your computer.
For Windows 8:
1. Insert the Installation CD into your CD or DVD
drive.
2. In a short while, a drive icon will be displayed.
Click on the icon, and then choose Run
setup.exe.
If you do not see the drive icon, follow the steps
below:
i. Right-click on the background of the Windows'
start screen, and then click All apps.
ii. Click Computer
iii. Right-click the CD or DVD drive icon, and then
click Open AutoPlay.
3. To complete the installation, follow the
instructions on the screen.
If you encounter the following message, click
Install.
4. When prompted, restart your computer.